
I'm an final year Maxillofacial surgery resident. For revision purpose I want to keep all the incisions important and related with oral and maxillofacial surgery. Kindly let me know and relevant book or article I should review and study. If book is not available pls can you jot down all the incisions and relevant information related to the incisions for studying.
oral maxillofacial surgery incisions comprehensive review textbook 2024
facial surgical incisions approaches oral maxillofacial surgery
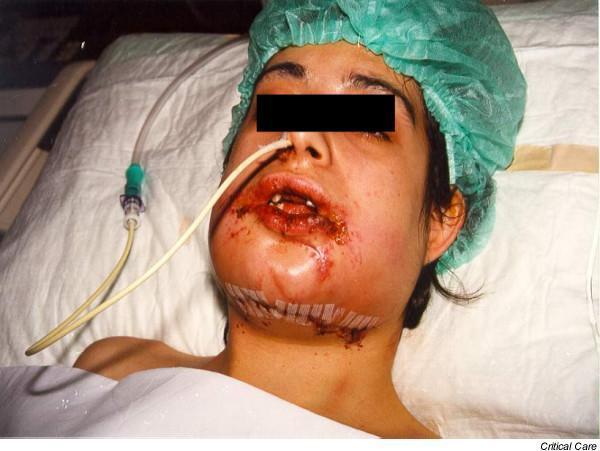
This clinical photograph shows a patient in a supine position following major maxillofacial trauma and surgery. The patient exhibits significant postoperative or post-traumatic facial edema, particularly concentrated in the perioral and submental regions. Visible signs include hemorrhagic crusting and lacerations around the lips and oral mucosa. A pediatric airway exchange catheter (PAEC) is inserted nasally through the right nostril, secured as a bridge for potential reintubation. The oral cavity demonstrates inter-maxillary fixation (archbars), which limits mouth opening. Surgical adhesive strips (Steri-Strips) are applied along the submental and mandibular lines to support surgical incisions or wound closure. The patient is wearing a green surgical cap. This image illustrates the management of a difficult airway in the Intensive Care Unit (ICU) setting, specifically highlighting the use of airway exchange catheters in patients with restricted jaw mobility due to surgical fixation for facial fractures.
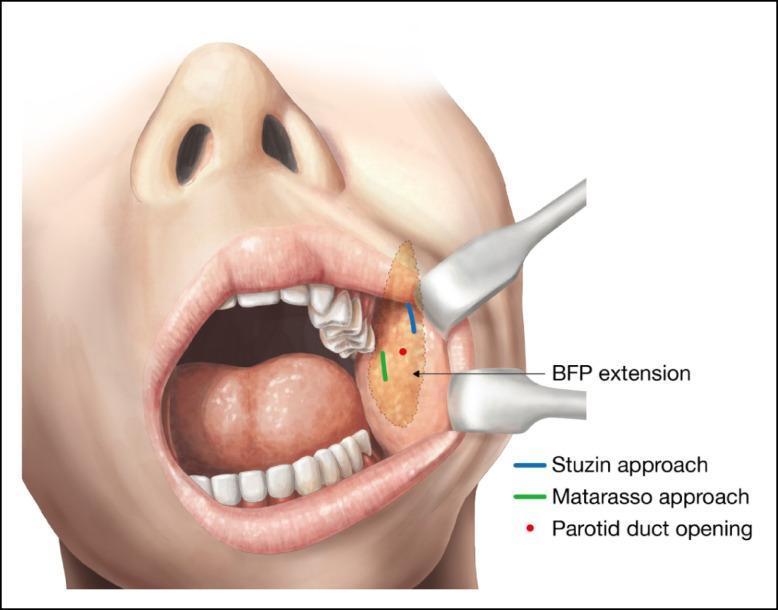
This medical anatomical diagram illustrates the surgical approaches for buccal fat pad (BFP) excision from an intraoral perspective. The diagram depicts an open mouth with surgical retractors exposing the buccal mucosa of the left cheek. Key anatomical landmarks include the parotid duct opening (Stensen's duct), marked by a red dot. The BFP extension is visualized as a shaded yellow oval within the cheek tissue. Two distinct surgical entry points are highlighted: 1) The Stuzin approach, indicated by a blue line, showing a superior incision in the maxillary gingivobuccal sulcus above the parotid duct to directly access the BFP pocket. 2) The Matarasso approach, indicated by a green line, showing an inferior incision in the oral vestibule approximately 1 cm below the parotid duct exit. This illustration serves as an educational guide for plastic surgery and maxillofacial procedures, emphasizing the spatial relationship between surgical incisions, the buccal fat pad, and critical structures like the parotid duct to minimize risk of glandular injury during facial contouring.
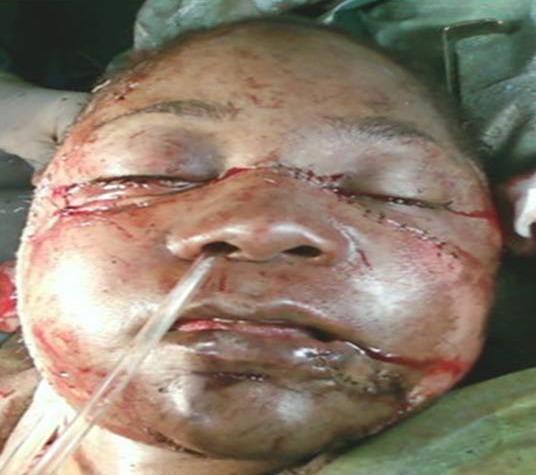
This clinical photograph shows the immediate postoperative appearance of a patient following complex maxillofacial reconstructive surgery for severe facial trauma. The image demonstrates extensive surgical intervention across the midface and mandible. Key findings include bilateral periorbital and palpebral edema with primary suture lines along the lower eyelids and canthus, indicating soft tissue and possibly orbital floor repair. Multiple surgical incisions are visible, closed with simple interrupted and continuous sutures, extending across the nasal bridge, cheeks, and perioral region. Significant ecchymosis and generalized facial swelling are present, typical of high-impact craniofacial injury. A nasogastric or endotracheal tube is visible exiting the naris, used for perioperative management. The reconstruction addresses multiple midface and mandibular fractures (such as Le Fort I/III and symphyseal fractures) through soft tissue debridement and anatomical repositioning. This visual serves as an educational example of emergency maxillofacial trauma management and primary surgical closure of complex facial lacerations.
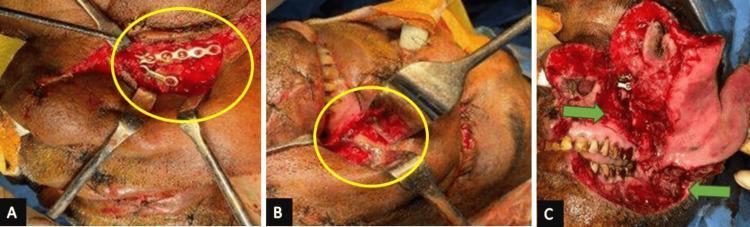
This composite of three intraoperative clinical photographs demonstrates the surgical management of complex maxillofacial trauma, specifically focusing on the open reduction and internal fixation (ORIF) of a left zygomaticomaxillary complex (ZMC) fracture. Panel A shows a subtarsal approach with surgical retractors exposing the left infraorbital margin, where a multi-hole metallic titanium plate and screws have been applied to stabilize the fracture line. Panel B displays the intraoral exposure of the left zygomatic buttress, showing a four-hole L-shaped plate secured with osteosynthesis screws for structural stability. Panel C illustrates the facial soft tissue injury and subsequent management, showing extensive lacerations involving the left cheek and upper lip region (highlighted by green arrows) during the debridement and layered closure phase. The images provide a detailed view of surgical landmarks, hardware placement, and soft tissue reconstruction essential for oral and maxillofacial surgery education. Key concepts include ZMC fracture stabilization, surgical access via subtarsal and vestibular incisions, and the use of internal fixation systems.
coronal incision preauricular incision retromandibular approach surgery
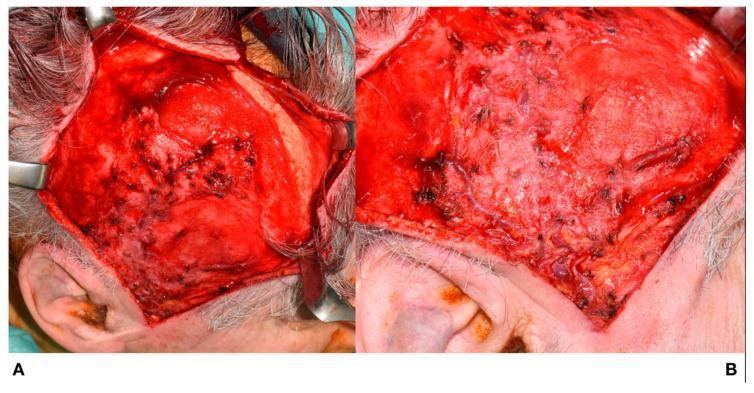
Clinical photograph of a coronal surgical approach for harvesting a galea-pericranium flap, shown in two intraoperative stages (A and B). The anatomical focus is the temporoparietal region of the scalp. Image A demonstrates the elevation of a skin flap using surgical retractors, revealing the underlying superficial temporal artery (STA) and superficial temporal vein (STV) preserved within the subcutaneous layer. The incision extends from the preauricular region superiorly. Image B shows the subsequent surgical step where the pericranium has been incised and blunt dissection is performed to detach it from the calvarium. The exposed surgical field displays increased vascularity and multiple hemostatic points following the separation of the pericranial layer from the bone. The images illustrate key steps in reconstructive surgery, specifically the preservation of the superficial temporal vascular supply for flap viability. The target audience includes surgical residents and specialists in oral and maxillofacial or plastic and reconstructive surgery.
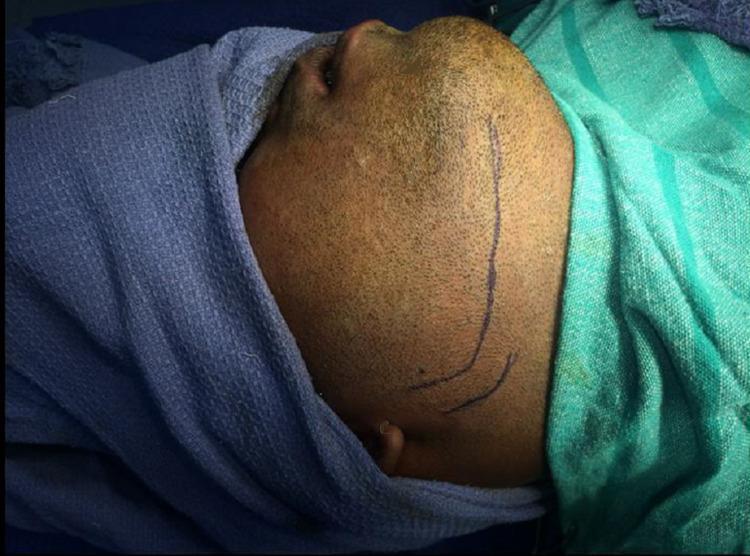
This clinical photograph shows a close-up, lateral view of a male patient's right face and neck in a preoperative surgical setting. The patient is supine with the head turned to the left and draped for a maxillofacial procedure. A clear, blue surgical marking indicates a retromandibular incision line. The marking begins approximately 0.5 cm inferior to the earlobe and extends inferiorly for several centimeters, following a course just posterior to the posterior border of the mandible and curving slightly toward the mandibular angle. A smaller, parallel auxiliary line is marked inferiorly to guide the surgical approach. This visualization demonstrates the planned incision site for a retromandibular transmasseteric approach, commonly used in oral and maxillofacial surgery for the open reduction and internal fixation (ORIF) of mandibular subcondylar fractures. The anatomical landmarks visible include the external ear, the ramus and angle of the mandible, and the cervical region, which serve as essential reference points for avoiding injury to the facial nerve (marginal mandibular branch) and parotid gland during dissection.
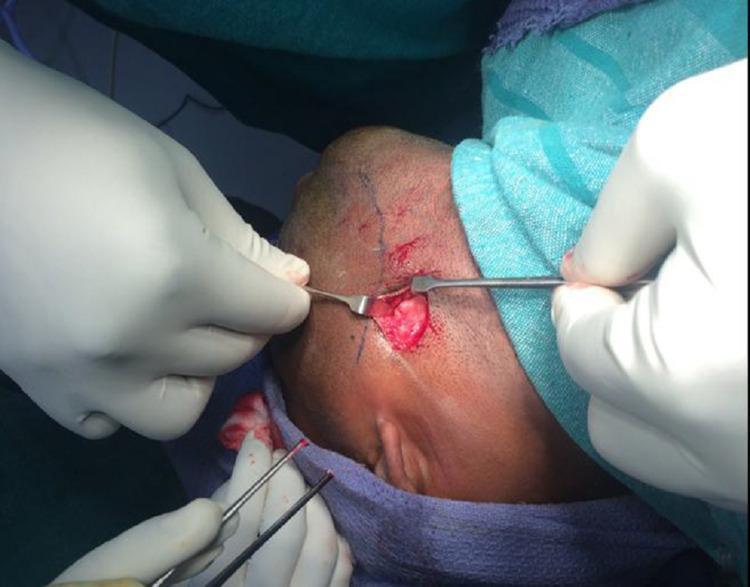
This clinical photograph captures an intraoperative view of a retromandibular transmasseteric surgical approach for the treatment of a mandibular condylar fracture. The image shows a patient in a supine position with the head draped, revealing the surgical site inferior to the earlobe and posterior to the mandibular ramus. Preoperative surgical markings are visible on the skin. The initial incision has been carried through the skin and subcutaneous tissue, with surgeons using hand-held retractors and forceps to expose the underlying platysma muscle. The exposed muscle tissue appears reddish and fibrous, representing the layer immediately deep to the superficial fascia. This visual serves to teach the anatomical layers encountered during maxillofacial surgery and the specific surgical access required for open reduction and internal fixation (ORIF) of condylar fractures, emphasizing the proximity to vital structures like the facial nerve and retromandibular vein.
Incisions in Oral and Maxillofacial Surgery - A Comprehensive Revision Guide
Recommended Textbooks
- Miloro M et al. - Peterson's Principles of Oral and Maxillofacial Surgery (3rd ed.) - Gold standard. Chapter on "Surgical Approaches to the Facial Skeleton."
- Ellis E III & Zide MF - Surgical Approaches to the Facial Skeleton (2nd ed.) - The most dedicated text solely on OMFS incisions and approaches. Highly recommended.
- Rowe NL & Williams JLL - Maxillofacial Injuries - Excellent for trauma-related incisions.
- Fonseca RJ - Oral and Maxillofacial Surgery (2nd ed.) - Comprehensive multi-volume.
- Booth PW, Schendel SA, Hausamen JE - Maxillofacial Surgery - Well-illustrated approaches.
- Cummings Otolaryngology Head and Neck Surgery (available in library) - Covers craniomaxillofacial trauma access incisions.
Complete Classification of OMFS Incisions
I. INTRAORAL INCISIONS
1. Vestibular / Sulcular Incision
- Location: Mucobuccal fold, at least 5 mm from mucogingival junction
- Uses: Access to maxilla, mandible body/symphysis, anterior maxillary wall, Le Fort I osteotomies, dentoalveolar surgery
- Key points: Keep sufficient soft tissue cuff for closure; avoid mental nerve (mental foramen at premolar region); periosteal elevation is subperiosteal
- Closure: Resorbable sutures (3-0 or 4-0 Vicryl)
2. Mucoperiosteal / Crestal Incision
- Location: Along alveolar crest, through attached gingiva
- Uses: Implant surgery, alveoloplasty, apicectomy, socket access
- Key points: Provides good access with excellent blood supply to flap; leave at least one releasing incision for tension-free closure
3. Semilunar (Partsch I) Incision
- Location: Curved incision in attached gingiva apical to the root apex
- Uses: Periapical surgery (apicectomy), cyst marsupialisation
- Key points: Curved convexity toward the apex; do NOT cross the mucogingival junction
4. Three-Cornered / Envelope Flap Incision
- Location: Intrasulcular + one mesial or distal releasing incision
- Uses: Single-tooth apicectomy, minor alveolar procedures, implant surgery
- Key points: Releasing incision placed at line angle, at least one tooth away from surgical site
5. Rectangular Flap Incision
- Location: Intrasulcular + two vertical releasing incisions
- Uses: Multiple teeth apicectomy, cyst removal, large bony access
- Key points: Base should be wider than free margin to preserve blood supply
6. Mandibular Anterior Vestibular Incision (Genioplasty incision)
- Location: Vestibular mucosa of lower anterior region, horizontal, from canine to canine
- Uses: Genioplasty, symphyseal fracture ORIF, chin augmentation
- Key points: Stay 5 mm from the gingival margin; identify and protect mental nerves bilaterally; periosteum stripped to inferior border
7. Sublabial / Maxillary Gingivobuccal Incision (Le Fort approach)
- Location: Upper buccal vestibule from 1st molar to 1st molar, 5 mm above mucogingival junction
- Uses: Le Fort I osteotomy, midface fracture ORIF, maxillary sinus access (Caldwell-Luc), palatal surgery access
- Key points: Avoid infraorbital nerve; entire mucoperiosteal flap elevated to expose piriform rims, anterior maxillary wall, and zygomatic buttress
8. Posterior Maxillary Vestibular Incision
- Location: Upper buccal vestibule behind the maxillary tuberosity
- Uses: Posterior maxillary access, tuberosity fractures, pterygomaxillary dysjunction access
9. Mandibular Third Molar / Retromolar Incision (Ward's / Modified)
- Location: Along anterior border of ramus, curving buccally behind last molar
- Uses: Mandibular third molar removal, ramus procedures, BSSO (sagittal split osteotomy)
- Variations:
- Standard Ward's incision: Extends from external oblique ridge forward to gingival sulcus of 2nd molar
- Bayonet incision (Killey & Kay modification): Step in the incision over the external oblique ridge - reduces risk of long buccal nerve damage
10. Mandibular Sagittal Split (BSSO) Intraoral Incision
- Location: Extends from external oblique ridge along ramus, anterior to medial pterygoid attachment
- Uses: Bilateral Sagittal Split Ramus Osteotomy (orthognathic surgery for mandible)
- Key points: Medial dissection to expose lingula; protect inferior alveolar nerve
11. Palatal Incision
- Location: Along gingival margins palatally, or midline palatal
- Uses: Palatal flap for bone grafts, palatal cyst/torus removal, palatoplasty
- Key points: Preserve greater palatine neurovascular bundle; flap must be robust
II. EXTRAORAL INCISIONS
12. Submandibular / Risdon Incision
- Location: Skin crease 1.5-2 finger-breadths (approximately 2 cm) below the lower border of the mandible
- Anatomical layers crossed: Skin → subcutaneous fat → platysma → investing fascia → surgical field
- Uses: Mandibular body/angle fracture ORIF, submandibular gland excision, floor of mouth abscess drainage, mandibular osteotomy
- Key points:
- Placed in a skin crease for cosmesis
- 2 cm below mandibular border protects the marginal mandibular branch of facial nerve (which loops 1-1.5 cm below lower border)
- Platysma incised; superficial layer of deep cervical fascia opened
- Scar is well-hidden in neck crease
- Reference: Scott-Brown's, Chapter 107; Cummings, Chapter on Neck Dissection

13. Retromandibular (Transparotid) Incision
- Location: 0.5 cm below the earlobe, extending 3-4 cm along the posterior border of the mandibular ramus
- Uses: Subcondylar/condylar neck fracture ORIF, parotid gland surgery, ramus procedures, mandibular angle
- Variations:
- Retromandibular transparotid approach (Hinds approach): Directly through parotid substance - risk of parotid fistula; facial nerve branches are spread by blunt dissection
- Retromandibular transmasseteric anteroparotid approach (Zide & Kent): Goes anterior to parotid gland, between parotid and masseter - safer for facial nerve
- Key points:
- The facial nerve trunk exits the stylomastoid foramen and enters the posterior parotid
- Use blunt dissection between nerve branches
- Marginal mandibular and cervical branches at risk
14. Pre-auricular Incision (Al-Kayat & Bramley modification)
- Location: Starts in the temporal hair, runs anterior to the tragus in the preauricular crease, curves around the ear lobule
- Uses:
- Temporomandibular joint (TMJ) surgery (arthrotomy, arthroplasty, total joint replacement, disc surgery)
- High condylar neck/condylar head fractures
- Parotid surgery
- Zygomatic arch access
- Key points:
- Incision is in a natural skin crease - excellent cosmesis
- Auriculotemporal nerve may be cut (causes preauricular numbness)
- Temporal branch of facial nerve at risk in temporal extension
- Superficial temporal vessels encountered in scalp extension
- Deep dissection through SMAS and parotid fascia
- Excellent exposure of the condylar head and glenoid fossa
15. Endaural Incision
- Location: Within the external auditory meatus
- Uses: Alternative to pre-auricular for TMJ, avoids visible scar
- Key points: More limited exposure; requires experience
16. Coronal Incision (Bicoronal / Bitemporal Incision)
- Location: From ear to ear, across the vertex of the skull, in or behind the hairline
- Uses:
- Frontal bone fractures
- Naso-orbital-ethmoid (NOE) fractures
- Zygomatic arch fractures (bilateral)
- Panfacial fractures
- Craniofacial surgery (distraction, craniosynostosis)
- Orbital surgery
- Calvarial bone graft harvest
- Variations:
- Conventional coronal: Straight across vertex, within hairline
- Sinusoidal/zigzag: Reduces scar alopecia
- Sawtooth: Minimizes visible scar in hair
- Postauricular extension: For improved temporal exposure
- Key points:
- Dissection in the loose areolar layer above the periosteum (subgaleal plane)
- Temporal extension: must go deep to temporoparietal fascia (superficial temporal fascia) to protect the frontal branch of facial nerve
- Supraorbital and supratrochlear nerves preserved during flap elevation
- Risk: alopecia, hypoesthesia of scalp, frontal nerve palsy if plane too superficial in temporal region
- Reference: Cummings Otolaryngology, p. 342 - "middle third bones are accessed from above via a coronal incision"
17. Blair Incision (Modified Blair)
- Location: Lazy-S incision starting in the preauricular crease, extending below the mandibular angle and along an upper neck crease
- Uses:
- Parotidectomy (superficial, total, radical)
- Deep lobe parotid tumors
- Access to parapharyngeal space
- Combined parotid + neck dissection
- Key points:
- Preauricular component parallels the ear crease
- Cervical component in a natural skin crease, approximately 2 cm below mandible
- Must protect the facial nerve (main trunk and all five branches during parotidectomy)
- Greater auricular nerve often sacrificed
18. Submandibular Crease Incision (for Submandibular Gland)
- Location: 2-3 cm below the lower border of mandible in a skin crease
- Uses: Submandibular gland excision
- Key points:
- Marginal mandibular branch of facial nerve must be identified and protected
- Lingual nerve and hypoglossal nerve at risk during deep dissection
- Wharton's duct ligated close to hilum
19. Lip-Splitting Incision (Transfacial)
- Location: Midline lower lip, around chin, extending into neck as midline neck incision
- Uses:
- Mandibulotomy approach for access to tongue base, oropharyngeal tumors, parapharyngeal space
- Reconstruction of large oromandibular defects
- Key points:
- Preserves mental nerve bilaterally
- Mandibulotomy site planned between canine and 1st premolar (or between central and lateral incisor)
- Step osteotomy prevents rotation of segments
- Leaves midline scar - cosmetically acceptable
- Used when transoral access is insufficient
20. Weber-Ferguson Incision
- Location: Splits upper lip at midline, extends along nasolabial fold to infraorbital rim, can include lower eyelid extension (modified)
- Uses:
- Maxillectomy (partial, total, infrastructure/suprastructure)
- Access to maxillary sinus for large tumors
- Sinonasal tumors
- Key points:
- Upper lip split follows philtrum column
- Combined with palatal incision intraorally
- Modified Weber-Ferguson includes subciliary extension for total maxillectomy
21. Subciliary / Subtarsal / Lower Lid Incision
- Location:
- Subciliary: 2 mm below eyelash margin
- Subtarsal (mid-lid): in the skin crease 4-5 mm below lash margin
- Transconjunctival: inside the lower eyelid, no external scar
- Uses: Orbital floor and infraorbital rim access (blowout fractures, Le Fort II/III, ZMC fractures)
- Comparison:
| Approach | Scar | Exposure | Ectropion Risk |
|---|---|---|---|
| Subciliary | Best hidden | Good | Highest |
| Subtarsal | Acceptable | Good | Moderate |
| Transconjunctival | None | Good | Lowest |
| Infraorbital | Visible | Excellent | Low |
- Key points: All require preseptal or postseptal dissection; avoid violation of orbital septum to prevent fat herniation
22. Upper Eyelid / Supraorbital / Browplasty Incision
- Location: Within the upper eyelid crease or along the brow
- Uses: Frontal sinus, supraorbital rim access, orbital roof, brow ptosis correction, forehead lift
- Key points: Supraorbital nerve exits 2.5 cm from midline
23. Lynch Incision (Medial Canthal / Transnasal Incision)
- Location: Vertical incision along the medial canthal region (10 mm medial to medial canthus)
- Uses:
- Frontoethmoid approach (anterior ethmoid artery ligation)
- NOE fracture access
- Lacrimal sac surgery (DCR)
- Access to medial orbital wall
- Key points: Lacrimal sac and canaliculi at risk; angular artery encountered; scar can be contracted (webbing)
24. Crow's Foot / Lateral Canthal Incision
- Location: In natural skin creases lateral to the lateral canthus
- Uses: Lateral orbital access, zygomatic frontal suture access for ZMC fracture
- Key points: Short incision, hidden in wrinkle line
25. Temporal (Gillies) Incision
- Location: 2-3 cm within the hairline, above the zygomatic arch, over the temporal fossa
- Uses:
- Elevation of depressed zygomatic arch fractures (Gillies' temporal approach)
- Zygomatic elevator passed under the arch to reduce fractures
- Key points:
- Temporalis fascia incised; elevator placed deep to temporalis fascia and superficial to the arch
- Avoids facial nerve (temporal branch runs superficial to deep temporal fascia)
- Minimal access, blind reduction - not for comminuted fractures
26. Hemicoronal Incision
- Location: Same as coronal but only on one side, from hairline to preauricular crease
- Uses: Unilateral zygomatic complex fractures with concomitant TMJ access, unilateral craniofacial
- Key points: Can be combined with preauricular for full lateral facial access
27. Mid-forehead / Forehead Incision
- Location: In a horizontal forehead wrinkle crease
- Uses: Brow lift, frontal bone access in older patients with prominent forehead creases, supraorbital rim
- Key points: Scar camouflaged in wrinkle line; inappropriate in young patients
28. Rhinoplasty Incisions
- Location:
- Closed (endonasal): Within the nostril - intercartilaginous, intracartilaginous, marginal
- Open (external): Marginal + transcolumellar incision (inverted V or step at columella midpoint)
- Uses: Post-traumatic rhinoplasty, nasal hump reduction, nasal reconstruction, naso-septal access
- Key points: Open approach allows direct visualization of entire nasal skeleton; transcolumellar scar heals well
29. Tracheostomy Incision
- Location: Horizontal skin crease between 1st and 2nd tracheal rings (standard) - 2-3 cm below the cricothyroid membrane
- Uses: Long-term airway management, obstructive pathology, post-oncologic surgery
- Key points: Thyroid isthmus encountered; stay in midline; cricothyroidotomy (emergency) is at the cricothyroid membrane
- Reference: Bailey & Love, Chapter 52 - "A vertical midline incision is made" for emergency tracheostomy
30. Neck Dissection Incisions
- Types:
- MacFee (double horizontal): Two parallel horizontal neck crease incisions - best blood supply, no trifurcation point; cosmetically excellent
- Schobinger: Trifurcation modified - inverted Y
- Modified Apron / H-flap: Horizontal + vertical components
- Hockey Stick (Martin): Horizontal neck + vertical ascending limb behind ear
- Hayes Martin: Similar hockey stick variant
- Radical Neck (Y-shaped): Classic radical neck - less favored now
- Key principles:
- Avoid trifurcation points over carotid (risk of skin breakdown and carotid exposure/blowout)
- MacFee incision preferred after radiation
- Incisions planned within natural skin crease lines (Langer's lines)
- At least 3 cm from previous radiation fields
III. SPECIAL / ORTHOGNATHIC SURGERY INCISIONS
31. Le Fort I Osteotomy - Sublabial Vestibular Incision
- As described above (#7) - from 1st molar to 1st molar, 5 mm above mucogingival junction
32. BSSO (Sagittal Split) Incision
- As described above (#10)
33. Genioplasty Incision
- As described above (#6)
34. Maxillary Segmental Osteotomy
- Modified sublabial incisions with additional vertical releases between segments
IV. KEY ANATOMICAL PRINCIPLES FOR INCISION DESIGN
| Nerve at Risk | Protecting Incision |
|---|---|
| Marginal mandibular branch (facial nerve) | Submandibular incision placed 2 cm below mandible |
| Temporal branch (facial nerve) | Dissect deep to temporoparietal fascia in temporal region |
| Mental nerve | Avoid direct dissection at premolar region; identify before retraction |
| Infraorbital nerve | Exits 1 cm below infraorbital rim; protect in orbital/Le Fort approaches |
| Auriculotemporal nerve | Enters parotid; cut in pre-auricular/retromandibular incisions (numbness) |
| Lingual nerve | Protect in retromolar/BSSO incisions; curves under floor of mouth |
| Hypoglossal nerve | Protect during deep submandibular dissection |
| Supraorbital/Supratrochlear nerves | Protect during coronal flap elevation |
V. PRINCIPLES OF INCISION PLANNING (Summary)
- Cosmesis: Use natural skin creases (Langer's lines), hairline, eyelid folds, nasolabial folds
- Access: Must provide adequate exposure without excessive tissue retraction
- Blood supply: Base of flap wider than free margin; avoid crossing watershed zones
- Nerve protection: Plan around known nerve locations; use blunt dissection near nerve branches
- Closure tension: Releasing incisions prevent wound dehiscence
- Radiation field: Avoid incisions over previously irradiated tissue; MacFee preferred post-XRT
- Scar location: Parallel to Langer's lines, hidden in hairline, ear crease, or neck creases
- Triangles of danger: Do not place trifurcation points over the carotid artery
Recommended Study Plan
- Primary resource: Ellis E & Zide MF, Surgical Approaches to the Facial Skeleton - read this systematically, chapter by chapter, one region at a time (orbital, midface, mandible, condyle, TMJ, etc.)
- Supplement with: Miloro's Peterson's Principles of Oral and Maxillofacial Surgery - Chapters 2, 3 (dentoalveolar), surgical access chapters
- For trauma incisions: Use Rowe & Williams or the Cummings chapter on craniomaxillofacial trauma (available in this library - Cummings Otolaryngology, block 5, covers Le Fort, ZMC, orbital, mandible access)
- For neck incisions: Scott-Brown's Otolaryngology (available in library) - Chapters on neck dissection and submandibular surgery
- Mnemonics for neck dissection incisions: "My Surgeon Always Helps Heal Rapidly" = MacFee, Schobinger, Apron, Hayes Martin, Hockey Stick, Radical
Note: The library here contains Cummings Otolaryngology Head and Neck Surgery and Scott-Brown's Otorhinolaryngology which both have solid chapters on surgical access for the head and neck region. However, for a complete OMFS incision atlas, Ellis & Zide's "Surgical Approaches to the Facial Skeleton" remains the single best-dedicated resource and is highly recommended for your revision.