
Bilateral and unilateral stands of hip complex biomechanics
Reading File
The hip complex biomechanics topic covers bilateral stance (double-leg support, forces distributed across both limbs) and unilateral stance (single-leg support, abductor muscles counteracting the ground reaction force). Let me search the medical library for detailed content.
Searching sources...
Finding Sources
Finding Sources
Finding Sources
Finding Sources
Finding Sources
Finding Sources
Reading File
Reading File
Reading File
Good content found. Let me now get more detail from the Thieme atlas on bilateral/unilateral stance and also get the broader Rheumatology textbook section.
Reading File
Reading File
Excellent content. Now let me get the specific content on the hip joint load with femoral neck angles and the Trendelenburg test from the Thieme atlas, plus fetch the key diagrams.
Reading File
Loading Image
Loading Image
Loading Image
Loading Image
Finding Sources
Excellent! Found a key passage in Rockwood & Green explicitly about double-leg vs single-leg stance. Let me read that.
Reading File
I now have comprehensive content from multiple authoritative sources. Let me compile the full answer.
Hip Complex Biomechanics: Bilateral and Unilateral Stance
Overview: The Hip as a Biomechanical Fulcrum
The hip is a ball-and-socket (spheroidal) joint functioning as the fulcrum for large surrounding muscles. Much of its stability comes from these muscles forcing the femoral head deep into the acetabulum. The capsule is relatively loose compared to other joints, enabling movement in multiple planes.
Axes of Motion (3 degrees of freedom) - all passing through the center of the femoral head:
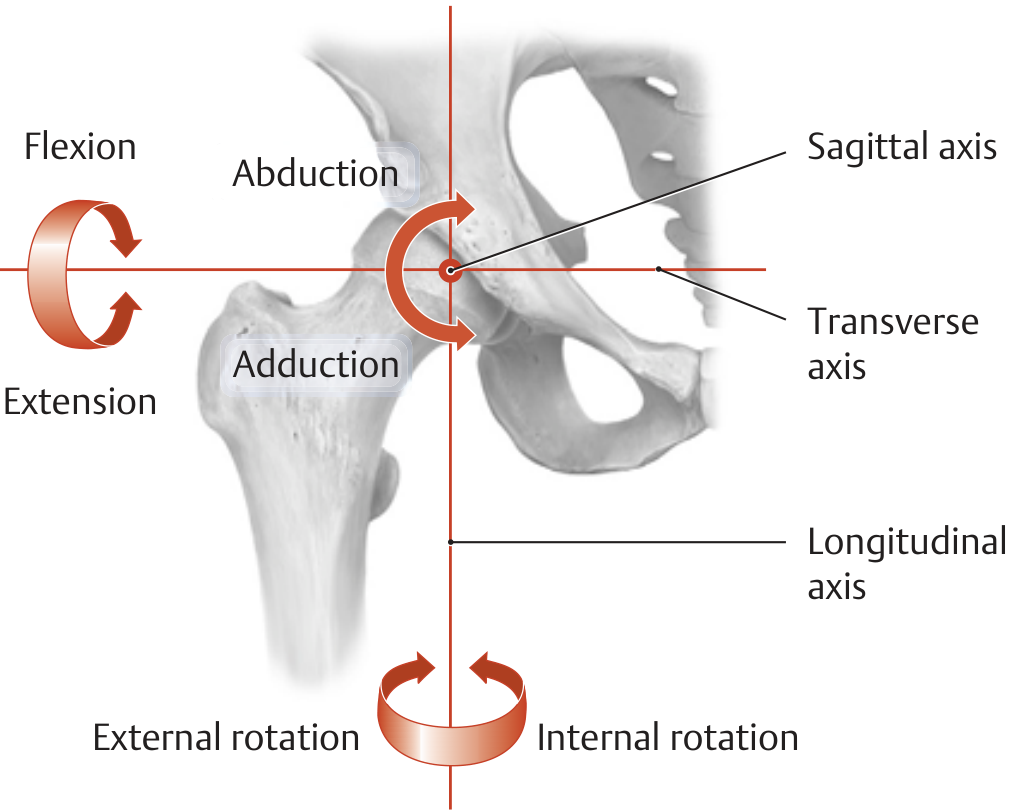
- Transverse axis - flexion (0-140°) and extension (0-15°)
- Sagittal axis - abduction (0-40° extended, 0-80° at 90° flexion) and adduction (0-20°)
- Longitudinal axis - internal rotation (0-40°) and external rotation (0-50°)
(THIEME Atlas of Anatomy: General Anatomy and Musculoskeletal System, p. 456-457)
1. Bilateral Stance (Double-Leg Support)
In quiet bilateral stance, the body is in static equilibrium - the sum of all forces (ΣF = 0) and moments (ΣM = 0) about every axis equals zero.
Ground Reaction Force (GRF) distribution:
- With weight symmetrically distributed, each foot supports one-half of body weight
- The resultant GRF passes approximately midway between the two feet, directly under the center of mass (COM)
- The GRF location shifts as the person leans - always tracking under the COM to maintain balance
- As weight shifts laterally, more load transfers to the ipsilateral limb
Joint reaction force in bilateral stance: Approximately 1/3 of body weight (0.33 BW). Because fewer muscles are required for balance in this symmetrical position, muscle-generated compressive forces at the joint are minimal. This is the lowest-load standing condition for the hip.
(Rockwood and Green's Fractures in Adults, 10th Ed., p. 2581)
Practical note: Transition from lying to partial weight-bearing (toe touch/foot flat) allows the ground to support the limb's weight rather than the hip musculature - generating the least force through the hip after surgery or injury.
2. Unilateral Stance (Single-Leg Support)
This is mechanically far more demanding. When one foot is lifted, the center of mass must shift over the single base of support (the stance foot) to maintain equilibrium.
Static Equilibrium Model
The hip abductor muscles are the key stabilizers. In single-limb stance on the right leg:
- The GRF passes medial to the hip joint center, creating an external hip adduction moment that tends to rotate the pelvis clockwise (contralateral side drops)
- To maintain a level pelvis, the hip abductor muscles (gluteus medius and minimus, tensor fasciae latae) generate an internal hip abduction moment (counterclockwise)
- Equilibrium requires: internal abduction moment = external adduction moment
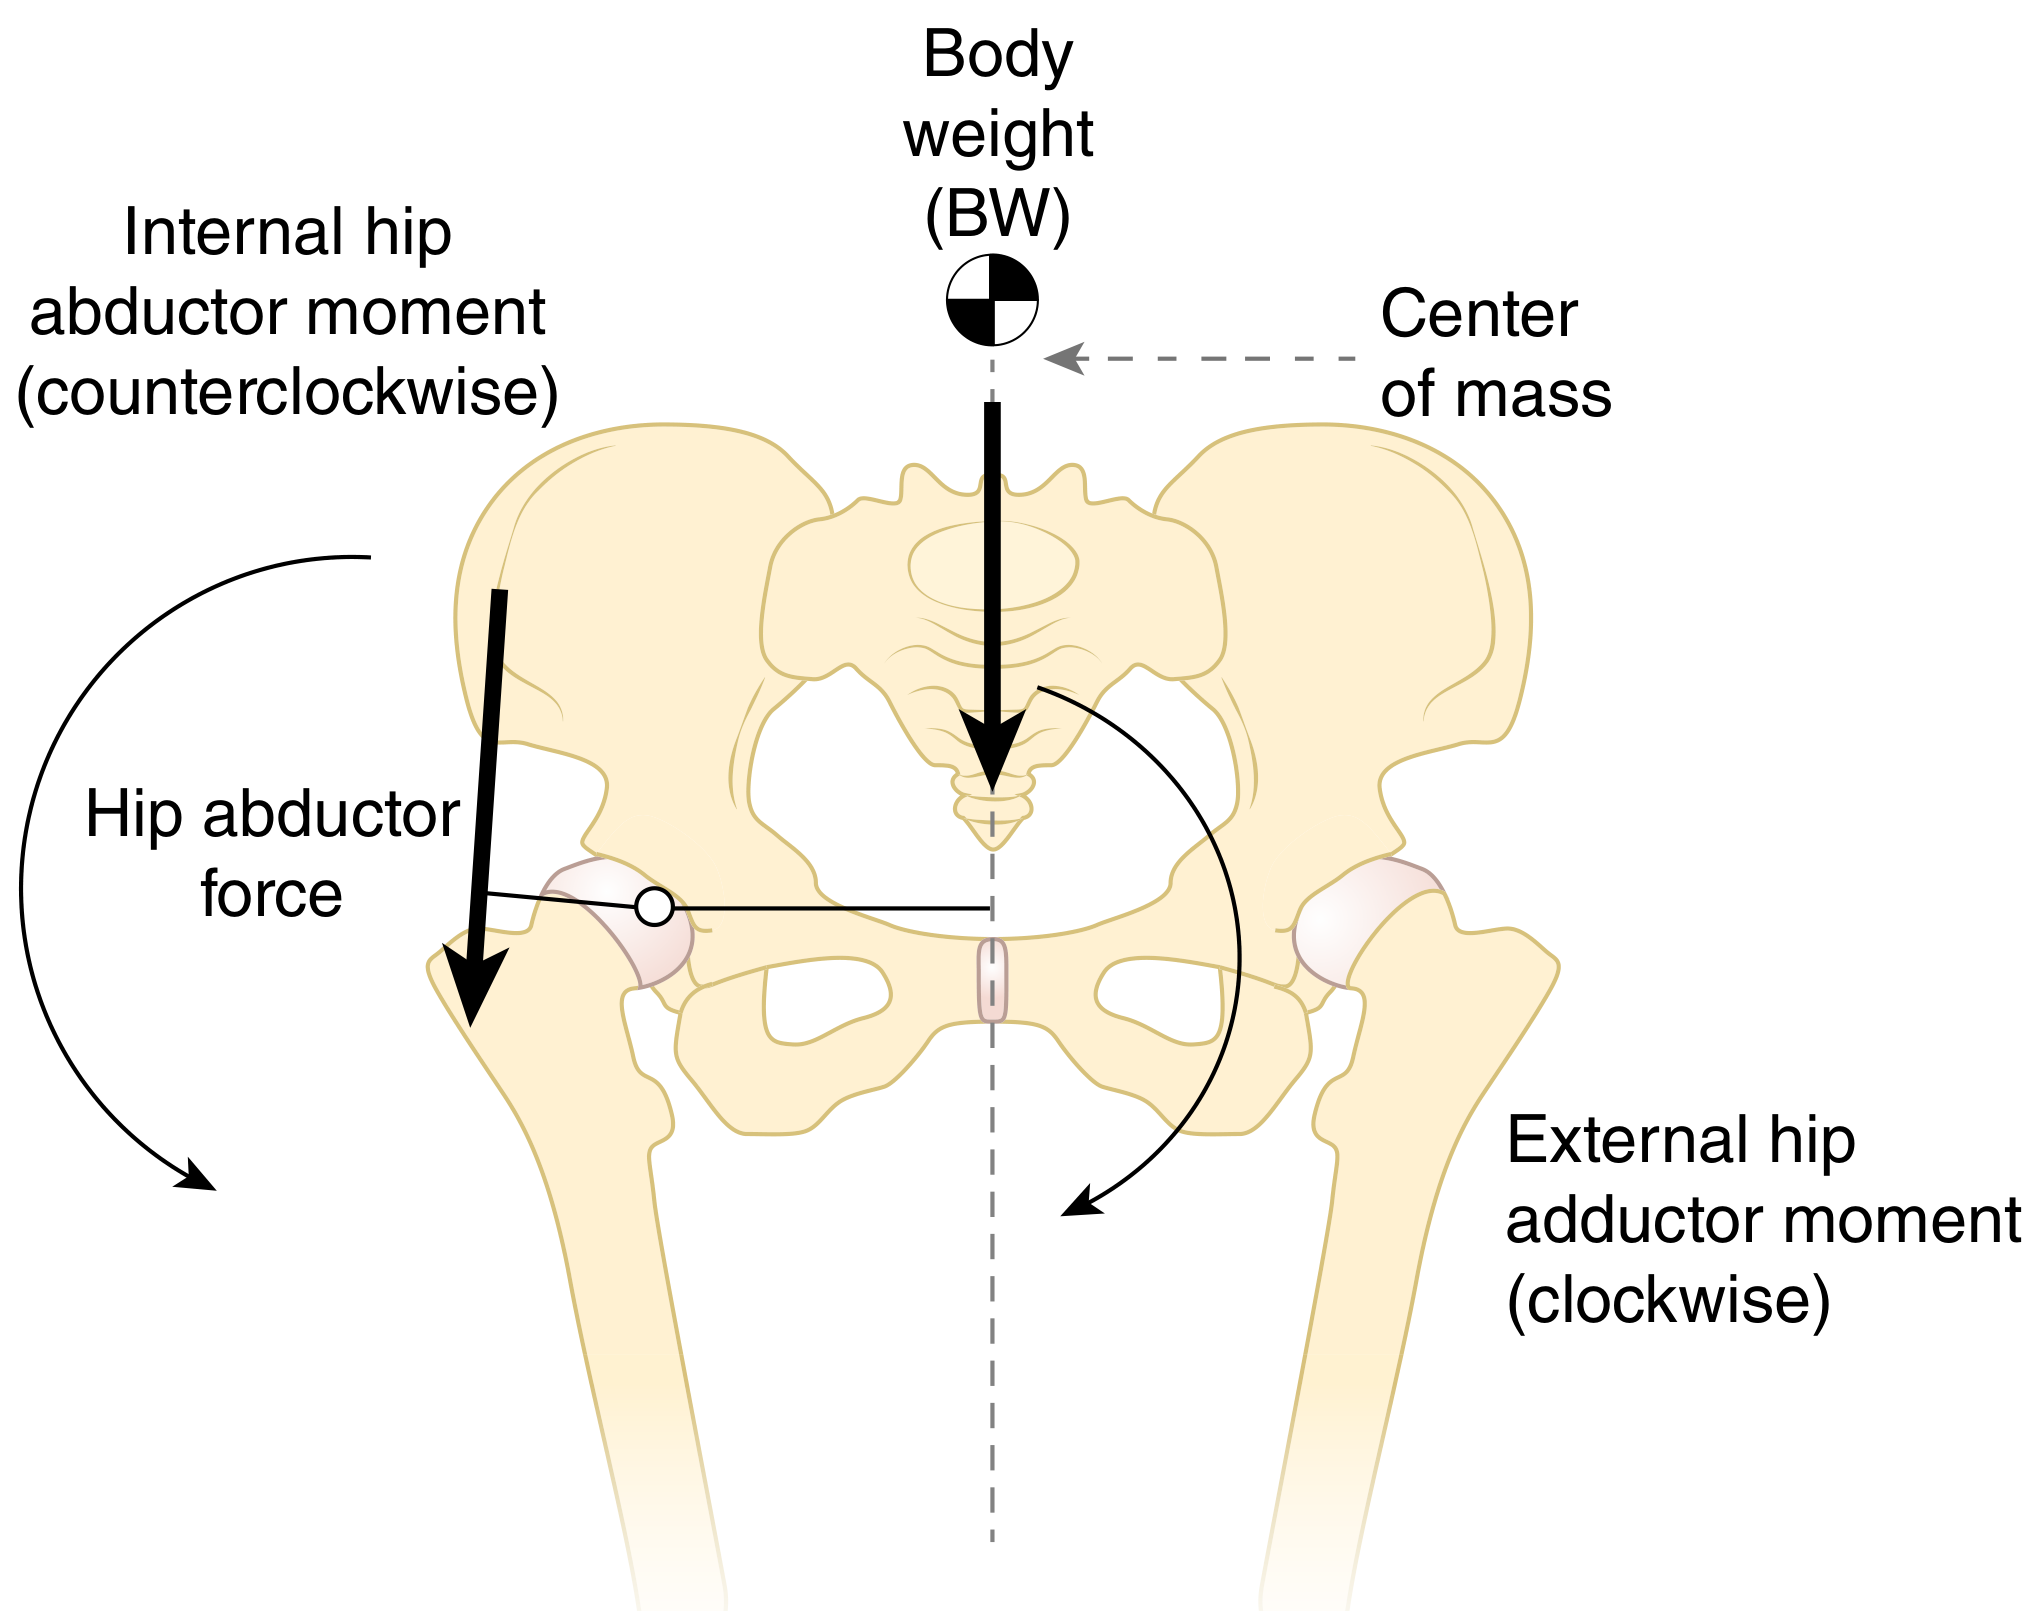
(Firestein & Kelley's Textbook of Rheumatology)
Joint Reaction Force in Unilateral Stance
Because the abductor muscle force required is large (due to their short moment arm), the joint reaction force (resultant R) is much greater than body weight alone:
| Condition | Joint Reaction Force |
|---|---|
| Lifting leg from bed | ~1.5× body weight |
| Bilateral quiet stance | ~0.33× body weight |
| Single-leg standing | ~3× body weight |
| Normal gait (peak) | ~6× body weight |
| Running / jumping | ~10× body weight |
(Bailey and Love's Short Practice of Surgery, 28th Ed., p. 572)
Lever Arm Relationships and the CCD Angle
The hip joint load in unilateral stance depends critically on the femoral neck (CCD) angle and the relative lever arms of body weight vs. muscle force:
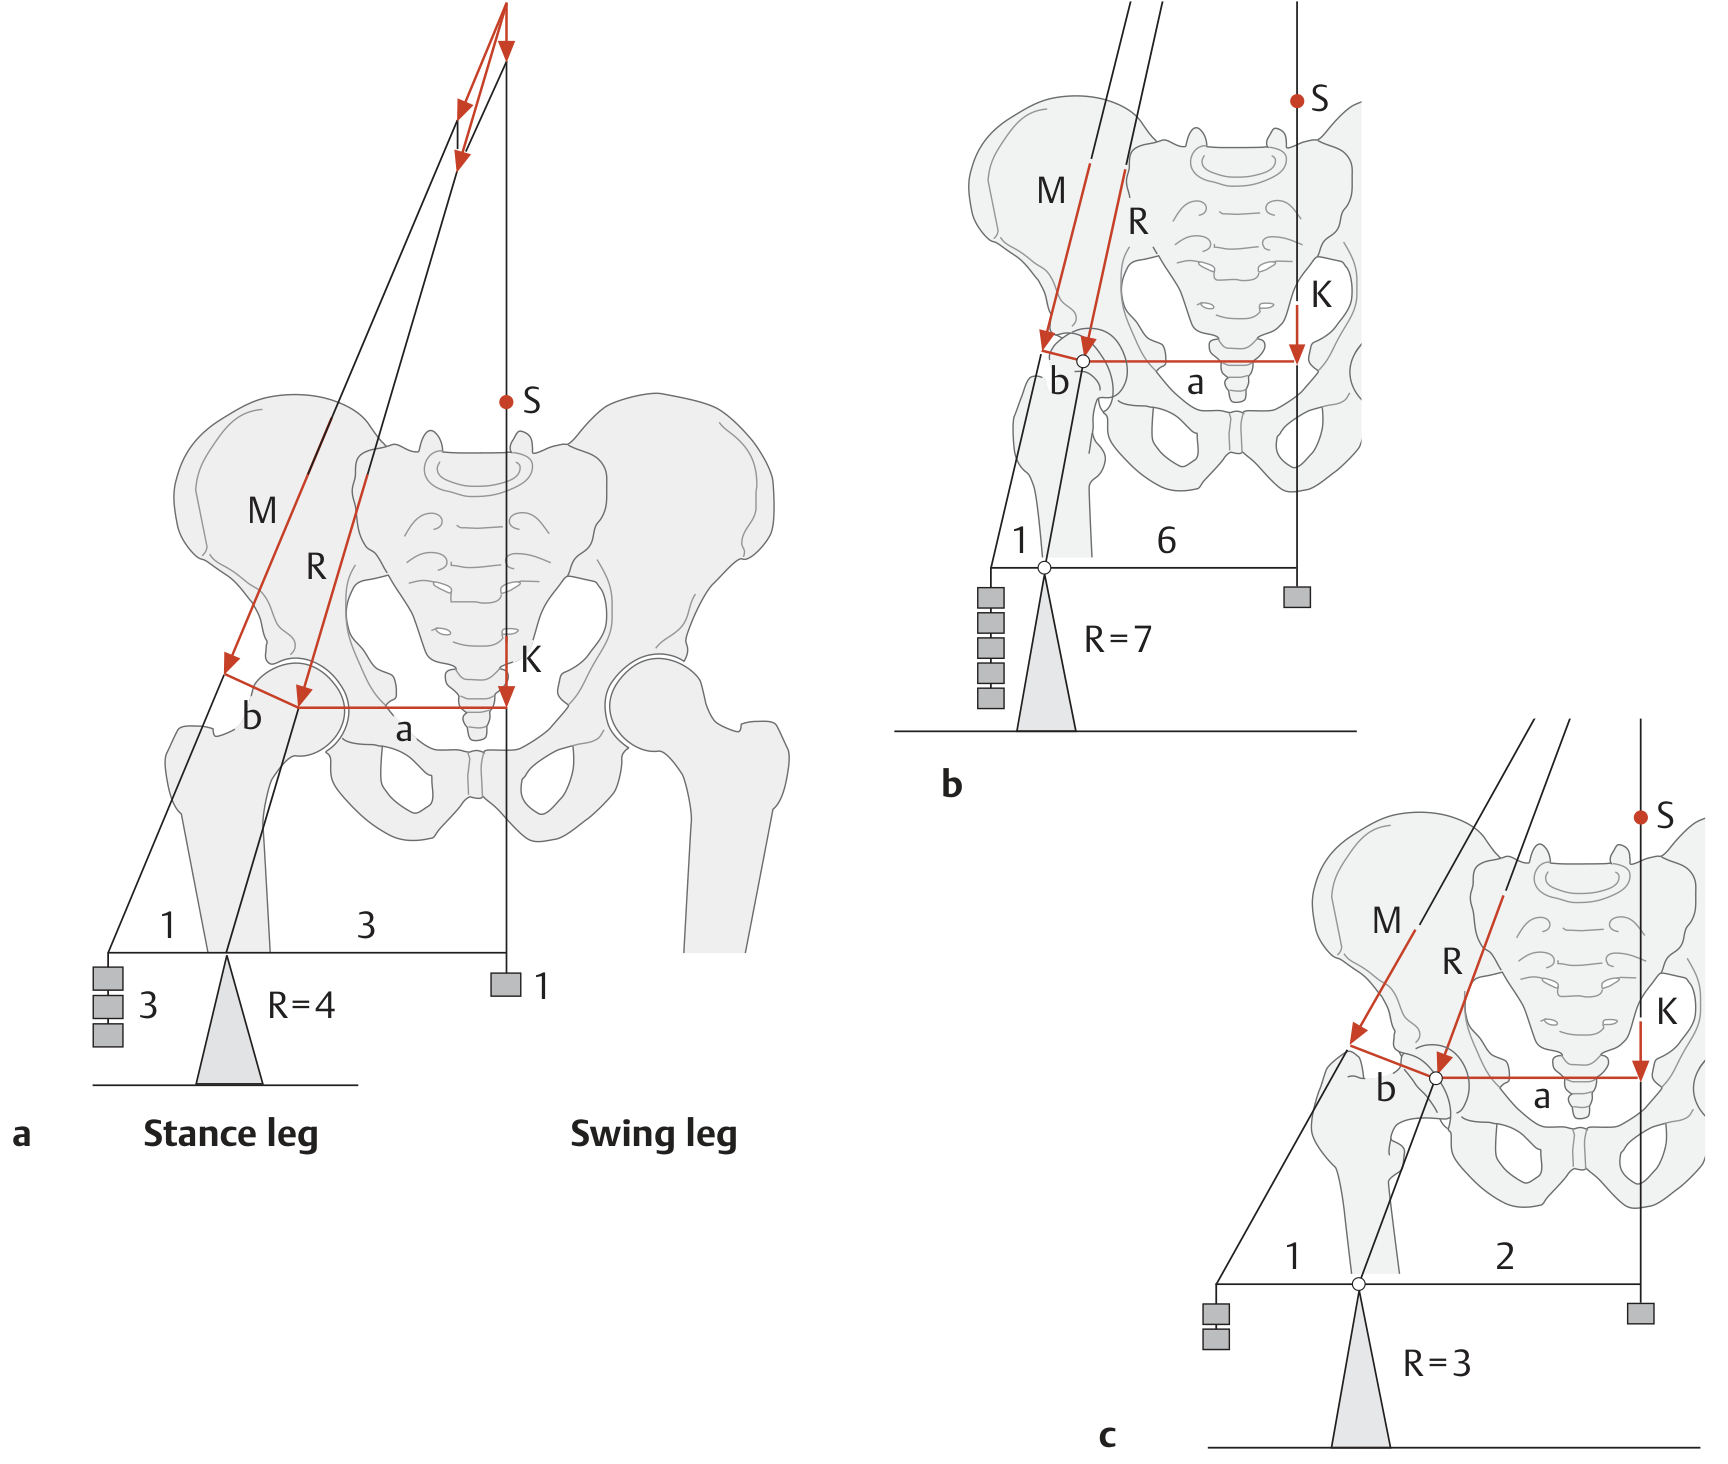
- Normal CCD angle (~126°): Lever arm of body weight is ~3× the lever arm of muscle force → R = 4× body weight
- Coxa valga (increased CCD): Abductor lever arm decreases → more muscle force needed → R = 7× body weight
- Coxa vara (decreased CCD): Abductor lever arm increases → less muscle force needed → R = 3× body weight
(THIEME Atlas of Anatomy: General Anatomy and Musculoskeletal System, p. 457)
The abductor moment arm is what governs efficiency: smaller moment arm = larger muscle force needed = higher joint contact force.
3. Trendelenburg Sign - Clinical Consequence
If the hip abductors fail to generate sufficient internal abduction moment in unilateral stance:
- The pelvis drops on the contralateral (swing leg) side - called contralateral pelvic drop
- This manifests clinically as Trendelenburg gait (positive Trendelenburg test)
- The abductors insert at the greater trochanter and support the pelvis when the patient stands on the ipsilateral leg
Pelvic drop can also result from a reduced abductor moment arm (e.g., coxa valga, lateralized hip center after arthroplasty with reduced offset), not just muscle weakness.
4. Modifying Joint Load - Clinical Applications
In patients with hip osteoarthritis, two strategies reduce joint stress during single-leg stance:
a) Duchenne limp / shifting trunk toward affected side:
Shifts the partial-body center of gravity toward the diseased hip → shortens the lever arm of body weight → reduces the torque generated → less abductor force needed → lower joint reaction force.
Carrying a bag on the affected side achieves the same effect.
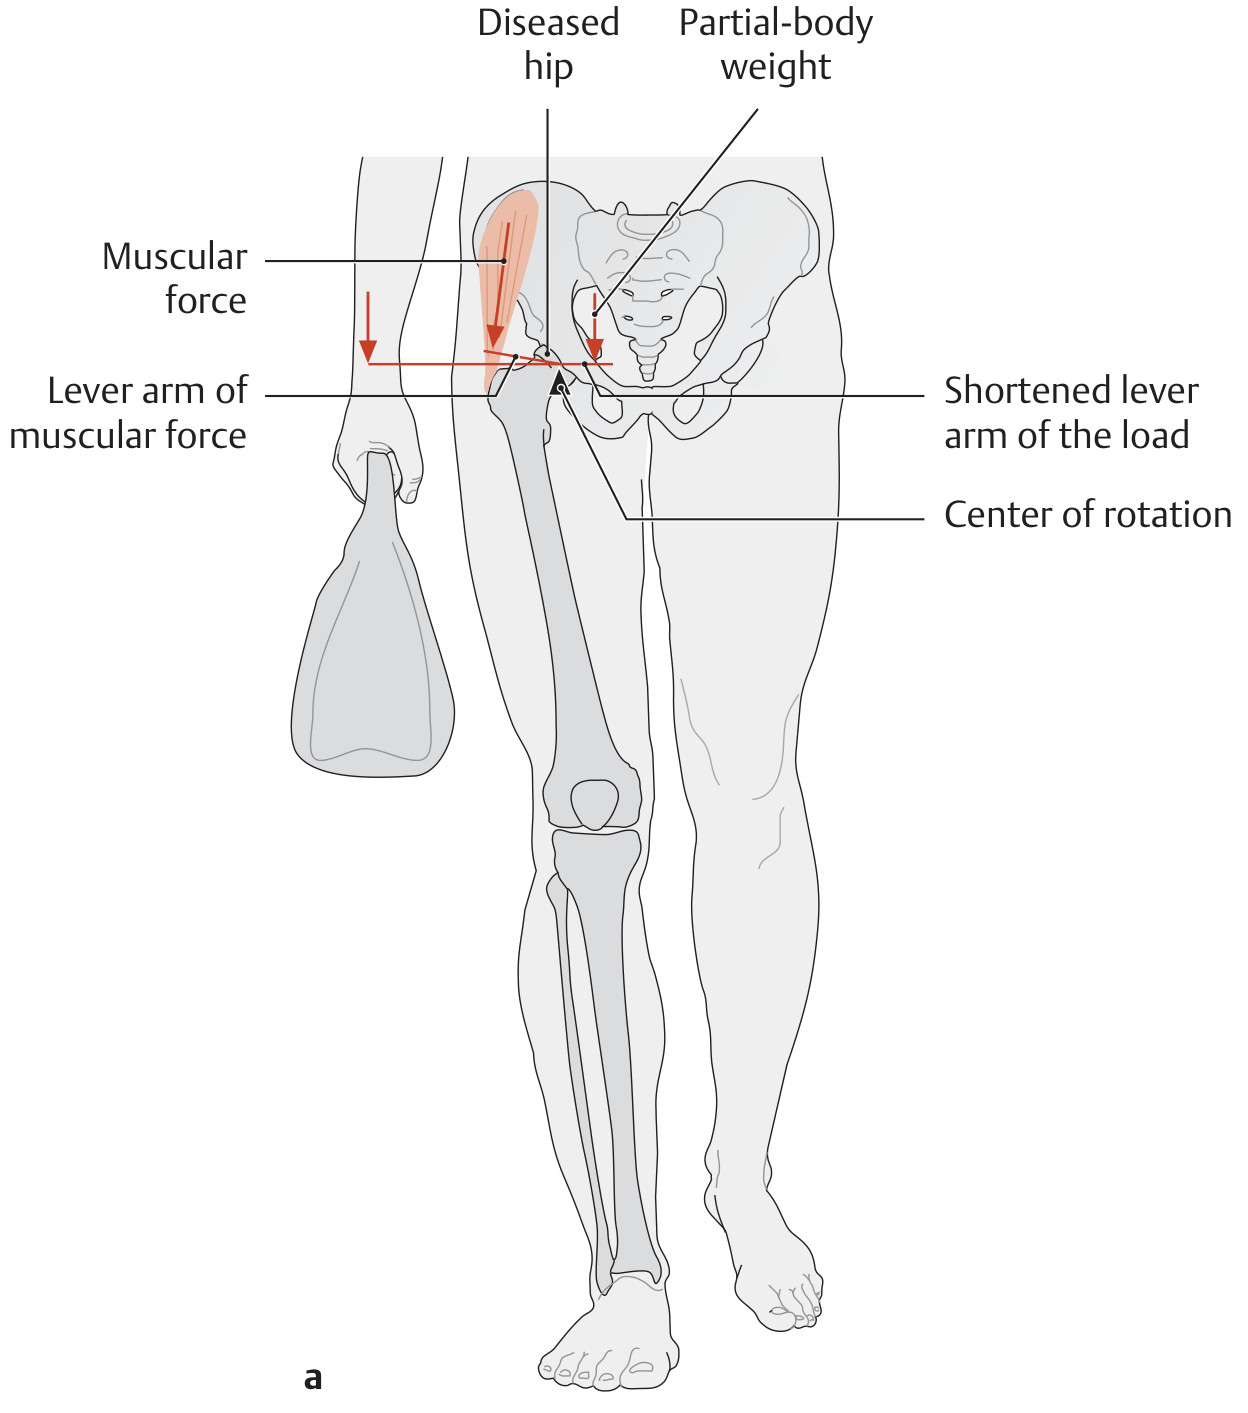
b) Cane on the contralateral (unaffected) side:
The cane provides an additional upward force at the end of the load lever arm. Although this lengthens the lever arm, the cane force counteracts the body load - net result is reduced torque and reduced abductor force demand.
(THIEME Atlas of Anatomy, p. 458)
5. Acetabular Loading Pattern
- Articular cartilage of the acetabulum is thickest laterally and peripherally - matching the predominantly peripheral loading pattern
- Articular cartilage of the femoral head is thickest medially and centrally
- The labrum deepens the socket by >10%, covering >50% of the femoral head even in motion
- Coxa valga + acetabular dysplasia is a particularly dangerous combination: increased muscle force (from reduced abductor lever arm) applied over a reduced contact area → elevated cartilage stress → accelerated OA
(Rockwood and Green's Fractures in Adults, 10th Ed.)
Summary Table
| Parameter | Bilateral Stance | Unilateral Stance |
|---|---|---|
| Muscles required | Minimal (balance muscles only) | Hip abductors heavily active |
| Joint reaction force | ~0.33× BW | ~3-4× BW (standing); up to 6× BW (gait) |
| Pelvis stability | Inherent (symmetric loading) | Depends on abductor moment arm |
| GRF location | Midway between feet | Directly under stance foot |
| Key failure | Rarely clinically relevant | Trendelenburg sign / pelvic drop |
| Main clinical concern | Lowest stress position (rehab) | Abductor insufficiency / coxa valga |
This is a shared conversation. Sign in to Orris to start your own chat.