
Examination of the breast gynecology
I'll start by reading the medical library skill as required for this medical query.
Reading File
Now let me search the medical library for breast examination in gynecology content.
Finding Sources
Finding Sources
Excellent! I found relevant sections. Let me read them in parallel - the Berek & Novak's Gynecology section and the Creasy & Resnik's Maternal-Fetal Medicine section.
Reading File
Reading File
Finding Sources
Now let me read the core gynecology content from Berek & Novak's and S. Das clinical surgery for the detailed examination technique content:
Reading File
Reading File
Reading File
Excellent content gathered. Now let me fetch the key clinical images and also read more from S. Das for the detailed palpation technique:
Loading Image
Reading File
Reading File
Reading File
Reading File
Reading File
I now have comprehensive content from multiple authoritative textbooks. Let me compile the full, detailed answer.
Examination of the Breast (Gynecology)
A thorough breast examination is a core component of gynecologic care. It includes a structured history, careful inspection, systematic palpation, and assessment of regional lymph nodes.
History (Before Physical Examination)
Key points to elicit:
- Breast development - age of onset, changes over time
- Breastfeeding history - previous lactational experience
- Menstrual history - relation of symptoms (pain/discharge) to menstrual cycle
- Marital/reproductive status - fibroadenosis and breast cancer are more common in nulliparous women
- Medications - e.g., OCPs, HRT (can cause breast tenderness/discharge)
- Previous breast surgery or trauma - location of scars (especially periareolar)
- Family history - first-degree relatives with breast cancer
- Systemic illnesses - tuberculosis, connective tissue disease
- Presenting complaint details - lump, pain, discharge, nipple change, skin change, weight loss
Positions for Examination
The patient should be stripped to the waist in a well-lit room with adequate privacy. Examination is performed in multiple positions:
| Position | Purpose |
|---|---|
| Sitting, arms at sides | Baseline inspection - size, shape, nipple levels |
| Sitting, arms raised overhead | Accentuates lumps, dimpling, submammary fold changes |
| Sitting, hands pressing on hips | Contracts pectoralis - reveals skin dimpling, nipple deviation |
| Sitting, leaning forward (bending from waist) | Breasts fall forward - nipple retraction due to carcinoma becomes obvious |
| Semi-recumbent (45°) | Good compromise for palpation |
| Supine (lying flat) | Flattens breast tissue - optimal for systematic palpation |
Inspection
Always compare both breasts simultaneously. Inspect in all the positions above and note:
1. The Breasts (Overall)
- Position - displaced or asymmetrical?
- Size and shape - larger or smaller than its fellow; gynecomastia in males
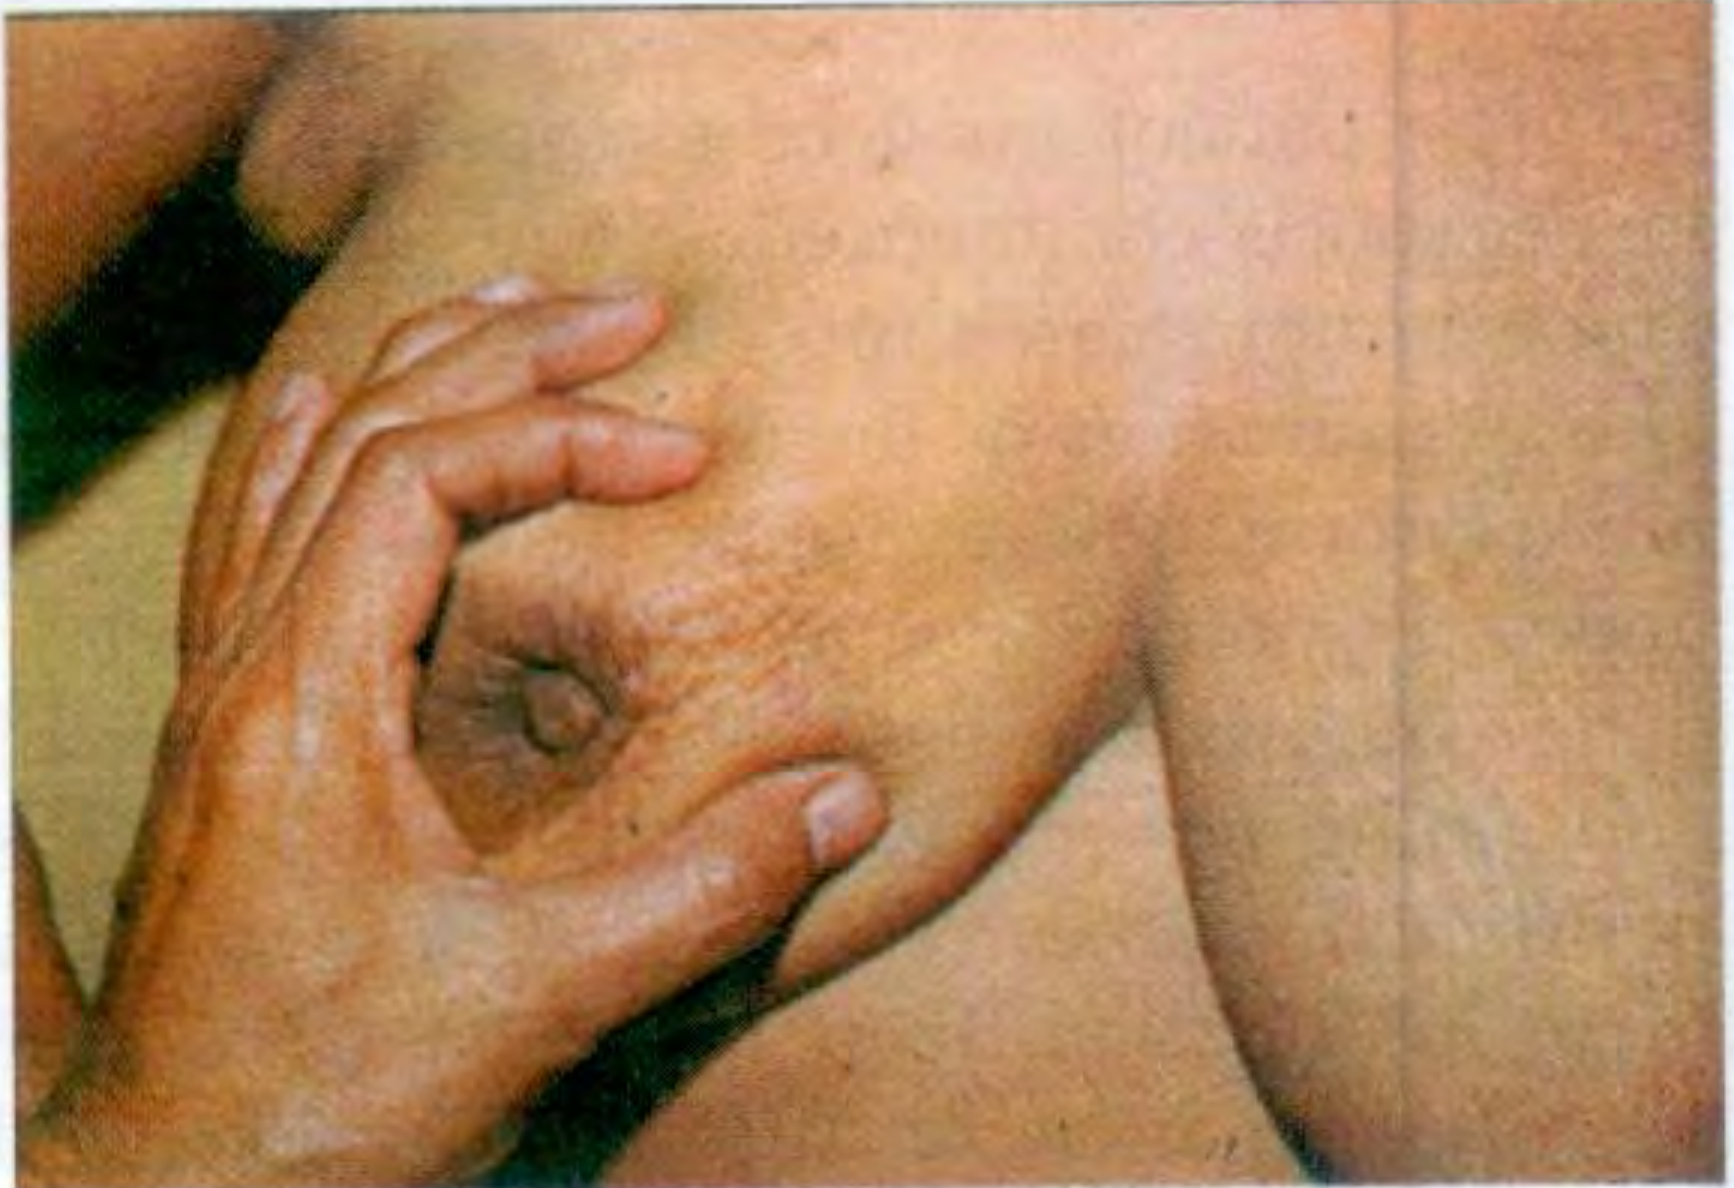
- Puckering or dimpling - skin dimpling is made more prominent by lifting the breast gently upward; in scirrhous carcinoma the breast may be shrunken
- Presence of a swelling or ulcer - note quadrant
2. Skin
- Colour and texture - erythema/warmth in acute mastitis
- Engorged veins - seen in large fibroadenoma, rapidly growing sarcoma, lacteal duct obstruction
- Peau d'orange - blockage of subcuticular lymphatics by carcinoma causes oedema; deepens mouths of sweat glands and hair follicles giving the classic "orange peel" appearance
- Dimpling/retraction/puckering - scirrhous carcinoma
- Nodules - often metastatic
- Ulceration and fungation - advanced carcinoma
3. Nipple
- Level - a raised or deviated nipple compared to the other side is significant
- Retraction - recent retraction is strongly suggestive of underlying carcinoma; long-standing retraction since puberty may be developmental
- Surface - cracks, fissures, eczema (bilateral suggests benign), Paget's disease (unilateral, starts as bright red areolar change → weeping ulcer)
- Discharge - note whether from nipple or from surrounding skin (mammary fistula); note character
4. Areola
- Colour - pale pink in young girls; darkens in adults; becomes brown in pregnancy
- Size - may enlarge in soft fibroadenoma/sarcoma; may diminish in scirrhous carcinoma
- Montgomery's glands - small nodules that normally line the areola; become enlarged (Montgomery's tubercles) in pregnancy
- Surface/texture - in Paget's disease, the areola becomes bright red early → destroyed leaving a red weeping ulcer
5. Arm and Thorax
- Brawny oedema of the arm - extensive neoplastic infiltration of axillary nodes (lymphatic blockage) or post-mastectomy
- Cancer en cuirasse - multiple cancerous nodules with thickened infiltrated skin like a coat of armour on the arm and thoracic wall
6. Axilla and Supraclavicular Fossa
- Inspect carefully for any visible swelling
The "Seven Ps" of Breast Examination
From Berek & Novak's Gynecology, the essential components are:
- Positions - multiple positions as above
- Palpation - systematic technique
- Pads of fingers - use pads of the 3 middle fingers (not fingertips, not grasping)
- Pressure - three levels: light, medium, deep
- Perimeter - cover the entire breast including axillary tail
- Pattern of search - vertical stripe (up-and-down) method preferred
- Patient education - about self-examination and reporting changes
Palpation
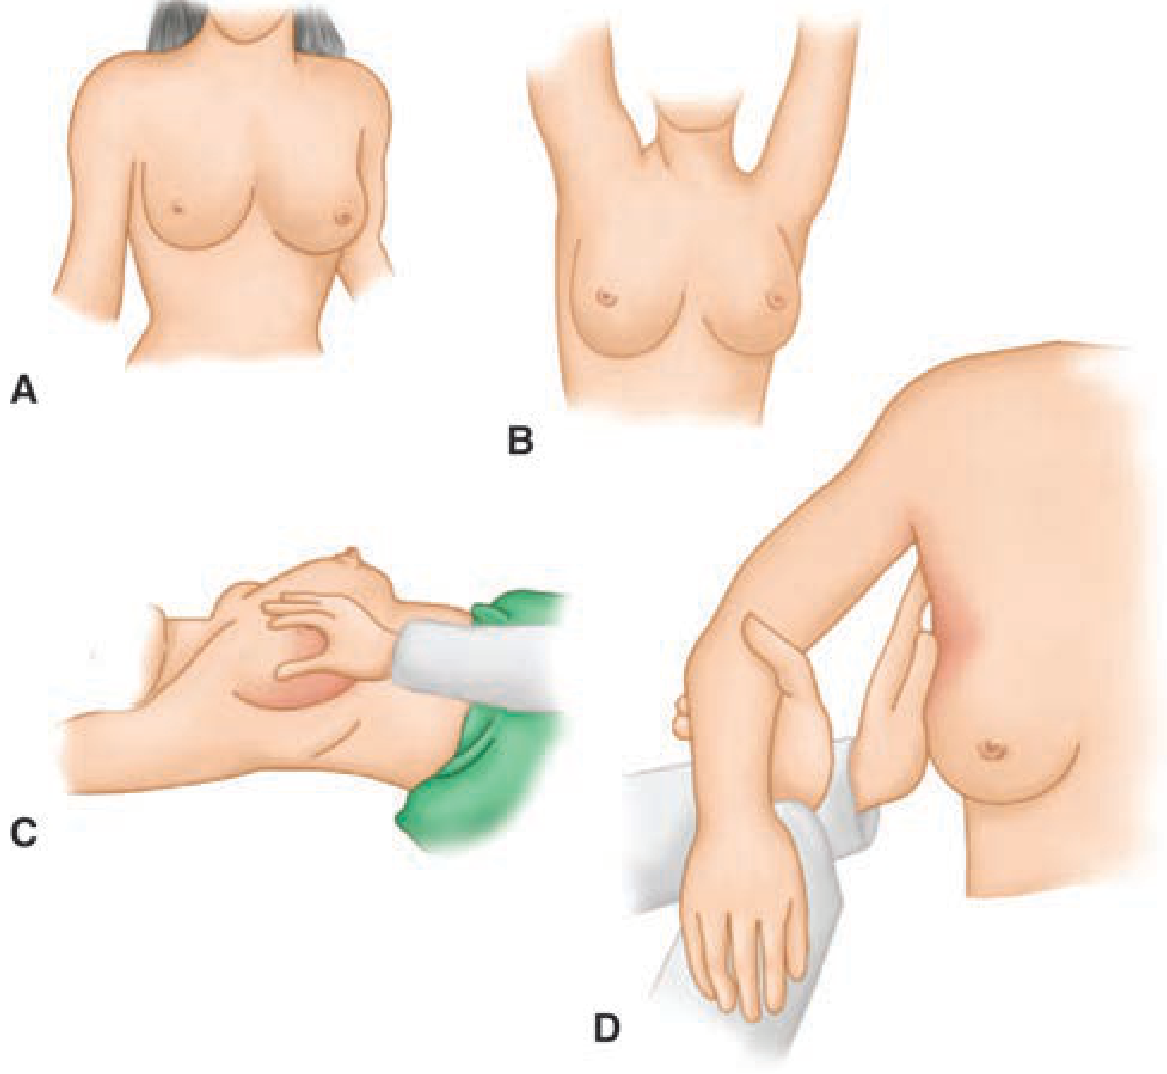
Technique
- Always palpate the normal breast first - to establish the baseline texture for that individual (varies from soft/smooth to firm and lobulated)
- Use palmar surface of the fingers with the hand flat - NOT the fingertips and NOT a grasping/pinching motion
- Positions: sitting → semi-recumbent (45°) → supine
- In the supine position, place a small pillow under the scapula on the examined side so the breast rests evenly on the chest wall
- Arm may be raised over the head during palpation
Systematic Pattern
Cover the entire breast from:
- Clavicle → inframammary fold (superiorly to inferiorly)
- Sternum → latissimus dorsi (medially to laterally)
- Include the axillary tail (tail of Spence)
- Palpate just behind the nipple (a small lump may be present here as the only abnormality)
- Preferred pattern: vertical stripe (up-and-down) rather than concentric circles or radial methods (which often miss the edges)
What to Note on Palpation (For Any Mass)
| Feature | Details |
|---|---|
| Site | Which quadrant? (UOQ, UIQ, LOQ, LIQ, central) |
| Number | Solitary vs. multiple (fibroadenosis - multiple) |
| Size and Shape | Globular, irregular |
| Surface | Smooth, nodular, irregular |
| Consistency | Soft, cystic, firm (fibroadenoma), stony hard (carcinoma), India-rubber feel (fibroadenosis) |
| Tenderness | Abscess/mastitis vs. carcinoma (usually painless) |
| Mobility | Free, fixed to skin, fixed to muscle |
| Fixity to skin | Move lump while tenting skin; skin dimpling; traction test |
| Fixity to pectoralis major | Move lump in direction of pectoral fibres while muscle is taut (patient presses hand on hip). If restricted = fixed to muscle |
| Fluctuation | For cystic swellings (cyst, abscess, lipoma) |
| Transillumination | In dark room - cysts transilluminate; solid tumours are opaque |
Nipple Assessment
- Gently compress the nipple to elicit any discharge
- Note: single duct discharge (duct papilloma, carcinoma) vs. multi-duct (fibrocystic change, duct ectasia)
- Bloody discharge - suspect carcinoma or papilloma; clear/serous - papilloma; milky - hyperprolactinaemia; purulent - infection
Lymph Node Examination
Axillary lymph nodes - the most important group. Exam technique:
- Support the patient's arm/elbow to relax the shoulder girdle
- Use gentle palpation with fingertips up into the apex of the axilla
- Assess all three levels of axillary nodes (relative to pectoralis minor):
- Level I - lateral to pectoralis minor
- Level II - behind pectoralis minor
- Level III - medial/apical (Rotter's nodes)
Also palpate:
- Supraclavicular nodes - in the supraclavicular fossa
- Infraclavicular nodes
- Parasternal/internal mammary nodes
For each node note: location, size, consistency (soft vs. hard), shape, mobility, fixation.
Breast Self-Examination (BSE)
- No longer routinely recommended for average-risk women (no improvement in survival; increases biopsies for benign lesions)
- For women who wish to perform BSE: examine 7-10 days after onset of menstrual cycle (premenopausal) or on a fixed calendar date (postmenopausal) - as instructed in Berek & Novak's Gynecology
- Method: inspect before mirror → palpate with vertical stripe method → soap and water in the shower can improve sensitivity
Clinical Breast Examination (CBE) vs. Screening
- CBE is part of routine gynecologic care
- It has limited sensitivity (~54%) and specificity compared to mammography
- Findings to prompt further workup: any palpable mass, nipple discharge, skin changes, or lymphadenopathy
- Key next steps after finding a mass: triple assessment (clinical examination + imaging + biopsy)
Sources:
- Berek & Novak's Gynecology, Chapter on Breast Disease (p. 961-968)
- S. Das - A Manual on Clinical Surgery, 13e, Chapter 30 (pp. 415-422)
- Schwartz's Principles of Surgery, 11e, Chapter 17
- Creasy & Resnik's Maternal-Fetal Medicine, Chapter 11 (p. 239)
Search for images showing peau d'orange and other breast examination findings
Finding Sources
Searching the Web
peau d'orange breast sign clinical photo examination findings
Now let me fetch the textbook images and the best web images simultaneously:
Loading Image
Loading Image
Loading Image
Loading Image
Finding Sources
Now let me get more textbook images - nipple retraction, skin dimpling, and inflammatory breast cancer findings:
Loading Image
Loading Image
Loading Image
Reading File
Let me fetch one more image - the peau d'orange close-up from Bailey & Love and the cancer en cuirasse:
Loading Image
Finding Sources
I now have a comprehensive set of images from the textbooks. Here is the full illustrated guide:
Breast Examination Findings - Illustrated Guide
1. Peau d'Orange ("Orange Peel Skin")
Mechanism: Tumour cells block the subdermal lymphatics or axillary lymph nodes, causing cutaneous lymphoedema. The skin swells between the tethered openings of the hair follicles and sweat glands, which deepens them - creating the characteristic dimpled, orange-peel texture. It is a sign of locally advanced breast disease.
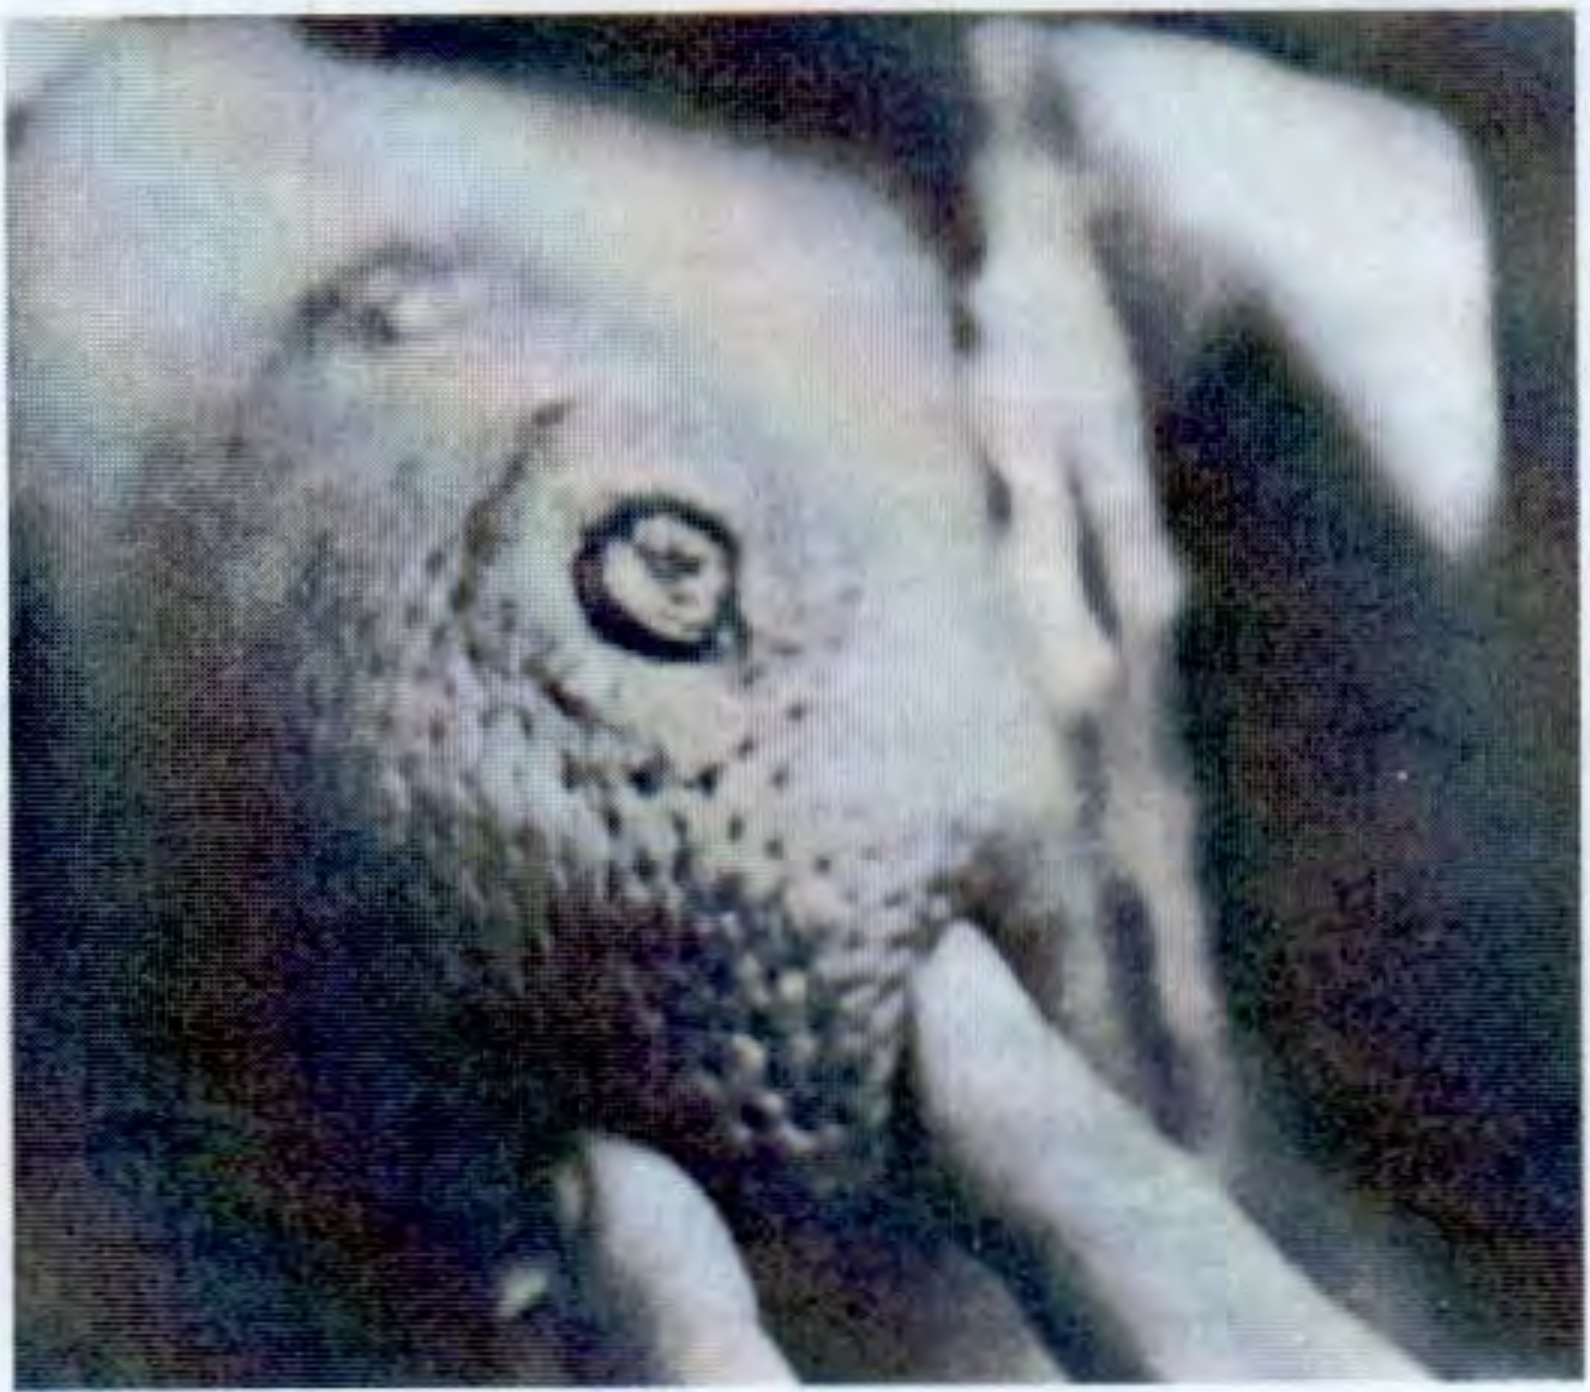

Key associations:
- Inflammatory breast carcinoma (most classic cause) - carcinoma erysipeloides
- Locally advanced breast cancer with lymphatic permeation
- Rarely: severe mastitis/cellulitis (reactive, resolves with treatment)
2. Nipple Retraction / Inversion
Mechanism: Fibrosis from an underlying tumour shortens the lactiferous ducts or Cooper's ligaments, pulling the nipple inward. A new onset of nipple retraction must be treated as carcinoma until proven otherwise.
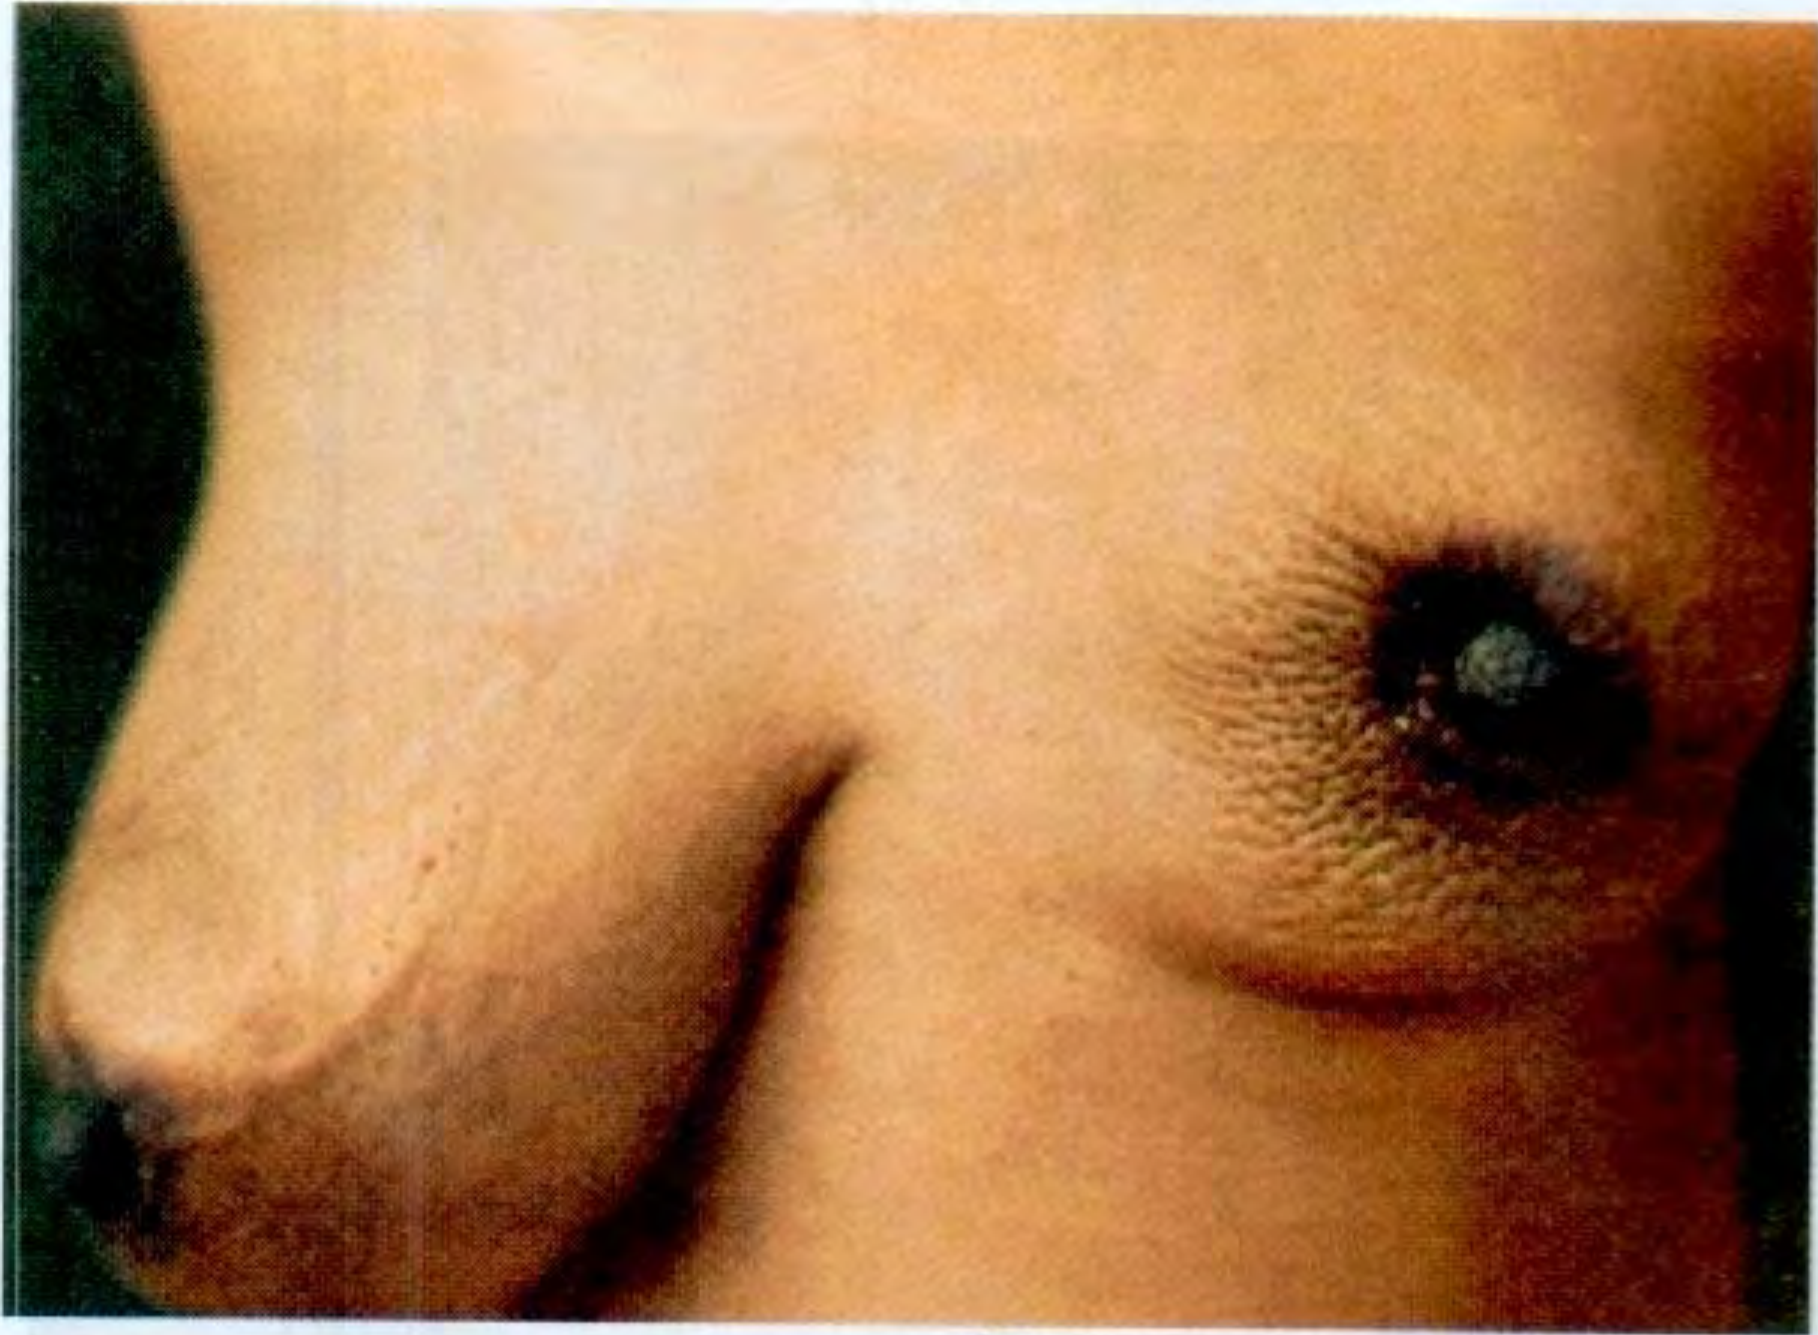
How to elicit: Retraction becomes more prominent when the patient:
- Raises both arms over the head
- Presses hands on hips (contracts pectoralis)
- Leans forward from the waist
3. Nipple Retraction with Elevated Nipple Level
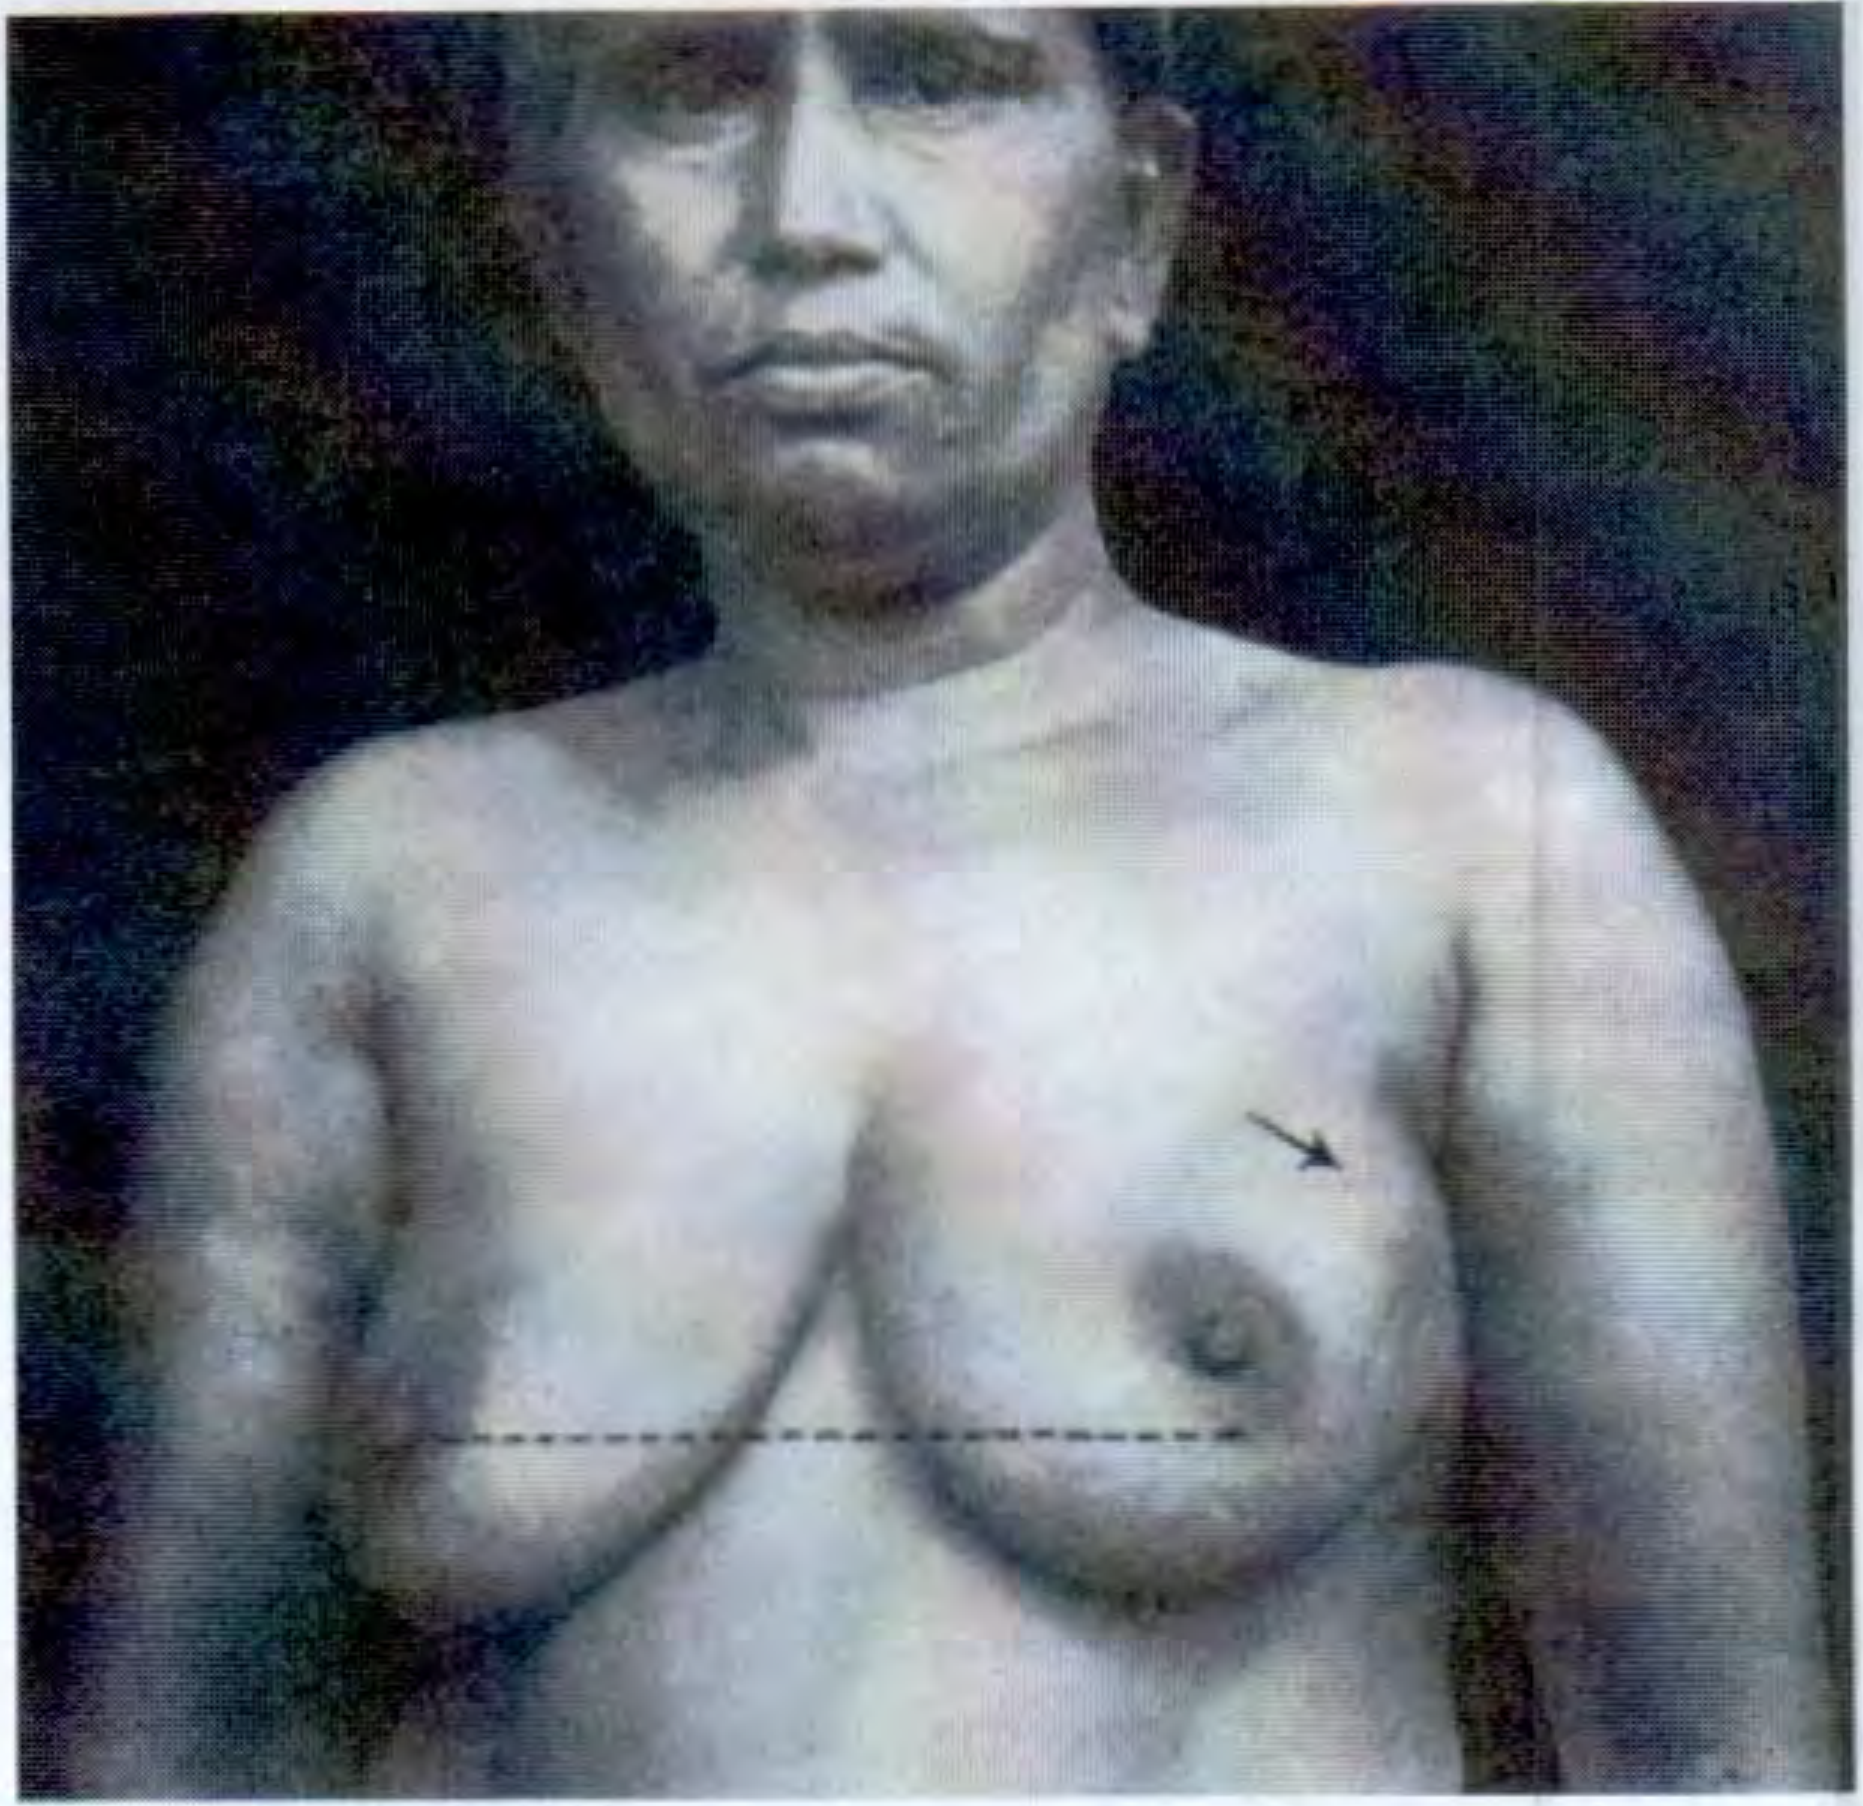
4. Advanced Breast Carcinoma with Fungation and Ulceration
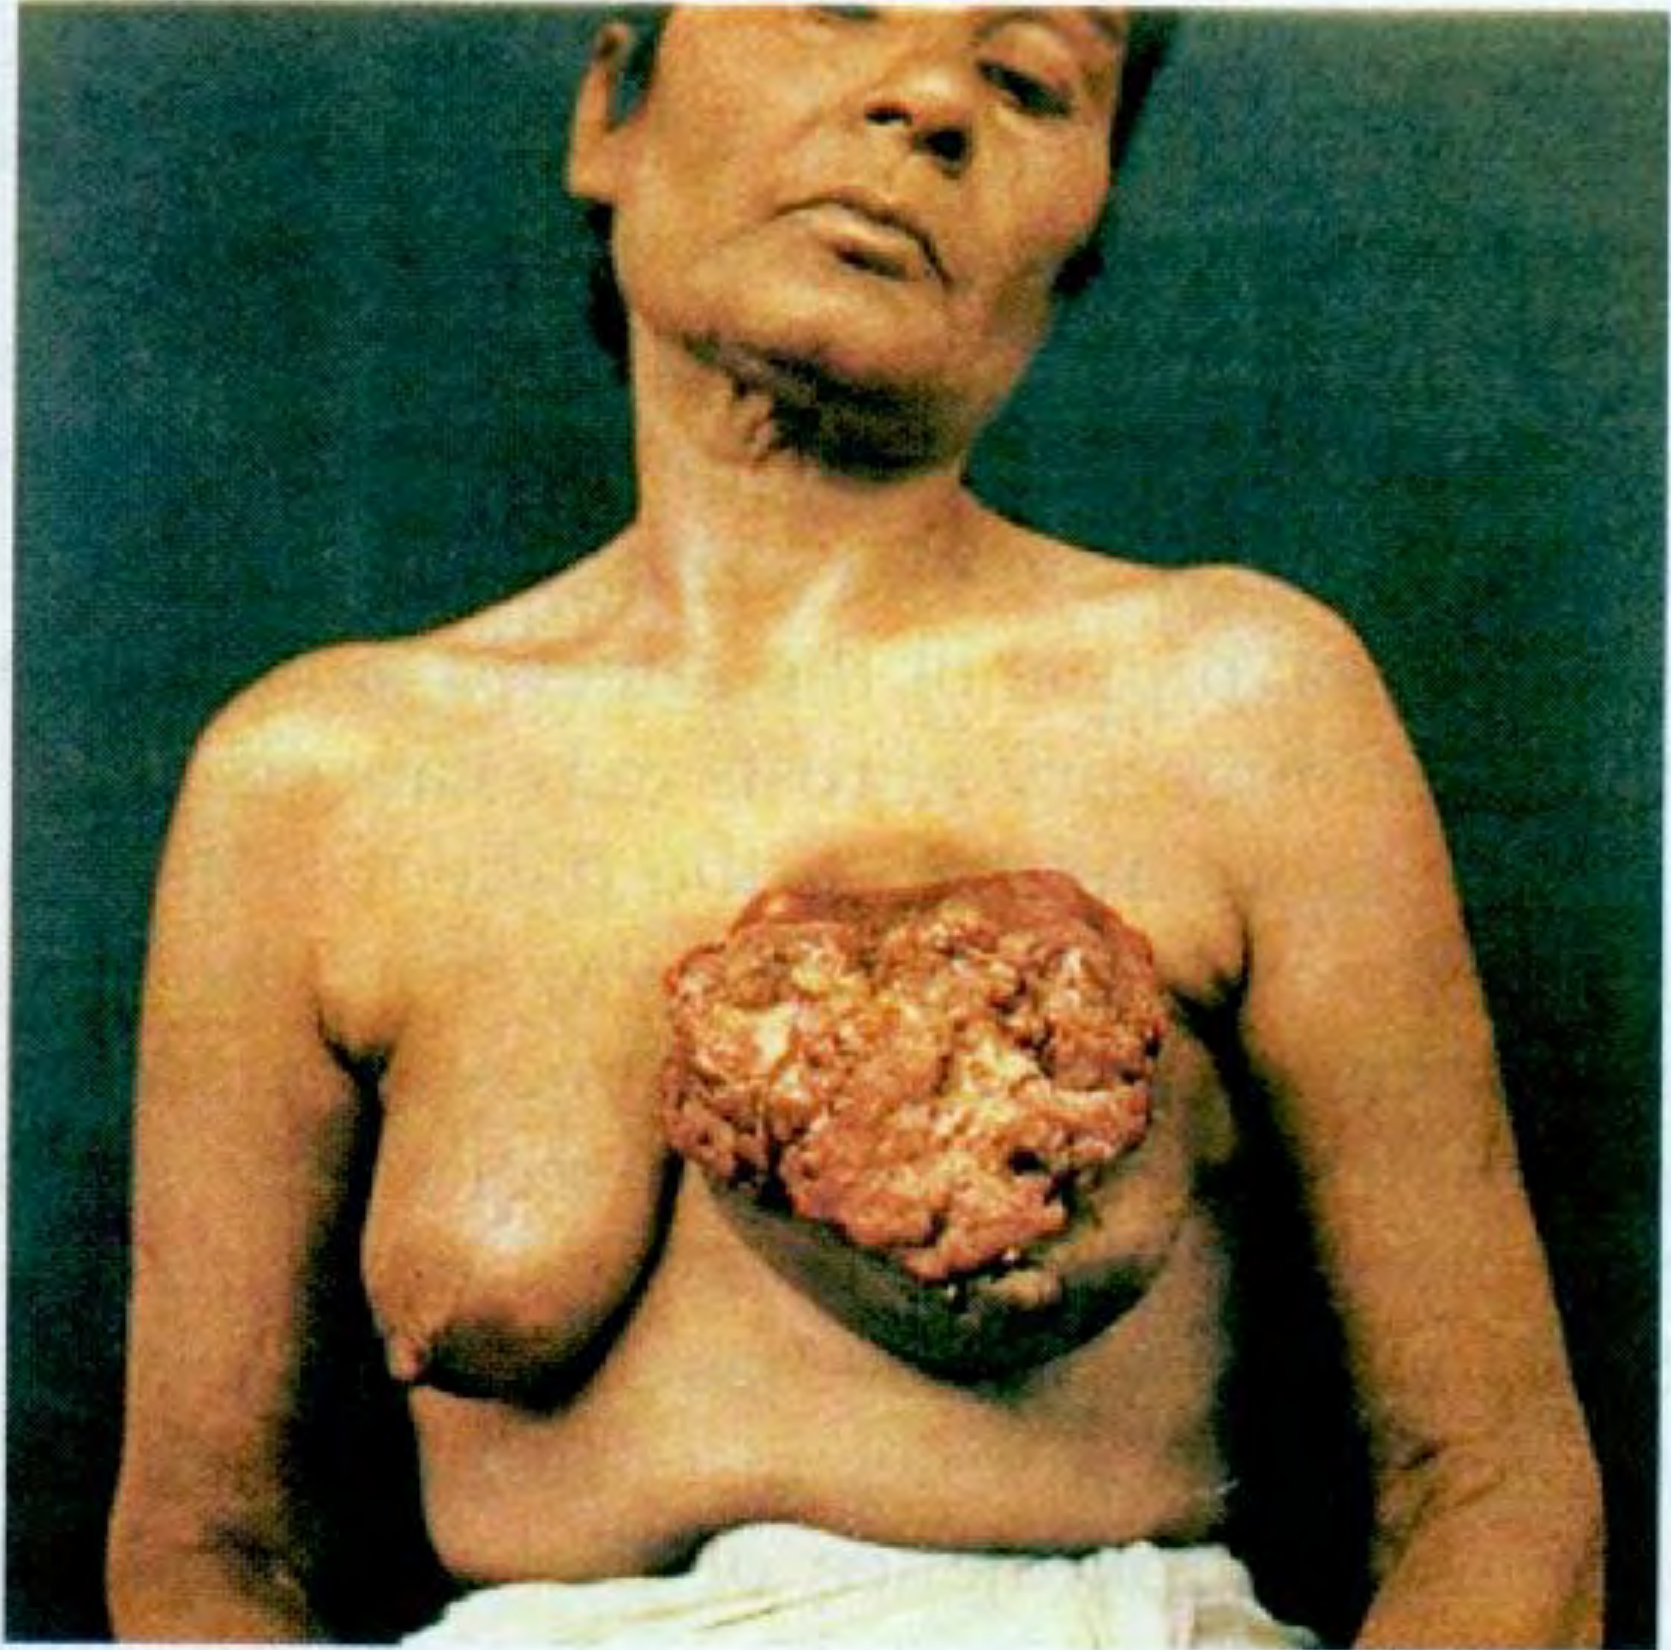
5. Cancer en Cuirasse with Ulceration
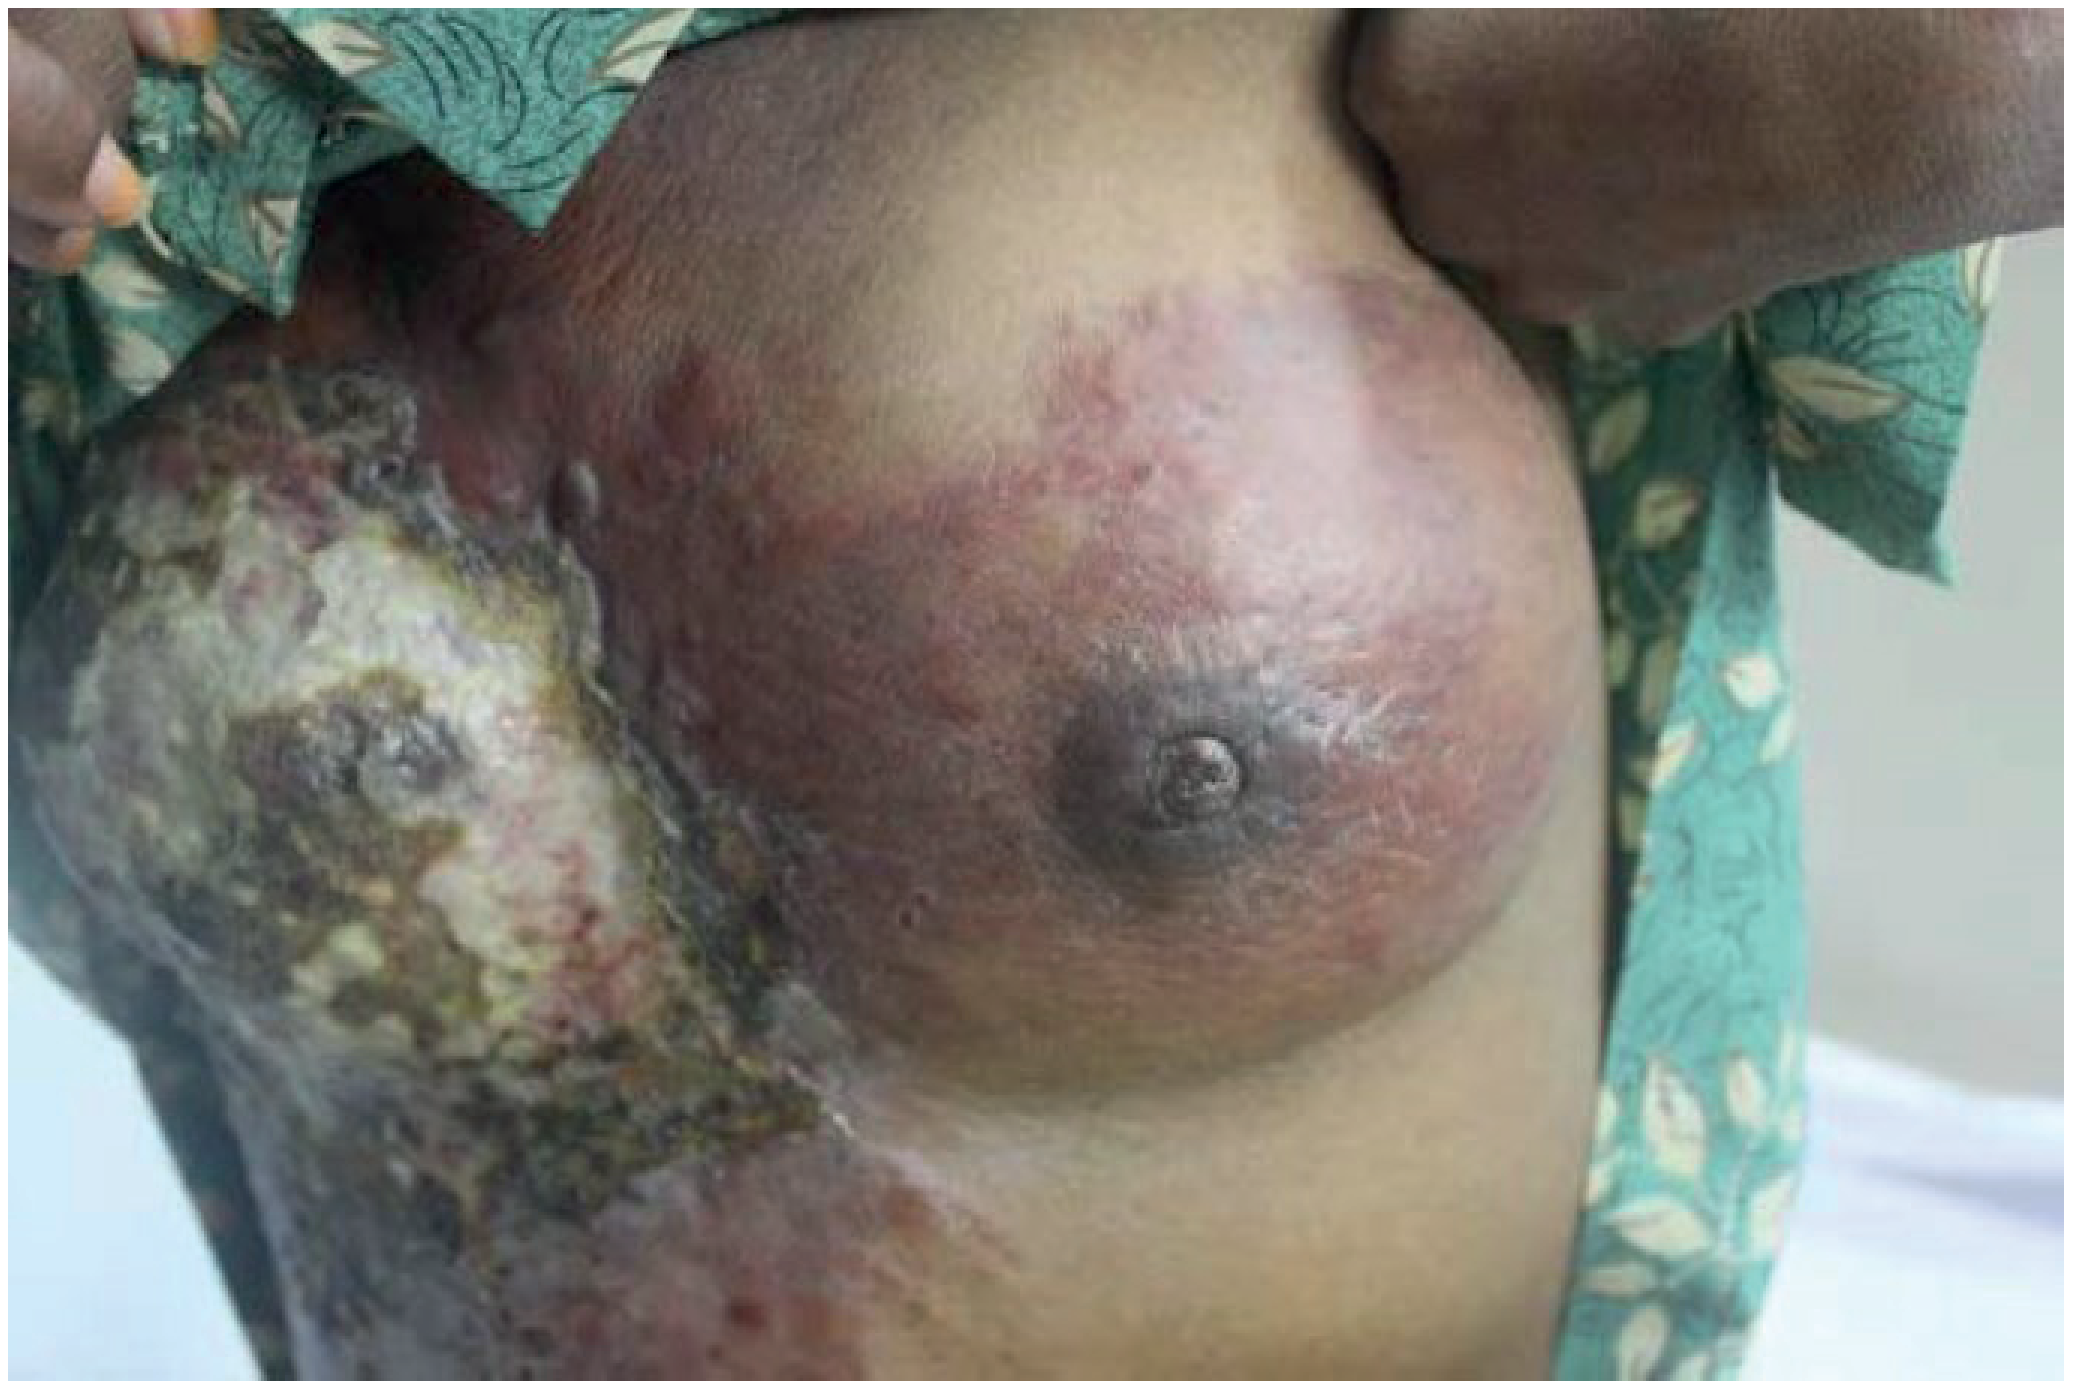
Cancer en cuirasse = French for "armour breastplate." Tumour infiltrates the entire skin of the chest wall, producing hardened, thickened, plate-like skin with multiple nodules. The arm may also be involved, producing brawny oedema from lymphatic obstruction.
6. Skin Dimpling Demonstrating Fixity
Summary Table: Key Breast Inspection Findings
| Sign | Appearance | Cause |
|---|---|---|
| Peau d'orange | Dimpled, orange-peel skin | Dermal lymphatic blockage (carcinoma) |
| Nipple retraction (recent onset) | Nipple pulled inward | Ductal shortening by fibrosis/tumour |
| Skin dimpling | Focal skin puckering | Cooper's ligament involvement by tumour |
| Erythema + warmth | Red, hot skin | Mastitis, inflammatory carcinoma |
| Engorged veins | Prominent superficial veins | Large fibroadenoma, sarcoma, duct obstruction |
| Ulceration/fungation | Skin breakdown, fungating mass | Advanced carcinoma |
| Cancer en cuirasse | Plate-like skin hardening | Extensive skin infiltration, post-mastectomy recurrence |
| Satellite nodules | Small dermal nodules | Cutaneous metastases |
| Paget's disease of nipple | Unilateral red/weeping areola | Intraductal carcinoma extending to nipple skin |
Sources:
- S. Das - A Manual on Clinical Surgery, 13e, pp. 416-422
- Bailey & Love's Short Practice of Surgery, 28e, p. 954
- Schwartz's Principles of Surgery, 11e
- Wikidoc - Peau d'orange in Breast Cancer
Describe different techniques of palapation in detail
Finding Sources
Finding Sources
Finding Sources
Finding Sources
Finding Sources
Finding Sources
Let me read the key sections directly from the textbooks we already located, plus search for specific palpation techniques:
Reading File
Reading File
Searching the Web
breast palpation techniques vertical strip concentric circular radial wedge clinical examination detailed
Excellent. Now let me fetch the key diagram images in parallel and also read more content:
Loading Image
Loading Image
Loading Image
Reading File
Now let me fetch the key textbook diagrams and the web extract for full technique details:
Loading Image
Loading Image
Reading Web Page
https://pmc.ncbi.nlm.nih.gov/articles/PMC5360550
I now have comprehensive, well-sourced content. Let me compile the complete detailed answer.
Techniques of Palpation of the Breast - Detailed Description
Breast palpation has two distinct components that are often confused: the search pattern (the direction/route the examiner travels across the breast) and the search/finger technique (the actual finger movements used at each point). Both must be understood separately.
Prerequisite Setup Before Palpation
Before any technique is applied, positioning must be correct:
- Always palpate the normal breast first - establishes individual baseline texture (varies from smooth/soft to firm and lobulated)
- Small pillow under the ipsilateral scapula when supine - so the breast rests evenly on the chest wall and does not fall laterally
- Ipsilateral arm raised above the head - flattens and spreads the breast tissue over the chest wall, making deep structures more accessible
- Examine in three positions: sitting → semi-recumbent (45°) → supine (lying flat)
Boundaries to Cover
Every technique must cover the entire perimeter of the breast:
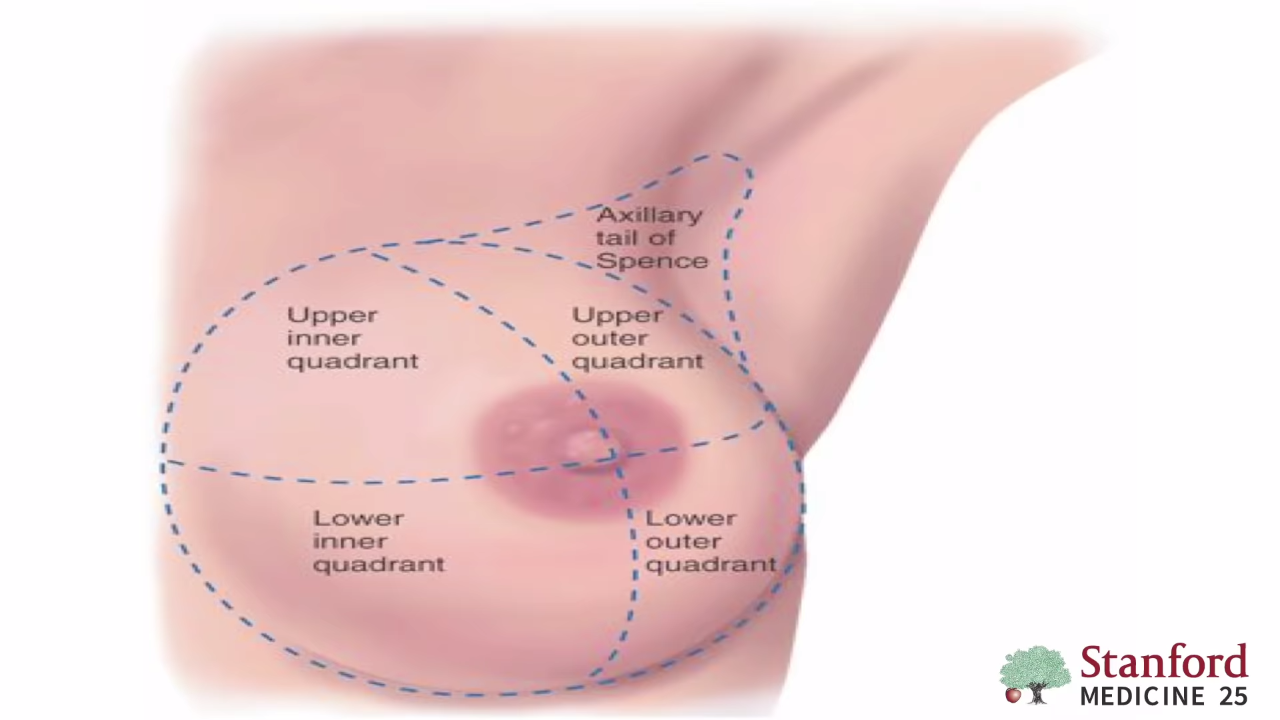
The area to be palpated spans:
- Superiorly - clavicle
- Inferiorly - inframammary fold / upper rectus sheath
- Medially - sternum
- Laterally - latissimus dorsi / mid-axillary line
- Special areas - axillary tail of Spence + directly behind the nipple
Part A: Search Patterns (Routes of Travel)
These are the three recognised patterns for how the examiner moves across the breast. The same finger technique can be applied with any pattern.
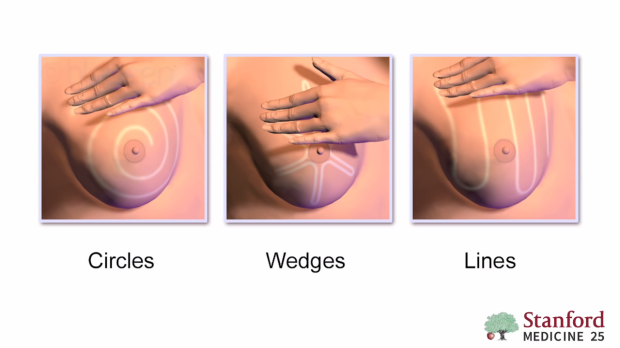
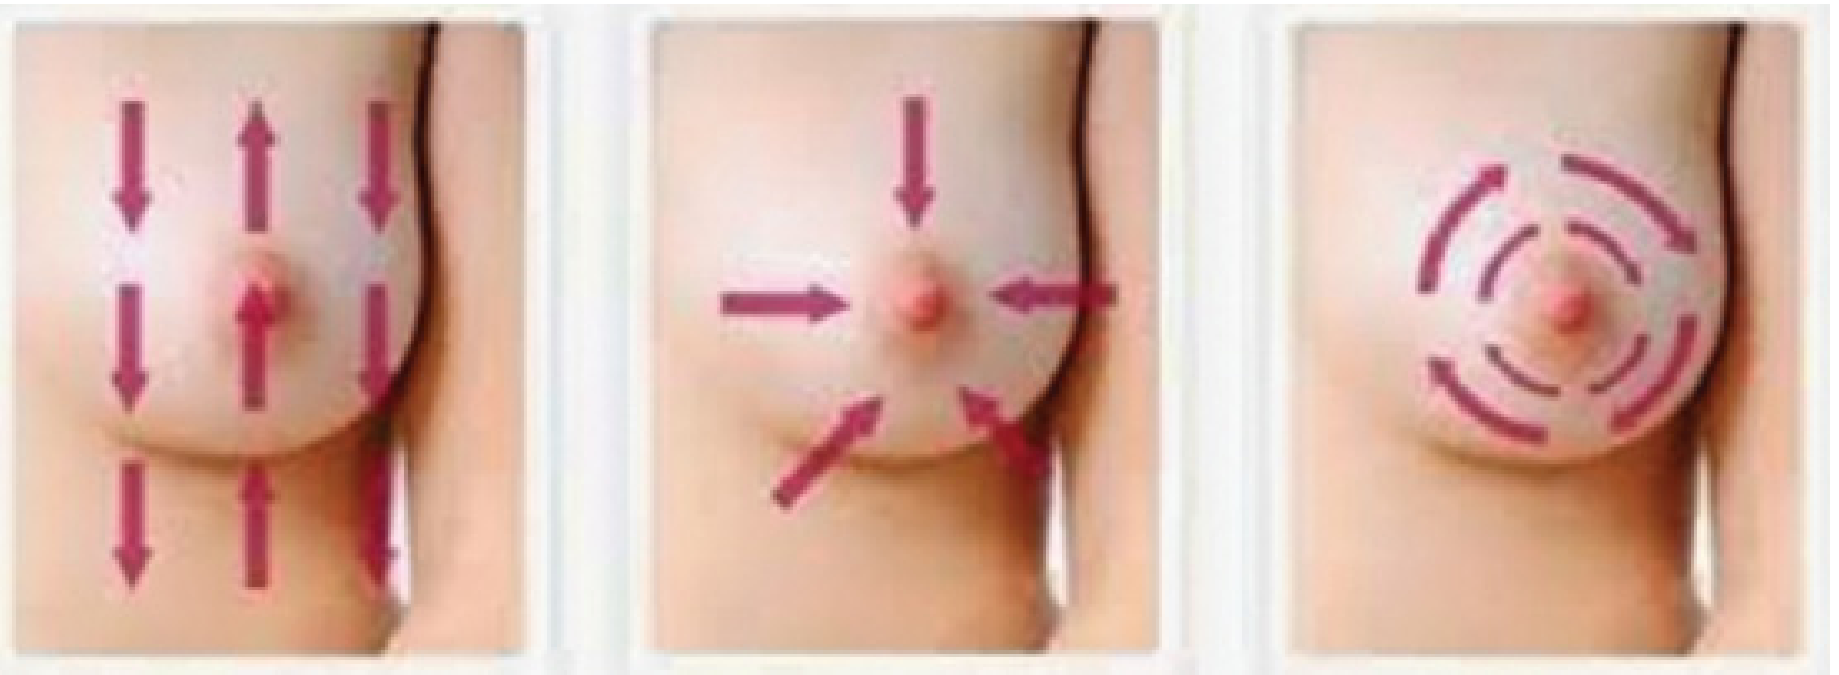
1. Vertical Strip Method (Lawnmower / Lines Pattern)
The currently recommended and most evidence-based technique.
How to perform:
- Begin at the axilla (most lateral point of breast tissue)
- Move fingers in a straight vertical line downward from the clavicle to the inframammary fold
- At the bottom, shift the fingers one finger-width medially
- Move upward in the next vertical strip
- Continue in alternating up-down columns, working medially across the breast toward the sternum
- Each column should overlap slightly with the previous one to ensure no area is missed
- The final columns cover the sternum and then loop back to include the axillary tail
Why preferred:
- Covers the entire breast systematically with minimal risk of omitting the periphery
- Studies show the concentric circle and radial methods often miss the edges of the breast tissue
- Berek & Novak's Gynecology specifically states: the up-and-down vertical stripe is preferred over concentric circular or radial methods "in which the edges of the breast tissue often are omitted"
Also called: Lawnmower pattern, linear pattern, vertical lines pattern
2. Concentric Circles Method (Circular Pattern)
The most commonly used in practice (64% of clinicians in one observational study), though not the most accurate.
How to perform:
- Begin at the outermost perimeter of the breast - identify the full extent of breast tissue
- Trace a large circle around the entire breast, maintaining steady finger contact
- At the end of each complete circle, move the fingers inward by one finger-width
- Continue tracing progressively smaller circles, spiralling inward toward the nipple
- Finish with direct palpation at the nipple-areola complex
- The innermost circle includes the subareolar tissue directly behind the nipple
Disadvantage:
- The outer edges are the most likely areas to be missed if the starting circle is placed too small
- Requires discipline to ensure each circle is complete and overlaps properly
Also called: Spiral pattern, spiral inward technique
3. Radial Spoke Method (Wedge / Clock Pattern)
Divides the breast into "pie slices" or clock positions.
How to perform:
- Conceptually divide the breast into segments like slices of a pie (or positions on a clock face)
- Begin at the 12 o'clock position at the outer edge of the breast
- Palpate inward toward the nipple along this "spoke"
- Return to the outer edge and move to the next clock position (e.g., 1 o'clock)
- Repeat for all positions around the full clock (12 "spokes" for a thorough exam)
- Each spoke is palpated from periphery to nipple
Advantage:
- Intuitive for documentation (e.g., "mass at 10 o'clock, 4 cm from nipple")
Disadvantage:
- The tissue between each spoke can be missed if spokes are spaced too far apart
- Less thorough coverage of the subareolar zone unless explicitly repeated
Also called: Clock method, radial pattern, pie-slice technique, wedge pattern
Part B: Search Techniques (Finger Movements)
These are the actual movements of the fingers at each point along the chosen pattern. This is independent of the pattern used.
Research from Giess et al. (PMC5360550) identified three primary techniques and compared their accuracy:
1. Rubbing Movement (Most Accurate)
Description: The finger pads are placed on the breast and moved in small circular or back-and-forth motions repeatedly at each point before advancing to the next position.
Technique:
- Use pads of the three middle fingers (index, middle, ring)
- Press the pads into the breast and rotate in small circles OR push back and forth
- Apply at each spot for 2-3 seconds before moving to the next
- Apply three pressures at each spot (see Pressure section below)
Evidence: Rubbing movement was 4 times more likely to yield an accurate palpation assessment compared to the other techniques (OR 3.81, p<0.001). This is the technique recommended in most clinical guidelines.
2. Vertical Movement (Dipping Technique)
Description: The fingertips or pads are pushed in and out of the breast tissue in a repetitive up-down (dipping) motion at each point.
Technique:
- Place finger pads on the breast surface
- Press downward firmly into the tissue, then release
- Repeat this dipping motion 2-3 times at each location
- Advance to the next spot and repeat
Usage: Used by ~51% of clinicians in observational studies. Less accurate than rubbing movement. The dipping action can be useful for deep tissue assessment but misses surface and intermediate depth lesions if not supplemented.
3. Piano Fingers Technique (Least Accurate - Avoid)
Description: Individual fingers are used in series to "march" or "walk" across the breast tissue one finger at a time, like playing piano keys.
Technique:
- Each finger independently presses down and releases, then the next finger presses, in sequence
Why to avoid:
- Highest failure rate - 36.5% of lesions missed overall; 46.5% miss rate in some studies
- The sequential single-finger pressure fails to compress breast tissue adequately between fingers, allowing lumps to "escape" to either side
- Should not be used as the primary examination technique
Part C: Depth of Pressure (Three-Level Palpation)
At every spot in the chosen pattern, three levels of pressure must be applied:
| Level | Depth | What It Detects |
|---|---|---|
| Light | Superficial - skin and subcutaneous tissue | Superficial nodules, skin tethering, lymphangitis |
| Medium | Mid-glandular tissue | Most palpable masses, fibrocystic changes, cysts |
| Deep | Chest wall/ribs | Deep-seated masses, fixity to chest wall |
This is one of the "Seven Ps" as described in Berek & Novak's Gynecology: light, medium, and deep pressure must be applied at each point without lifting the fingers off the skin between pressure levels.
Part D: Bimanual Technique (for Large or Pendulous Breasts)
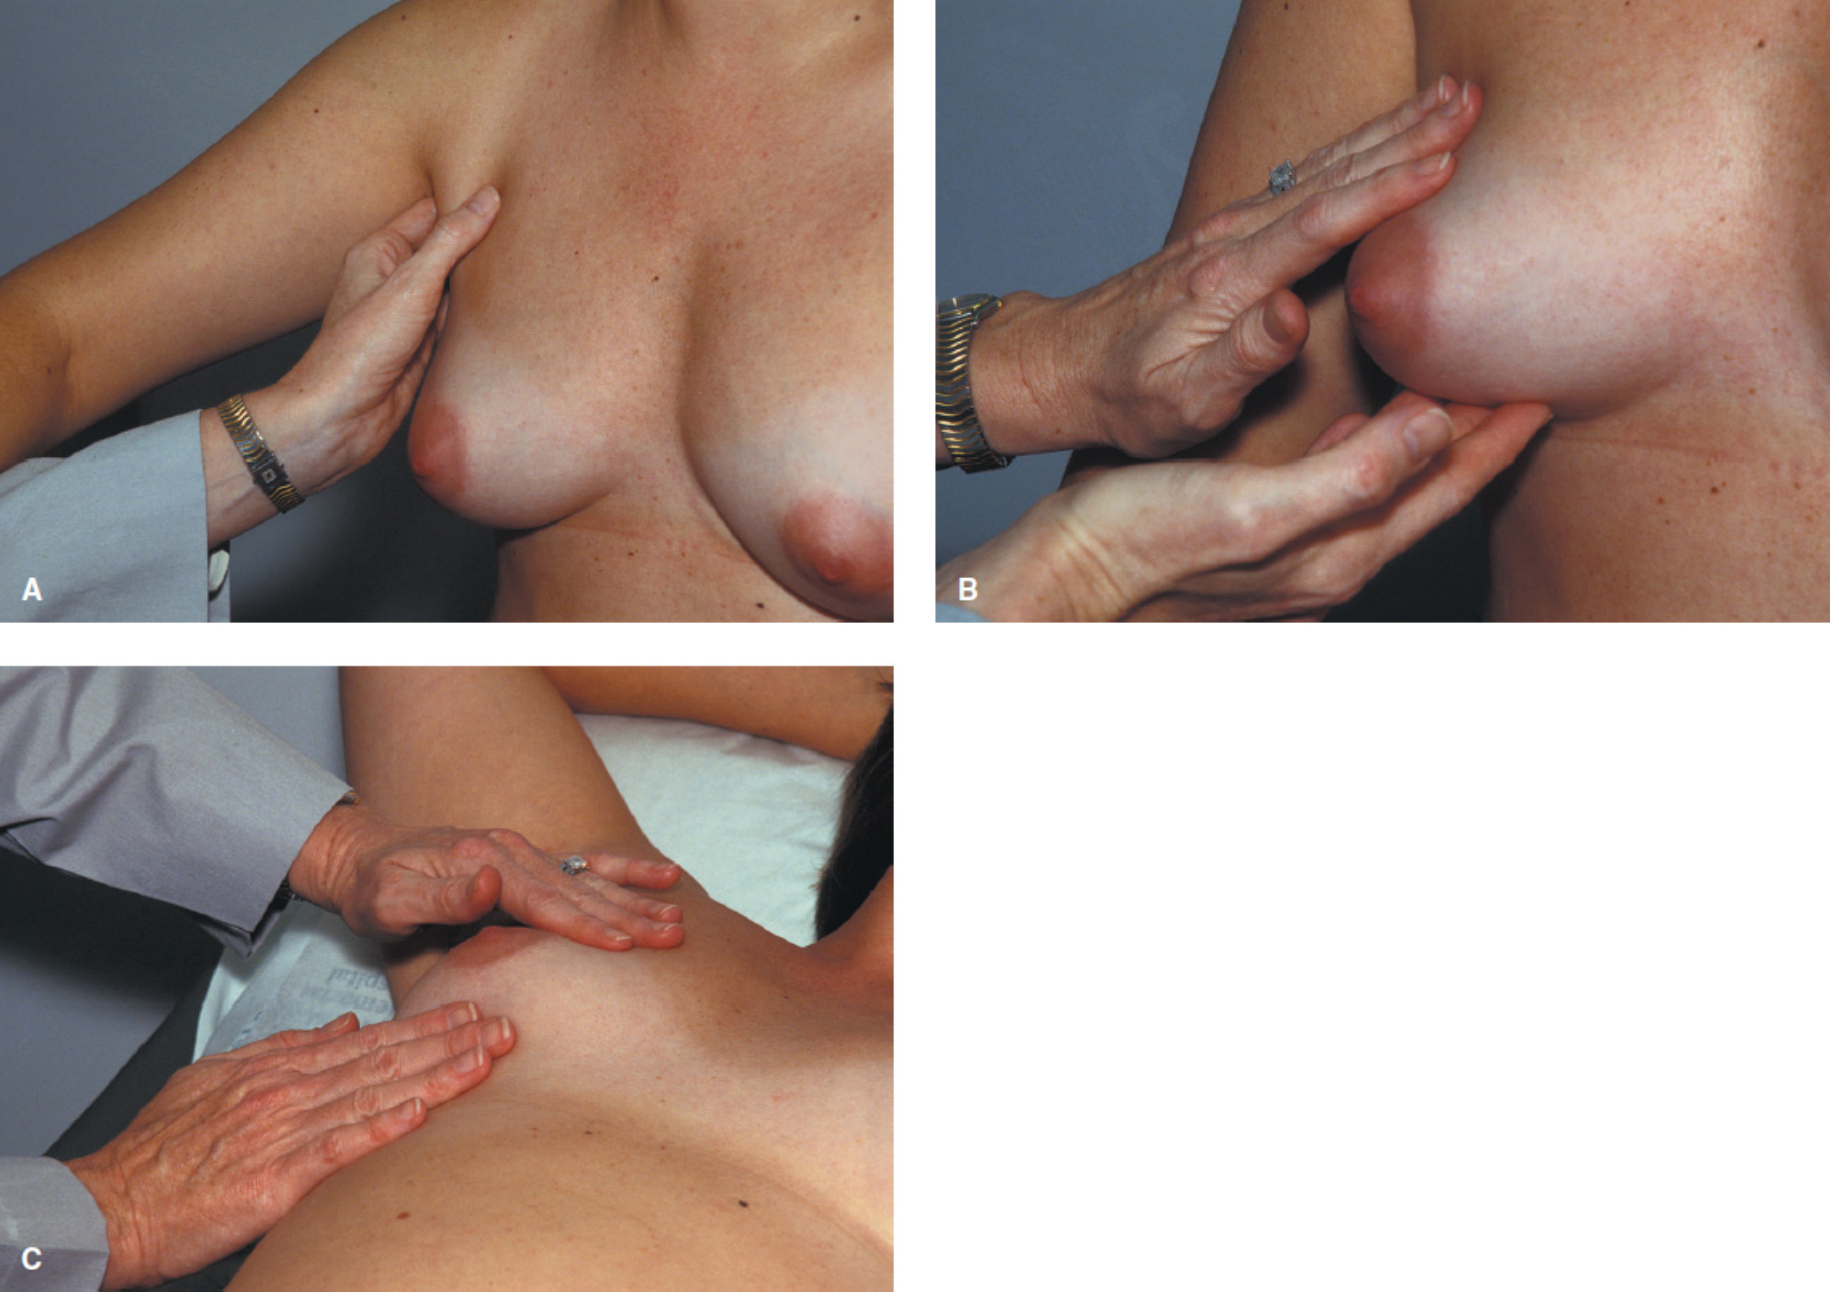
How to perform:
- One hand placed behind the breast (underneath/supporting)
- Other hand palpates anteriorly on top
- The breast tissue is trapped between both hands and compressed gently
- Most useful for large or pendulous breasts where single-hand palpation leaves deep tissue inaccessible
- Also used to check for retraction - cupping or molding the breast in the examiner's hands to reveal skin tethering
Part E: Palpation of the Nipple-Areola Complex
- Done last, after the full breast is examined
- Gently compress the nipple with the thumb and index finger
- Note any discharge (character, colour, whether from a single or multiple ducts)
- Duct papilloma or duct carcinoma - produces blood on expressing the nipple
- Palpate the subareolar tissue directly behind the nipple - a small lump here can be the only abnormality in the entire breast
Part F: Skin and Retraction Assessment During Palpation
- Skin fixity test: Try to move the lump while tenting the overlying skin; if the skin dimples or moves with the lump, it is fixed to skin (suggests carcinoma invading dermis)
- Traction test: Pinch a fold of skin over the lump; if it adheres to the lump rather than sliding freely, fixity is present
- Breast cupping: Cup both hands around the breast and mold it; any retraction that was not seen on inspection becomes apparent
Part G: Axillary Node Palpation
This is part of the breast examination and should not be omitted.
- Support the ipsilateral arm/elbow to fully relax the pectoral muscles and shoulder girdle - this is the single most important step
- Reach the fingers high into the apex of the axilla
- Palpate systematically:
- Level I - lateral/inferior to pectoralis minor (most accessible)
- Level II - posterior to pectoralis minor (central group)
- Level III - medial/apical (highest, hardest to reach)
- Pectoral group - medially along pectoralis major
- Also palpate supraclavicular and infraclavicular fossae
For each palpable node, note: size, consistency (soft/rubbery/hard), whether mobile or matted/fixed, and tenderness.
Summary Comparison Table
| Feature | Vertical Strip | Concentric Circles | Radial Spoke |
|---|---|---|---|
| Direction | Up-down columns, medial to lateral | Outer → inner spiral | Periphery → nipple, clock positions |
| Coverage of edges | Best | Risk of missing periphery | Gaps between spokes |
| Evidence | Most recommended | Most commonly used | Less evidence |
| Best suited to | Clinical exam | Self-examination | Documentation/localisation |
| Misses area if done incorrectly | Lateral edge if starting column too far medial | Outer perimeter | Inter-spoke tissue |
Key principle from S. Das - Clinical Surgery: "Palpation should be made with the palmar surface of the fingers with the hand flat... breast cancer is best felt by the hand flat, which being less sensitive fails to feel any other lump than carcinoma." For detecting softer lesions (fibroadenoma, fibroadenosis, cysts), palpation with the pulps of the fingers and thumb provides more sensitivity.
Sources:
- Berek & Novak's Gynecology - Seven Ps of breast examination
- S. Das - A Manual on Clinical Surgery, 13e, pp. 418-422 - Palpation technique
- Mulholland & Greenfield's Surgery, 7e, Fig. 74.5-74.6 - Search patterns and bimanual technique
- Rescuing the Clinical Breast Examination (PMC5360550) - Rubbing vs. vertical vs. piano fingers accuracy evidence
- Stanford Medicine 25 - Illustrated search patterns
This is a shared conversation. Sign in to Orris to start your own chat.