
Can you make a pictorial diagram esthetic for zones of immediate implant
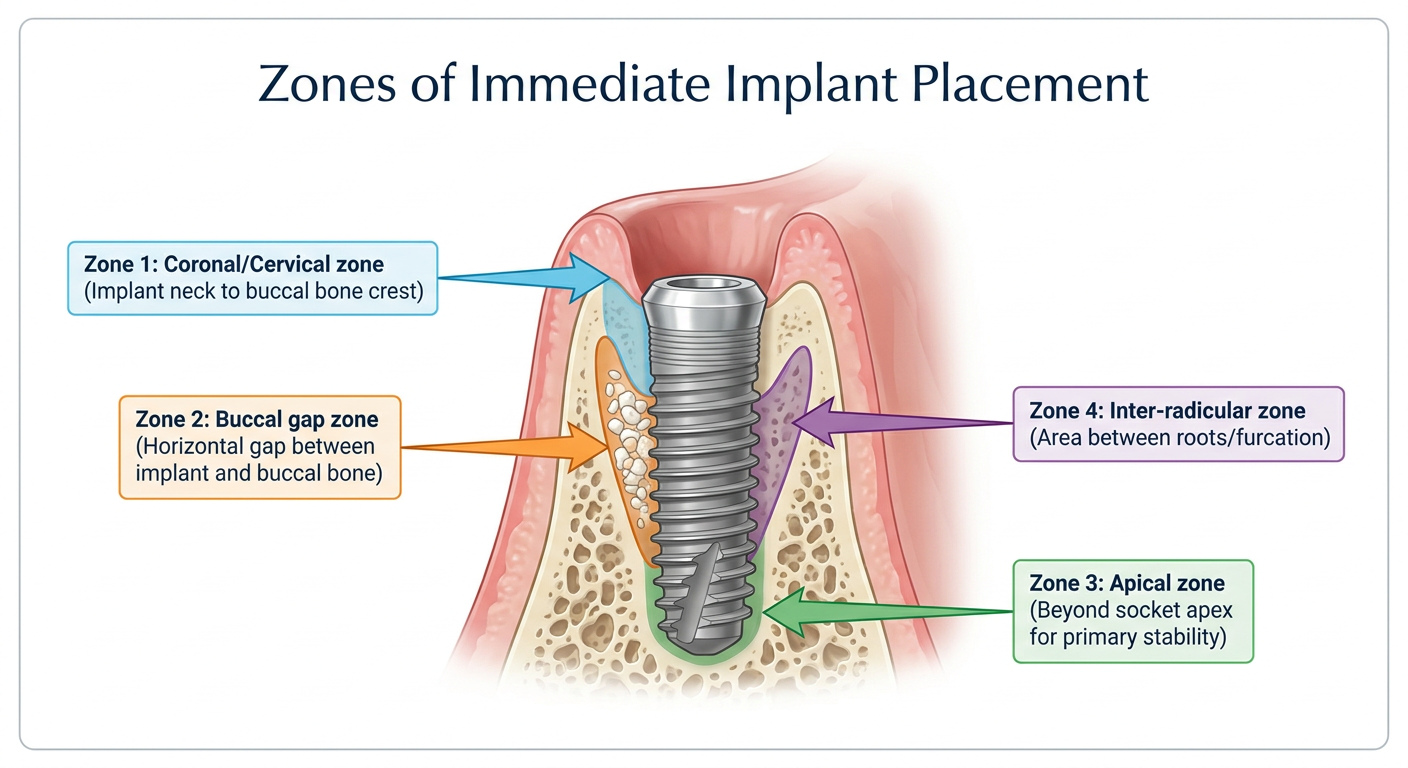
A clean, professional, aesthetic dental diagram showing the zones of immediate implant placement. The diagram should show a cross-sectional view of a tooth socket after extraction with an implant being placed. Label the following zones clearly with color-coded arrows and annotations: 1. Zone 1 (Coronal/Cervical zone) - the area between the implant neck and the buccal bone crest, shown in light blue 2. Zone 2 (Buccal gap zone) - the horizontal gap between the implant body and the buccal bone wall, shown in orange 3. Zone 3 (Apical zone) - the area beyond the apex of the socket where the implant tip engages for primary stability, shown in green 4. Zone 4 (Inter-radicular zone) - the area between roots (for multi-rooted teeth), shown in purple Include a realistic cross-section showing: buccal bone wall, lingual bone wall, implant fixture (titanium screw shape), bone graft particles in the gap, gingival tissue at the top. Use a modern medical illustration style with clean lines, soft shadows, and a white or light gray background. Add a title "Zones of Immediate Implant Placement" at the top in elegant typography. Make it visually appealing and educational.
| Zone | Location | Clinical Significance |
|---|---|---|
| Zone 1 - Cervical/Coronal | Between implant neck and buccal bone crest | Critical for soft tissue support and emergence profile |
| Zone 2 - Buccal Gap | Horizontal space between implant and buccal bone wall | Typically filled with bone graft (if >2 mm); important for buccal bone preservation |
| Zone 3 - Apical | Beyond the socket apex into native bone | Primary source of initial stability (primary stability) |
| Zone 4 - Inter-radicular | Between roots of multi-rooted teeth | Secondary anchorage point for molars and premolars |
- The implant should be positioned palatally/lingually to maximize the buccal gap (Zone 2) for grafting
- Primary stability is achieved mainly through Zone 3 and Zone 4 engagement
- A jumping distance (Zone 2 gap) of up to 2 mm may heal without grafting; larger gaps require a bone substitute
- Zone 1 management directly influences the final esthetic outcome and crestal bone levels
6 zones photo
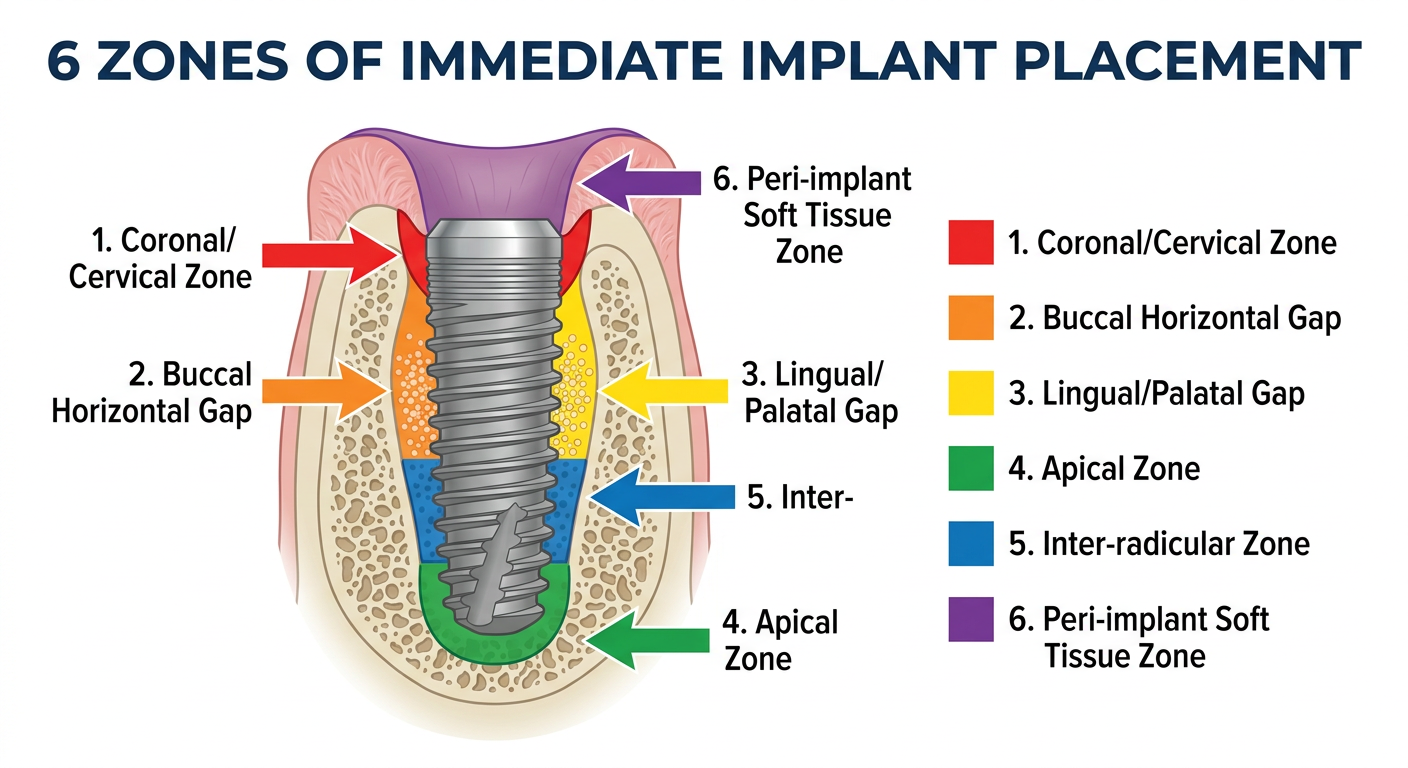
A highly detailed, professional, aesthetic dental medical illustration showing ALL 6 ZONES of immediate implant placement. Cross-sectional view of a tooth socket after extraction with a dental implant placed inside. Each zone is distinctly color-coded with bold labels and arrows: Zone 1 (RED) - Coronal/cervical zone: the space between the implant shoulder and the gingival margin at the top Zone 2 (ORANGE) - The buccal horizontal gap: space between the implant and the buccal (outer) bone wall Zone 3 (YELLOW) - The lingual/palatal gap: space between the implant and the lingual bone wall Zone 4 (GREEN) - The apical zone: bone area below the socket apex where implant engages for primary stability Zone 5 (BLUE) - Inter-radicular zone: between the roots of multi-rooted teeth, lateral engagement Zone 6 (PURPLE) - Peri-implant soft tissue zone: gingival tissue tunnel at the very top around implant emergence Show: titanium screw-shaped implant, buccal bone wall, lingual bone wall, cortical and cancellous bone layers, gingival tissue at top, bone graft particles filling the gaps, root socket outline. Each zone clearly shaded in its respective color with a numbered legend on the side. Title at top: "6 Zones of Immediate Implant Placement". Modern clean medical illustration style, white background, professional typography, educational diagram aesthetic.
| Zone | Color | Location | Clinical Role |
|---|---|---|---|
| Zone 1 | 🔴 Red | Coronal/cervical - between implant shoulder and gingival margin | Soft tissue seal and emergence profile |
| Zone 2 | 🟠 Orange | Buccal horizontal gap - between implant and buccal bone wall | Grafting zone; key to preventing buccal bone resorption |
| Zone 3 | 🟡 Yellow | Lingual/palatal gap - between implant and lingual bone wall | Usually smaller; aids in blood clot stabilization |
| Zone 4 | 🟢 Green | Apical zone - below the socket floor into virgin bone | Primary stability via bicortical or apical engagement |
| Zone 5 | 🔵 Blue | Inter-radicular zone - lateral bone between roots | Additional anchorage in multi-rooted sites (molars/premolars) |
| Zone 6 | 🟣 Purple | Peri-implant soft tissue tunnel | Esthetic zone; determines final mucosal contour |
- Zones 4 and 5 together determine the insertion torque and primary stability
- Zone 2 is the most studied - a gap >2 mm requires bone grafting to prevent implant thread exposure
- Zone 1 and 6 are the esthetic-critical zones - positioning here affects long-term pink esthetic score
- Palatal/lingual implant placement intentionally widens Zone 2 to accommodate grafting