
Immediate implant placement in mandibular,2 premolar and 2 molar..give me detailed description of implant planning.procedure.care tu be taken according to prosthodontics point of view
immediate implant placement mandibular premolar molar extraction socket protocol prosthodontic considerations
"immediate implant placement" AND mandibular molar
PMID: 41430227
PMID: 37621586
immediate dental implant placement extraction socket mandibular molar
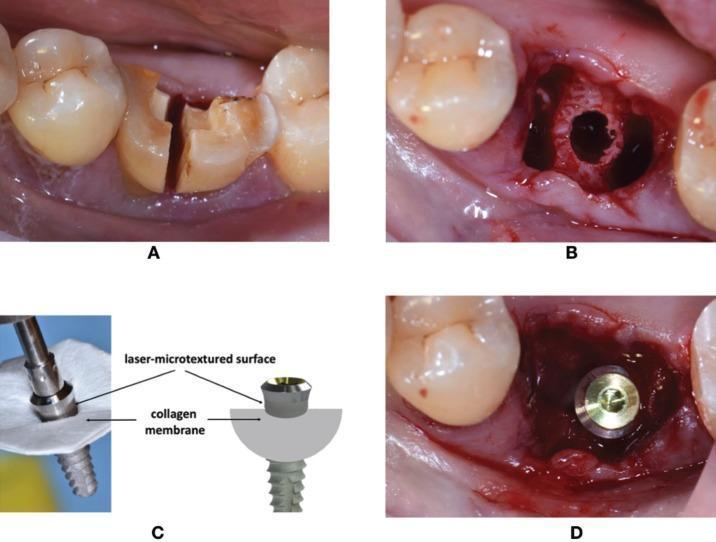
A series of four images (A-D) documenting an immediate dental implant procedure in a mandibular molar site. Figure A shows the clinical photograph of a mandibular molar tooth sectioned mesiodistally to facilitate atraumatic extraction. Figure B displays the post-extraction socket with the inter-radicular recipient site surgically prepared. Figure C features a photograph and corresponding diagram showing the assembly of a dental implant and a resorbable collagen membrane; the implant is inserted through the membrane such that the laser-microtextured collar remains coronal to the membrane. Figure D illustrates the clinical placement of the implant-membrane complex into the socket, showing the implant centrally positioned with the membrane tucked under the peripheral soft tissue margins. This sequence demonstrates a Guided Bone Regeneration (GBR) technique specifically using a laser-microtextured implant surface to promote soft tissue sealing while utilizing the membrane to manage alveolar bone defects during immediate placement.
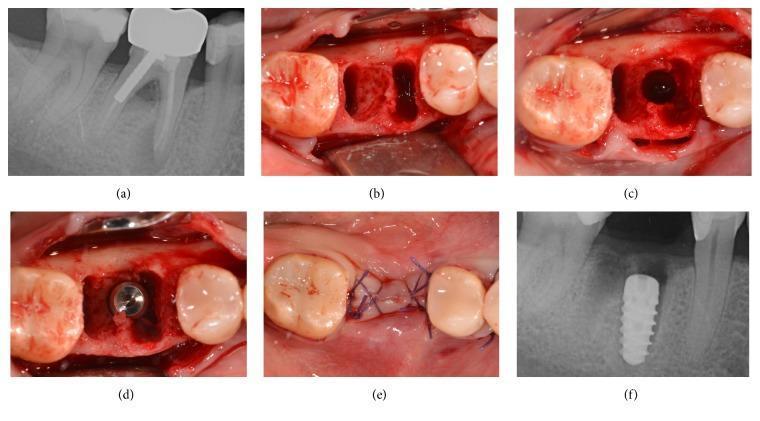
This composite figure illustrates a timeline of immediate implant placement for a mandibular first molar. (a) Preoperative periapical radiograph shows a tooth with an endodontic post and crown, exhibiting periapical radiolucency. (b) Intraoperative clinical photograph displays the multi-rooted post-extraction socket with visible alveolar bone architecture and marginal gingival retraction. (c) Clinical view showing the osteotomy site prepared within the interradicular bone of the extraction socket. (d) Direct visualization of the dental implant body seated within the prepared site, positioned below the crestal bone level. (e) Post-surgical clinical view demonstrating primary wound closure achieved with blue non-resorbable monofilament sutures in a cross-mattress pattern over the surgical site. (f) Postoperative periapical radiograph confirming the final vertical and horizontal positioning of the radiopaque, threaded tapered implant within the mandibular alveolar bone. This sequence demonstrates the surgical protocol for immediate implant placement following tooth extraction in oral implantology.
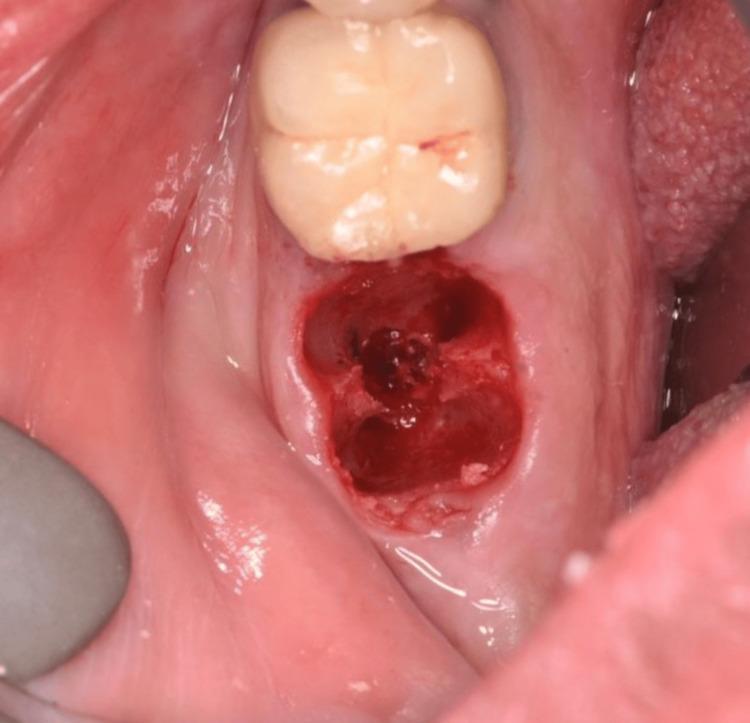
This clinical intraoral photograph displays a freshly prepared dental extraction site in the maxillary or mandibular arch, immediately following a tooth extraction performed with a piezotome. The extraction socket is prominently visible, characterized by its deep red color and irregular, multi-lobed morphology reflecting the previous root architecture. The interior of the socket shows evidence of early clot formation and exposed alveolar bone. The surrounding gingival tissue is pale pink with localized erythema and slight edema at the marginal edges, consistent with immediate post-operative inflammation. An adjacent, intact molar is visible distally or mesially to the surgical site, serving as an anatomical landmark. The surgical field is clean, indicating a controlled extraction procedure designed for immediate or delayed implant placement. This image is significant for demonstrating the minimally invasive nature of piezoelectric surgery in preserving the integrity of the buccal and lingual alveolar plates for subsequent implantology.
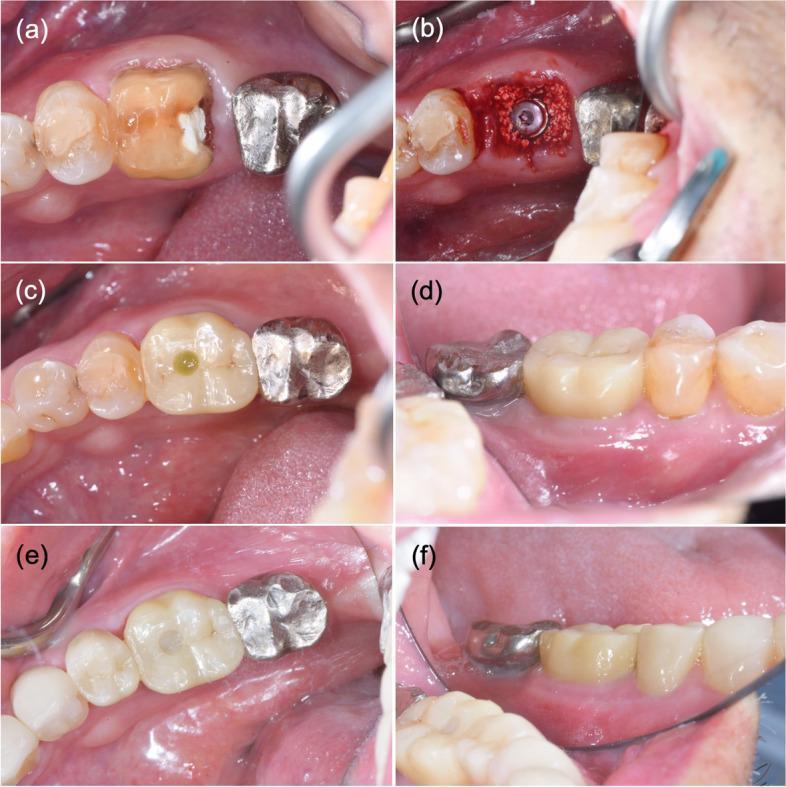
A series of six clinical intraoral photographs documenting the timeline of an immediate dental implant procedure for tooth 46 (mandibular right first molar). (a) Pre-operative occlusal view showing an unrestorable tooth with significant coronal destruction. (b) Intra-operative view of immediate implant placement following extraction, demonstrating the implant fixture positioned within the socket surrounded by xenograft bone grafting material. (c, d) Post-operative occlusal and buccal views 6 months after surgery, showing the installation of a screw-cement-retained zirconia crown; the gingival tissues appear healthy with a stable emergence profile. (e, f) Long-term follow-up occlusal and buccal views at 4 years and 9 months post-implantation, demonstrating maintained aesthetic integration of the zirconia restoration and continued periodontal health. This series illustrates successful immediate implant therapy in the posterior region, focusing on bone grafting, soft tissue stability, and the durability of zirconia prosthetics in implant dentistry.
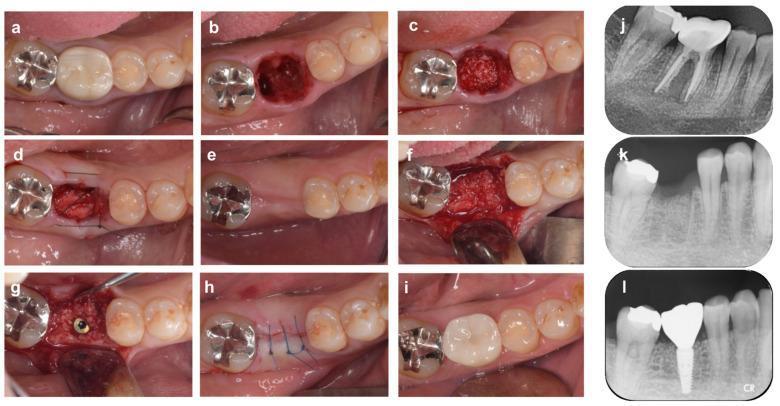
This composite figure illustrates a clinical timeline of Alveolar Ridge Preservation (ARP) and subsequent implant placement in the mandibular right first molar (#46). Panels (a)-(i) present intraoral clinical photographs, while (j)-(l) show corresponding periapical radiographs. The sequence begins with a tooth extraction due to root fracture (b), followed by grafting the socket with bovine xenogeneic bone (c). An absorbable collagen membrane is applied and stabilized with cross-mattress sutures (d). A 4-month healing phase shows slight ridge width reduction (e) before surgical re-entry and implant placement (f-g). Post-implantation suturing (h) leads to the final installation of a superstructure (i) at 9 months. Radiographically, the preoperative state (j) exhibits vertical bone resorption. Immediate post-ARP imaging (k) shows the radiopaque xenograft material within the socket. The 9-month follow-up radiograph (l) demonstrates successful osseointegration of the dental implant with increased bone density and stabilized alveolar height, confirming the effectiveness of the ARP technique in maintaining bone volume for prosthetic rehabilitation.
Immediate Implant Placement in Mandibular Premolars and Molars — Planning, Procedure, and Prosthodontic Considerations
1. Case Selection and Pre-Surgical Planning
- Best candidates: teeth extracted for fracture, non-restorable caries, or failed endodontics without active suppurative infection.
- Chronic apical periodontitis is not an absolute contraindication if the socket walls are intact - a 5-year retrospective study of 97 mandibular molars found no significant difference in survival, marginal bone loss, or peri-implant bone density between immediate implants placed in sites with chronic apical periodontitis versus healthy sites, provided thorough debridement/curettage of the socket was performed (Yang et al., 2023, PMID 37621586).
- Avoid immediate placement with acute purulent infection, extensive buccal/lingual plate loss, or inadequate residual bone for primary stability.
| Site | Mean root apex-to-inferior alveolar canal distance |
|---|---|
| Premolar | 5.14 mm |
| First molar | 6.32 mm |
| Second molar | 4.65 mm |
- The second molar site had the highest prevalence (73%) of an undercut lingual ridge morphology, which raises the risk of lingual plate perforation during osteotomy - angulate the drill buccally/toward the socket wall accordingly and consider a shorter/narrower fixture at this site.
- Map the inferior alveolar canal (IAC) course in 3D; maintain a minimum 2 mm safety margin from the canal.
- For molars, assess interradicular septal bone — this is usually the primary stability zone since the socket itself is wider than the implant.
- Check buccolingual socket width, presence of furcation involvement/root fusion (affects extraction difficulty and residual defect size), and keratinized tissue width.
- Even though this is "immediate" surgery, position should be dictated by the eventual crown, not just available bone. Use a diagnostic wax-up / digital smile or occlusal plan and, ideally, a surgical guide.
- Decide implant platform position 3-4 mm below the planned facial gingival margin and centered under the future occlusal contact point (screw-access channel ideally exits through the central fossa/cingulum area of the planned crown, not the buccal cusp).
- Plan for a multi-unit or standard platform based on whether a screw-retained or cement-retained final restoration is intended - this decision should be made before surgery, not after.
2. Surgical Procedure
- Atraumatic extraction - section multi-rooted premolars/molars mesiodistally with a fine fissure bur/piezotome and remove each root separately using periotomes; avoid forceps rotation that fractures the buccal plate. Preserving the socket walls (especially buccal plate) is the single biggest determinant of success.
- Socket debridement - thorough curettage of granulation tissue/apical lesion, irrigation, and inspection of all four walls for fenestration or dehiscence.
- Osteotomy in the interradicular septum (for molars) or apical/palatal-lingual wall (for premolars) to engage native bone beyond the socket, since the socket itself is wider than any implant diameter. Under-preparation of the last drill width is often used to enhance primary stability in soft/immediate sites.
- Implant insertion - aim for primary stability with insertion torque of at least 35 Ncm (many clinicians target 35-45 Ncm for immediate loading candidacy); position 3-4 mm apical to the planned free gingival margin, angled so the access channel is prosthetically favorable.
- Gap management - a "jumping distance" (peri-implant gap) >2 mm is typically grafted with a slow-resorbing xenograft/allograft; gaps <2 mm often fill spontaneously with clot. A resorbable collagen membrane or connective tissue graft over the facial gap improves ridge contour preservation.
- Soft tissue closure - primary closure is not mandatory; many protocols use a healing abutment or immediate provisional to seal the socket and maintain papilla/interproximal soft tissue, which is prosthodontically important for the emergence profile.
- Confirm implant position and canal safety with an immediate post-op periapical radiograph.
3. Prosthodontic Point of View — Planning and Care
- Immediate/non-functional provisionalization is acceptable only if insertion torque ≥35 Ncm and ISQ (resonance frequency) is favorable (~≥65-70); the provisional must be taken completely out of occlusion in centric and all excursive movements to protect osseointegration under heavy posterior forces.
- If primary stability is borderline, delay to conventional loading (10-16 weeks mandibular posterior) rather than risk micromotion-induced failure - posterior sites bear much greater occlusal load than anterior sites, so the threshold for "safe" immediate loading is stricter here.
- A screw-retained provisional (rather than a removable partial denture pontic) is preferred so the peri-implant soft tissue is undisturbed and shaped from day one.
- Multi-rooted molar sockets are wider than the implant platform; an anatomically contoured provisional (or a custom healing abutment) is used to guide soft tissue collapse into a natural, scalloped emergence profile that mimics the original tooth's cervical contour - critical for cleansability and esthetics in second premolar sites.
- Avoid leaving a flat/narrow healing abutment in a wide molar socket for long periods; this leads to a "black triangle" or inverted emergence that is very hard to correct prosthetically later.
- Screw-retained is generally preferred in posterior sites: retrievability for hygiene, screw-loosening management, and peri-implantitis access — all easier without residual cement, which is a leading cause of posterior peri-implant disease.
- If angulation forces a buccal screw access (common with lingual-undercut second molar sites noted above), consider angled screw channel (ASC) abutments or switch to cement-retention with a well-fitting custom abutment margin ≤1 mm subgingival for retrievable excess cement control.
- Design for light/no contact in centric relation during provisional phase; at definitive restoration, aim for shared/simultaneous occlusal contacts with adjacent natural teeth, but implants classically get slightly lighter contact (~30 micron shim clearance) than natural teeth because implants lack a periodontal ligament and proprioception/shock absorption.
- Reduce cuspal inclines and buccolingual table width relative to the natural tooth to lower lateral/off-axis loading — especially important in molars given the higher masticatory forces (up to 3-4x anterior forces).
- Eliminate or minimize working- and non-working-side interferences; group function or mutually protected occlusion with cuspid guidance should be verified in excursions.
- Zirconia or metal-ceramic crowns are standard for posterior implants due to wear resistance and load-bearing needs; monolithic zirconia is popular for high-load molar sites needing durability, sometimes at a slight esthetic trade-off that is inconsequential posteriorly.
- For interim restorations, PMMA/composite provisionals allow for iterative contour adjustment before finalizing the emergence profile.
- Baseline radiograph at implant placement, then at provisional delivery, at final crown delivery, and periodically (6-12 months) to monitor marginal bone levels.
- Reinforce oral hygiene specific to implant crowns (interdental brushes/floss threaders under the wide molar contour) since peri-implant mucositis progresses to peri-implantitis faster than natural-tooth periodontitis.
- Monitor occlusion at each recall - implants do not intrude/adapt like natural teeth, so any occlusal shift from opposing tooth wear or eruption can rapidly concentrate excessive force on the implant crown.
Case example for context
Key evidence summary
- Anatomic risk points (IAC distance, lingual undercut prevalence) are quantified in a 2025 systematic review/meta-analysis of the mandibular posterior region - Behfarnia et al., BMC Oral Health 2025.
- Five-year outcome data support immediate placement even in molars with pre-existing chronic apical periodontitis, provided debridement is thorough - Yang et al., World J Clin Cases 2023.