
Fragment reattachment procedures
Which type of fragment reattachment are you asking about?
tooth fragment reattachment dental trauma
PMID: 38609648
PMID: 39364829
tooth fragment reattachment procedure steps clinical protocol 2024
https://pmc.ncbi.nlm.nih.gov/articles/PMC11070882
tooth fragment reattachment dental crown fracture bonding
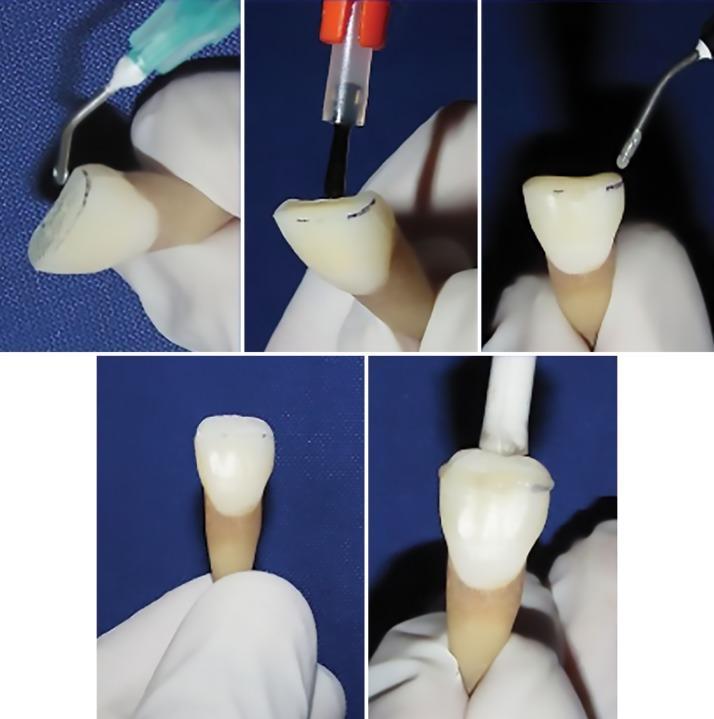
A series of five intraoral clinical photographs documenting the step-by-step dental fragment reattachment procedure on a maxillary central incisor specimen. The images illustrate the following sequence: 1) Application of an etching agent (typically 37% phosphoric acid) to the fractured enamel surface using a green-hubbed syringe with a metal bent needle tip. 2) Application of a dental bonding agent using a small disposable applicator brush. 3) Dispensing flowable composite resin from a syringe onto the prepared fracture site. 4) The initial approximation of the separated tooth fragment to the apical tooth portion. 5) The final reattachment, where the fragment is stabilized with a white placement instrument during light-curing. The tooth specimen features a visible dark horizontal line marking the intended fracture site 3 mm from the incisal edge. This educational sequence demonstrates restorative techniques for managing crown fractures in pediatric and general dentistry, focusing on the adhesive protocol required to restore anatomical integrity and function using composite resin materials.
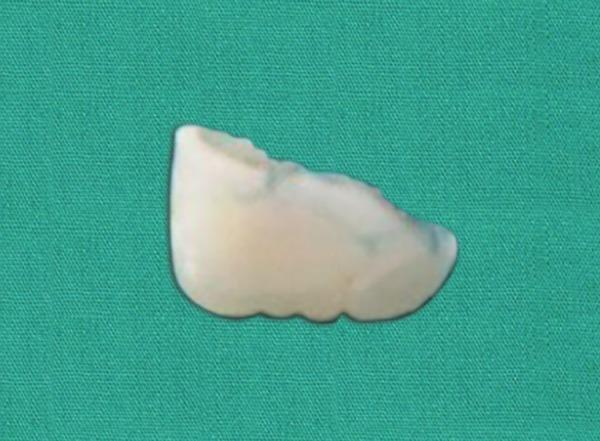
Clinical photograph of a surgically retrieved tooth fragment placed against a green surgical backdrop. The specimen is a portion of a fractured maxillary central incisor (tooth 21). The fragment displays the morphological characteristics of an incisal edge, including a slightly serrated or mamelon-like inferior border. The enamel appears off-white to translucent with a visible fracture line along the superior aspect, characterized by a rough, uneven, and jagged surface where it detached from the crown. This image illustrates a case of dental trauma where a fractured tooth segment was embedded in soft tissue (the lip) and recovered for potential reattachment. The specimen is clean, showing no significant attrition or secondary decay, which is clinically relevant for evaluating the feasibility of biological restoration and adhesive bonding in pediatric dentistry.
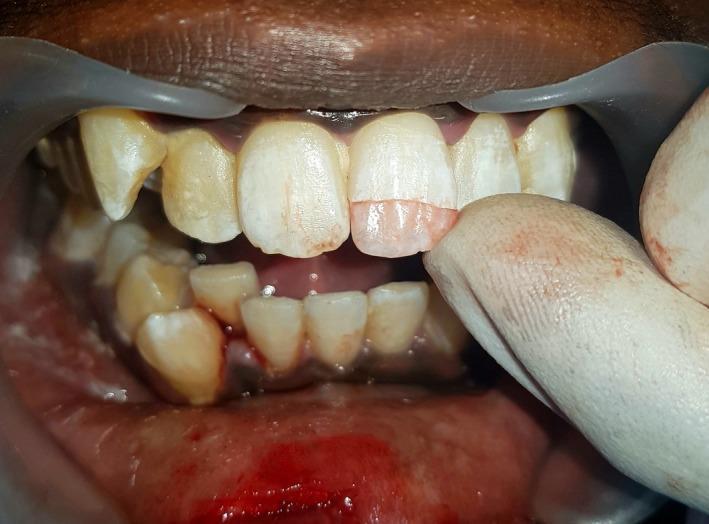
This clinical photograph displays an intraoral view of the maxillary and mandibular teeth, highlighting a dental trauma case. The primary focus is on the maxillary left central incisor (tooth 21), which exhibits an Ellis class II fracture with exposed dentin. A gloved finger is shown approximating a retrieved tooth fragment to the fractured incisal edge to check for fit and alignment prior to reattachment. The surrounding gingival tissues show signs of acute inflammation, including erythema and localized hemorrhage along the lower gingival margin, consistent with recent surgical intervention or trauma. The maxillary teeth appear to have some dental bonding or opaque white restorations, while the mandibular teeth show yellowish discoloration and extrinsic staining. Plastic cheek retractors are used to provide clear visualization of the surgical site. This image serves as an educational example of dental fragment approximation and the clinical management of crown fractures in restorative dentistry.
Dental Tooth Fragment Reattachment
Indications and Contraindications
- The fragment is available and has been stored properly
- Fracture is confined to enamel-dentin (Ellis Class I/II) or involves pulp (Class III) provided endodontic treatment is completed first
- Fragment edges are intact with no micro-fragmentation
- Root fracture is absent (confirmed radiographically)
- Root fracture is present
- Fragment is lost, severely fragmented, or badly discolored
- Insufficient ferrule effect in subgingival fractures
- Compromised fragment fit that prevents adequate marginal adaptation
Fragment Storage Prior to Reattachment
- Hank's Balanced Salt Solution (HBSS) - maintains cell viability and fragment moisture
- Normal saline or sterile water - acceptable short-term option
- Milk - if other media unavailable
- Dry storage - causes desiccation and micro-infractions; avoid
Classification of Crown Fractures (Ellis Classification)
| Class | Structure Involved | Fragment Reattachment |
|---|---|---|
| I | Enamel only | Yes |
| II | Enamel + dentin (no pulp) | Yes - first choice |
| III | Enamel + dentin + pulp | Yes - after endodontic treatment |
| IV | Non-vital tooth | After root canal, with post if needed |
Techniques for Fragment Reattachment
1. Simple (Direct) Reattachment
- Fracture strength recovery: ~44% reported in some studies
2. Internal Dentinal Groove Technique
- Bond strength equivalent to enamel beveling in comparative studies
- Greater fracture resistance than simple reattachment
3. External Chamfer Technique
4. Overcasting / Composite Veneer Over Reattachment
5. Fiber-Reinforced Composite (FRC) Reinforcement
- Rigid FRC posts improve fracture resistance in anterior teeth
- Flexible fiber bundles enhance fracture strength in posterior teeth with reattached cusps
- Overall: low-quality evidence but clinically recommended for high-stress areas
Step-by-Step Clinical Procedure
Pre-operative
- Clinical and radiographic examination - rule out pulp exposure, root fracture, mobility
- Evaluate fragment for fit - check for perfect marginal adaptation
- Disinfect fragment in 0.12% chlorhexidine; lightly air dry
Tooth and Fragment Preparation
- Remove a thin surface layer from the internal fragment surface to accommodate resin cement, preserving the peripheral margin
- Clean tooth and fragment with 2% chlorhexidine solution; rinse and lightly air dry
Etching (Total-Etch Protocol preferred)
- Apply 37% phosphoric acid to both tooth and fragment for 15 seconds
- Rinse for 5 seconds, gently air dry for 5 seconds (avoid over-desiccation)
- Remoisten with water if dentin appears chalky-white
Adhesive Application
- Apply a hydrophilic adhesive agent (e.g., Optibond Solo Plus, Prime & Bond NT) to both surfaces for 20 seconds with a disposable brush
- Remove excess with a dry microbrush using continuous motion
Cementation
- Inject light-cured or dual-cured resin cement (e.g., Nexus II, VarioLink II) onto the internal fragment surface
- Seat the fragment firmly using an adhesive applicator tip
- Remove excess cement with a sable brush using the "Wet Brush Technique"
- Leave a small residual cement bead at the margins before final light-curing
- Tack-cure for 3 seconds, remove excess, then full-cure each surface for 40 seconds
Post-operative
- Remove rubber dam; check occlusion in centric, protrusive, and lateral excursions
- Equilibrate any premature contacts with an egg-shaped finishing bur
- Polish and post-cure for 2 minutes to improve conversion and surface hardness
- Fabricate a custom mouthguard to protect against future trauma
Clinical Images

Outcomes and Evidence
- Overall fragment loss rate: 20% (95% CI: 13-30%)
- Risk ratio for fragment loss was 2.21 in uncomplicated crown fractures and 2.54 in complicated (pulp-involved) fractures, compared to composite restorations
- Fragment loss was lowest when reinforcement was used in uncomplicated fractures
- Fragment loss was highest in complicated fractures bonded without reinforcement
- Grade of evidence: very low - more robust trials are needed
- Fragment reattachment carries a higher failure risk than a conventional composite restoration
- Reinforcement (FRC, internal groove, or chamfer) significantly improves retention
- The procedure is still preferred when aesthetics and biologic restoration are priorities
Advantages vs. Disadvantages
| Advantages | Disadvantages |
|---|---|
| Preserves original color, texture, translucency | Fragment not always available |
| Incisal edge wears at same rate as adjacent teeth | ~20% long-term fragment loss |
| Single appointment, chairside | Does not restore full fracture resistance |
| Cost-effective | Re-fracture risk higher than composite |
| Psychologically beneficial for patient | Requires careful fragment hydration/storage |
| Minimal tooth preparation |