
Tendon suturing technique in Orthopaedics for 10 marks
Reading File
Now let me search the medical library for tendon suturing techniques in orthopaedics.
Finding Sources
Finding Sources
Searching Images
tendon suturing techniques orthopaedics Kessler Bunnell repair
Excellent - found the key section. Let me read the tendon repair section from Campbell's Operative Orthopaedics and also the multiple looped suture section.
Reading File
Reading File
Now let me read the main tendon repair content section with core techniques:
Reading File
Reading File
Excellent - I found Kessler core stitch details and figures. Let me now read the main tendon repair section more comprehensively:
Reading File
Reading File
Let me read the key tendon repair section with the core techniques descriptions and Bunnell/Kessler details:
Reading File
I now have rich content. Let me fetch the key diagram images and also read a bit earlier in the chapter for fundamentals:
Reading File
Loading Image
Now I have a good image of a tendon core suture. Let me fetch the Kessler repair diagram and one more important figure showing multiple techniques:
Loading Image
Loading Image
I now have excellent material from Campbell's Operative Orthopaedics 15th Edition. Let me compile a comprehensive 10-mark answer.
Tendon Suturing Techniques in Orthopaedics
Campbell's Operative Orthopaedics 15th Ed 2026
Introduction
Tendon repair (tenorrhaphy) requires techniques that restore continuity, maintain adequate tensile strength for early mobilization, minimize bulk at the repair site to allow gliding through tendon sheaths, and preserve the tendon's vascular supply. Two components make up every repair:
- Core suture - provides the main tensile strength
- Peripheral (epitendinous) suture - smooths the repair surface and adds 10-50% additional strength
Properties of an Ideal Tendon Suture Technique
- Easy and reproducible to perform
- Secure knots with minimal gapping
- Smooth, low-profile repair that glides through pulley systems
- Sufficient strength to allow early active motion (minimum 50 N load-to-failure)
- Minimal interference with tendon vascularity
Suture Materials
- Non-absorbable sutures are preferred: polypropylene (Prolene), polyester (Ethibond), nylon
- Core suture: 3-0 or 4-0; epitendinous: 5-0 or 6-0
- Looped sutures (e.g., looped nylon) improve purchase and strength without extra knots
A. Core Suture Techniques
1. Bunnell Suture
- The classic historical technique (criss-cross or figure-of-eight pattern)
- Uses a zig-zag (crisscross) configuration through the tendon substance
- Two needles are passed in a "to-and-fro" pattern with the knot buried between the cut ends
- Disadvantage: constricts the tendon vascularity ("strangulating"), creates bulkier repair - largely replaced by Kessler and modifications
2. Modified Kessler (Grasping) Suture - Most Widely Used
- A 2-strand core suture that forms a rectangular loop on either side of the repair site
- Technique (per Campbell's Fig. 71.10):
- Insert a round-bodied needle as a "grasping" bite transversely near the cut end on one side
- Pass the suture longitudinally within the tendon substance 1-1.5 cm back from the cut end
- Bring out through the cut face
- Mirror this pattern on the other tendon end
- Tie the knot between the cut ends (buried knot) - reduces irritation
- Advantage: does not constrict blood supply; better gliding; easy to perform
- Load to failure: ~35-45 N (2-strand)
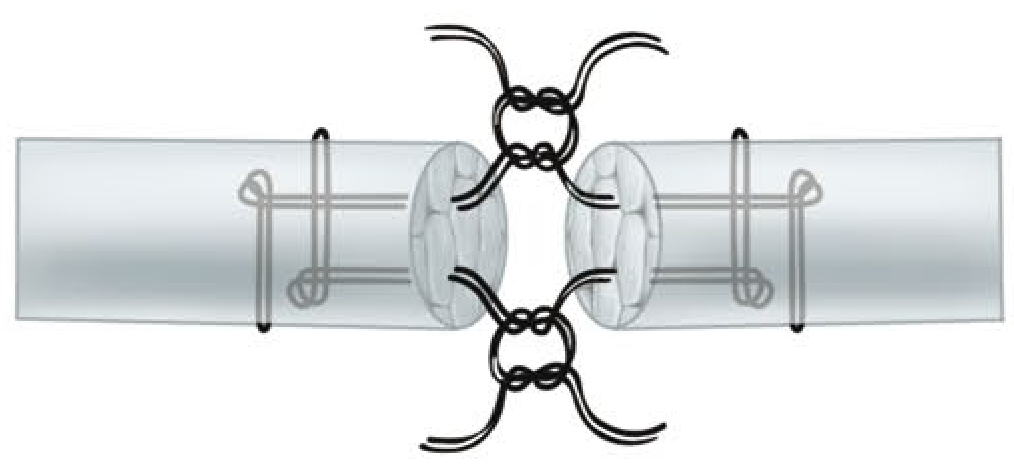
Double-loop (modified Kessler) core repair showing the grasping configuration on each tendon end
3. Modified Becker / Massachusetts General Hospital (MGH) Repair
- A 4-strand repair derived from the Kessler
- Uses two separate Kessler-type sutures placed at 90° to each other
- Provides significantly greater strength than 2-strand techniques
- Supports early active motion rehabilitation
4. Cruciate (Cross-Locked) Four-Strand Repair
- Suture passes through the tendon in a cross (cruciate) pattern, locking the suture in the tendon substance
- Shown to provide better resistance to gap formation and greater ultimate tensile strength than Kessler, Strickland, or Savage techniques
- The locked cruciate, modified double Tsuge, and modified Becker repairs are strong enough to support early active motion programs
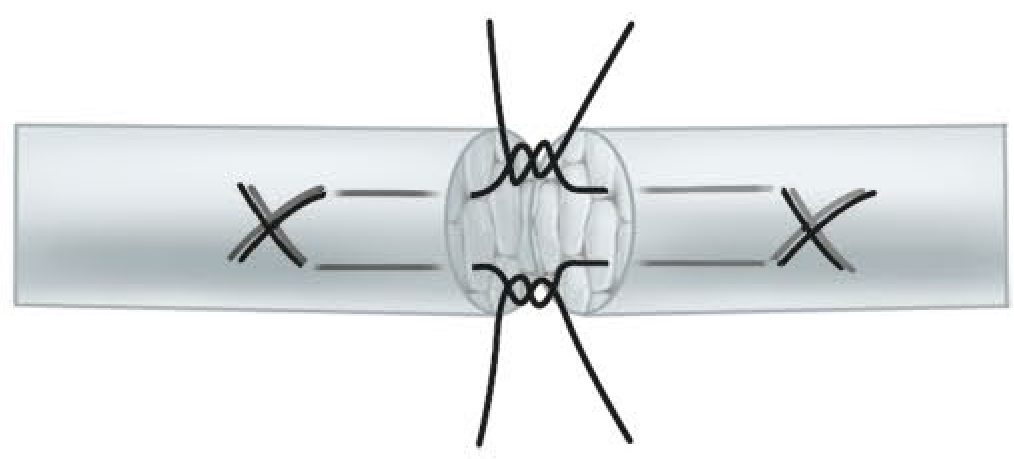
Single-cross locked cruciate four-strand repair - note the crossing pattern and locked grasps
5. Savage Six-Strand Repair
- Uses three pairs of sutures creating 6 strands across the repair
- One of the strongest end-to-end repair methods
- The "cross-stitch" epitendinous suture with Savage core was found to be 117% stronger than a modified Kessler with conventional epitendinous repair
- Supports early active motion but technically more demanding
6. Tang (Modified Tsuge / Multiple Looped Suture) Repair
- Uses looped nylon sutures (4-0 or 5-0)
- Three threads placed at tips of a triangle in cross-section (palmar and two dorsal placements)
- Knots are arranged in triangular fashion on the tendon surface
- Tang and cruciate repairs show better tensile strength and elastic properties than Silfverskiöld, Robertson, and modified Kessler repairs
7. Tajima (Modified Kessler with Two Separate Sutures)
- Uses two separate sutures inserted from the cut ends
- Provides a 4-strand purchase
- Commonly combined with a running epitendinous stitch for a strong, low-profile repair
B. Peripheral (Epitendinous) Suture
Added around the circumference of the repair after core suturing:
| Type | Description |
|---|---|
| Simple interrupted | Basic circumferential stitches |
| Running over-and-over | Continuous suture around the repair |
| Running lock (Halsted) | Locking loop increases strength |
| Cross-stitch (Silfverskiöld) | A 6-0 braided polyester cross-stitch - adds 10-50% extra strength |
- Epitendinous suture smooths the repair, reduces gapping, and provides up to 50% additional tensile strength
- Preferred suture: 6-0 polypropylene or nylon in a running-lock stitch
C. End-to-Side (Pulvertaft Weave) Technique
Used when a tendon of smaller diameter is joined to one of larger diameter (e.g., tendon transfer):
- The smaller tendon is passed transversely through the larger tendon 2-3 times in a weaving fashion (Fig. 71.15 in Campbell's)
- Each passage is anchored with one or two sutures
- Provides strong union and allows tension adjustment before final fixation
- Preferred for tendon transfers and grafts
D. Flexor Tendon Zones and Technique Selection
| Zone | Location | Recommendation |
|---|---|---|
| Zone I | Distal to FDS insertion | Repair or advancement of FDP |
| Zone II ("No Man's Land") | Within the fibro-osseous sheath | Most demanding; 4-6 strand core + epitendinous; early mobilization |
| Zone III | Palm | Direct repair; simpler than Zone II |
| Zone IV | Carpal tunnel | Direct repair |
| Zone V | Forearm | Direct repair; good prognosis |
E. Number of Strands and Strength
The number of core suture strands crossing the repair directly determines strength:
| Strands | Example | Approximate Strength |
|---|---|---|
| 2 | Modified Kessler | ~35-45 N |
| 4 | Cruciate, MGH, Tajima | ~60-80 N |
| 6 | Savage, Tang | ~90-120 N |
| 8 | Eight-strand repair | Strongest; bulkiest |
More strands = stronger repair, but also more bulk, increased difficulty, and potential compromise of tendon vascularity.
F. Factors Affecting Repair Strength
- Purchase length: longer suture purchase (1-1.5 cm) increases strength
- Suture calibre: larger suture = stronger
- Locking vs. grasping: locked loops resist gap formation better
- Knot placement: knot between the cut ends minimizes friction during gliding
- Epitendinous suture: critical addition to core repair
- Suture material: non-absorbable braided polyester or looped nylon preferred
G. Postoperative Rehabilitation
- Passive mobilization (Kleinert protocol): rubber-band traction for passive flexion, active extension
- Place-and-hold (Duran): passive flexion held by active muscle contraction
- Early active motion: requires 4-6 strand repair with adequate strength (>50-60 N); reduces adhesions and improves gliding
Summary Table
| Technique | Strands | Knot Position | Key Feature |
|---|---|---|---|
| Bunnell | 2 | Between ends | Crisscross; historical; vascular compromise |
| Modified Kessler | 2 | Between ends | Most common; grasping; vascular-friendly |
| Cruciate | 4 | Between ends | Best gap resistance; supports active motion |
| Tajima | 4 | Cut end surface | Two separate sutures from each end |
| Savage | 6 | Surface | Strongest end-to-end for active rehab |
| Tang/Tsuge (looped) | 6 | Surface | Triangular placement; looped nylon |
| Pulvertaft weave | - | Woven | Tendon transfer/graft; end-to-side |
Key Points for 10-mark Answer:
- Always use a core + epitendinous combination
- Modified Kessler remains the workhorse technique
- For Zone II injuries requiring early active mobilization, use a 4-6 strand repair
- The Pulvertaft weave is specifically for tendon transfers/grafts
- Cruciate four-strand provides the best balance of strength and clinical feasibility
Source: Campbell's Operative Orthopaedics 15th Ed 2026, Chapter 71 (Flexor and Extensor Tendon Injuries)
This is a shared conversation. Sign in to Orris to start your own chat.