
Latarjet procedures ot notes
Reading File
The Latarjet procedure is a coracoid transfer operation for recurrent anterior shoulder instability, particularly when there is significant glenoid bone loss. Let me search the library and web simultaneously.
Searching sources...
Finding Sources
Searching the Web
Latarjet procedure operative technique OT notes surgical steps
Excellent - found dedicated sections in Campbell's Operative Orthopaedics. Let me read all the key sections in parallel.
Reading File
Reading File
Reading File
Good - found the main technique section (Walch & Boileau, TECHNIQUE 52.6) in block 26. Let me read more of that detailed step-by-step technique and also the Rockwood section.
Reading File
Reading File
Excellent - getting great detail. Let me read more of the Rockwood technique steps and also fetch the key surgical diagram images.
Reading File
Reading File
Getting detailed steps. Let me read the rest of the graft transfer and fixation steps.
Reading File
Reading File
Reading File
I now have comprehensive information to write detailed OT notes. Let me also fetch the key surgical illustration.
Reading File
Loading Image
I now have all the information needed to compile comprehensive OT notes. Here are the detailed Latarjet procedure operative notes:
Latarjet Procedure - OT Notes
Source: Campbell's Operative Orthopaedics 15th Ed 2026 (Walch & Boileau Technique); Rockwood & Green's Fractures in Adults 10th Ed 2025
Indication
Recurrent anterior glenohumeral instability with:
- Anterior glenoid bone loss >13.5-17.3% (CT 3D reconstruction threshold)
- Inverted pear-shaped glenoid on imaging
- Engaging Hill-Sachs lesion (off-track shoulder)
- Contact/collision athletes even with moderate bone loss
- Failed prior arthroscopic Bankart repair
- Glenoid loss >17.3% to <30% - Latarjet is the standard; >30% requires iliac crest autograft or distal tibia allograft
Triple mechanism of stability:
- Bone block restores glenoid arc (bony buttress)
- Sling effect - conjoined tendon acts as dynamic anterior sling in abduction/external rotation
- Capsulorrhaphy - coracoacromial ligament remnant repaired to lateral capsule
Preoperative Planning
- CT scan with 3D reconstruction (mandatory - assess glenoid bone loss %)
- MRI/MRA to assess Bankart lesion, Hill-Sachs size, on-track vs. off-track status
- Implants: 3.5 mm or 4.0 mm solid cortical or cancellous AO malleolar screws (x2, bicortical lag fixation)
- Suture buttons are an alternative to screws for fixation
Anaesthesia & Position
- General endotracheal anaesthesia + interscalene nerve block
- Beach-chair position (upright semi-seated)
- Small pillow placed behind the scapula to position the glenoid surface perpendicular to the operative table
- Arm holder/arm positioner attached to allow free positioning and rotation throughout the case
- Sterile draping of neck, chest, axilla, and entire arm
Surgical Approach
Deltopectoral approach (anterior shoulder):
- 4-7 cm skin incision beginning just below the tip of the coracoid process, extending distally along the deltopectoral interval to the superior aspect of the axillary fold
- Open the deltopectoral interval; protect and retract the cephalic vein laterally with the deltoid
- Place a self-retaining retractor into the deltopectoral interval
- Place a Hohmann retractor on the top of the coracoid process
Operative Steps
Phase 1: Coracoid Harvest & Preparation
-
Position the arm in 90° abduction and external rotation. Divide the coracoacromial (CA) ligament 1 cm from the coracoid tip - preserve its full length for later capsular repair.
-
Adduct and internally rotate the arm. Release the pectoralis minor insertion from the medial coracoid with electrocautery. Use a periosteal elevator to expose the base of the coracoid and identify the "knee" (horizontal-vertical junction).
-
Osteotomize the coracoid at its knee from medial to lateral using an osteotome or small angulated oscillating saw. This yields a bone block of approximately 1.5-2 cm length.
-
Bring the arm back into abduction/ER and release the coracohumeral ligament from the lateral coracoid.
-
Grasp the bone block firmly with forceps and release it from deep attachments. Carefully dissect the lateral part of the conjoined tendon only - protect the medial aspect to avoid injury to the musculocutaneous nerve (which enters coracobrachialis medially).
-
Evert the bone block. Decorticate the deep (inferior) surface with a cutting rongeur or oscillating saw to prepare a flat, bleeding surface for union.
-
Drill two parallel holes in the deep surface of the bone block. Measure thickness with calipers. Tuck the graft under the pectoralis major, held by the self-retaining retractor.
Phase 2: Subscapularis Division, Capsulotomy & Joint Exposure
-
With the arm in full external rotation, identify the superior and inferior margins of the subscapularis tendon.
-
Divide the subscapularis along the superior 2/3 : inferior 1/3 junction (horizontal split in line with fibers) using electrocautery then Mayo scissors. The lower 1/3 (lower fourth) is left intact to protect the anterior humeral circumflex artery and axillary nerve. Carry division down to the white capsule; extend medially with a 4×4 sponge into the cleavage plane to expose the subscapular fossa.Alternative: L-shaped subscapularis release (superior 2/3 detached from lesser tuberosity) for large/muscular patients - allows superior capsule and rotator interval exposure.
-
Place a Hohmann retractor in the subscapular fossa superiorly.
-
With the arm in neutral rotation, make a 1.5 cm vertical capsulotomy at the level of the anteroinferior glenoid margin. Apply a posteriorly directed force on the humeral head to identify the joint line during capsulotomy.
-
Move the arm to full internal rotation; insert a Fukuda humeral head retractor resting on the posterior glenoid margin.
-
Retract the superior 2/3 of the subscapularis superiorly with a Steinmann pin impacted into the superior scapular neck. Retract the inferior part inferiorly with a Hohmann retractor placed under the neck of the scapula (between capsule and subscapularis). A Bankart retractor may be placed along the medial glenoid neck for further exposure.
-
Inspect the labrum, cartilage, and capsuloligamentous insertions. Resect the medial capsular flap along with damaged labrum fragments and any loose bodies.
-
Use a scalpel to expose the anteroinferior glenoid rim. Decorticate it with a curette, osteotome, or motorized burr to create a flat, bleeding recipient surface for the coracoid bone block.
Phase 3: Bone Block Fixation
-
Insert the bone block through the subscapularis split. Position it flush with the anteroinferior glenoid margin (at the equator of the glenoid). Check position with the arm in internal rotation.Critical rule: No lateral overhang is acceptable - even 1-2 mm medial position is preferable. Lateral overhang leads to rapid degenerative joint disease. Use a motorized burr to correct if needed.
-
Insert the inferior screw first: drill through the inferior hole of the bone block into the glenoid neck in an anteroposterior and slightly superior direction, parallel to the articular surface. Temporarily reflect the block to measure depth with a depth gauge.
-
Insert a 3.5 mm or 4.0 mm solid cortical or cancellous screw (AO malleolar screw) into the posterior cortex (bicortical fixation, lag technique). Tighten loosely first to allow rotational correction.
-
When position is confirmed, drill and insert the second superior screw through the superior hole. Tighten both screws firmly.
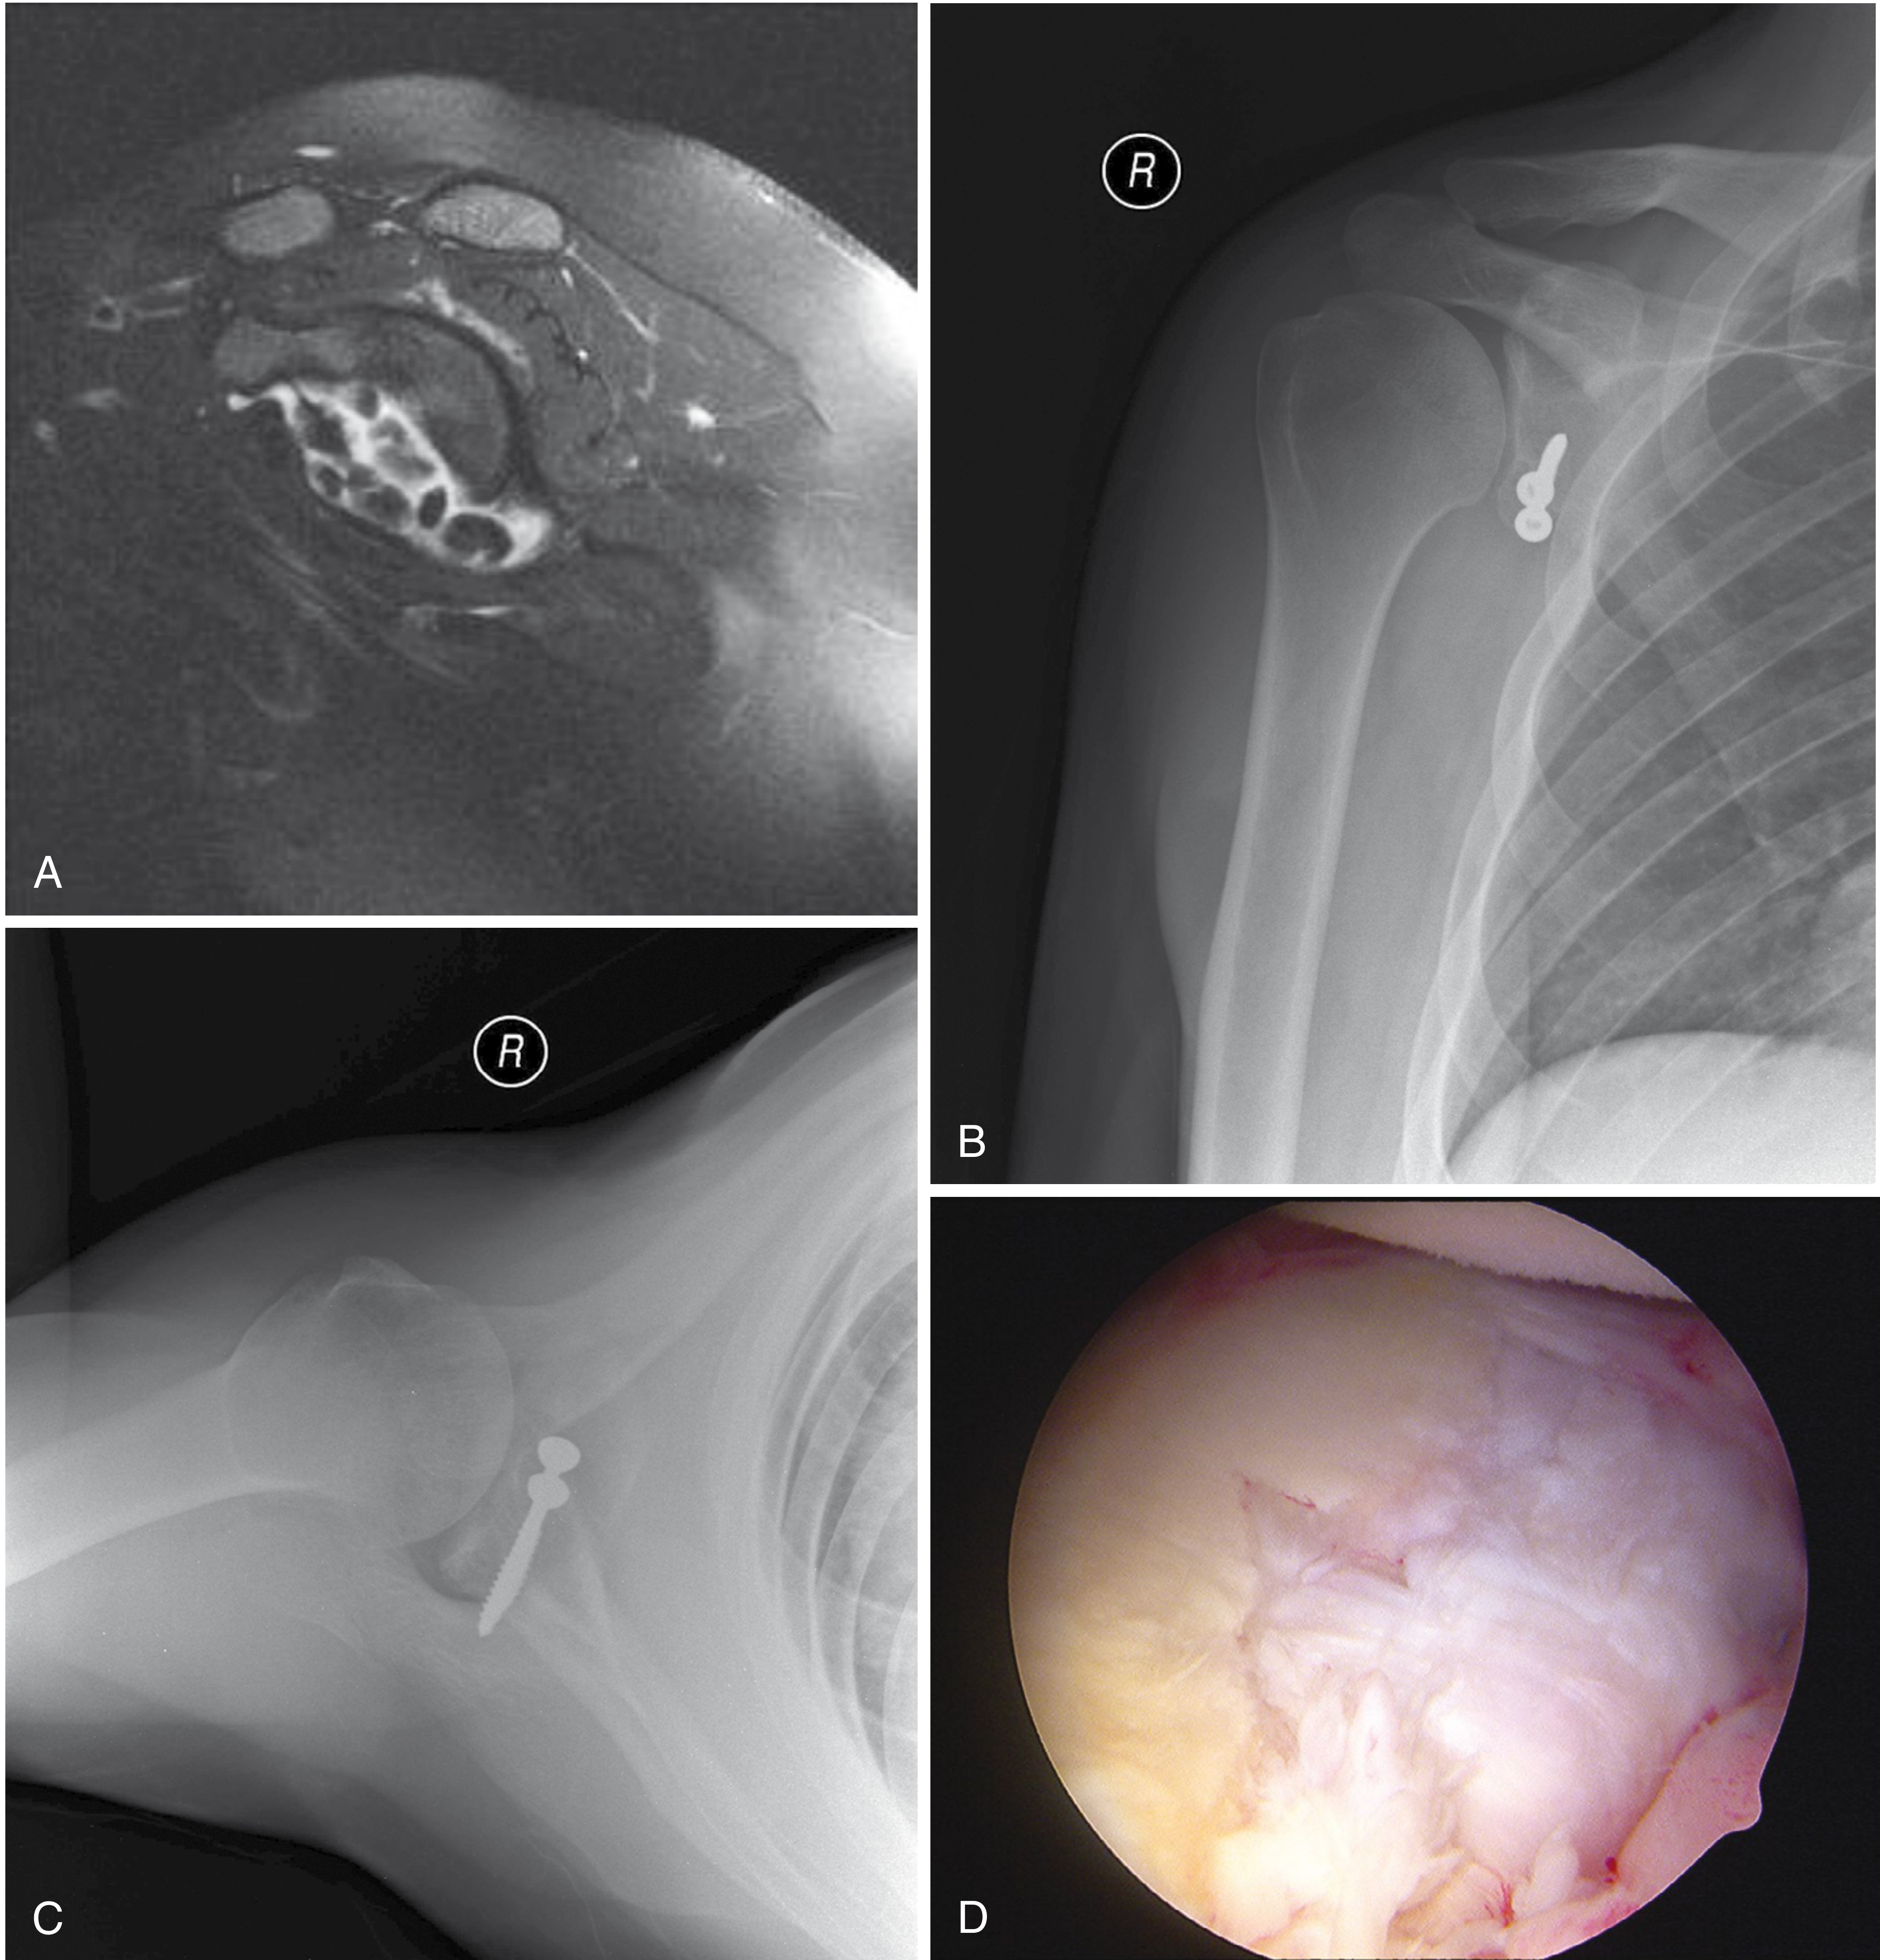
Campbell's Fig 52.25 - Preoperative MRI and post-Latarjet radiographs with parallel screw fixation
Phase 4: Closure
-
With the arm in external rotation, repair the remnant of the coracoacromial ligament to the lateral capsular flap using 2 interrupted absorbable sutures. This reconstructs the anterior capsular complex.
-
Remove the sponge from the subscapular fossa. Move the arm through all ranges of motion to evaluate mobility and confirm stability.
-
Coat the cut surface of the coracoid stump with bone wax.
-
Close the superficial soft-tissue layers over a drain if required; subcuticular skin closure.
Key Intraoperative Dangers / Pitfalls
| Structure at Risk | How to Protect |
|---|---|
| Musculocutaneous nerve | Dissect only the lateral conjoined tendon; do not retract medially |
| Axillary nerve | Leave inferior 1/3 of subscapularis intact; place Hohmann retractor carefully inferiorly |
| Anterior humeral circumflex artery | Inferior subscapularis left intact |
| Cephalic vein | Retract laterally with deltoid |
| Lateral overhang of graft | Check position with arm in IR; never accept lateral overhang into joint |
Postoperative Care
| Phase | Timing | Activity |
|---|---|---|
| Immobilisation | 0-2 weeks | Sling or shoulder immobilizer |
| Phase I | 2-4 weeks | Passive forward flexion to 90°; ER to 25°; elbow/wrist ROM |
| Phase II (sling weaning) | 4-8 weeks | Passive to active-assisted ROM; wean from sling at 4-6 weeks; add ER gradually |
| Phase III | 8 weeks | Begin rotator cuff + periscapular strengthening; upper body ergometer |
| Phase IV | 3-6 months | Isokinetics; push-ups; chin-ups (~4-5 months); sports-specific training |
| Return to sport | When CT confirms bony union + functional testing passed | Typically 4-6 months |
If subscapularis was taken down (not split), external rotation gains must be progressed more slowly and aggressive ER stretching is avoided until the tendon heals.
Complications
- Recurrent instability - rare; usually from significant re-injury or graft nonunion
- Graft nonunion - may occur but does not always compromise the result (sling effect preserved)
- Screw prominence - from graft resorption; may require delayed screw removal
- Nerve injury - 1-3% (usually musculocutaneous or axillary nerve neurapraxia, self-resolving)
- Degenerative joint disease - from lateral graft overhang; avoid at all costs intraoperatively
- Infection - <1%; perioperative antibiotics mandatory
Notes on Arthroscopic Latarjet
An arthroscopic Latarjet (Bankart-Bristow-Latarjet technique) has been described with good results - reported 100% return to contact rugby in one series of 40 players with no recurrent dislocations at 2 years. However, per Campbell's, this is a technique for advanced arthroscopists only after extensive cadaveric laboratory training, and results should be comparable to the gold-standard open procedure before adopting it clinically.
Campbell's Operative Orthopaedics 15th Ed 2026, Technique 52.6 (Walch and Boileau) | Rockwood & Green's Fractures in Adults 10th Ed 2025, Ch. 35
This is a shared conversation. Sign in to Orris to start your own chat.