
Compartment syndrome - for muhs pg theory exam
Reading File
Now let me search the medical library for compartment syndrome content across multiple books simultaneously.
Finding Sources
Finding Sources
Excellent sources found. Let me read the most comprehensive ones - Bailey & Love (surgery) and Campbell's Operative Orthopaedics simultaneously.
Reading File
Reading File
Great content. Let me read more from Campbell's (which has the most comprehensive section) and also read the Bailey & Love section on compartment syndrome from the vascular surgery chapter.
Reading File
Reading File
Let me read more from Campbell's for the fasciotomy technique details and Current Surgical Therapy.
Reading File
Reading File
Now let me get the fasciotomy technique section from Campbell's and fetch the key anatomical image.
Reading File
Loading Image
Excellent! I have very rich content. Let me now get the fasciotomy technique details and the Volkmann's contracture / sequelae section.
Reading File
I now have very comprehensive content. Let me compile the complete answer for the MUHS PG theory exam.
Compartment Syndrome - MUHS PG Theory
Definition
Compartment syndrome is an elevation of the interstitial pressure in a closed osteofascial compartment that results in microvascular compromise, leading to tissue ischaemia and irreversible muscle and nerve damage.
- Campbell's Operative Orthopaedics, 15th Ed
Classification
| Type | Features |
|---|---|
| Acute | Sudden rise in pressure; surgical emergency; due to trauma, fracture, burns, reperfusion |
| Chronic (Exertional) | Recurrent pressure rise with exercise; resolves with rest; most common in anterior/deep posterior compartment of leg in runners |
| Volkmann's | Late sequela of untreated acute CS; ischaemic contracture of forearm muscles |
Aetiology / Causes
Causes that INCREASE content (volume) in compartment:
- Fractures - most common (70%); tibial shaft fractures (1.5-11% risk)
- Soft-tissue contusions (23%)
- Vascular injury / arterial ischaemia with reperfusion (swelling post-revascularisation)
- Burns (circumferential third-degree)
- Crush injuries
- Spontaneous haematoma (bleeding disorders, anticoagulants)
- IV fluid / contrast extravasation under pressure
- Post-ischaemic reperfusion swelling
- Drug abuse / limb compression during altered consciousness
- Military antishock trousers (MAST)
Causes that DECREASE compartment volume:
- Tight casts and dressings
- Circumferential burns causing eschar
MUHS Exam Point: Fractures (70%) + soft tissue contusion (23%) = 93% of cases. Tibial shaft fractures carry highest risk.
Anatomy - Compartments of the Leg (Most Commonly Affected)
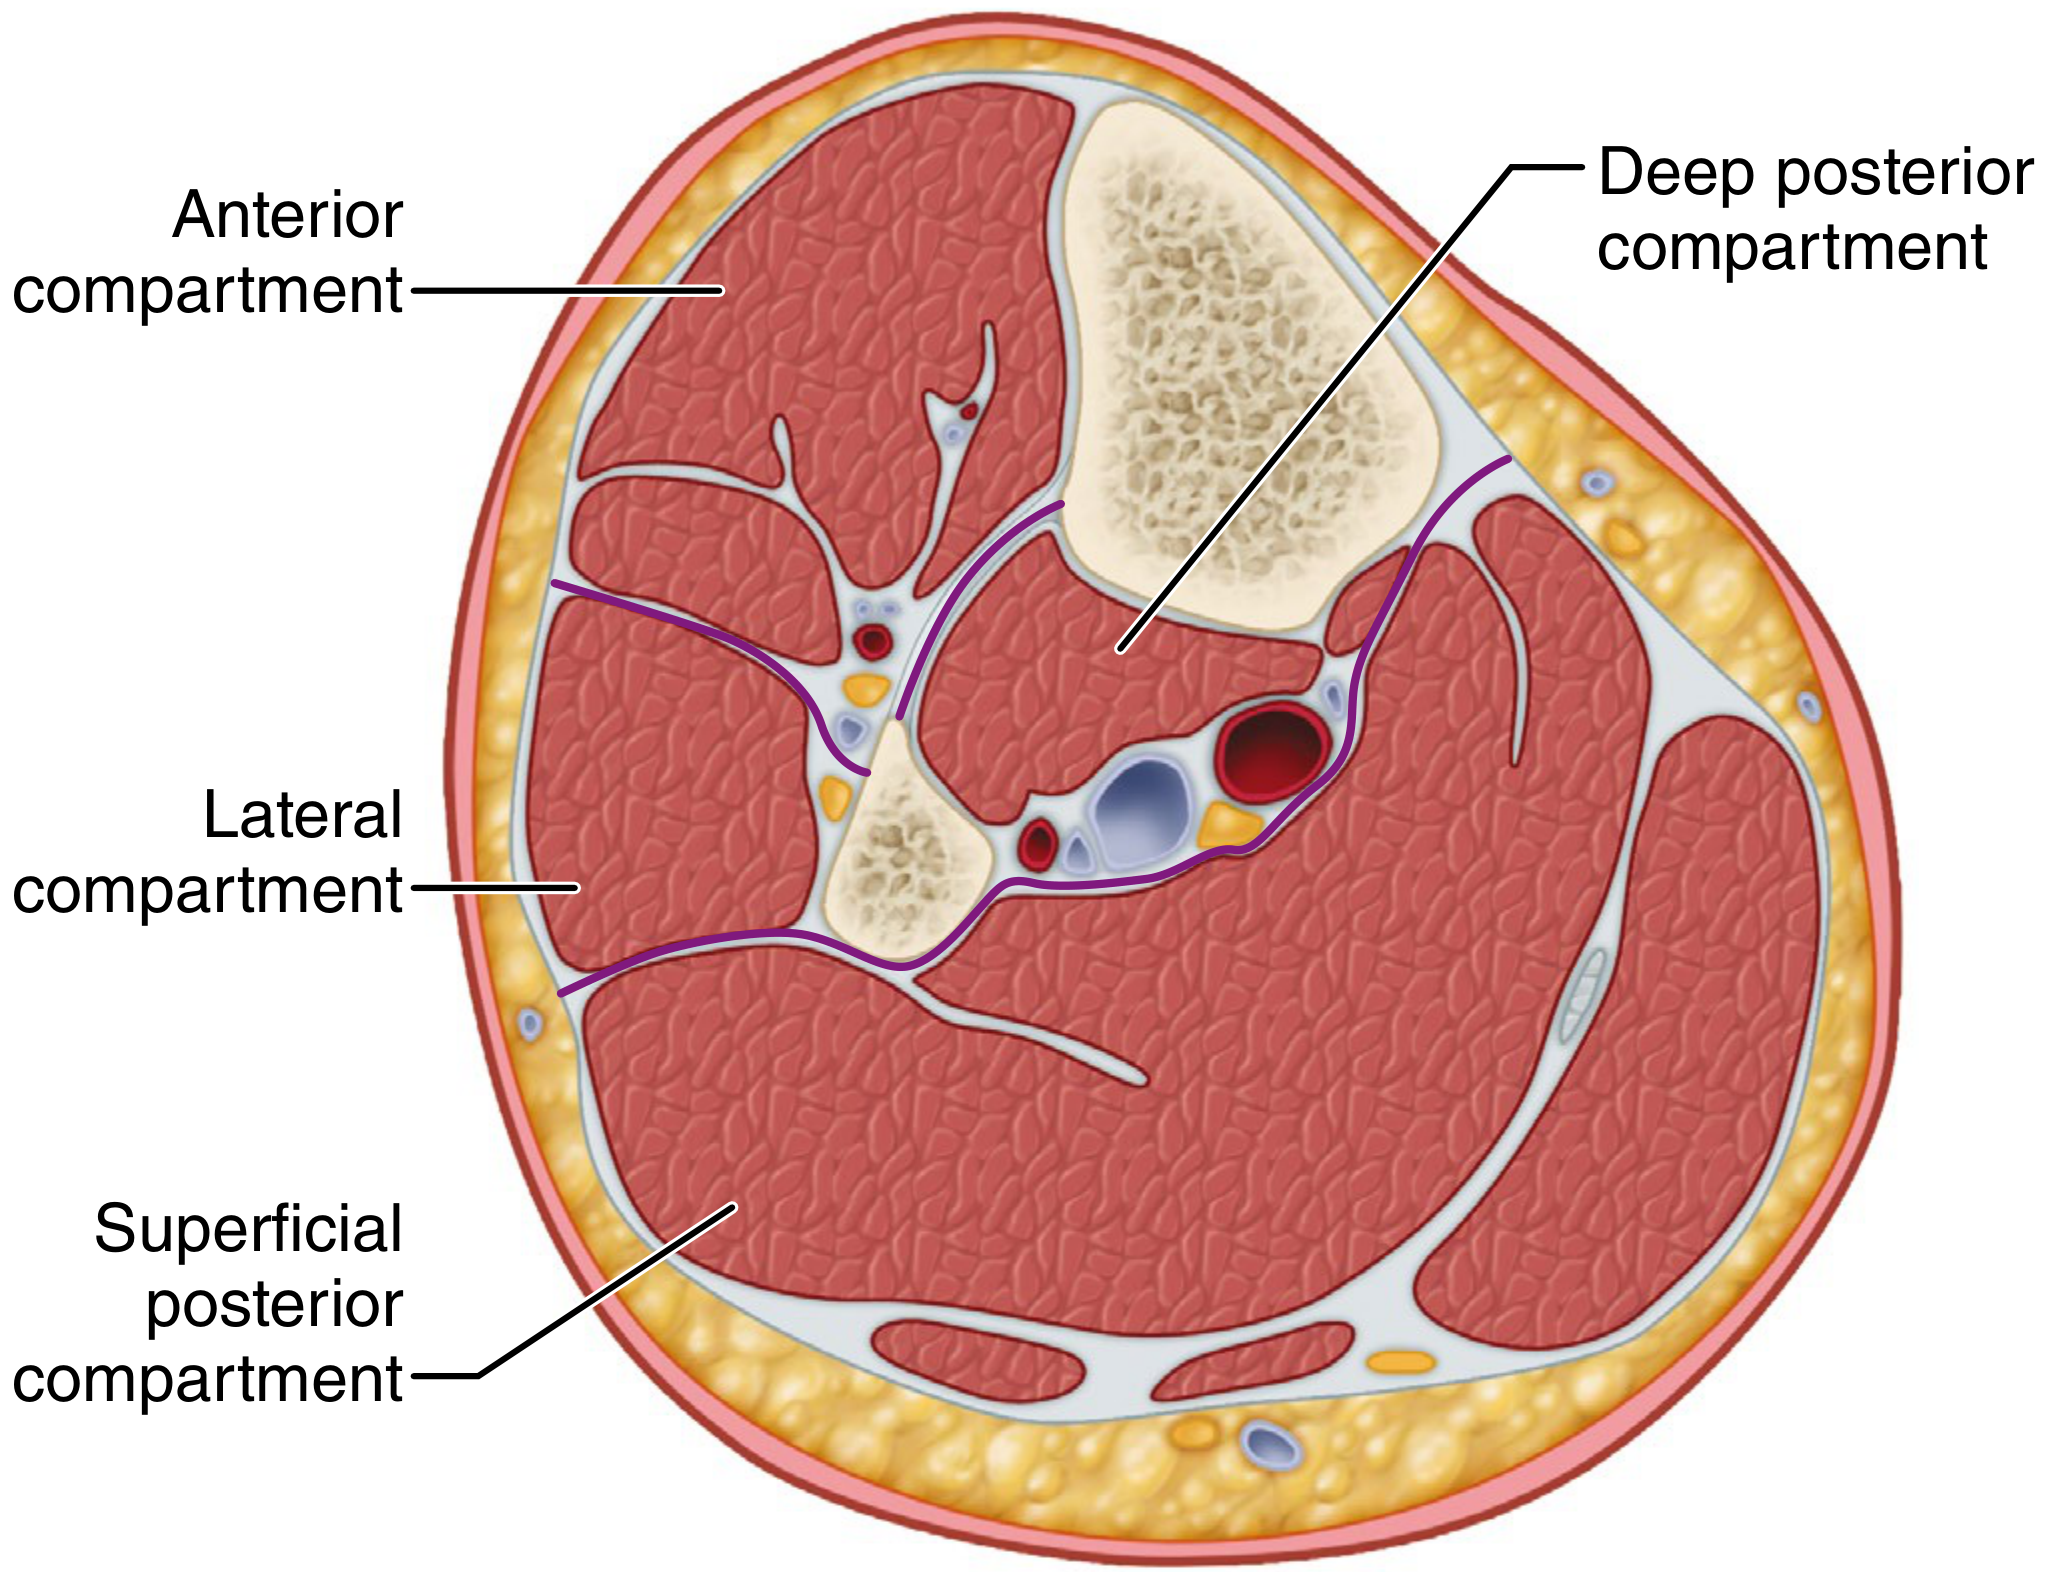
Compartments and Contents:
Lower Leg (4 compartments):
| Compartment | Key Contents | Nerve at Risk |
|---|---|---|
| Anterior | Tibialis anterior, extensor hallucis longus, EDB, anterior tibial vessels | Deep peroneal nerve |
| Lateral | Peroneus longus & brevis | Superficial peroneal nerve |
| Superficial posterior | Gastrocnemius, soleus, plantaris | Sural nerve |
| Deep posterior | FHL, FDL, tibialis posterior, posterior tibial vessels | Tibial nerve |
Forearm (Volar compartment): FDS, FDP, FPL, median nerve, ulnar nerve
Thigh (3 compartments): Anterior (quadriceps, femoral nerve), Medial (adductors, obturator nerve), Posterior (hamstrings, sciatic nerve)
Key fact: Anterior and deep posterior compartments of the leg are MOST commonly involved (non-compliant walls). Anterior compartment of thigh is most vulnerable due to stiffest walls (fascia lata + IT band).
Pathophysiology
The classic model is the arteriovenous gradient hypothesis:
- Increased interstitial pressure (from haematoma, oedema, external compression)
- Reduced capillary perfusion pressure
- Tissue ischaemia - oxygen deprivation to muscle and nerve
- Cellular anoxia → irreversible muscle necrosis
- If >30 mmHg sustained for >8 hours → significant muscle necrosis even with normal systemic blood flow
- Nerve fibres (especially unmyelinated type-C sensory fibres) are most sensitive to hypoxia - explains early paraesthesia
Systemic effects: Rhabdomyolysis → myoglobinaemia → myoglobinuria → acute tubular necrosis → renal failure (a feared complication)
Clinical Features - "6 Ps"
| Sign | Notes |
|---|---|
| Pain (out of proportion) | Most important - disproportionate to injury, unresponsive to analgesia |
| Pain on passive stretch | Most sensitive early sign - passively stretch the muscles of the compartment |
| Paraesthesia / Hypesthesia | Early neurological sign (type-C fibres most sensitive) |
| Pressure / Tightness | Tense, woody feel to compartment |
| Paralysis / Weakness | Muscle weakness - late sign |
| Pallor + Pulselessness | VERY LATE signs - do not wait for these |
MUHS Exam Point: "Pulselessness is an extremely late sign. Pulses may be present even in established compartment syndrome." - Bailey & Love 28th Ed. Never rely on absence of pulse to rule out CS.
Diagnosis
Clinical Diagnosis (Primary)
- Pain out of proportion
- Pain on passive muscle stretch (most sensitive)
- Paraesthesia in nerve distribution
- Tense compartment
"The absence of clinical findings is more useful for excluding the diagnosis than the presence is for confirming it." - Campbell's
Compartment Pressure Monitoring (Adjunct)
Used when:
- Altered level of consciousness (head injury, intubation, sedation)
- Unreliable clinical examination
- Epidural anaesthesia masking pain
- Peripheral nerve injury / tourniquet palsy
- Children (difficult physical assessment)
Devices:
- Stryker handheld compartment pressure monitor (commercial)
- Whitesides three-way stopcock apparatus
- Wick/slit catheter monitor
- Arterial line manometer
Pressure Thresholds for Fasciotomy:
| Criterion | Threshold |
|---|---|
| Absolute compartment pressure | ≥ 30 mmHg |
| Delta pressure (ΔP) = Diastolic BP - Compartment pressure | ≤ 30 mmHg (Bailey & Love) / < 10-20 mmHg (Current Surgical Therapy) |
Note: Pressure measurements are erroneous in 30-35% of patients. Never use pressure alone - combine with clinical assessment. CPK and myoglobinuria are LATE markers and should NOT be used to establish diagnosis.
Treatment
Emergency (Immediate) - "Decompression"
- Remove all external constricting causes immediately - split casts, dressings down to skin level; remove circumferential bandages
- Limb should be kept at heart level (not elevated - reduces perfusion pressure)
- High-flow oxygen
- IV access, fluids
- Urgent senior surgical review
Definitive Treatment - Fasciotomy
Indication: Compartment pressure ≥ 30 mmHg OR ΔP ≤ 30 mmHg, OR strong clinical suspicion
Timing is critical:
- <6 hours: excellent results
- <12 hours: 68% good results
-
12 hours: only 8% good results → risk of permanent disability, Volkmann's contracture
Four-Compartment Fasciotomy of Leg (Double Incision - Mubarak & Hargens Technique)
Two incisions:
Incision 1 - Anterolateral (2 cm lateral to tibial crest):
- Releases anterior compartment (in line with anterior tibial muscle)
- Releases lateral compartment (in line with fibular shaft)
- Identify and protect superficial peroneal nerve posterior to the lateral intermuscular septum
Incision 2 - Posteromedial (2 cm posterior to posterior margin of tibia):
- Saphenous vein and nerve retracted anteriorly
- Releases superficial posterior compartment (over gastro-soleus)
- Releases deep posterior compartment (over flexor digitorum longus)
- If soleus bridge extends >halfway down tibia, release the extended origin
Post-fasciotomy wound management:
- Leave wound OPEN - never attempt primary closure
- Vacuum-assisted closure (VAC) device applied
- Return to OT at 48-72 hours for debridement + viability check
- Intravenous fluorescein + Wood's light to assess muscle viability
- Closure options: primary closure, secondary intention, split-thickness skin grafting (needed in ~50%)
- Delayed primary closure with "shoelace" vessel loop technique
Forearm fasciotomy:
- Volar and dorsal forearm compartments released
- If swelling extends to hand: carpal tunnel release + hand fasciotomies
Prophylactic fasciotomy:
- Indicated after revascularisation of prolonged ischaemic limb (>6 hours ischaemia)
- "Liberal concomitant calf ± thigh fasciotomies following revascularisation of prolonged ischaemic limb is advisable" - Bailey & Love
Complications of Untreated / Delayed Compartment Syndrome
| Complication | Mechanism |
|---|---|
| Volkmann's ischaemic contracture | Irreversible fibrosis of ischaemic forearm muscles → wrist flexion, finger flexion contracture |
| Permanent nerve damage | Sensory/motor deficit in compartment nerve distribution |
| Rhabdomyolysis | Muscle breakdown → myoglobinuria |
| Acute tubular necrosis / Renal failure | Myoglobin-induced tubular damage |
| Infection / Gas gangrene | Necrotic tissue |
| Limb loss | Irreversible ischaemia |
| Mortality | Sepsis, renal failure |
Management of rhabdomyolysis:
- Aggressive IV fluid resuscitation - target urine output >100 mL/hour until CPK <5000 U/L
- Urinary alkalinisation with bicarbonate
- Monitor electrolytes (K+ leak from necrotic cells)
Chronic Exertional Compartment Syndrome (CECS)
- Most common: anterior and deep posterior compartments of leg
- Athletes - long-distance runners, military recruits
- Forearm in weightlifters, rowers, welders
- Exercise increases muscle volume by ~20%
- 15-40% have associated fascial hernias
- Treatment: Fasciotomy (definitive)
Special Situations
Open Fractures
- Compartment syndrome CAN occur with open fractures - do NOT assume open wound decompresses the compartment
- High index of suspicion required
Children
- Physical findings more difficult to detect; diagnosis often delayed
- Altered pain expression
Incidence
- High and low-energy injuries have nearly equal incidence of compartment syndrome - do not underestimate low-energy injuries
Summary Box (MUHS Quick Points)
| Feature | Key Fact |
|---|---|
| Most common cause | Fractures (70%) |
| Most common site | Anterior compartment of leg |
| Most important sign | Pain out of proportion + pain on passive stretch |
| Most sensitive early finding | Paraesthesia (type-C nerve fibre ischaemia) |
| Pulselessness | Extremely LATE sign |
| Pressure threshold | ≥30 mmHg absolute / ΔP ≤30 mmHg |
| Fasciotomy timing | <6 hours for best outcome; >12 hours → poor |
| Leg fasciotomy | Double incision, 4-compartment release |
| Late complication | Volkmann's ischaemic contracture |
| Systemic complication | Rhabdomyolysis → Renal failure |
Sources: Bailey and Love's Short Practice of Surgery 28th Ed; Campbell's Operative Orthopaedics 15th Ed (2026); Current Surgical Therapy 14th Ed; Rosen's Emergency Medicine
Peg
I want to make sure I cover exactly what you need. "PEG" could mean a few different things in a surgery/medicine context:
Asking for Preferences
What does PEG refer to for your MUHS PG theory exam?
Reading File
Searching sources...
Finding Sources
Finding Sources
Excellent sources. Let me read the most comprehensive ones in parallel - Clinical GI Endoscopy, Maingot's, and Current Surgical Therapy.
Reading File
Reading File
Reading File
Excellent content. Let me now get the complications and contraindications sections.
Reading File
Reading File
Good. Now let me get the complications and contraindications from Clinical GI Endoscopy and the post-PEG care section.
Reading File
Reading File
Excellent - I have very comprehensive content. Now let me get the complications section from Clinical GI Endoscopy.
Reading File
Let me now get the contraindications and complications section specifically.
Finding Sources
Reading File
Now let me get the complications section from Pfenninger.
Reading File
I now have comprehensive, exam-ready content. Let me compile the full answer.
Percutaneous Endoscopic Gastrostomy (PEG) - MUHS PG Theory
Definition
PEG is a procedure in which a flexible feeding tube is placed into the stomach through the abdominal wall under endoscopic guidance, providing semi-permanent enteral access for nutrition, medication administration, or gastric decompression, without requiring general anaesthesia or open surgery.
Indications
PEG should be considered in any patient requiring specialized nutrition therapy for more than 4 weeks (or unable to maintain sufficient nutritional intake for >1 month despite a functioning GI tract).
| Category | Examples |
|---|---|
| Neurological | Stroke (CVA), head injury, altered consciousness, motor neurone disease, cerebral palsy, dementia |
| Oropharyngeal | Oropharyngeal/oesophageal tumours, facial trauma, post-surgery for head/neck cancer |
| Systemic | Severe malnutrition, cystic fibrosis, Crohn's disease, AIDS with wasting |
| Gastric decompression | Chronic gastric outlet obstruction, palliative decompression |
| Paediatric | Failure to thrive, congenital anomalies |
| Gastroparesis / reflux | Converted to PEG-J (jejunal tube through PEG) for transpyloric feeding |
Contraindications
Absolute
- No identifiable safe puncture site (e.g. interposing bowel on transillumination)
- Uncorrectable severe coagulopathy
- Haemodynamic instability / inability to safely perform endoscopy
- Life expectancy very short (procedure futile)
- Pharyngeal obstruction (tube cannot pass - use introducer/Russell technique)
- Peritonitis
Relative
- Prior abdominal surgery with adhesions
- Ascites
- Obesity (difficult transillumination)
- Hepatomegaly (liver between stomach and wall)
- Gastric varices
- Active gastric ulcer
- Sepsis
MUHS Exam Note: Oropharyngeal/oesophageal malignancy is NOT an absolute contraindication - but use Introducer (Russell) technique to avoid tumour seeding in the PEG tract. Pull/Push techniques carry risk of seeding oropharyngeal cancers into the tract.
Techniques
Three main techniques exist - differing in how the tube is brought into position:
1. Pull Technique (Ponsky-Gauderer) - Most Common (~90%)
Step-by-step:
- Patient supine/semi-Fowler; abdomen prepped and draped
- Endoscope passed, stomach distended with air insufflation
- Brief endoscopic survey of oesophagus, stomach, duodenum
- Assistant fingers the abdomen - identify the point of maximum transillumination and indentation (ideally 2-3 cm below costal margin, left upper quadrant - or lower/more central for antral placement to ease PEG-J conversion)
- Safe tract technique: 22-gauge spinal needle + saline syringe passed through abdominal wall. Bubbles should appear in syringe ONLY when needle enters gastric lumen (seen by endoscopist). If bubbles appear BEFORE - intervening hollow viscus present - choose new site
- Skin incision (7-9 mm), 14G cannula advanced into gastric lumen, snare tightened around it, stylet removed
- Blue looped guide wire passed through cannula into stomach, snared by endoscopist ("blue through" the silver loop of feeding tube)
- Endoscope + snare withdrawn through oesophagus and out of mouth, bringing guidewire out of mouth
- Wire looped to PEG tube; tube pulled down through oesophagus, stomach and out through abdominal wall
- Endoscope reinserted to confirm internal bolster position against anterior gastric wall
- External bolster placed loosely - allow one finger between bolster and skin
2. Push Technique (Sachs-Vine)
- Single-stranded guidewire passed through trocar, brought out of mouth
- Long plastic leader attached to PEG tube pushed over guidewire and out through abdominal wall
- Otherwise same steps as Pull technique
3. Introducer / Russell Technique (Percutaneous, no transoral passage)
- Uses Seldinger technique + peel-away sheath + fluoroscopy
- Tube placed percutaneously without passing through oropharynx
- Preferred for: oropharyngeal malignancy (avoids tumour seeding), obstructed oesophagus
- Endoscope used for mucosal counterpressure during insertion only
- Inflatable balloon tip instead of mushroom bumper
Pre-procedure Preparation
- Antibiotic prophylaxis: Single IV dose of 3rd-generation cephalosporin (e.g. cefazolin 1g) before procedure - mandatory
- Aspirin does NOT need to be stopped
- Warfarin: switch to LMWH 1 week before, hold dose on morning of procedure
- Clopidogrel: ideally switch to aspirin alone 5 days before; if not possible, proceed with caution (epinephrine in local anaesthetic, tighter external bolster)
- NPO (nil by mouth) for 4-6 hours before
- INR, platelets, coagulation screen
Post-procedure Care
- Feeding may begin 4 hours after placement
- Clean stoma with soap and water daily; split 4x4 gauze sponge placed OVER (not under) external bolster
- Antibacterial ointment NOT routinely recommended
- Tube irrigated with water before and after feeds/medications
- Rotate tube daily to prevent buried bumper syndrome
- External bolster should allow one finger beneath it at all times
PEG-J (Jejunal Extension through PEG)
- Indicated when patient cannot tolerate gastric feeding (gastroparesis, severe GORD, recurrent aspiration)
- Jejunal tube passed through PEG lumen under endoscopic guidance, advanced beyond ligament of Treitz
- 24 Fr PEG accommodates 12.5 Fr J-tube; 20 Fr PEG accommodates 8.5 Fr J-tube
- Note: aspiration pneumonia is usually from aspirated oropharyngeal secretions, NOT necessarily from gastric reflux
Complications
Early / Periprocedural
| Complication | Notes |
|---|---|
| Wound infection (most common) | ~5-30%; prophylactic antibiotics reduce incidence |
| Haemorrhage | At puncture site or gastric mucosa |
| Malpositioning / colon puncture | Interposing colon between stomach and wall; prevented by safe tract technique |
| Aspiration | During endoscopy |
| Peritonitis | Leakage of gastric contents; rare with proper technique |
| Pneumoperitoneum | Free air under diaphragm; usually self-limiting |
Late / Post-procedure
| Complication | Description |
|---|---|
| Buried Bumper Syndrome | Internal bolster migrates into gastric wall and is covered by mucosa; occurs when external bolster too tight; causes obstruction, tube won't rotate; removed endoscopically (needle-knife incision) or surgically |
| Peristomal leakage | Tube too loose, stoma enlarged; treat with NPO + skin protection; may need re-siting |
| Tube blockage | Flush regularly; unclog with warm water, cola |
| Tube dislodgement | - If <4 weeks (immature tract): do NOT replace blindly - refer for endoscopic replacement (risk of peritonitis) - If ≥4 weeks (mature tract): replace with Foley catheter or original tube temporarily |
| Necrotising fasciitis | Rare but lethal; diabetics/immunocompromised at risk; treat with wide debridement + broad-spectrum antibiotics + ICU |
| Tumour implantation in PEG tract | Occurs in <1% of patients with oropharyngeal cancer undergoing pull/push PEG; almost universally fatal (0% 5-year survival) |
| Granuloma | Overgrowth of granulation tissue at stoma; treated with silver nitrate |
| PEG site herniation | Rare late complication; diagnose with CT; treat surgically |
| Volvulus around PEG tube | Rare; more common in children; involves stomach/colon/small bowel; treat surgically |
MUHS Exam Key Point: Buried bumper syndrome - caused by external bolster too tight → internal bolster grows into gastric wall. Prevented by leaving one finger's breadth between bolster and skin.
Advantages of PEG over Surgical Gastrostomy
| PEG | Surgical Gastrostomy |
|---|---|
| No general anaesthesia | Requires GA/spinal |
| Less invasive | Open or laparoscopic surgery |
| Lower cost | Higher cost |
| Lower morbidity/mortality | Higher wound complications |
| Can be done at bedside/endoscopy suite | Requires OT |
| Preferred method in most patients | Reserved for when endoscopy not possible |
Removal of PEG Tube
- Can be removed when no longer needed (after tract matures in ~4-6 weeks, tract closes spontaneously after removal)
- Methods:
- Traction removal (cut-and-push): For mushroom/bumper-type internal fixator - snip tube at skin level, push internal bumper into bowel to pass per rectum (suitable for mushroom bumpers <28 Fr)
- Endoscopic removal: Snare the internal bumper and withdraw through mouth - more controlled
- For buried bumper: endoscopic or surgical incision over bumper
Summary Table for Quick Revision
| Point | Fact |
|---|---|
| Duration of feeding needed | >4 weeks = PEG |
| Prophylactic antibiotic | Single IV 3rd-gen cephalosporin |
| Most common technique | Pull (Ponsky) ~90% |
| Safe tract technique | Saline + spinal needle; bubbles only on gastric entry = safe |
| Bolster tension | One finger between external bolster and skin |
| Start feeds | 4 hours post-procedure |
| Oropharyngeal malignancy | Use Introducer/Russell technique |
| Most common complication | Wound infection |
| Buried bumper cause | External bolster too tight |
| Tumour seeding | Pull/Push technique in oropharyngeal cancer |
| PEG-J indication | Gastroparesis, severe reflux, aspiration |
| Tract maturation | ~4 weeks |
Sources: Maingot's Abdominal Operations; Clinical Gastrointestinal Endoscopy 3rd Ed; Current Surgical Therapy 14th Ed; Pfenninger and Fowler's Procedures for Primary Care 3rd Ed
This is a shared conversation. Sign in to Orris to start your own chat.