
Orthopaedic fracture table
orthopaedic fracture table surgical positioning femur
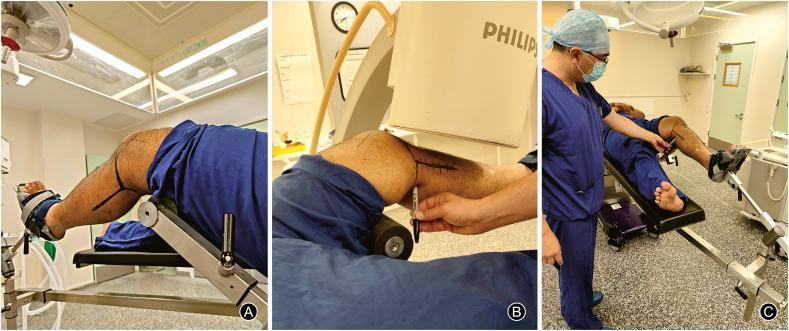
A three-panel clinical and procedural photograph (A, B, C) demonstrating standardized patient positioning and operating table setup for the surgical management of proximal tibia and distal femur fractures. The images show a patient in the supine position with the operative leg elevated and flexed. Key components include a transverse radiolucent post covered with a soft padded bolster positioned under the distal third of the femur to lift the femoral condyles and facilitate joint distraction. Panel A illustrates the operative foot secured in a foot support with straps, connected to the table via a metal bar and hinge joint, while the non-operative leg rests on a separate support. Panel B highlights intraoperative fluoroscopy using a C-arm imaging device positioned for an anteroposterior (AP) view of the knee joint. Panel C shows the surgical team identifying anatomical landmarks marked on the skin, demonstrating access to posteromedial and posterolateral structures. This setup is designed to optimize surgical exposure, facilitate fracture reduction through traction, and ensure clear radiological visualization during orthopedic procedures.
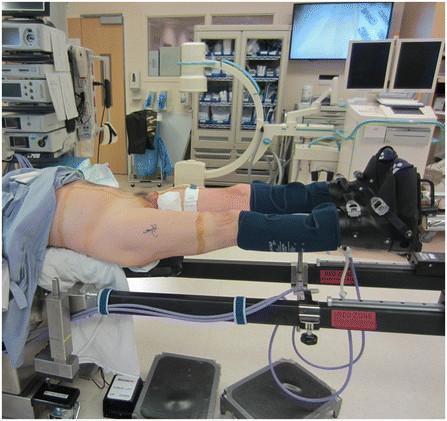
A clinical procedural photograph demonstrating the supine positioning of a patient on a specialized orthopaedic traction table, specifically a hana® table, for an anterior approach hip surgery. The patient is secured with a well-padded perineal post located between the legs to provide a counter-traction point. Both lower extremities are secured in heavy-duty padded traction boots, which are attached to the independent spars of the table. The positioning shows approximately 15 degrees of internal rotation and 5–10 degrees of hip flexion. Sequential compression devices are visible on the calves to mitigate the risk of venous thromboembolism. The background includes standard operating room equipment, such as a C-arm fluoroscopy unit and monitors, indicating the intraoperative setting where real-time imaging is used to guide the surgical procedure. This setup is designed to allow for the manipulation of the femur and hip joint during procedures like total hip arthroplasty (THA) or revision hip surgery.
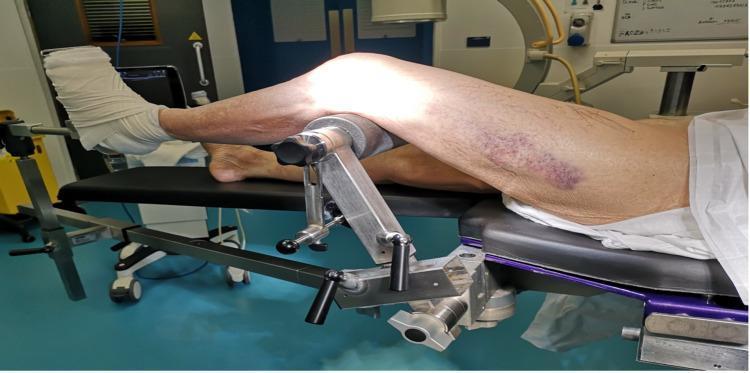
A clinical photograph demonstrates the surgical positioning for an indirect reduction of a distal femur fracture on a traction table. The patient is in a supine position with the left leg elevated. A specialized tibia nailing attachment is utilized, featuring a metal framework with adjustable femoral condyle pads that provide posterior support at the level of the distal femur and proximal tibia, maintaining knee flexion. Significant ecchymosis is visible on the anterolateral aspect of the left thigh, indicative of soft tissue trauma associated with the fracture. The left foot and ankle are heavily wrapped in white protective wool and secured with an adhesive bandage to a metal traction unit footplate. This setup allows for longitudinal traction and skeletal alignment under image intensifier guidance. The contralateral (right) leg remains in a neutral supine position on the radiolucent table. This configuration is typical for orthopedic procedures requiring stable limb fixation and intraoperative fluoroscopy for intra-articular fracture management.
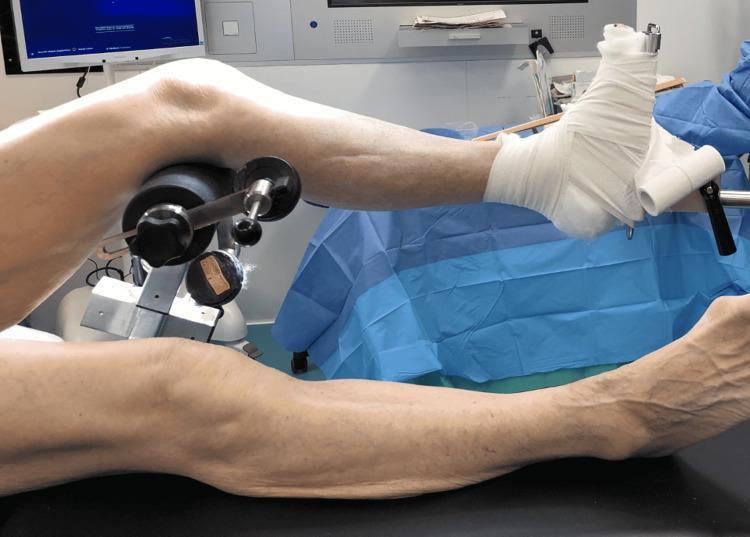
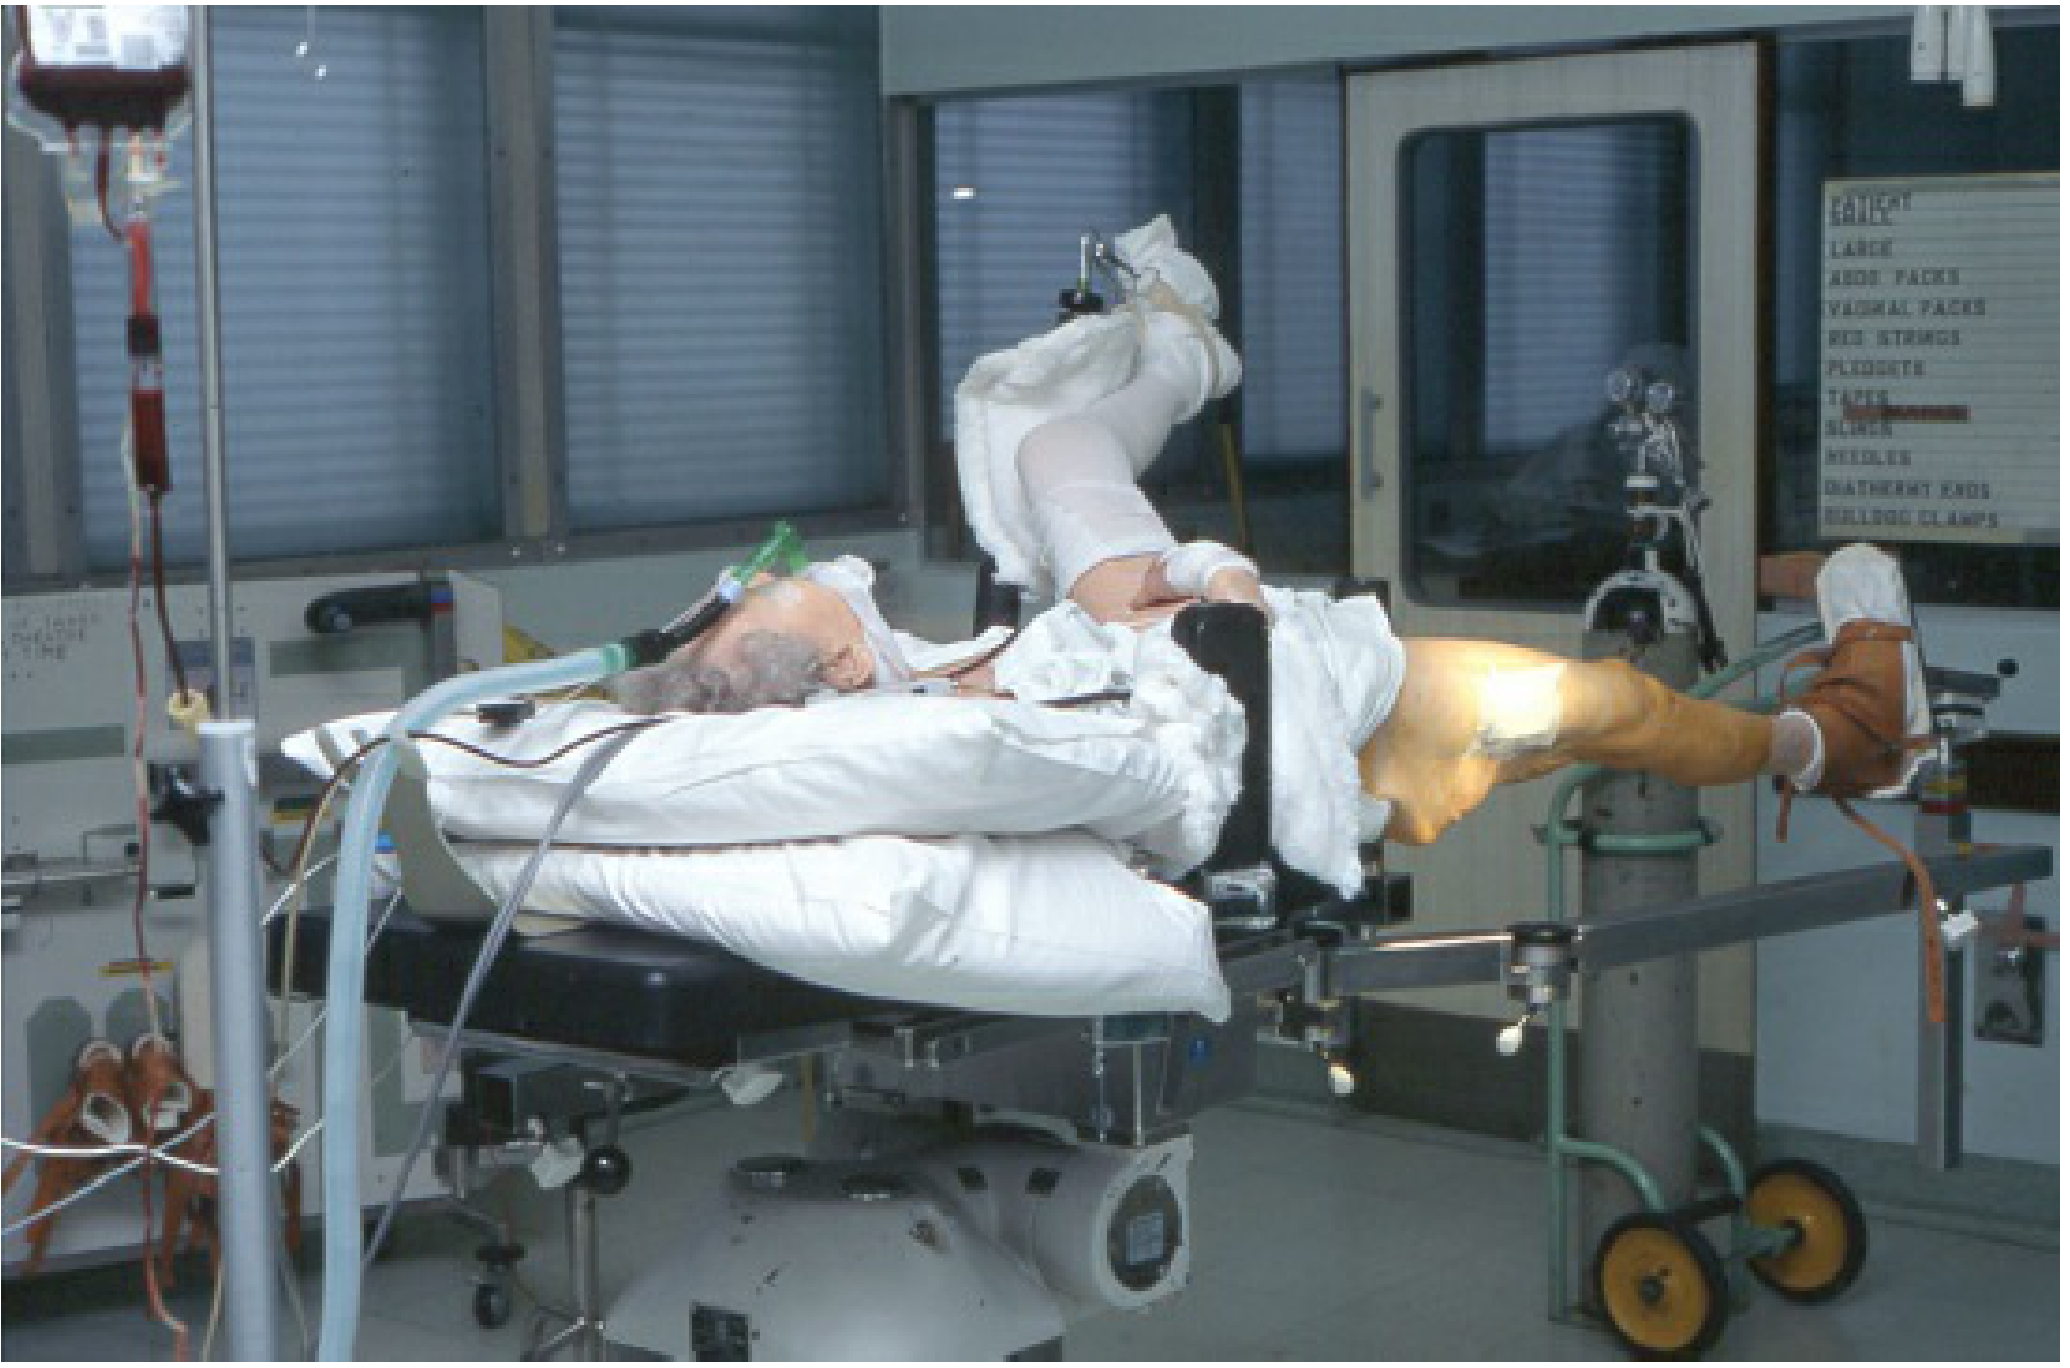
A clinical procedural photograph demonstrating the intraoperative positioning of a patient's lower extremities for orthopedic surgery, specifically a distal femur fracture reduction. The patient is in a supine position on a radiolucent traction table. The left leg is flexed at the knee and supported by a specialized tibia nailing attachment featuring a black cylindrical femoral condyle pad to provide posterior support. The left foot is meticulously wrapped in white orthopedic wool and secured to a mechanical traction unit footplate using adhesive bandages and clamps to maintain longitudinal traction and rotational control. The right leg remains in a neutral, extended position on the surgical table. Visible hardware includes metallic support rods, adjustable knobs for precise limb alignment, and blue surgical drapes in the background. This setup illustrates the 'indirect reduction' technique required for intramedullary nailing or internal fixation of distal femoral fractures, allowing for fluoroscopic imaging and limb manipulation.
Orthopaedic Fracture Table
What It Is
Indications (Common Uses)
| Fracture | Notes |
|---|---|
| Intertrochanteric / trochanteric hip fractures | Strongly recommended; fixation without a fracture table is not advised as reduction is difficult to maintain |
| Femoral neck fractures | Supine positioning with traction for cannulated screw or DHS fixation |
| Femoral shaft fractures | Antegrade intramedullary nailing - either supine or lateral positioning on the table |
| Subtrochanteric fractures | Useful but requires care - excessive traction can accentuate the proximal flexion deformity |
| Tibial shaft fractures | Used with a calcaneal traction pin for IM nailing; hip flexed 45°, knee flexed 90° |
Patient Positioning
- Hip in neutral (or slight flexion/adduction for nail entry access)
- Injured foot secured in traction boot, or calcaneal traction pin attached to traction apparatus
- Uninjured leg: either flexed/abducted in a lithotomy stirrup (lithotomy position) or placed in extension (scissors position)
- Image intensifier placed between the legs (lithotomy) or from the opposite side (scissors)
- Well-padded perineal post placed in the groin region
- Preferred in obese patients (improves access to proximal femur entry point)
- Increased positioning time; less favourable for polytrauma
Fracture Table vs. Standard Radiolucent Table
| Feature | Fracture Table | Standard Radiolucent Table |
|---|---|---|
| Skilled assistant required | Not needed | Required to maintain reduction |
| Reduction maintenance | Easier (traction applied mechanically) | More difficult without skeletal traction |
| Positioning time | Longer | Shorter |
| Multiple injuries / polytrauma | Less ideal | Preferred |
| Associated spine injury | Caution (lateral bending) | Preferred |
| Obesity | Less ideal (supine); lateral preferred | Difficult |
| Flexibility of limb manipulation | Limited (limb fixed distally) | Greater |
| Risk of iatrogenic nerve injury | Higher | Lower |
Advantages of the Fracture Table
- Applies very high distraction forces across the fracture
- Stabilises the limb free in space, allowing near-circumferential access to the entire femur
- Reduces need for constant assistant traction
- Facilitates fine-tuning of fracture reduction
- Allows clear lateral fluoroscopic views of the proximal femur
Complications and Risks
- Caused by pressure from the perineal post, worsened by hip adduction during nail insertion
- Minimised by: well-padded post, limiting hip adduction, releasing traction during setup/draping and entry portal creation, minimising operative time
- Higher risk in: segmental femoral fractures, floating knee injuries (require prolonged or large traction forces)
- Risk increases with prolonged traction
- The uninjured leg should be placed in extended supine position (NOT in a well-leg holder, which can elevate compartment pressures)
- Risk if the unoperated leg is placed in a calf-supporting holder for prolonged periods
- In subtrochanteric fractures, excessive traction can accentuate the flexion deformity of the proximal fragment and prevent reduction
- Solution: limited open reduction or percutaneous joystick manipulation rather than excessive traction
Technique Tips (Tibial IM Nailing on Fracture Table)
- Place a calcaneal traction pin before positioning
- Supine with hip flexed 45°, knee flexed 90°
- Place a well-padded crossbar proximal to the popliteal fossa to support the thigh
- Attach calcaneal pin to traction apparatus, apply traction, reduce fracture under fluoroscopy
- Release traction after confirming reduction ability (reduces nerve injury risk)
- Drape with exposure from above the patella to distal tibia; reapply traction after entry portal is made
Lateral vs. Supine Positioning Summary (Antegrade Femoral Nailing)
| Scenario | Best Choice |
|---|---|
| Polytrauma / multiple injuries | Supine, radiolucent table |
| Spine injury (associated) | Supine, radiolucent table (plating/retrograde nail) |
| Acetabular fracture (associated) | Supine (either table) |
| Obesity | Lateral on fracture table |
| Need to minimise assistant involvement | Fracture table (either position) |
- Campbell's Operative Orthopaedics, 15th Ed 2026 - Chapters on tibial and femoral nailing, complications of positioning
- Rockwood and Green's Fractures in Adults, 10th Ed 2025 - Chapter 57 (femoral shaft), Chapter 54 (trochanteric fractures), Chapter 13 (fracture distraction/lengthening)
Generate a step-by-step intraoperative checklist for fracture table setup
Fracture Table Setup - Intraoperative Checklist
Applies to: Femoral shaft, subtrochanteric, intertrochanteric/trochanteric, and femoral neck fractures. Tibial IM nailing steps are noted separately. Adapt for procedure type (antegrade nail, DHS/SHS, retrograde nail).
PHASE 1 - Pre-Positioning Decision
- Choose table type - fracture table vs. standard radiolucent table based on:
- Fracture pattern and acuity
- Surgeon preference and assistant availability
- Body habitus (obese patients: consider lateral on fracture table)
- Polytrauma or associated spine/acetabular injury (favour radiolucent table)
- Choose patient position - supine (universal) vs. lateral decubitus (proximal subtrochanteric, obese)
- Confirm C-arm/image intensifier is compatible with planned table orientation and entry position
- Decide on traction method - skeletal traction pin (distal femur or calcaneus) vs. traction boot
- Distal femoral pin preferred: avoids stress through injured knee, allows knee flexion, better distal segment control
- Traction boot: simpler but transmits force through knee; risk of sciatic nerve stretch with knee in extension
PHASE 2 - Pre-Positioning Preparation (Before Patient on Table)
- Insert skeletal traction pin if planned (do this before positioning):
- Tibial IM nailing: calcaneal traction pin
- Femoral IM nailing: distal femoral traction pin (medial to lateral, anterior to allow nail passage)
- Confirm pin position with fluoroscopy before positioning on table
- Pre-measure rotational alignment on the uninjured limb using fluoroscopy; save images for intraoperative reference (lesser trochanter profile on AP; hip anteversion on lateral)
- Confirm all table attachments are available: perineal post, traction boot(s), leg holder/stirrup, crossbar, traction apparatus connectors
PHASE 3 - Patient Positioning on the Fracture Table
3A - Trunk and Upper Limbs
- Transfer patient to fracture table supine; translate distally until firm contact between perineum and perineal post
- Pad the perineal post generously (reduces pudendal nerve compression risk)
- Non-operative arm: place on arm board
- Operative arm: secure across the chest (out of fluoroscopy field)
- Confirm adequate airway access for anaesthesiologist, especially in polytrauma
3B - Operative (Injured) Leg
- Pad the foot well; wrap in self-adherent dressing if using traction boot
- Place foot securely in traction boot OR attach skeletal traction pin to traction apparatus
- Set hip position:
- Antegrade femoral nail (supine): flex hip 15-30°; slight adduction for trochanteric/piriformis entry
- Trochanteric fractures (DHS/SHS): supine with traction applied
- Tibial IM nail: hip flexed 45°, knee flexed 90°; place well-padded crossbar proximal to popliteal fossa to support thigh
- Apply traction - confirm fracture can be reduced under fluoroscopy (AP and lateral)
- Release traction after confirming reducibility - do not maintain traction during draping and entry portal creation (reduces nerve injury risk)
3C - Non-Operative (Well) Leg
- Lithotomy position - flex hip and knee, secure in stirrup/leg holder; C-arm enters between the legs for AP view
- Caution: Check hourly for compartment syndrome; avoid calf pressure from the holder; support at the lateral knee, not the calf
- Scissors (extended) position - well leg kept in extension, adducted; secured to central beam with pillow and adhesive wrap or in foot holder
- Preferred when: compartment risk is a concern, contralateral hip motion is limited, or lithotomy is contraindicated
- C-arm enters from the opposite side at ~30° for AP view
PHASE 4 - C-Arm Fluoroscopy Setup
- Position image intensifier and confirm adequate AP view of fracture and proximal femur
- Confirm adequate lateral view - rotate C-arm under (or around) the operative leg
- Lithotomy: C-arm enters between legs; rotated under for lateral
- Scissors: C-arm from opposite side; rotated around for lateral
- Save reference images of the uninjured hip and knee at matched rotation (for rotational correction intraoperatively)
- Confirm no equipment obstructs the C-arm arc before draping
PHASE 5 - Final Position Check Before Draping
- Confirm fracture reduction on both AP and lateral fluoroscopy views
- Verify rotational alignment - rotate distal fragment to match proximal; use lesser trochanter profile and "true lateral" C-arm angle as reference
- Check that the operative entry portal site is accessible (e.g., proximal femur for antegrade nail, patella tendon for tibial nail)
- Confirm adequate padding at all pressure points:
- Perineal post (pudendal nerve)
- Popliteal fossa crossbar (posterior tibial nerve, popliteal vessels - for tibial nailing)
- Fibular head and lateral malleolus of well leg (peroneal nerve)
- Axillary roll if lateral decubitus
- Confirm patient is stable and secure on the table before releasing grip
PHASE 6 - Skin Preparation and Draping
- Shave and clean the operative field
- Prep with iodine-based or chlorhexidine solution
- Apply drapes - consider a transparent plastic isolation drape suspended from a rail to separate the sterile field from the C-arm
- Expose: from above the patella to distal tibia (tibial nailing); or proximal femur + full thigh (femoral nailing)
- Reapply traction after entry portal is established (reduce time under traction)
- Perform surgical pause/time out
PHASE 7 - Intraoperative Traction Management
- Use minimum traction necessary to maintain reduction - do not over-distract
- In subtrochanteric fractures: avoid excessive traction - can accentuate proximal flexion deformity; use joystick or limited open reduction if needed
- Adduct the hip only briefly when needed for nail entry; return to neutral to reduce perineal post pressure
- Monitor well-leg position at least hourly if in lithotomy - check for compartment signs
- Release traction as soon as reduction is no longer needed (e.g., after reaming or proximal locking)
KEY COMPLICATIONS TO ACTIVELY PREVENT
| Risk | Preventive Step |
|---|---|
| Pudendal nerve palsy | Generous post padding; minimise adduction and traction time |
| Peroneal nerve palsy | Pad fibular head; avoid prolonged traction |
| Well-leg compartment syndrome | Avoid calf pressure in leg holder; scissors position preferred; hourly checks |
| Malrotation | Pre-op rotational reference images; intraop lesser trochanter/C-arm angle check |
| Vascular injury (traction pin) | Place distal femoral pin medial-to-lateral, anterior to nail path |