
Paediatric tracheostomy in detail according to standard ENT textbook and in simplified manner without missing any important details or information
paediatric tracheostomy tube child surgical technique
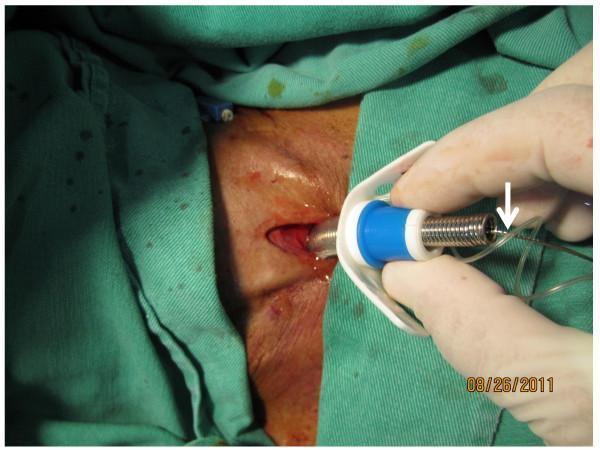
This clinical photograph captures a critical step in a percutaneous tracheostomy procedure. The image depicts the insertion of a tracheostomy tube into a surgically created tracheal opening in the anterior neck. The procedure follows the Seldinger technique, where the tracheostomy tube is advanced over a flexible, spherical-tip introducer and a pre-placed guidewire (indicated by a white arrow). A surgeon's gloved hand is shown stabilizing the tube assembly. The operative field is demarcated by green surgical drapes, and the neck skin shows signs of surgical preparation. Key instruments visible include the tracheostomy cannula with its white flange and blue connector, the metallic flexible introducer, and the thin guidewire emerging from the proximal end of the device. This visual serves as an educational aid for understanding airway management and surgical placement techniques in critical care or otorhinolaryngology.
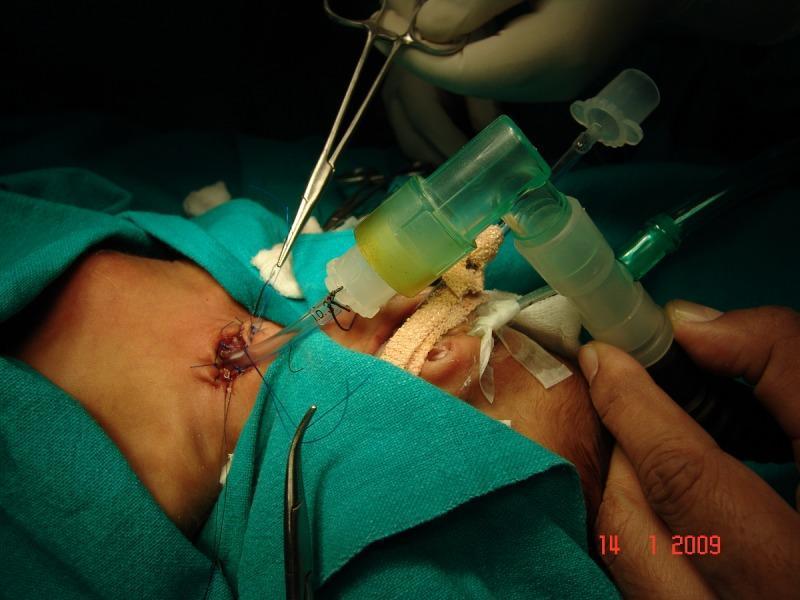
This clinical photograph captures a surgical tracheostomy procedure on a patient's neck within a sterile operative field draped in green surgical cloths. A clear, makeshift tracheostomy tube is seen inserted into a midline tracheal stoma. The surgical site displays peristomal inflammation, minor localized hemorrhage, and several dark blue non-absorbable sutures used to approximate the incision edges and secure the airway device. The tracheostomy tube is connected to a series of respiratory circuits via a green and yellow T-piece adapter and transparent plastic connectors. Hemostatic forceps are visible in the upper quadrant, held by a gloved hand, manipulating suture material. The image illustrates advanced airway management and surgical technique, highlighting the anatomical landmarks of the anterior neck and the complexity of neonatal or pediatric respiratory support systems.
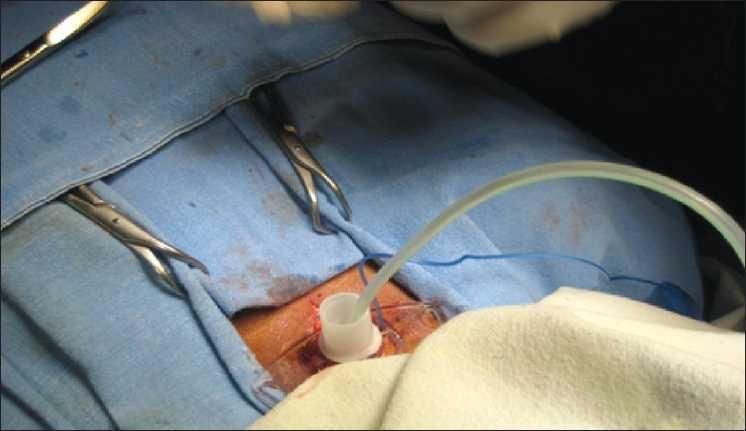
This clinical photograph captures a close-up of a surgical tracheostomy procedure. The image depicts a stoma in the anterior neck region where a white, flanged tracheostomy tube is being inserted. A flexible, translucent yellowish-green Ryle's tube is seen passing through the central lumen of the tracheostomy tube, serving as a guidewire in a 'railroading' technique to ensure proper tracheal placement and prevent false passage. The surgical site shows minor erythema and moistening at the skin edges. The operative field is surrounded by blue sterile surgical drapes, which are secured with metallic surgical clamps (forceps). Some reddish-brown staining, indicative of blood or serosanguinous fluid, is visible on the drapes. A blue suture or thread is also present near the insertion site. This visual illustrates a specialized airway management maneuver used in challenging tracheostomy cases to maintain airway patency during tube exchange or initial placement.
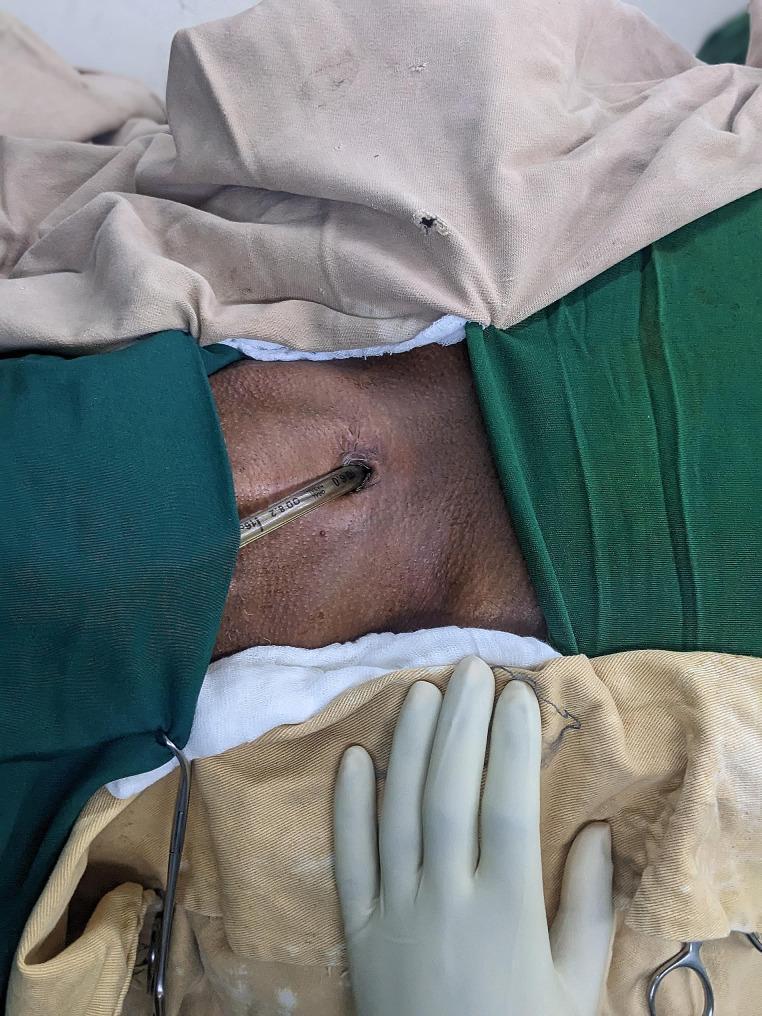
This clinical photograph captures a surgical field preparation for a tracheal resection or airway procedure. The patient is in a supine position with the head oriented to the left. The surgical site focuses on the anterior neck, where a tracheostomy stoma is present. A sterile, clear endotracheal tube (ETT) with visible depth markings is inserted directly through the tracheostomy site into the distal trachea to maintain ventilation. The surgical field is established using multi-layered draping: tan and green sterile drapes isolate the skin area, with white gauze or towels placed at the margins. A surgeon's hand in a sterile white glove is visible in the foreground, adjacent to surgical instruments like towel clips. The setup demonstrates 'cross-field ventilation,' a critical anesthetic technique where the ETT is passed under the drapes to the anesthesia machine to provide a clear, sterile surgical field for the repair of tracheal stenosis or end-to-end anastomosis. This visual is intended for surgical and anesthesia education regarding intraoperative airway management.
Paediatric Tracheostomy - A Complete Guide
1. Definition
- Tracheotomy: A surgical opening made in the trachea.
- Tracheostomy: Creation of a stoma at the skin surface that leads into the tracheal lumen (i.e., a permanent or semi-permanent opening).
2. Why Paediatric Tracheostomy Is Unique
- The paediatric trachea is shorter, narrower, softer, and more mobile
- The cricoid cartilage is the narrowest point of the paediatric airway (vs. the glottis in adults)
- The pretracheal tissues are loose - structures move more easily during dissection and neck extension
- The thyroid is relatively larger and often overlies the trachea
- Overextension of the neck in infants brings intrathoracic trachea into the operative field, risking an incision that is too low
- The great vessels at the root of the neck are closer to the operative field in infants
3. Indications for Paediatric Tracheostomy
- Relieve upper airway obstruction
- Prevent complications of prolonged intubation
- Reduce anatomical dead space
- Allow suction toilet of the trachea
Causes of Upper Airway Obstruction Requiring Tracheostomy
| Anatomical Site | Examples |
|---|---|
| Oropharynx / Tongue base | Macroglossia, Treacher Collins syndrome, Goldenhar syndrome, Cystic hygroma |
| Nose / Nasopharynx | Choanal atresia |
| Supraglottis | Supraglottic cyst |
| Glottis | Vocal cord palsy, Physical trauma |
| Subglottis | Subglottic stenosis, Subglottic haemangioma |
| Trachea | Tracheomalacia, High tracheal stenosis |
Important Note on Changing Indications
- The availability of good paediatric intensive care has allowed many airway surgeries to be done without a covering tracheostomy (the "single-stage" approach - post-operative intubation instead).
- Subglottic haemangioma: propranolol and surgical excision have largely replaced tracheostomy.
- Subglottic stenosis: anterior cricoid split procedure has also reduced the need for tracheostomy.
- Increasing numbers of tracheostomies are now performed for ventilatory support in neurologically impaired or premature children with chronic lung disease.
4. Surgical Anatomy
- Thyroid isthmus - crosses the trachea at the level of tracheal rings 2-4; must be divided or retracted superiorly
- Cricoid cartilage - must be identified before making the tracheal incision; incision too high risks subglottic stenosis
- Great vessels - especially in infants where the innominate artery sits higher and the operative field is compact
- Thyroid gland - relatively large in children and may obscure the trachea
- Pretracheal fascia - must be dissected cleanly in the midline
5. Pre-operative Preparation
- Procedure is always performed under general anaesthesia in children (never local anaesthesia)
- The anaesthetist maintains the airway via an oral or nasotracheal tube throughout the procedure
- The anaesthetist must be skilled in paediatric airway management
- A senior paediatric anaesthetist must always be present
- A bronchoscope should be available
- The correct-sized tracheostomy tube must be selected and ready before the incision is made
- A spare tube of the same size and one size smaller must be present on the table
6. Operative Technique (Step by Step)
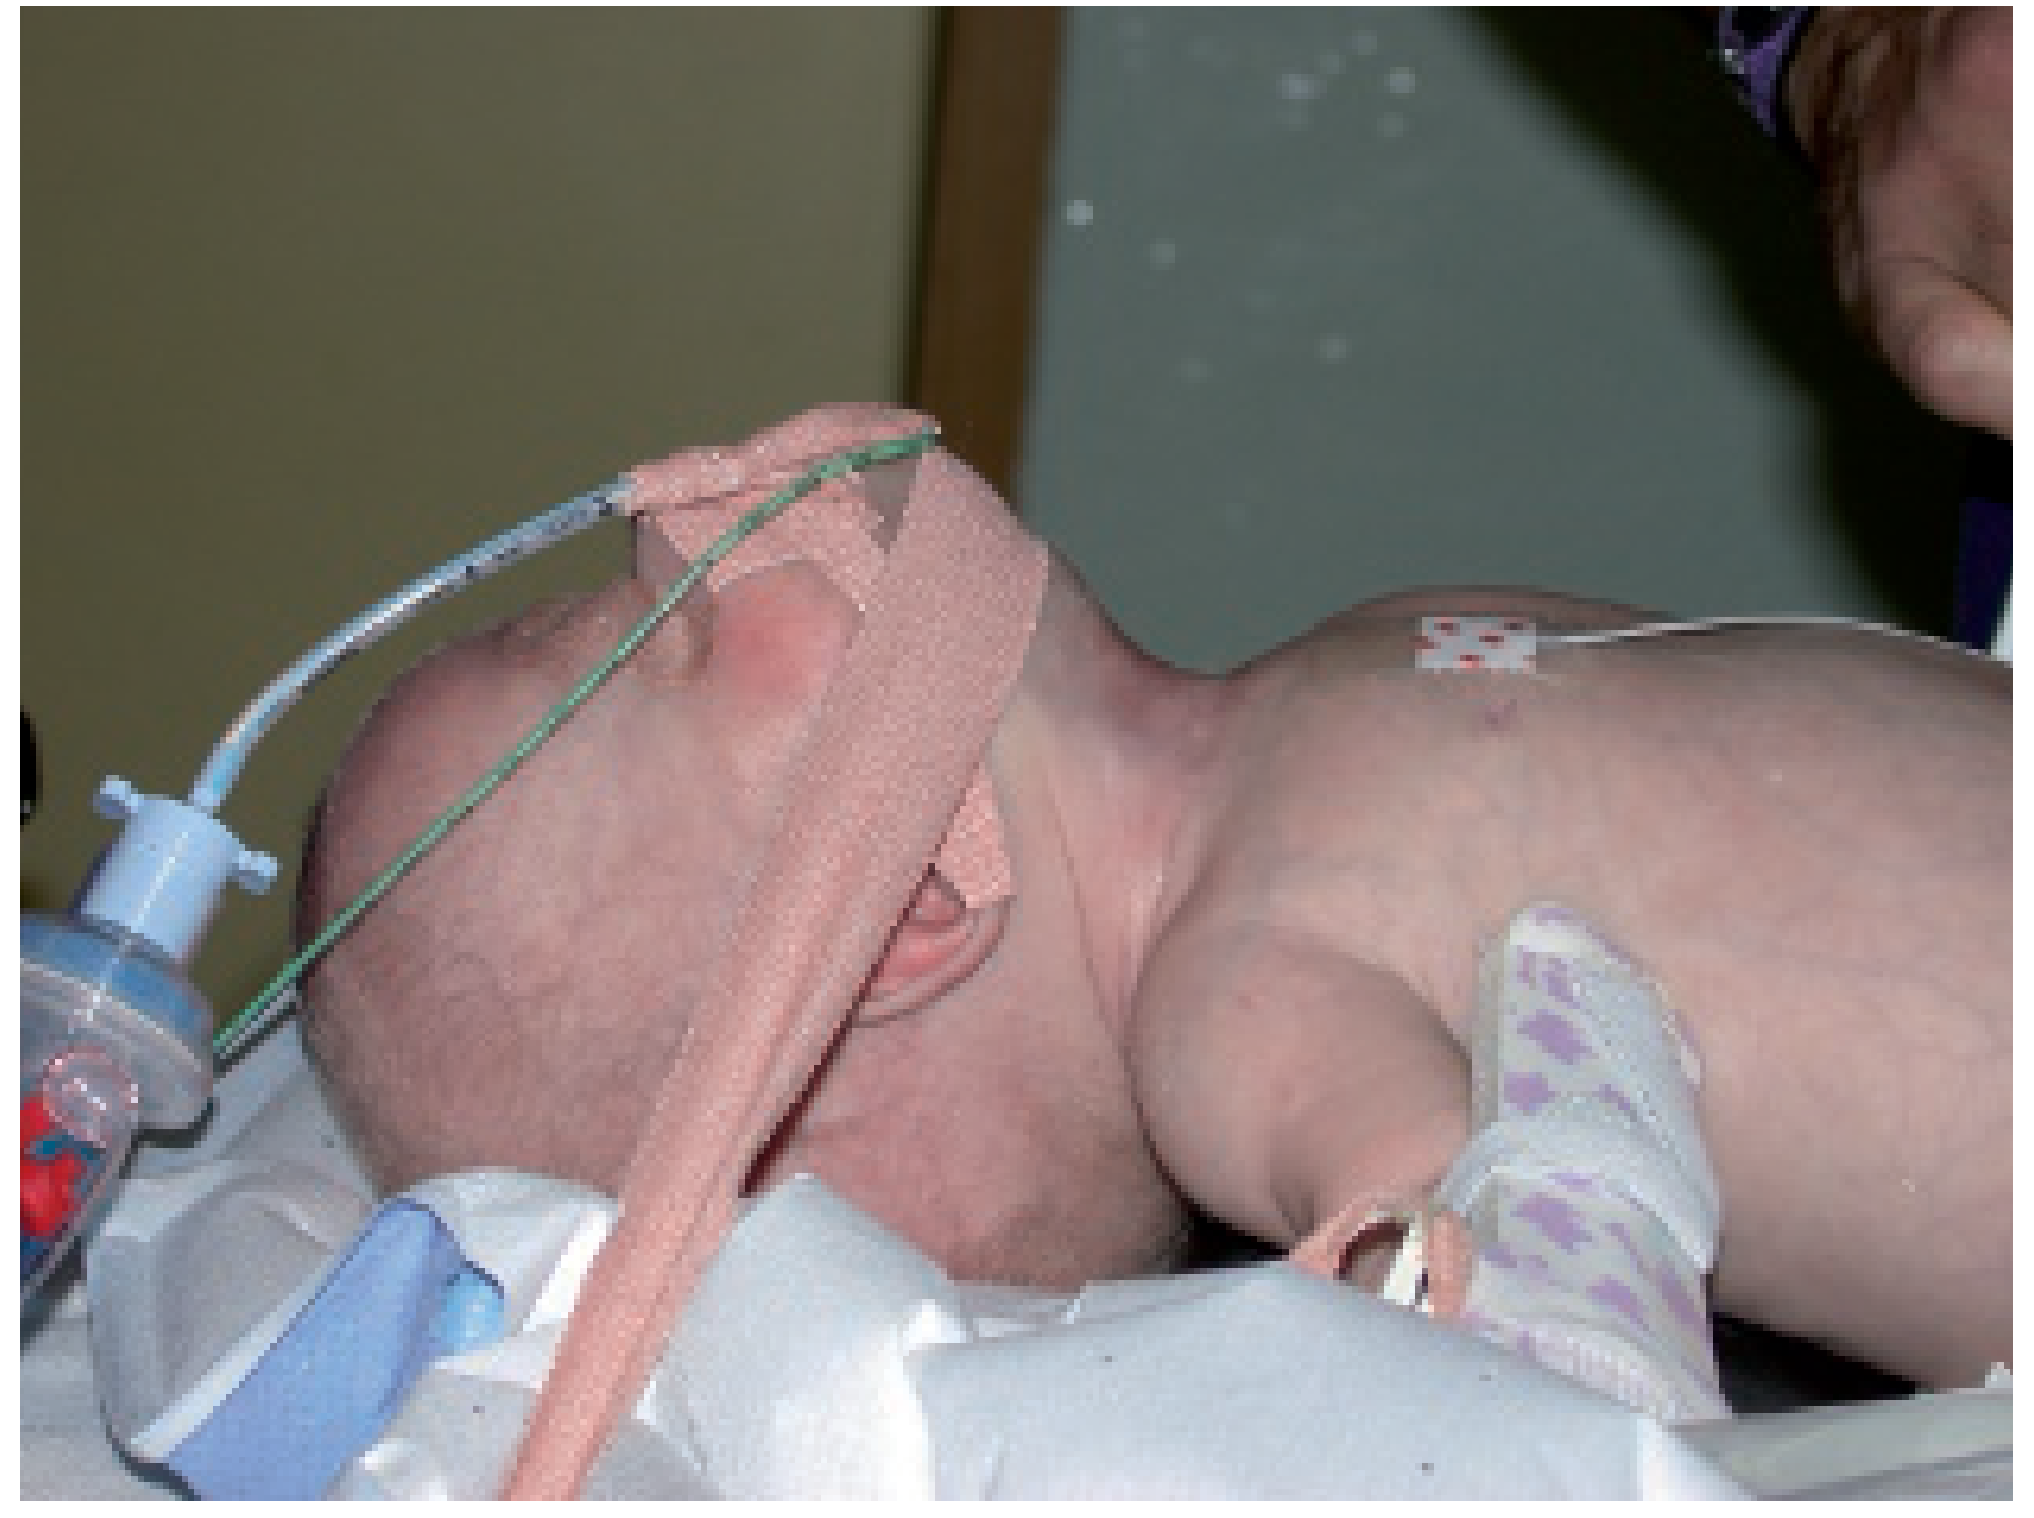
Step 1 - Positioning
Step 2 - Skin Incision
- In adult practice, a horizontal incision halfway between the cricoid and sternal notch is standard.
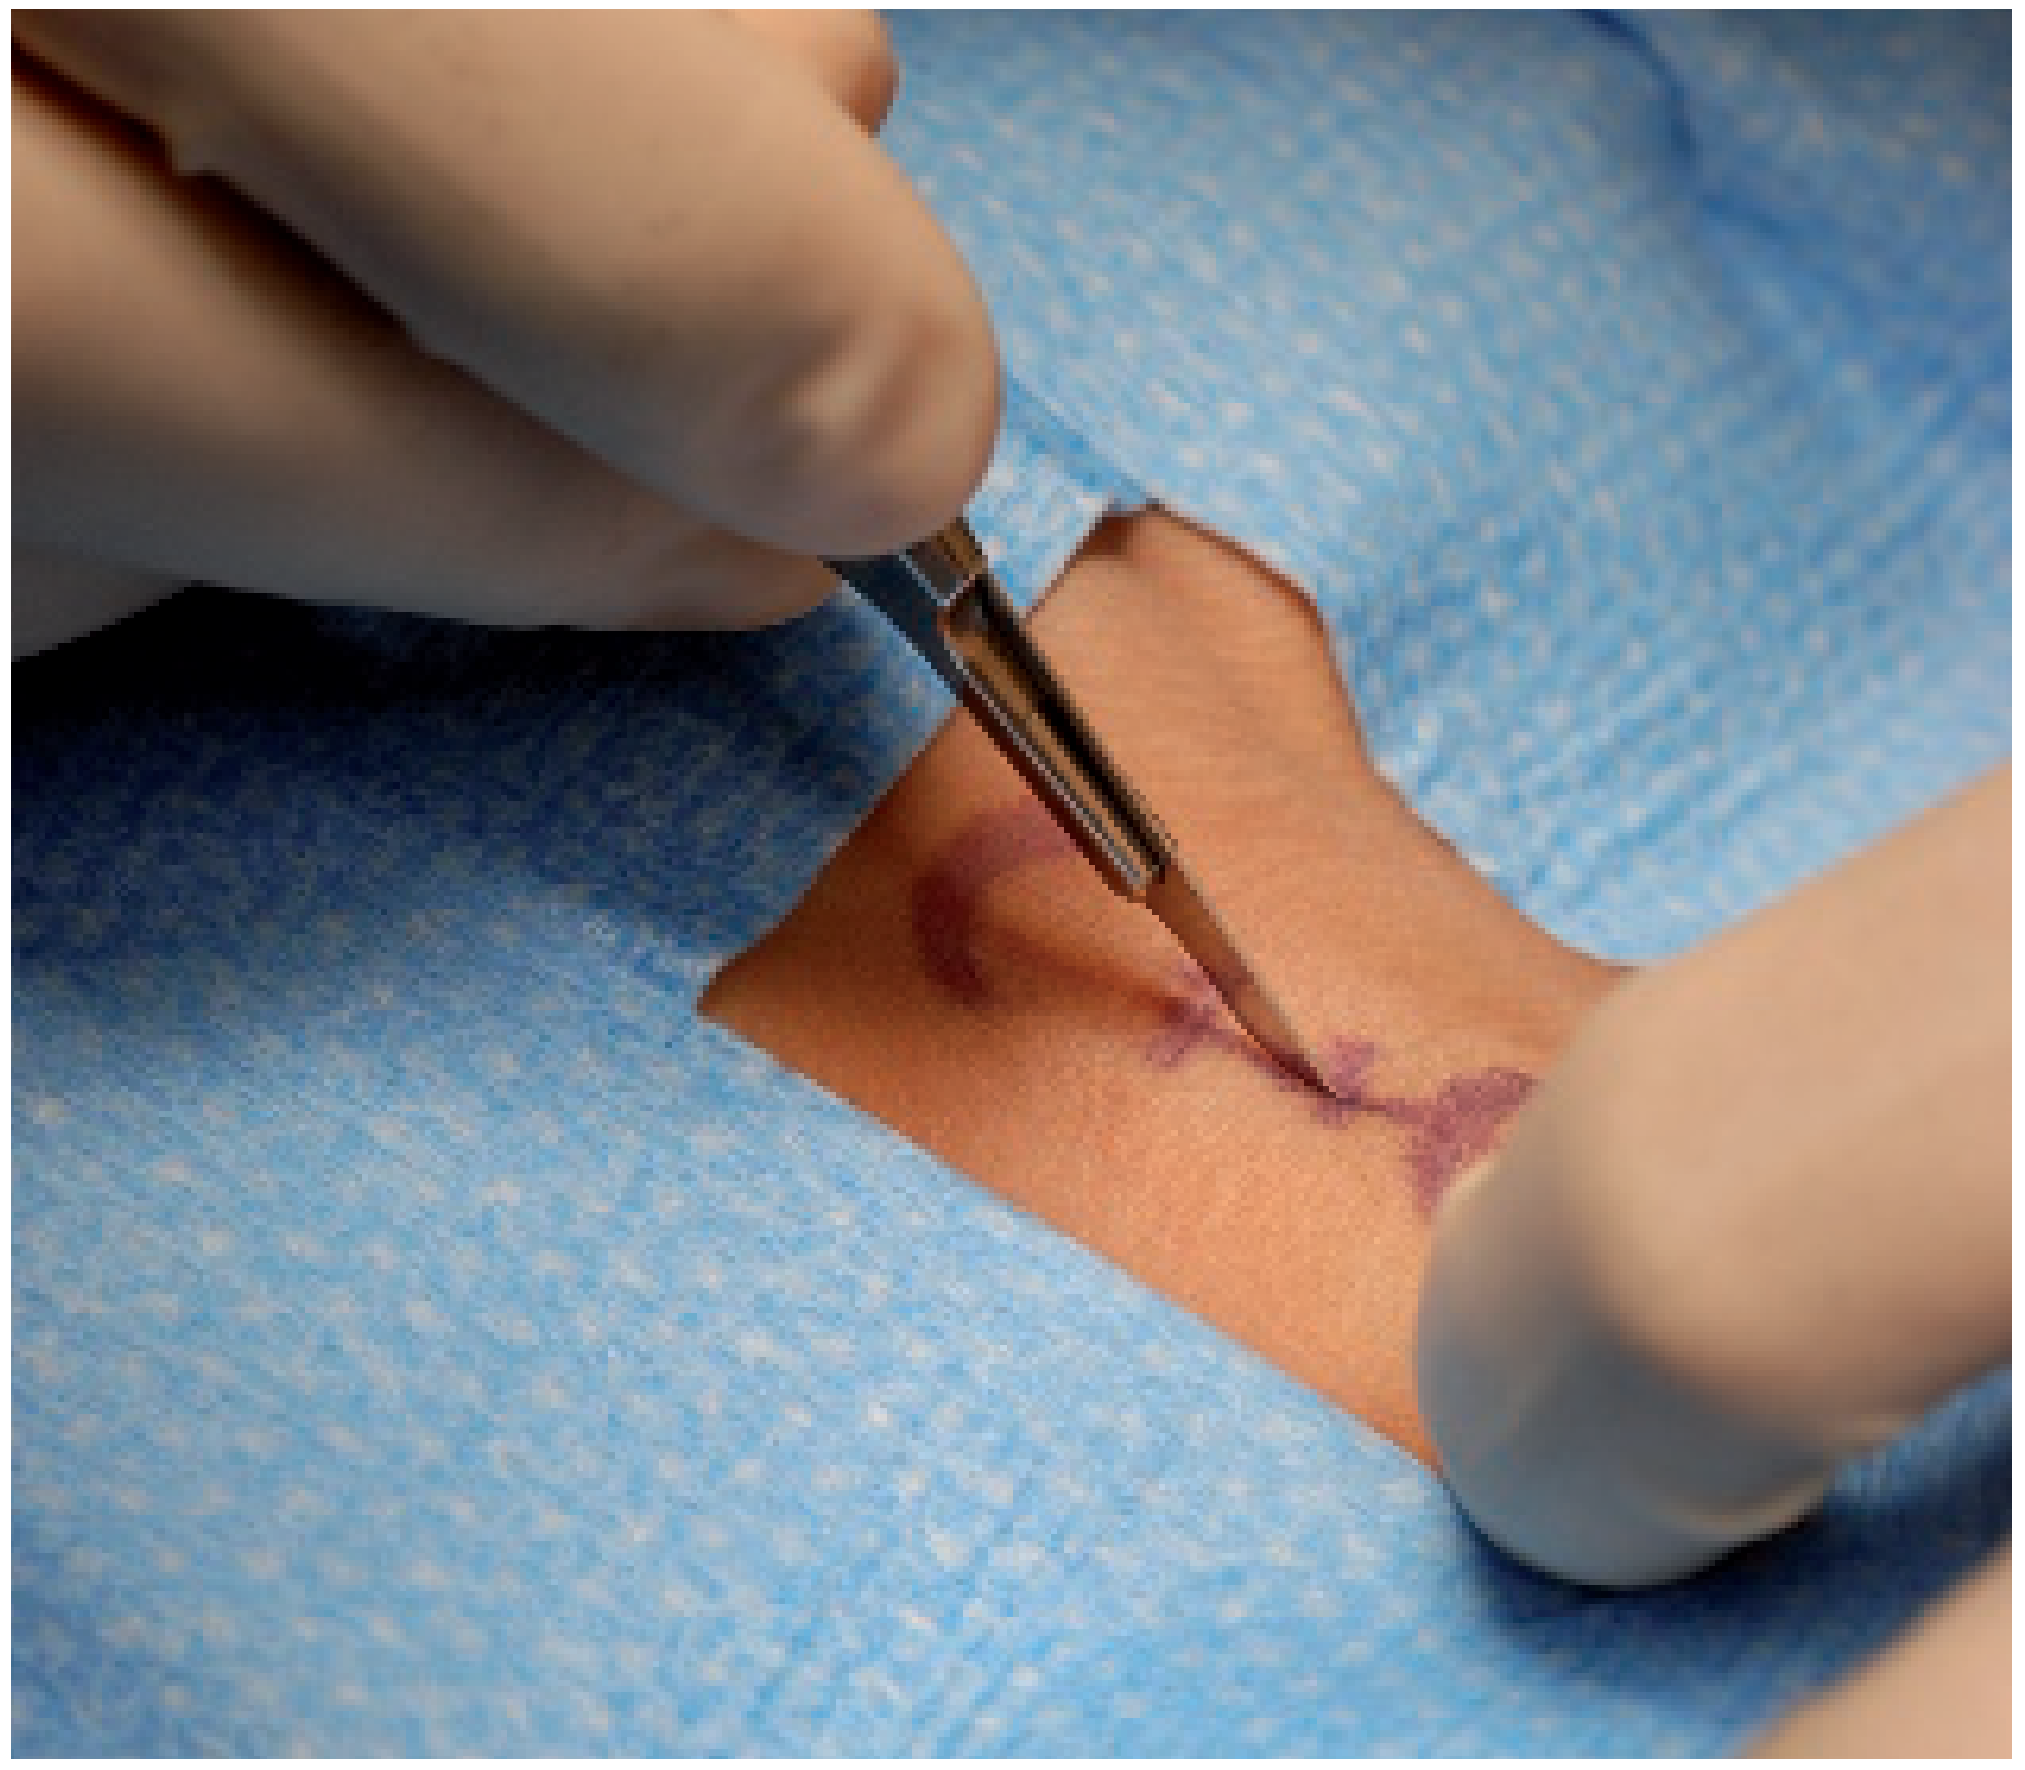
- In paediatric practice, a vertical skin incision has become standard in most major children's units over the last two decades.
- Advantages of vertical incision in children:
- Keeps dissection in the midline
- Reduces tendency to stray from the trachea
- Allows easier placement of maturation sutures
- The incision is placed halfway between the cricoid ring and the sternal notch.
- The incision does not need to be much longer than required to insert the tube - skin retraction during surgery makes the defect appear larger than the original incision.
Step 3 - Removal of Subcutaneous Fat and Maturation Sutures
- A disc of subcutaneous fat around the incision is removed after completing the skin incision.
- This allows skin edges to invert slightly, creating a stoma lined with healthy squamous epithelium.
- Maturation sutures: Interrupted absorbable sutures are placed between the skin edge and the tracheal wall. These serve to:
- Stabilise the tracheostomy tract immediately post-operatively
- Reduce the risk of creating a false passage during tube change
- Reduce the risk of surgical emphysema if the tube is accidentally dislodged
- Some surgeons also place stay sutures on either side of the tracheal incision to allow traction and identification of the trachea in an emergency.
Step 4 - Deep Dissection
- Incise the subcutaneous fat and platysma in the midline
- Separate the strap muscles (sternohyoid) in the midline using blunt dissection - no muscle is cut
- Identify and retract or divide the thyroid isthmus
- Identify the cricoid cartilage as the landmark for the correct level
Step 5 - Tracheal Incision
- A vertical incision is made in the midline, usually through tracheal rings 3-4
- It is vital to identify the cricoid cartilage before making the incision - an incision too high (at ring 1 or 2) predisposes to subglottic stenosis, which is a serious complication
- Various tracheal incision types have been described:
- Simple vertical incision (currently favoured by most)
- Excision of an anterior tracheal window
- Superiorly or inferiorly based tracheal flap sutured to skin
- Cruciate incision with tracheal edges apposed to skin
- Tracheal flaps were advocated for increased tract stability, but animal experiments suggest they increase the risk of long-term stenosis - hence simple vertical incision remains most popular
Step 6 - Tube Insertion
- The anaesthetist partially withdraws the existing endotracheal tube just before the tracheal incision is made
- The tracheostomy tube is inserted into the trachea under direct vision
- The anaesthetist confirms ventilation
- The original ETT is then fully withdrawn
Step 7 - Securing the Tube
- Initially secured with inelastic linen tapes (supplied with the tube), tied with a secure knot
- Sufficiently tight to allow one finger to be inserted between the tapes and the neck skin
- Tapes should be tightened with the neck in flexion (not in the extended operative position), because neck extension will loosen the tapes once the patient is in normal position
- Suturing the flange to the skin should be avoided in children - infant skin is too thin and flexible to provide a secure anchor
- After 7 days, the first tube change is performed and linen tapes can be replaced by Velcro fastening, which is easier to change and less traumatic to the skin
7. Tracheostomy Tubes in Children
Key Principles
- Paediatric tracheostomy tubes are uncuffed in most cases (the narrow cricoid creates a natural seal)
- Cuffed tubes are used only when positive pressure ventilation requires a seal, or to prevent aspiration
- Modern tubes are made from silicone (less reactive than PVC or metal, reducing granulation formation)
Commonly Used Tubes in UK
- Shiley® tubes: Available in neonatal and paediatric lengths, and paediatric long (PDL) for older children
- Bivona® tubes: Available in neonatal and paediatric lengths
- Bivona® Flexextend™: Silicone tube with a longer external component - useful for ventilated children and very small infants with limited chin-to-chest distance
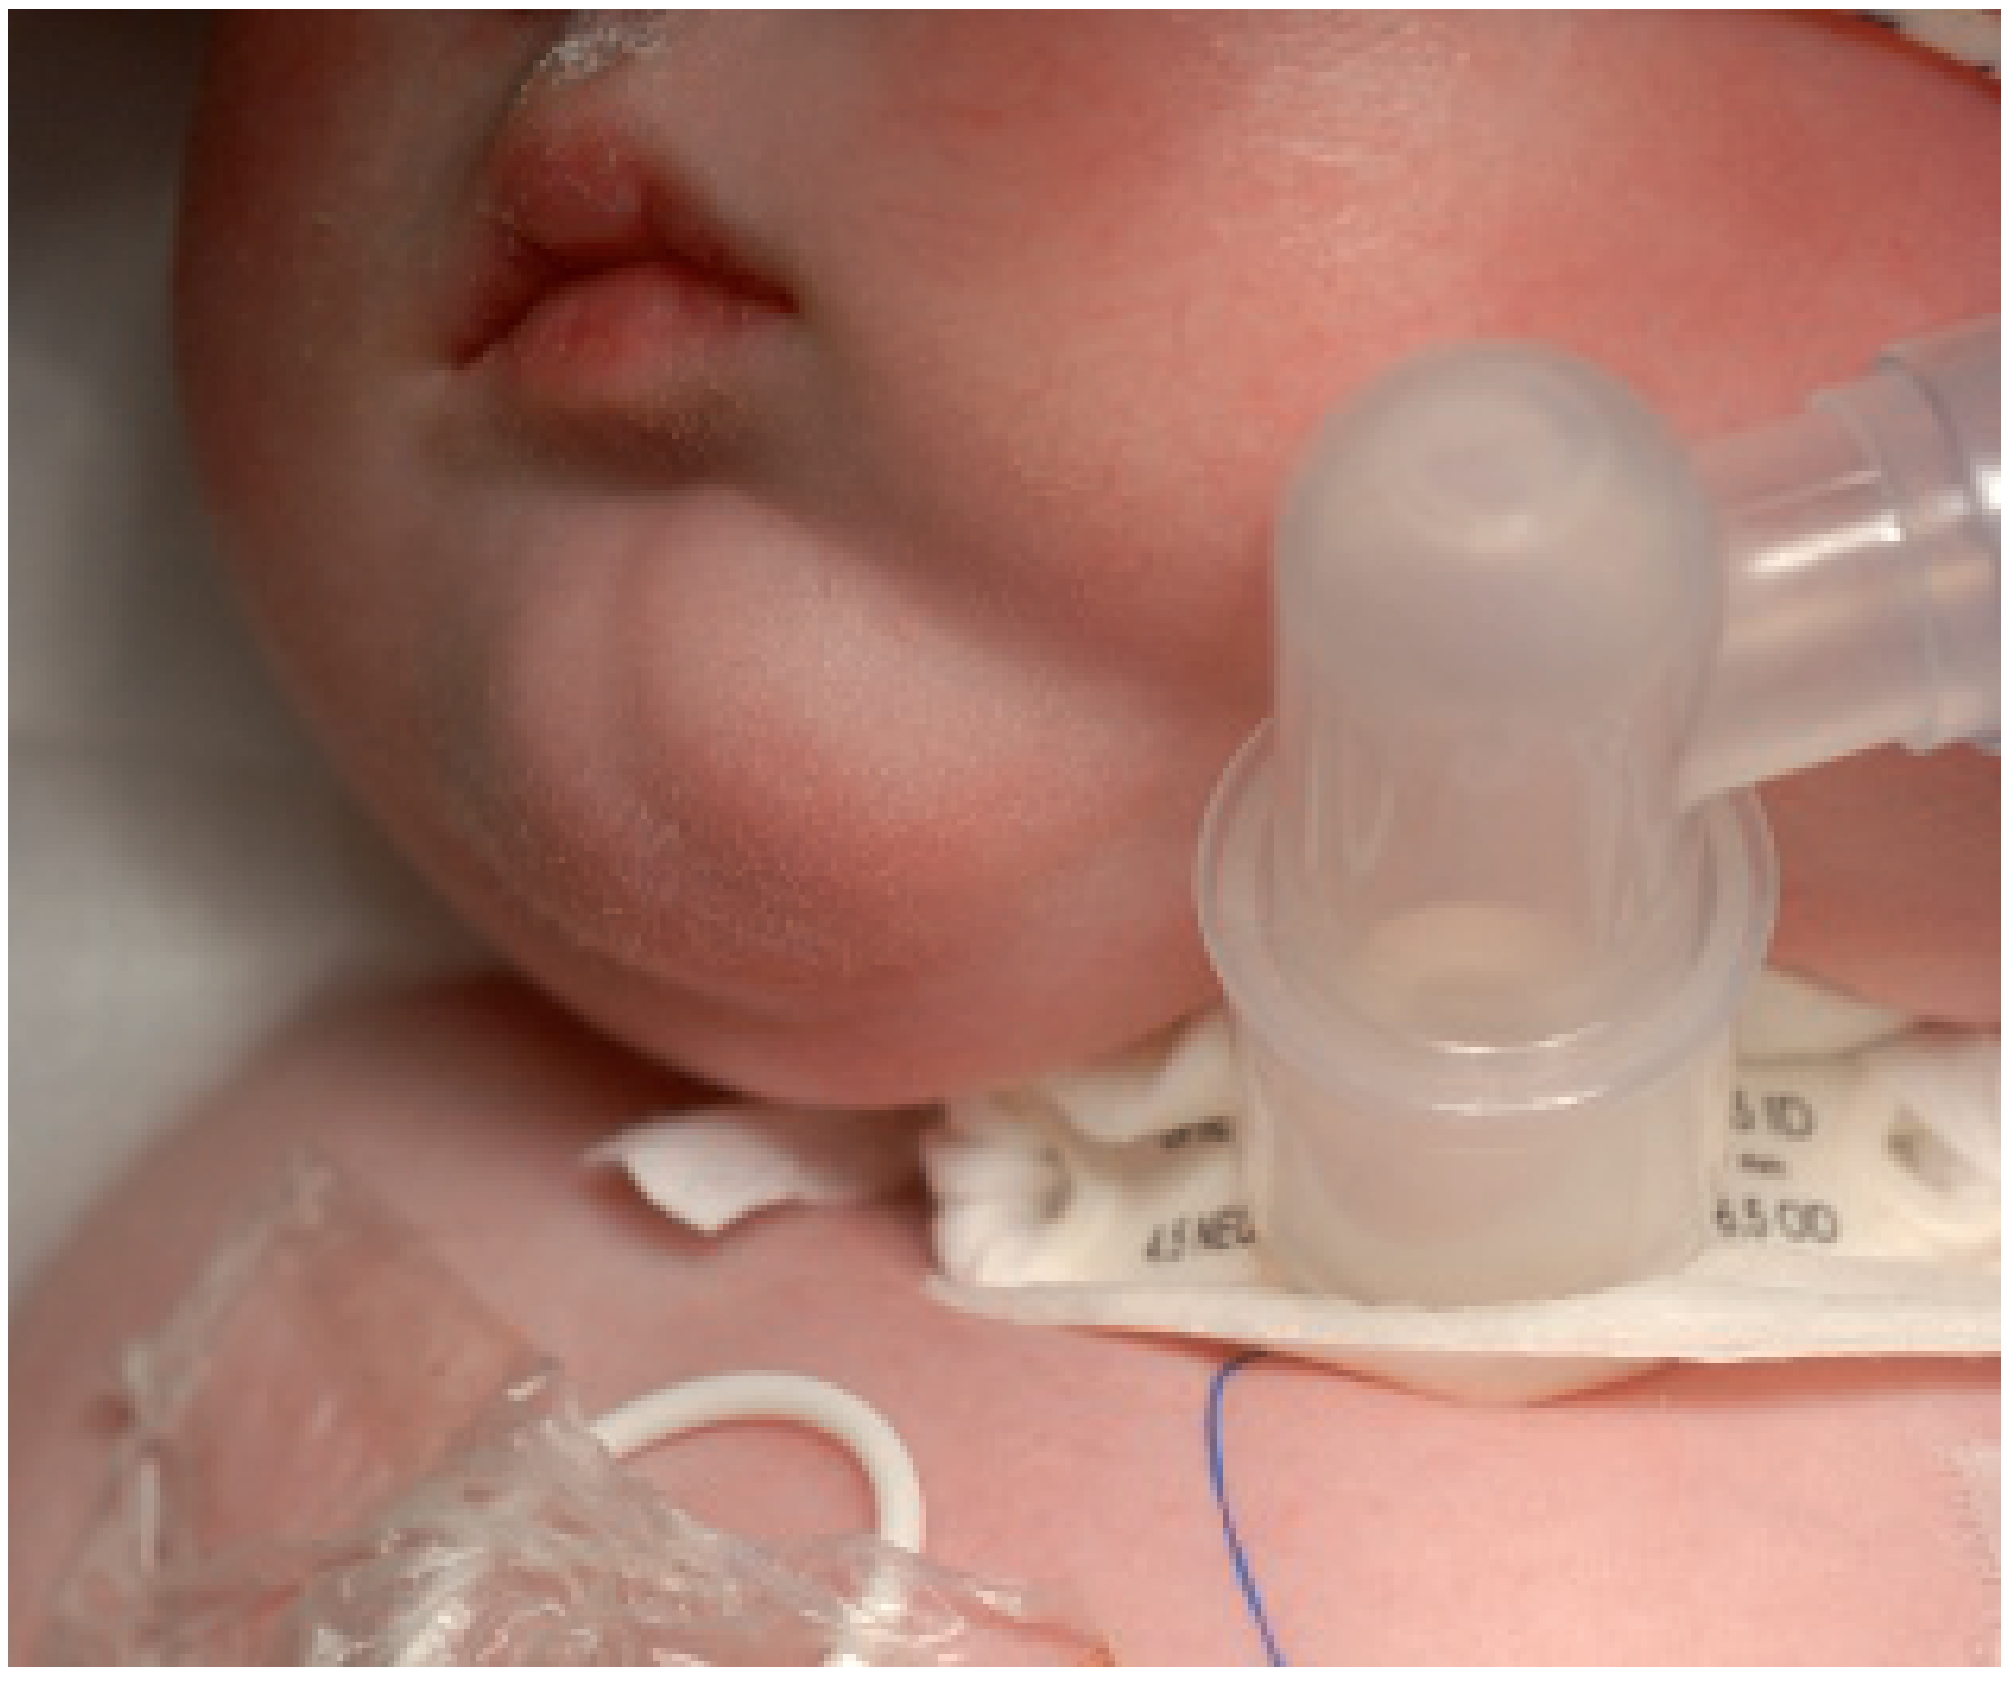
- Bivona® Hyperflex™: Adjustable flange allowing change of effective tube length - useful for anatomical constraints (e.g., bypassing low tracheal obstruction)
- Custom-made tubes are available for specific anatomical difficulties
Tube Features
| Feature | Purpose |
|---|---|
| Uncuffed (standard) | Most paediatric tubes; cricoid provides natural seal |
| Cuffed | For positive pressure ventilation or aspiration prevention; keep cuff pressure low to protect mucosa |
| Inner tube | Allows removal, cleaning, and replacement without disturbing the patient |
| Fenestration | At point of maximum curvature; allows air upward through larynx to enable phonation |
| Flexible / armoured | For patients where a rigid tube lies at an awkward angle |
| Adjustable flange | Alters intra-tracheal length to account for deep stoma or bypass obstruction |
Speaking Valves
- One-way valves (e.g., Passy-Muir valve) that allow inhalation through the tube but force exhalation upward through the glottis
- Benefits:
- Allow phonation and speech
- May improve lung function
- May reduce aspiration
- Help the child get used to expiration through the normal airway pre-decannulation
- Must only be used with an uncuffed tube or with the cuff deflated
- Should not be used when large suprastomal granulations are present (blocks exhalation pathway)
8. Post-operative Care
Immediate Post-operative Period
- Child should be nursed in PICU or high dependency unit initially
- Continuous monitoring: SpO2, heart rate, respiratory rate
- Two competent caregivers should be present at all times
- Spare tube of same size and one size smaller must be at bedside
- Humidified oxygen must be provided
Humidification
- Inspired air is cold and dry
- Secretions thicken and can block the tube
- Heat and moisture exchangers (HME / "Swedish nose") are attached to the tube connector to passively humidify
- Active heated water humidifiers are used in ventilated children
Suctioning
- Regular, careful suctioning using appropriate-sized catheters to keep the tube clear of secretions
- Excessive or traumatic suctioning must be avoided - it causes mucosal damage and stimulates granulation tissue formation
- Sterile technique should be used in hospital; clean technique may be acceptable at home
Wound and Stoma Care
- Keep the stoma clean and dry
- Change the foam/gauze dressing beneath the flange regularly
- Inspect for peristomal granulations at each change
- Tube change protocol: first change at 7 days (tracheostomy tract has matured sufficiently); thereafter according to unit protocol
9. Complications
Early Complications (within 7 days)
| Complication | Details |
|---|---|
| Accidental decannulation | Most dangerous early complication; tract not yet formed; tube cannot be easily re-inserted; must have spare tube at bedside at all times |
| Haemorrhage | Usually minor reactionary bleeding; major haemorrhage rare |
| Surgical emphysema | Air enters pretracheal tissues if tube partially dislodged; also if incision is too tight around tube |
| Pneumothorax / pneumomediastinum | Air tracking down pretracheal plane |
| Tube obstruction | By blood clot, secretions, or mucous plug |
| False passage | During tube insertion or change; commoner when tract not yet mature |
| Intraoperative hypoxia / cardiac arrest | If airway lost on table |
Late Complications
| Complication | Details |
|---|---|
| Accidental decannulation | Remains a risk throughout; fatal if not immediately corrected |
| Tube obstruction | Secretions, granulation tissue, tube displacement |
| Granulation tissue | Almost universal; peristomal and suprastomal forms |
| Infection | Peristomal wound infection, tracheitis, pneumonia |
| Subglottic stenosis | If incision is too high (ring 1 or 2) or from tube tip trauma |
| Tracheomalacia | Weakening of tracheal wall from pressure/inflammation |
| Tracheo-oesophageal fistula | Rare; from tube tip erosion through posterior tracheal wall into oesophagus |
| Tracheo-innominate artery fistula | Rare but life-threatening haemorrhage; from tube eroding into innominate artery |
| Persistent tracheocutaneous fistula | After decannulation; especially if tracheostomy present for a long time |
| Swallowing difficulties | Tracheostomy anchors the larynx, reducing laryngeal elevation during swallowing |
| Speech and language delay | Particularly in infants who have never vocalised through the larynx |
Granulation Tissue in Detail
- Peristomal granulation: At the skin edge of the tract - discharges, bleeds, makes tube changing difficult. Managed with topical steroid/antibiotic preparations; bipolar diathermy if severe. Silver nitrate should be used cautiously as it can enter the trachea.
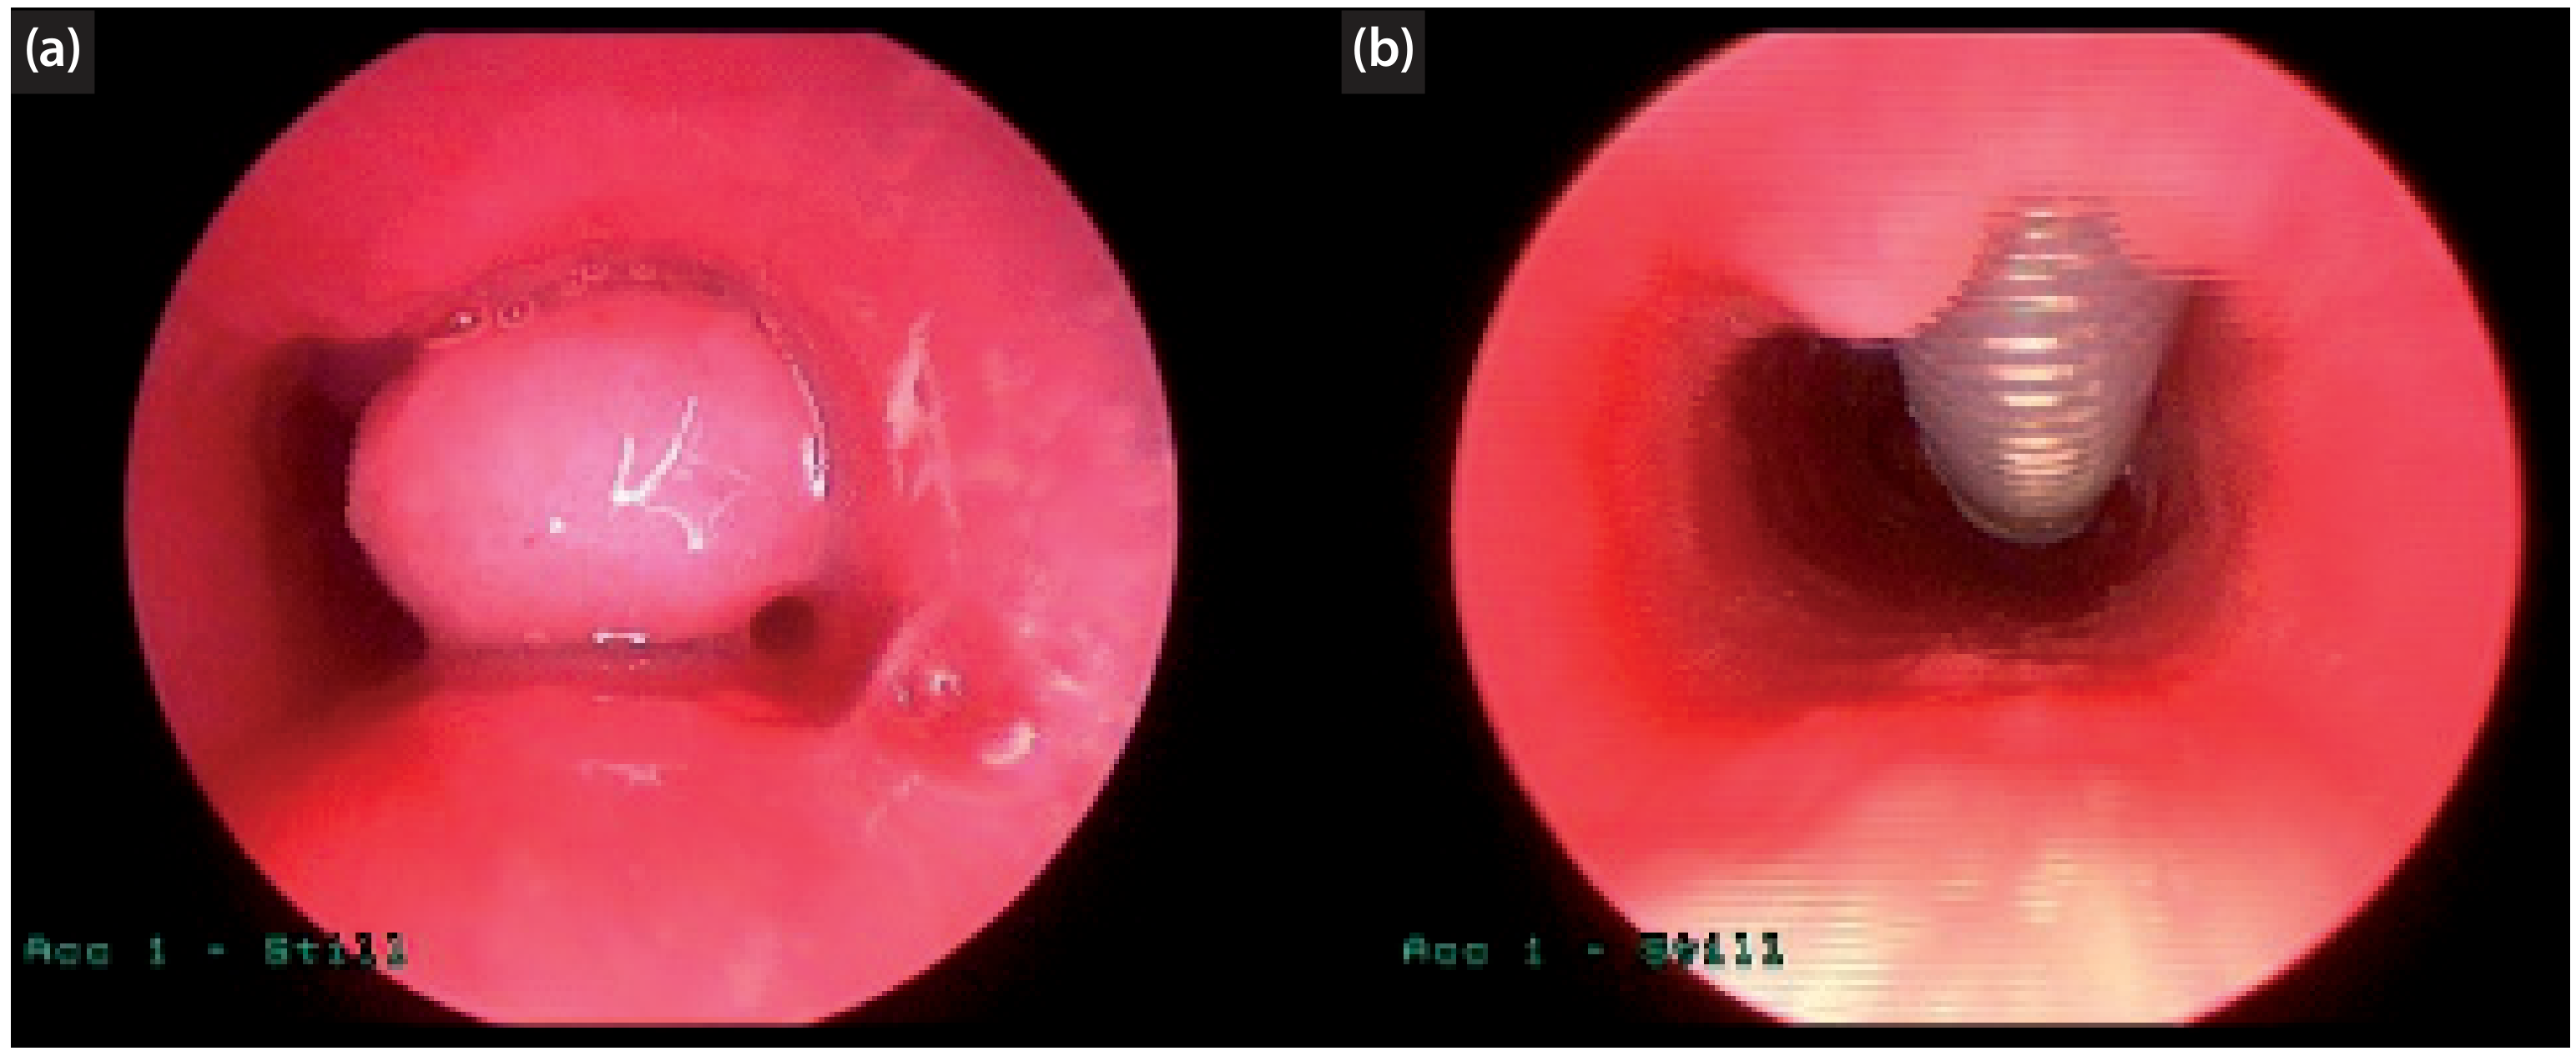
- Suprastomal granulation: Almost universal (reported in 80% of tracheostomies at bronchoscopy). Located on the anterior tracheal wall above the tube. Can obstruct the supraglottic airway - making accidental decannulation more dangerous. Can make speaking valve use impossible.
10. Decannulation
Prerequisites for Decannulation
- Underlying cause of tracheostomy has resolved
- Child can breathe adequately through the upper airway
- Laryngeal function is adequate (assessed by microlaryngoscopy and bronchoscopy)
- Swallowing is safe
- Family and community support is in place
Decannulation Protocol (Standard Approach)
- Endoscopy first: Microlaryngoscopy and bronchoscopy to assess the airway, identify any granulation or stenosis, and confirm adequate lumen above the tube
- Downsizing: Progressively smaller tubes to encourage breathing around the tube and through the larynx
- Speaking valve use: To acclimatise child to laryngeal exhalation before decannulation
- Tube occlusion: Block the tube during the day; unblock at night for the first 24 hours
- Full occlusion: If day occlusion tolerated, occlude for a full 24 hours
- Decannulation: Remove tube if 24-hour occlusion is tolerated
- Airway monitoring: Post-decannulation observation in a monitored setting for at least 24 hours
- Stoma management: Apply an airtight dressing (gauze squares + occlusive dressing) to occlude the stoma; change whenever an air leak appears; most stomata close spontaneously within days to weeks
- Persistent fistula: If it fails to close, silver nitrate cautery first; formal surgical closure (excision of tract down to anterior tracheal wall, multi-layer closure) for those that fail
11. Discharge Home and Community Care
Requirements Before Discharge
- Parents/carers trained in tube change, suctioning, and emergency management
- At least two competent adults should be available at home at all times
- Home must have adequate space, heating, electricity, telephone, and access to transport
Essential Equipment at Home (Non-ventilated Child)
- Correct-sized tracheostomy tubes and one size smaller
- Neck ties and scissors (for emergency tube change)
- Lubricant for tube insertion
- Suction catheters (appropriate size)
- Two suction machines (one portable); most children keep a third at school
- HME / Swedish nose
- Speaking valves
- Saturation monitor (portable version for outside home)
- Ambu bag
- Oxygen cylinders / concentrator
- Gauze, dressings, sterile saline for stoma care
- Gloves, aprons, protective goggles
Additional Requirements for Home-Ventilated Children
- Home ventilator
- Backup ventilator
- Pulse oximeter
- Alarm systems
- Nursing support overnight (typically required)
Community Support
- District nurse, community paediatrician, health visitor, GP
- Hospital-based tracheostomy specialist nurse
- Hospital hotline for parents
- Speech and language therapist
- Physiotherapist
- Children with tracheostomies (without other significant disabilities) can attend mainstream schooling in many cases, though swimming, water-based sports, and contact sports must be avoided
12. Key Points Summary (Quick Reference)
| Topic | Key Point |
|---|---|
| Commonest indication | Upper airway obstruction or ventilator support |
| Always under | General anaesthesia (NEVER local in children) |
| Skin incision | Vertical midline (now standard in paediatric units) |
| Tracheal incision | Vertical, through rings 3-4 - NEVER ring 1 or 2 |
| Why not ring 1 or 2? | Risk of subglottic stenosis |
| Tapes | Linen initially; Velcro after day 7 |
| Suturing flange to skin | AVOID in children (skin too thin) |
| Tape tension | One finger between tape and neck, with neck FLEXED |
| Most dangerous early complication | Accidental decannulation (tract not yet formed) |
| Almost universal complication | Suprastomal granulation tissue |
| Tube type | Uncuffed in most; cuffed only for ventilation/aspiration |
| First tube change | Day 7 |
| Decannulation check | Endoscopy first, then progressive occlusion |
| School | Mainstream possible but no swimming or contact sports |