
Say me about scoliosis and the curves of scoliosis, what’s the reason behind the curves of cholis explain me about side of the scoliosis, what the cause of the sides of scoliosis, then say me about why the scholar is only measured in anterior posterior in x-ray view
scoliosis curves types causes Cobb angle measurement AP x-ray anterior posterior
scoliosis spinal curve types classification AP x-ray Cobb angle measurement
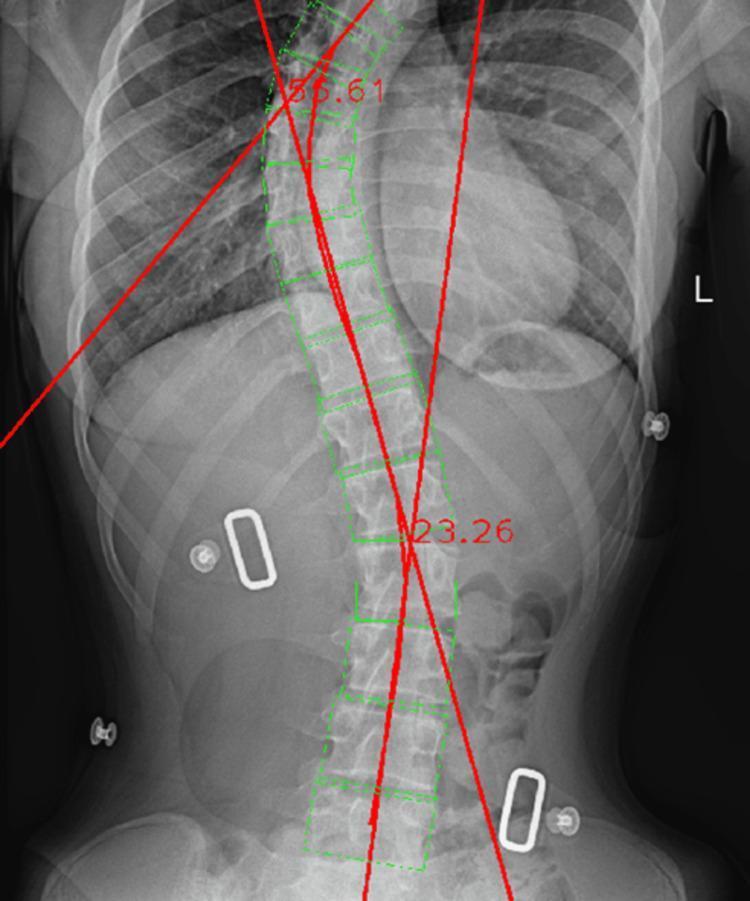
This diagnostic image is an anteroposterior (AP) X-ray of the thoracolumbar spine showing significant scoliotic deformity. The visual content demonstrates an automated Cobb angle measurement performed by clinical software. Green rectangular boxes are overlaid on individual vertebral bodies from the upper thoracic to the lower lumbar region, mapping their anatomical margins. A red polyline follows the central spinal midline, highlighting lateral curvature. Two sets of intersecting red tangent lines are visible: one in the upper thoracic region measuring an angle of 36.61 degrees, and another in the lumbar region measuring 23.26 degrees. These measurements identify a double-curve pattern consistent with combined thoracic and lumbar scoliosis. The vertebral bodies show visible rotation and tilting, particularly at the apex of the curves. The software tools illustrated are used for objective spinal deformity assessment and classification in orthopedic and radiological settings.
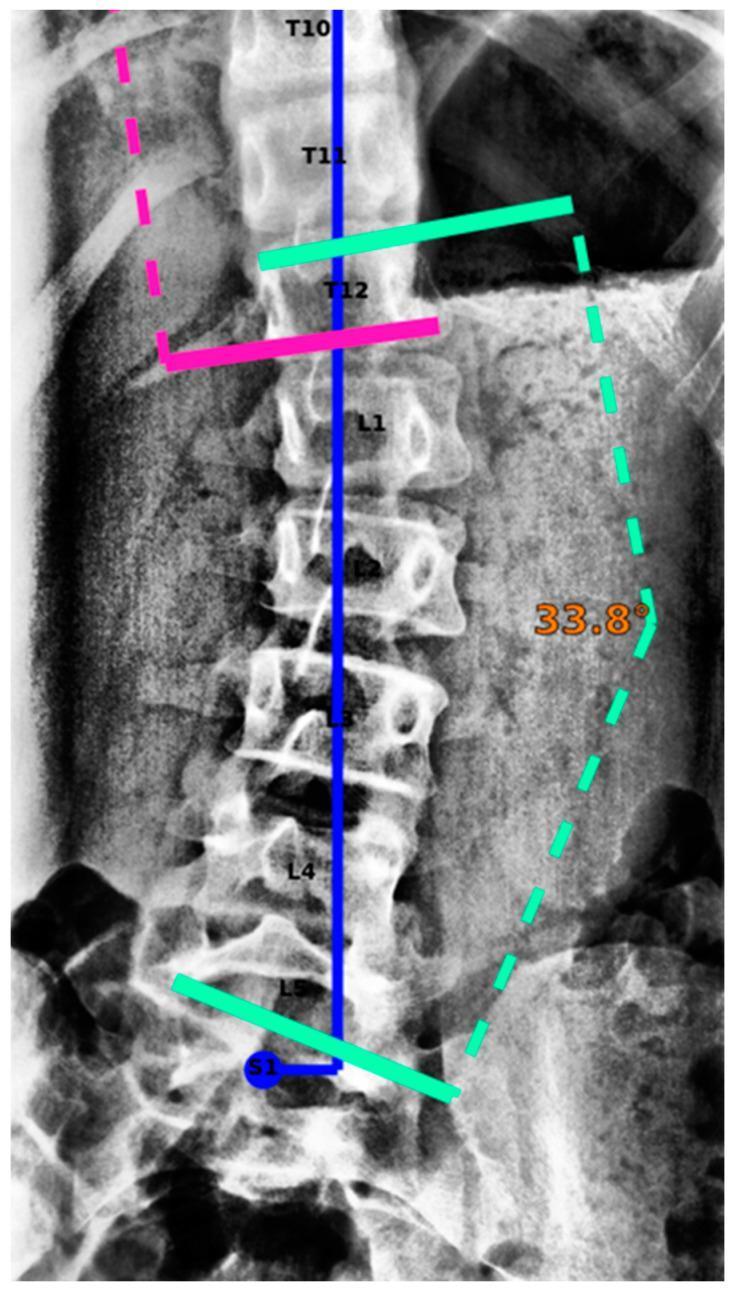
Anteroposterior (AP) X-ray radiograph of the thoracolumbar spine demonstrating a scoliotic curve with superimposed digital measurement aids. The image shows the spinal segment from T10 to S1, with each vertebral body explicitly labeled. A central blue vertical line indicates the coronal midline. Green solid lines are placed at the superior endplate of T11 and the inferior endplate of L5 to define the vertebrae for Cobb angle calculation. A dashed green line traces the lateral spinal curvature on the right side (dextroscoliosis), with a calculated Cobb angle of 33.8 degrees. Additional pink solid and dashed lines provide further alignment references at the T12 level. The image serves as a clinical evaluation of spinal deformity and demonstrates a potential technical outlier where the inferior endplate marker (green line) shows slight misalignment with the S1/L5 junction, highlighting the importance of precise vertebral endplate identification in automated software for scoliosis assessment.
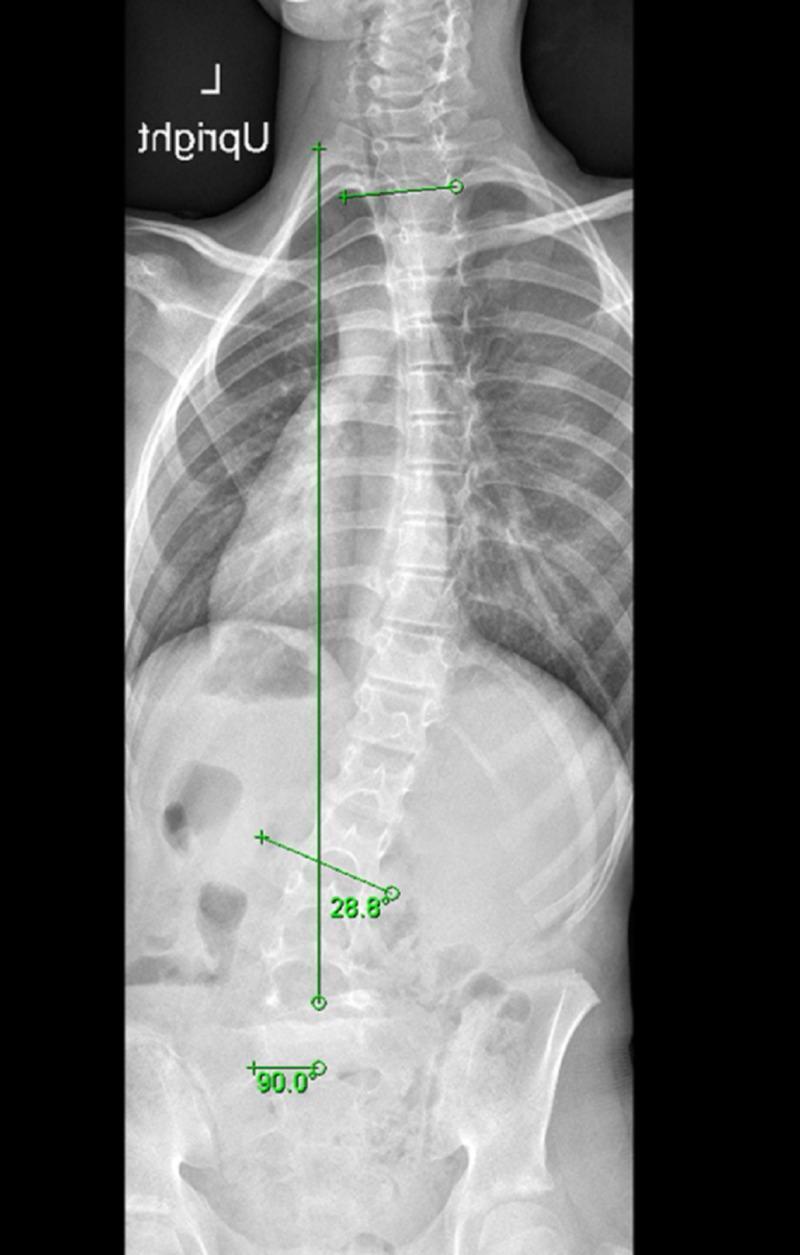
This diagnostic image is a weight-bearing anteroposterior (AP) full-spine radiograph, commonly used for scoliosis evaluation. The X-ray demonstrates a long-segment scoliotic curvature of the spine with a dextroconvex (right-sided) orientation. Anatomical landmarks indicate the curve originates in the upper thoracic spine (T2) and extends through the thoracolumbar junction to the upper lumbar region (L2). Digital annotations show a Cobb angle measurement of 28.8 degrees for this primary curve. Additional quantitative markers include a 90.0-degree angle measurement at the pelvic/lower lumbar interface, evaluating coronal balance or pelvic tilt. The image is critical for diagnosing spinal deformities, assessing vertebral alignment, and monitoring progression in pediatric or adult orthopedic patients. It highlights the absence of significant pedicle rotation at the apex, which is a key clinical indicator in distinguishing between structural and compensatory or non-structural scoliotic curves secondary to conditions like spondylolisthesis.
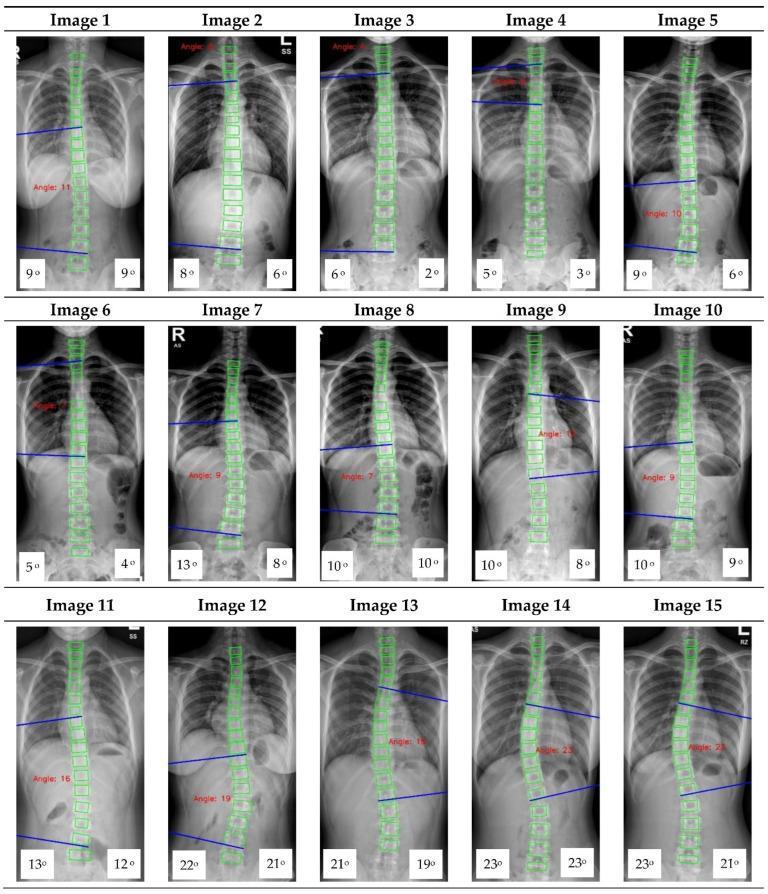
This diagnostic imaging set consists of 15 anterior-posterior (AP) X-ray images of the human spine, showcasing various degrees of spinal curvature consistent with Adolescent Idiopathic Scoliosis (AIS). Each image features an automated Cobb angle measurement overlay generated by a convolutional neural network (CNN). The individual vertebrae from the thoracic to the lumbar region are demarcated by green bounding boxes. The Cobb angle is visually represented by two intersecting blue lines tangential to the superior and inferior endplates of the most tilted vertebrae in a curve, with the calculated angle displayed in red text. The images demonstrate diverse spinal morphologies, ranging from mild postural deviations to significant lateral curvatures. At the bottom left and right of each panel, numerical values represent independent evaluations from two human observers for clinical comparison. The collection illustrates the application of deep learning algorithms in orthopedic radiology for the automated detection, landmark localization, and quantification of spinal deformities.
Scoliosis: Curves, Sides, Causes, and Why AP X-Ray is Used
What is Scoliosis?
- Lateral (side-to-side) curvature - the most visible component
- Axial rotation - vertebrae twist around a vertical axis
- Sagittal plane changes - loss or alteration of the normal front-to-back curves
The Curves of Scoliosis
By Shape
| Pattern | Description |
|---|---|
| C-curve (single curve) | One curve with one apex; the spine bends to one side only |
| S-curve (double curve) | Two curves - a primary structural curve and a secondary compensatory curve above or below it; the spine resembles the letter "S" |
| Triple curve | Three curves; less common, seen in severe cases |
By Region
| Region | Vertebrae Involved |
|---|---|
| Cervical | C1-C6 |
| Cervicothoracic | C6-T1 |
| Thoracic | T2-T11 (most common in idiopathic scoliosis) |
| Thoracolumbar | T11-L1 |
| Lumbar | L1-L4 |
| Lumbosacral | L4-S1 |
Primary vs. Compensatory Curves
- The primary (structural) curve is the original, fixed curve. It does not fully correct when the patient bends sideways.
- The compensatory (non-structural) curve develops above or below the primary curve to keep the head balanced over the pelvis. It is flexible and corrects on side-bending.
Why Does the Curve Form? - Causes of Scoliosis
1. Idiopathic Scoliosis (80-85% of all cases)
| Type | Age at Onset |
|---|---|
| Early onset | < 10 years |
| Adolescent | 11-18 years (most common) |
| Adult | After skeletal maturity |
2. Congenital Scoliosis
- Hemivertebra - only half a vertebra forms, creating an asymmetric wedge that tilts the spine
- Block vertebra - two adjacent vertebrae fail to separate
- Butterfly vertebra - the vertebral body is split into two halves
3. Neuromuscular Scoliosis
- Cerebral palsy
- Muscular dystrophy
- Myelomeningocele (spina bifida) - the incidence is directly tied to the level of the defect: 100% with T12 lesions, down to 5% with S1 lesions
- Polio, syringomyelia, spinal cord tumors, tethered cord
4. Functional (Non-structural) Scoliosis
- Leg length discrepancy
- Muscle spasm (from disc herniation, infection)
- Postural compensation
The Side of Scoliosis: Why Does It Curve to a Specific Side?
Naming Convention
- Dextroscoliosis = convexity to the right
- Levoscoliosis = convexity to the left
Why Thoracic Scoliosis is Almost Always Right-Sided (Dextroscoliosis)
-
Aortic hypothesis: The descending thoracic aorta runs on the left side of the spine. It acts as a mechanical buttress, resisting leftward bending and therefore predisposing the curve to go to the right.
-
Neurological asymmetry: Some researchers propose that asymmetric maturation of the central nervous system (particularly cerebellar or brainstem pathways controlling trunk posture) causes the spine to rotate and curve preferentially to the right during the adolescent growth spurt.
-
Growth asymmetry: During rapid growth, asymmetric forces on the vertebral growth plates (anterior faster than posterior, right faster than left) cause progressive wedging and rotation toward the right side.
Clinical significance: A left-sided (levo) thoracic curve is a RED FLAG. It is atypical and should prompt MRI to exclude an underlying cause such as a spinal cord tumor, syrinx (syringomyelia), tethered cord, or Chiari malformation - Grainger & Allison's Diagnostic Radiology.
Lumbar Scoliosis is Typically Left-Sided (Levoscoliosis)
Why is Scoliosis Measured Only on the AP (Anteroposterior) X-Ray View?
The Nature of the Deformity
Why Not Lateral (Side) View?
The Cobb Angle Measurement
- Identify the most tilted vertebra at the top of the curve (upper end vertebra)
- Identify the most tilted vertebra at the bottom of the curve (lower end vertebra)
- Draw a line along the superior endplate of the top vertebra
- Draw a line along the inferior endplate of the bottom vertebra
- The angle where these two lines (or their perpendiculars) intersect = the Cobb angle
| Cobb Angle | Severity | Management |
|---|---|---|
| < 10° | Not scoliosis | Observation |
| 10-20° | Mild | Observation, re-check |
| 20-40° | Moderate | Bracing |
| > 40-50° | Severe | Surgical fusion |
AP vs. PA: Radiation Concern
Why Weight-Bearing (Standing) AP View?
- Gravity loads the spine and reveals the true magnitude of the structural curve
- Compensatory curves become visible
- Pelvic obliquity and coronal balance can be assessed
- Lying down allows flexible curves to partially correct, underestimating severity
Visual Reference
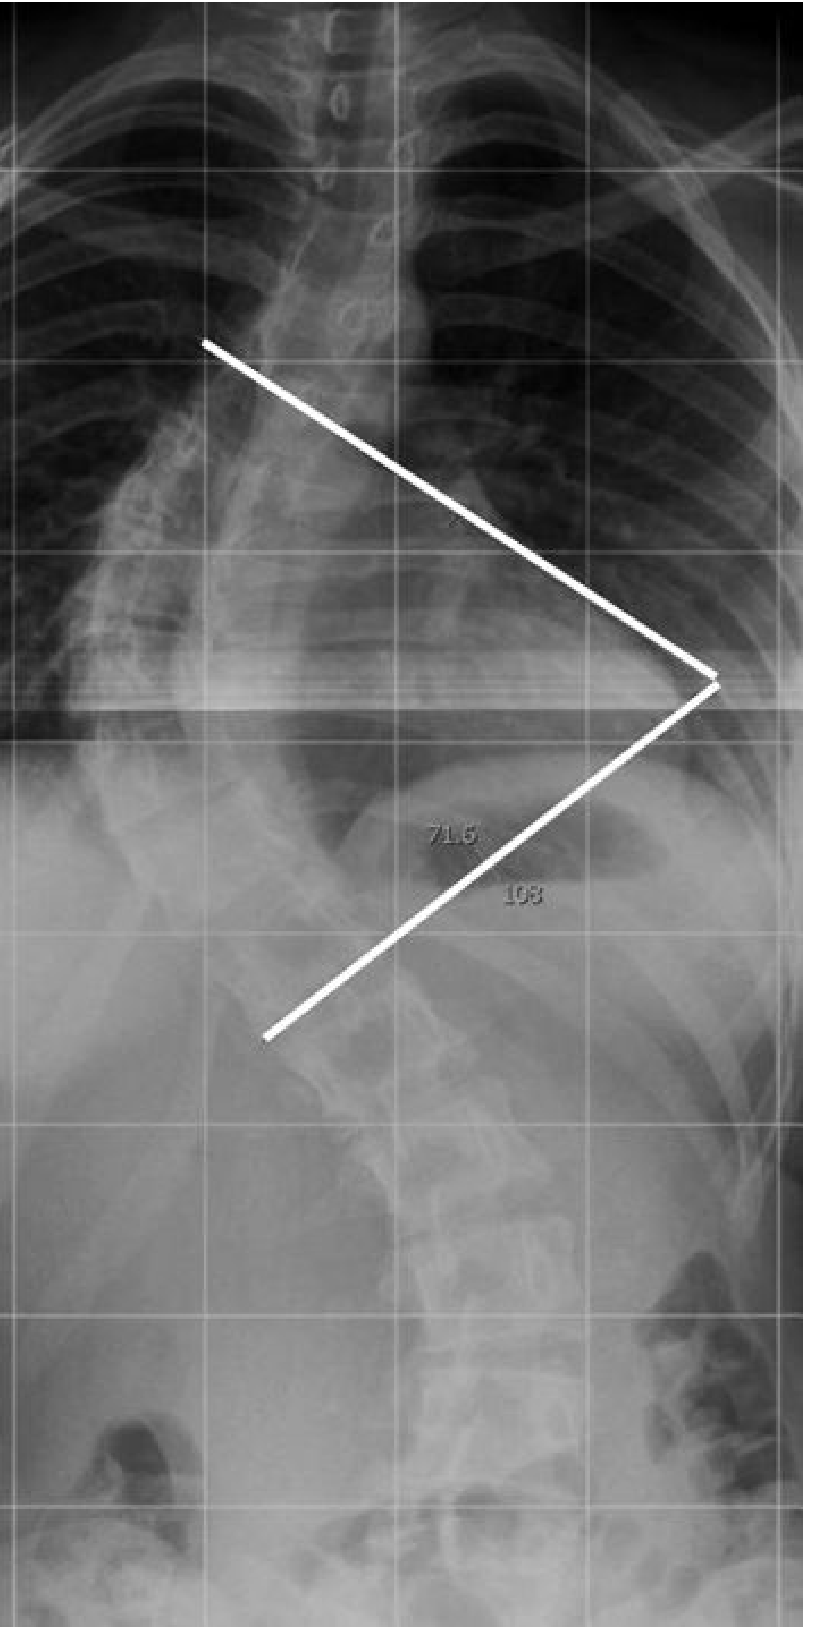
Summary Table
| Question | Key Answer |
|---|---|
| What is scoliosis? | Lateral + rotational spine deformity, Cobb angle ≥ 10° |
| Main curve types | C-curve (single), S-curve (double), triple |
| Most common cause | Idiopathic (unknown), especially adolescent |
| Why right-sided thoracic? | Aortic buttress on left + neurological asymmetry theories |
| Left thoracic = ? | Red flag - must exclude cord tumor, syrinx, Chiari |
| Why AP view for measurement? | Scoliosis is a coronal plane (side-to-side) deformity; AP view is the only projection that shows this |
| Why not lateral view? | Lateral shows sagittal plane (front-back) - kyphosis/lordosis only |
| Why standing? | Gravity loads the curve; reveals true structural magnitude |
About degenerative poses, why it is known as degenerative, what is the reason behind it?
Could you clarify what you mean by 'degenerative poses'? I want to make sure I answer the right topic.
About degenerates scoliosis why is known as degenerative? What is the reason behind it?
degenerative scoliosis pathophysiology why called degenerative disc degeneration mechanism
degenerative scoliosis disc degeneration facet joint pathology spine MRI x-ray
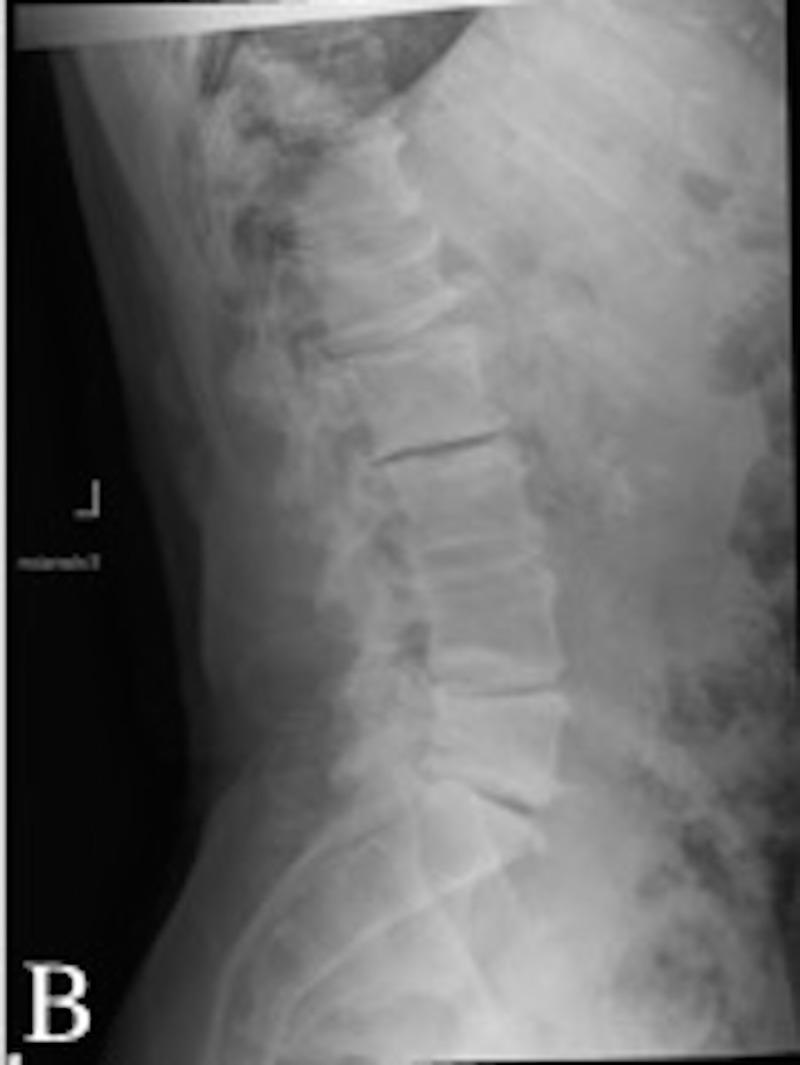
This lateral lumbar spine X-ray demonstrates advanced degenerative changes and scoliotic deformity in a 56-year-old patient. Key findings include significant multilevel intervertebral disc space narrowing, particularly prominent in the mid-to-lower lumbar segments, indicating chronic disc degeneration. Extensive anterior and lateral osteophyte formation is visible along the margins of the vertebral bodies. There is evidence of facet joint arthropathy characterized by sclerosis and hypertrophy of the posterior elements. The spinal alignment shows a loss of normal lumbar lordosis and malalignment suggestive of degenerative scoliosis, with vertebral body rotation and tilting. The combined findings are consistent with multilevel central canal and neuroforaminal stenosis, typical of complex adult spinal deformity secondary to degenerative joint and disc disease. This imaging serves as an educational example of progressive spondylosis and its impact on sagittal spinal balance.
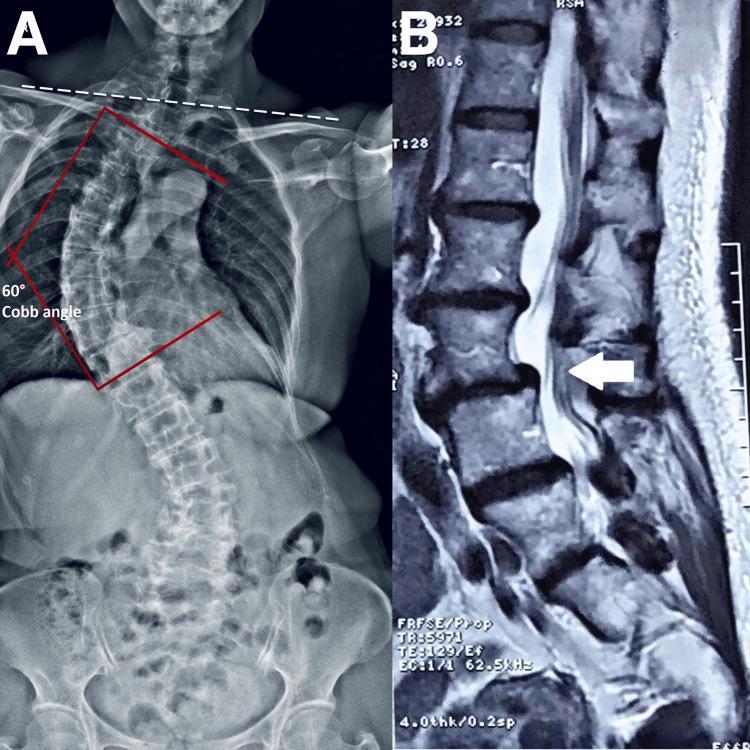
The image consists of two diagnostic views of the spine. Figure A is a posterior-anterior full-spine radiograph demonstrating severe degenerative scoliosis. A double curve pattern is visible, with a primary thoracic curvature quantified by a Cobb angle of 60 degrees (marked with red lines). A dashed white line across the shoulders indicates a significant shoulder and pelvic tilt, highlighting postural imbalance. Figure B is a sagittal T2-weighted MRI of the lumbar spine. It reveals multilevel degenerative disc disease and spondylolisthesis. At the L4-5 level, a white arrow points to a posterior disc bulge and ligamentum flavum hypertrophy, resulting in mild indentation of the thecal sac. Facet joint degeneration and osteophyte formation are also evident at the L2-3 level, contributing to mild spinal stenosis. The combined images illustrate the correlation between macroscopic spinal deformity (scoliosis) and localized structural pathology (spondylolisthesis and disc herniation) in a clinical context of chronic back pain.
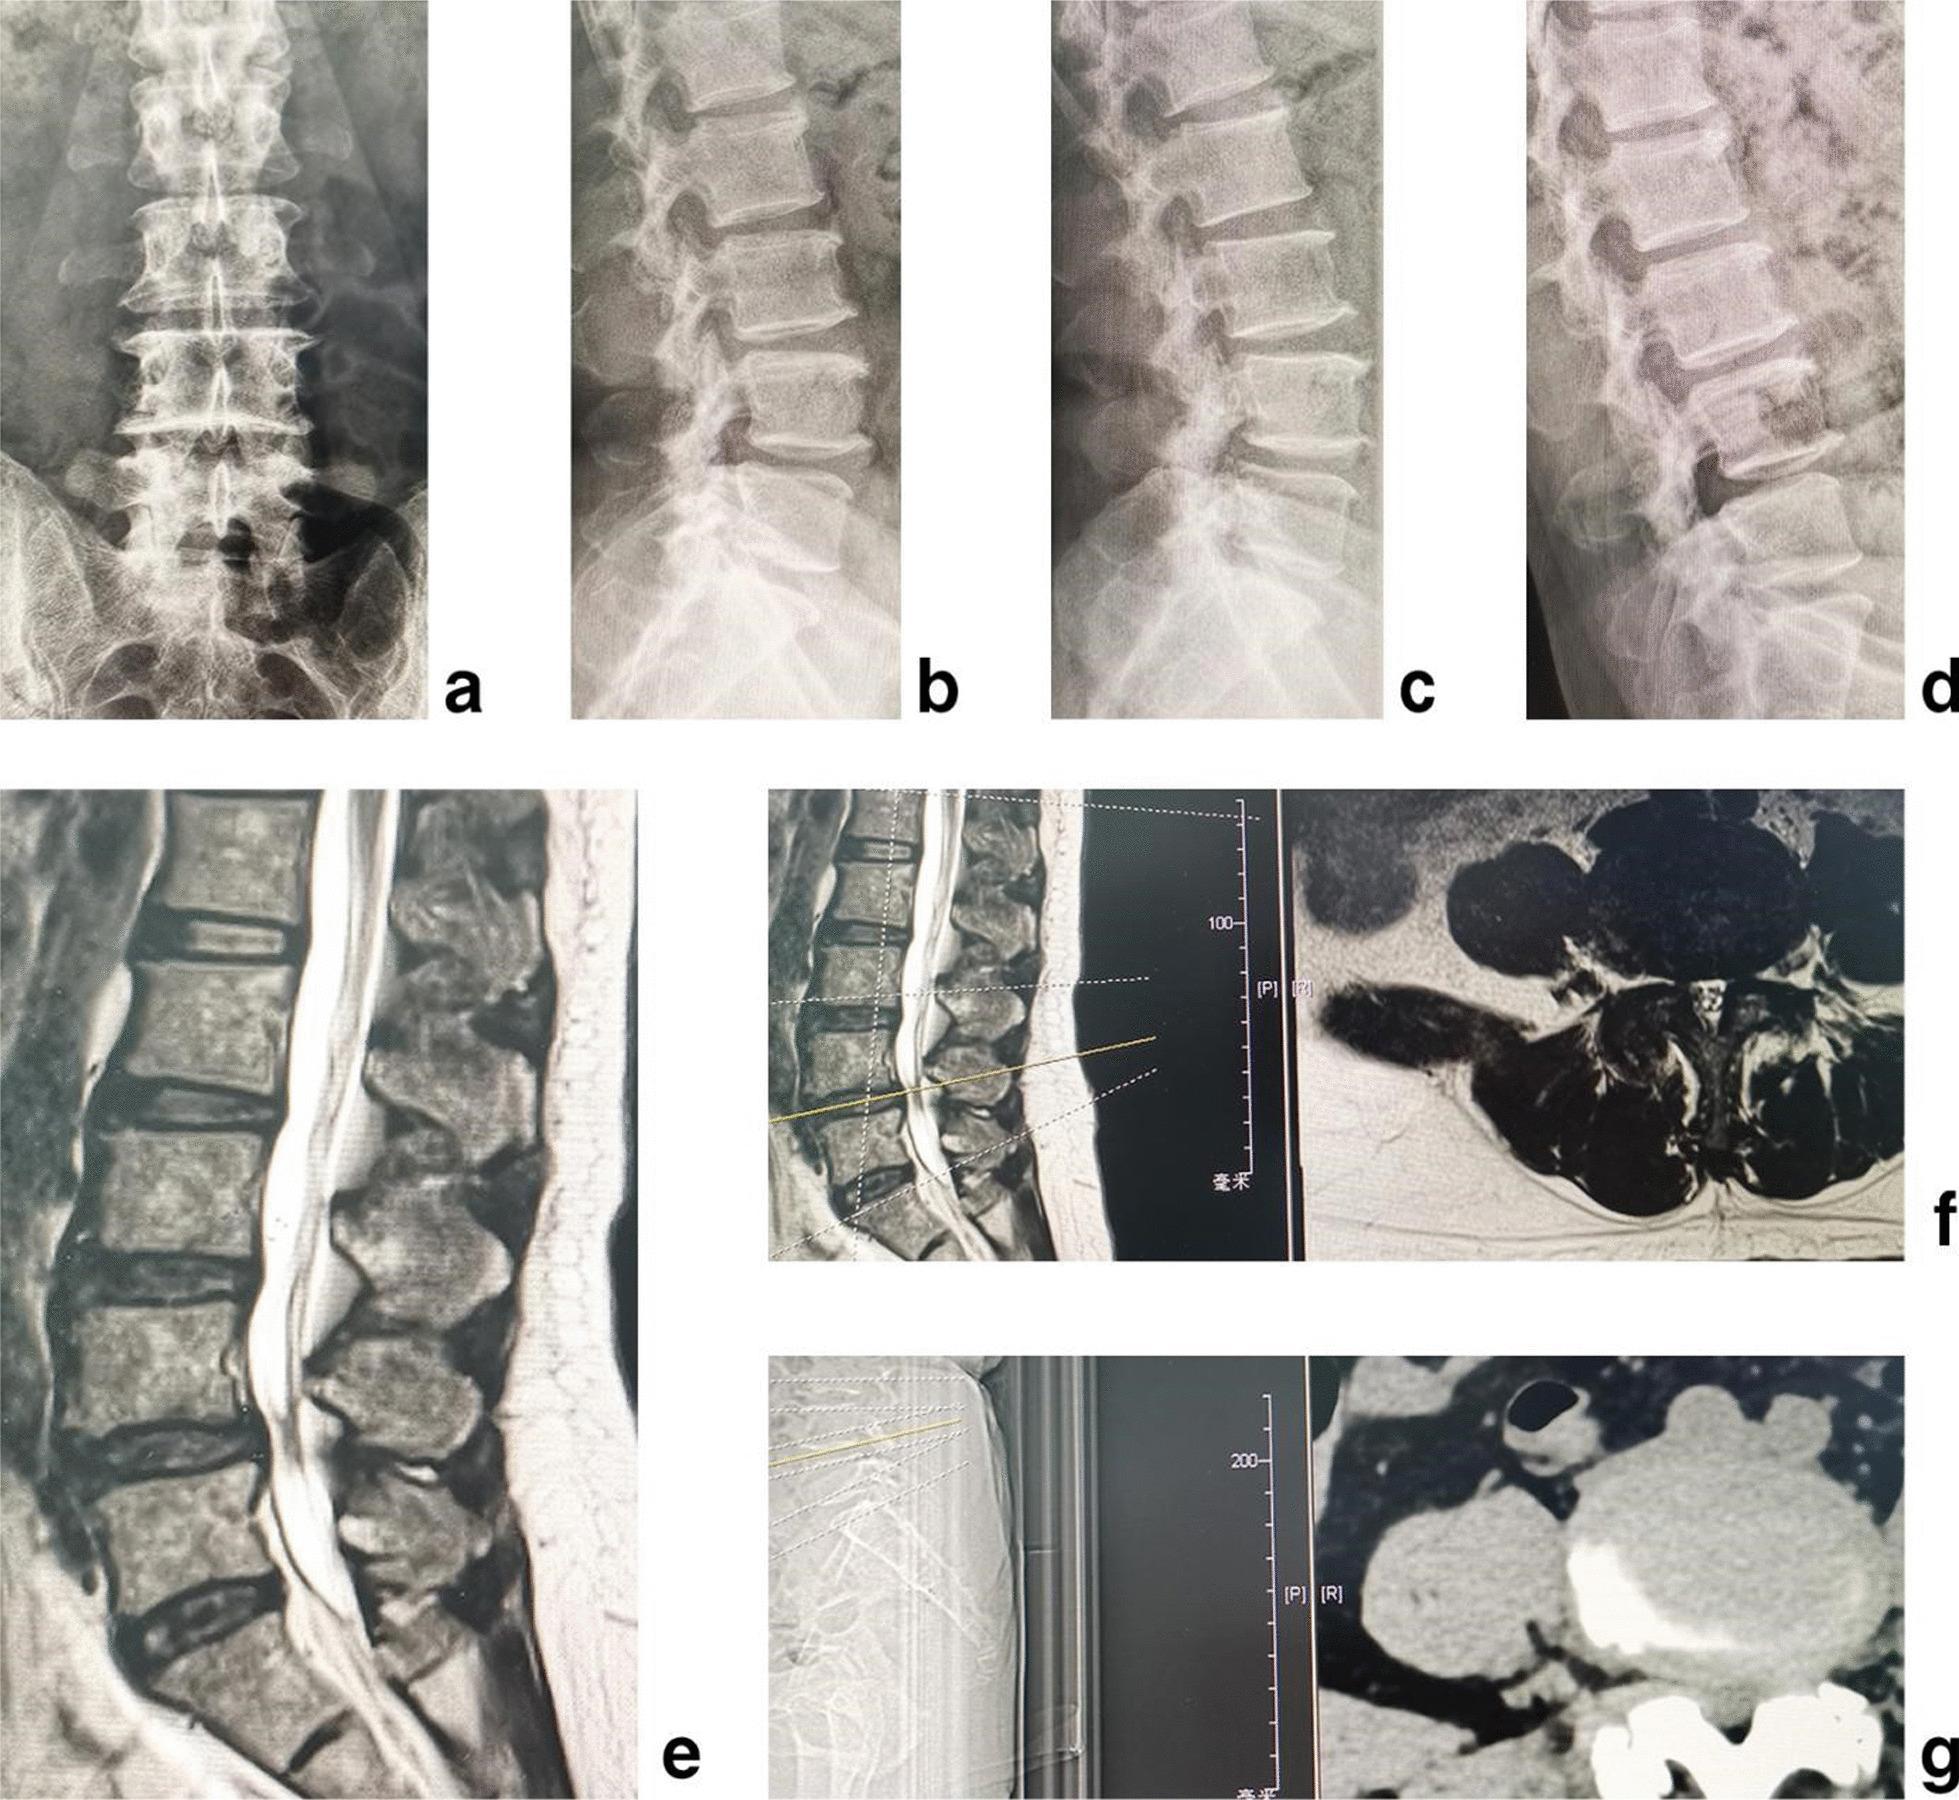
A multi-modal radiological composite demonstrating multilevel lumbar disc degeneration (LDD) and spinal instability in a 58-year-old patient. The image series includes: (a) posteroanterior X-ray showing lumbar alignment; (b) lateral neutral X-ray; (c) hyperextension and (d) hyperflexion lateral X-rays illustrating dynamic instability at the L4/5 level through vertebral translation and angular changes. (e) Sagittal T2-weighted MRI highlights degenerative disc changes across L3/4, L4/5, and L5/S1, characterized by reduced disc height and signal intensity loss (desiccation). (f) Axial MRI provides detailed visualization of central canal stenosis and potential neural foraminal narrowing. (g) Axial CT scan emphasizes bony anatomy, revealing facet joint hypertrophy and osteophyte formation. The collection serves as an educational example of how different imaging modalities contribute to diagnosing complex spinal pathology, specifically highlighting the utility of dynamic X-rays for instability, MRI for soft tissue/disc assessment, and CT for osseous changes in the context of degenerative spine disease.
Degenerative Scoliosis: Why Is It Called "Degenerative"?
The Core Answer
What "Degeneration" Actually Means in the Spine
- The intervertebral disc (cushion between vertebrae)
- The two facet joints (small paired joints at the back of each vertebra)
- The ligaments (interspinous ligament, ligamentum flavum)
The Step-by-Step Degenerative Cascade
Stage 1: Disc Desiccation (Drying Out)
- Water content drops from ~80% in young adults to ~70% or less
- The disc loses height as it dries and collapses
- It becomes stiff and unable to distribute load evenly
- Micro-tears develop in the outer annulus fibrosus (the tough fibrous ring around the disc)
Stage 2: Asymmetric Collapse
- One side of the disc space narrows more than the other
- The vertebra above tips toward the narrowed side
- This tilting initiates a lateral curve
"Degenerative scoliosis is caused by asymmetrical degenerative changes in the discs and facet joints or secondary to asymmetrical collapse of vertebrae." - Grainger & Allison
Stage 3: Facet Joint Degeneration (Arthrosis)
- Cartilage in the facet joints wears away
- Osteophytes (bone spurs) form at the joint margins
- Subchondral sclerosis (hardening of bone under the cartilage) and cyst formation occur
- The facet joints become stiff, enlarged, and asymmetric
Stage 4: Ligamentous Changes
- The ligamentum flavum (a ligament running along the back of the spinal canal) undergoes hypertrophy (thickening and buckling) as the disc space narrows
- The interspinous ligaments become lax, losing their ability to resist motion
- This combination creates segmental instability - the vertebrae start to slip and rotate relative to each other
Stage 5: Vertebral Rotation and Lateral Listhesis
- Vertebrae begin to rotate axially (twist around a vertical axis)
- Lateral listhesis occurs - vertebrae slide sideways on each other (this is different from spondylolisthesis which is forward slip)
- The combined rotation + lateral shift + disc collapse = a true structural scoliotic curve
Why It Happens in Adults (Not Children)
| Feature | Adolescent Idiopathic Scoliosis | Degenerative Scoliosis |
|---|---|---|
| Age of onset | 10-18 years | Usually > 50 years |
| Spine before onset | Normal | Normal |
| Cause | Unknown (idiopathic) | Tissue breakdown with aging |
| Primary region | Thoracic spine | Lumbar spine (L1-L5) |
| Curve direction | Right thoracic (90%) | Variable, often left lumbar |
| Rotation | Significant | Moderate |
| Main symptom | Cosmetic deformity | Back pain + leg pain (stenosis) |
| Bone quality | Normal | Often reduced (osteoporosis) |
Additional Degenerative Contributors
- Osteoporosis: Asymmetric vertebral compression fractures (wedge fractures) from bone thinning cause the vertebra to collapse more on one side, creating or worsening a curve
- Spondylolisthesis: Forward or sideways slippage of one vertebra on another due to degenerative instability
- Muscle atrophy: Paraspinal muscles weaken with age, reducing dynamic support for the spine
The Classification of Degenerative Scoliosis (Aebi Classification)
| Type | Description |
|---|---|
| Type I | Primary degenerative scoliosis - develops in a previously straight spine after skeletal maturity; mostly lumbar; advanced disc and facet degeneration; minimal structural deformity |
| Type II | Progressive idiopathic scoliosis that began before skeletal maturity but becomes symptomatic and worsens in adulthood due to degeneration |
| Type III | Secondary degenerative scoliosis - curve develops secondary to pelvic obliquity, hip pathology, lumbosacral anomaly, or metabolic disease (mostly osteoporosis) |
Symptoms: What Degeneration Does to the Patient
- Axial back pain (from disc and facet arthritis)
- Neurogenic claudication - leg pain, heaviness, and weakness when walking that is relieved by sitting or bending forward; present in 71-90% of patients with degenerative scoliosis - Campbell's Operative Orthopaedics, 15th Ed
- Radiculopathy - shooting leg pain from nerve root compression in the narrowed side (concavity) of the curve
- Spinal stenosis - the spinal canal itself narrows from bone spurs, thickened ligamentum flavum, and buckled disc material
Imaging
Summary: Why the Name "Degenerative"
- The disc degenerates - loses water, height, and mechanical integrity
- The facet joints degenerate - cartilage wears away, bone spurs form
- The ligaments degenerate - lose tension and stability
- Critically, all of this happens asymmetrically (more on one side than the other)
- This asymmetric breakdown causes the vertebrae to tilt, rotate, and shift sideways
- The result is a new lateral spinal curve (Cobb angle ≥ 10°) in a spine that was previously straight
Physiotherapy management and exercise exercises given for a chaotic patient in different curve
Schroth method physiotherapy exercises scoliosis curve-specific right thoracic left lumbar
https://pmc.ncbi.nlm.nih.gov/articles/PMC4973373
Schroth method scoliosis exercises physiotherapy curve correction breathing
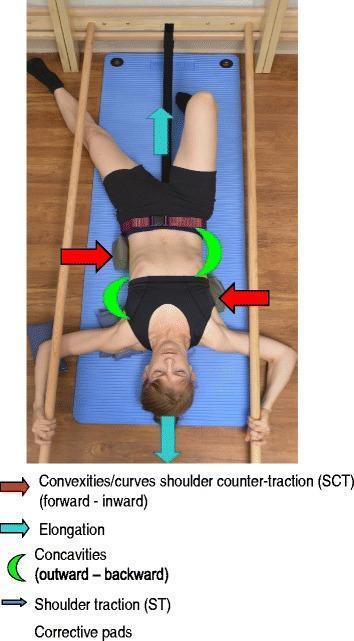
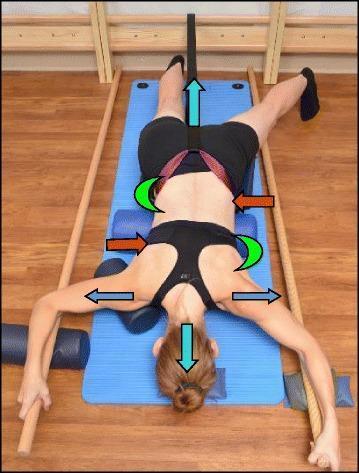
This clinical photograph illustrates a patient performing a Schroth method supine exercise for the conservative treatment of adolescent idiopathic scoliosis, specifically targeting a major lumbar curve. The patient is positioned on a blue mat, utilizing wall bars for bilateral shoulder traction. One leg is flexed while the other is extended and stabilized with a belt for pelvic counter-traction. The image is overlaid with instructional icons representing Physiotherapeutic Scoliosis-Specific Exercises (PSSE) principles: turquoise arrows indicate cranial and caudal axial elongation; red arrows signify counter-traction forces directed at convexities to shift the spine inward toward the midline; and green half-moons denote areas of concavity expansion to facilitate rotational angular breathing. Small pads are strategically placed to support corrective alignment. This visual serves as a pedagogical tool for demonstrating 3D postural self-correction, muscle activation around spinal curves, and the use of external supports to prevent postural collapse in scoliosis rehabilitation.
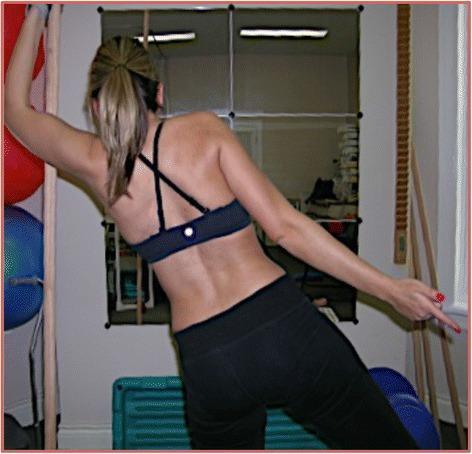
Clinical photograph from a posterior view showing a female patient with idiopathic scoliosis performing a Schroth method physiotherapy exercise known as the 'muscle cylinder.' The image captures visible postural deviations, including a right-sided thoracic rib hump, an elevated right shoulder, and a depressed, retracted left shoulder. The patient is engaged in active axial self-elongation and 3D postural correction. Her left arm is elevated and reaching overhead to facilitate expansion of the thoracic concavity and spinal de-rotation, while her right arm is extended laterally for stabilization. This therapeutic intervention aims to address a 3C curve type (according to Schroth classification) by utilizing rotational breathing techniques to increase vital capacity and reduce the Cobb angle. The setting is a rehabilitation environment with physiotherapy equipment, such as stall bars and exercise balls, visible in the background, illustrating the practical application of conservative scoliosis management.
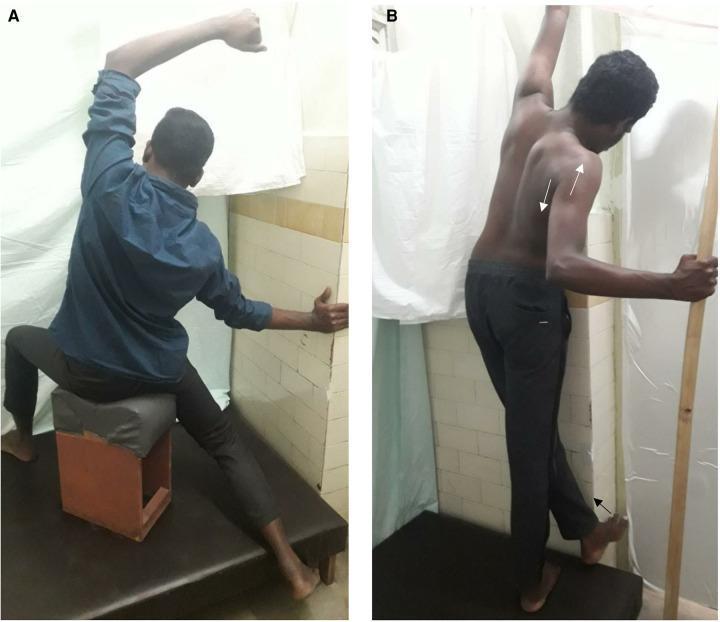
Two-panel clinical photograph demonstrating curve-specific correction exercises for adolescent idiopathic scoliosis (AIS). Panel A (Sitting): The subject is seated on a raised platform with asymmetrical lower limb positioning. The right leg is abducted and extended while the left knee is flexed. The torso displays ipsilateral lateral flexion with the right arm elevated overhead and the left arm abducted against a wall for support. Panel B (Standing): The subject is standing with the right leg slightly posterior and the left foot elevated against a wall. The left arm is adducted with the scapula protracted and rotated, while the right hand stabilizes against a vertical pole. White arrows indicate corrective vectors for thoracic and lumbar shift. These postural maneuvers aim to achieve sagittal and transverse plane correction of spinal deformities and pelvic obliquity. These therapeutic exercises are common in the Schroth method or similar physiotherapy protocols for scoliosis management.
Physiotherapy Management and Exercises for Scoliosis Patients - by Curve Type
Note: I'm interpreting "chaotic patient" as scoliotic patient (likely a voice-to-text capture). If you meant something different, please let me know.
Overview: Goals of Physiotherapy in Scoliosis
- Halt or slow curve progression during growth
- Reduce Cobb angle when possible (especially in adolescents)
- Correct posture and improve cosmetic appearance
- Strengthen weak/elongated muscles on the concave side
- Stretch tight/shortened muscles on the convex side
- Improve breathing capacity (especially in thoracic curves with rib hump)
- Reduce pain (especially in adult and degenerative scoliosis)
- Delay or avoid surgery by controlling progression
The Foundational Principle: 3D Correction
- Coronal (lateral deviation - the curve)
- Sagittal (loss of normal kyphosis/lordosis)
- Transverse (vertebral rotation and rib hump)
Major Physiotherapy Approaches (PSSE - Physiotherapy Scoliosis Specific Exercises)
| Method | Origin | Key Feature |
|---|---|---|
| Schroth Method | Germany (Katharina Schroth, 1921) | Rotational Angular Breathing (RAB) + curve-specific posture correction |
| SEAS (Scientific Exercise Approach to Scoliosis) | Italy | Auto-correction + stabilization in daily activities |
| DoboMed | Poland | Anterior-posterior correction in kyphotic position |
| BSPTS (Barcelona Scoliosis Physical Therapy School) | Spain | Evolution of Schroth - systematic curve patterns |
| Side Shift | UK | Active lateral shift against the curve |
The Schroth Curve Classification (for Exercise Prescription)
| Curve Pattern | Description | Most Common Presentation |
|---|---|---|
| 3C (Three-curve) | Right thoracic primary + left lumbar compensatory + cervical counter-curve | Classic AIS S-curve |
| 4C (Four-curve) | Right thoracic + left lumbar + cervical + lumbosacral | S-curve with pelvic component |
| Single thoracic | One thoracic curve only | Right thoracic, less common |
| Single lumbar / thoracolumbar | One curve in lower spine | Often left-sided |
Core Principles Applied to All Exercises
1. Auto-elongation (De-compression)
2. Rotational Angular Breathing (RAB) / Orthopaedic Breathing
- Identifies the concave (collapsed) side of the curve
- Directs breathing into the concavity - expanding the collapsed ribs outward and backward
- Simultaneously pushes the convexity (rib hump) forward and inward
- This gradually de-rotates the vertebrae and rib cage from within
3. Muscle Activation Asymmetry
- Concave side muscles: weak, elongated, atrophied - need strengthening and activation
- Convex side muscles: tight, shortened, overactive - need stretching and inhibition
Exercises by Curve Type
A. Right Thoracic Curve (3C Pattern - Most Common AIS)
- Right thoracic muscles: shortened/tight
- Left thoracic muscles: elongated/weak
- Right ribs: compressed and rotated forward
- Left ribs: expanded posteriorly
Key Exercises:
- Patient sits on a Swiss ball in front of a mirror
- Performs active 3D auto-elongation
- Uses wall bars to push convexities "forward and inward" and draw concavities "outward and backward"
- Engages RAB - breathing into the left side
- 50 repetitions of rhythmic correction
- Patient lies face down
- Shoulder traction (ST): pull the left (concave) shoulder outward to elongate the concavity
- Shoulder counter-traction (SCT): push the right (convex) shoulder inward
- Right hip flexion: activates the iliopsoas to correct the lumbar compensatory curve
- RAB into the left chest
- Patient stands or sits with the left arm raised overhead
- Bends laterally to the right, opening up the left thoracic concavity
- RAB directs breath into the stretched left side
- Elongates the compressed left rib cage
- Patient lies on the right (convex) side
- A corrective pad/bolster placed under the right thoracic convexity
- Gravity pulls the spine toward correction (toward left)
- Left arm reaches overhead - active elongation of left side
- RAB into the left chest
- Standing exercise engaging the quadratus lumborum on the concave (left lumbar) side
- Patient stands with left side to wall bar, left arm overhead gripping the bar
- Actively side-bends left (against the lumbar compensatory curve)
- Creates internal cylinder of muscle activation around the spine
- Patient stands in front of a mirror
- Performs 3D postural correction: shift trunk left, de-rotate thorax, elongate spine
- Holds the corrected posture isometrically for 30-60 seconds
- Trains neuromuscular awareness of the corrected position
B. Left Lumbar Curve (Single Lumbar or 4C Pattern)
- Left lumbar muscles: tight/shortened
- Right lumbar muscles: elongated/weak
- Right hip: elevated
- Left hip: depressed
Key Exercises:
- Patient lies on back with wall bars for bilateral shoulder traction
- One knee flexed, the other leg extended with a belt providing counter-traction
- RAB directed into the right lumbar concavity
- Green crescent pad placed at the right lumbar hollow to guide breathing expansion
- Turquoise arrows = cranial elongation; red arrows = pushing left lumbar convexity inward
- In side-lying on the left (convex) side
- Patient activates the right quadratus lumborum to hitch the right hip upward
- This corrects the lateral shift of the lumbar spine
- Against gravity, this builds the weakened right lumbar musculature
- Standing: patient actively shifts the pelvis/lower trunk to the right (against the left-convex curve)
- Arms may assist by pushing off a wall
- A lateral decompression of the left lumbar joints occurs
- Hold 10-30 seconds, repeat 10 times
- Since lumbar scoliosis often involves pelvic obliquity (one side of the pelvis higher)
- Pelvic tilt exercises, hip hiking, and limb length correction are integrated
- Single-leg stance training to correct pelvic balance
- Right hip flexion exercises (lying or standing) activate the right iliopsoas
- This muscle when activated pulls the lumbar vertebrae toward correction
- Straight leg raises, hip flexor activation in corrected posture
C. Double Curve (S-Curve: Right Thoracic + Left Lumbar - 3C/4C Pattern)
Key Exercises:
- Patient hangs from a bar with asymmetric arm placement
- Right arm reaches higher (to decompress the right thoracic convexity)
- Left arm at a lower position
- Gravity decompresses both curves simultaneously
- Prone position with:
- Right shoulder counter-traction (for thoracic curve)
- Right hip flexion / iliopsoas activation (for lumbar curve)
- RAB into left chest AND right lumbar simultaneously
- Sit on a wedge (higher on the left side) - this corrects the lumbar curve
- Left arm reaches overhead - opens left thoracic concavity
- Right arm presses down/back - counter-acts right thoracic convexity
- RAB into left chest
- Carrying schoolbag on the convex (right) shoulder only
- Sleeping on the convex side
- Postural corrections during sitting (corrected chair use)
- Computer and desk posture modifications
D. Thoracolumbar Curve (Single Curve, T11-L1 Region)
- Similar principles to lumbar curve but applied at a higher level
- Emphasis on lateral breathing into the concave thoracolumbar region
- Thoracolumbar mobilization exercises (rotation, lateral flexion into the concavity)
- Standing side-shift exercises are particularly effective here
General Physiotherapy Programme Structure
Assessment First
- Cobb angle (from x-ray)
- Curve type and location
- Risser grade (bone maturity in adolescents)
- Trunk shift and sagittal balance
- Rib hump height (scoliometer/inclinometer reading)
- Muscle flexibility (hamstring, hip flexor tightness)
- Pain score
Programme Components (All Curve Types)
| Component | Exercises | Frequency |
|---|---|---|
| Warm-up / Mobilization | Cat-camel, spinal rotation in lying, hip circles | 5-10 min daily |
| Curve-specific PSSE | Schroth/SEAS exercises as above | 30-60 min, 5x/week |
| Core stabilization | Dead bug, bird-dog, plank (in corrected posture) | Daily |
| Flexibility | Hamstring stretches, hip flexor stretch, thoracic rotation stretches | Daily |
| Strengthening | Curve-concave side muscles, glutes, deep neck flexors | 3-5x/week |
| Posture training | Mirror work, postural correction in sitting/standing/walking | Integrated daily |
| RAB | Breathing exercises into concavities | 2-3x daily, 10 min each |
| Aerobic activity | Swimming (especially backstroke), cycling | 3x/week |
Swimming - Special Mention
- Water reduces gravitational load on the spine
- Backstroke and freestyle asymmetric arm pulls can provide corrective forces
- Core muscles are activated without axial compression
- Breathing into alternating sides builds thoracic flexibility
When Bracing Combines With Physiotherapy
- Exercises done outside brace hours to maintain muscle strength
- Schroth exercises specifically complement the Rigo-Chêneau brace which is also curve-specific
- Exercise prevents muscle atrophy that can result from prolonged bracing
Key Contraindications and Cautions
- Do NOT perform symmetric general exercises (e.g., standard sit-ups, symmetric yoga poses) without curve-specific modification - these can reinforce the asymmetric muscle pattern
- Avoid heavy axial loading exercises (e.g., deadlifts, barbell squats) during active curve progression
- Left thoracic curve patients need MRI before beginning exercise to rule out cord pathology
- Degenerative scoliosis patients (older adults) have different goals - pain control, stenosis management, not curve reduction
Evidence Summary
- Reducing Cobb angle progression in adolescent idiopathic scoliosis
- Improving quality of life and cosmesis
- Reducing pain in adult scoliosis
Give me about exercise exercises and their pictures how they are performed
Schroth scoliosis exercise prone correction thoracic lumbar
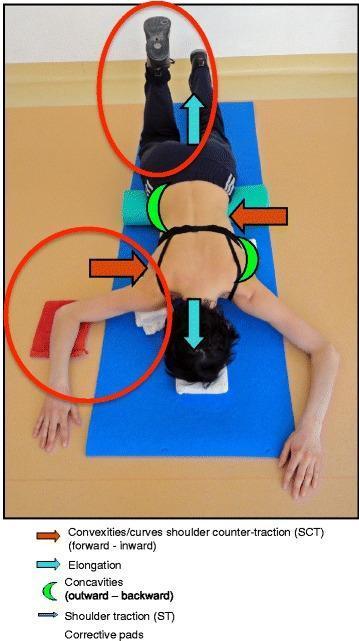
This clinical photograph illustrates a patient performing the Schroth prone exercise, a Physiotherapeutic Scoliosis-Specific Exercise (PSSE) designed for three-dimensional spinal correction. The patient is positioned prone on a blue mat with the head resting on a pillow and a green lumbar roll supporting the lower torso. The legs are elevated vertically against a wall. Visible annotations detail the biomechanical corrective forces: blue arrows indicate axial trunk elongation (cranial and caudal forces), while red arrows denote muscle activation directed toward the midline (shoulder counter-traction) to correct spinal convexities. Green half-moon symbols represent the intended expansion of spinal concavities in an outward-backward direction. Red circles highlight specific corrective focal points, including iliopsoas muscle activation via right hip flexion and shoulder traction/counter-traction aimed at reducing thoracic and lumbar curves. This therapeutic modality focuses on active self-correction, rotational angular breathing, and postural stabilization to manage idiopathic scoliosis and mitigate curve progression.
A clinical photograph and diagrammatic summary of a patient performing the Schroth prone exercise for scoliosis management. The patient is positioned prone on a blue mat, utilizing various therapeutic aids to facilitate trunk stabilization and spinal correction. Key equipment includes a pelvic support (footstool) to elevate the pelvis, and cylindrical rolls placed under the lower abdomen and the right shoulder. The left leg is abducted, corresponding to the lumbar convex side, while the arms are extended laterally, holding dowel rods for stability. Superimposed icons illustrate the biomechanical forces applied: Turquoise arrows indicate axial trunk elongation through cranial and caudal traction. Blue arrows at the shoulders represent bilateral shoulder traction and counter-traction to address thoracic curvature. Red arrows signify targeted muscle activation intended to shift convexities toward the midline. Green half-moon shapes identify the concavities of the spine where respiratory expansion is encouraged. This visual serves as an educational guide for Physiotherapeutic Scoliosis-Specific Exercises (PSSE) focusing on 3D postural self-correction.
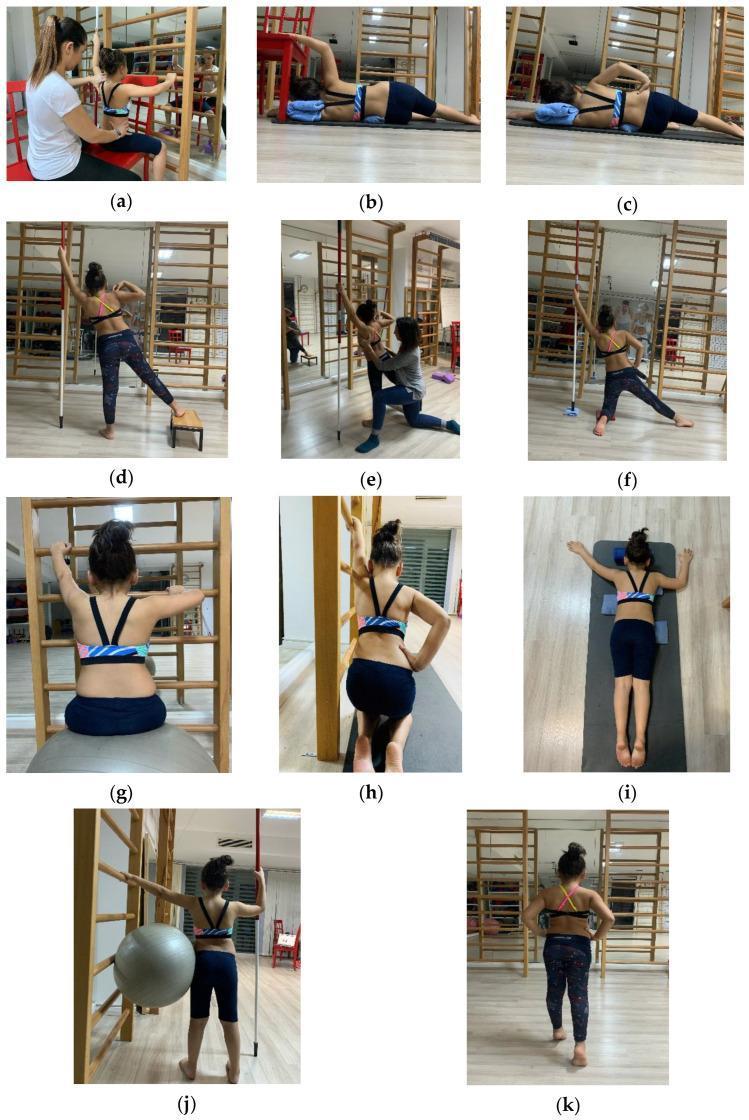
A series of clinical photographs (a-k) documenting a patient performing the Schroth method, a conservative physiotherapeutic scoliosis-specific exercise (PSSE) system. The images demonstrate three-dimensional postural corrections using specific therapeutic equipment. (a-f, h) utilize Swedish wall bars and poles for elongation and shoulder counter-traction. (b, c, i) show side-lying and prone positions on mats with supportive cushions for muscle cylinder and rotational respiration training. (g, j) demonstrate sitting and standing exercises using a Swiss ball to challenge core stability and pelvic alignment. Key anatomical focuses visible include the correction of thoracic and lumbar spinal asymmetry, pelvic tilt adjustment, and paraspinal muscle engagement. These exercises aim to treat idiopathic scoliosis by promoting spinal elongation, derotation, and lateral correction through specialized breathing and isometric tension techniques. The series illustrates the clinical application of Schroth principles including rotational respiration, sail exercises, sideways hangs, and gait training in a rehabilitative setting.
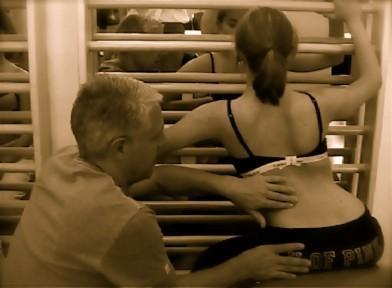
A clinical photograph in a physical therapy setting demonstrating the 'New Power Schroth' exercise for scoliosis management. The image shows a female patient in a kneeling or squatting position facing a wall bar apparatus. Her right arm is elevated and gripping a high bar to facilitate thoracic derotation and redression of a rib hump on the convex side of the spinal curve. A therapist is positioned behind the patient, using tactile cues with his hands on her lumbar region and lower back to monitor postural synergy and alignment. The patient is wearing a dark sports bra with a white measuring tape or band secured around the lower rib cage/waistline to monitor thoracic expansion or spinal correction. This illustration highlights the application of the Schroth method, a specialized physiotherapy approach used to improve pulmonary function, reduce pain, and halt curve progression in adolescent or adult idiopathic scoliosis through three-dimensional spinal correction.
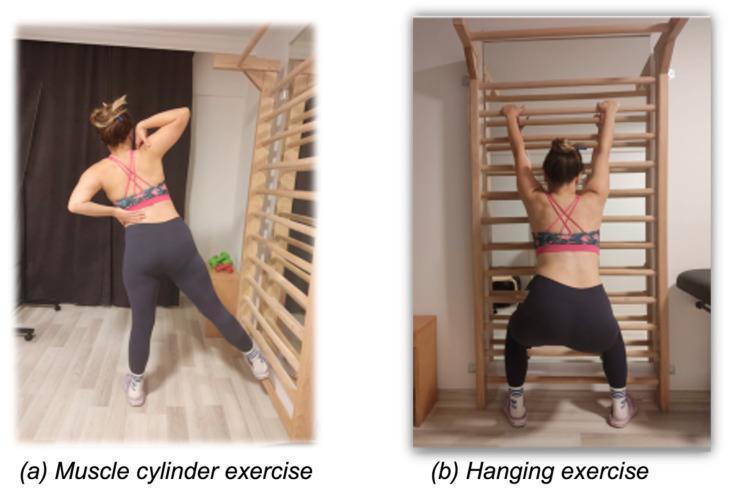
Two clinical photographs demonstrating corrective physical therapy exercises for scoliosis management, specifically within the Schroth Best Practice approach. (a) Muscle Cylinder Exercise: A patient is shown in a standing position with the torso rotated. One leg is extended laterally toward a stall bar (wall ladder), and one hand is placed on the lumbar region to provide tactile feedback or support. This exercise aims to activate intrinsic back musculature and achieve multi-planar spinal correction (frontal, sagittal, and horizontal). (b) Hanging Exercise: The patient is seen from the posterior view, suspended from a stall bar with arms extended overhead. The knees are flexed and the body is aligned vertically. This modality focuses on spinal elongation and mobilization, particularly relevant for severe scoliotic curves where thoracic gibbosity is present. Both images serve as educational demonstrations of rehabilitation techniques used to modify the Angle of Trunk Rotation (ATR) and manage spinal curvature in orthopedic and physical therapy contexts.
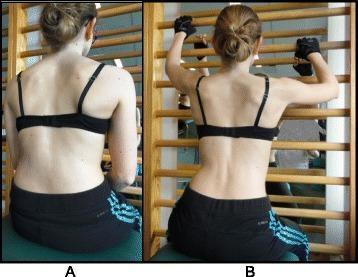
Clinical photograph (posterior view) demonstrating a female patient with scoliosis performing the Schroth '50 x Pezziball' exercise. The image is split into two panels, (a) and (b), illustrating the principle of active 3D auto self-correction. In panel (a), the patient is seated in a neutral, relaxed position on a green Swiss ball (Pezziball) in front of a mirror and wall bar. Visible spinal asymmetry is present, with a right thoracic prominence and left lumbar indentation. In panel (b), the patient performs the corrective exercise by reaching upward and outward to grasp the horizontal rungs of the wall bar. This active engagement facilitates spinal elongation and derotation, aimed at shifting the trunk's convexities inward and expanding the concavities. The patient is wearing athletic attire and gloves for grip. This exercise is a key component of Physiotherapeutic Scoliosis-Specific Exercises (PSSE) designed to stabilize the spine and counter the 'vicious cycle' of curve progression through postural awareness and muscular activation.
scoliosis physiotherapy exercises side lying supine standing correction posture
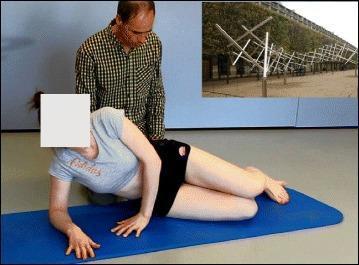
A clinical photograph illustrating a patient performing spinal stabilization exercises according to the Lyon method for scoliosis management. The image shows a female patient in a side-lying posture on a blue exercise mat. She is supported by her right forearm and left hand, with her torso partially elevated to engage core and paraspinal musculature. Her hips and knees are flexed in a stable, stacked arrangement. A physical therapist is positioned behind the patient, providing supervision and tactile guidance to ensure correct spinal alignment and trunk positioning. The exercise focuses on active stabilization, proprioception, and the correction of scoliotic curves through muscle activation and postural awareness. The background features a plain wall and an inset image showing tree-like architectural structures, which likely serves as a visual aid or context for the Lyon school's setting. This material is designed for physical therapy education, specifically demonstrating Conservative Management of Spinal Deformities (CMSD) through Physiotherapy Scoliosis-Specific Exercises (PSSE).
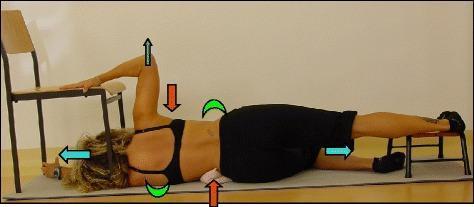
Clinical photograph of a patient performing the 'Muscle-cylinder' exercise, a specialized physiotherapy technique for scoliosis correction. The patient is positioned in a side-lying posture on a yoga mat, resting on the lumbar convex side. A small support (rice bag) is placed under the lumbar convexity to assist horizontal spinal alignment. The upper leg is abducted and supported by a small stool, while the upper arm rests on a chair seat with the elbow flexed. Overlaid graphical elements illustrate biomechanical forces: light blue arrows indicate cranial and caudal trunk elongation; green half-moons mark concave areas targeted for expansion; red arrows denote muscle activation directing convexities toward the midline; and a dark blue arrow at the right elbow signifies lateral isometric shoulder traction with a fixed scapula. This therapeutic position is designed to promote 3D postural correction, segmental mobilization, and core stabilization specifically for major lumbar scoliosis curves.
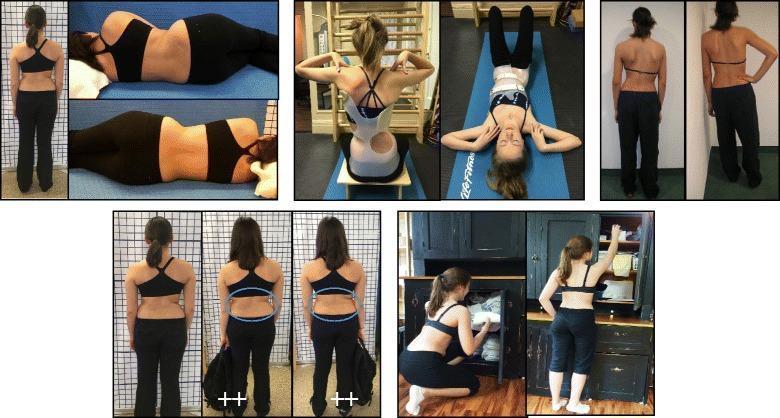
A multi-panel clinical photograph series documenting postural adaptations and therapeutic management in adolescent idiopathic scoliosis (AIS). The images illustrate patients in various positions relevant to activities of daily living (ADLs), including standing, side-lying (supine/prone variants), and sitting. Visible clinical features of scoliosis include lateral spinal curvature, uneven shoulder height, and waistline asymmetry. Several frames demonstrate the use of asymmetric rigid spinal braces (such as the ARTbrace or Rigo-Chêneau type), highlighting how the orthosis provides external corrective forces to improve truncal alignment and thoracic symmetry during rest and activity. Lower panels specifically depict ergonomic modifications for ADLs: carrying a bag with proper weight distribution (highlighted with blue ellipses for pelvic/waist alignment) and performing tasks like bending, lifting, and reaching. The content emphasizes the integration of Physiotherapy Scoliosis-Specific Exercises (PSSE), such as the BSPTS or Schroth methods, aiming to correct 3D spinal deformities through active self-correction and postural awareness training.
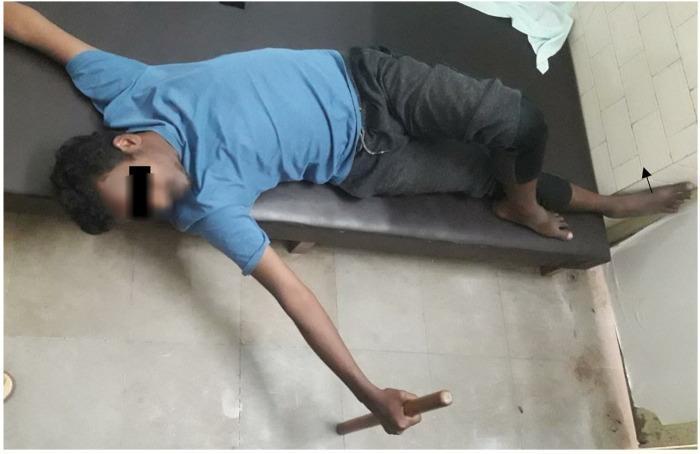
This clinical photograph demonstrates a specific therapeutic positioning technique in the supine position for curve-specific correction, typically used in physical therapy for scoliosis or pelvic obliquity. The patient is lying supine on a padded examination couch. To address transverse and sagittal plane pelvic asymmetries, the left leg is crossed over the straight right leg, with the left hip and knee flexed and the left foot placed beside the right knee. This configuration aims to bring a posteriorly rotated left pelvis forward. The patient's upper body is stabilized with arms extended laterally; the right hand holds a cylindrical wooden dowel, likely used to facilitate thoracic stabilization or derotation during corrective exercises. This posture leverages the lower extremities as a lever arm to assist in lumbar and pelvic realignment. The image serves as an educational example of conservative rehabilitative management for spinal deformities and pelvic malalignment.
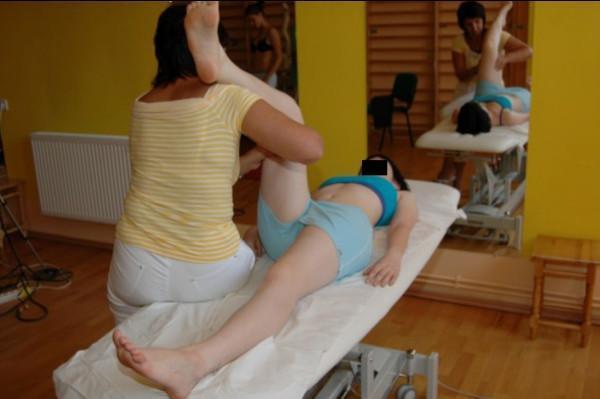
A clinical photograph depicting a manual therapy session in a rehabilitation or physiotherapy clinic. A patient is lying supine on a white adjustable treatment table while a therapist performs active myofascial relaxation. The therapist is positioned at the patient's side, manipulating the right lower extremity; the hip is flexed and the knee is extended, with the patient's foot resting near the therapist's shoulder to achieve a deep stretch. This technique is specifically targeted at the hamstrings and erector spinae muscles as part of a scoliosis treatment protocol. The clinical setting includes a large wall mirror reflecting similar therapeutic activities, suggesting a specialized facility for spinal correction and motor balance training. The educational focus is on normalizing tension along the Superficial Back Line (SBL) to address spinal deformities in the sagittal plane, such as flattened thoracic kyphosis or lumbar lordosis adjustments associated with adolescent idiopathic scoliosis.
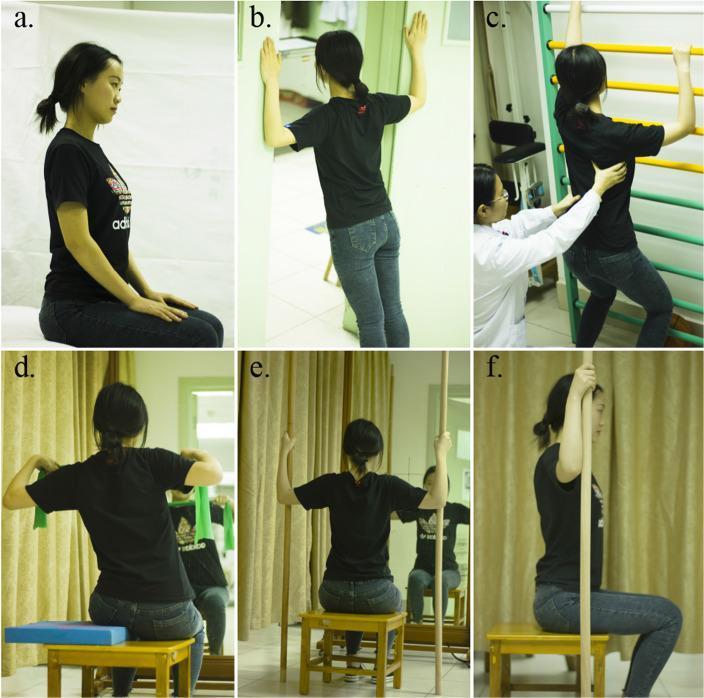
A composite of six clinical photographs (a–f) demonstrating various Physiotherapeutic Scoliosis-Specific Exercises (PSSE) performed by a female patient with adolescent idiopathic scoliosis. (a) Side profile showing neutral seated posture for education. (b) Rear view of a standing 'plank' position against a doorframe with bilateral shoulder abduction and external rotation. (c) Therapist-assisted rotary breathing training in a squatting position using a wall bar (ladder). (d) Active 3D correction while seated on a bench, utilizing a blue wedge pad under the left hemipelvis and an elastic resistance band held with abducted/externally rotated arms in front of a mirror. (e) Seated correction using two vertical wooden rods for stabilization, viewed from the rear. (f) Side profile of the seated correction holding a single vertical rod. The series illustrates core PSSE principles: 3D autocorrection, breathing techniques, and the use of corrective aids like wedges and poles to stabilize spinal curvature in the coronal, sagittal, and horizontal planes.
scoliosis Schroth exercises images how to perform step by step photos
Scoliosis Exercises - Illustrated Guide with How to Perform
All exercises below are from the Schroth Method and PSSE (Physiotherapy Scoliosis Specific Exercises) - the gold standard physiotherapy approach for scoliosis. Every exercise is curve-specific, meaning the direction of correction depends on which side the curve goes.
Before ANY Exercise: The 3 Universal Starting Steps
Exercise 1: Pezziball (Swiss Ball) Auto-Correction
- Sit on a Swiss ball in front of a mirror (mirror is essential for feedback)
- Sit tall - auto-elongate the spine upward
- Reach both arms upward and grip the wall bars or hold poles
- Pull the thoracic convexity (rib hump side) forward and inward
- Open the thoracic concavity (hollow side) outward and backward
- Breathe into the concave side (RAB)
- Hold 30-60 seconds, repeat 5-10 times
Exercise 2: Prone Exercise (Face-Down with Wall Bars)
- Lie face down on a mat
- Legs: elevate against wall OR bend the right knee (right hip flexion) to activate the right iliopsoas muscle - this corrects the lumbar compensatory curve
- Left arm: reach outward (shoulder traction - ST) - this stretches and opens the left thoracic concavity
- Right arm: press inward/downward (shoulder counter-traction - SCT) - this pushes the right thoracic convexity toward midline
- A corrective pad/bolster placed under the right side of the chest
- RAB into the left chest - breathe left ribs outward and backward
- Hold correction isometrically on each exhale for 3-5 seconds, repeat 10-15 times
Exercise 3: Muscle Cylinder Exercise
Standing Version (Thoracic Curve):
- Stand sideways to the wall bars
- Left foot steps out slightly (wider stance on the concave/left side)
- Left arm reaches up overhead and grips the bar - this elongates and opens the left thoracic concavity
- Right hand placed on the lower back for tactile feedback
- Activate the muscles around the trunk like a cylinder (all around)
- RAB into the left chest
- Right leg may step outward to help de-rotate pelvis
- Hold 30-60 seconds
Hanging Version (Spinal Decompression):
- Both arms grip high bar overhead
- Let the body hang with knees slightly bent
- Spine decompresses under gravity
- Corrective pads can be placed at the convexity during the hang
- 30 seconds, 3-5 sets
Exercise 4: Side-Lying Muscle Cylinder (for Lumbar Curve)
- Lie on your LEFT side (the convex/hump side of the lumbar curve)
- Place a small rice bag or foam roll under the lumbar convexity - this acts as a fulcrum and uses gravity to push the curve toward correction
- Upper (right) leg: abduct slightly and rest on a small stool
- Upper (right) arm: rest with elbow on a chair for lateral shoulder traction
- RAB: direct breathing into the RIGHT lumbar hollow (concavity) - expand it outward
- The green crescents in the image show where to breathe; red arrows show where to push inward; teal arrows show elongation
- Hold correction on exhale, 3-5 seconds per breath, 10-15 repetitions
Exercise 5: Side-Lying Lyon Method Stabilization
- Lie on the side (on the convex side of the primary curve)
- Support yourself on forearm (elbow directly below shoulder)
- Hips and knees stacked, slightly bent
- The therapist guides the correct spinal alignment with tactile cues
- Once in corrected posture, hold isometrically - engage all trunk muscles to stabilize
- Do not let the spine sag or rotate during hold
- 3 sets of 20-30 second holds
Exercise 6: Full Schroth Programme - Comprehensive Sequence
| Panel | Exercise | Position |
|---|---|---|
| (a) | Seated correction with wall bars - postural baseline | Sitting |
| (b) | Side-lying correction | Side-lying |
| (c) | Side-lying with arm overhead | Side-lying |
| (d) | Standing pole exercise with one leg on step | Standing |
| (e) | Therapist-assisted standing correction | Standing |
| (f) | Standing lunge with pole - thoracolumbar correction | Standing |
| (g) | Sitting on Swiss ball with wall bar reaches | Sitting |
| (h) | Standing hip-hitch side shift | Standing |
| (i) | Prone with pads | Prone |
| (j) | Standing with Swiss ball and pole | Standing |
| (k) | Standing posture hold against wall bars | Standing |
Exercise 7: SEAS Method - Sitting Correction Exercises
| Panel | How to Perform |
|---|---|
| (a) | Posture assessment sitting - baseline neutral sitting posture observed from the side |
| (b) | Wall standing correction - stand facing wall, both hands on wall, actively shift thorax away from the curve side, hold corrected posture |
| (c) | Assisted standing correction - therapist applies manual corrections at the thorax and pelvis while patient actively maintains the corrected position against resistance |
| (d) | Seated wedge correction with resistance band - sit on a wedge (higher on the concave pelvic side), hold resistance band with arms abducted - exercises outer thoracic muscles |
| (e) | Mirror sitting correction - sit facing mirror, arms behind back, actively observe and correct spinal asymmetry in real time |
| (f) | Seated pole exercise - sit on chair, hold vertical pole overhead, use pole as biofeedback to maintain axial elongation during correction |
Exercise 8: Muscle Cylinder Standing - New Power Schroth
- Stand in a slight squat or kneeling position facing wall bars
- Right arm reaches high on the bar (concave thoracic side - opens left if that's your concavity - depending on curve, the arm on the concave side reaches UP)
- Therapist applies hands-on guidance at the lower thorax and lumbar region
- A measuring band around the lower ribs gives biofeedback of chest expansion
- Patient performs RAB - breathing outward into the concave side under the therapist's hand
- Active trunk de-rotation with each breath
- 10 breaths per set, 3 sets
Key to All Exercise Images (Universal Arrow Code)
| Arrow / Symbol | Meaning |
|---|---|
| 🔴 Red/Orange arrows | Push convexity (rib hump) FORWARD and INWARD toward midline |
| 🟢 Green crescents | Breathe INTO the concavity - expand it OUTWARD and BACKWARD |
| 🩵 Teal/Blue arrows | Direction of ELONGATION (always cranial + caudal simultaneously) |
| ⬜ Gray arrows | Shoulder traction - pull shoulder outward to open concavity |
| 🔵 Dark blue arrows | Counter-traction - hold or stabilize opposing shoulder |
Home Exercise Programme Summary
| # | Exercise | Position | Duration | Curve Target |
|---|---|---|---|---|
| 1 | Pezziball auto-correction | Sitting on ball | 10 min | All curves |
| 2 | Prone correction with RAB | Lying face down | 10 min | Right thoracic |
| 3 | Muscle cylinder standing | Standing | 3 × 30 sec holds | Right thoracic |
| 4 | Hanging | Hanging from bar | 3 × 30 sec | All curves |
| 5 | Side-lying muscle cylinder | Side-lying | 10 min | Left lumbar |
| 6 | Mirror postural correction | Standing | 5 min | All curves |
| 7 | RAB breathing only | Any corrected posture | 3 × 10 breaths, 3x daily | All curves |
| 8 | Seated wedge correction | Sitting | 10 min | Double curves |
| 9 | Cat-camel mobilization | 4-point kneeling | 2 × 10 reps | Warm-up / all |
| 10 | Hamstring stretch | Supine | 3 × 30 sec each side | All - flexibility |
Remember: these exercises must be prescribed and initially taught by a certified Schroth therapist, as the exact arm/leg position, breathing direction, and correction angle differs significantly between patients with different curve patterns.
Why the lumber spine turns left in scoliosis why not towards right
why lumbar scoliosis curves left compensatory right thoracic spine balance mechanism
scoliosis right thoracic left lumbar compensatory curve balance mechanism diagram
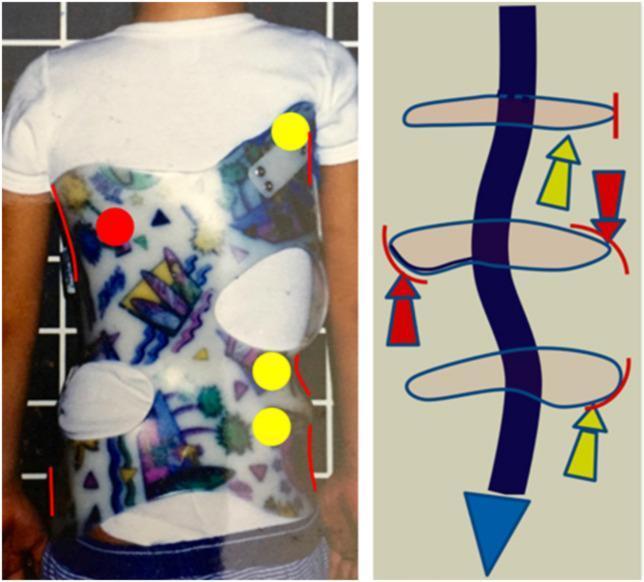
This composite educational graphic illustrates the design and biomechanical principles of a 3D corrective brace (based on Rigo principles) for early-onset single thoracic scoliosis. The left panel shows a clinical photograph of a pediatric patient wearing a rigid thoracic-lumbar-sacral orthosis (TLSO). The brace features specific expansion voids and pressure areas, including a regional derotation zone (marked with a red circle) and counter-rotation points (marked with yellow circles). The right panel provides a corresponding biomechanical diagram of the vertebral column with a left-convex thoracic curve. Large red arrows indicate the primary regional derotation mechanism acting at the apical region of the main curve, while yellow arrows demonstrate cranial (superior) and caudal (inferior) counter-rotation forces. The diagram highlights lateral, dorsal, and ventral contacts designed to optimize frontal and sagittal plane alignment. This visual demonstrates the multi-planar corrective strategy used in orthotic management to achieve spinal balance and prevent the progression of compensatory curvatures in scoliosis patients.
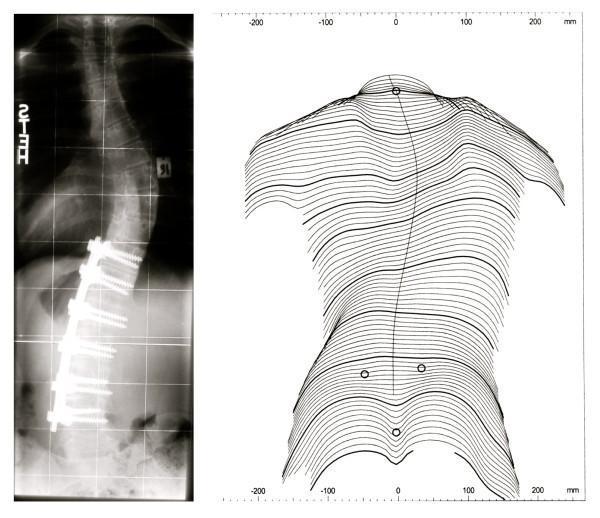
This composite educational graphic illustrates post-surgical lateral decompensation in Adolescent Idiopathic Scoliosis (AIS). On the left, a posterior-anterior (PA) diagnostic X-ray of the spine shows a lumbar curve stabilization using spinal fusion instrumentation, consisting of a longitudinal metal rod and multiple pedicle screws. Despite the lumbar fusion, a significant compensatory thoracic curve is visible, resulting in coronal imbalance. On the right, a corresponding posterior trunk surface topography diagram (line drawing) maps the external cosmetic deformity. The topographic lines demonstrate clear asymmetry: the right side of the upper torso is more prominent, while the left side of the lower torso projects further outward. This side-by-side comparison demonstrates the lack of correlation between internal radiographic correction of a single curve and the overall clinical/cosmetic balance of the trunk, highlighting the phenomenon where progression of an unfused curve leads to patient dissatisfaction due to persistent postural imbalance.
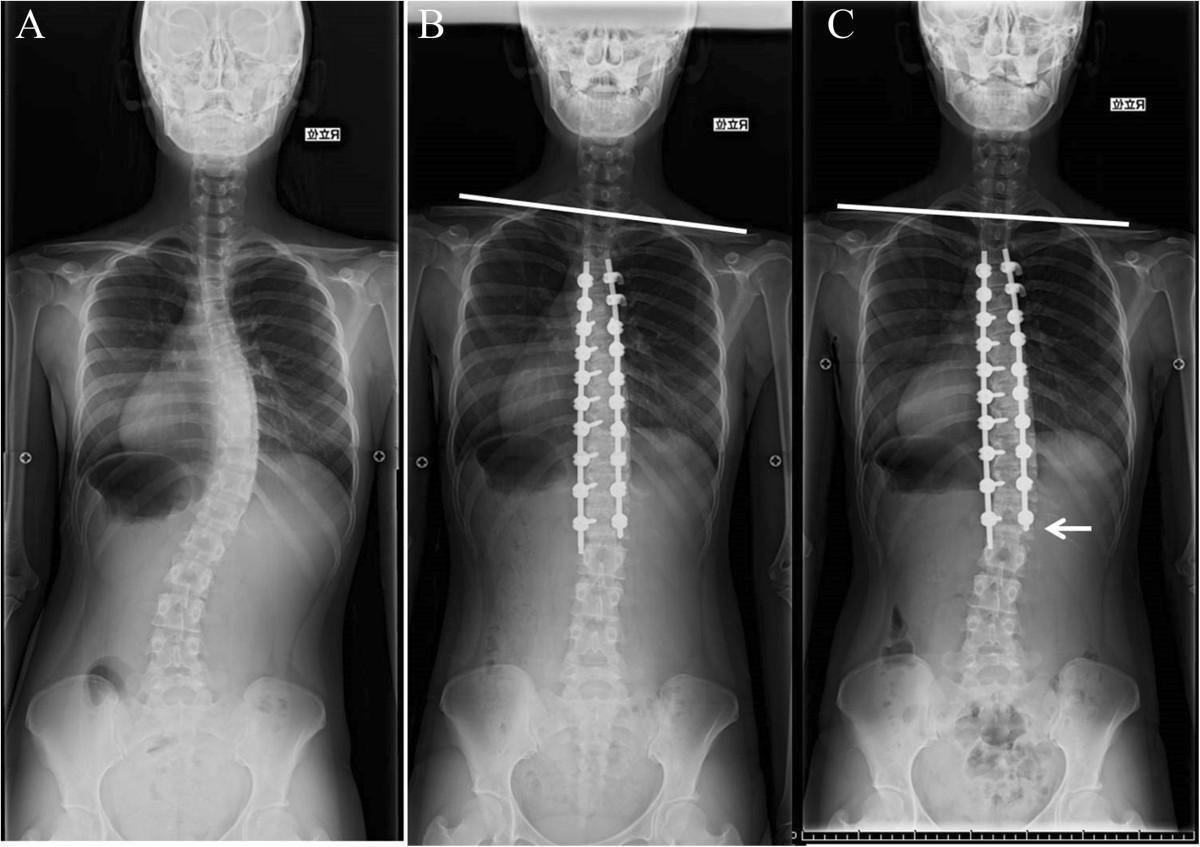
This set of three standing posteroanterior (PA) spinal radiographs demonstrates the surgical management and longitudinal follow-up of adolescent idiopathic scoliosis (AIS). Panel A (preoperative) shows a primary right-convex thoracic curve and a secondary left-convex lumbar curve, resulting in significant coronal imbalance and shoulder asymmetry. Panel B (immediate postoperative) shows the result of posterior spinal fusion using bilateral pedicle screw (PS) constructs extending from the upper thoracic to the lower thoracic/upper lumbar vertebrae. A horizontal line across the clavicles highlights the postoperative improvement in shoulder balance, although some residual tilt persists. Panel C (two-year follow-up) illustrates the long-term stability of the hardware and correction. A white arrow points to the 'distal adding-on' phenomenon, where a new curve develops immediately below the lowest instrumented vertebra (LIV). This compensatory mechanism is shown in relation to the achievement of a level shoulder balance, represented by the horizontal line being parallel to the top of the frame. These images serve as an educational example of thoracic curve correction, postoperative postural adaptation, and common radiographic phenomena following spinal instrumentation.
Why Does the Lumbar Spine Curve Left in Scoliosis?
The Fundamental Law: The Body Always Seeks Balance
The head must stay centered over the pelvis, and the eyes must stay level with the horizon.
Step-by-Step: How the Left Lumbar Curve Develops
Step 1: The Primary (Structural) Curve Forms - Thoracic Goes RIGHT
- The mid-thoracic spine shifts to the right
- The thoracic cage moves right
- The upper trunk shifts right
- The head starts to deviate to the RIGHT of the midline
Step 2: The Spine Triggers a Compensatory Response
Step 3: The Compensation Works Like a Counterweight
- Bend the top of a rod to the right
- To keep the base directly below the top, the bottom must bend to the left
- The two bends cancel each other out, keeping the ends aligned
Why Specifically Left (and Not Right)?
| Primary Curve | Compensatory Lumbar Curve | Why |
|---|---|---|
| Right thoracic (most common) | Left lumbar | Opposite direction needed to re-center the head |
| Left thoracic (rare, red flag) | Right lumbar | Same logic, opposite side |
| Left thoracolumbar | Right lumbar | Same logic |
Visualizing It on X-Ray
- Upper thoracic and mid-thoracic spine: curves to the RIGHT (primary structural curve)
- Lumbar spine: curves to the LEFT (compensatory curve)
- The S-shape together keeps the head roughly centered over the pelvis
The Structural vs. Compensatory Distinction
| Feature | Primary (Structural) Curve | Compensatory (Non-structural) Curve |
|---|---|---|
| Direction | Right (thoracic) | Left (lumbar) |
| Vertebral rotation | Present - vertebrae twist | Minimal or absent |
| Flexibility | Rigid - does NOT correct on side-bending | Flexible - CORRECTS fully on side-bending |
| Rib hump | Present (rotation causes rib hump) | No significant rib hump |
| On forward bending | Hump visible | No hump |
| Treatment target | Must be corrected | Corrects itself when primary is fixed |
| Cobb angle | Usually larger | Usually smaller (by definition of compensatory) |
What About Degenerative Scoliosis?
- Curves above L2 tend to curve right (influenced by the normal right-rotated thoracic spine)
- Curves below L2 tend to curve left (related to the natural asymmetry of the lumbar discs)
- Both left and right degenerative lumbar curves occur - the PMC research shows it is roughly equally distributed in purely degenerative cases
Summary
| Question | Answer |
|---|---|
| Why does the lumbar curve go left? | Because it is a compensatory response to the primary right thoracic curve |
| What is the purpose of this left curve? | To bring the head back to the center over the pelvis (coronal balance) |
| Is it always left? | Only when the primary thoracic curve is right - which is 90% of AIS cases |
| Could it go right instead? | Yes - if the primary thoracic curve is left (atypical, needs MRI to exclude cord pathology) |
| Is the left lumbar curve a disease itself? | No - it is the spine's own correction mechanism; it resolves when the primary curve is fixed |
| In degenerative scoliosis? | The lumbar curve can go either left or right - determined by asymmetric degeneration pattern |
About kyphosis and lordosis curves normal and when it’s said to be abnormalities
normal kyphosis lordosis degrees cervical thoracic lumbar sacral spine abnormal hyperkyphosis hyperlordosis
normal spine sagittal curves kyphosis lordosis diagram lateral view
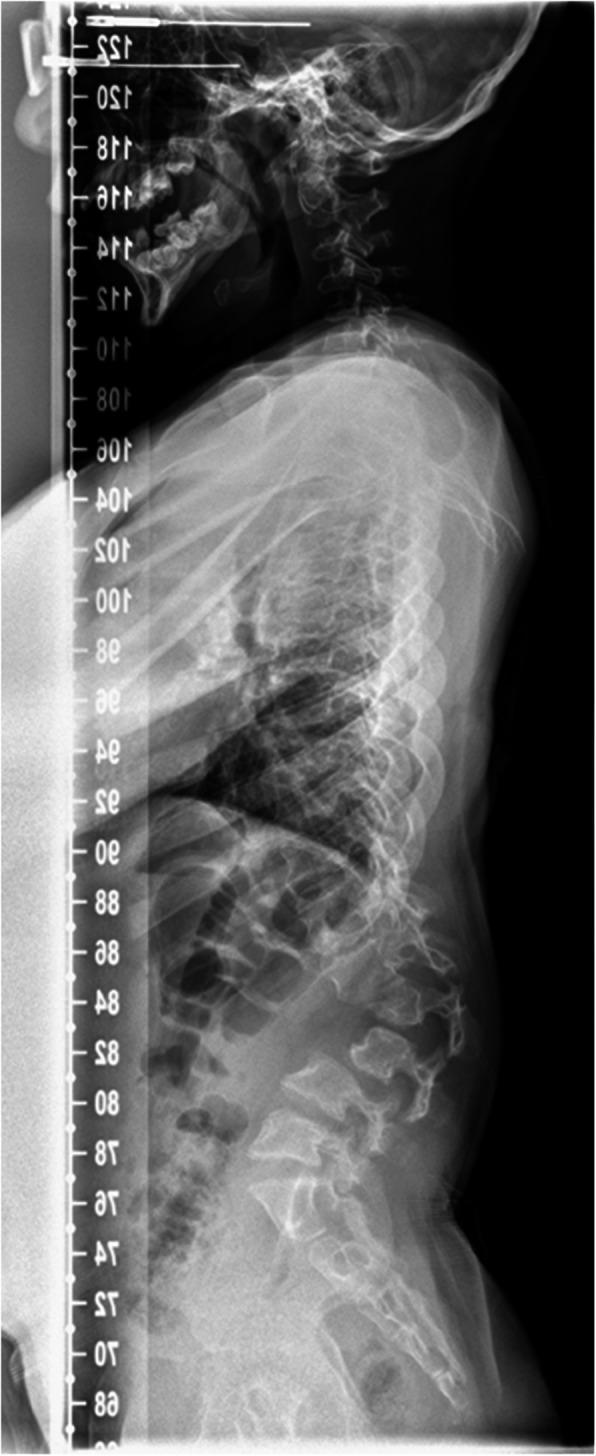
This lateral view X-ray radiography shows a pre-operative sagittal profile of the cervical, thoracic, and lumbar spine. The image reveals a significant thoracolumbar kyphosis, particularly pronounced at the high lumbar region. The normal lumbar lordosis is absent, replaced by a forward angulation of the spine. The vertebral bodies in the affected lumbar and thoracic segments demonstrate dysplastic changes characteristic of dysostosis multiplex, including anterior beaking and wedging, where the anterior height is significantly reduced compared to the posterior height. This structural abnormality leads to narrowed and irregular intervertebral spacing and global spinal malalignment. The bone density appears heterogenous with areas of radiolucency. This radiograph is a classic clinical example of spinal manifestations associated with Mucopolysaccharidosis Type 1 (MPS 1), illustrating the severe skeletal deformities that require orthopedic intervention to prevent neurological compromise and improve functional gait outcomes.
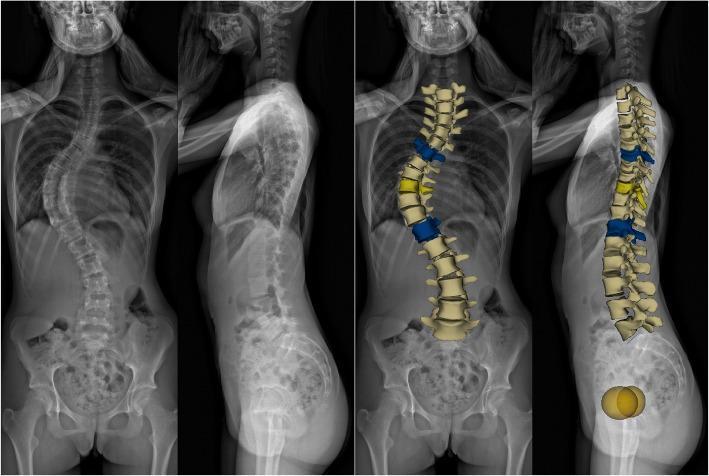
Full-body EOS imaging and corresponding 3D digital reconstructions of a 16-year-old female patient diagnosed with Adolescent Idiopathic Scoliosis (AIS). The image set includes coronal (anterior-posterior) and sagittal (lateral) views. The coronal view demonstrates a significant 'S'-shaped lateral spinal curvature characterized by a 67-degree Cobb angle. The primary thoracic curve exhibits a rightward convexity, while the lumbar region shows a compensatory leftward convexity, classified as Lenke 1AN. The 3D models highlight vertebral rotation, specifically shifting the spinous processes toward the concavity of the curves. In the sagittal view, there is a visible reduction in normal thoracic kyphosis and an altered lumbar lordosis, accompanied by a posterior pelvic tilt. These diagnostic images illustrate the complex three-dimensional deformity of the spine, showing the relationship between coronal malalignment, sagittal profile changes, and pelvic compensation in scoliosis management.
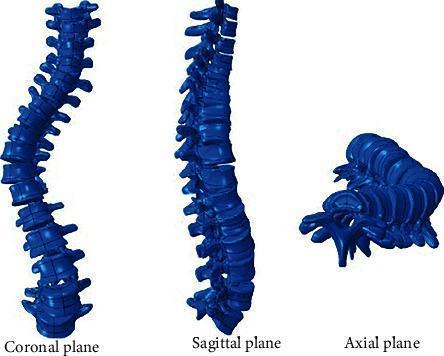
This medical illustration presents a three-dimensional anatomical diagram of the human spine demonstrating scoliosis across three standard orthogonal planes: coronal, sagittal, and axial. In the coronal plane, the spine shows a significant lateral 'S-shaped' curvature, deviating from the normal vertical midline. The sagittal plane view displays the anterior-posterior profile, illustrating alterations in the natural thoracic kyphosis and lumbar lordosis associated with the deformity. The axial plane view highlights the critical rotational component of scoliosis, where vertebral bodies and spinous processes are twisted relative to the longitudinal axis. This visualization serves as an educational tool for orthopedic and radiological study, emphasizing that scoliosis is a complex 3D deformity involving lateral displacement, rotation, and sagittal plane changes. The blue-colored 3D model facilitates the identification of vertebral alignment and the morphological changes used to calculate the Cobb angle for determining clinical severity.
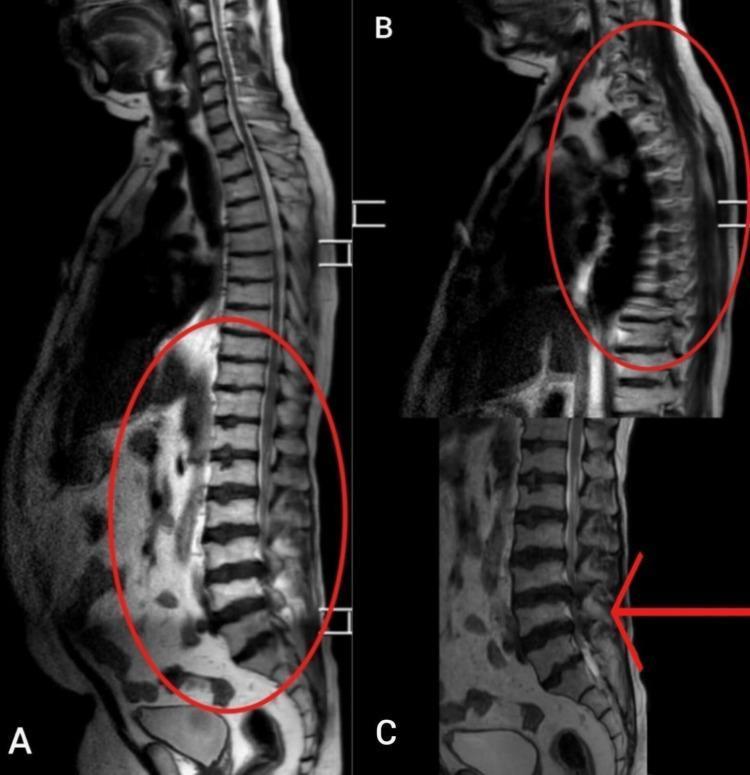
Diagnostic sagittal Magnetic Resonance Imaging (MRI) of the spine, presented in three views (A, B, and C) highlighting degenerative and structural pathologies. Panel A shows a lateral view of the lumbar and sacral spine, demonstrating significant kyphosis and loss of normal lumbar lordosis. Red ovals in panels A and B delineate regions of multi-level vertebral body wedging, irregular endplates, and prominent osteophyte formation characteristic of Scheuermann disease. Panel C provides a focused view of the lower lumbar region where a red arrow points to significant spinal canal stenosis. Visible features include reduced intervertebral disc height, disc bulging, and ligamentous hypertrophy contributing to the narrowing of the neural canal. The imaging captures extensive degenerative disc disease across multiple vertebral levels, demonstrating the clinical progression of juvenile osteochondrosis into adult spinal deformity.
Scheuermann kyphosis hyperkyphosis lateral spine x-ray vertebral wedging
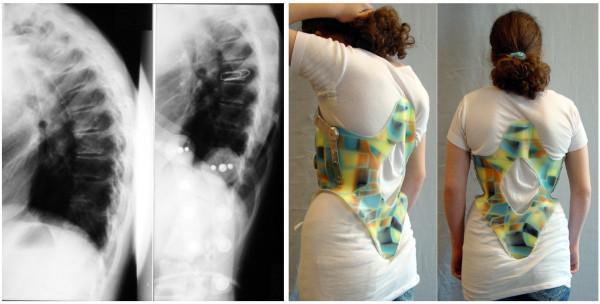
This composite image illustrates the conservative management of Scheuermann's kyphosis using a specialized spinal orthosis. The left panel consists of two lateral X-ray radiographs of the thoracic spine. The first X-ray demonstrates rigid thoracic kyphosis with characteristic vertebral wedging and increased sagittal curvature. The second X-ray shows the patient in a Kyphologic™ brace, exhibiting significant in-brace correction of the curvature (>20°) and improved vertebral alignment. The right panel contains two clinical photographs (posterolateral and posterior views) of a patient wearing the low-profile Kyphologic™ brace over a white T-shirt. The brace is a rigid thoracolumbosacral orthosis (TLSO) featuring a colorful geometric pattern, significant posterior cutouts for comfort and ventilation, and a side-closure mechanism using straps. The design employs a 3-point pressure system to redress thoracic hyperkyphosis while minimizing material bulk to improve patient compliance and quality of life.
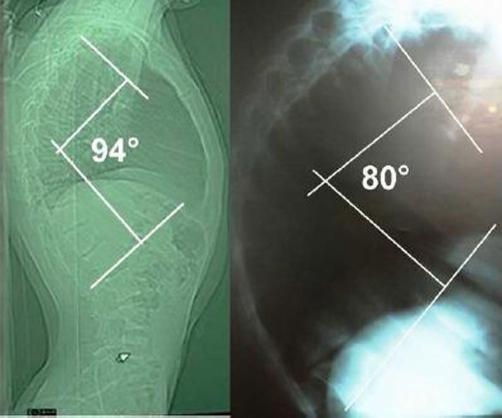
Comparison of two lateral diagnostic X-ray images of the thoracic spine demonstrating significant hyperkyphosis. The left image shows a more severe sagittal plane deformity with a Cobb angle measurement of 94°, indicating a pronounced thoracic curvature. The right image shows a slightly improved but still abnormal kyphotic curvature measured at 80°. Both images utilize white anatomical landmarks and intersecting lines to illustrate the measurement of the thoracic kyphosis angle. The radiographs display the vertebral bodies of the thoracic and upper lumbar regions, highlighting the degree of anterior wedging or postural deviation contributing to the deformity. Clinically, such images are used in orthopedics and neurosurgery to assess the severity of spinal conditions like Scheuermann's disease, neuromuscular kyphosis, or compensatory changes related to spinal lesions or cysts. The visual comparison serves as an educational tool for monitoring disease progression or postoperative correction in pediatric or adolescent patients.
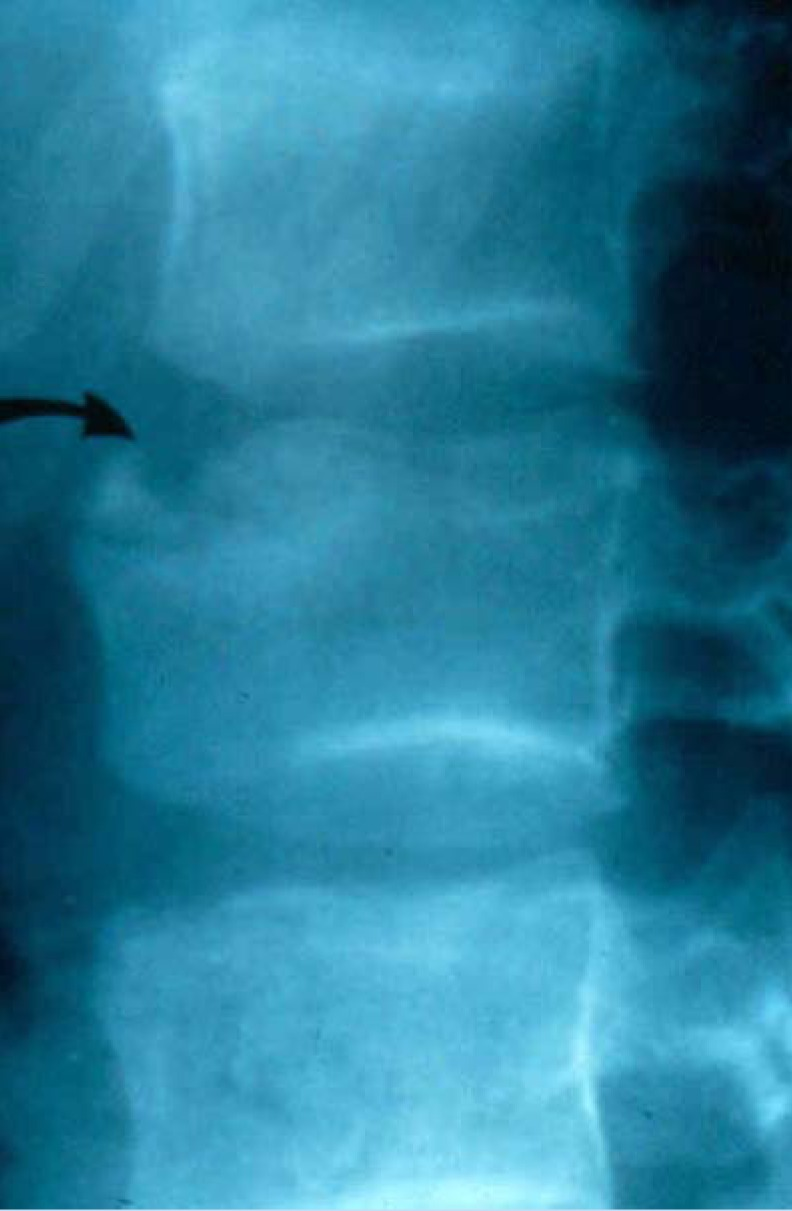
**Imaging Modality:** Lateral plain film radiograph (X-ray). **Anatomical Region:** Thoracolumbar spine, focusing on multiple contiguous vertebral bodies. **Observed Pathology:** The image demonstrates classic radiologic features of Scheuermann’s kyphosis. Key findings include: * **Vertebral Wedging:** Anterior shortening of the vertebral bodies, contributing to an increased thoracic kyphotic curvature. * **End-plate Irregularities:** Undulating and fragmented superior and inferior vertebral end-plates, indicated by the black arrow. * **Schmorl’s Nodes:** Intravertebral disc herniations visible as focal radiolucent indentations into the vertebral end-plates. * **Disc Space Narrowing:** Reduced intervertebral disc height in the affected segments. **Characteristic Visual Features:** The vertebrae exhibit a loss of the normal rectangular profile in favor of a wedged morphology. There is evidence of subchondral sclerosis adjacent to the irregular end-plates. **Clinical Context:** These structural changes are diagnostic of juvenile osteochondrosis of the spine (Scheuermann's disease), characterized by fixed hyperkyphosis and secondary degenerative changes of the spinal column.
Kyphosis and Lordosis: Normal Curves and When They Become Abnormal
Part 1: Understanding the Sagittal Plane
Part 2: Definitions
Kyphosis
Lordosis
Part 3: The Four Normal Curves of the Spine
| Region | Curve Type | Normal Range | Function |
|---|---|---|---|
| Cervical (C1-C7) | Lordosis (concave posteriorly) | 20-40° | Supports head weight; allows head movement |
| Thoracic (T1-T12) | Kyphosis (convex posteriorly) | 20-50° | Protects thoracic organs; accommodates rib cage |
| Lumbar (L1-L5) | Lordosis (concave posteriorly) | 31-79° | Bears body weight; transfers load to pelvis |
| Sacral (S1-S5) | Kyphosis (convex posteriorly) | Fixed, ~20-45° | Connects spine to pelvis; absorbs ground forces |
- Campbell's Operative Orthopaedics, 15th Ed: "In the sagittal plane, the normal spine has four balanced curves: the cervical spine is lordotic; the thoracic spine is kyphotic (20 to 50 degrees)... the lumbar region is lordotic (31 to 79 degrees); and the sacral curve is kyphotic."
Part 4: How the Curves Develop (Ontogeny)
| Curve | When It Develops | Type |
|---|---|---|
| Thoracic kyphosis | Present at birth (primary curve) | Primary curve |
| Sacral kyphosis | Present at birth (primary curve) | Primary curve |
| Cervical lordosis | Develops at 3-4 months when baby starts lifting head | Secondary curve |
| Lumbar lordosis | Develops at 12-18 months when baby starts standing/walking | Secondary curve |
Part 5: When Is Kyphosis Called ABNORMAL?
The Threshold
- Campbell's Operative Orthopaedics: "Kyphosis of 50 degrees or more in the thoracic spine usually is considered abnormal."
- Any kyphosis in the cervical or lumbar spine is abnormal - those regions are normally lordotic.
Types of Abnormal Kyphosis
1. Postural Kyphosis (Most Common, Most Benign)
- Who: Adolescents, especially tall teenagers; desk workers
- Cause: Weak core and back extensor muscles, habitual slouching; the curve is flexible - it fully corrects on lying down or standing straight
- Diagnosis: Curve disappears when patient lies prone or hyperextends the back voluntarily
- X-ray: No vertebral wedging - vertebrae have normal rectangular shape
- Treatment: Postural correction exercises, back extensor strengthening, no brace needed
2. Scheuermann's Disease (Structural Hyperkyphosis)
- Who: Males aged 10-15 (prepubertal growth spurt), slightly more common in males
- Cause: Abnormal mechanical loading on anterior vertebral endplates during growth, possibly combined with abnormal collagen in the endplate cartilage - leads to uneven growth and anterior wedging of vertebrae
- Definition: Kyphosis > 45-50° with at least 5° of anterior wedging at 3 or more consecutive vertebrae (Sorensen's criteria)
- Key distinction from postural: The curve is RIGID - it does NOT correct on lying down or hyperextension
- X-ray findings: Anterior vertebral wedging, endplate irregularities, Schmorl's nodes (disc material herniating into vertebral body), disc space narrowing
- Types:
- Typical Scheuermann: thoracic spine (T7-T9 apex) - produces rounded back
- Atypical Scheuermann: thoracolumbar junction (T10-T12) - produces flat back
- Treatment: Observation if < 60°; bracing (Milwaukee brace or Kyphologic brace) for 60-75°; surgery for > 75° with neurological symptoms
3. Congenital Kyphosis
- Cause: Failure of vertebral body formation (hemivertebra) or failure of segmentation (block vertebra) during fetal development
- Most dangerous type - high risk of spinal cord compression and paralysis
- Progresses rapidly during growth spurts
- Requires early surgical intervention
4. Kyphosis Due to Osteoporosis (Senile/Compression Fracture Kyphosis)
- Who: Elderly, post-menopausal women predominantly
- Cause: Osteoporotic vertebral compression fractures - the anterior vertebral body collapses (wedge fracture), creating a kyphotic angle at each fracture level
- Multiple levels = cumulative severe kyphosis ("dowager's hump")
- Most common in thoracic and thoracolumbar junction
5. Secondary Kyphosis (Other Causes)
| Cause | Example |
|---|---|
| Infection | Pott's disease (spinal tuberculosis) - classic angular kyphosis (gibbus deformity) |
| Tumour | Vertebral metastasis with pathological fracture |
| Neuromuscular | Cerebral palsy, muscular dystrophy (long C-shaped kyphoscoliosis) |
| Inflammatory | Ankylosing spondylitis - fixed, rigid pan-spinal kyphosis |
| Iatrogenic | Laminectomy kyphosis (after surgical removal of posterior structures) |
Part 6: When Is Lordosis Called ABNORMAL?
Hyperlordosis (Excessive Inward Curve)
- Who: Pregnant women, obese patients, dancers/gymnasts, people with tight hip flexors
- Common causes:
- Weak abdominal muscles (core fails to hold pelvis in neutral)
- Tight hip flexor muscles (iliopsoas, rectus femoris) that tilt the pelvis forward (anterior pelvic tilt)
- Pregnancy (shifted center of gravity)
- Spondylolisthesis (forward slip of one vertebra over another - pulls lumbar spine into lordosis)
- Achondroplasia (dwarfism) - severe lumbar hyperlordosis
- Appearance: Exaggerated inward hollow at the lower back, protruding buttocks, belly pushed forward, exaggerated lumbar curve
- Symptoms: Low back pain (facet joint compression), muscle fatigue
- Treatment: Core strengthening, hip flexor stretching, postural correction
Hypolordosis / Flatback (Reduced or Reversed Lordosis)
- Causes:
- Muscle spasm (disc herniation or infection causing pain-protective flattening)
- Ankylosing spondylitis (fuses the spine flat or in kyphosis)
- Post-surgical flatback syndrome (after spinal fusion without maintaining lordosis)
- Degenerative disc disease (disc collapse reduces lordosis)
- Appearance: Flat back, inability to stand fully upright without bending the hips and knees
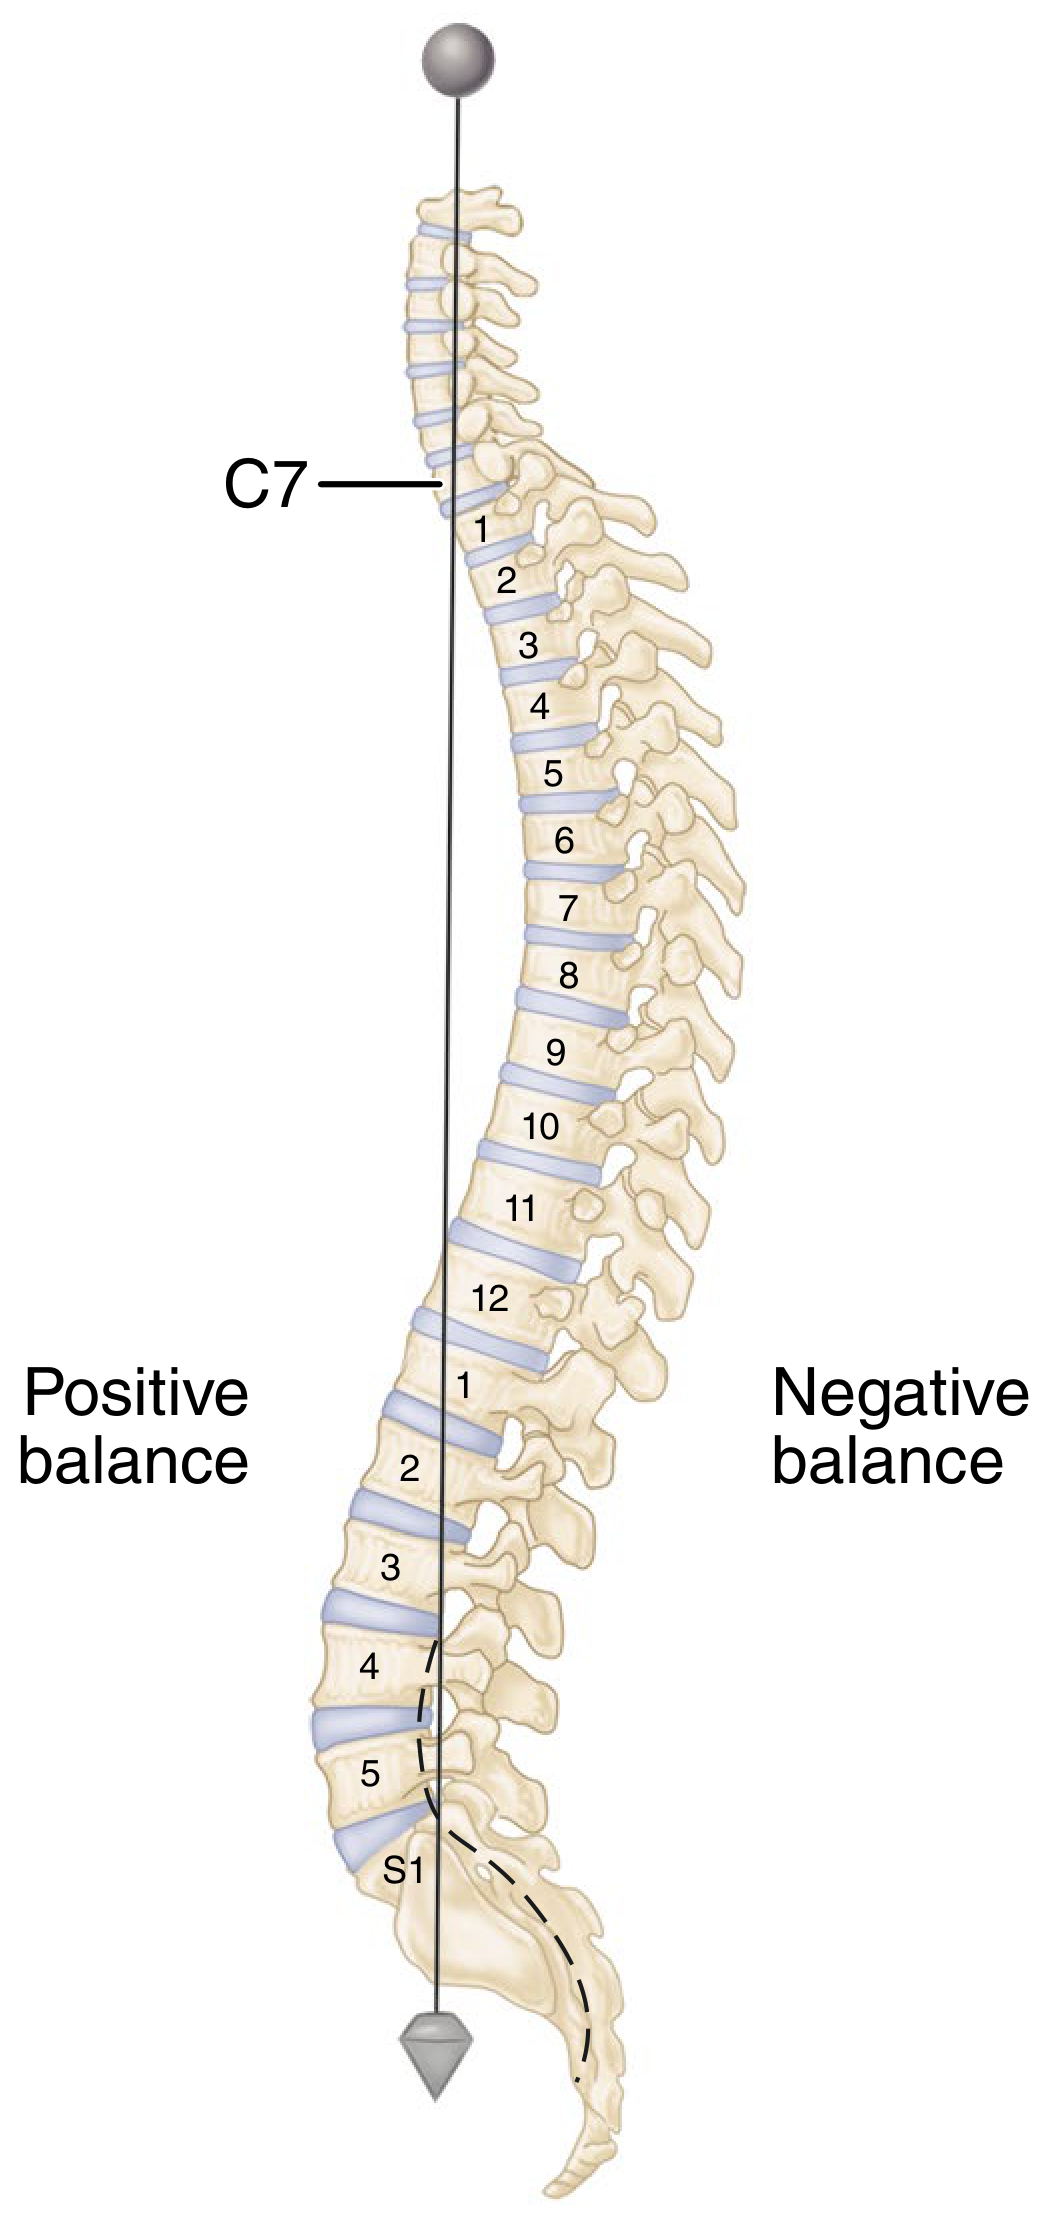
- Symptoms: Positive sagittal balance (body weight falls in front of feet), constant muscle fatigue from fighting to stay upright, low back and hip pain
- Significance: Sagittal imbalance from flatback is one of the most disabling spinal deformities
Cervical Lordosis Abnormalities
| Condition | Description |
|---|---|
| Cervical hyperlordosis | Excessive neck inward curve; usually postural or from tight neck extensors |
| Loss of cervical lordosis (military neck) | Straight or reversed cervical spine; common in whiplash, disc herniation, muscle spasm |
| Cervical kyphosis | Dangerous reversal - any forward curve in the cervical spine is abnormal; causes cord compression |
Part 7: The Normal Ranges Summary Table
| Spinal Region | Normal Curve | Normal Range | Abnormal if... |
|---|---|---|---|
| Cervical | Lordosis | 20-40° | Kyphosis = always abnormal; lordosis > 40° = hyperlordosis |
| Thoracic | Kyphosis | 20-50° | < 20° = flat back / hypokyphosis; > 50° = hyperkyphosis |
| Thoracolumbar junction | Neutral (near 0°) | ~0-5° | ANY kyphosis here is significant - Scheuermann's atypical |
| Lumbar | Lordosis | 31-79° | < 20-30° = flat back; > 70-80° = hyperlordosis |
| Sacral | Kyphosis | Fixed 20-45° | Fixed - does not vary pathologically in isolation |
Part 8: How They Are Measured
- Thoracic kyphosis: Angle between the superior endplate of T2 and the inferior endplate of T12
- Lumbar lordosis: Angle between the superior endplate of L1 and the superior endplate of S1 (or L1-L5)
- Must be standing (weight-bearing) - lying down significantly reduces the measured angles by up to 10-15°
Part 9: Key Clinical Distinction - Postural vs. Structural
| Result | Meaning |
|---|---|
| Curve fully corrects when patient lies face down or extends voluntarily | Postural (non-structural) - flexible, caused by muscle weakness or habit |
| Curve remains fixed and does NOT correct | Structural - vertebral changes present (wedging, fusion, fracture) - needs imaging |
Summary
| Kyphosis | Lordosis | |
|---|---|---|
| Direction | Spine bows backward (posteriorly convex) | Spine bows forward (anteriorly convex) |
| Normal regions | Thoracic + Sacral | Cervical + Lumbar |
| Normal range | Thoracic: 20-50° | Lumbar: 31-79° / Cervical: 20-40° |
| Too much | Hyperkyphosis (> 50°) = hunchback appearance | Hyperlordosis (> 70-80°) = exaggerated hollow back |
| Too little | Hypokyphosis / flat thoracic spine | Hypolordosis / flatback - can cause sagittal imbalance |
| Most common abnormal cause | Scheuermann's disease (adolescents); osteoporotic fractures (elderly) | Weak core + tight hip flexors; spondylolisthesis |
| Measured on | Lateral x-ray | Lateral x-ray |
Give more relavent ans as per actricles
kyphosis lordosis normal values spine sagittal alignment
Scheuermann kyphosis hyperkyphosis diagnosis treatment
lumbar hyperlordosis flatback sagittal imbalance causes clinical
PMID: 37615931
PMID: 30407981
PMID: 33027127
sagittal spinal alignment lumbar lordosis pelvis pelvic incidence normal
PMID: 40407040
PMID: 34727958
thoracic hyperkyphosis aging osteoporosis vertebral fracture consequences
hyperkyphosis elderly consequences morbidity mortality function
lumbar lordosis measurement pelvic incidence mismatch clinical significance
thoracic kyphosis hyperkyphosis older adults falls disability
pelvic incidence lumbar lordosis mismatch back pain sagittal
Kyphosis and Lordosis: Normal Values and Abnormalities - Evidence from Peer-Reviewed Articles
1. Normal Sagittal Alignment: What the Evidence Says
The Landmark Meta-Analysis (2025) - 35,900+ Volunteers
| Parameter | Overall Mean | Clinical Significance |
|---|---|---|
| Global Thoracic Kyphosis (T1-T12) | ~37-45° | Higher in women; increases significantly after age 60 |
| Lumbar Lordosis to S1 (LL-S1) | ~50-60° | Higher in women; decreases with age after 60 |
| Pelvic Incidence (PI) | ~50-55° | Higher in women; determines required LL |
| Pelvic Tilt (PT) | ~10-15° | Increases with age; compensatory mechanism |
| Sagittal Vertical Axis (SVA) | ~0-5 cm | Increases significantly after age 60 |
Pediatric and Adolescent Data - Meta-Analysis (2021)
Thoracic kyphosis (TK), pelvic incidence (PI), and sacral slope (SS) in Chinese pre-adult populations were significantly SMALLER than Caucasian populations (all P < 0.001).
Cervical Spine Morphotypes - Systematic Review (2020)
| Morphotype | C2-C7 Cobb Angle | T1 Slope | Prevalence |
|---|---|---|---|
| Kyphotic Curve Cohort (KCC) | -8.6° ± 7.3° (kyphotic!) | 17.4° | 32.1% of normal people |
| Medium Lordosis Cohort (MLC) | +8.7° ± 7.2° (mild lordosis) | 26.6° | 51.2% |
| Large Lordosis Cohort (LLC) | +21.2° ± 7.2° (pronounced lordosis) | 39.5° | 16.7% |
2. Abnormal Kyphosis: What the Articles Define
Scheuermann's Kyphosis - 2023 Current Concepts Review
- Alterations in mechanical stress on the anterior vertebral growth plates during the pubertal growth spurt
- Hormonal disturbances (growth hormone dysregulation)
- Candidate genes have been identified - SK has a significant hereditary component
- Abnormal collagen and matrix composition of the vertebral endplate cartilage
- Kyphosis > 45-50° on lateral standing x-ray
- Anterior wedging ≥ 5° at 3 or more consecutive vertebral bodies
- Endplate irregularities, Schmorl's nodes, disc space narrowing
| Curve Magnitude | Treatment |
|---|---|
| < 45° | Observation; generally good prognosis |
| 45-70° | Physical therapy; bracing in skeletally immature patients |
| 70-75° | Surgical consideration threshold |
| > 75° or neurologic deficit / cardiopulmonary compromise | Surgery indicated |
3. The Pelvic Incidence-Lumbar Lordosis (PI-LL) Concept: The Modern Understanding of "Abnormal Lordosis"
What is Pelvic Incidence (PI)?
The PI-LL Formula
PI-LL Mismatch = Abnormal Lordosis
- If LL is much less than PI (PI-LL mismatch > +10°): the person has insufficient lordosis (flatback/hypolordosis) - they cannot stand upright without bending knees and hips, and the center of gravity falls forward (positive sagittal imbalance)
- If LL far exceeds PI: excess lordosis - hyperlordosis - with facet joint overloading
4. Updated Normal Ranges - Synthesized from Evidence
Thoracic Kyphosis
| Age Group | Mean Thoracic Kyphosis | "Abnormal" Threshold |
|---|---|---|
| Adolescents (10-18 yrs) | 25-35° | > 45° = Scheuermann's; < 15° = hypokyphosis |
| Young adults (20-40 yrs) | 30-40° | > 50° = hyperkyphosis |
| Middle-aged (40-60 yrs) | 35-45° | > 55° |
| Older adults (> 60 yrs) | 40-50° (expected increase) | > 60° = clinically significant |
Lumbar Lordosis
| Population | Mean LL (L1-S1) | Abnormal |
|---|---|---|
| Caucasian adults (mean) | 50-60° | < PI - 9° = hypolordosis; > PI + 9° = hyperlordosis |
| Asian adults (mean) | 45-55° | Same formula using individual PI |
| Adolescents | 45-55° | < 30° = flat back; > 70° = hyperlordosis |
| Post-60 adults | Decreases ~5-10° | PI-LL mismatch > 10° = clinically significant |
5. When Abnormal Kyphosis/Lordosis Becomes Clinically Dangerous
Sagittal Imbalance - The Most Disabling Consequence
| SVA | Clinical Status |
|---|---|
| < 5 cm | Normal sagittal balance |
| 5-9 cm | Moderate imbalance - back pain, fatigue |
| > 9.5 cm | Severe imbalance - correlates with worst patient-reported quality of life scores (Oswestry Disability Index) |
Summary of Consequences of Abnormal Curves
| Abnormality | Mechanism | Consequence |
|---|---|---|
| Hyperkyphosis (> 50° thoracic) | Anterior trunk shift; increased thoracic loading | Back pain, restrictive lung disease (forced vital capacity ↓), dysphagia, falls, reduced quality of life |
| Hypolordosis / flatback | PI-LL mismatch; positive sagittal balance | Cannot stand upright; constant back and hip pain; fatigue; "chin-on-chest" deformity in severe cases |
| Hyperlordosis | Facet joint compression; spondylolisthesis | Facet arthropathy; neural foraminal stenosis; radiculopathy |
| Cervical kyphosis (structural) | Cord compression from forward head tilt | Myelopathy; cervicogenic headache; neck pain; dysphagia |
Summary of Evidence Hierarchy
| Study | Evidence Level | Key Finding |
|---|---|---|
| Dionne et al. 2025 - Spine | Systematic Review + Meta-analysis (Level I) | Normative values from 35,900+ volunteers; curves change significantly with age and ethnicity |
| Hou et al. 2021 - J Orthop Surg Res | Meta-analysis (Level II) | Asian adolescents have significantly smaller TK, PI, SS than Caucasians |
| Virk et al. 2020 - J Bone Joint Surg Am | Systematic Review (Level I) | 3 normal cervical morphotypes exist; 32% of normal people have cervical kyphosis |
| O'Donnell et al. 2023 - Curr Rev Musculoskelet Med | Review | Updated SK pathogenesis - mechanical + hormonal + genetic; posterior-only surgery trend |
| Sardar, Ames & Lenke 2019 - JAAOS | Review | Surgical threshold for SK is 70-75°; posterior-only approach now standard |
| Lee et al. 2021 - J Neurosurg Spine | Systematic Review + Meta-analysis (Level I) | Posterior-only fusion non-inferior to combined approach for SK |
Text book
normal kyphosis lordosis spine lateral view Scheuermann gibbus deformity comparison
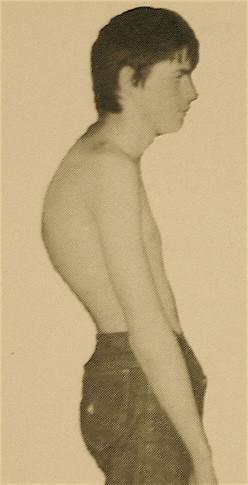
This clinical photograph provides a lateral view of a male patient demonstrating severe sagittal plane spinal deformity characteristic of Scheuermann's disease (juvenile kyphosis). The image illustrates a pronounced, fixed angular thoracic kyphosis centered in the mid-to-upper back. Visible compensatory mechanisms include an exaggerated lumbar lordosis (increased inward curvature of the lower spine) and increased cervical lordosis. The patient's posture is marked by a forward head protrusion, often referred to as 'gooseneck' posture, where the head is positioned anterior to the vertical axis of the shoulders. The shoulders themselves appear rounded and anteriorly displaced. This visual representation serves as an educational example of significant spinal imbalance and the characteristic morphological changes associated with structural hyperkyphosis in the thoracic region. This content is relevant for orthopedic and physical therapy studies focusing on spinal pathology, postural assessment, and sagittal alignment disorders.
Diagnostic sagittal Magnetic Resonance Imaging (MRI) of the spine, presented in three views (A, B, and C) highlighting degenerative and structural pathologies. Panel A shows a lateral view of the lumbar and sacral spine, demonstrating significant kyphosis and loss of normal lumbar lordosis. Red ovals in panels A and B delineate regions of multi-level vertebral body wedging, irregular endplates, and prominent osteophyte formation characteristic of Scheuermann disease. Panel C provides a focused view of the lower lumbar region where a red arrow points to significant spinal canal stenosis. Visible features include reduced intervertebral disc height, disc bulging, and ligamentous hypertrophy contributing to the narrowing of the neural canal. The imaging captures extensive degenerative disc disease across multiple vertebral levels, demonstrating the clinical progression of juvenile osteochondrosis into adult spinal deformity.
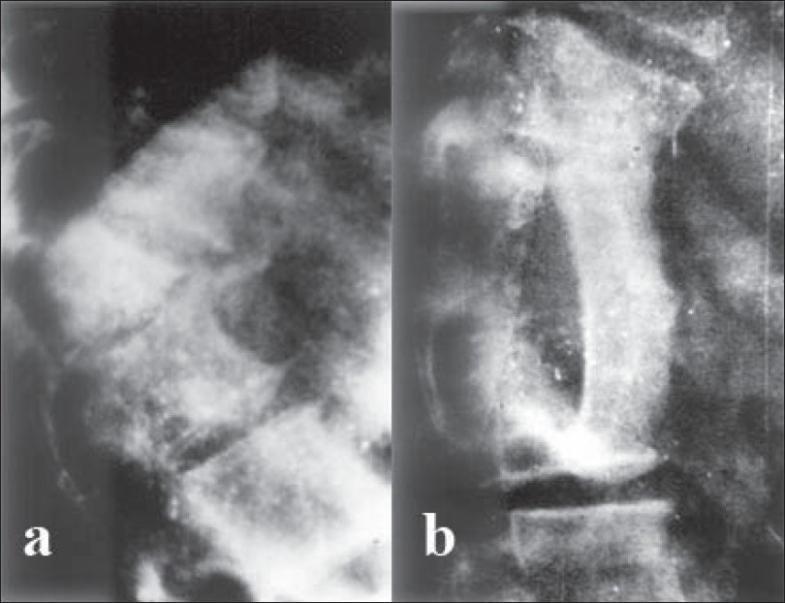
This lateral-view spinal skiagram (X-ray) comparison demonstrates the preoperative and postoperative states of a severe thoracolumbar kyphotic deformity. (a) Preoperative image: Shows a high-grade, acute angular kyphosis of the dorsal spine. A wedge-shaped 'internal gibbus' is visible, formed by the anterior collapse and subsequent posterior protrusion of vertebral remnants into the spinal canal, leading to mechanical spinal stenosis. (b) Postoperative image: Displays the result of anterior decompression via gibbus excision. The sharp curvature is noticeably corrected, and an autogenous iliac bone graft is seen bridging the intervertebral gap to provide structural stability and promote arthrodesis. The alignment of the vertebral column is significantly improved compared to the preoperative state. The images illustrate surgical management for paraplegia resulting from healed spinal tuberculosis (Pott's disease) with secondary kyphosis.
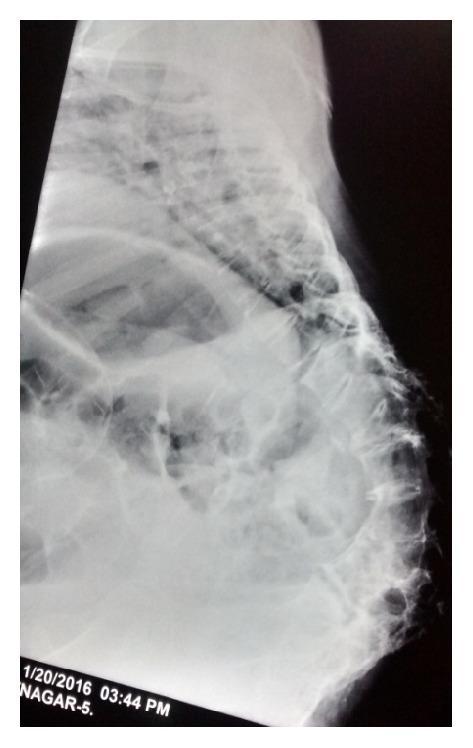
Lateral view X-ray of the thoracolumbar spine demonstrating a severe reversal of physiological spinal curvature. The thoracic region exhibits an atypical inward concavity (lordosis), while the lumbar region shows a pronounced outward convexity (kyphosis), creating a large gibbus deformity in the lumbosacral junction. The vertebral bodies appear crowded and irregular, with visible loss of intervertebral disc space in the affected segments. These structural findings are clinically consistent with sequelae of spinal tuberculosis (Pott's disease), resulting in a 'kyphotic pelvis' and significant skeletal remodeling. The image illustrates advanced orthopedic pathology and its impact on sagittal alignment, often leading to restricted pulmonary function and obstetric complications such as obstructed labor.
An error occurred (ValidationException) when calling the ConverseStream operation: The model returned the following errors: messages.13.content.25.image.source.base64.data: At least one of the image dimensions exceed max allowed size for many-image requests: 2000 pixels
We encountered an error while processing your request. Please try again or reach out to us for help.
Cambells text of orthopaedic 15 th edition download
Which textbook has been used to abstract the matter can uh provide the text book pdf
An error occurred (ValidationException) when calling the ConverseStream operation: The model returned the following errors: messages.17.content.32.image.source.base64.data: At least one of the image dimensions exceed max allowed size for many-image requests: 2000 pixels
We encountered an error while processing your request. Please try again or reach out to us for help.
Say me about scoliosis and the curves of scoliosis, what’s the reason behind the curves of cholis explain me about side of the scoliosis, what the cause of the sides of scoliosis, then say me about why the scholar is only measured in anterior posterior in x-ray view
An error occurred (ValidationException) when calling the ConverseStream operation: The model returned the following errors: messages.13.content.25.image.source.base64.data: At least one of the image dimensions exceed max allowed size for many-image requests: 2000 pixels
We encountered an error while processing your request. Please try again or reach out to us for help.