
Explain in detail about BLS for adult health nursing osce
Reading File
Now let me search the medical library for BLS content in parallel with a web search.
Finding Sources
Finding Sources
Searching the Web
BLS basic life support adult OSCE nursing checklist 2024 AHA guidelines
Now let me read the key textbook sections and the Geeky Medics OSCE guide in parallel.
Reading File
Reading File
Reading File
Reading Web Page
https://geekymedics.com/basic-life-support-bls-osce-guide
Let me also fetch the BLS algorithm image and read the table of CPR components from the textbook.
Loading Image
Finding Sources
Reading File
I now have comprehensive information from both textbooks and the OSCE guide. Let me compile a thorough, well-structured answer.
Basic Life Support (BLS) for Adult - Health Nursing OSCE
Here is a detailed, step-by-step breakdown of adult BLS as assessed in a nursing OSCE, incorporating the AHA 2020/2025 guidelines and clinical standards.
The Chain of Survival
BLS is built around the Chain of Survival - four interdependent links, each of which must be strong:
- Early recognition of cardiac arrest and call for help
- Early CPR to buy time
- Early defibrillation (AED use)
- Early Advanced Life Support (ALS)
For each minute a shock is delayed, survival from sudden cardiac arrest (SCA) falls by 10-12%. - Fuster and Hurst's The Heart, 15th Edition
The Adult BLS Algorithm (AHA 2020/2025 - Healthcare Provider)
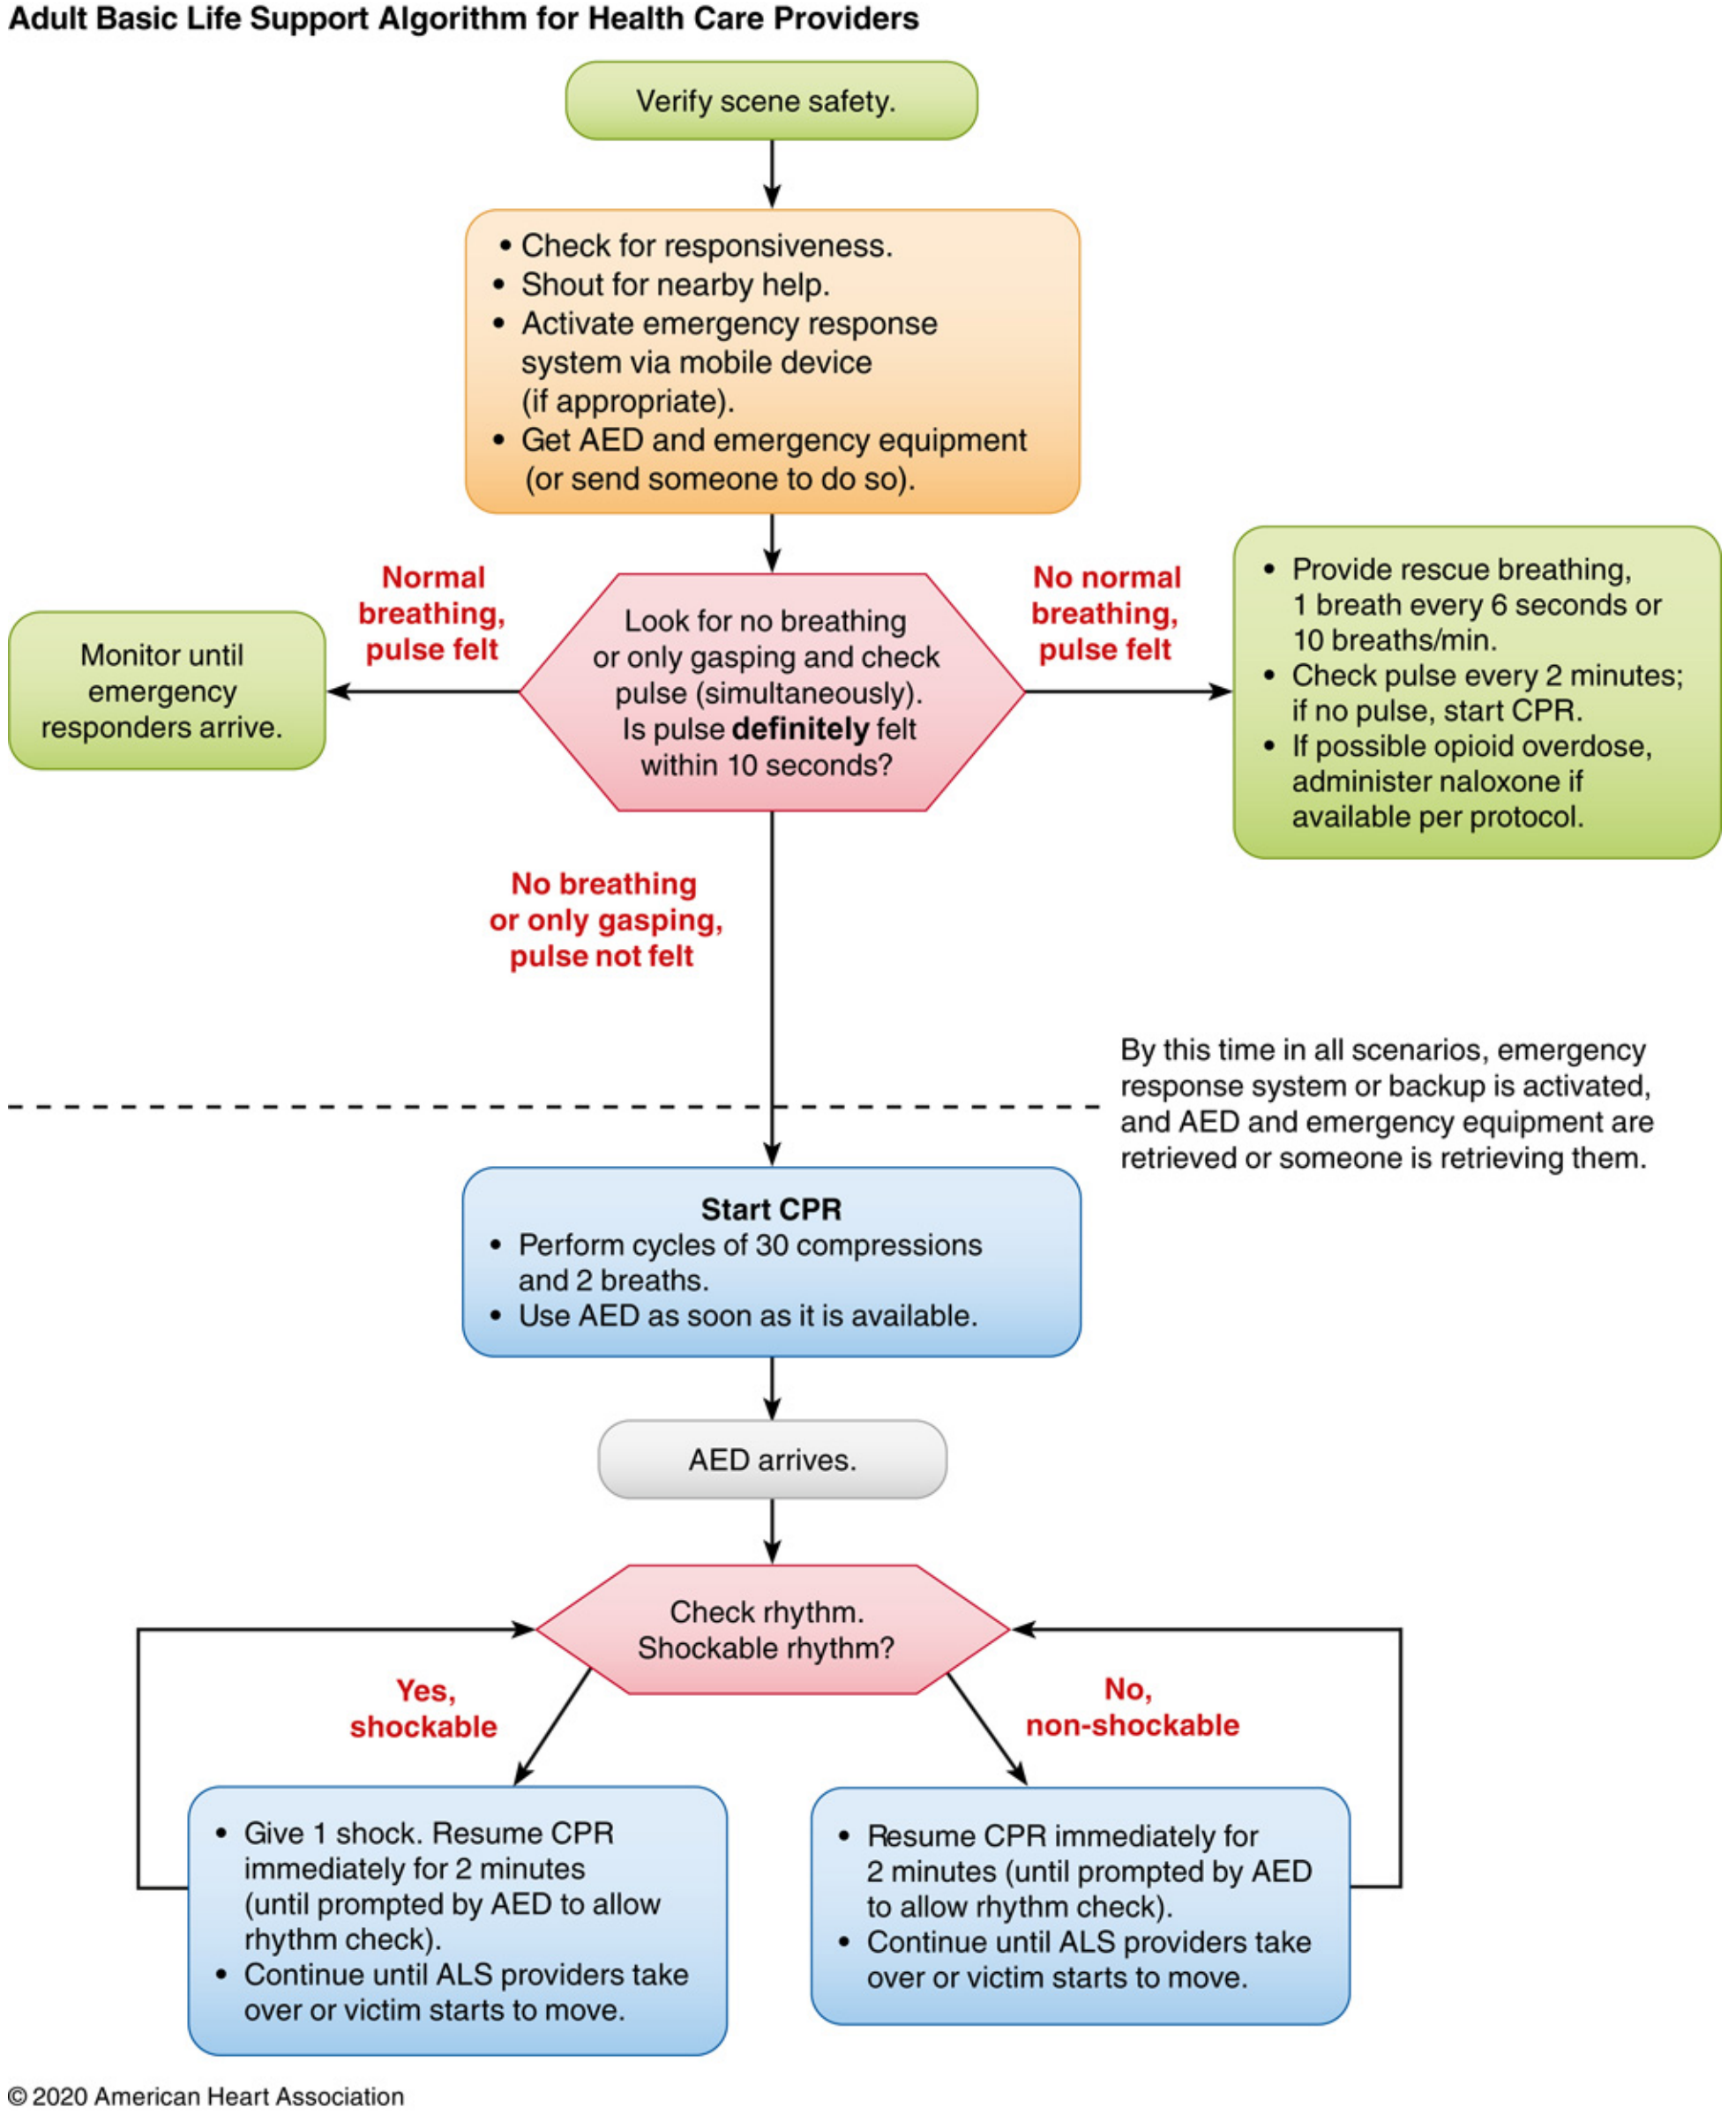
Adult BLS Algorithm for Health Care Providers - AHA 2020 Update. - Miller's Anesthesia, 10e
Step-by-Step OSCE Breakdown
STEP 1 - Ensure Personal Safety (Scene Safety)
- Look around for any hazards before approaching (electrical wires, traffic, chemicals, sharps)
- Don gloves and other PPE as soon as possible
- Be careful with sharps throughout resuscitation
- If YOU are injured, you cannot help the patient - take scene safety seriously
STEP 2 - Check for Response
- Approach the patient
- Gently shake both shoulders and shout: "Hello, can you hear me?" or "Are you alright?"
- Do not shake vigorously if a spinal injury is suspected
If the patient responds: Arrange urgent medical assessment, then perform a full ABCDE assessment (Airway, Breathing, Circulation, Disability, Exposure)
If NO response: Proceed to Step 3
STEP 3 - Shout for Help
- Shout for help from those nearby immediately
- You cannot effectively assess and manage alone
- Send someone to call the crash/resuscitation team
- Ask a second person to retrieve the AED
STEP 4 - Position the Patient and Open the Airway
- Place the patient supine (on their back) on a firm, flat surface
- Perform the Head-Tilt Chin-Lift manoeuvre:
- Place one hand on the forehead and two fingers under the chin
- Tilt the head back while lifting the chin forward to extend the neck
- This lifts the tongue away from the posterior pharynx
- If spinal injury is suspected: Use the Jaw Thrust instead:
- Place two fingers under the angle of the mandible (both sides), thumbs on cheeks
- Lift the mandible forwards without moving the neck
- Inspect the mouth for visible foreign bodies or dentures - remove them if accessible
STEP 5 - Assess for Signs of Life (No more than 10 seconds)
Simultaneously assess breathing AND carotid pulse:
Breathing assessment (Look, Listen, Feel):
- Look: observe for chest rising and falling
- Listen: ear close to mouth - any breath sounds?
- Feel: air blowing against your cheek?
- Check for no more than 10 seconds
Pulse check:
- Place two fingers over the carotid artery (lateral to the trachea, below the jaw)
- Check for no more than 10 seconds
- If you do not definitely feel a pulse within 10 seconds - start CPR
- Healthcare providers have difficulty detecting a weak pulse; do not waste time - Miller's Anesthesia, 10e
Agonal breathing (slow, laboured, gasping respirations) is NOT normal breathing - treat as cardiac arrest.
Three possible outcomes:
| Finding | Action |
|---|---|
| Normal breathing + pulse felt | Monitor; await emergency responders |
| No normal breathing + pulse felt | Rescue breathing (1 breath every 6 sec / 10/min); check pulse every 2 min |
| No breathing (or only gasping) + no pulse | Start CPR immediately |
STEP 6 - Call the Resuscitation (Crash) Team
- Dial the emergency number (911 / 999 / hospital crash number)
- Shout "Cardiac arrest!" and direct someone specifically to make the call
- In hospital: call the resuscitation team AND ensure AED/defibrillator is on its way
- If alone: make the call first, then start CPR (except in children or suspected drowning, where CPR takes priority)
STEP 7 - Start CPR (C-A-B Sequence)
Current AHA guidelines follow C-A-B (Compressions - Airway - Breathing), not the old A-B-C, to minimise delay in beginning chest compressions in adults. - Miller's Anesthesia, 10e
The ratio for healthcare providers: 30 compressions : 2 breaths
CHEST COMPRESSIONS (The Primary Element)
Hand position:
- Expose the chest
- Place the heel of one hand on the centre of the chest (lower half of the sternum)
- Place the heel of the other hand on top, interlace fingers
- Keep fingers off the ribs
Body position:
- Kneel or stand beside the patient
- Arms straight (elbows locked) - this provides a less tiring and more forceful action
- Shoulders directly over your hands
Compression parameters (must know for OSCE):
| Parameter | Standard |
|---|---|
| Rate | 100-120 compressions/min |
| Depth | At least 2 inches (5 cm), not more than 2.4 inches (6 cm) |
| Recoil | Allow complete chest recoil after each compression - do not lean on chest |
| Compression fraction | >60% of CPR time (minimise interruptions) |
| Ratio (HCP) | 30:2 (compressions:breaths) |
- "Push hard, push fast" - compressions are more often too shallow than too deep in practice - Miller's Anesthesia, 10e
- Rates above 140/min result in inadequate depth - avoid excessively fast compressions
- Switch compressors every 2 minutes to avoid fatigue and maintain quality
RESCUE BREATHING (Ventilation)
Airway opening: Re-establish head-tilt chin-lift
Mouth-to-mouth:
- Pinch the nostrils closed (thumb and index finger)
- Form a tight seal over the patient's mouth
- Deliver 2 breaths, each over ~1 second, watching for chest rise
- Release nostrils and observe for chest fall
- If chest does not rise: re-tilt the head, re-check for obstructions, and try again
With a bag-valve-mask (BVM):
- Apply the mask with a C-E grip (thumb and index form a 'C' around the mask; remaining three fingers lift the jaw in an 'E')
- Give 2 breaths, each over ~1 second, watching for visible chest rise
- With two rescuers, one compresses and one manages the airway/BVM
- Add supplemental oxygen as soon as available
Avoid excessive ventilation: Over-ventilation increases intrathoracic pressure, reduces venous return, and worsens outcomes. Each breath should only interrupt CPR for 3-4 seconds. - Fuster and Hurst's The Heart, 15th Edition
COMPRESSION-ONLY CPR
For untrained lay bystanders or single rescuers unwilling/unable to give rescue breaths: hands-only CPR is acceptable for adult cardiac arrest of cardiac origin. For trained healthcare providers, always give both compressions AND breaths. - Miller's Anesthesia, 10e
STEP 8 - AED Use (Defibrillation)
- Apply AED as soon as it arrives - do not delay
- Turn on AED and follow voice prompts
- Attach pads:
- One pad: right clavicle / upper right chest
- One pad: left lateral chest, below the axilla (V6 position)
- Stand clear while AED analyses rhythm (pause compressions)
- If shockable rhythm (VF/pVT): deliver shock, then immediately resume CPR for 2 minutes
- If non-shockable rhythm (PEA/asystole): resume CPR immediately for 2 minutes
- Recheck rhythm every 2 minutes as prompted by the AED
It is no longer recommended to perform CPR before applying the AED - apply it immediately when it arrives. - Fuster and Hurst's The Heart, 15th Edition
STEP 9 - Continue CPR Until...
Stop CPR only when:
- The patient shows signs of life (starts breathing normally, moving purposefully)
- The ALS/resuscitation team takes over
- A doctor makes the decision to stop resuscitation
- You become physically exhausted and no one else can take over
STEP 10 - Recovery Position (if the patient regains spontaneous circulation - ROSC)
If the patient regains a pulse and breathing:
-
Place in the recovery position (lateral decubitus)
-
Monitor using ABCDE approach:
- Airway: ensure patent
- Breathing: administer supplemental O₂, monitor SpO₂
- Circulation: measure BP, obtain IV access, attach ECG monitoring
- Disability: assess AVPU or GCS, check capillary blood glucose
- Exposure: look for trauma, rash, bleeding
-
Prepare SBAR handover for the attending team
Summary Table: High-Quality CPR Components (OSCE Quick Reference)
| Component | Adult Standard |
|---|---|
| Compression rate | 100-120/min |
| Compression depth | ≥2 inches (5 cm), ≤2.4 inches (6 cm) |
| Hand placement | Centre of chest, lower sternum |
| Chest recoil | Complete recoil after each compression |
| Compression fraction | >60% |
| Compression:ventilation ratio | 30:2 (healthcare provider) |
| Breath duration | ~1 second each |
| Breath volume | Enough to see chest rise |
| Rescuer switch | Every 2 minutes |
| Pulse check time | No more than 10 seconds |
Common OSCE Errors to Avoid
| Error | Correct Approach |
|---|---|
| Forgetting scene safety | Always check first |
| Forgetting to shout for help | Essential - you cannot manage alone |
| Checking pulse for too long | Maximum 10 seconds |
| Leaning on chest between compressions | Allow complete recoil |
| Compressions too shallow | Aim for at least 5 cm |
| Over-ventilating | 2 breaths only, 1 second each |
| Delaying AED application | Apply and use as soon as it arrives |
| Not resuming CPR immediately after shock | Resume immediately without pausing for rhythm check |
| Forgetting to switch compressors | Switch every 2 minutes to maintain quality |
Sources
- Goldman-Cecil Medicine International Edition, Cardiac Arrest and Sudden Cardiac Death
- Miller's Anesthesia, 10e - BLS chapter (AHA 2020 Guidelines)
- Fuster and Hurst's The Heart, 15th Edition - BLS Healthcare Provider section
- Geeky Medics BLS OSCE Guide (ERC guidelines, clinical OSCE format)
- AHA 2025 Adult BLS Guidelines
This is a shared conversation. Sign in to Orris to start your own chat.