PMV (Passy Muir Valve) Introduction + Sensory Priming The FEES shows mobile vocal folds bilaterally and bilateral LAR present — PMV candidacy is favorable. TASK DETAIL PMV trial Cuff must be fully deflated before PMV placement; confirm no air leak, adequate SpO₂ Duration target Begin 15–20 min; increase by 10 min each session toward 4–8 hrs/day Rationale PMV restores subglottic pressure → improves laryngeal sensation → reduces penetration/aspiration (O'Connor et al., Heart Lung 2019, PMID 30573194) explain how can i do this procedure aS AN SLP
"Passy Muir valve" tracheostomy dysphagia speech language pathology
Passy Muir valve PMV trial procedure SLP speech language pathologist step by step placement
"Passy Muir valve" swallowing sensation subglottic pressure
SLP PMV trial procedure steps cuff deflation placement monitoring
"speaking valve" tracheostomy aspiration laryngeal sensation
PMV Trial Procedure for the SLP
Why It Works (The Physiology You Need to Know)
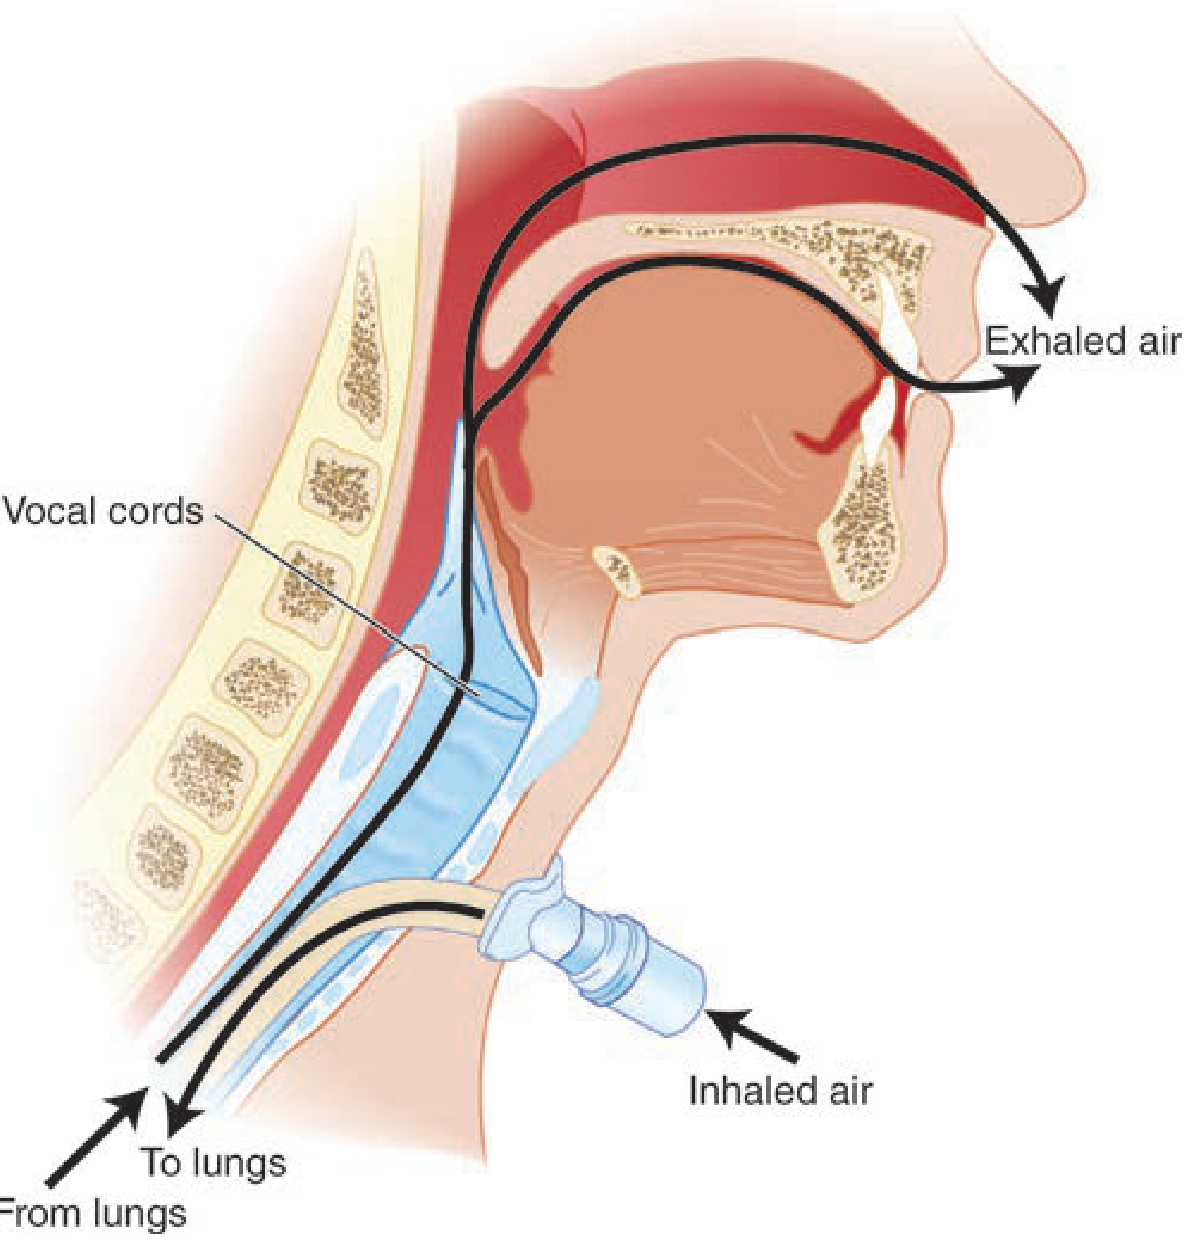
- Inhalation: valve opens → air flows into trachea/lungs normally
- Exhalation: valve closes → air must travel upward past the vocal cords, restoring subglottic pressure
- This restores laryngopharyngeal sensation, improves glottic closure timing, and reduces penetration/aspiration
Pre-Trial Checklist (Before You Walk In)
| Item | Action |
|---|---|
| Physician order | Ensure order is in for "speaking valve evaluation/trial" |
| Chart review | Trach brand, size, cuff type, vent status, recent secretion frequency |
| Trach tube type | Foam-cuffed trach = absolute contraindication for PMV |
| Glottic patency confirmed | FEES showing mobile VFs + bilateral LAR ✅ (your patient qualifies) |
| Equipment at bedside | PMV, pulse oximeter, suction (oral + tracheal), manual resuscitation bag |
| Pilot balloon label | Attach the PMV warning label to the pilot balloon line before you start |
Step-by-Step: PMV Trial on a Non-Ventilated Patient
Phase 1 — Set Up and Educate
- Explain the procedure to the patient and family: what the valve does, how breathing will feel different (harder to exhale at first), what sensations are normal (cough, throat clearing), and STOP criteria.
- Position patient upright — minimum 45°, preferably 90°. Upright positioning facilitates lung expansion and reduces aspiration risk.
- Baseline vitals — record SpO₂, HR, RR before you touch anything.
- Establish a backup communication system (letterboard, paper/pen, eye blink code) in case the patient cannot tolerate the valve.
Phase 2 — Pre-Placement Suctioning
- Suction oropharynx first (oral suction) — clear pooled secretions above the cuff before deflating.
- Suction trachea as needed.
Phase 3 — Cuff Deflation (critical safety step)
- Slowly and completely deflate the cuff using a 10 cc syringe. Gradual deflation gives the patient time to adjust to the shift in airflow and allows residual pooled secretions to be coughed or suctioned away.
- Re-assess for suctioning — secretions sitting on top of the cuff will now fall. Suction again if needed.
- Confirm upper airway patency — look and listen for:
- Coughing or throat clearing
- Vocalizations or reflexive oral movements
- Exhaled airflow felt at mouth/nose when you hold your hand there
- This is your glottic patency check: if no airflow reaches the upper airway, the PMV is contraindicated at this time.
Phase 4 — Finger Occlusion Trial (Optional but Recommended)
- If the patient is alert enough, occlude the trach hub with a gloved finger momentarily. If the patient can breathe adequately with the hub occluded, they are much more likely to tolerate the PMV. This is a low-risk screening step.
Phase 5 — PMV Placement
- Stabilize the trach tube: place one hand on the trach flange/neck plate — do NOT press down on the trachea or create discomfort.
- Attach the PMV to the trach hub with the other hand. Give it a ¼ turn clockwise to lock. Do not force it; a forced placement makes removal difficult.
- For PMV 2000/2001: attaches directly to the 15 mm hub. For PMV 007: may require an adapter inline.
Phase 6 — Monitoring During the Trial
- Continuously monitor for the following STOP criteria — remove the PMV immediately if any occur:
| STOP Criteria | Action |
|---|---|
| SpO₂ drops below 93% | Remove PMV, suction, consider cuff re-inflation |
| HR increases >10 bpm above baseline | Remove PMV |
| RR increases significantly or WOB increases | Remove PMV |
| Patient reports significant discomfort | Remove PMV |
| Persistent, unrelieved coughing | May indicate upper airway obstruction — remove PMV |
| PMV pops off with cough | Suction, re-assess, replace securely |
- Do not remove HME (heat-moisture exchanger) and use PMV simultaneously — these are incompatible.
- Duration target for first trial: 15–20 minutes as stated in your plan. Increase by ~10 min each subsequent session toward the 4–8 hour/day goal.
Phase 7 — Sensory Priming WITH the PMV In Place
- Thermal-tactile stimulation (anterior faucial arches with cold/pressure)
- Sour bolus stimulation (small sour liquid if safe) — heightened laryngeal chemoreceptor response with restored airflow
- Effortful throat clear / volitional cough — now possible with subglottic pressure restored
- Vocalization tasks — sustained /a/, counting — confirms VF adduction and builds sensorimotor relearning
- FEES or clinical observation of swallow — if dysphagia assessment is the goal, now is the time to trial small boluses (starting with thin liquid via teaspoon or syringe) while observing penetration/aspiration behavior. The restored subglottic pressure should reduce the aspiration events seen without the PMV.
Phase 8 — Removal and Post-Trial
- Remove the PMV: stabilize the trach neck plate with one hand → gently pull or twist the PMV off with the other hand. Twist right, not left — leftward rotation can inadvertently unlock the inner cannula.
- If the patient did not tolerate: re-inflate the cuff, return to baseline vent/O₂ settings, document STOP criteria met.
- Post-trial vitals — confirm return to baseline.
- Post-trial suction as needed.
- Clean the PMV: mild pure soap + tepid water → rinse thoroughly with cool water → air dry. No hot water, bleach, peroxide, vinegar, alcohol, or autoclaving — these destroy the silastic membrane. PMV is single-patient use; replace if it becomes noisy/vibrating or after ~2 months.
Contraindications — Know These Cold
| Contraindication | Reason |
|---|---|
| Foam-cuffed trach (e.g., Bivona) | Cuff cannot be fully deflated |
| Inability to tolerate cuff deflation | Exhalation pathway is obstructed |
| Severe upper airway obstruction | PMV would cause air trapping |
| Medical instability | Physiologic reserve too low |
| Severe aspiration risk | Relative — weigh risk/benefit; FEES helps stratify |
| Sleeping patient | Never leave PMV in during sleep |
| Concurrent HME use | Incompatible |
| Active aerosol/nebulizer treatment | Remove PMV first |
Ventilated Patients — Key Differences
- Record baseline PIP and tidal volume before cuff deflation
- After cuff deflation, note the air leak — significant leak confirms upper airway patency
- Place PMV in-line (between inline suction catheter adapter and flex tubing)
- Volume augmentation: may increase tidal volume up to +200 cc without physician order; do not exceed baseline PIP
- Adjust sensitivity to prevent auto-cycling
- RT manages ventilator; SLP manages valve trial and swallowing assessment simultaneously
Documentation Points
- Pre/post vitals (SpO₂, HR, RR)
- Trach tube type, size, cuff status
- Glottic patency confirmation method (FEES findings as noted, finger occlusion result)
- Duration tolerated
- Vocal quality (wet/dry, hoarse, clear)
- Penetration/aspiration on any bolus trials (PAS scale if FEES done)
- Patient/family education provided
- Plan for wear-time progression
- Any STOP criteria triggered
Evidence Summary
| Source | Finding |
|---|---|
| O'Connor et al., Heart & Lung 2019 [PMID 30573194] | Systematic review + meta-analysis: OR 0.12 for aspiration reduction with speaking valve in situ (p=0.003); also improved olfaction, secretion management, ventilator weaning |
| Cummings Otolaryngology | PMV aids swallowing and prevents aspiration by increasing subglottic pressure |
| Tintinalli's Emergency Medicine | PMV opens on inhalation, closes on exhalation; air directed through VCs; never use with cuffed tube |
Create a PMV trial protocol checklist PDF for SLP competency verification