
Draw stick diagram of muscle strenging for Transformers and trans tribble amputation
amputation AND exercise
amputee rehabilitation strengthening exercises transtibial transfemoral guideline
An accurate educational stick-figure exercise sheet for lower-limb amputee muscle strengthening, divided into two clearly labeled sections: "Transtibial amputation" and "Transfemoral amputation". In each section, show six simple stick-figure exercise diagrams with arrows: seated knee extension, straight-leg raise, hip abduction, prone hip extension, bridge, and upper-body chair push-up. For transtibial, label quadriceps, hamstrings, gluteals, hip abductors, and upper limbs. For transfemoral, emphasize gluteals, hip extensors, hip abductors, core, and upper limbs. Use a generic residual limb with no blood or wounds, show both limbs where relevant, include clear arrows and short labels. Make this a clinically appropriate physiotherapy handout, not photorealistic.
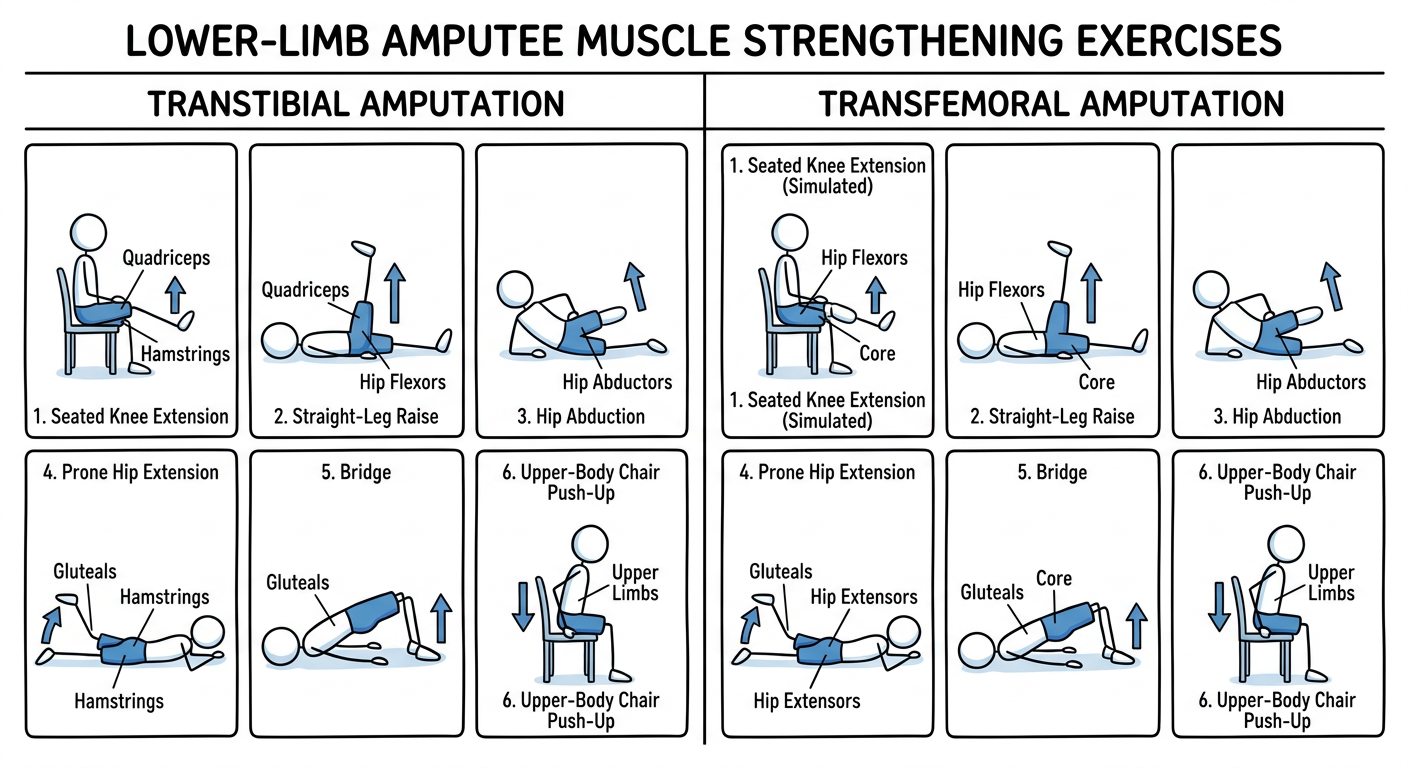
- Transtibial amputation (below knee): quadriceps, hamstrings, gluteals, hip abductors, and upper limbs for transfers.
- Transfemoral amputation (above knee): hip extensors, hip abductors, gluteals, core, and upper limbs. Hip-extension and hip-abduction work helps reduce common flexion/abduction contractures.
To remember wt excercise to give
amputation AND exercise
lower limb amputation rehabilitation strengthening exercises hip abduction extension guideline
“Knee present = Knee exercises. No knee = Hip exercises.”
1. Transtibial amputation (below-knee)
- Quadriceps: knee extension, static quads
- Hamstrings: knee flexion
- Gluteals and hip muscles: bridging, hip extension, hip abduction
- Upper limbs: chair push-ups, transfers, walking-aid training
2. Transfemoral amputation (above-knee)
- Hip extension: prone lying, hip extension
- Gluteus medius: side-lying hip abduction
- Core: bridging, pelvic control, balance
- Upper limbs: chair push-ups and transfer training
One-line exam answer
- Below knee: strengthen knee + hip + upper limb muscles.
- Above knee: strengthen hip + core + upper limb muscles.
More proper stick diagram with proper
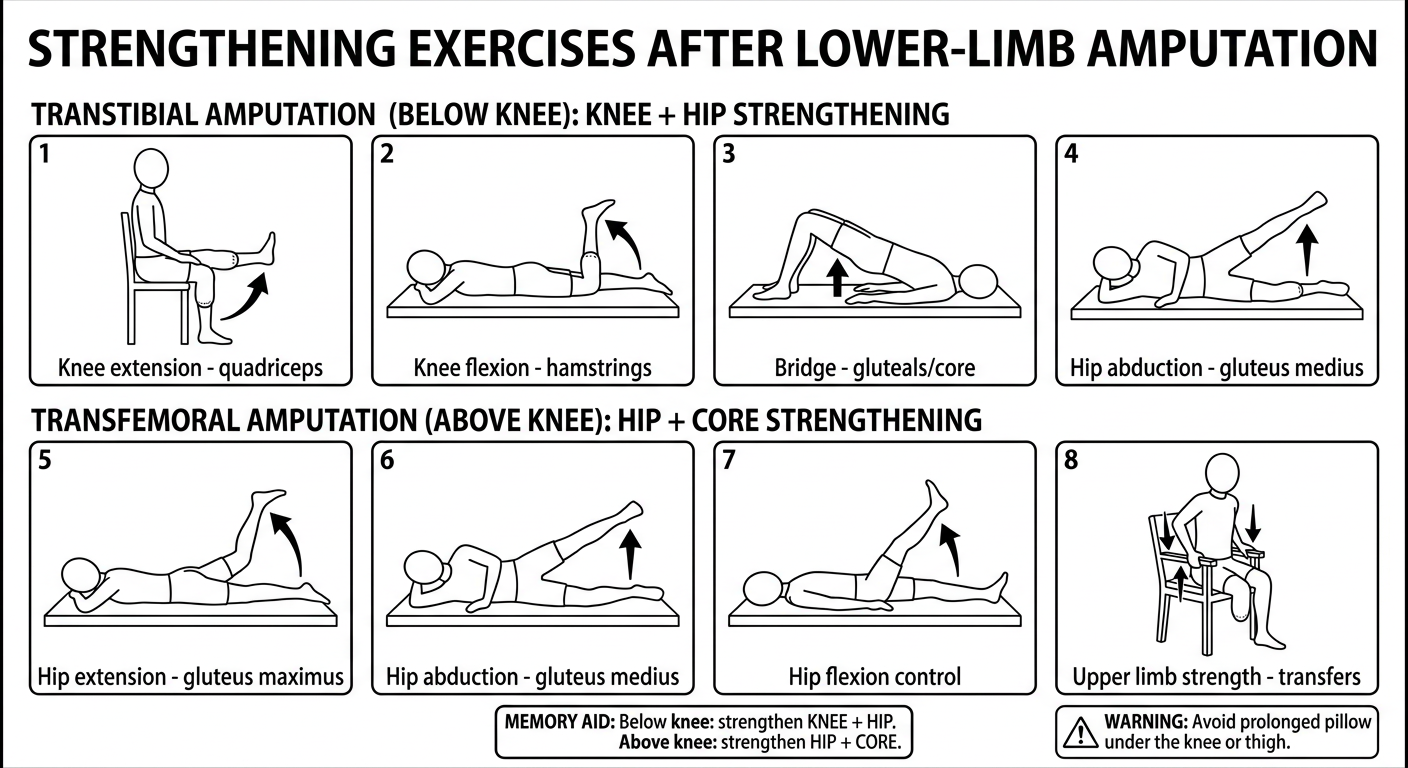
A clean, medically accurate black-and-white physiotherapy stick-figure chart titled "Strengthening Exercises After Lower-Limb Amputation". Use a grid of eight separate, clearly drawn exercise panels with large readable labels and directional movement arrows. Show generic adult figures with a clearly visible right residual limb, no blood, dressings, or prosthesis. Top section heading: "Transtibial amputation (below knee): knee + hip strengthening". Panels: 1) Seated knee extension: patient seated on chair, below-knee residual limb starts bent and straightens at knee, curved arrow upward, label "Knee extension - quadriceps". 2) Prone knee flexion: lying face down, bend residual limb at knee, label "Knee flexion - hamstrings". 3) Bridge: lying on back with intact leg bent, lift pelvis, label "Bridge - gluteals/core". 4) Side-lying hip abduction: residual limb straight and lifted upward, label "Hip abduction - gluteus medius". Bottom section heading: "Transfemoral amputation (above knee): hip + core strengthening". Panels: 5) Prone hip extension: lying face down, lift above-knee residual limb backward/up, label "Hip extension - gluteus maximus". 6) Side-lying hip abduction: lift above-knee residual limb sideways/up, label "Hip abduction - gluteus medius". 7) Supine straight residual-limb lift: lying on back, lift residual thigh with knee absent, label "Hip flexion control". 8) Seated chair push-up: hands press on armrests to lift body slightly, label "Upper limb strength - transfers". At the bottom, include a small boxed memory aid: "Below knee: strengthen KNEE + HIP. Above knee: strengthen HIP + CORE." Include a small warning: "Avoid prolonged pillow under the knee or thigh." The figure posture and residual limb anatomy must be unambiguous, arrows must accurately show movement, and the layout must look like a professional rehabilitation textbook line drawing, not a cartoon.
Quick way to use it
| Level of amputation | Give these exercises |
|---|---|
| Transtibial, below knee | Knee extension, knee flexion, bridge, hip abduction, upper-limb strengthening |
| Transfemoral, above knee | Hip extension, hip abduction, hip-flexion control, bridge/core work, upper-limb strengthening |
Below knee = Knee + Hip
Above knee = Hip + Core
Not enough I should fill 6 pages
lower limb amputation AND rehabilitation exercise
VA DoD lower limb amputation rehabilitation exercise contracture prevention
Page 1 of a professional black-and-white physiotherapy textbook stick-diagram handout, A4 portrait, titled "LOWER-LIMB AMPUTATION: POSITIONING AND RANGE OF MOTION". Four large numbered panels, showing generic adult patient with a residual limb, anatomical and unambiguous, no wounds or blood. Panel 1: transtibial amputation patient lying supine with knee fully straight, green check, label "1. Keep knee straight - prevent knee flexion contracture". Panel 2: same patient with a pillow under residual knee, red X, label "Do not keep pillow under knee". Panel 3: transfemoral amputation patient lying prone with hip neutral, green check, label "3. Prone lying - maintain hip extension". Panel 4: transfemoral patient sitting with residual thigh held flexed and abducted, red X, label "Avoid prolonged hip flexion and abduction". Add simple movement arrows for knee and hip extension. Bottom memory box: "BTK: protect knee extension. ATK: protect hip extension and adduction." Accurate rehab textbook line art, clear labels, ample white space.
Page 2 of a professional black-and-white physiotherapy textbook stick-diagram handout, A4 portrait, title "TRANSTIBIAL AMPUTATION: KNEE STRENGTHENING". Clearly depict a person with below-knee amputation, intact knee joint visible, no prosthesis. Four large numbered panels with motion arrows: 1 seated knee extension, residual limb starts hanging with knee bent then straightens, label "Quadriceps: knee extension"; 2 supine static quadriceps set, knee straight and pressed down into bed, label "Quadriceps setting"; 3 prone knee flexion, bend below-knee residual limb at knee, label "Hamstrings: knee flexion"; 4 short-arc knee extension with rolled towel beneath knee, label "Terminal knee extension". Include set/rep blank fields: "____ reps x ____ sets" beside every panel. Include a note: "Keep hip and trunk still. Move only the knee." Clinically precise stick diagrams, black white textbook line art.
Page 3 of a professional black-and-white physiotherapy textbook stick-diagram handout, A4 portrait, titled "TRANSTIBIAL AMPUTATION: HIP AND TRUNK STRENGTHENING". Show a generic adult with a below-knee residual limb, no prosthesis, four large numbered panels and clear arrows: 1 bridge in supine, lift pelvis with intact leg bent and residual limb supported comfortably, label "Bridge - gluteals and core"; 2 prone hip extension, lift straight residual limb backwards/up, label "Hip extension - gluteus maximus"; 3 side-lying hip abduction, raise residual limb upward while trunk stays straight, label "Hip abduction - gluteus medius"; 4 side-lying hip adduction, top intact leg supported forward, lift lower residual limb upward, label "Hip adduction". Add caution box "Do not roll pelvis backward. Keep limb in line with trunk." Add blank set/rep fields. Accurate black-and-white rehabilitation textbook stick figures.
Page 4 of a professional black-and-white physiotherapy textbook stick-diagram handout, A4 portrait, titled "TRANSFEMORAL AMPUTATION: HIP STRENGTHENING". Clearly show generic adult figures with above-knee residual limb, no knee joint below residual thigh, no prosthesis. Four large, anatomically clear numbered panels with arrows: 1 prone hip extension, raise above-knee residual limb backward/up, label "Hip extension - prevents hip flexion contracture"; 2 side-lying hip abduction, lift residual thigh upward with pelvis stable, label "Hip abduction - gluteus medius"; 3 side-lying hip adduction, top intact leg bent forward, lift lower residual thigh, label "Hip adduction - prevents abduction contracture"; 4 supine pelvic bridge with intact leg, lift pelvis, label "Bridge - gluteals/core". Bottom memory box: "Above knee: HIP EXTENSION + ADDUCTION are priorities." Use precise black-and-white medical textbook stick drawings, labels and blank repetitions fields.
Page 5 of a professional black-and-white physiotherapy textbook stick-diagram handout, A4 portrait, titled "ALL AMPUTATION LEVELS: CORE, UPPER LIMB AND TRANSFER STRENGTH". Show generic adult lower-limb amputee, four large numbered panels with clear arrows: 1 seated chair push-up using armrests, lift body slightly, label "Chair push-up - triceps and transfers"; 2 seated resistance-band row, pull band toward ribs, label "Rows - back and shoulder strength"; 3 wall push-up, body straight and hands press wall, label "Wall push-up - chest and arms"; 4 seated trunk rotation with arms crossed, label "Core control - sitting balance". Add note "Upper-limb strength is needed for walker/crutch use and transfers." Include safety box "Use stable chair. Lock wheelchair brakes. Supervise early practice." Accurate black white physiotherapy line art with blank set/rep fields.
Page 6 of a professional black-and-white physiotherapy textbook stick-diagram handout, A4 portrait, titled "FUNCTIONAL PRE-PROSTHETIC EXERCISES". Show a generic lower-limb amputee with residual limb and a walker or parallel bars as appropriate. Four large numbered panels with arrows: 1 rolling and moving from lying to sitting at edge of bed, label "Bed mobility"; 2 sit-to-stand from firm chair holding walker, label "Sit to stand"; 3 supported single-leg standing at parallel bars or stable walker, label "Balance on intact limb"; 4 weight shift side to side at parallel bars while using an early prosthesis or a clearly labelled prosthetic limb, label "Weight shifting for gait". At bottom include an exam revision box: "BTK = knee + hip + upper limb. ATK = hip + core + upper limb." Add safety note "Stop for dizziness, new wound bleeding, severe pain, or falls risk." Clean and accurate black-and-white physiotherapy textbook stick diagram style, no cartoons.
Page 1: Positioning and contracture prevention
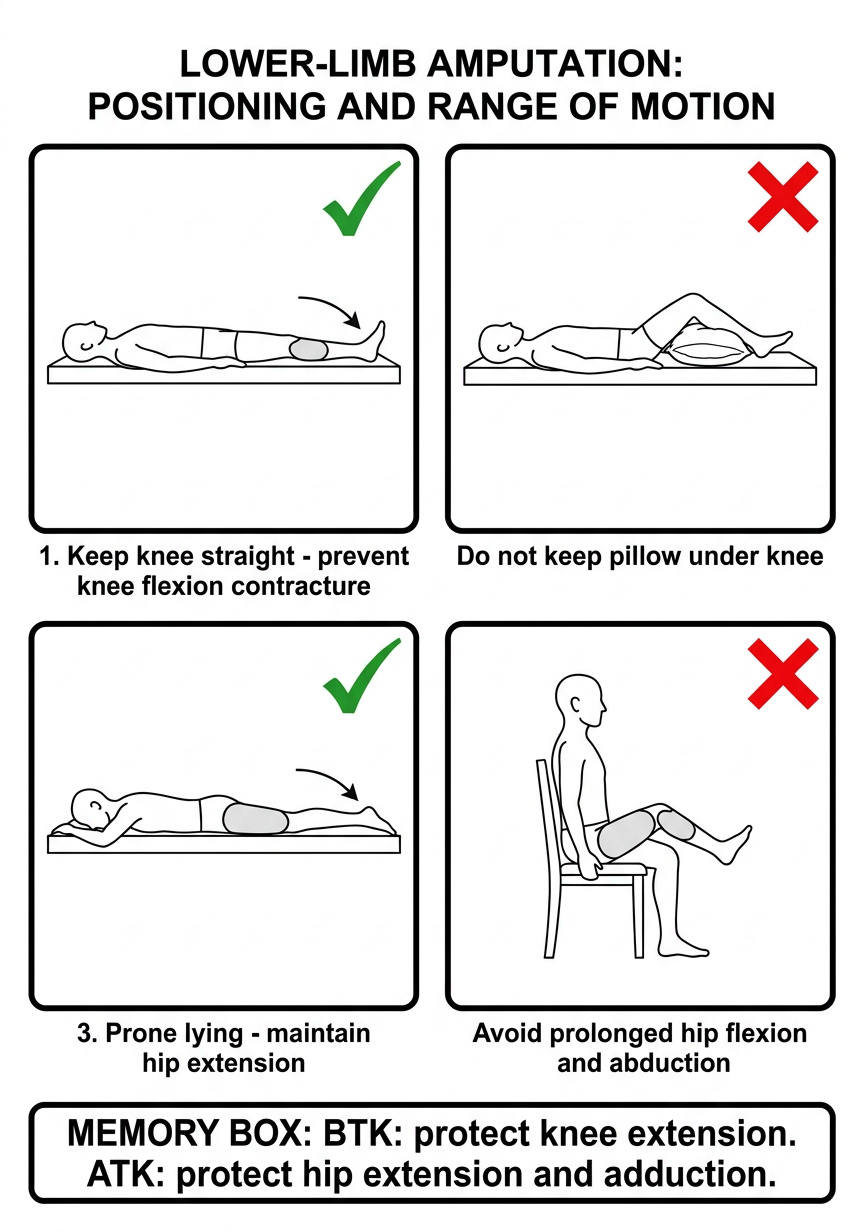
- Transtibial amputation: keep knee straight in bed.
- Do not keep a pillow under the residual knee.
- Transfemoral amputation: practise prone lying to maintain hip extension.
- Avoid prolonged sitting with the residual limb flexed or abducted.
Page 2: Transtibial amputation - knee exercises
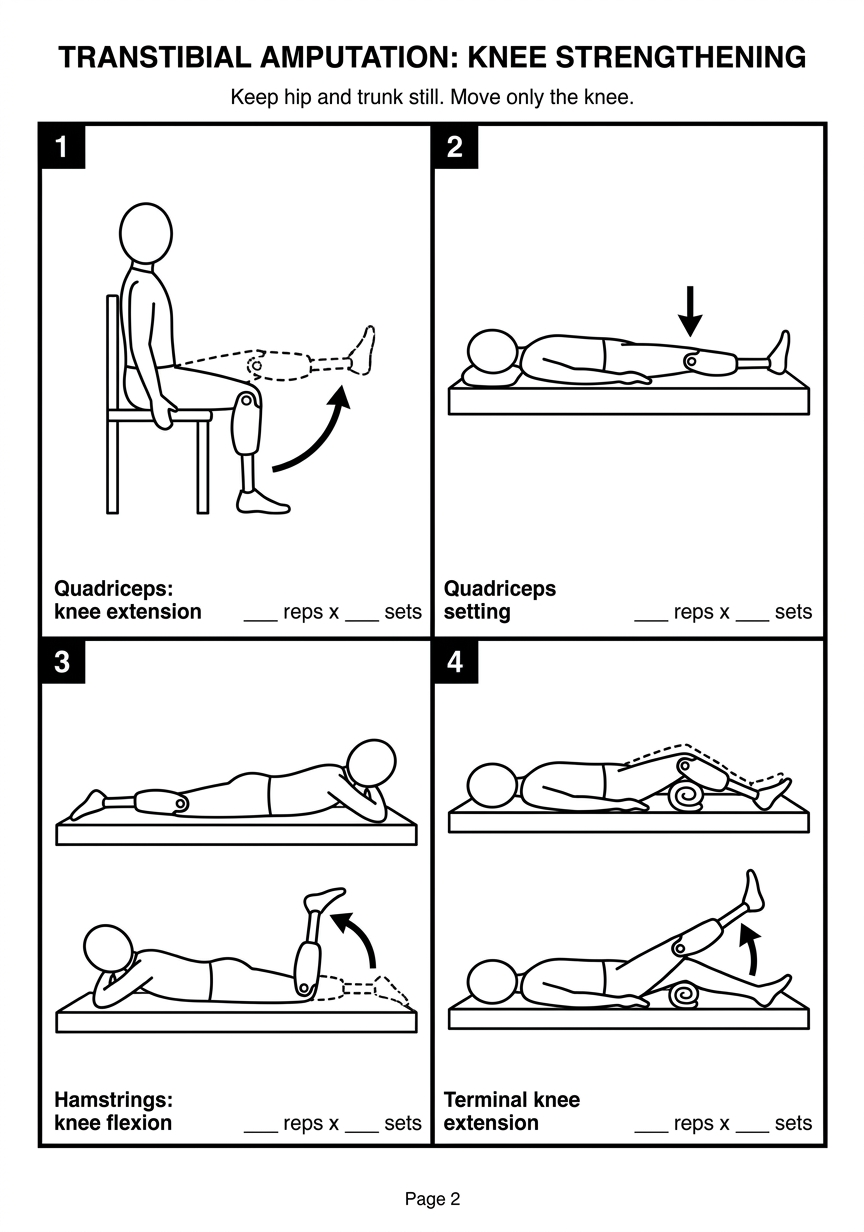
- Quadriceps setting
- Seated knee extension
- Prone knee flexion
- Terminal knee extension over a towel roll
Page 3: Transtibial amputation - hip and trunk exercises
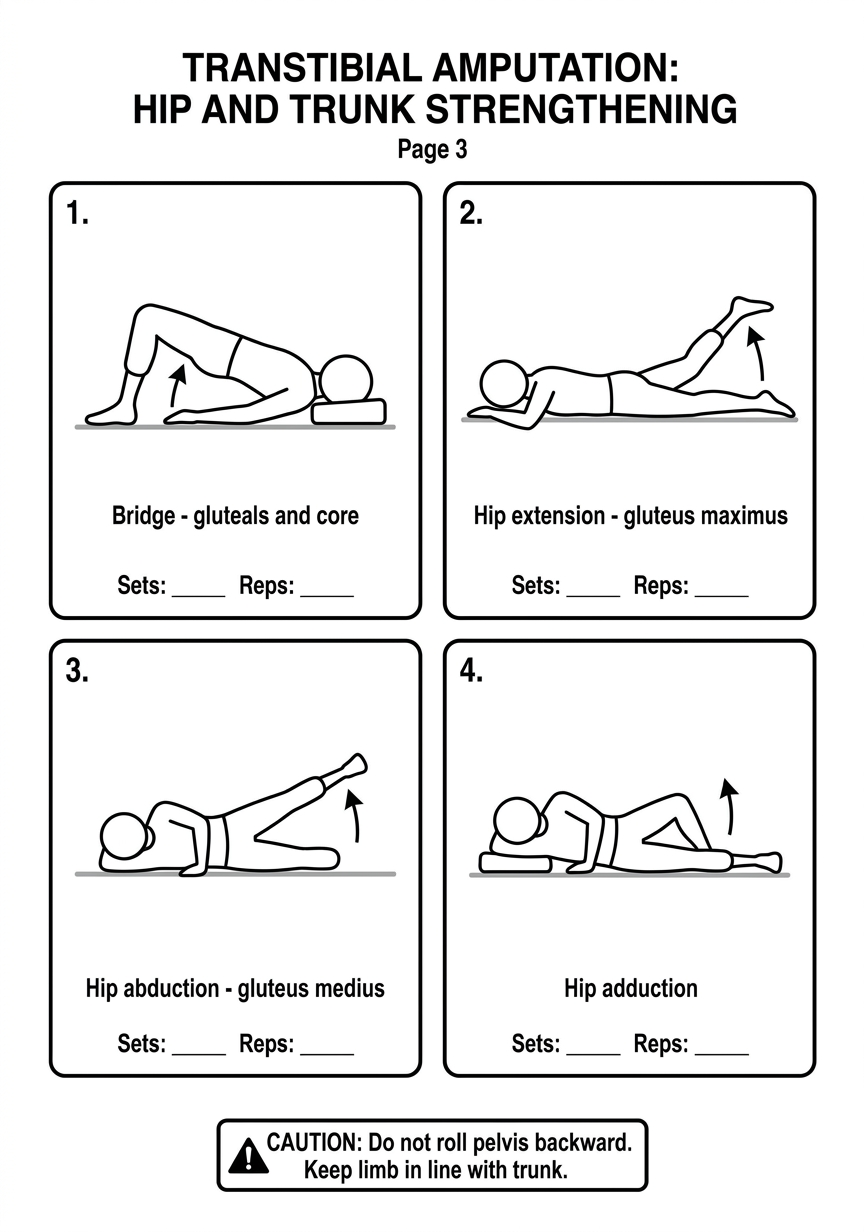
- Bridging
- Prone hip extension
- Side-lying hip abduction
- Side-lying hip adduction
Page 4: Transfemoral amputation - hip strengthening
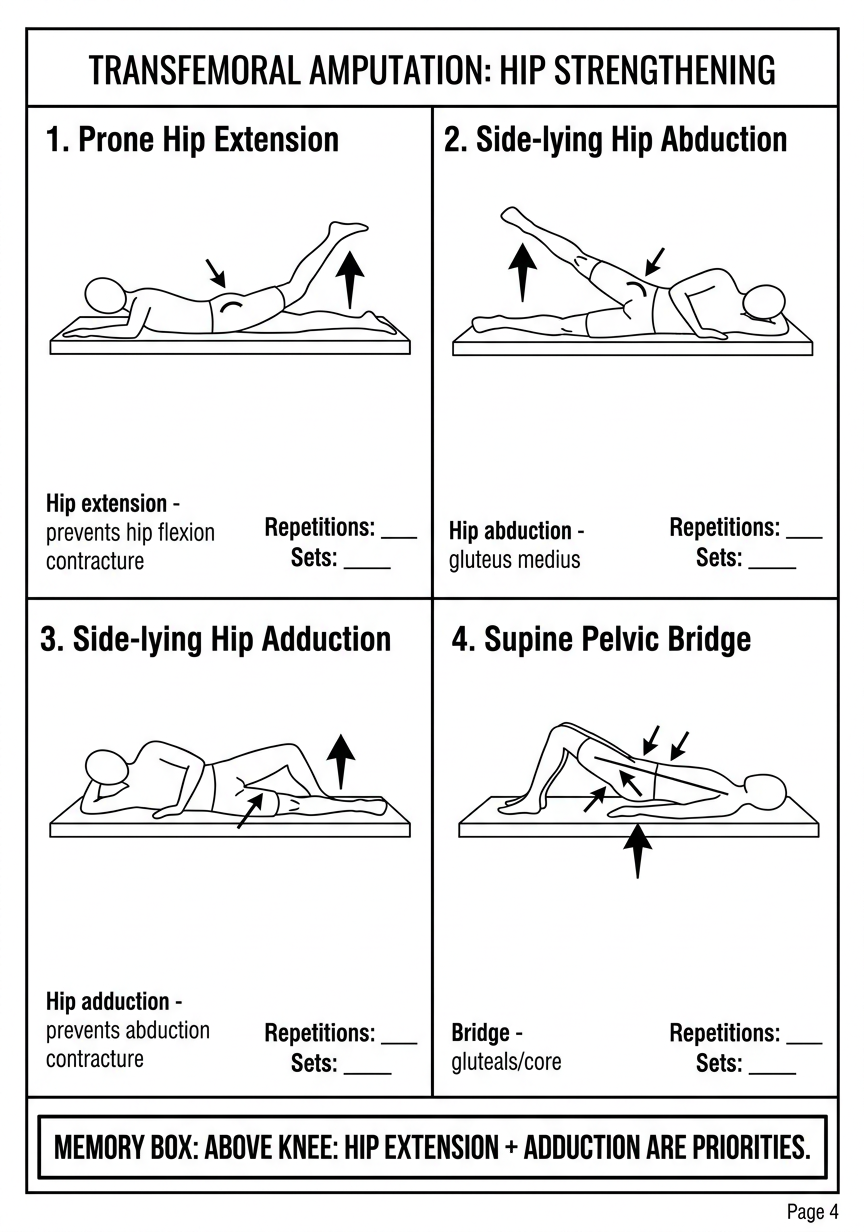
- Prone hip extension
- Side-lying hip abduction
- Side-lying hip adduction
- Bridging
Page 5: Core, upper-limb, and transfer strengthening
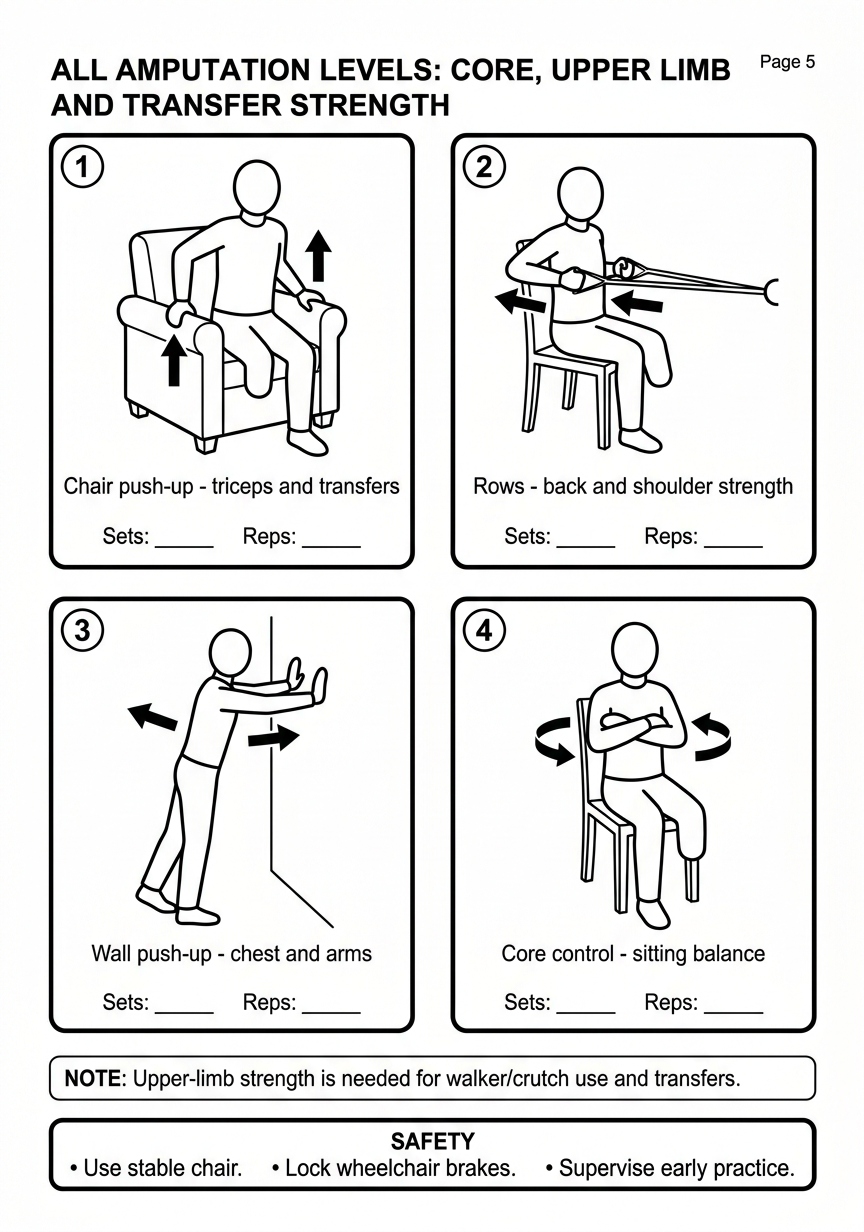
- Chair push-ups
- Resistance-band rows
- Wall push-ups
- Seated trunk rotation
Page 6: Functional pre-prosthetic exercises
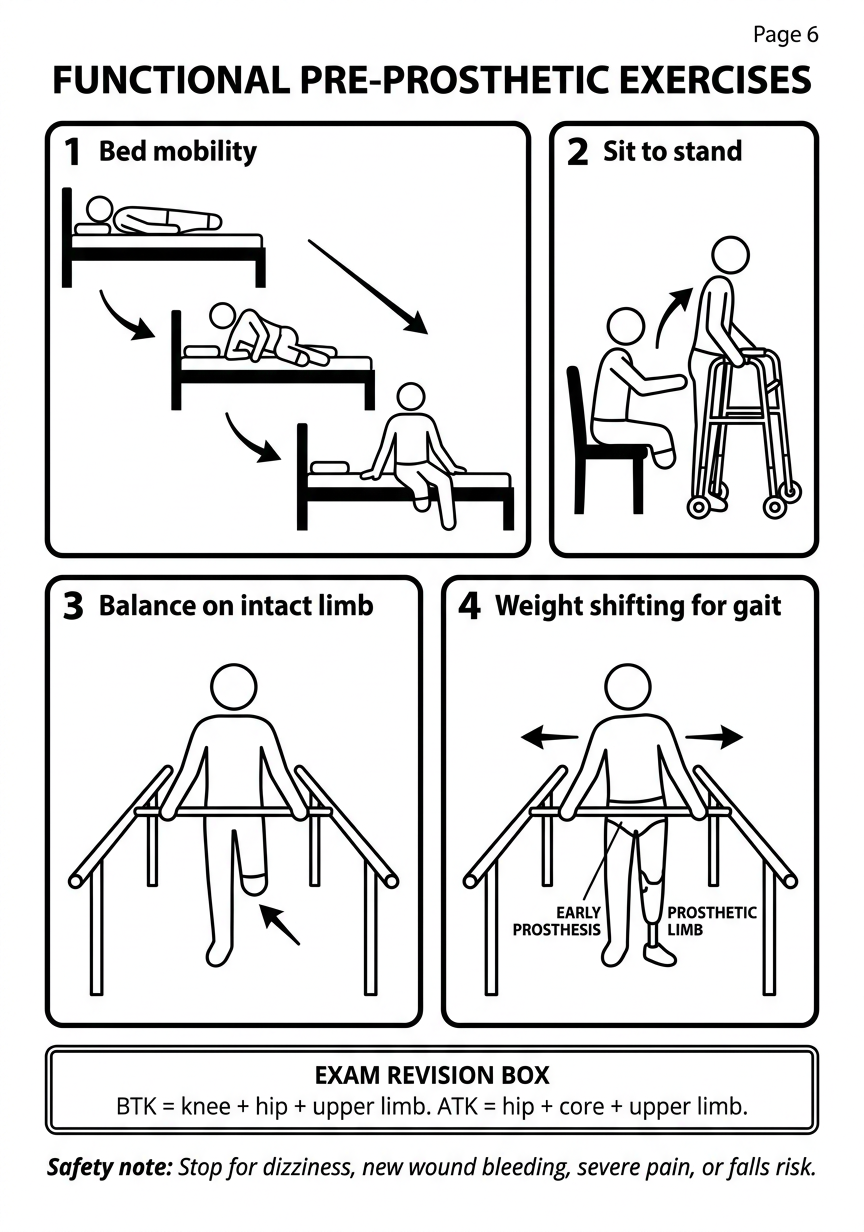
- Bed mobility
- Sit-to-stand practice
- Standing balance on the intact limb
- Weight-shifting in parallel bars or with a walker
Final revision box for the last page
| Amputation level | Main exercises |
|---|---|
| Transtibial, below knee | Knee extension, knee flexion, hip strengthening, core work, upper-limb strengthening |
| Transfemoral, above knee | Hip extension, hip abduction/adduction, core strengthening, upper-limb strengthening |
BTK = Knee + Hip + Upper limb
ATK = Hip + Core + Upper limb