
Cementing techniques in orthopedicsexplain in detail with appropriate illustrative diagrams and images
Reading File
Cementing techniques in orthopedics involve the use of bone cement (typically polymethylmethacrylate/PMMA) to fix prosthetic implants to bone in arthroplasty procedures. The field has evolved from first-generation finger-packing to modern pressurized, vacuum-mixed techniques with improved cement mantles. Let me pull full textbook content and images now.
Searching sources...
Finding Sources
Finding Sources
Searching the Web
cementing techniques orthopedics generations PMMA bone cement arthroplasty illustrated
Finding Sources
Reading Web Page
https://pmc.ncbi.nlm.nih.gov/articles/PMC9780613
Loading Image
Finding Sources
Finding Sources
Loading Image
Reading File
Finding Sources
Loading Image
Reading File
Searching the Web
cementing technique orthopedics generations diagram Barrack classification cement mantle grading images
Loading Image
Loading Image
Loading Image
Loading Image
Reading File
Loading Image
Loading Image
Reading File
Loading Image
I now have comprehensive content from Campbell's Operative Orthopaedics 15th Ed 2026, PMC review articles, and multiple illustrative images. Let me compose the full detailed answer.
Cementing Techniques in Orthopedics
1. What Is Bone Cement?
Polymethylmethacrylate (PMMA) is the standard bone cement used in orthopedic surgery. The term "cement" is technically a misnomer - PMMA has no intrinsic adhesive properties. It functions as a space-filling grout, creating a tight mechanical interlock between the irregular surface of cancellous bone and the prosthesis. It is not a glue.
Composition:
- Powder phase: pre-polymerized PMMA beads + initiator (benzoyl peroxide) + radiopaque agent (barium sulfate or zirconium dioxide) ± antibiotic
- Liquid phase: methyl methacrylate (MMA) monomer + co-initiator (N,N-dimethyl-p-toluidine/DMPT)
- Mixing triggers free-radical addition polymerization - an exothermic reaction releasing ~57 kJ/mol heat
Uses of bone cement (illustrated):

2. Phases of Cement After Mixing
| Phase | Characteristics | Clinical Action |
|---|---|---|
| Mixing | Liquid, sticky | Mixing in bowl or vacuum device |
| Waiting / Doughing | Loses stickiness, becomes dough-like | Prepare for insertion |
| Working | Malleable, non-sticky | Inject and pack into bone |
| Setting | Becomes firm, exothermic | Hold implant still |
| Hardening | Fully polymerized | Implant is fixed |
The working time is typically 4-8 minutes (varies with cement type, room temperature, humidity). Campbell's states: "Plan to inject the cement as it enters a dough phase, or when it no longer sticks to a gloved finger. This typically is about 4 minutes after the start of mixing for Simplex cement."
3. Generations of Cementing Technique
First Generation (1958 - ~1975)
Introduced by Sir John Charnley (1958) who used cold-cured PMMA to fix an acrylic cup and metallic femoral prosthesis in THA.
Technique:
- Hand mixing in an open bowl (introduces air and porosity)
- Finger packing - cement pushed into the canal with fingers
- No canal preparation, no canal plug
- No pressurization
Problems: High porosity, poor penetration into trabeculae, high aseptic loosening rates over time.
Second Generation (~1975 - ~1985)
Driven by observations that canal cleanliness dramatically affects cement-bone interface strength.
Key additions:
- Cement restrictor (plug) placed 1-2 cm distal to the anticipated stem tip to act as a stop, preventing distal extrusion and enabling pressurization
- Thorough pulsatile lavage of the canal to remove blood, marrow, and debris
- Canal drying (sponge tampon or dilute epinephrine-soaked sponges)
- Retrograde filling with a cement gun (nozzle inserted to restrictor level, cement injected as nozzle is slowly withdrawn)
- Collar femoral stems
Cement Restrictor (plug):
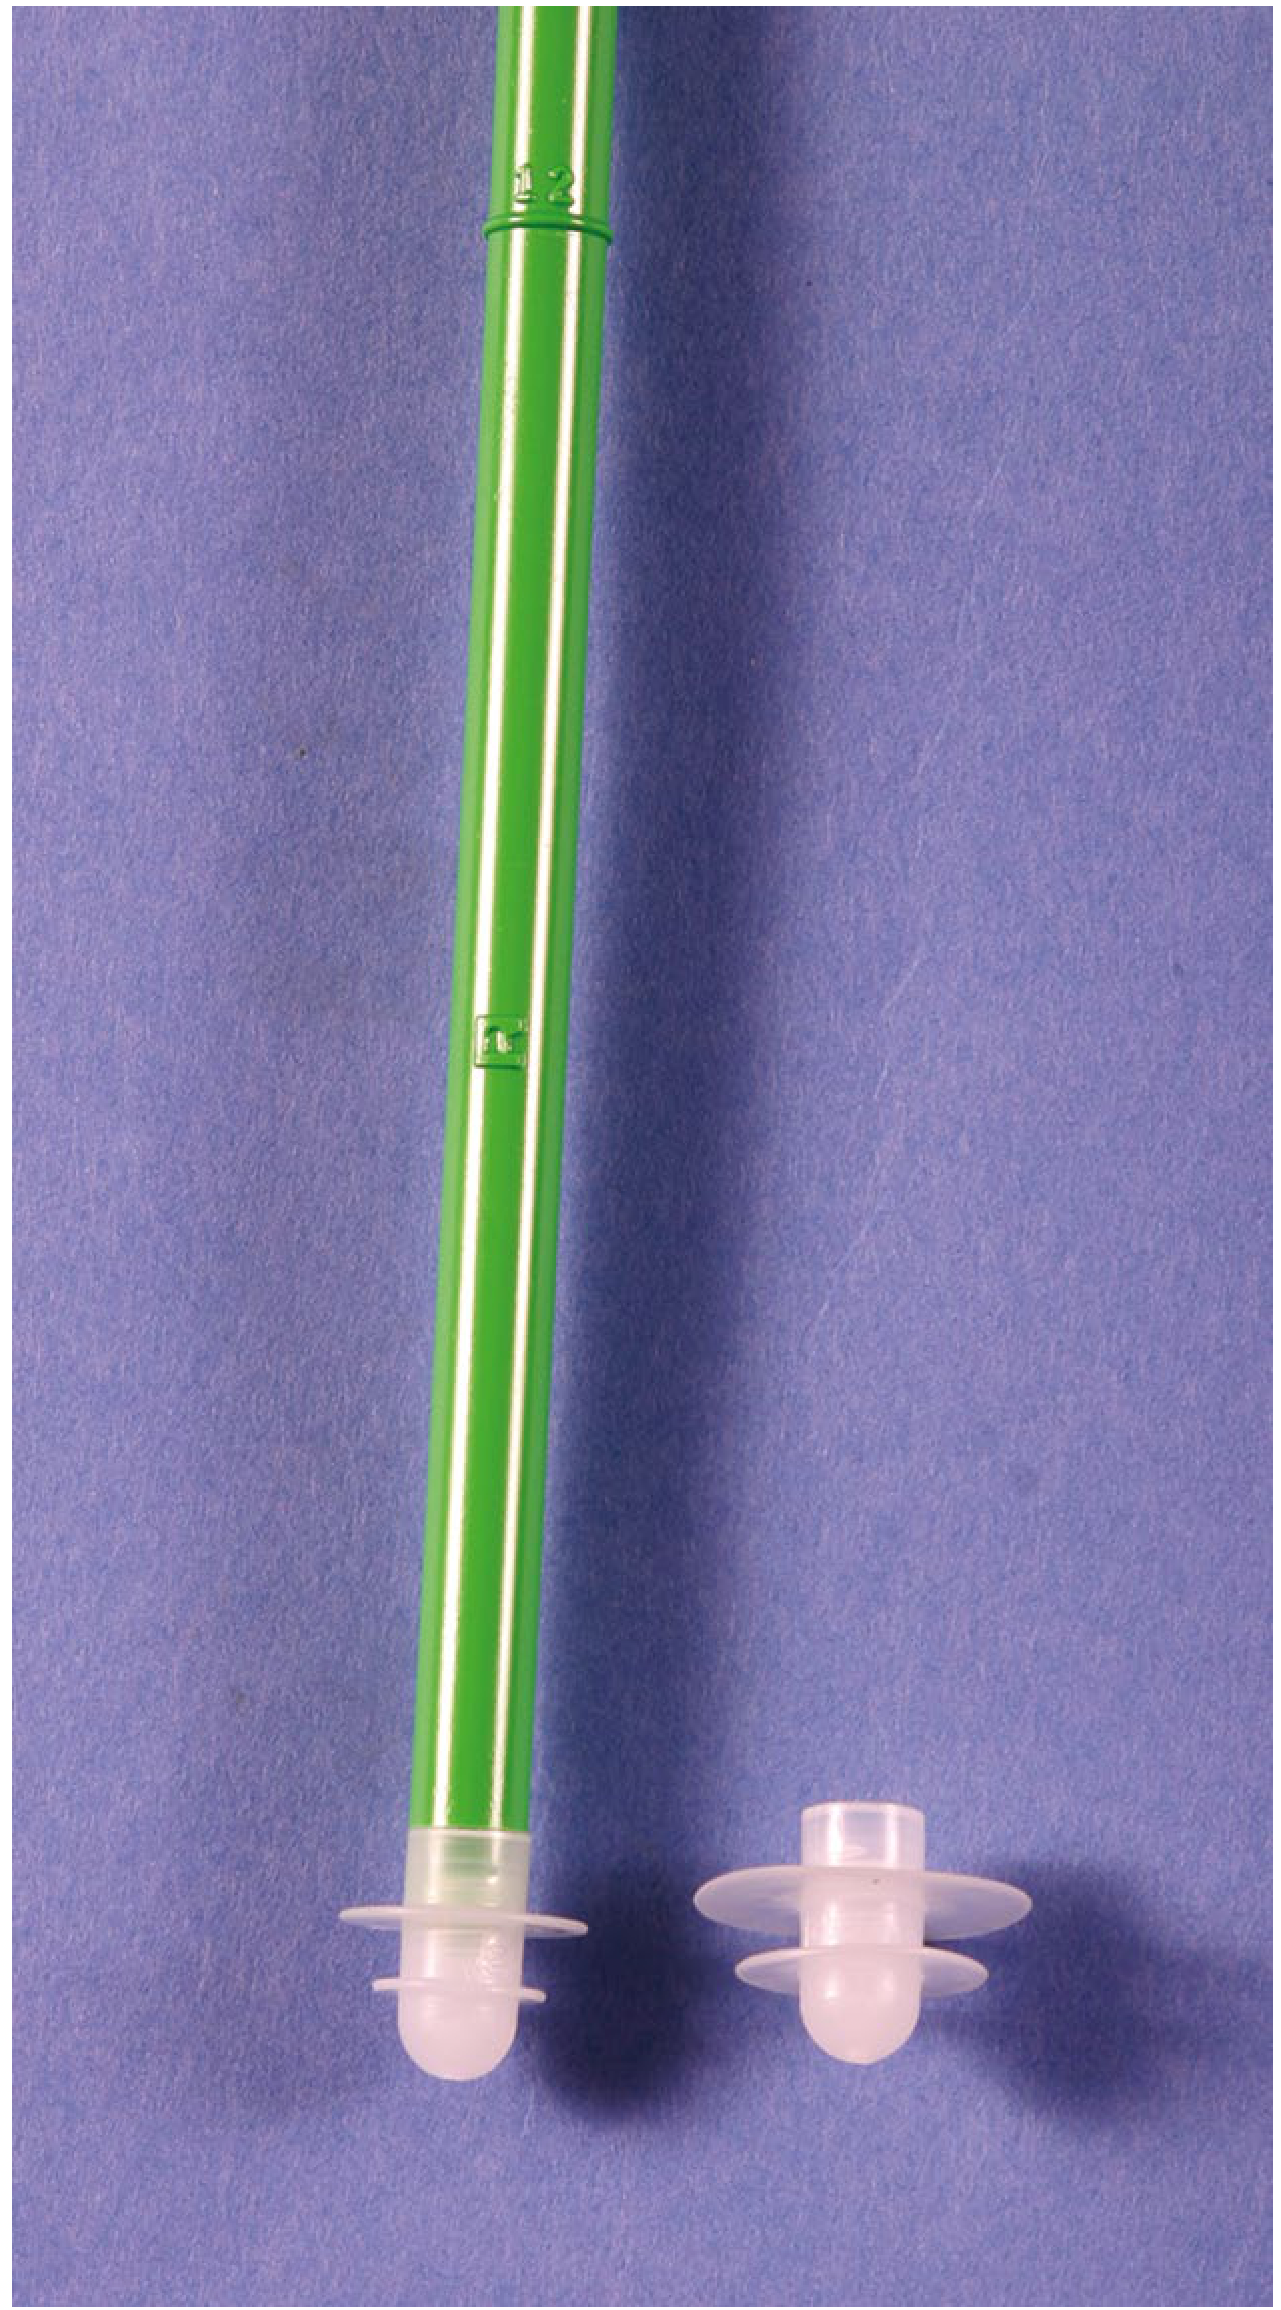
FIGURE 4.58 from Campbell's Operative Orthopaedics 15th Ed: Plastic plug with flexible thin flanges can be inserted to occlude the medullary canal; screwed to a calibrated rod for insertion to correct depth.
Third Generation (~1985 - present)
The modern "gold standard." Adds to 2nd generation:
Key additions:
- Vacuum mixing - reduces cement porosity by eliminating air bubbles entrapped during hand mixing, improving tensile and fatigue strength
- Cement pressurization - a pressurizing nozzle seals the proximal femur, and additional cement is injected under pressure to drive cement deeper into the trabecular interstices
- Distal stem centralizers - maintain a uniform circumferential cement mantle around the stem tip, preventing direct implant-to-bone contact
Summary comparison:
| Feature | 1st Gen | 2nd Gen | 3rd Gen |
|---|---|---|---|
| Mixing | Hand, open bowl | Hand | Vacuum mixer |
| Canal prep | None | Pulsatile lavage + dry | Pulsatile lavage + dry |
| Canal plug | No | Yes | Yes |
| Delivery | Finger packing | Cement gun (retrograde) | Cement gun (retrograde) |
| Pressurization | No | Partial (gun) | Full (pressurizing nozzle) |
| Centralizer | No | No | Yes |
| Cement porosity | High | Moderate | Low |
4. Step-by-Step Surgical Technique (Cemented Femoral Component in THA)
Based on Campbell's Operative Orthopaedics 15th Ed (Technique 4.6)
Canal Preparation
Steps 1-15: After broaching to the templated size and trialing:
- Remove residual loose cancellous bone with a femoral canal brush or curettes
- Retain several millimeters of dense cancellous bone for cement intrusion (this is the cancellous "key")
Cement Restrictor Insertion
Steps 16-18:
- Size the canal with sounds
- Insert the restrictor 1-2 cm below the anticipated stem tip
- Reinsert trial stem to confirm the restrictor is distal enough
Canal Lavage and Drying
Step 19-20:
- Pulsatile lavage with long straight tip, radially directed spray - removes blood, marrow, and debris from trabeculae
- Dry the canal with epinephrine-soaked sponge (1:500,000) or suction tampon sponge
- A dry, clean canal is mandatory for optimal cement-bone bonding
Cement Mixing
Step 21-25:
- Mix per manufacturer instructions (vacuum mixing preferred for 3rd generation)
- Time from start of mixing is critical
- Inject when cement is in the dough phase (no longer sticks to gloved finger, ~4 minutes for Simplex)
Retrograde Cement Injection
Step 26-29:
- Use a cement gun with a long nozzle
- Advance nozzle to the level of the restrictor
- Inject with smooth, sequential compressions of the trigger
- The cement pressure pushes the nozzle back out of the canal as it fills from distal to proximal (retrograde filling)
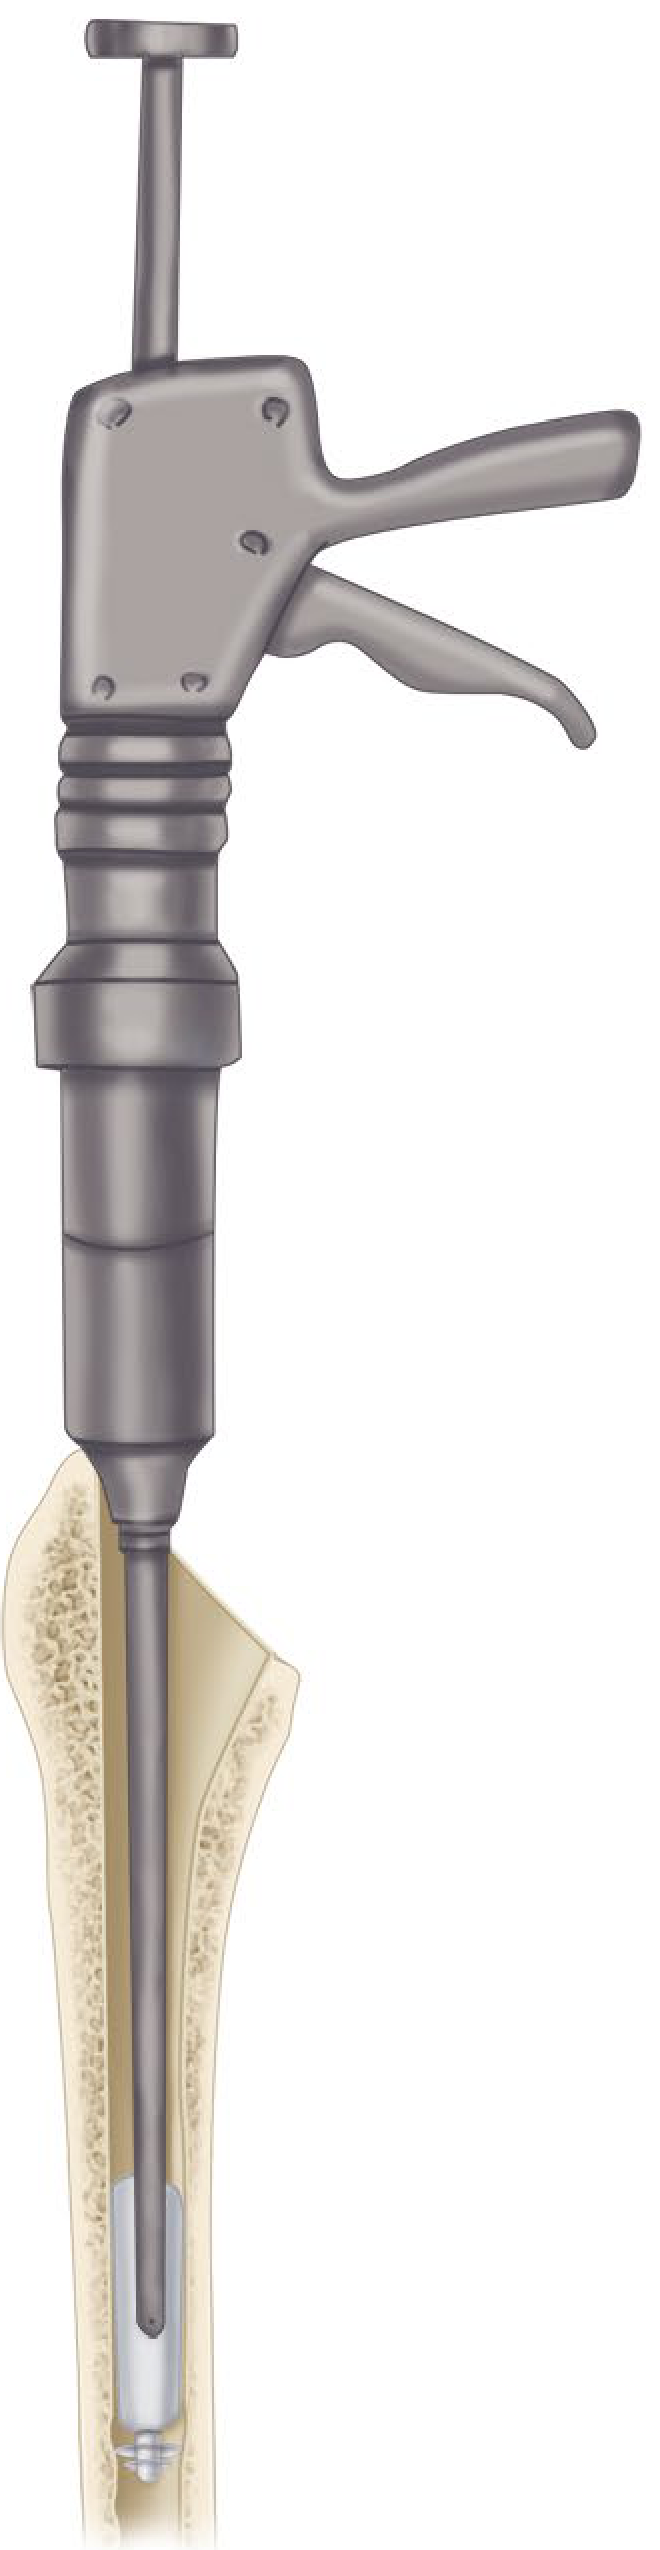
FIGURE 4.59 from Campbell's 15th Ed: Cement gun with long nozzle injecting cement. Distal part of canal is filled first; tip is slowly withdrawn as cement is injected until nozzle is clear.
Cement Pressurization
Step 30:
- Attach a flexible pressurizing nozzle over the proximal femur to create a seal
- Apply firm continuous pressure while injecting additional cement
- Pressurization drives cement further into trabecular interstices for superior interdigitation
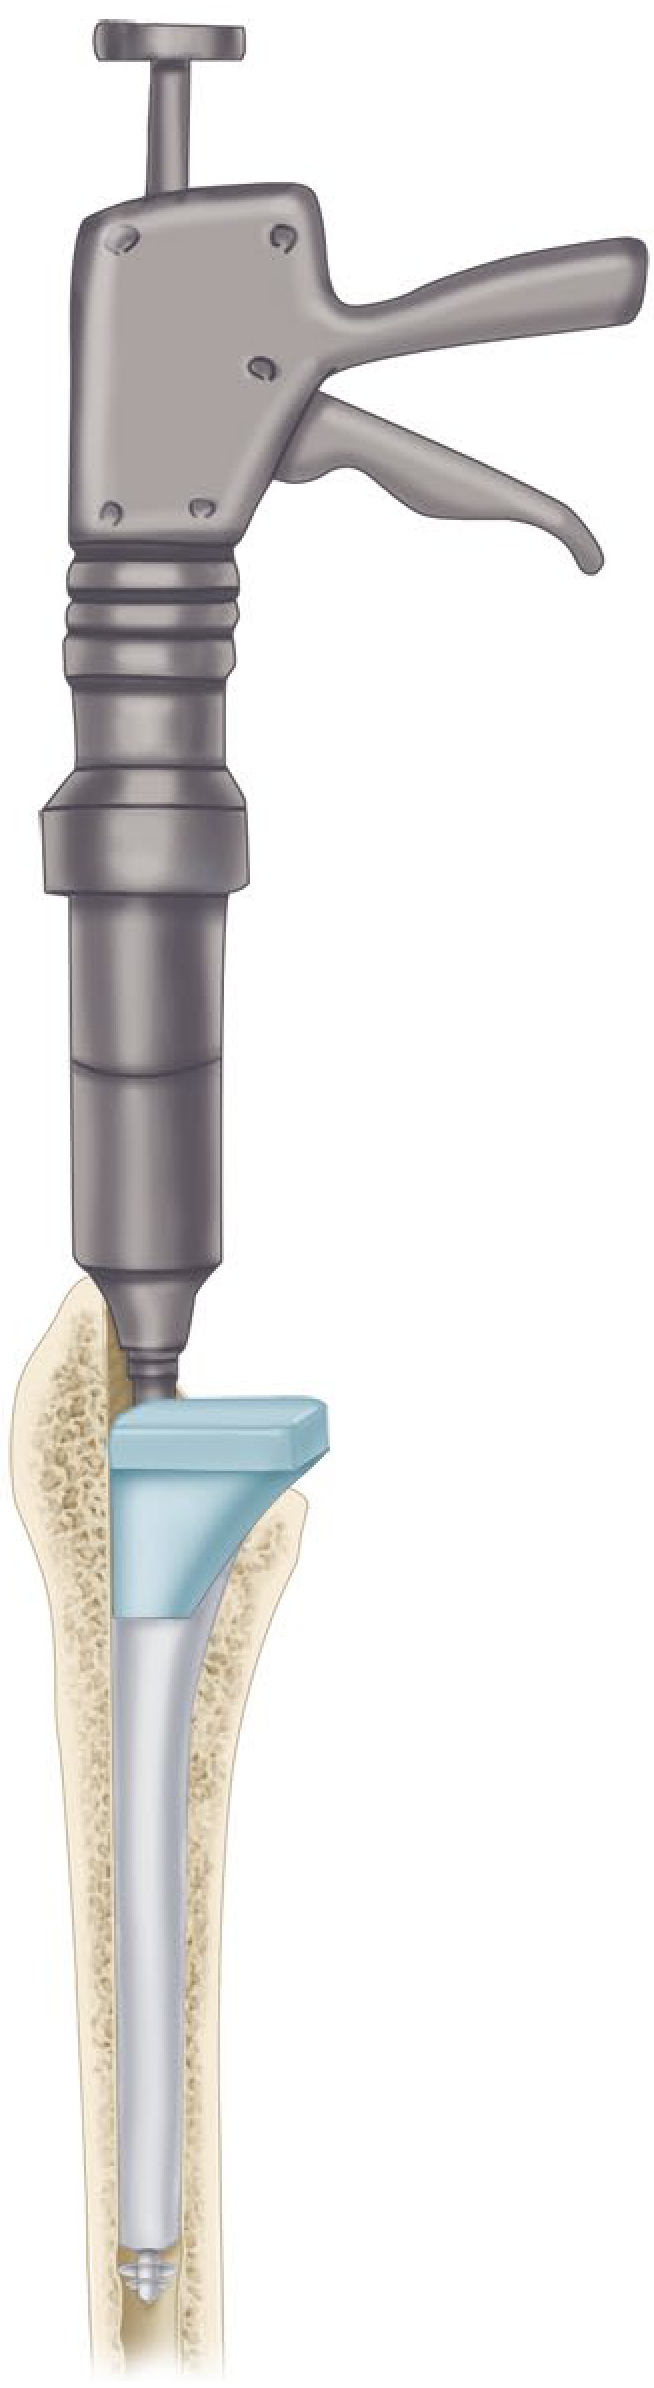
FIGURE 4.60 from Campbell's 15th Ed: Flexible pressurizing nozzle seals proximal femur; firm pressure is applied as additional cement is injected.
Manual Finger Packing (alternative / supplementary)
If using a manual technique or if cement gun is not available:
- Pack cement firmly into the canal with a gloved finger, working it into the trabeculae
- After the canal is filled, press the thumb over the opening to increase intracanal pressure
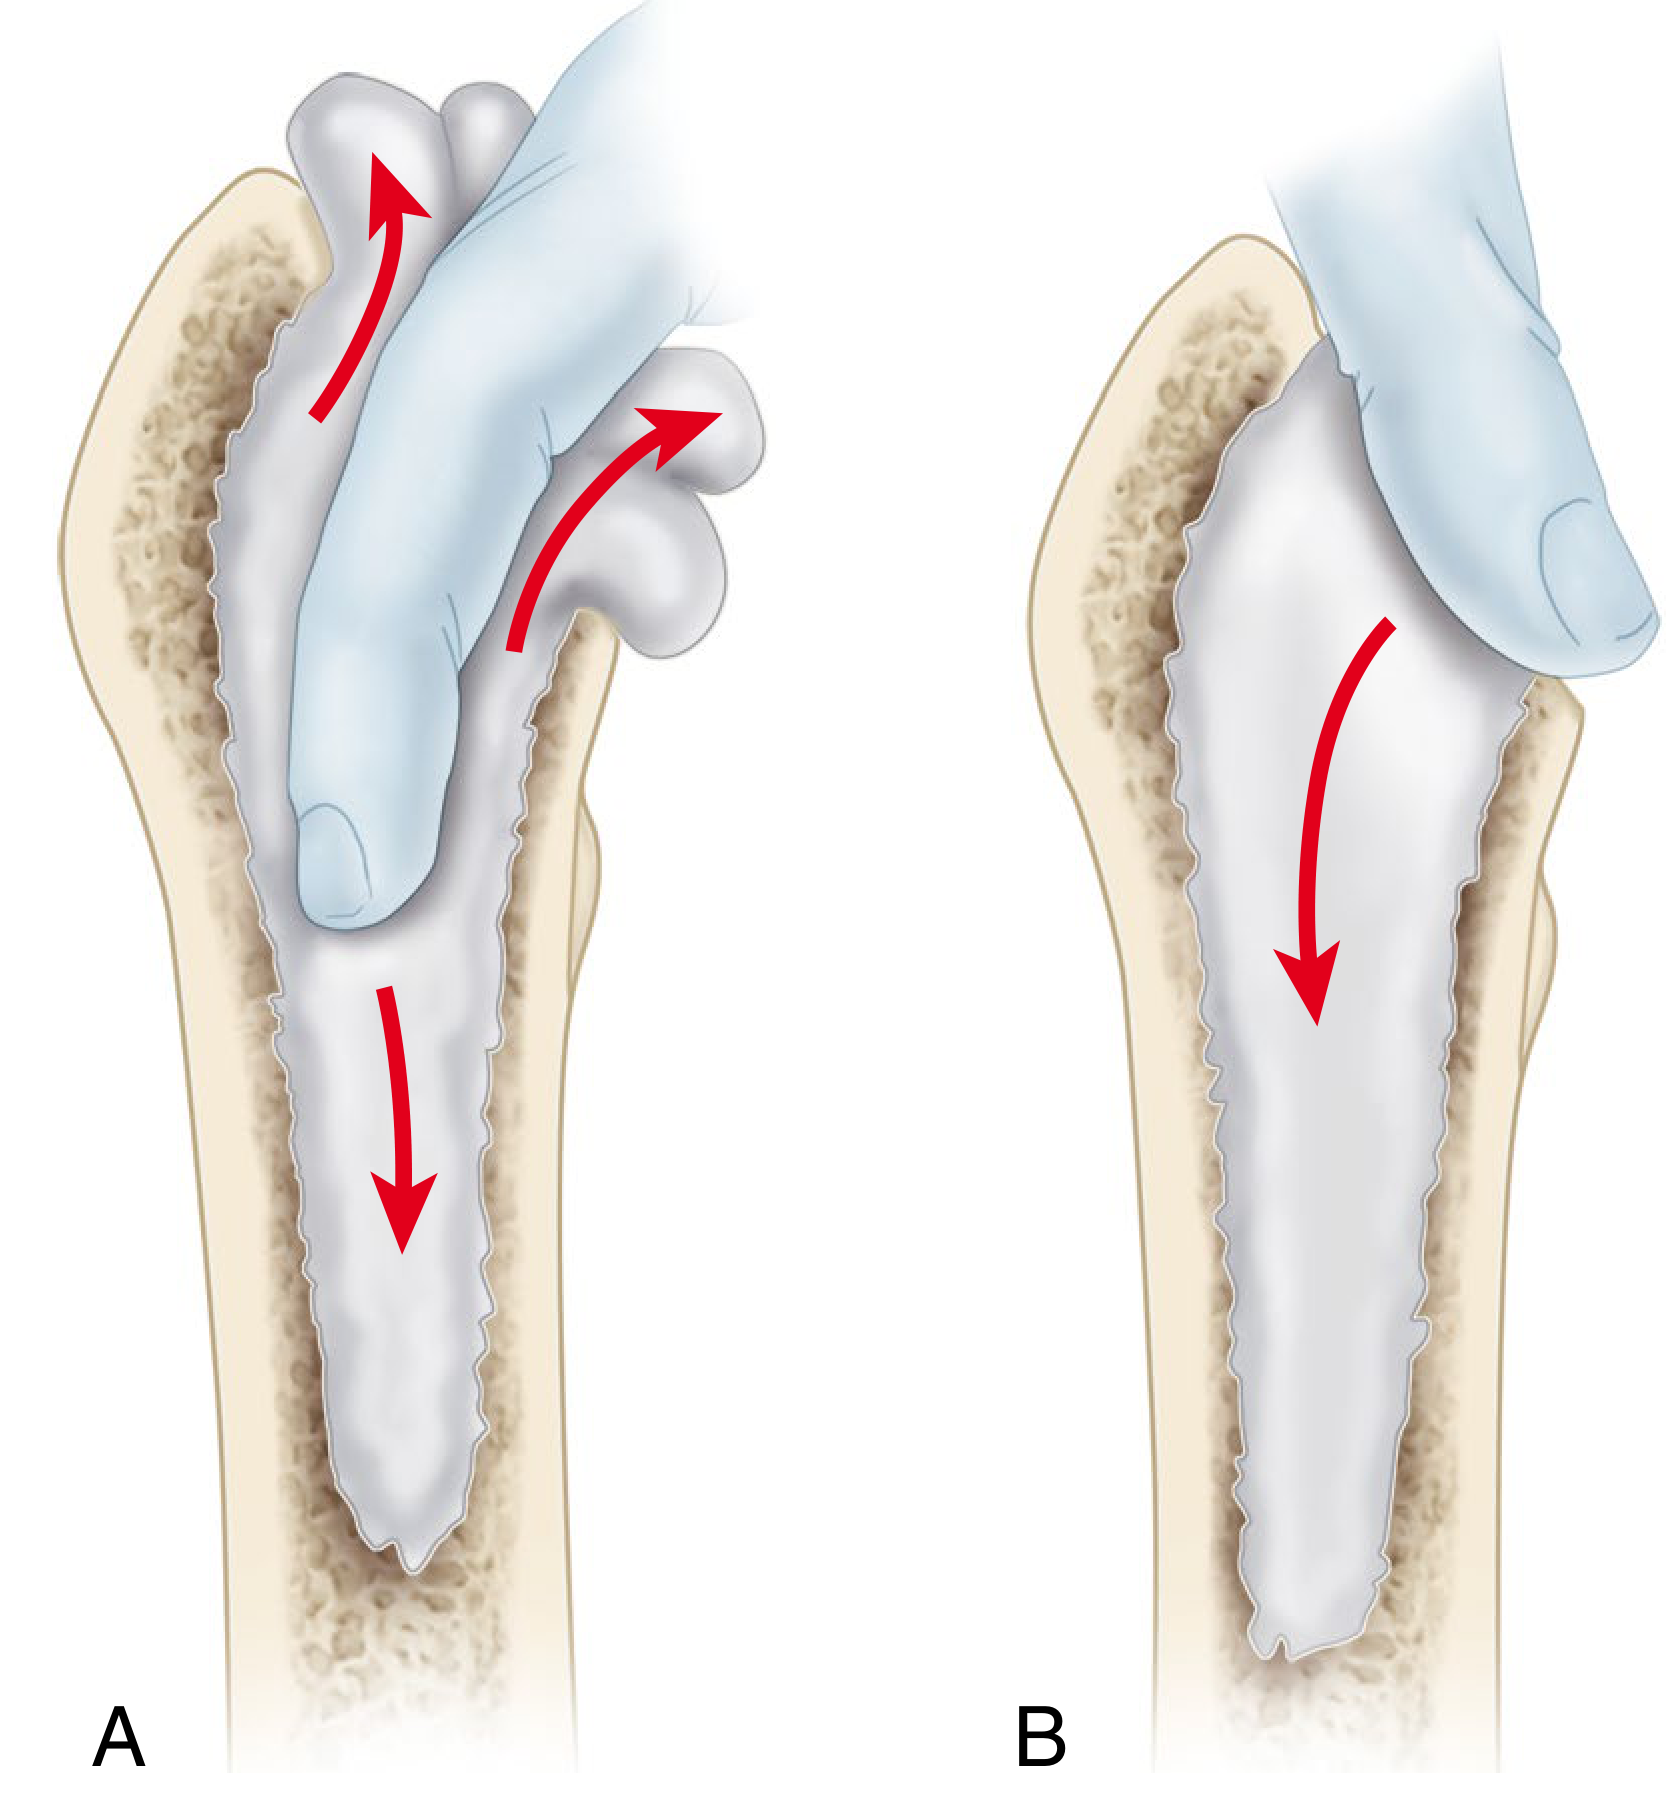
FIGURE 4.61 from Campbell's 15th Ed: A - finger packing cement; B - thumb pressure to pressurize.
Stem Insertion
- Insert the femoral stem before the cement hardens
- Hold stem in correct version and alignment until cement fully sets
- Remove excess cement from around the collar and acetabulum
5. Cemented vs. Cementless Fixation: Comparison
| Feature | Cemented | Cementless |
|---|---|---|
| Immediate stability | Excellent | Requires press-fit |
| Indication | Elderly, osteoporosis, thin cortex | Younger, good bone stock |
| Revision | More complex (cement removal) | Easier (if not well-ingrown) |
| Time to full weight-bear | Immediate | 6 weeks (biological ingrowth) |
| Risk of BCIS | Yes | No |
Textured vs. smooth stems with cement:
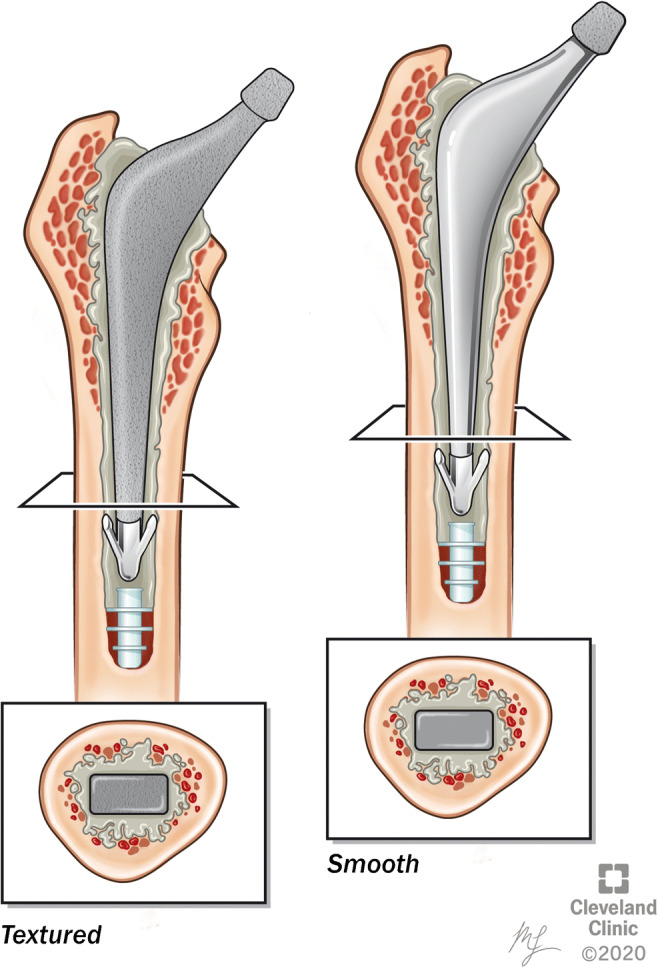
Textured stems (left) promote mechanical interlock with cement; smooth/polished stems (right) rely on the "taper-slip" principle where controlled subsidence within the cement mantle is intended.
6. Femoral Stem Design for Cementing
Different stem geometries interact with the cement mantle differently (from Orthobullets):
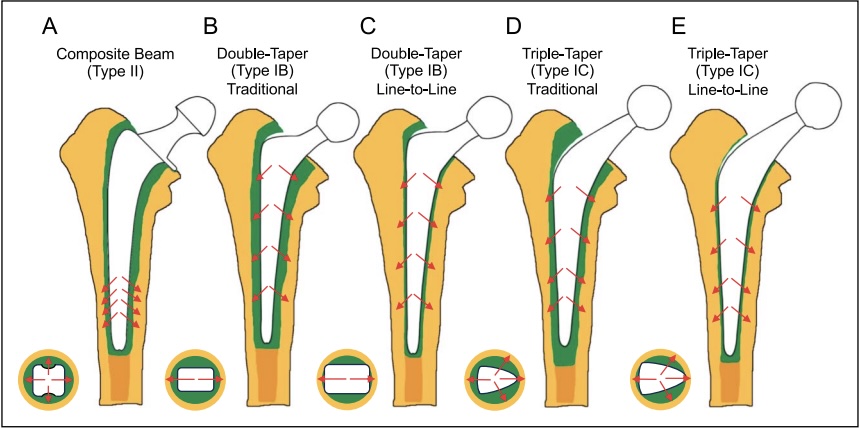
- Composite beam (Type II): Textured/roughened stem - the cement and stem move as one unit; relies on cement-bone interface
- Taper-slip (Type IB/IC): Polished stem tapers - controlled micromotion/subsidence transfers load to cement-bone interface; less stress on cement mantle
7. Barrack Classification of Cement Mantle Quality
Used to radiographically grade the quality of femoral cementation post-operatively:

| Grade | Radiographic Feature | Clinical Significance |
|---|---|---|
| A | Complete filling, no radiolucent lines ("white-out") | Excellent - lowest loosening risk |
| B | Radiolucent line at up to 50% of cement-bone interface | Acceptable |
| C | Radiolucent line at 50-99% OR incomplete cement mantle | At risk for loosening |
| D | Complete (100%) radiolucent line OR absent cement distally | High loosening risk |
Grades A and B = low risk group; C and D = high risk group. Modern 3rd-generation techniques aim to consistently achieve Grade A.
8. Antibiotic-Loaded Bone Cement (ALBC)
- Antibiotics (typically gentamicin or tobramycin, less commonly vancomycin) are incorporated into the cement powder
- Provides local high-concentration antibiotic delivery at the implant-bone interface
- Reduces risk of periprosthetic joint infection (PJI)
- Used prophylactically (low-dose) or therapeutically (high-dose spacers in two-stage revision)
- High-dose ALBC is used in antibiotic spacers for infected THA/TKA - maintains joint space and delivers antibiotics until re-implantation
9. Bone Cement Implantation Syndrome (BCIS)
A recognized complication of cementing, particularly during hip arthroplasty:
Mechanism: During pressurization and stem insertion, fat, marrow, bone fragments, cement monomer, and air are forced into the venous sinusoids and embolize to the pulmonary circulation. Monomer also causes direct vasodilation.
Clinical features: Hypoxia, hypotension, arrhythmia, cardiac arrest (in severe cases)
Risk reduction:
- Thorough canal lavage before cementing (reduces marrow emboli load)
- Venting the canal during stem insertion
- Warning the anesthesiologist before cementing
- Adequate preload
10. Key Principles Summary
- Cement is a grout, not a glue - fixation is via mechanical interlock
- Canal preparation is paramount - pulsatile lavage and drying maximizes trabecular penetration
- Cement restrictor creates a closed space for effective pressurization
- Retrograde filling (distal first) avoids air entrapment
- Vacuum mixing reduces porosity and improves mechanical strength
- Pressurization drives cement 3-5 mm into cancellous bone
- Centralizer ensures a uniform cement mantle around the stem
- Timing matters - inject in the dough phase; too early = runs and mixes with blood; too late = poor insertion before setting
- Barrack Grade A (complete white-out) is the target radiographic result
- BCIS is preventable with careful technique and communication with the anesthesia team
Sources:
- Campbell's Operative Orthopaedics, 15th Ed 2026 (Technique 4.6 - Cemented Femoral Component Implantation)
- Cementation in THA: history, principles, and technique - PMC
- Bone cement - PMC (Kaur et al.)
- Barrack RL et al. - Femoral cement mantle grading system
This is a shared conversation. Sign in to Orris to start your own chat.