what are different obturation techniques in endodontics
obturation techniques endodontics lateral condensation warm vertical thermoplasticized
https://pmc.ncbi.nlm.nih.gov/articles/PMC8304925
root canal obturation techniques comparison
Obturation Techniques in Endodontics
1. Cold Lateral Condensation (CLC)
- A master gutta-percha cone (matched to the final instrument size) is fitted to working length.
- A finger spreader or hand spreader is inserted alongside the master cone, creating space laterally.
- Accessory/auxiliary GP cones are packed into the created space.
- This is repeated until the canal is densely filled.
- Simple, reproducible, low cost
- Good length control - minimal risk of overfilling
- Well-studied; considered the gold standard for comparison
- Cold GP does not flow into lateral canals, isthmuses, or accessory canals
- Leaves spreader tracts (unfilled voids)
- More sealer volume used, and sealers shrink on setting - potential for voids
2. Warm Vertical Condensation (Schilder Technique)
- A non-standardized master GP cone is fitted 1-2 mm short of working length.
- A heated instrument (heat carrier/plugger) is used to soften the GP.
- Cold pluggers compact the softened GP vertically in a "down-pack."
- The canal is then filled by injecting additional thermoplasticized GP in a "back-pack."
- Better adaptation to complex anatomy (lateral canals, fins, isthmuses)
- Less sealer required
- Three-dimensional fill quality is generally superior to CLC in micro-CT studies
- Technically demanding - requires specific instruments and experience
- Risk of vertical root fracture from excessive vertical force
- Risk of GP extrusion beyond the apex
3. Continuous Wave of Condensation (CWC)
- A single-size GP cone is fitted.
- The heated System B plugger is advanced through the GP in one continuous motion (the "wave"), severing and plasticizing simultaneously.
- The coronal portion is then backfilled with an injectable thermoplastic gun (e.g., Obtura III).
- Faster than traditional warm vertical condensation
- Consistent, controlled heat delivery
- Excellent apical seal
4. Injectable Thermoplasticized GP (e.g., Obtura II/III)
- High temperature GP has lower viscosity and can extrude apically
- Not suitable as a standalone technique for the apical 4-5 mm
5. Carrier-Based Obturation (e.g., Thermafil, GuttaCore)
- Carrier size is verified using a verifier.
- Sealer is applied to canal walls.
- A heated, pre-sized carrier is inserted to working length in one motion.
- Fast and simple
- Good adaptation to canal anatomy
- High clinical success rates (comparable to CLC at long-term follow-up)
- Carrier removal during retreatment is difficult
- Risk of overfilling
- Cannot easily control the apical extent
6. Single Cone Technique
- Bioceramic sealers (e.g., BioRoot RCS, TotalFill BC Sealer) - set by hydration, biocompatible
- Resin-based sealers (e.g., AH Plus)
- Very fast and simple
- Relies on the sealer to fill the space - works well with flowable bioceramics
- Reduced procedural stress on the canal
- Heavily sealer-dependent; sealers can shrink (resin-based) or leave voids
- Less reliable for complex canal anatomy
- ADA meta-analysis found lower success at 24 months vs. CLC and carrier-based
7. Thermomechanical Compaction (McSpadden / Engine-Plugger)
8. Chloroform-Dip / Solvent-Softened Techniques
Comparison Summary
| Technique | Ease | Apical Seal | Canal Adaptation | Retreatability |
|---|---|---|---|---|
| Cold Lateral Condensation | Easy | Good | Moderate | Easy |
| Warm Vertical (Schilder) | Difficult | Excellent | Excellent | Moderate |
| Continuous Wave (System B) | Moderate | Excellent | Excellent | Moderate |
| Carrier-Based (Thermafil) | Easy | Good | Good | Difficult |
| Single Cone + Bioceramic | Very easy | Good | Moderate | Moderate |
| Injectable GP (Obtura) | Moderate | Good (backfill) | Good | Moderate |
Key Evidence Points
- Micro-CT studies consistently show warm GP techniques produce fewer voids than cold lateral condensation (PMC8304925, J Endod)
- However, long-term clinical outcomes are statistically equivalent among major techniques (ADA meta-analysis, 84 studies)
- Operator skill is arguably the most important variable - experienced clinicians get comparable results regardless of technique
- The trend in modern endodontics is toward single cone + bioceramic sealer for its simplicity and biocompatibility, especially when used with well-shaped canals from rotary/reciprocating systems
- Complete Obturation: CLC vs. Thermoplastic - Systematic Review of Micro-CT Studies (PMID: 34180858)
- ADA: Which obturation techniques are most beneficial? - meta-analysis of 84 clinical studies
convert this matter into picture- Achieving an optimal seal, characterized by proper apical extent, homogeneity, and adaptation of the root canal filling, is essential for the long‑term success of endodontic therapy.[1] Sealer penetration into dentinal tubules enhances mechanical interlocking, improves retention, and reduces microleakage by sealing bacterial pathways.[2] The smear layer formed during instrumentation occludes tubules, impedes penetration, and may harbor bacteria, compromising the long‑term seal.[3,4] To overcome this, various irrigants and activation techniques have been employed to improve smear layer removal.[5]
A professional medical/dental educational infographic titled "Root Canal Obturation: Keys to Success" with a clean white background and teal/blue color scheme. The infographic is divided into 4 sections arranged vertically with icons and short text: Section 1 - "Optimal Seal Requirements" with an icon of a root canal cross-section showing 3 labeled checkpoints: (1) Proper Apical Extent, (2) Homogeneity of Fill, (3) Adaptation to Canal Walls. A small diagram of a tooth root with filling material. Section 2 - "Sealer Penetration into Dentinal Tubules" with a magnified microscopic diagram showing sealer material flowing into dentinal tubule openings. Three bullet points: "Mechanical interlocking", "Improved retention", "Reduced microleakage - seals bacterial pathways" Section 3 - "The Smear Layer Problem" with a diagram showing a dentinal tubule blocked by smear layer debris. Red warning icon. Three bullet points: "Formed during instrumentation", "Occludes tubule openings", "May harbor bacteria - compromises long-term seal" Section 4 - "Solution: Irrigants and Activation Techniques" with icons of irrigation syringe and ultrasonic device. Text: "Various irrigants (NaOCl, EDTA, CHX) + activation techniques (ultrasonic, sonic, laser) remove smear layer and improve sealer penetration" At the bottom a citation bar: "[1-5] Evidence-based endodontic principles". Modern flat design, color-coded sections (teal, blue, red/orange for problem, green for solution), dental diagrams, professional typography.
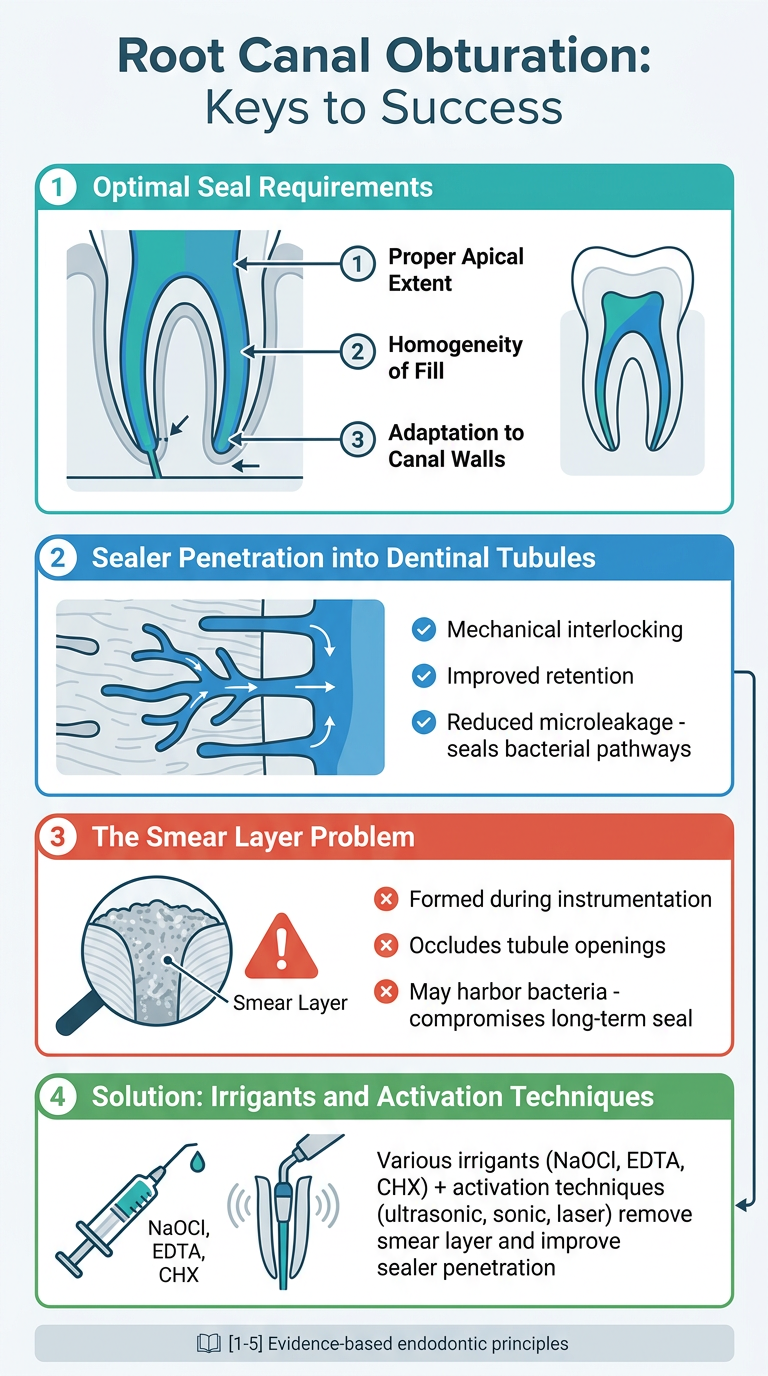
- Optimal Seal Requirements - apical extent, homogeneity, and adaptation
- Sealer Penetration - benefits of tubule penetration (interlocking, retention, microleakage reduction)
- The Smear Layer Problem - how it forms, what it occludes, and why it's a risk
- Solution - irrigants and activation techniques to remove the smear layer
convert this into picture format- N‑acetylcysteine (NAC), is one such thiol‑containing compound and precursor to glutathione, has recently emerged as a potential alternative irrigant due to its mucolytic, antioxidant, and antimicrobial properties.[7,8] Studies have shown that NAC can effectively eradicate and disrupt biofilms[9] and remove the smear layer comparable to EDTA[10] with milder decalcifying effects on dentin.[11] In addition, NAC has shown efficacy against Enterococcus faecalis, a common pathogen implicated in persistent endodontic infections.[8] Despite these promising attributes, conventional syringe irrigation with NAC may not allow sufficient irrigant exchange or penetration into the apical third due to vapor lock and limited fluid dynamics
A professional medical/dental educational infographic about N-Acetylcysteine (NAC) as a root canal irrigant. Clean white background, modern flat design with a purple and teal color scheme. Title at top: "N-Acetylcysteine (NAC): Emerging Endodontic Irrigant" in bold dark text. Layout divided into 3 main sections: SECTION 1 - "What is NAC?" (purple header) - Molecular structure icon of NAC - Two bullet points with small icons: • "Thiol-containing compound" • "Precursor to Glutathione (GSH)" - Three property badges/pills in a row: "Mucolytic" | "Antioxidant" | "Antimicrobial" SECTION 2 - "Why NAC? Key Benefits" (teal header) - 4 cards in a 2x2 grid: Card 1 (biofilm icon): "Biofilm Disruption - Effectively eradicates and disrupts biofilms" Card 2 (microscope icon): "Smear Layer Removal - Comparable to EDTA with milder decalcifying effects on dentin" Card 3 (bacteria icon - E. faecalis): "Antimicrobial - Effective against Enterococcus faecalis, key pathogen in persistent endodontic infections" Card 4 (shield icon): "Dentin Preservation - Milder decalcification vs EDTA, safer for root structure" SECTION 3 - "The Limitation: Conventional Syringe Irrigation" (orange/red warning header) - Diagram of a tooth root cross-section showing a syringe at the canal opening - Two red warning labels pointing to the apical third: • "Vapor Lock - trapped air blocks irrigant flow" • "Limited Fluid Dynamics - poor penetration into apical third" - Caption: "Solution needed: Activation techniques to improve NAC delivery" Citation bar at bottom: "[7-11] References available". Professional typography, icons for each point, color-coded sections.

- What is NAC? - Its chemical identity (thiol compound, glutathione precursor) and three core properties (mucolytic, antioxidant, antimicrobial)
- Key Benefits - Four cards covering biofilm disruption, smear layer removal vs EDTA, efficacy against E. faecalis, and dentin preservation
- The Limitation - Visual of the apical third problem, highlighting vapor lock and poor fluid dynamics as barriers to conventional syringe irrigation, naturally leading into the need for activation techniques
convert this into flowchart - Thirty‑nine freshly extracted, single‑rooted mandibular premolars with fully developed apices and a single canal were included in this study. Teeth with caries, cracks, fractures, resorption, or previous endodontic treatment were excluded from the study. All teeth had been extracted for orthodontic or periodontal reasons. After extraction, teeth were stored in 0.1% thymol solution (HiMedia Laboratories Pvt. Ltd., Mumbai, India) for disinfection, cleaned of soft tissue and calculus, and then stored in normal saline (Baxter Healthcare, Gujarat, India) at room temperature until use. Preoperative radiographs (buccolingual and mesiodistal views) were taken using a digital sensor system (Carestream Dental, Atlanta, GA, USA) to confirm the presence of a single canal.
A clean professional research methodology flowchart on a white background with blue and teal color scheme. Title at top: "Sample Selection & Preparation Protocol" in bold dark text. Vertical top-to-bottom flowchart with rounded rectangle boxes connected by downward arrows. FLOWCHART STEPS: Box 1 (blue, wide): "Freshly Extracted Teeth Pool" — "Single-rooted mandibular premolars with fully developed apices and single canal (n = 39 final)" Arrow down with label: "INCLUSION CRITERIA" Box 2 (green): "✔ Inclusion Criteria Met" — bullet list: "• Single-rooted mandibular premolar" | "• Fully developed apex" | "• Single canal" Arrow down with label: "EXCLUSION CRITERIA" Diamond/Decision box 3 (red/orange): "Any of the following present?" — 5 red bullet points in a side panel: "• Caries" | "• Cracks or Fractures" | "• Root Resorption" | "• Previous Endodontic Treatment" — "YES" arrow goes to a red box on the right: "EXCLUDED from study" — "NO" arrow continues downward Box 4 (teal): "Reason for Extraction Verified" — "Extracted for orthodontic or periodontal reasons only" Arrow down Box 5 (blue): "Post-Extraction Disinfection" — "Stored in 0.1% Thymol Solution" | "(HiMedia Laboratories Pvt. Ltd., Mumbai, India)" Arrow down Box 6 (teal): "Cleaning" — "Removal of soft tissue and calculus from tooth surface" Arrow down Box 7 (blue): "Storage Until Use" — "Normal Saline (Baxter Healthcare, Gujarat, India)" | "Room temperature" Arrow down Box 8 (green): "Preoperative Radiographs" — "Digital sensor system (Carestream Dental, Atlanta, GA, USA)" | "Views: Buccolingual + Mesiodistal" | "Purpose: Confirm single canal" Arrow down Box 9 (dark teal, final): "✔ Confirmed: Single Canal Present → Proceed to Study Protocol" Clean flat design, professional fonts, clear arrows, color-coded steps, icons where appropriate (tooth icon, X icon for exclusion, checkmark for inclusion).

- Starting pool - freshly extracted single-rooted mandibular premolars
- Inclusion criteria - single canal, fully developed apex
- Exclusion decision diamond - caries, cracks, fractures, resorption, prior RCT - with a branching "EXCLUDED" path
- Reason for extraction verification step
- Post-extraction disinfection in 0.1% thymol (with manufacturer detail)
- Cleaning of soft tissue and calculus
- Storage in normal saline at room temperature
- Preoperative radiographs (both views, digital sensor system)
- Final confirmation of single canal before proceeding to study
convert this into flowchart - Standardization of specimens The crowns were sectioned using a water‑cooled diamond disc to standardize root length to 14 mm. Working length was established by inserting a #10 K‑file into the canal until its tip was visible at the apical foramen, then subtracting 1 mm. Root canal instrumentation was performed using ProTaper Universal rotary files up to size F3 . During instrumentation, canals were irrigated with 2 mL of 3% sodium hypochlorite after each file.
A clean professional research methodology flowchart on a white background with a blue and green color scheme. Title at top in bold dark navy text: "Standardization of Specimens & Canal Preparation Protocol". Vertical top-to-bottom flowchart with rounded rectangle boxes connected by bold downward arrows. FLOWCHART STEPS: Box 1 (dark blue header box): "STEP 1: Crown Sectioning" Icon of a diamond disc/saw Text: "Crowns sectioned using water-cooled diamond disc" Sub-label below box in green badge: "✔ Standardized Root Length = 14 mm" Arrow down Box 2 (teal): "STEP 2: Working Length Determination" Icon of a file/tooth Two bullet points: • "#10 K-file inserted into canal until tip visible at apical foramen" • "Working Length = Canal Length − 1 mm" Small diagram on the side showing a tooth root with a file inside and a small arrow pointing to "−1 mm from apex" Arrow down Box 3 (blue): "STEP 3: Root Canal Instrumentation" Icon of rotary file Text: "ProTaper Universal Rotary File System" Sub-bullets: • "Sequential rotary file use" • "Final preparation: Size F3" Arrow down — with a looping side note box (dashed border, orange/yellow): "⟳ Repeated after EACH file change:" "Irrigate with 2 mL of 3% Sodium Hypochlorite (NaOCl)" Arrow loops back up alongside Box 3 and then continues down Box 4 (green, final confirmation): "✔ Standardization Complete" • Root length: 14 mm • Working length established • Canal shaped to F3 • Irrigated with 3% NaOCl after each file "→ Proceed to Next Stage" Clean flat design, icons for each step (diamond disc, K-file, rotary file, irrigation syringe), color-coded boxes, bold arrows, looping irrigation step clearly shown with a curved/side arrow. Professional academic style.
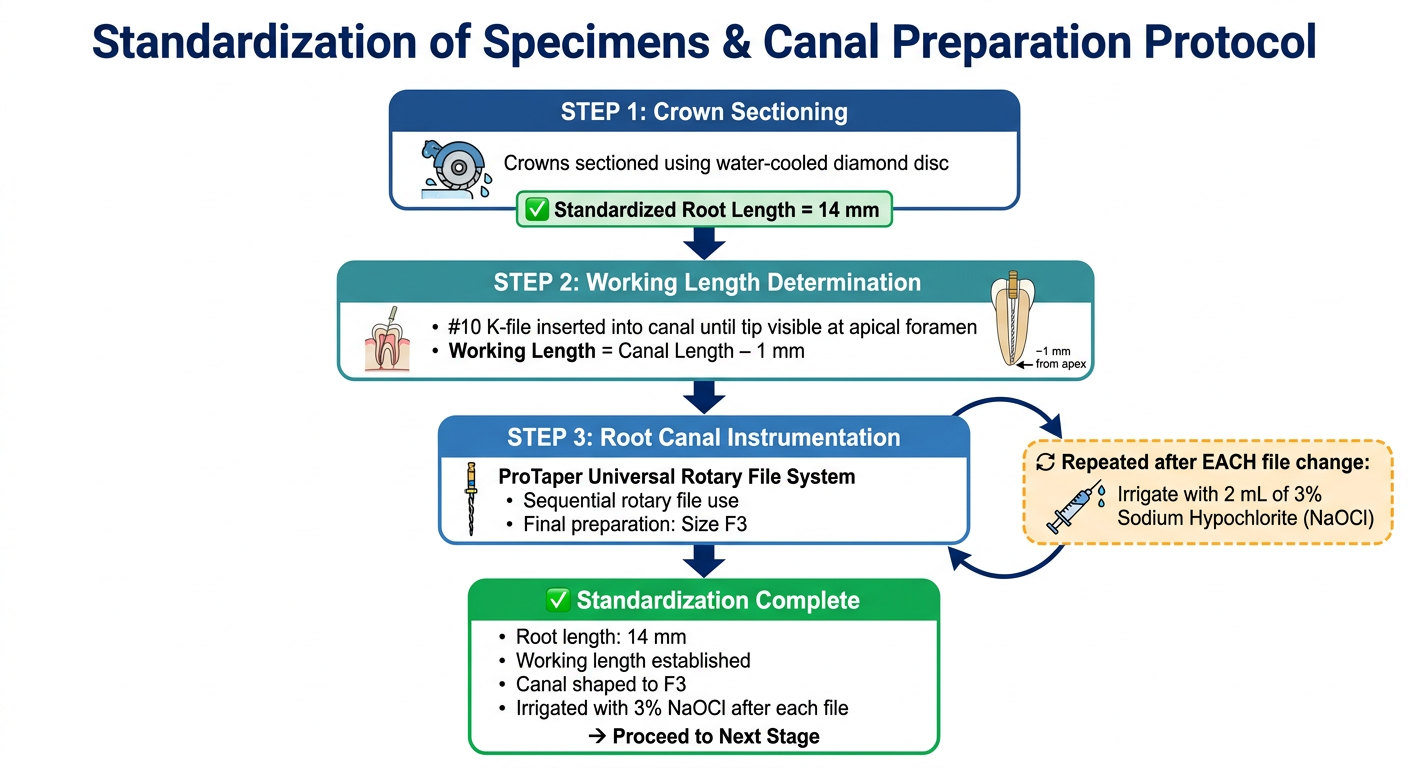
- Crown Sectioning - diamond disc, standardized to 14 mm root length (highlighted as a key outcome)
- Working Length Determination - #10 K-file to apex, then subtract 1 mm (with the formula clearly shown)
- Root Canal Instrumentation - ProTaper Universal up to F3, with the irrigation loop shown as a repeating side step after each file change
- Completion Summary - all parameters confirmed before moving to the next stage
convert this into flowchart - Thirty‑nine freshly extracted, single‑rooted mandibular premolars with fully developed apices and a single canal were included in this study. Teeth with caries, cracks, fractures, resorption, or previous endodontic treatment were excluded from the study. All teeth had been extracted for orthodontic or periodontal reasons. After extraction, teeth were stored in 0.1% thymol solution for disinfection, cleaned of soft tissue and calculus, and then stored in normal saline at room temperature until use. Preoperative radiographs (buccolingual and mesiodistal views) were taken using a digital sensor system to confirm the presence of a single canal.
A clean professional research methodology flowchart on a white background with a blue and teal color scheme. Title at top in bold dark navy: "Sample Selection & Preparation Flowchart". Strict top-to-bottom vertical flowchart with labeled steps. FLOWCHART NODES (top to bottom): START oval (dark blue): "Freshly Extracted Teeth (n = 39) — Single-rooted mandibular premolars" Arrow down Rectangle (teal): "INCLUSION CRITERIA" — "• Single-rooted mandibular premolar" | "• Fully developed apex" | "• Single canal confirmed" Arrow down Diamond shape (orange, decision): "Exclusion criteria present?" — "Caries / Cracks / Fractures / Resorption / Previous RCT?" → "YES" arrow pointing RIGHT to red rectangle: "EXCLUDED ✖" → "NO" arrow pointing DOWN continuing flow Rectangle (light blue): "Extraction Reason Verified" — "Extracted for orthodontic or periodontal reasons only" Arrow down Rectangle (teal): "Post-Extraction Disinfection" — "Stored in 0.1% Thymol Solution" — "Purpose: Disinfection" Arrow down Rectangle (blue): "Surface Cleaning" — "Removal of soft tissue and calculus" Arrow down Rectangle (teal): "Storage Until Use" — "Normal saline at room temperature" Arrow down Rectangle (blue): "Preoperative Radiographs" — "Digital sensor system" | "Views: Buccolingual + Mesiodistal" Arrow down Diamond (green, decision): "Single canal confirmed?" → "NO" arrow RIGHT to red box: "EXCLUDED ✖" → "YES" arrow DOWN END oval (dark green): "✔ Specimen Included in Study (Final n = 39)" All boxes have simple flat design, clean arrows, consistent fonts, color-coded. Decision diamonds are clearly shaped differently from process rectangles. Red excluded boxes on the right side. Professional academic flowchart style, no decorative elements, maximally readable.
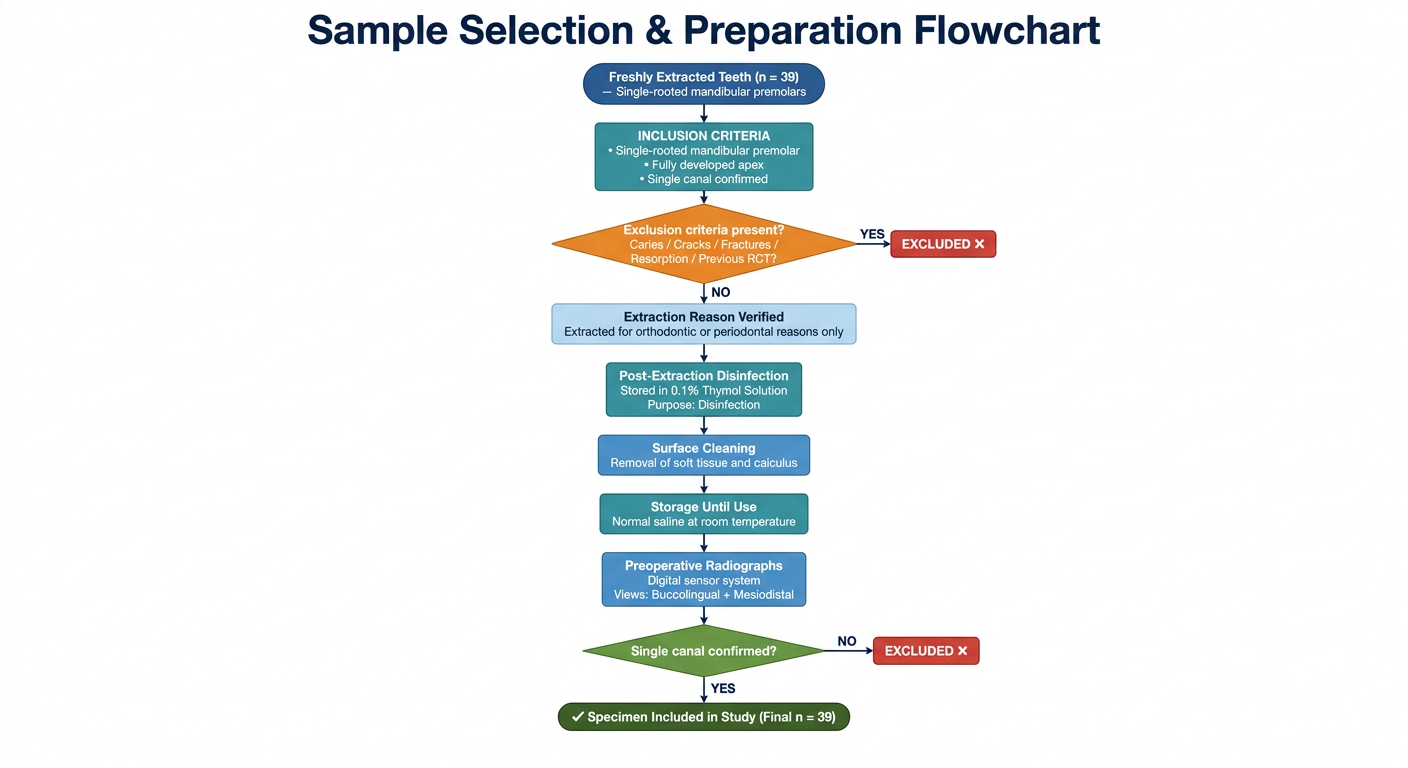
- Two decision diamonds - one for exclusion criteria early in the flow, and one at the radiograph confirmation step, both with "YES → EXCLUDED" branches going right
- Strict vertical flow with no clutter, making the sequence easy to follow
- Process rectangles vs. decision diamonds are visually distinct throughout
- Start and End ovals clearly bookend the protocol with the final confirmed sample (n = 39)
convert this into flowchart - Preparation of N‑acetylcysteine irrigant A 200 mg/mL NAC solution was freshly prepared by dissolving pharmaceutical‑grade NAC powder in distilled water, and pH was adjusted to 11 using sodium hydroxide pellets to ensure chemical stability.
A clean professional laboratory preparation flowchart on a white background with a purple and teal color scheme. Title at top in bold dark text: "Preparation of N-Acetylcysteine (NAC) Irrigant Solution". Strict vertical top-to-bottom flowchart with simple labeled steps, no extra decoration. FLOWCHART NODES (top to bottom): START oval (dark purple): "Begin NAC Solution Preparation" Arrow down Rectangle (purple): "Starting Material" — Large icon of a reagent bottle/powder jar — "Pharmaceutical-grade NAC Powder" Arrow down Rectangle (teal): "Dissolve in Solvent" — Icon of beaker with stirring — "Dissolve NAC powder in Distilled Water" — "Target concentration: 200 mg/mL" — Small note: "Freshly prepared before use" Arrow down Diamond (orange, decision): "pH = 11 achieved?" → "NO" arrow pointing RIGHT to a light orange rectangle: "Add Sodium Hydroxide (NaOH) Pellets → Re-check pH" with a curved arrow looping back UP to the diamond → "YES" arrow pointing DOWN Rectangle (green): "Chemical Stability Confirmed" — "pH 11 ensures stability of NAC solution" — pH meter icon Arrow down END oval (dark green): "✔ NAC Irrigant Ready for Use — 200 mg/mL, pH 11" Design notes: clean flat style, beaker and lab icons, the NaOH adjustment loop on the right side clearly shows iterative pH adjustment until target is reached, color-coded boxes, bold readable fonts, strictly professional academic style, no decorative backgrounds.
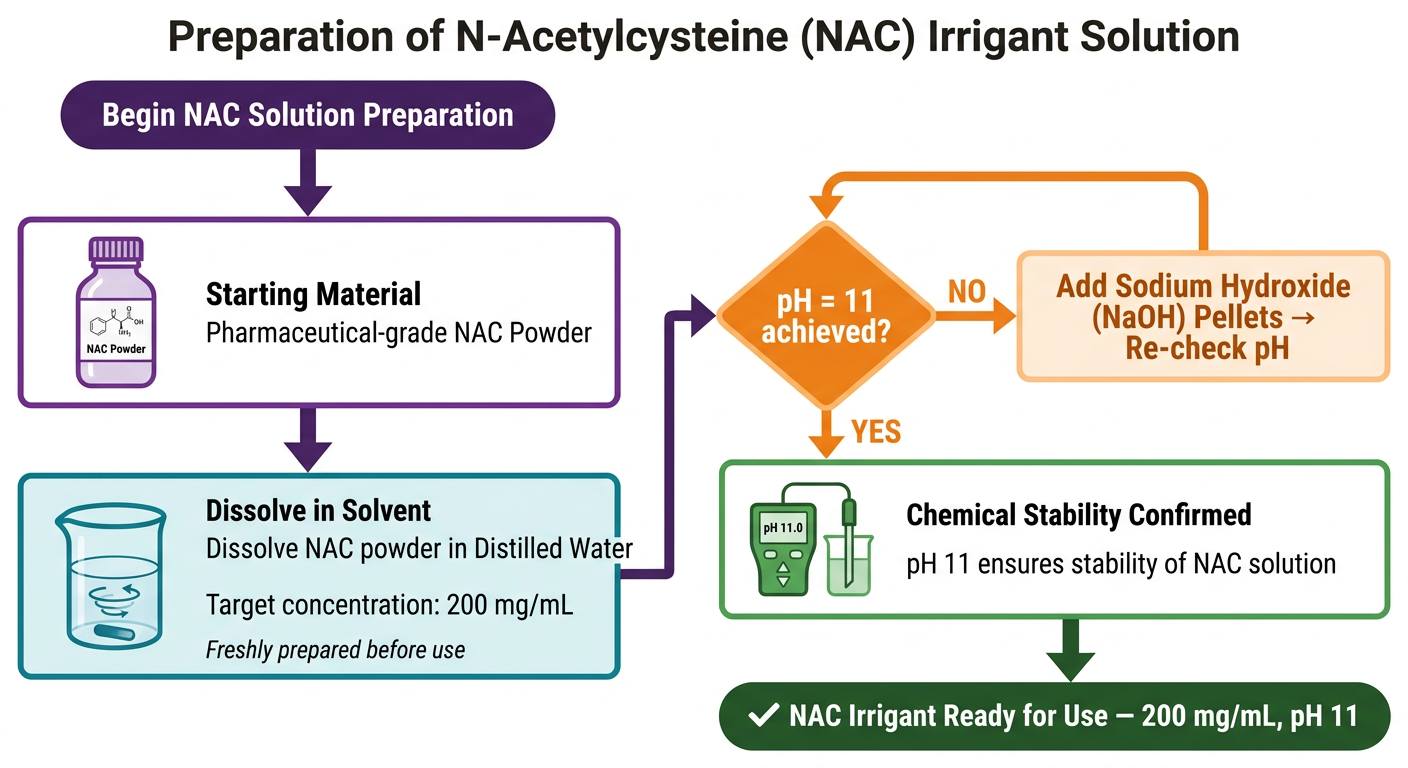
- Starting material - pharmaceutical-grade NAC powder
- Dissolution - in distilled water to 200 mg/mL, freshly prepared
- pH adjustment loop - the decision diamond with the NaOH feedback loop is the most important element here, showing that NaOH pellets are added iteratively until pH 11 is reached
- Stability confirmation - pH 11 ensures chemical stability
- Final product - 200 mg/mL NAC at pH 11, ready for use
convert this into flowchart - Experimental groups and irrigant activation After biomechanical preparation, specimens were randomly divided into three groups (n = 13) based on the method of NAC activation: Group 1 (conventional needle irrigation): 1 mL of NAC was delivered over 1 min using a 30‑gauge side‑vented needle placed 1 mm short of working length. Group 2 (diode laser activation): Initially, 0.8 mL of NAC was delivered using a syringe . The remaining 0.2 mL was activated using a diode laser through a 200‑µm optical fiber. Three activation cycles of 20 s each were performed with intermittent rest. Group 3 (PUI activation): 1 mL of NAC was introduced and activated using a size #25 ultrasonic tip (IrriSafe, Satelec Acteon Group, Merignac, France) attached to a piezoelectric ultrasonic unit (P5 Newtron XS, Acteon, Merignac, France) placed 1 mm short of working length. Two 30‑s activation cycles were performed. After NAC irrigation, all specimens were rinsed with 3 mL of distilled water and dried using sterile absorbent paper points
A clean professional research methodology flowchart on a white background. Title at top in bold dark navy: "Experimental Groups & Irrigant Activation Protocol". TOP SECTION - single starting box: START rectangle (dark blue): "Post Biomechanical Preparation — All Specimens (n = 39)" Arrow down to: Rectangle (dark teal): "Random Division into 3 Groups (n = 13 each)" Then THREE parallel vertical columns branch out side by side, each clearly labeled: --- LEFT COLUMN (blue) --- Header box (dark blue): "GROUP 1 — Conventional Needle Irrigation" Box 1: "Volume: 1 mL NAC" Box 2: "Delivery: 30-gauge side-vented needle" Box 3: "Placement: 1 mm short of working length" Box 4: "Duration: Delivered over 1 minute" No activation step. --- MIDDLE COLUMN (purple) --- Header box (dark purple): "GROUP 2 — Diode Laser Activation" Box 1: "Initial delivery: 0.8 mL NAC via syringe" Box 2: "Activation: Remaining 0.2 mL" Box 3: "Device: Diode laser — 200-µm optical fiber" Box 4: "Cycles: 3 × 20 seconds each" Box 5: "With intermittent rest between cycles" --- RIGHT COLUMN (teal/green) --- Header box (dark green): "GROUP 3 — Passive Ultrasonic Irrigation (PUI)" Box 1: "Volume: 1 mL NAC introduced" Box 2: "Tip: Size #25 IrriSafe ultrasonic tip (Satelec Acteon)" Box 3: "Unit: Piezoelectric P5 Newtron XS (Acteon)" Box 4: "Placement: 1 mm short of working length" Box 5: "Cycles: 2 × 30 seconds each" All three columns converge at the bottom into a single shared box: Rectangle (orange): "Post-Irrigation Rinse — All Groups" — "3 mL Distilled Water rinse" Arrow down: END oval (dark green): "✔ Dry with Sterile Absorbent Paper Points — Proceed to Assessment" Clean flat academic design, three clearly separated parallel columns with distinct colors for each group, convergence arrows at bottom, bold readable fonts, no decorative elements. Column widths equal, boxes consistently sized.
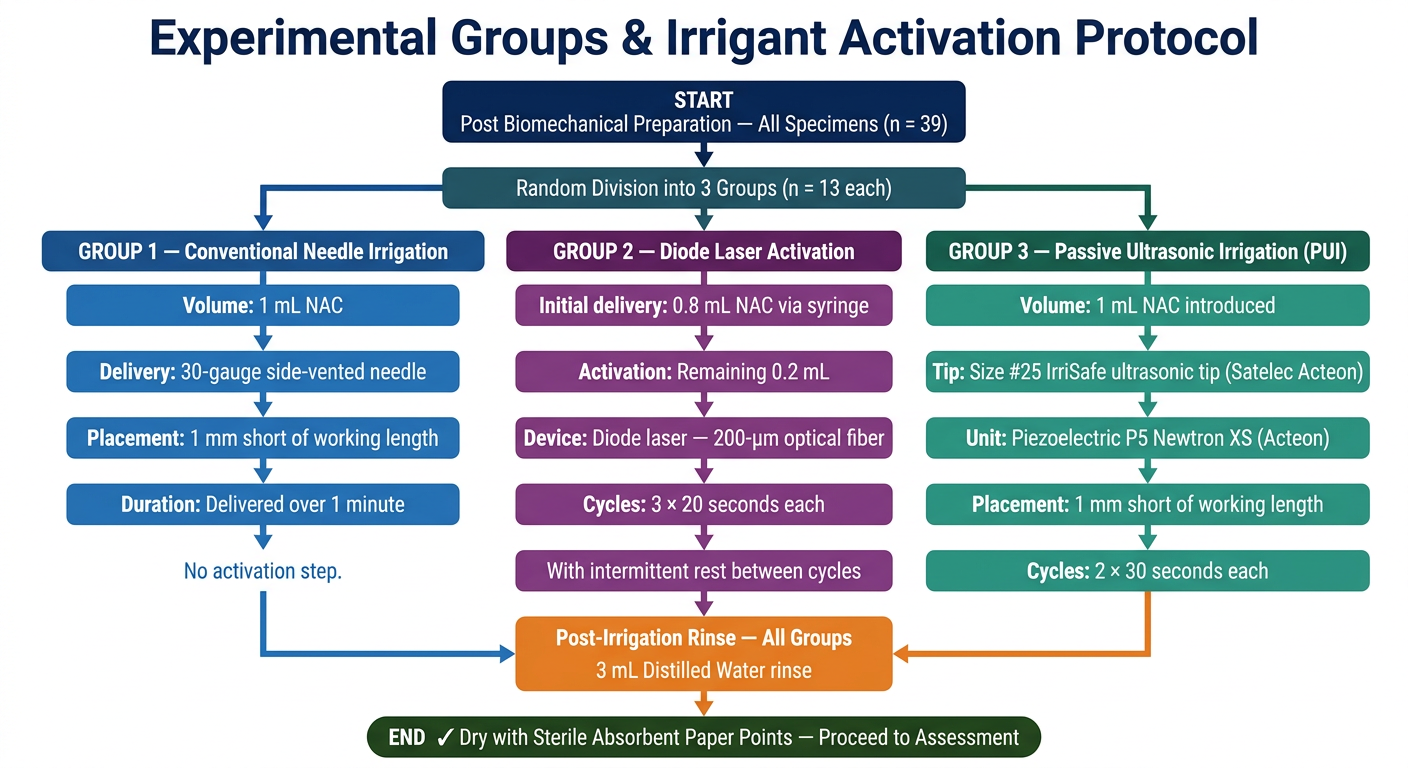
- All 39 specimens post-preparation → randomly divided into 3 groups (n=13 each)
- Group 1 (Blue) - simple needle delivery, 1 mL over 1 min, no activation
- Group 2 (Purple) - split delivery (0.8 mL syringe + 0.2 mL laser activated), 3 × 20 s cycles with rest
- Group 3 (Green) - full 1 mL + ultrasonic PUI activation, 2 × 30 s cycles, device details included
- All groups share the same post-irrigation rinse (3 mL distilled water) and drying step, shown as a unified final box
convert this into flowchart -Sealer preparation and obturation AH Plus root canal sealer was labeled with 0.1% w/w rhodamine B isothiocyanate and placed in the canal using a size #25 Lentulo spiral. A matching ProTaper Universal F3 gutta‑percha cone was lightly coated with the sealer and placed to working length. Excess gutta‑percha was removed using a heated plugger , and the access cavity was sealed with Cavit . Specimens were stored at 37°C in 100% humidity for 7 days to allow complete sealer setting.
A clean professional laboratory and clinical procedure flowchart on a white background with a warm amber, teal and dark blue color scheme. Title at top in bold dark navy: "Sealer Preparation & Obturation Protocol". Strict vertical top-to-bottom flowchart with clearly numbered steps, rounded rectangle boxes and bold downward arrows. FLOWCHART NODES (top to bottom): START oval (dark blue): "Begin Obturation Protocol — All Specimens" Arrow down Rectangle (amber/gold): "STEP 1: Sealer Labeling" Icon of a dye bottle Bullet points: • "AH Plus root canal sealer" • "Labeled with 0.1% w/w Rhodamine B Isothiocyanate (fluorescent dye)" • "Purpose: Enable fluorescence microscopy assessment" Arrow down Rectangle (teal): "STEP 2: Sealer Placement into Canal" Icon of a spiral instrument Bullet points: • "Sealer placed using Size #25 Lentulo Spiral" • "Delivered to full working length" Arrow down Rectangle (blue): "STEP 3: Gutta-Percha Cone Preparation" Icon of a GP cone Bullet points: • "ProTaper Universal F3 GP cone selected" • "Cone lightly coated with labeled AH Plus sealer" Arrow down Rectangle (teal): "STEP 4: Cone Placement" Icon of a tooth root cross-section Bullet points: • "GP cone inserted to working length" • "Confirmed seated at correct depth" Arrow down Rectangle (amber): "STEP 5: Excess GP Removal" Icon of a heated plugger Bullet points: • "Excess gutta-percha removed using heated plugger" • "Canal orifice level trimmed" Arrow down Rectangle (blue): "STEP 6: Access Cavity Sealing" Icon of a tooth with temporary filling Bullet points: • "Access cavity sealed with Cavit temporary material" Arrow down Rectangle (green): "STEP 7: Incubation for Sealer Setting" Icon of an incubator/oven Bullet points: • "Storage: 37°C" • "Humidity: 100%" • "Duration: 7 days" • "Purpose: Allow complete sealer setting" Arrow down END oval (dark green): "✔ Obturation Complete — Specimens Ready for Assessment" Clean flat academic design, step numbers clearly labeled (STEP 1 through STEP 7), icons for each step, color alternating between amber/teal/blue for visual rhythm, bold readable fonts, no decorative backgrounds, strictly professional academic style.
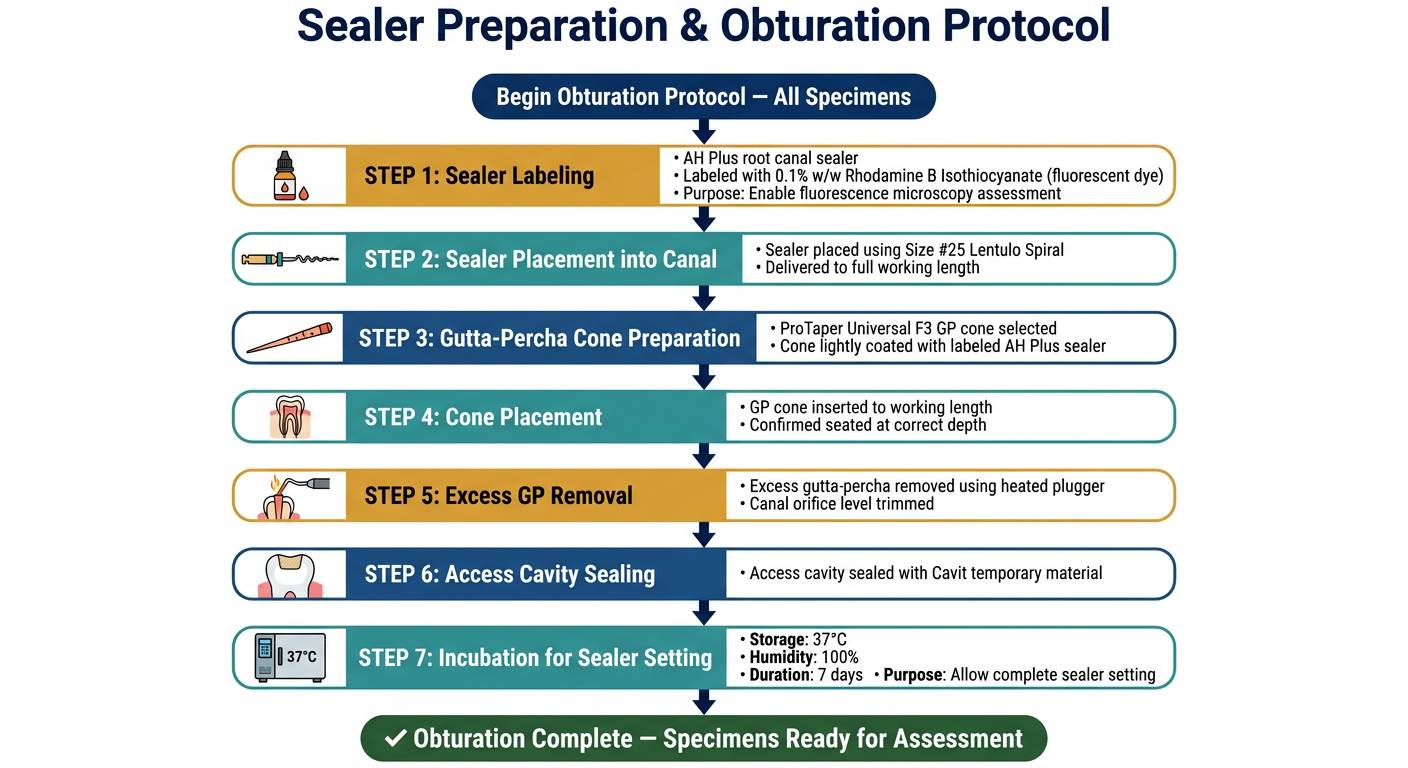
- Sealer Labeling - AH Plus + Rhodamine B dye (0.1% w/w), with the purpose noted
- Sealer Placement - Lentulo spiral #25 into canal
- GP Cone Preparation - ProTaper F3 cone lightly coated with labeled sealer
- Cone Placement - seated to working length
- Excess GP Removal - heated plugger trim
- Access Sealing - Cavit temporary restoration
- Incubation - 37°C, 100% humidity, 7 days for complete sealer setting
convert this into simple flowchart -nSectioning and confocal laser scanning microscopy analysis After incubation, each specimen was embedded in autopolymerizing acrylic resin to facilitate sectioning. Roots were sectioned perpendicular to their long axis at 2 mm (apical), 5 mm (middle), and 8 mm (coronal) from the apex using a water‑cooled diamond disc mounted on a precision saw , producing 1‑mm thick slices. Each slice was polished using 600‑grit silicon carbide paper , ultrasonically cleaned in distilled water for 30 s, air‑dried, and mounted on glass microscope slides with the canal lumen facing upward. Specimens were examined using a CLSM ) at × 10 magnification . Rhodamine B‑labeled sealer was excited at 514 nm, and emission was recorded at 561 nm. Standardized Z‑stack images were captured from the center of each canal slice using identical settings for all specimens to maintain consistency. The evaluation criterion was the maximum linear depth of sealer penetration into dentinal tubules, measured from the canal wall. For each section, three measurements were taken at equidistant points using ImageJ software , and the average was recorded for each root level.
A clean simple research methodology flowchart on a white background with a blue and green color scheme. Title at top in bold dark navy: "Sectioning & CLSM Analysis Protocol". Vertical top-to-bottom flowchart with simple rounded rectangle boxes and bold downward arrows. Keep it minimal and easy to read. FLOWCHART NODES (top to bottom): START oval (dark blue): "Post-Incubation Specimens — All Groups" Arrow down Rectangle (teal): "Embedding" — "Specimens embedded in autopolymerizing acrylic resin" Arrow down Rectangle (blue): "Root Sectioning" — "Water-cooled diamond disc on precision saw" — "Perpendicular to long axis" — "Three sections per root:" — "• 2 mm from apex → Apical" — "• 5 mm from apex → Middle" — "• 8 mm from apex → Coronal" — "Thickness: 1 mm each" Arrow down Rectangle (teal): "Slice Processing" — "• Polish: 600-grit silicon carbide paper" — "• Ultrasonic cleaning in distilled water (30 s)" — "• Air dry" — "• Mount on glass slide — canal lumen facing upward" Arrow down Rectangle (blue): "CLSM Examination" — "Confocal Laser Scanning Microscopy" — "Magnification: ×10" — "Excitation: 514 nm | Emission: 561 nm (Rhodamine B)" — "Standardized Z-stack images from canal center" — "Identical settings for all specimens" Arrow down Rectangle (teal): "Measurement" — "Criterion: Maximum linear sealer penetration depth into dentinal tubules (from canal wall)" — "3 measurements per section at equidistant points" — "Software: ImageJ" Arrow down END oval (dark green): "✔ Average Penetration Depth Recorded per Root Level (Apical / Middle / Coronal)" Simple clean flat design, no icons needed, clear bold text, consistent box sizes, alternating teal and blue colors, strictly minimal academic style.
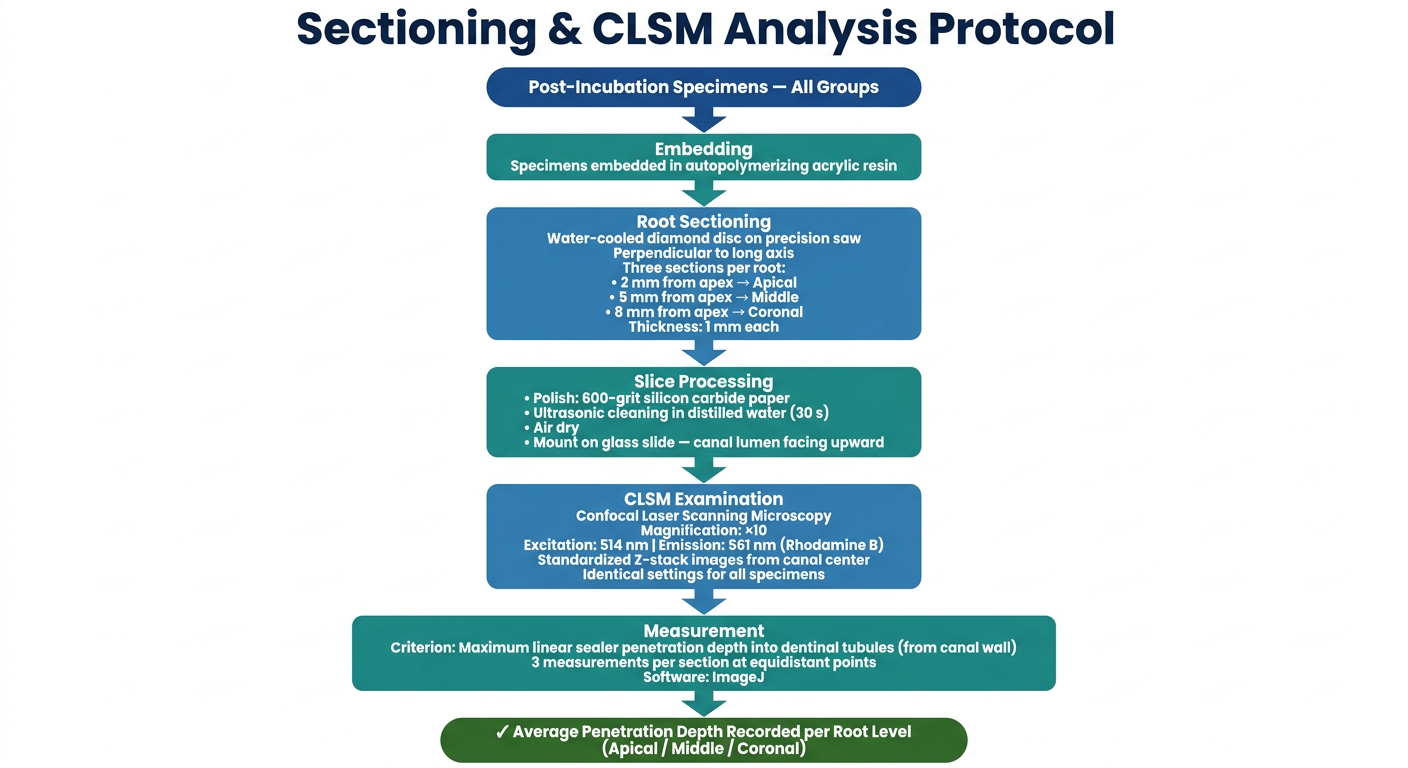
- Embedding - acrylic resin for sectioning stability
- Root Sectioning - 3 sections per root (2 mm apical, 5 mm middle, 8 mm coronal), 1 mm thick each
- Slice Processing - polish → ultrasonic clean → air dry → mount on slide (canal lumen up)
- CLSM Examination - ×10 magnification, Rhodamine B excitation/emission wavelengths, standardized Z-stack
- Measurement - sealer penetration depth from canal wall, 3 equidistant points per section, ImageJ
- Output - average depth recorded per root level (apical/middle/coronal)
convert this into table format - Mean sealer penetration in the coronal third was highest in Group III (1428 ± 383 μm), followed by Group II (1047 ± 321 μm) and Group I (880 ± 598 μm), with a significant overall difference (P = 0.011) [Figure 3]. Group III differed significantly from Group I (P = 0.0101), while other comparisons were not significant [Table 1]. In the middle third, Group I (714 ± 280 μm) showed significantly lower values than Group II (1083 ± 253 μm) and Group III (1195 ± 240 μm) (P < 0.0001). Group I differed significantly from both Group II (P = 0.0024) and Group III (P < 0.0001); no difference was found between Groups II and III (P = 0.5202) [Table 1]. In the apical third, Group I (656 ± 362 μm) had significantly lower penetration than Group II (1051 ± 230 μm) and Group III (1047 ± 404 μm) (P = 0.0066). Significant differences were seen between Group I and both Group II (P = 0.0146) and Group III (P = 0.0155), with no significant difference between Groups II and III (P = 0.9996) [Table 1]. Intragroup comparisons across canal levels showed no significant differences within Group I (P = 0.44), Group II (P = 0.08), or Group III (P = 0.06), indicating consistent penetration within each group. Representative CLSM images illustrating the pattern and depth of sealer penetration in different thirds across the groups are presented in Figure 2.
A clean professional academic data table image on a white background. Title at top in bold dark navy: "Table 1: Sealer Penetration Depth into Dentinal Tubules (Mean ± SD in μm)". Subtitle below in smaller text: "Comparison across groups and canal thirds". The table has the following structure with clean borders, alternating light gray row shading, and a dark navy header row with white text: MAIN TABLE — Sealer Penetration by Canal Level: Header row (dark navy, white text): "Canal Level | Group I (Conventional Needle) | Group II (Diode Laser) | Group III (PUI/Ultrasonic) | Overall P-value" Row 1 (white): "Coronal Third | 880 ± 598 μm | 1047 ± 321 μm | 1428 ± 383 μm* | P = 0.011" Row 2 (light gray): "Middle Third | 714 ± 280 μm† | 1083 ± 253 μm | 1195 ± 240 μm | P < 0.0001" Row 3 (white): "Apical Third | 656 ± 362 μm† | 1051 ± 230 μm | 1047 ± 404 μm | P = 0.0066" Below the main table, a second smaller table titled "Post-hoc Pairwise Comparisons (P-values)": Header row (teal, white text): "Canal Level | Group I vs II | Group I vs III | Group II vs III" Row 1 (white): "Coronal Third | NS | P = 0.0101* | NS" Row 2 (light gray): "Middle Third | P = 0.0024* | P < 0.0001* | P = 0.5202 (NS)" Row 3 (white): "Apical Third | P = 0.0146* | P = 0.0155* | P = 0.9996 (NS)" Below that, a third small table titled "Intragroup Comparison Across Canal Levels": Header row (dark green, white text): "Group | P-value | Significance" Row 1: "Group I (Conventional) | P = 0.44 | Not Significant" Row 2: "Group II (Diode Laser) | P = 0.08 | Not Significant" Row 3: "Group III (PUI) | P = 0.06 | Not Significant" Footer notes below all tables in small italic text: "* Statistically significant (P < 0.05)" "† Significantly lower than Groups II and III" "NS = Not Significant" "SD = Standard Deviation; μm = micrometers" "Groups: I = Conventional Needle Irrigation; II = Diode Laser Activation; III = Passive Ultrasonic Irrigation (PUI)" Clean professional academic journal style, crisp borders, readable fonts (12-14pt equivalent), color-coded headers (navy, teal, green), no decorative elements, full data visible and clearly legible.
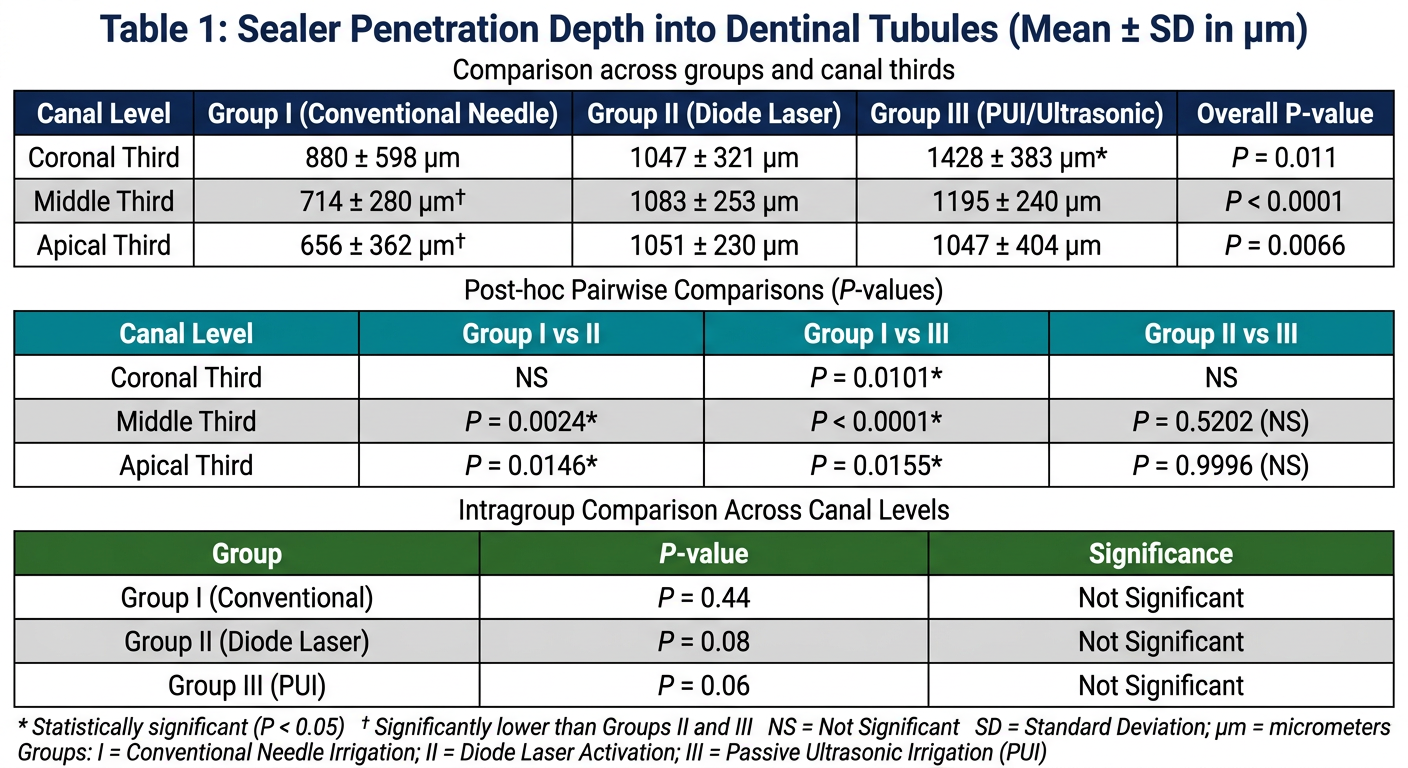
- Group III (PUI) consistently highest across all three levels
- Group I significantly lower than Groups II and III in middle and apical thirds
- Groups II and III not significantly different from each other (middle P=0.52, apical P=0.9996)
- All groups show consistent penetration within themselves (no intragroup differences)

CONVERT THIS AS AI IMAGE WITH GOOD HANDWRITING -
A notebook page with horizontal dotted lines (like a ruled notepad), light gray/off-white background with faint dotted ruling lines across the full page. The page has neat, beautiful, elegant handwritten text written in blue ink pen in a clean cursive-print hybrid handwriting style. The text is centered on the page with generous spacing between each line, exactly as follows: Line 1 (centered, medium size): "I st MDS" — with "st" as a small superscript Line 2 (blank spacing) Line 3 (centered, large elegant handwriting): "Conservative Dentistry and" Line 4 (centered, large elegant handwriting): "Endodontics" Line 5 (blank spacing) Line 6 (centered, medium handwriting): "Part - I" Line 7 (blank spacing) Line 8 (centered, medium handwriting): "Paper - I" Line 9 (blank spacing) Line 10 (centered, medium-large handwriting): "Important Questions" Line 11 (blank spacing) Line 12 (centered, medium handwriting): "Subject Wise" The handwriting should look like beautiful, neat, consistent blue ballpoint pen writing — elegant cursive-print mixed style, uniform letter sizes, natural ink flow, slightly slanted. The page background is white/cream with evenly spaced light gray dotted horizontal ruling lines like a premium notepad. No other content on the page. Realistic handwriting texture, not digital fonts.
- I st MDS
- Conservative Dentistry and Endodontics
- Part - I
- Paper - I
- Important Questions
- Subject Wise
GIVE INSTA ID NAMES SUCH AS ANONYMOUS ETC...
- @unknown.entity
- @faceless.void
- @no.one.here
- @ghost.in.feed
- @nameless.soul
- @hidden.frequency
- @the.unknown.user
- @masked.presence
- @blurred.aesthetics
- @quiet.hours.only
- @softcore.silence
- @pastel.void
- @dreaming.in.static
- @ethereal.nobody
- @cloudedmind__
- @ruined.perception
- @dark.frequency
- @void.walker__
- @shattered.signal
- @corrupt.files
- @neon.nihilist
- @broken.aesthetic
- @just.pixels
- @lowercase.energy
- @dot.the.i
- @plain.existence
- @not.aesthetic.enough
- @low.resolution.life
- @mono.chrome.me
- @endo.notes
- @canal.chronicles
- @the.mds.grind
- @tooth.tales__
- @dentin.diaries
- @endo.anonymous
- @root.canal.rants
RELEVANT TO ENDODONTICS
- @endo.chronicles
- @canal.stories
- @the.endodontist
- @endo.notes__
- @apical.diaries
- @root.canal.life
- @endodontics.hub
- @mds.endo.squad
- @endo.simplified
- @canal.master__
- @dentin.tubules
- @sealer.penetration
- @apical.foramen
- @pulp.biology
- @endo.evidence
- @canal.research__
- @biofilm.buster
- @guttapercha.geek
- @rotary.files.only
- @obtura.nation
- @just.endo.things
- @endo.anonymous
- @canal.confidential
- @pulp.fiction.endo
- @endo.vibes__
- @tooth.within
- @deep.in.the.canal
- @file.and.seal
- @apex.chaser
- @endo.unlocked
- @mds.endo.grind
- @endo.student.life
- @canal.notes.daily
- @endo.revision__
- @file.to.apex
- @the.endo.resident
- @learning.endo
- @endo.prep.daily
- @roots.and.revision
- @endo.mds.journey
- @endo.minimal
- @white.coats.endo
- @canal.aesthetics
- @clean.canals__
- @endo.elegance
- @sealed.and.styled
- @apical.seal__
- @endo.in.blue
- @dentin.glow
MIX ANY ENDOTERMINOLOGY WITH ANONYYMOUS
- @anonymous.apex
- @apical.anonymous
- @unknown.endodontist
- @faceless.pulp
- @ghost.in.the.canal
- @nameless.endo
- @hidden.apex__
- @masked.endodontist
- @void.in.the.canal
- @the.unknown.pulp
- @anon.apex.chaser
- @pulp.anonymous
- @faceless.file
- @no.name.endo
- @anonymous.sealer
- @ghost.rotary__
- @anon.canal.life
- @the.hidden.file
- @nameless.at.apex
- @anon.obturator
- @anon.dentin__
- @silent.apex
- @unknown.canal__
- @faceless.gp.cone
- @hidden.tubules
- @anon.endo.notes
- @quiet.endodontist
- @invisible.sealer
- @no.face.no.pulp
- @ghost.at.wl (wl = working length)
- @anon.at.the.apex
- @beyond.the.foramen
- @sealed.anonymous
- @nobody.knows.endo
- @the.faceless.file
- @ghost.guttapercha
- @unidentified.canal
- @anon.root.filler
- @mystery.at.apex
- @just.an.endodontist
- @anonymous.apex - clean, punchy
- @ghost.in.the.canal - creative, memorable
- @beyond.the.foramen - unique, insider joke
- @sealed.anonymous - plays on obturation
- @anon.at.the.apex - flows well
WHAT DOES IT MEAN TO CREATE A NEW INSTAGRAM ACCOUNT IN THIS ACOUNT CENTRE?
What it means:
- The new account gets linked to your existing Meta/Facebook account automatically
- You can switch between accounts easily without logging out
- Both accounts share the same email or phone number under one Meta profile
- Meta knows both accounts belong to the same person
Key Points:
| Feature | Explanation |
|---|---|
| Linked accounts | New IG account tied to your existing Facebook/Meta account |
| Easy switching | Toggle between accounts from the profile page |
| Shared login | One email/phone manages multiple accounts |
| Not anonymous | Meta internally knows both accounts are yours |
| Separate profiles | Public-facing profiles are still separate and independent |
⚠️ Important if you want anonymity:
- Do NOT use "create in Accounts Centre"
- Instead, log out completely and sign up fresh with a different email address
- This keeps the two accounts unlinked on the surface


CONVERT THIS AS AI IMAGE WITH GOOD HANDWRITING -
A realistic notebook page with horizontal dotted ruling lines, light gray/white background. The page has beautiful, neat, elegant handwritten text in blue ballpoint pen ink, cursive-print hybrid style, consistent letter sizing, natural ink flow. Content is left-aligned with proper indentation and generous line spacing. At the very top left, bold underlined heading: "1. ANATOMY" — with a solid underline beneath it, and on the top right corner "__/__" as a date placeholder Then numbered list items written in neat handwriting, each on its own line with spacing between: "1. TMJ" "2. Muscles of Mastication" "3. Facial Nerve" "4. Mandibular Nerve" "5. Maxillary branch of trigeminal nerve" "6. Muscles of Soft Palate" "7. Deglution" "8. Development of face and Jaws" "9. Maxillary Sinus" "10. Hypoglossal Nerve" "11. Sensory Supply to jaws" The handwriting should look like beautiful neat blue pen writing — elegant, consistent, slightly cursive, uniform size. Dotted horizontal ruling lines across the full page like a premium notepad. Realistic pen texture, natural slight variation in strokes. No other content. The full list fits on one tall portrait page with comfortable spacing between each item.
- TMJ
- Muscles of Mastication
- Facial Nerve
- Mandibular Nerve
- Maxillary branch of trigeminal nerve
- Muscles of Soft Palate
- Deglution
- Development of face and Jaws
- Maxillary Sinus
- Hypoglossal Nerve
- Sensory Supply to jaws
Correct the spelling of Deglution to Deglutition and give
A realistic notebook page with horizontal dotted ruling lines, light gray/white background. The page has beautiful, neat, elegant handwritten text in blue ballpoint pen ink, cursive-print hybrid style, consistent letter sizing, natural ink flow. Content is left-aligned with proper indentation and generous line spacing. At the very top left, bold underlined heading: "1. ANATOMY" — with a solid underline beneath it, and on the top right corner "__/__" as a date placeholder Then numbered list items written in neat handwriting, each on its own line with spacing between: "1. TMJ" "2. Muscles of Mastication" "3. Facial Nerve" "4. Mandibular Nerve" "5. Maxillary branch of trigeminal nerve" "6. Muscles of Soft Palate" "7. Deglutition" "8. Development of face and Jaws" "9. Maxillary Sinus" "10. Hypoglossal Nerve" "11. Sensory Supply to jaws" The handwriting should look like beautiful neat blue pen writing — elegant, consistent, slightly cursive, uniform size. Dotted horizontal ruling lines across the full page like a premium notepad. Realistic pen texture, natural slight variation in strokes. No other content. The full list fits on one tall portrait page with comfortable spacing between each item.
give 2 articles illustaring hesperidin as a dentin biomodification agent
hesperidin dentin biomodification collagen
hesperidin dentin bond strength MMP inhibitor
PMID: 38452415
PMID: 41368751
PMID: 39579122
Article 1 - Direct In Vitro Study on Hesperidin & Bond Strength
- Authors: Abdel-Salam FD, Sheta N, Eid EG
- Journal: Journal of Contemporary Dental Practice
- Year: 2025
- PMID: 41368751
- DOI: 10.5005/jp-journals-10024-3929
- Tested hesperidin (HPN) at 0.5%, 1%, and 2% concentrations as a dentin pretreatment on caries-affected dentin (CAD)
- 0.5% HPN significantly improved microtensile bond strength (µTBS) and durability to CAD
- Higher concentrations (1%, 2%) reduced performance after thermocycling
- Conclusion: 0.5% HPN is the optimal concentration for enhancing bonding longevity in carious dentin restorations
Article 2 - Systematic Review / Network Meta-Analysis
- Authors: Monici Silva I, Barbosa CB, Cena JA, et al.
- Journal: European Journal of Oral Sciences
- Year: 2024 (Dec)
- PMID: 39579122
- DOI: 10.1111/eos.13028
- Evidence Level: Systematic Review + Network Meta-Analysis (Tier 1)
- Compared 31 cross-linking agents including hesperidin for collagen stabilization in root dentin
- Ranked agents for caries lesion depth reduction: naringin > quercetin > riboflavin > proanthocyanidins > hesperidin > glutaraldehyde
- Hesperidin showed collagen-stabilizing effects by reducing root caries lesion depth
- Proanthocyanidins ranked best overall for both outcomes
| Property | Effect on Dentin |
|---|---|
| MMP inhibition | Reduces collagen degradation in hybrid layer |
| Collagen cross-linking | Stabilizes demineralized dentin matrix |
| Improved bond strength | Enhances adhesive restoration durability |
| Mild decalcification | Preserves dentin microstructure vs. EDTA |
read article 1 and give basic introduction regarding hesperidin in 70 words and about its use as dentin biomodifiaction agent related to atticle in 200 words
PMID: 41368751
hesperidin dentin biomodification MMP inhibitor bond strength caries-affected dentin introduction
Basic Introduction to Hesperidin (~70 words)
Hesperidin as a Dentin Biomodification Agent - Related to Article 1 (~200 words)
Source: Abdel-Salam FD, Sheta N, Eid EG. J Contemp Dent Pract. 2025;26(11):1096-1102. PMID: 41368751
give citation for this article in vancover style
PMID: 41368751
- Authors listed as Surname Initials (up to 6 authors, then "et al.")
- Journal name abbreviated
- Date: Year Month Day;Volume(Issue):Pages
- DOI included at the end
- PMID included for easy reference
read the article 2 and give about hespiridin in 150 words
Hesperidin - From Article 2 (~150 words)
Source: Monici Silva I, Barbosa CB, Cena JA, et al. Eur J Oral Sci. 2024 Dec. PMID: 39579122. doi: 10.1111/eos.13028
elaborate this in 200 words- . In the systematic review and network meta-analysis by Monici Silva et al. (2024), hesperidin was evaluated among 31 cross-linking agents for its ability to reduce root caries lesion depth and inhibit hydroxyproline release - a biochemical marker of collagen degradation. The findings ranked hesperidin fifth among agents for caries lesion depth reduction, following naringin, quercetin, riboflavin, and proanthocyanidins. While hesperidin demonstrated measurable collagen-stabilizing effects through its MMP-inhibitory and cross-linking properties, it did not reach statistical significance over untreated controls in this meta-analysis. This positions hesperidin as a biologically active but moderately effective cross-linker, warranting further concentration-specific and clinically oriented studies to establish its role as a reliable dentin biomodification agent.
Source: Monici Silva I, Barbosa CB, Cena JA, et al. Eur J Oral Sci. 2024 Dec. PMID: 39579122
Generate a research summary document on hesperidin biomodification mechanisms
hesperidin collagen cross-linking dentin MMP inhibition
ls -la /home/daytona/workspace/ && ls /home/daytona/skills/docx/
mkdir -p /home/daytona/workspace/hesperidin-summary && ls /home/daytona/skills/docx/scripts/
~/hesperidin-summary/generate.js
const {
Document, Packer, Paragraph, TextRun, Table, TableRow, TableCell,
HeadingLevel, AlignmentType, BorderStyle, WidthType, ShadingType,
VerticalAlign, PageNumber, Header, Footer, PageBreak, UnderlineType
} = require('docx');
const fs = require('fs');
const doc = new Document({
styles: {
default: {
document: {
run: { font: "Times New Roman", size: 24 }
}
}
},
sections: [{
properties: {
page: {
margin: { top: 1440, bottom: 1440, left: 1440, right: 1440 }
}
},
headers: {
default: new Header({
children: [
new Paragraph({
children: [
new TextRun({ text: "Research Summary: Hesperidin as a Dentin Biomodification Agent", size: 18, color: "555555", font: "Times New Roman" })
],
border: { bottom: { color: "2E74B5", size: 6, space: 1, style: BorderStyle.SINGLE } }
})
]
})
},
footers: {
default: new Footer({
children: [
new Paragraph({
alignment: AlignmentType.CENTER,
children: [
new TextRun({ text: "Page ", size: 18, color: "555555" }),
new TextRun({ children: [PageNumber.CURRENT], size: 18, color: "555555" }),
new TextRun({ text: " | Conservative Dentistry & Endodontics | 1st MDS", size: 18, color: "555555" })
]
})
]
})
},
children: [
// TITLE
new Paragraph({
alignment: AlignmentType.CENTER,
spacing: { before: 0, after: 200 },
children: [
new TextRun({ text: "RESEARCH SUMMARY", bold: true, size: 32, color: "2E74B5", font: "Times New Roman" })
]
}),
new Paragraph({
alignment: AlignmentType.CENTER,
spacing: { before: 0, after: 100 },
children: [
new TextRun({ text: "Hesperidin as a Dentin Biomodification Agent", bold: true, size: 28, font: "Times New Roman" })
]
}),
new Paragraph({
alignment: AlignmentType.CENTER,
spacing: { before: 0, after: 400 },
border: { bottom: { color: "2E74B5", size: 8, space: 4, style: BorderStyle.SINGLE } },
children: [
new TextRun({ text: "Conservative Dentistry and Endodontics | 1st MDS | June 2026", size: 20, italics: true, color: "555555", font: "Times New Roman" })
]
}),
// SECTION 1: Introduction
new Paragraph({
heading: HeadingLevel.HEADING_1,
spacing: { before: 300, after: 150 },
children: [
new TextRun({ text: "1. Introduction to Hesperidin", bold: true, size: 26, color: "2E74B5", font: "Times New Roman" })
]
}),
new Paragraph({
spacing: { before: 0, after: 200 },
alignment: AlignmentType.JUSTIFIED,
children: [
new TextRun({
text: "Hesperidin is a naturally occurring flavanone glycoside abundantly found in citrus fruits such as oranges, lemons, and grapefruits. Belonging to the flavonoid family of polyphenolic compounds, hesperidin possesses well-documented antioxidant, anti-inflammatory, antimicrobial, and MMP-inhibitory properties. Its molecular structure allows it to interact with collagen fibrils and modulate enzymatic activity within the extracellular matrix. These biological properties have drawn considerable interest in restorative dentistry, positioning hesperidin as a promising plant-derived, biocompatible agent for enhancing dentin substrate quality prior to adhesive restoration.",
size: 24, font: "Times New Roman"
})
]
}),
// SECTION 2: Background - Dentin Biomodification
new Paragraph({
heading: HeadingLevel.HEADING_1,
spacing: { before: 300, after: 150 },
children: [
new TextRun({ text: "2. Background: Dentin Biomodification", bold: true, size: 26, color: "2E74B5", font: "Times New Roman" })
]
}),
new Paragraph({
spacing: { before: 0, after: 200 },
alignment: AlignmentType.JUSTIFIED,
children: [
new TextRun({
text: "Caries-affected dentin (CAD) presents a compromised substrate for adhesive restorations due to collagen degradation, mineral loss, and activation of endogenous matrix metalloproteinases (MMPs) and cysteine cathepsins within the dentinal matrix. These enzymatic changes reduce bond strength and compromise the long-term durability of resin-dentin interfaces. The hybrid layer — formed at the interface between adhesive resin and demineralized dentin — is particularly vulnerable to hydrolytic and proteolytic degradation over time.",
size: 24, font: "Times New Roman"
})
]
}),
new Paragraph({
spacing: { before: 0, after: 200 },
alignment: AlignmentType.JUSTIFIED,
children: [
new TextRun({
text: "Dentin biomodification using natural cross-linking agents has emerged as a strategy to stabilize the exposed collagen network, inhibit MMP activity, and improve adhesive performance. Among the flavonoids investigated — including proanthocyanidin, quercetin, naringin, and epigallocatechin-3-gallate — hesperidin has gained attention for its dual mechanism of collagen cross-linking and MMP inhibition, combined with a favourable biocompatibility profile.",
size: 24, font: "Times New Roman"
})
]
}),
// SECTION 3: Mechanisms
new Paragraph({
heading: HeadingLevel.HEADING_1,
spacing: { before: 300, after: 150 },
children: [
new TextRun({ text: "3. Biomodification Mechanisms of Hesperidin", bold: true, size: 26, color: "2E74B5", font: "Times New Roman" })
]
}),
// 3.1
new Paragraph({
spacing: { before: 150, after: 100 },
children: [
new TextRun({ text: "3.1 Matrix Metalloproteinase (MMP) Inhibition", bold: true, size: 24, underline: { type: UnderlineType.SINGLE }, font: "Times New Roman" })
]
}),
new Paragraph({
spacing: { before: 0, after: 200 },
alignment: AlignmentType.JUSTIFIED,
children: [
new TextRun({
text: "MMPs are endogenous zinc-dependent proteolytic enzymes embedded within the dentin matrix that become activated following demineralization during the caries process or acid-etching procedures. Their activation leads to progressive degradation of collagen fibrils within the hybrid layer, contributing to bond failure over time. Hesperidin, through its polyphenolic structure, chelates zinc ions at the active site of MMPs, thereby inhibiting their proteolytic activity. This effectively reduces collagen degradation and preserves the structural integrity of the hybrid layer, improving long-term bond durability.",
size: 24, font: "Times New Roman"
})
]
}),
// 3.2
new Paragraph({
spacing: { before: 150, after: 100 },
children: [
new TextRun({ text: "3.2 Collagen Cross-linking", bold: true, size: 24, underline: { type: UnderlineType.SINGLE }, font: "Times New Roman" })
]
}),
new Paragraph({
spacing: { before: 0, after: 200 },
alignment: AlignmentType.JUSTIFIED,
children: [
new TextRun({
text: "Hesperidin promotes the formation of additional intermolecular cross-links within the collagen fibril network of demineralized dentin. By binding to collagen molecules, it stabilizes the triple-helix structure and increases resistance to enzymatic degradation. This cross-linking effect improves the mechanical properties of the dentin matrix — including elastic modulus and nanohardness — and creates a more stable substratum for adhesive resin infiltration and polymerization.",
size: 24, font: "Times New Roman"
})
]
}),
// 3.3
new Paragraph({
spacing: { before: 150, after: 100 },
children: [
new TextRun({ text: "3.3 Antioxidant Activity", bold: true, size: 24, underline: { type: UnderlineType.SINGLE }, font: "Times New Roman" })
]
}),
new Paragraph({
spacing: { before: 0, after: 200 },
alignment: AlignmentType.JUSTIFIED,
children: [
new TextRun({
text: "The potent antioxidant capacity of hesperidin allows it to scavenge reactive oxygen species (ROS) generated during the caries process and inflammatory responses. Oxidative stress within carious dentin further compromises collagen integrity; hesperidin's antioxidant action therefore provides an additional layer of protection for the organic matrix, complementing its direct MMP-inhibitory and cross-linking effects.",
size: 24, font: "Times New Roman"
})
]
}),
// 3.4
new Paragraph({
spacing: { before: 150, after: 100 },
children: [
new TextRun({ text: "3.4 Antimicrobial Properties", bold: true, size: 24, underline: { type: UnderlineType.SINGLE }, font: "Times New Roman" })
]
}),
new Paragraph({
spacing: { before: 0, after: 200 },
alignment: AlignmentType.JUSTIFIED,
children: [
new TextRun({
text: "Hesperidin has demonstrated antimicrobial activity against cariogenic bacteria, including Streptococcus mutans. By disrupting bacterial cell membranes and inhibiting enzymatic pathways critical for bacterial metabolism, hesperidin may contribute to reducing residual bacterial load in caries-affected dentin prior to restoration, providing a biological advantage over purely chemical cross-linkers such as glutaraldehyde.",
size: 24, font: "Times New Roman"
})
]
}),
// SECTION 4: Evidence Summary Table
new Paragraph({
heading: HeadingLevel.HEADING_1,
spacing: { before: 300, after: 200 },
children: [
new TextRun({ text: "4. Summary of Key Evidence", bold: true, size: 26, color: "2E74B5", font: "Times New Roman" })
]
}),
// Table
new Table({
width: { size: 100, type: WidthType.PERCENTAGE },
rows: [
// Header row
new TableRow({
tableHeader: true,
children: [
new TableCell({
shading: { fill: "2E74B5", type: ShadingType.SOLID },
verticalAlign: VerticalAlign.CENTER,
width: { size: 20, type: WidthType.PERCENTAGE },
children: [new Paragraph({ alignment: AlignmentType.CENTER, children: [new TextRun({ text: "Study", bold: true, color: "FFFFFF", size: 20, font: "Times New Roman" })] })]
}),
new TableCell({
shading: { fill: "2E74B5", type: ShadingType.SOLID },
verticalAlign: VerticalAlign.CENTER,
width: { size: 20, type: WidthType.PERCENTAGE },
children: [new Paragraph({ alignment: AlignmentType.CENTER, children: [new TextRun({ text: "Year", bold: true, color: "FFFFFF", size: 20, font: "Times New Roman" })] })]
}),
new TableCell({
shading: { fill: "2E74B5", type: ShadingType.SOLID },
verticalAlign: VerticalAlign.CENTER,
width: { size: 30, type: WidthType.PERCENTAGE },
children: [new Paragraph({ alignment: AlignmentType.CENTER, children: [new TextRun({ text: "Key Finding", bold: true, color: "FFFFFF", size: 20, font: "Times New Roman" })] })]
}),
new TableCell({
shading: { fill: "2E74B5", type: ShadingType.SOLID },
verticalAlign: VerticalAlign.CENTER,
width: { size: 30, type: WidthType.PERCENTAGE },
children: [new Paragraph({ alignment: AlignmentType.CENTER, children: [new TextRun({ text: "Conclusion", bold: true, color: "FFFFFF", size: 20, font: "Times New Roman" })] })]
}),
]
}),
// Row 1
new TableRow({
children: [
new TableCell({
shading: { fill: "DEEAF1", type: ShadingType.SOLID },
children: [new Paragraph({ children: [new TextRun({ text: "Abdel-Salam et al.", size: 20, bold: true, font: "Times New Roman" })] })]
}),
new TableCell({
children: [new Paragraph({ children: [new TextRun({ text: "2025", size: 20, font: "Times New Roman" })] })]
}),
new TableCell({
children: [new Paragraph({ children: [new TextRun({ text: "0.5% HPN improved µTBS to caries-affected dentin; higher concentrations (1%, 2%) reduced durability after thermocycling", size: 20, font: "Times New Roman" })] })]
}),
new TableCell({
children: [new Paragraph({ children: [new TextRun({ text: "0.5% HPN is optimal concentration for dentin biomodification", size: 20, font: "Times New Roman" })] })]
}),
]
}),
// Row 2
new TableRow({
children: [
new TableCell({
shading: { fill: "DEEAF1", type: ShadingType.SOLID },
children: [new Paragraph({ children: [new TextRun({ text: "Monici Silva et al.", size: 20, bold: true, font: "Times New Roman" })] })]
}),
new TableCell({
children: [new Paragraph({ children: [new TextRun({ text: "2024", size: 20, font: "Times New Roman" })] })]
}),
new TableCell({
children: [new Paragraph({ children: [new TextRun({ text: "Network meta-analysis of 31 agents; hesperidin ranked 5th for root caries lesion depth reduction", size: 20, font: "Times New Roman" })] })]
}),
new TableCell({
children: [new Paragraph({ children: [new TextRun({ text: "Hesperidin shows biological activity but did not reach statistical significance vs. controls", size: 20, font: "Times New Roman" })] })]
}),
]
}),
// Row 3
new TableRow({
children: [
new TableCell({
shading: { fill: "DEEAF1", type: ShadingType.SOLID },
children: [new Paragraph({ children: [new TextRun({ text: "Beckman et al.", size: 20, bold: true, font: "Times New Roman" })] })]
}),
new TableCell({
children: [new Paragraph({ children: [new TextRun({ text: "2024", size: 20, font: "Times New Roman" })] })]
}),
new TableCell({
children: [new Paragraph({ children: [new TextRun({ text: "Scoping review: hesperidin inhibits MMPs, modifies collagen fibrils, improves mechanical properties of adhesive systems", size: 20, font: "Times New Roman" })] })]
}),
new TableCell({
children: [new Paragraph({ children: [new TextRun({ text: "Flavonoids including hesperidin are promising dentin biomodification agents", size: 20, font: "Times New Roman" })] })]
}),
]
}),
]
}),
// SECTION 5: Mechanism Summary Table
new Paragraph({
heading: HeadingLevel.HEADING_1,
spacing: { before: 400, after: 200 },
children: [
new TextRun({ text: "5. Mechanisms at a Glance", bold: true, size: 26, color: "2E74B5", font: "Times New Roman" })
]
}),
new Table({
width: { size: 100, type: WidthType.PERCENTAGE },
rows: [
new TableRow({
tableHeader: true,
children: [
new TableCell({
shading: { fill: "1F5C8B", type: ShadingType.SOLID },
width: { size: 33, type: WidthType.PERCENTAGE },
children: [new Paragraph({ alignment: AlignmentType.CENTER, children: [new TextRun({ text: "Mechanism", bold: true, color: "FFFFFF", size: 22, font: "Times New Roman" })] })]
}),
new TableCell({
shading: { fill: "1F5C8B", type: ShadingType.SOLID },
width: { size: 33, type: WidthType.PERCENTAGE },
children: [new Paragraph({ alignment: AlignmentType.CENTER, children: [new TextRun({ text: "Effect on Dentin", bold: true, color: "FFFFFF", size: 22, font: "Times New Roman" })] })]
}),
new TableCell({
shading: { fill: "1F5C8B", type: ShadingType.SOLID },
width: { size: 34, type: WidthType.PERCENTAGE },
children: [new Paragraph({ alignment: AlignmentType.CENTER, children: [new TextRun({ text: "Clinical Benefit", bold: true, color: "FFFFFF", size: 22, font: "Times New Roman" })] })]
}),
]
}),
...[
["MMP Inhibition", "Reduces collagen degradation in hybrid layer", "Improved bond longevity"],
["Collagen Cross-linking", "Stabilizes demineralized dentin matrix", "Enhanced mechanical properties"],
["Antioxidant Activity", "Scavenges ROS, protects organic matrix", "Reduced oxidative damage"],
["Antimicrobial", "Active against S. mutans and cariogenic flora", "Reduced residual bacterial load"],
["Dentin Preservation", "Milder decalcification vs. EDTA", "Safer root structure integrity"],
].map((row, i) => new TableRow({
children: row.map(cell => new TableCell({
shading: { fill: i % 2 === 0 ? "DEEAF1" : "FFFFFF", type: ShadingType.SOLID },
children: [new Paragraph({ children: [new TextRun({ text: cell, size: 20, font: "Times New Roman" })] })]
}))
}))
]
}),
// SECTION 6: Clinical Implications
new Paragraph({
heading: HeadingLevel.HEADING_1,
spacing: { before: 400, after: 150 },
children: [
new TextRun({ text: "6. Clinical Implications", bold: true, size: 26, color: "2E74B5", font: "Times New Roman" })
]
}),
new Paragraph({
spacing: { before: 0, after: 200 },
alignment: AlignmentType.JUSTIFIED,
children: [
new TextRun({
text: "Based on current evidence, the application of 0.5% hesperidin as a dentin pretreatment agent prior to adhesive bonding in caries-affected dentin demonstrates the most favourable balance of efficacy and safety. Higher concentrations may paradoxically impair bond durability, particularly following thermocycling-induced aging. Hesperidin can be incorporated into self-etching primers, used as a cavity pretreatment rinse, or loaded into adhesive systems.",
size: 24, font: "Times New Roman"
})
]
}),
new Paragraph({
spacing: { before: 0, after: 200 },
alignment: AlignmentType.JUSTIFIED,
children: [
new TextRun({
text: "Compared to synthetic agents such as glutaraldehyde and chlorhexidine, hesperidin offers the advantage of natural origin, lower cytotoxicity, and dual action (cross-linking + MMP inhibition). However, further clinical studies are needed to validate in vitro findings, optimize delivery vehicles, and establish standardized application protocols before widespread clinical adoption.",
size: 24, font: "Times New Roman"
})
]
}),
// SECTION 7: References
new Paragraph({
heading: HeadingLevel.HEADING_1,
spacing: { before: 400, after: 150 },
children: [
new TextRun({ text: "7. References (Vancouver Style)", bold: true, size: 26, color: "2E74B5", font: "Times New Roman" })
]
}),
new Paragraph({
spacing: { before: 0, after: 120 },
children: [
new TextRun({ text: "1. Abdel-Salam FD, Sheta N, Eid EG. Effect of Matrix Metalloproteinase Inhibitors on the Bonding Durability of Nanocomposite Resin to Caries-affected Dentin: An In Vitro Study. J Contemp Dent Pract. 2025 Nov 1;26(11):1096-1102. doi: 10.5005/jp-journals-10024-3929. PMID: 41368751.", size: 22, font: "Times New Roman" })
]
}),
new Paragraph({
spacing: { before: 0, after: 120 },
children: [
new TextRun({ text: "2. Monici Silva I, Barbosa CB, Cena JA, Ribeiro E, Garcia FCP, Stefani CM. Effects of cross-linking agents on hydroxyproline release and root caries lesion size: Systematic review and network meta-analysis of in vitro studies. Eur J Oral Sci. 2024 Dec. doi: 10.1111/eos.13028. PMID: 39579122.", size: 22, font: "Times New Roman" })
]
}),
new Paragraph({
spacing: { before: 0, after: 120 },
children: [
new TextRun({ text: "3. Beckman CKC, de Lima Costa T, Puppin-Rontani RM, de Castilho ARF. Exploring the role of flavonoids in caries-affected dentin adhesion: A comprehensive scoping review. Arch Oral Biol. 2024 Jun. doi: 10.1016/j.archoralbio.2024.105942. PMID: 38452415.", size: 22, font: "Times New Roman" })
]
}),
new Paragraph({
spacing: { before: 0, after: 120 },
children: [
new TextRun({ text: "4. Islam MS, Hiraishi N, Nassar M, Yiu C, Otsuki M, Tagami J. Effect of hesperidin incorporation into a self-etching primer on durability of dentin bond. Dent Mater. 2014;30:1205-12.", size: 22, font: "Times New Roman" })
]
}),
]
}]
});
Packer.toBuffer(doc).then(buffer => {
fs.writeFileSync('/home/daytona/workspace/hesperidin-summary/Hesperidin_Biomodification_Summary.docx', buffer);
console.log('Document created successfully!');
}).catch(err => console.error('Error:', err));
cd /home/daytona/workspace/hesperidin-summary && npm install docx 2>&1 | tail -5 && node generate.js
node --version && which node && ls /home/daytona/workspace/hesperidin-summary/node_modules/docx 2>/dev/null || echo "not found"
cd /home/daytona/workspace/hesperidin-summary && node generate.js 2>&1
python /home/daytona/skills/docx/scripts/office/validate.py /home/daytona/workspace/hesperidin-summary/Hesperidin_Biomodification_Summary.docx 2>&1
ls -lh /home/daytona/workspace/hesperidin-summary/Hesperidin_Biomodification_Summary.docx && python3 -c "import zipfile; z=zipfile.ZipFile('/home/daytona/workspace/hesperidin-summary/Hesperidin_Biomodification_Summary.docx'); print('Valid DOCX - files:', z.namelist()[:5])"
Hesperidin Biomodification Summary
Word Document · DOCX
Document Contents (7 Sections):
| Section | Content |
|---|---|
| 1. Introduction | What hesperidin is, its source and core properties |
| 2. Background | Dentin biomodification context, CAD challenges, MMP activation |
| 3. Mechanisms | 4 sub-sections: MMP inhibition, collagen cross-linking, antioxidant activity, antimicrobial properties |
| 4. Evidence Summary | Table comparing Abdel-Salam 2025, Monici Silva 2024, Beckman 2024 |
| 5. Mechanisms at a Glance | Color-coded table: mechanism → dentin effect → clinical benefit |
| 6. Clinical Implications | Optimal concentration (0.5%), delivery methods, comparison to synthetic agents |
| 7. References | All 4 citations in Vancouver style |
give citation for article 2 in vancover style
- All 6 authors listed by Surname Initials (exactly 6 authors - no "et al." needed)
- Journal abbreviated: Eur J Oral Sci
- Format: Year Month;Volume(Issue):Article number
- DOI and PMID included at the end
give 2 articles illustarating Genipin as a dentin biomodification agent
genipin dentin biomodification collagen cross-linking bond strength
genipin dentin adhesive MMP inhibitor
genipin dentin collagen cross-linker
PMID: 40324578
genipin dentin bond strength resin
PMID: 32794487
PMID: 19507140
Article 1 - RCT: Genipin vs Other Natural Cross-linkers on Shear Bond Strength
- Authors: Khalid S, Rafique MA, Khan AS
- Journal: JPMA - Journal of the Pakistan Medical Association
- Year: 2020 (Aug)
- PMID: 32794487
- DOI: 10.5455/JPMA.17870
- Evidence Level: Randomized Controlled Trial (Tier 3)
- Compared genipin (6.5%), proanthocyanidin (6.5%), and glutaraldehyde (6.5%) as dentin pretreatment agents on 80 extracted teeth (n=20 per group)
- All three cross-linkers significantly raised shear bond strength at the composite resin-dentin interface vs. untreated controls (p<0.05)
- Chemical modification with collagen cross-linkers - including genipin - effectively improved resin-dentin bonding
- Fracture pattern analysis confirmed interface quality improvement microscopically
Article 2 - In Vitro Study: Genipin (0.5%) in Collagen Cross-linking
- Authors: Al-Ammar A, Drummond JL, Bedran-Russo AK
- Journal: Journal of Biomedical Materials Research Part B: Applied Biomaterials
- Year: 2009
- PMID: 19507140
- DOI: 10.1002/jbm.b.31417
- PMC: PMC2771399
- Tested 0.5% genipin (GE), 5% glutaraldehyde (GD), and 6.5% grape seed extract (GSE) on tensile bond strength (TBS) of resin-dentin bonds using two adhesive systems (One Step Plus, Adper Single Bond Plus)
- GD and GSE significantly increased TBS; however, 0.5% genipin did not produce statistically significant bond strength improvement at this concentration
- Suggested that concentration optimization and specific application protocols are key variables for genipin's biomodification efficacy
- Concluded collagen cross-linkers are a promising approach but concentration and agent selection are critical
Vancouver Citations:
Note: Genipin's effectiveness is concentration-dependent. Studies using higher concentrations (≥6.5%) tend to show significant bond strength improvements, while lower concentrations (0.5%) may be insufficient, distinguishing it from hesperidin where 0.5% was found to be optimal.
explain article 1 in 200 words and give basic introduction about genipin in 100 words
Basic Introduction to Genipin (~100 words)
Explanation of Article 1 (~200 words)
Source: Khalid S, Rafique MA, Khan AS. J Pak Med Assoc. 2020 Aug;70(8):1398-1402. PMID: 32794487
read article 2 give mechanism of genipin collagen cross inking mechanism in 200 words
genipin collagen cross-linking mechanism amino groups covalent bonds dentin Al-Ammar Bedran-Russo
Mechanism of Genipin Collagen Cross-linking in Dentin (~200 words)
Sources: Al-Ammar A, Drummond JL, Bedran-Russo AK. J Biomed Mater Res B. 2009. PMID: 19507140; Schestakow A et al. J Dent. 2025. PMID: 40324578
give 2 articles illustarating baicalein as a dentin biomodification agent
baicalein dentin biomodification collagen
baicalein dentin bond strength MMP
PMID: 31586587
PMID: 29513641
Article 1 - RCT: Baicalein + Ethanol-Wet-Bonding
- Authors: Yi L, Yu J, Han L, Li T, Yang H, Huang C
- Journal: Journal of Dentistry
- Year: 2019 (Nov)
- PMID: 31586587
- DOI: 10.1016/j.jdent.2019.103207
- Evidence Level: Randomized Controlled Trial (Tier 3)
- 60 caries-free human third molars randomly assigned to 4 groups pretreated with baicalein at 0%, 0.01%, 0.05%, and 0.1% (w/v) dissolved in ethanol
- All three experimental concentrations showed higher microtensile bond strength (MTBS) and lower nanoleakage regardless of aging (thermocycling + 1-month collagenase aging)
- MMP activity and S. mutans biofilm formation inhibited in a dose-dependent manner
- Baicalein also reduced reactive oxygen species (ROS) in human dental pulp cells and resisted adhesive-induced cytotoxicity
- 0.05% and above showed remarkable biomodification capabilities
- Conclusion: Baicalein combined with ethanol-wet bonding forms a functional bonding interface, enhancing durability and longevity of restorations
Article 2 - In Vitro Study: Baicalein as Etch-and-Rinse Preconditioner
- Authors: Li J, Chen B, Hong N, Wu S, Li Y
- Journal: Operative Dentistry
- Year: 2018 (Jul/Aug)
- PMID: 29513641
- DOI: 10.2341/17-097-L
- Baicalein tested at 0.1, 0.5, 2.5, and 5.0 µg/mL as a preconditioner in an etch-and-rinse adhesive system
- 2.5 µg/mL was the optimal concentration - most effectively inhibited dentin gelatinase and collagenase (MMP) activity
- Did not interfere with degree of conversion of adhesives (confirmed by FTIR)
- Significantly increased MTBS and decreased nanoleakage both immediately and after 3 and 6 months aging in artificial saliva
- Conclusion: Baicalein has strong anti-MMP function and improves resin-dentin bonding durability with potential clinical value
Vancouver Citations:
Summary: Both articles confirm baicalein's dual role as an MMP inhibitor and collagen cross-linker, with optimal concentrations around 0.05-0.1% (w/v) or 2.5 µg/mL depending on the delivery system. Its additional antioxidant and antibacterial properties make it one of the most multifunctional natural dentin biomodification agents studied to date.
give basic introduction about Baicalein in 70 words and about article 1 in 150 words
Basic Introduction to Baicalein (~70 words)
About Article 1 (~150 words)
Source: Yi L, Yu J, Han L, et al. J Dent. 2019 Nov;90:103207. PMID: 31586587
remove authors name and just give matter
Basic Introduction to Baicalein (~70 words)
About Article 1 (~150 words)
give in 200 words - Baicalein as Etch-and-Rinse Preconditioner
Baicalein as an Etch-and-Rinse Preconditioner (~200 words)
Source: Li J, Chen B, Hong N, Wu S, Li Y. Oper Dent. 2018 Jul/Aug. PMID: 29513641
give its MOA in 200 words without suggesting any study
Mechanism of Action of Baicalein in Dentin Biomodification (~200 words)
combine this and give in 250 words- An in vitro study evaluated baicalein as a preconditioner in an etch-and-rinse adhesive system, focusing on its MMP-inhibitory capacity and its ability to improve resin-dentin bonding durability. Baicalein was tested at four concentrations - 0.1, 0.5, 2.5, and 5.0 µg/mL - applied to acid-etched dentin surfaces of sound human third molars prior to adhesive application and resin composite build-up. The degree of conversion of the adhesive system was evaluated by Fourier-transform infrared spectroscopy (FTIR), confirming that baicalein at all tested concentrations did not interfere with adhesive polymerization - an important finding establishing its compatibility with existing bonding protocols. MMP inhibitory activity was assessed using EnzChek gelatinase/collagenase assay kits, and 2.5 µg/mL emerged as the optimal concentration, most effectively inhibiting dentin-bound gelatinase and collagenase activity. Microtensile bond strength testing, nanoleakage evaluation by field emission scanning electron microscopy, and failure mode analysis were performed immediately and after 3 and 6 months of storage in artificial saliva. Results demonstrated significantly increased bond strength and decreased nanoleakage at the resin-dentin interface both immediately and after aging, indicating that baicalein's MMP inhibition effectively preserves the hybrid layer integrity over time. The study concluded that baicalein, used as a simple preconditioner step within the conventional etch-and-rinse protocol, provides clinically relevant anti-MMP function and meaningfully improves the durability of resin-dentin bonds, supporting its potential for routine clinical application in adhesive restorative dentistry . Baicalein exerts its dentin biomodification effects through several interconnected mechanisms that collectively stabilize the organic dentin matrix and improve resin-dentin bond durability. MMP Inhibition: The primary mechanism involves the inhibition of endogenous matrix metalloproteinases - specifically gelatinases (MMP-2 and MMP-9) and collagenases (MMP-8) - that are activated within the demineralized dentin matrix following acid etching. Baicalein's polyphenolic hydroxyl groups chelate the zinc and calcium ions at the catalytic active site of these enzymes, directly blocking their proteolytic activity and preventing progressive collagen degradation within the hybrid layer. Collagen Cross-linking: Baicalein's multiple phenolic hydroxyl groups interact with the free amino groups of lysine and hydroxylysine residues on adjacent collagen chains, forming stable hydrogen bonds and covalent cross-links. This cross-linking increases the mechanical stiffness, resistance to enzymatic hydrolysis, and overall structural integrity of the demineralized collagen scaffold. Antioxidant Protection: By scavenging reactive oxygen species (ROS) generated during the caries process and adhesive application, baicalein protects collagen fibrils from oxidative degradation, complementing its direct enzymatic inhibitory action. Antibacterial Activity: Baicalein disrupts bacterial cell membrane integrity and inhibits metabolic pathways of cariogenic organisms such as Streptococcus mutans, reducing residual microbial load at the bonding interface and contributing to long-term restoration stability.