
Gv black class 5 caries
GV Black class V caries cervical cavity preparation
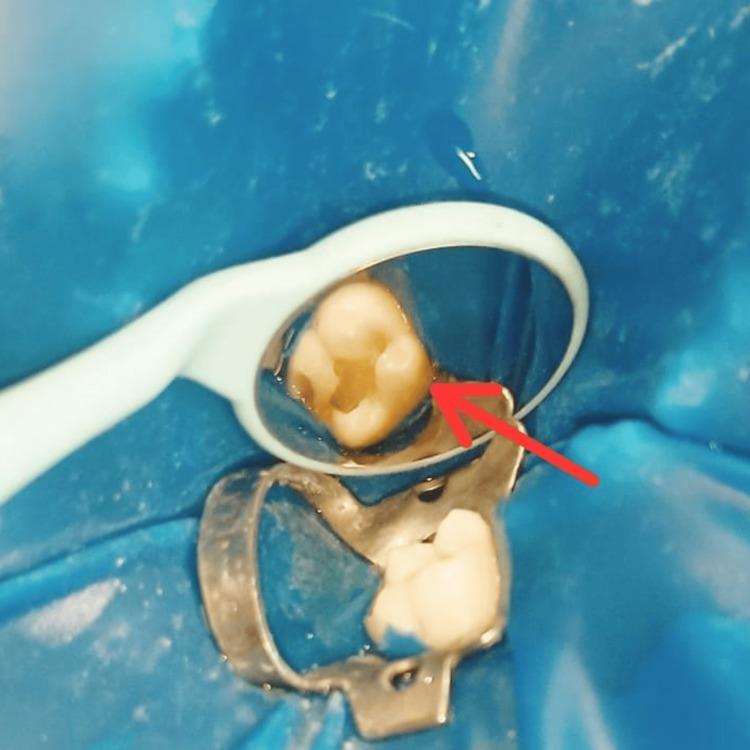
This intraoral clinical photograph demonstrates the procedural stages of operative dentistry, specifically caries excavation and cavity preparation on a mandibular molar. The field is isolated using a blue rubber dam secured with a metal clamp at the cervical margin of the tooth to ensure moisture control and a sterile working environment. In the upper portion of the frame, a dental mirror provides a reflective view of the occlusal surface, where a Class I cavity preparation is visible. A red arrow points to the prepared cavity, which shows well-defined margins and a clean pulpal floor following the removal of decayed tissue. The exposed dentin within the preparation exhibits a slightly darker hue compared to the surrounding peripheral enamel. This image serves as an educational example of standard protocols for conservative dental restoration, highlighting proper isolation and the morphological characteristics of a prepared tooth prior to composite resin application.
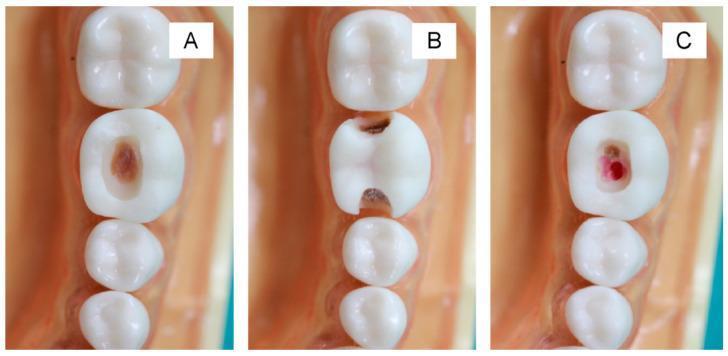
An intraoral clinical photograph set illustrating 3D-printed molar teeth used for dental education on Selective Caries Removal (SCR) techniques. The images demonstrate different cavity preparation outcomes on a permanent left first molar. Image A shows a Black's Class I occlusal cavity with a dark brown material at the base, representing simulated residual caries intentionally left over the pulp to prevent exposure. Image B depicts a Black's Class II proximal-occlusal cavity preparation involving the mesial or distal marginal ridge. Image C shows an over-prepared Class I cavity where red material is visible at the floor, simulating an iatrogenic pulp exposure due to excessive preparation depth. The models are mounted in a realistic pink gingival base. These visual aids are used in operative dentistry to teach students how to manage deep carious lesions by maintaining sound peripheral margins while preserving pulp vitality through conservative caries excavation.
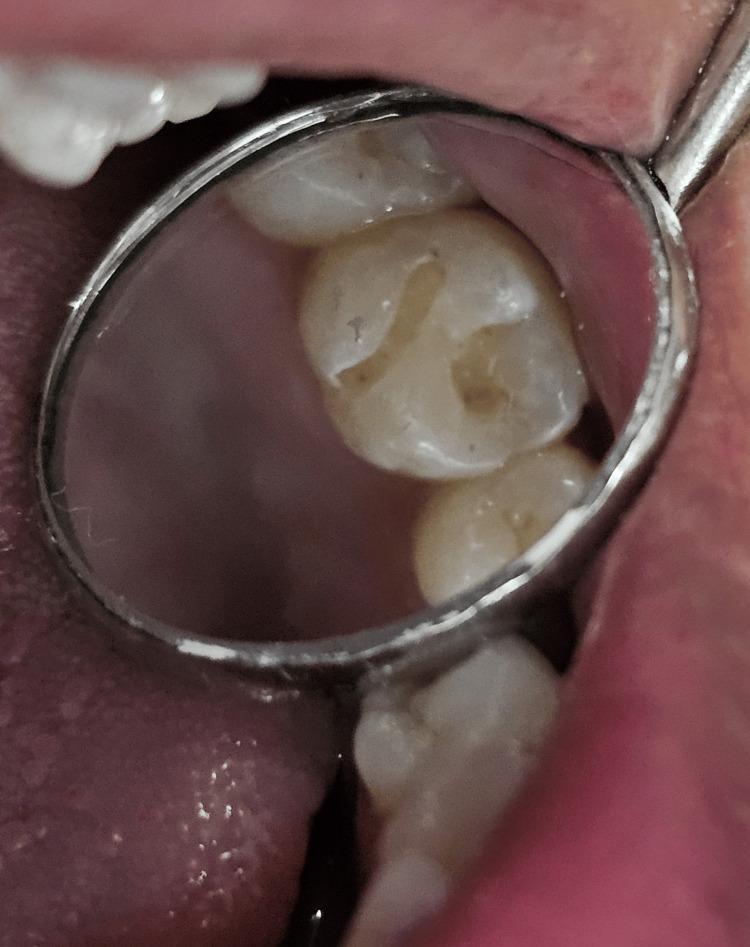
This clinical intraoral photograph, captured via a dental mirror, shows a Class I cavity preparation on the occlusal surface of tooth 26 (maxillary left first molar). The cavity preparation is centrally located and follows the anatomy of the pits and fissures, displaying an irregular morphology characteristic of conservative caries excavation. The internal walls of the preparation appear smooth and well-defined, with the pulpal floor exhibiting a darker, matte yellowish-brown appearance compared to the surrounding translucent white enamel, indicating exposed dentin. The marginal ridges remain intact, preserving the structural integrity of the tooth. The image serves as an educational example of operative dentistry, specifically the initial stages of a restorative procedure for occlusal caries before the application of bonding agents or composite resin. Surrounding soft tissues, including the buccal mucosa, are visible in the periphery.
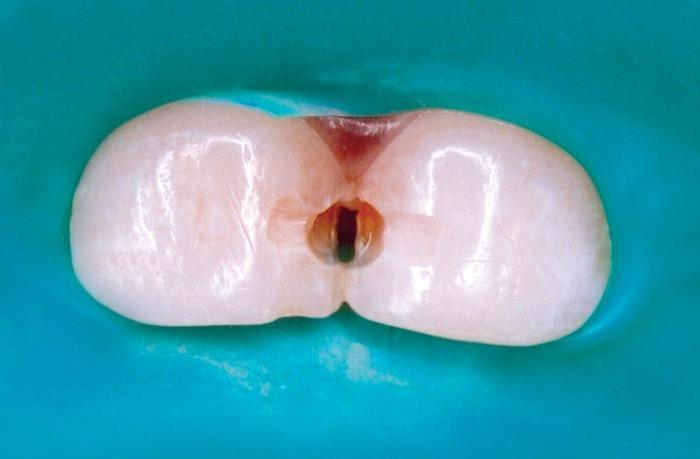
An intraoral clinical photograph displaying a Class III cavity preparation involving the proximal surfaces of the maxillary central primary incisors (teeth 51 and 61). The teeth are isolated using a teal-colored rubber dam to ensure a dry operative field. The central focus is a prepared interproximal cavity at the mesial interface of both teeth. The preparation reveals a deep, rounded void with internal walls showing varied coloration: a dark brown-to-black central area suggestive of remaining carious tissue or stained dentin, and a reddish-pink hue near the gingival aspect possibly indicating proximity to the pulp chamber or gingival tissue. The enamel of the primary teeth appears glossy, translucent, and creamy-white, providing a sharp contrast against the matte rubber dam. This image illustrates pediatric restorative dentistry techniques, specifically the management of proximal caries in primary dentition through operative preparation.
GV Black class 5 caries cavity preparation features restoration
https://semmelweis.hu/konzervalo-fogaszat/files/2021/03/Blac…
GV Black Class V Caries
Definition
Location
- Cervical/gingival third of any tooth
- Facial (buccal/labial) surface - more common
- Lingual (palatal) surface - less common
- Affects incisors, canines, premolars, and molars
Etiology (Causes)
| Type | Cause |
|---|---|
| Carious (true GV Black) | Bacterial plaque accumulation at the gingival margin - poor plaque control, inadequate brushing at cervical area |
| Non-carious cervical lesions (NCCL) | Abrasion (toothbrush), erosion (acid), abfraction (occlusal stress) |
| Root surface caries | Gingival recession exposing cementum/dentin - common in elderly and periodontal patients |
Cavity Characteristics
- Shape: Crescent or kidney-shaped, following the gingival contour
- Walls: Occlusal/incisal wall, gingival wall, mesial wall, distal wall, axial wall
- Margins:
- Occlusal/incisal margin - in enamel
- Gingival margin - may be at or below the CEJ (cementoenamel junction)
- Depth: Uniform axial depth following the convexity of the surface
Cavity Preparation Features
- Crescent/semicircular shape following gingival contour
- Extend mesially and distally to include all caries
- Extend 0.5 mm below the CEJ if caries involves root surface
- Retention grooves placed in the axio-occlusal and axio-gingival line angles
- Depth of retention boxes: 0.75 - 1.25 mm
- For composite: micromechanical retention via acid etching and bonding
- For glass ionomer: chemical bonding to tooth structure
- Axial wall follows convexity of the surface
- Flat pulpal floor concept does NOT apply here (axial wall, not pulpal)
- Walls should be smooth and well-defined
- Approximately 0.75 mm into dentin (axial depth)
- Avoid injury to the pulp (close proximity in anterior teeth) and gingival tissues
Restorative Materials (in order of preference)
| Material | Indication | Notes |
|---|---|---|
| Composite resin | Anterior and posterior, esthetic areas | Requires dry field, acid etch + bonding |
| Resin-Modified Glass Ionomer (RMGI) | Gingival wall in dentin, subgingival, root caries | Self-adhesive, hydrophilic, fluoride releasing - excellent for Class V |
| Glass Ionomer Cement (GIC) | Root caries, primary teeth, dry-field challenging | Chemical bond, fluoride release |
| Amalgam | Posterior, non-aesthetic areas (now rarely used) | Requires mechanical retention grooves |
| Sandwich technique | Deep lesions with gingival wall in dentin | RMGI base + composite on top |
Clinical Tips
- Field isolation is critical - rubber dam or cotton rolls; gingival retraction may be needed for subgingival margins
- Use a round or pear-shaped diamond bur (high speed) or round bur (slow speed) for preparation
- Check the EDJ (enamel-dentin junction) with a probe - should feel hard; affected dentin on the axial wall (not infected) can be left if near pulp
- Avoid iatrogenic damage to the gingiva
- After RMGI placement: apply dentin conditioner for 10 sec, rinse and gently dry (do NOT desiccate)
Stevenson Classification of Class V Lesions (modern supplement)
| Type | Description | Primary Retention |
|---|---|---|
| Type EE | Both margins in enamel (true GV Black) | Enamel bonding |
| Type ED | Occlusal margin in enamel, gingival margin in dentin | RMGI liner + composite |
| Root caries | Gingival margin on root surface | GI/RMGI restoration |
Differential from Other Classes
| Class | Location |
|---|---|
| I | Pit and fissure - occlusal, buccal/lingual pits |
| II | Proximal - posterior teeth |
| III | Proximal - anterior teeth (no incisal angle) |
| IV | Proximal - anterior teeth (with incisal angle) |
| V | Gingival third - facial/lingual of ALL teeth |
| VI | Cusp tips (added by Simon, 1956) |
Patient complaints and signs seen by dentist
GV Black class V caries patient symptoms complaints clinical signs dentist examination
class V caries clinical appearance cervical lesion tooth
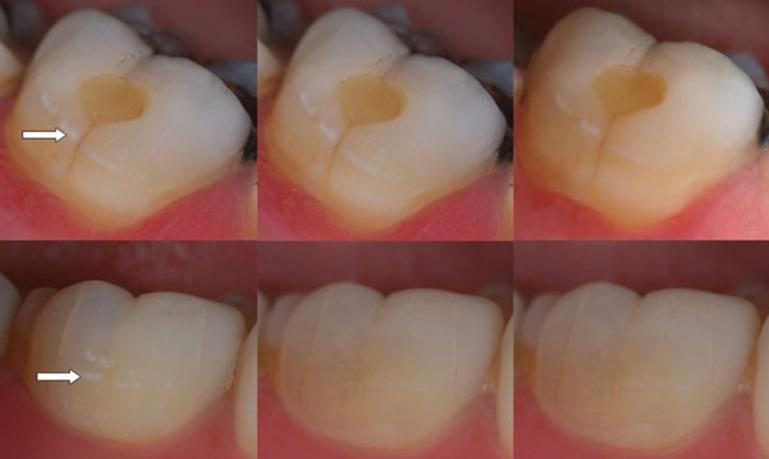
This clinical photographic series displays a temporal progression of Class V dental caries lesions in two different subjects (top and bottom rows) following a single application of P11-4 self-assembling peptide. The images are organized into three time points: baseline (D0), 30-day follow-up (D30), and 180-day follow-up (D180). In the top row (a-c), the baseline image shows a distinct yellowish-brown, oval-shaped carious lesion on the cervical third of the tooth. Over 180 days, the lesion demonstrates a reduction in color intensity and a softening of the margins. In the bottom row (d-f), the baseline lesion (indicated by an arrow) presents as multiple white-spot lesions indicative of early enamel demineralization. By D180, these white spots appear less opaque and more integrated with the surrounding healthy enamel. The sequence illustrates the clinical use of biomimetic mineralization scaffolds to manage early caries, with the primary educational focus being the visual reduction in lesion size and opacity as markers of potential remineralization or stabilization over a six-month period.
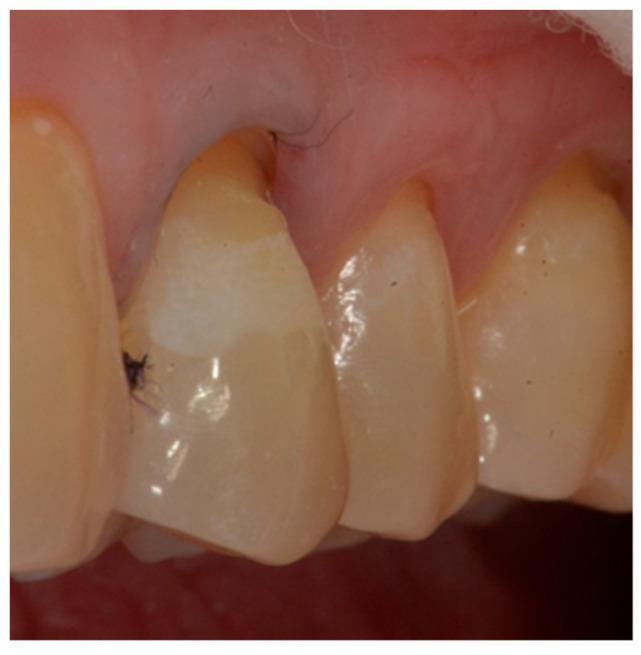
This clinical intraoral photograph demonstrates a Non-Carious Cervical Lesion (NCCL) following the enamel-dentin etching process. The primary focus is on a premolar tooth exhibiting a wedge-shaped cervical defect. Post-etching with phosphoric acid, the cervical enamel displays a characteristic 'frosty' or chalky white, opaque appearance, indicating the creation of microporosities and a change in the refractive index for optimized bonding. The gingival margin shows moderate recession and slight inflammation, with blunted interdental papillae. Small dark spots at the coronal margin of the NCCL may represent dental caries or minor debris. A retraction cord or thin foreign fibers are visible in the gingival sulcus area, typically used to manage moisture and provide better access to the cervical margin during restorative dental procedures. The image serves as an educational example of substrate preparation in adhesive dentistry for managing NCCLs and gingival recession.
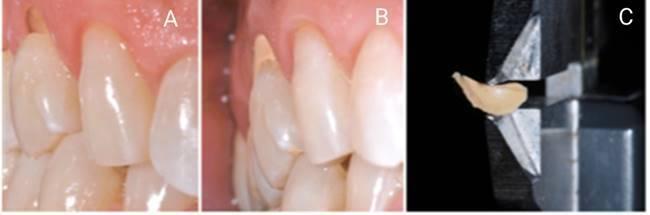
This composite dental image illustrates the identification and quantification of Non-Carious Cervical Lesions (NCCLs). Panel A shows an intraoral clinical photograph of maxillary teeth with visible wear at the cervical margin, appearing as V-shaped or saucer-shaped defects at the cementoenamel junction. Panel B demonstrates the clinical application of an addition silicone (polyvinyl siloxane) molding material into the cervical lesion to create a physical cast of the lost tooth structure. Panel C displays the resulting polymerized elastomeric cast being measured with a digital caliper to determine the precise depth of the lesion. This process is used in restorative dentistry to categorize NCCL severity, assess remaining dentin thickness (RDT), and plan appropriate interventions for tooth wear or hypersensitivity. The educational focus is on the diagnostic methodology for measuring hard tissue loss in the absence of dental caries.
Patient Complaints (Subjective)
1. Sensitivity / Pain
- Cold sensitivity - the most common complaint; sharp, brief pain on contact with cold water/air
- Sweet/sour stimulus sensitivity - sugar or acidic foods trigger sharp pain
- Thermal sensitivity (heat) - less common in early stages; more pronounced as caries deepens
- Duration of pain matters:
- Short, lasting seconds = reversible pulpitis (early/moderate caries with dentin involvement)
- Pain lasting minutes to hours, or spontaneous pain = irreversible pulpitis (deep caries near/involving pulp) - Tintinalli's Emergency Medicine
2. Localized Pain / Toothache
- Aching or sharp pain near the gum line of a specific tooth
- Pain may worsen when brushing near the cervical area
3. Sensitivity to Toothbrush / Touch
- Discomfort during brushing at the gum line - patients often avoid brushing that area, worsening plaque accumulation
4. Cosmetic / Aesthetic Concern
- Noticeable dark spot, brown/black discoloration or a "hole" at the base of the tooth
- More distressing on anterior teeth
5. "Notch" or Rough Feeling
- Patient may feel a rough or notched area at the cervical region with their tongue
6. Asymptomatic (early lesions)
- Early Class V white spot/incipient lesions are often painless - discovered incidentally on examination
Clinical Signs (Objective - Seen by the Dentist)
Visual Examination
| Finding | Significance |
|---|---|
| White spot lesion | Earliest sign - demineralization of enamel (opaque, chalky white area) |
| Yellowish-brown discoloration | Active/progressing caries at the cervical third |
| Brown-black cavitation | Frank cavity at the gingival margin |
| Crescent/kidney-shaped defect | Characteristic shape following the gingival contour |
| Location on gingival third | Facial or lingual surface of any tooth |
Tactile (Probe) Examination
| Finding | Significance |
|---|---|
| Soft, sticky feel on probing | Active caries - infected demineralized dentin |
| Rough, leathery dentin | Affected but not infected dentin (may be left if near pulp) |
| Hard EDJ on probing | Sound margins - caries confined to prepared area |
| Cavitation with probe catch | Confirms cavitated lesion requiring restoration |
Radiographic Examination
- Radiolucency at the cervical region on periapical X-rays
- Note: Class V lesions on the facial/lingual surface can be difficult to detect radiographically - clinical exam is primary
- Root surface caries may be visible as radiolucency below the CEJ
Additional Clinical Observations
- Gingival inflammation / bleeding on probing adjacent to the lesion - due to plaque accumulation in the cervical area
- Gingival recession - may expose root surface, predisposing to root caries
- Plaque/calculus accumulation at the gingival margin
- Pain on percussion - if the lesion has progressed to pulpal involvement (periradicular pathology)
Progression of Symptoms by Depth of Caries
| Stage | Depth | Patient Complaint | Clinical Sign |
|---|---|---|---|
| Incipient | Enamel only | None (asymptomatic) | White spot lesion |
| Superficial | Enamel - early dentin | Mild cold/sweet sensitivity | Slight discoloration, soft enamel |
| Moderate | Dentin | Cold/sweet pain, brief (reversible pulpitis) | Visible cavity, soft dentin on probing |
| Deep | Near pulp | Prolonged pain to stimuli | Deep cavity, possible pulpal exposure |
| Pulpal | Pulp involved | Spontaneous, throbbing pain (irreversible pulpitis) | Deep cavity, draining sinus may be present |
Diagnosis Summary
- Visual + tactile inspection using a blunt dental probe - primary method
- Dental radiographic examination - supplementary
- Based on Scott-Brown's Otorhinolaryngology: "detection and evaluation of the severity of the lesion through clinical examination (predominantly visual and tactile inspection using blunt dental probes) coupled with dental radiographic examination"
Patient complaints and signs seen by dentist in class 5
Patient Complaints (What the Patient Reports)
Pain / Sensitivity
- Cold sensitivity - sharp, brief pain on cold water, cold air, or ice cream - most common complaint
- Sweet/sour sensitivity - pain triggered by sugary or acidic foods/drinks
- Heat sensitivity - less common; appears as caries deepens
- Spontaneous/throbbing pain - only if pulp is involved (deep/advanced caries)
Duration of pain helps stage the disease:
| Duration | Diagnosis |
|---|---|
| Pain for seconds, stops quickly | Reversible pulpitis (dentin caries) |
| Pain for minutes to hours | Irreversible pulpitis (near/in pulp) |
| Spontaneous, no stimulus needed | Pulpal necrosis / irreversible pulpitis |
Other Complaints
- Sensitivity while brushing near the gum line - patient avoids brushing that area
- "Rough/notched feeling" at the base of the tooth with the tongue
- Dark spot or hole visible near the gum line (cosmetic concern, especially anterior teeth)
- Asymptomatic in early/incipient lesions - patient unaware
Clinical Signs Seen by the Dentist (Objective)
On Visual Examination
| Sign | What It Means |
|---|---|
| White spot lesion (chalky, opaque) | Earliest sign - incipient enamel demineralization |
| Yellow-brown discoloration at cervical third | Active/progressing caries |
| Brown-black cavitation at gingival margin | Frank cavity - dentin involved |
| Crescent/kidney-shaped defect | Characteristic Class V outline following gingival contour |
| Gingival inflammation/redness adjacent | Plaque accumulation causing gingivitis around the lesion |
| Gingival recession | Exposes root surface - predisposes to root caries |
On Tactile/Probe Examination
| Sign | What It Means |
|---|---|
| Soft, sticky feel on probing | Active infected caries - needs removal |
| Leathery/rough feel | Affected dentin (can be conserved if near pulp) |
| Hard feel at EDJ margins | Sound peripheral enamel - adequate cavity outline |
| Probe "catches" in lesion | Confirms cavitated caries |
On Radiographic Examination
- Radiolucency at the cervical third on periapical X-ray
- Class V on facial/lingual surfaces may be difficult to see on X-ray - clinical exam is the primary diagnostic tool
- Root caries appears as radiolucency below the CEJ
On Percussion / Palpation
- Positive percussion test - pain on tapping the tooth - suggests periradicular involvement (advanced disease)
- Negative in early cases - confined to enamel/dentin
Summary by Stage
| Caries Stage | Patient Complaint | Dentist Sees |
|---|---|---|
| Incipient (enamel only) | None | White spot, no cavitation |
| Superficial (enamel - outer dentin) | Mild cold/sweet sensitivity | Slight discoloration, early softness |
| Moderate (dentin) | Cold/sweet pain, brief | Visible cavity, soft dentin on probing |
| Deep (near pulp) | Prolonged pain | Deep cavity, close to pulp on X-ray |
| Pulpal involvement | Spontaneous throbbing pain | Deep cavity ± sinus/swelling |
Ncl and cl
non-carious cervical lesion abrasion erosion abfraction wedge shaped defect
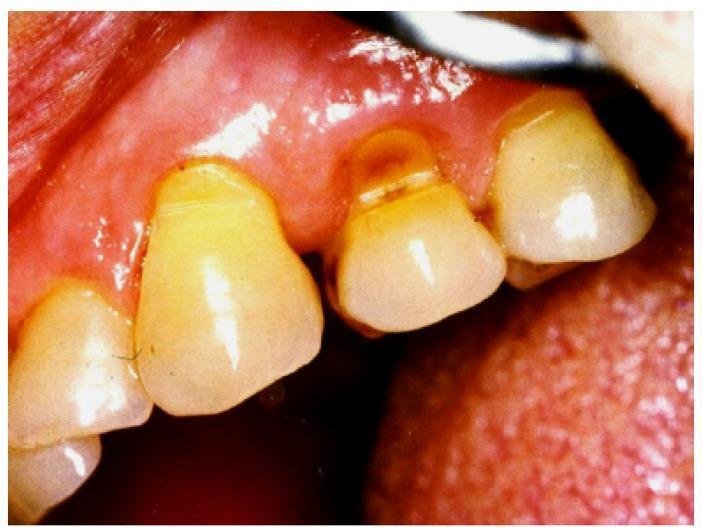
This clinical photograph is an intraoral image showing a classic example of dental abfraction on a premolar. The image highlights a non-carious cervical lesion (NCCL) characterized by a deep, wedge-shaped or V-shaped notch located at the cemento-enamel junction (CEJ). The defect exhibits a sharp internal angle and brownish discoloration within the groove, suggesting exposed dentin. The surrounding gingival tissue shows signs of recession and mild inflammation. This pathology is clinically significant in dentistry as it illustrates the loss of tooth substance due to mechanical loading and tooth flexure during occlusal stress, distinct from other forms of tooth wear such as attrition, erosion, or abrasion. The educational focus is on identifying biomechanically-induced hard tissue loss and distinguishing it from chemical or friction-related dental wear.
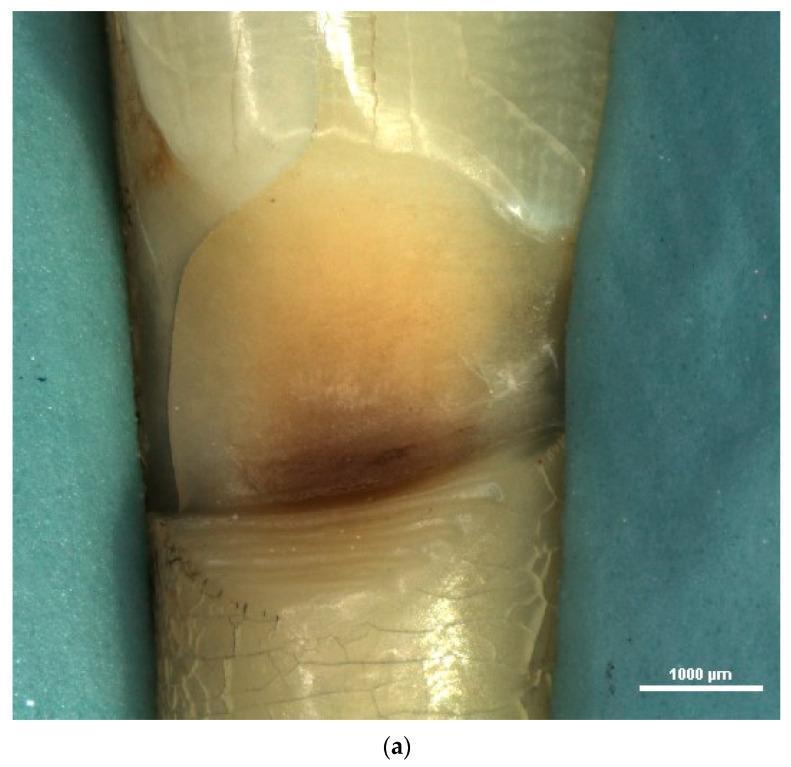
This stereomicroscopic diagnostic image (15x magnification) displays a clinical view of a human lower incisor affected by a prominent Non-Carious Cervical Lesion (NCCL). The lesion is located at the cervical margin, exhibiting a characteristic wedge-shaped morphology with a sharp internal angle. There is significant loss of hard dental tissue, with the lesion floor demonstrating exposed dentin and a dark brownish discoloration indicative of chronic mineral loss or extrinsic staining. Micromorphological features include a rough, irregular surface texture marked by visible furrows, cracks, and scratches. The adjacent enamel appears relatively intact, though fine crazing lines are visible on the tooth surface surrounding the defect. This image illustrates the macromorphological impact of mechanical or chemical wear—such as abfraction, abrasion, or erosion—on the dental hard tissues at the cementoenamel junction, serving as a primary educational example of wedge-shaped NCCLs for dental professionals and students.
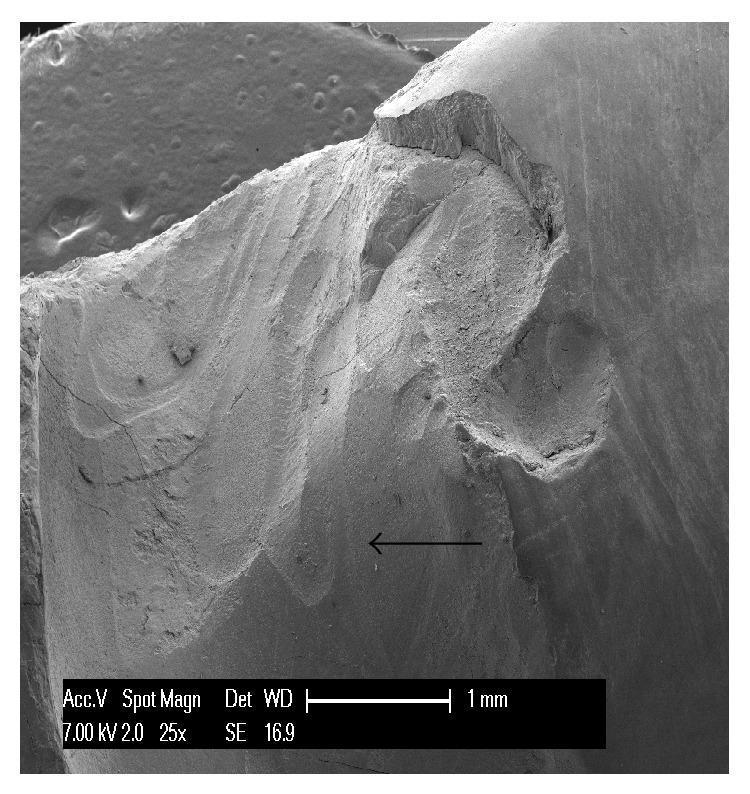
Scanning Electron Micrograph (SEM) at 25x magnification showing a non-carious cervical lesion (NCCL) in an upper human canine. The image displays a complex wedge-shaped abfraction lesion characterized by a deep, irregular morphology with clearly defined margins. Key visual features include multiple internal cavities and partially overlapping furrows. The surface texture exhibits a smear layer and distinctive mechanical wear patterns, specifically parallel striations alternating with protruding crests, indicating a superimposed process of mechanical abrasion. A black arrow points toward a prominent cavity within the lesion where these striations are visible. The imaging highlights the structural damage to dental hard tissues—enamel and dentin—and illustrates the multifactorial nature of tooth wear where tensile stress (abfraction) and physical friction (abrasion) coexist. This diagnostic image is intended for dental education regarding the classification and microscopic analysis of non-carious tooth loss.
NCCL vs carious lesion class V cervical differences features comparison dentistry
https://www.speareducation.com/resources/spear-digest/non-ca…
NCL - Non-Carious Cervical Lesion
Definition
Causes (Multifactorial - often a combination)
| Cause | Mechanism |
|---|---|
| Abrasion | Mechanical wear by a foreign object - most commonly improper toothbrushing (hard brush, horizontal technique, abrasive toothpaste) |
| Erosion | Chemical dissolution by dietary acids (citrus, carbonated drinks) or gastric acid (GERD, bulimia) |
| Abfraction | Tooth flexure at the CEJ due to occlusal stress/bruxism - enamel/dentin at CEJ is weakest under tensile stress |
| Combination | Most NCCLs in clinical practice are caused by 2-3 factors acting together |
Shape / Morphology of NCL
| Type | Shape | Cause |
|---|---|---|
| Abrasion | Wedge-shaped / V-shaped, sharp internal angle, polished smooth surface | Toothbrush |
| Erosion | Saucer-shaped / concave / dish-shaped, broad shallow, rounded margins | Acid |
| Abfraction | Angular / notch-like, sharp edges at the base | Occlusal stress |
Clinical Features of NCL
- Location: CEJ on facial (buccal) surface - most common on premolars
- Surface texture: Smooth, hard, polished (not soft or sticky)
- Probe feel: Hard - no softness, no stickiness
- Color: Yellow/ivory - exposed dentin; no brown/black discoloration from bacteria
- Margins: Sharp, well-defined, angular
- Multiple teeth: Often affects several teeth in a pattern (e.g., all teeth on one side - dominant brushing hand)
- Gingival recession: Commonly associated - root surface may be involved
- Sensitivity: Dentinal hypersensitivity - cold, touch, air; due to exposed dentinal tubules
- No plaque/caries activity at the lesion base
CL - Carious Lesion (Class V)
Definition
Cause
- Bacterial plaque accumulation at the gingival margin
- Poor oral hygiene, high sugar diet, reduced saliva (xerostomia)
- Gingival recession exposing cementum (root caries - highly susceptible)
Shape / Morphology of CL
- Crescent/kidney-shaped following the gingival contour
- Irregular margins, undermined enamel possible
- Progresses from white spot (pre-cavitation) to frank cavity
Clinical Features of CL
- Surface texture: Soft, sticky on probing (active caries)
- Probe feel: Soft or leathery - probe sticks in the cavity
- Color: White chalky spot (early) → yellow/brown → dark brown/black (advanced)
- Plaque present at and around the lesion
- Progression: Spreads along the dentinoenamel junction
- Pain: Cold/sweet sensitivity (reversible pulpitis) to spontaneous pain (irreversible pulpitis) depending on depth
Head-to-Head Comparison Table
| Feature | NCL (Non-Carious) | CL (Carious) |
|---|---|---|
| Cause | Abrasion / erosion / abfraction | Bacterial plaque / acid |
| Shape | Wedge / saucer / angular | Crescent / kidney-shaped |
| Surface feel on probe | Hard, polished, smooth | Soft, sticky, leathery |
| Color | Yellowish-ivory (no bacterial stain) | White spot → brown → black |
| Margins | Sharp, well-defined | Irregular, undermined |
| Plaque at lesion | Absent | Present |
| Teeth affected | Often multiple in a pattern | Single or multiple (plaque-related areas) |
| Most common tooth | Premolars (buccal) | Any tooth (gingival margin) |
| Associated gingival recession | Common | Less common (unless root caries) |
| Sensitivity | Dentinal hypersensitivity (cold/air/touch) | Cold/sweet pain, progresses to pulpitis |
| Bacterial involvement | No | Yes |
| Radiographic appearance | No radiolucency (usually) | Radiolucency at cervical region |
| Treatment | Identify/remove cause + restore if indicated | Remove caries + restore |
| Restoration material | RMGI / Composite (adhesive technique) | RMGI / Composite / GIC |
| Restoration challenge | High failure rate due to flexure stress at CEJ | Standard cavity restoration |
Stevenson Classification (Modern Approach to Class V)
| Type | Description |
|---|---|
| Type EE | Both margins in enamel - true bacterial caries (GV Black CL) |
| Type ED | Occlusal margin in enamel, gingival margin in dentin - mixed |
| Root/dentin type | Gingival margin on root surface - often NCCL + root caries overlap |
Key Clinical Rule
If the probe feels soft/sticky = carious (CL) If the probe feels hard/smooth = non-carious (NCL)
Give treatment planing for ncl and cl
treatment planning NCL NCCL vs carious class V lesion management restoration dentistry
https://decisionsindentistry.com/article/treatment-strategie…
TREATMENT PLANNING: NCL vs CL (Class V)
PART 1: NCL - Non-Carious Cervical Lesion
Step 1 - Identify the Cause First (MANDATORY)
| Cause | Clue | Management |
|---|---|---|
| Abrasion | Multiple adjacent teeth affected, horizontal brush marks, sensitive | Change to soft toothbrush, correct brushing technique (modified Bass), non-abrasive toothpaste |
| Erosion | Widespread smooth dissolution, GERD/bulimia/diet history | Dietary counseling (reduce acidic food/drinks), treat GERD, saliva substitutes for xerostomia |
| Abfraction | Single tooth, wear facets on cusps, bruxism | Occlusal adjustment, night guard/occlusal splint, improve anterior guidance |
| Combined | Most cases | Address all contributing factors |
Step 2 - Decide: Restore or Monitor?
- Lesion causes dentinal hypersensitivity unresponsive to conservative measures
- Lesion is esthetically unacceptable to patient (anterior teeth)
- Structural integrity of the tooth is threatened (deep lesion)
- Pulp exposure is likely if lesion progresses
- Lesion is trapping plaque and secondary caries has started
- Shallow, asymptomatic lesion
- Hard, polished surface with no sensitivity
- Lesion not worsening (arrested)
- No esthetic concern
Step 3 - Non-Operative (Conservative) Treatment
- Fluoride varnish application (professionally applied) - occlude dentinal tubules
- Desensitizing toothpaste (potassium nitrate, stannous fluoride) - home use
- Dentin bonding agents - applied to seal tubules without full restoration
- Casein phosphopeptide-amorphous calcium phosphate (CPP-ACP) - remineralization
Step 4 - Operative Treatment (Restoration of NCL)
Cavity Preparation
- No aggressive preparation needed - do NOT cut a box form like Class V caries
- Roughen enamel margins with a flame-shaped diamond bur (create bevel)
- Consider mechanical retention grooves (axio-occlusal and axio-gingival angles) - do NOT rely on adhesive alone, especially in abfraction lesions (tooth flex breaks the bond)
- Remove only loose/undermined tooth structure
Material Selection
| Material | When to Use |
|---|---|
| Resin-Modified Glass Ionomer (RMGI) | First choice for most NCLs - chemical bond, fluoride release, hydrophilic, tolerates moisture |
| Microfilled / Nanofilled Composite | Good for esthetic anterior NCLs - low elastic modulus tolerates tooth flexure better |
| Flowable Composite (liner/base) | Abfraction lesions - flexible material at the base accommodates CEJ flex |
| Sandwich technique | RMGI base + composite on top - combines fluoride release with esthetics |
| Conventional GIC | High-moisture areas, root surface, elderly patients with poor isolation |
Key principle: Use materials with low elastic modulus (flexible) for abfraction - they flex with the tooth rather than debonding.
If Occlusal Stress is the Main Cause:
- Consider occlusal adjustment BEFORE restoration
- Shift from group function to canine guidance
- Night guard fabrication
- If severe: crowns or veneers to modify anterior guidance
Step 5 - Periodontal Considerations
- If gingival recession is associated with NCL: consider mucogingival surgery (coronally advanced flap, connective tissue graft) for root coverage
- Restore the CEJ reference first, THEN perform the soft tissue graft
- Combined restorative-periodontal treatment gives best long-term outcomes
PART 2: CL - Carious Lesion (Class V)
Step 1 - Caries Risk Assessment
- Diet (frequency of sugar/acid intake)
- Salivary flow (xerostomia from medications, radiation, Sjogren's)
- Oral hygiene status
- Fluoride exposure history
Step 2 - Prevention Protocol (Always First)
- Dietary counseling - reduce frequency of fermentable carbohydrates
- Oral hygiene instruction - correct brushing at the gum line (Bass technique)
- Fluoride therapy - high-concentration fluoride varnish (professionally), fluoride toothpaste at home
- Saliva substitutes / stimulants if xerostomia is present
- Chlorhexidine varnish/gel - reduce S. mutans load in high-risk patients
For incipient/white spot lesions (no cavitation): prevention + remineralization only - NO drilling
Step 3 - Operative Treatment (When Cavitation is Present)
Cavity Preparation
- Remove ALL infected dentin (soft, dark, bacterial)
- Affected dentin (leathery, hard) near pulp can be conserved
- Shape: crescent/kidney following gingival contour
- Axial depth: ~0.75 mm into dentin
- Retention grooves in axio-occlusal and axio-gingival line angles
- Extend 0.5 mm below CEJ if margin is on root surface
Material Selection for CL
| Material | Best For | Notes |
|---|---|---|
| RMGI (Resin-Modified GIC) | First choice - most Class V CL | Fluoride release prevents secondary caries, hydrophilic, self-adhesive |
| GIC (Conventional) | Root caries, primary teeth, poor isolation | Chemical bond, fluoride release |
| Composite Resin | Anterior teeth (esthetics), enamel margins | Requires dry field, acid etch + bond; watch for marginal leakage at root surface |
| Sandwich (RMGI + Composite) | Deep lesion with gingival margin in dentin | RMGI base protects dentin, composite restores esthetics |
Best single material for carious Class V: RMGI - fluoride inhibits secondary caries, bonds chemically, tolerates moisture at the gingival margin
If Deep Caries (Near Pulp):
- Indirect pulp capping: place calcium hydroxide or MTA over affected dentin, then restore
- Direct pulp capping: if pulp is exposed but vital and uninfected - MTA or Biodentine
- RCT: if irreversible pulpitis or necrosis - root canal before restoration
Step 4 - Post-Operative
- Check margins, occlusion, and contour
- Polish restoration
- Schedule recall every 3-6 months (high-risk patient)
- Reinforce oral hygiene and diet instructions at every visit
Summary Comparison: Treatment Plan at a Glance
| Phase | NCL | CL |
|---|---|---|
| 1. Etiologic control | Remove cause (brushing/diet/occlusion) | Caries risk reduction (diet, hygiene, fluoride) |
| 2. Conservative Rx | Desensitizing agents, fluoride varnish | Fluoride remineralization (pre-cavitation) |
| 3. Decision to restore | Only if symptomatic / esthetic / structural threat | As soon as cavitation + dentin involvement |
| 4. Preparation | Minimal, no box form, bevel margins, retention grooves | Remove infected dentin, retention grooves, ~0.75mm axial depth |
| 5. Material | RMGI / Flowable/Microfilled composite / Sandwich | RMGI (preferred) / GIC / Composite / Sandwich |
| 6. Adjunct treatment | Night guard, occlusal adjustment, gingival graft | Pulp capping / RCT if deep; salivary stimulants |
| 7. Recall | 6-12 months | 3-6 months (high caries risk) |
For NCL: treat the cause first, restore only when needed, use flexible low-modulus materials. For CL: prevent first, restore all cavitated lesions, use fluoride-releasing materials (RMGI/GIC) to inhibit secondary caries.
Give me the name of books you used for reference
Textbooks from Medical Library
| Book | Used For |
|---|---|
| Tintinalli's Emergency Medicine: A Comprehensive Study Guide | Dental caries and pulpitis - symptoms, pain duration (reversible vs irreversible pulpitis), pain management |
| Scott-Brown's Otorhinolaryngology Head & Neck Surgery | Clinical diagnosis of caries - visual/tactile/radiographic examination; factors in caries development |
| Brogdon's Forensic Radiology | Class V caries definition - gingival margin caries (buccal/facial or lingual) |
Web / Online Sources
| Source | Used For |
|---|---|
| Semmelweis University - Dept. of Conservative Dentistry (Black-classification-pdf.pdf) | GV Black classification, cavity preparation principles, retention/resistance forms |
| Mr. Bur Dental Education Blog | Class V location, cavity outline, bur selection |
| Stevenson Dental Solutions | Stevenson Type EE/ED/DD classification of Class V lesions, lesion-specific restoration protocols |
| Decisions in Dentistry | NCL treatment strategies, when to restore, occlusal management |
| Dimensions of Dental Hygiene | Carious vs non-carious Class V, GIC and composite for carious lesions, prevention protocol |
| PMC / NIH - Restoration of Noncarious Cervical Lesions (PMC3246729) | NCL restoration indications, adhesion challenges, material selection |
| Spear Education | NCL causes - abrasion, erosion, abfraction etiology |
| StatPearls / NCBI Bookshelf | GV Black classification overview, modern updates (ICDAS, ADA CCS) |
Important Note
- Sturdevant's Art and Science of Operative Dentistry - Roberson, Heymann, Swift
- Mount and Howe's Preservation and Restoration of Tooth Structure
- Textbook of Operative Dentistry - Vimal Sikri
- Shafer's Textbook of Oral Pathology (for caries pathology)