
Types of tendon repairs in Orthopaedics. For 10 marks in MS ortho exam
tendon repair suture techniques orthopaedics Kessler Bunnell
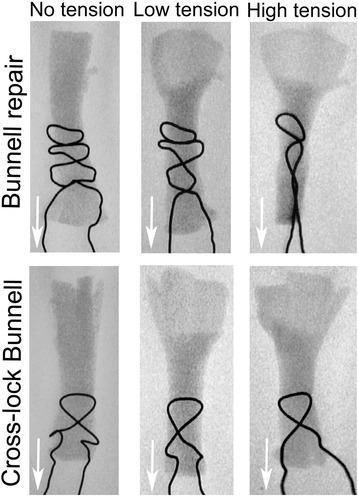
This orthopaedic diagnostic image consists of a series of six fluoroscopic panels demonstrating tendon repair biomechanics. The panels are organized into a 2x3 grid comparing two surgical suturing techniques—the Bunnell repair (top row) and the Cross-lock Bunnell (bottom row)—under three progressive load conditions: No tension, Low tension, and High tension. Radiopaque stainless steel wire is used to visualize the suture patterns within the tendon segments. In the Bunnell repair, increasing tension causes the distinct, loosely arranged loops to constrict and 'cut out' through the soft tissue, leading to significant longitudinal elongation and narrowing of the suture configuration. In contrast, the Cross-lock Bunnell row demonstrates a more stable, interwoven interlocking pattern. As tension increases in the Cross-lock group, the suture maintains better structural integrity and consistent apposition with minimal 'cut out' or longitudinal distortion compared to the standard Bunnell technique. White arrows indicate the direction of the applied axial load, illustrating the mechanical failure mechanism and resistance to gap formation in tendon surgery.
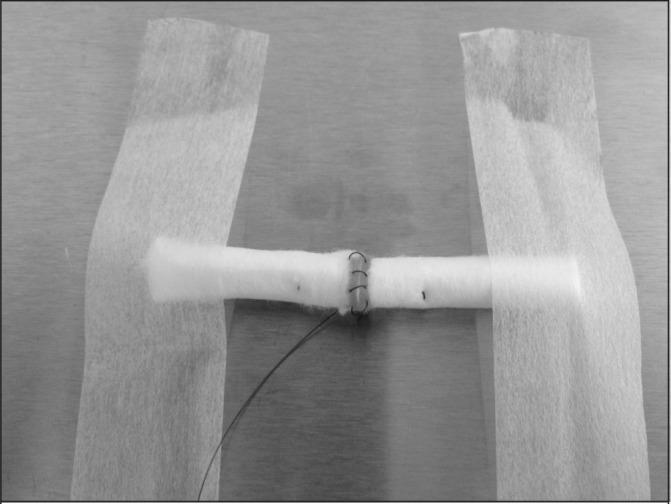
This clinical photograph demonstrates a surgical simulation model used for practicing tendon repair techniques. The model utilizes white, fibrous dental rolls as an inexpensive substitute for human tendons due to their comparable size, shape, and tactile feedback when suturing. Two vertical tape strips secure a horizontal dental roll to a flat surface, simulating a cut tendon end under tension. The image specifically illustrates the placement of core and epitendon sutures. A dark, thin suture thread is visible, forming a circumferential ring around the cylinder to demonstrate an epitendon suture placed approximately 2mm from the edge. Additionally, markings or needle entry points indicate the placement of a core suture at a 10mm distance. This educational setup is designed for surgical skills training in orthopedics or plastic surgery to master complex suturing patterns, such as the Kessler or modified Bunnell techniques, without the need for animal tissue.
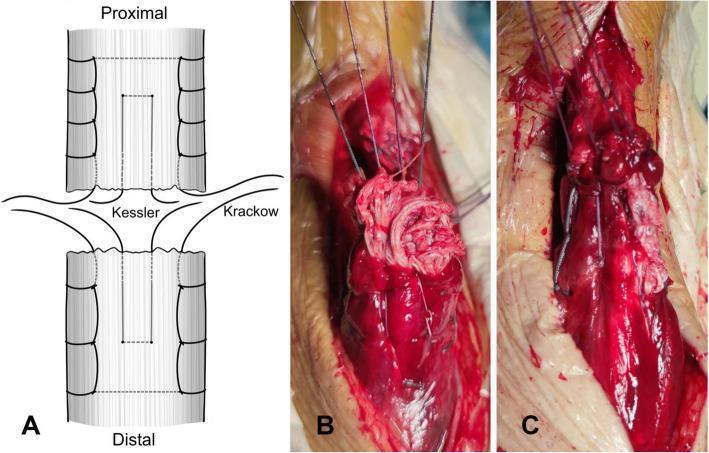
A multi-panel medical resource demonstrating surgical techniques for Achilles tendon repair. (A) Anatomical diagram illustrating the internal logic of a combined Krackow and Kessler suture approach. The Krackow technique shows interlocking peripheral loops, while the modified Kessler technique depicts a central core suture bridging the proximal and distal tendon segments. (B) Intraoperative clinical photograph showing a ruptured Achilles tendon being approximated. The tissue appears erythematous and frayed at the rupture site. Thin, dark non-absorbable sutures are woven through the tendon substance using the Krackow locking loop and modified Kessler techniques to align and stabilize the torn ends. (C) Clinical photograph of the completed repair reinforced with four figure-eight sutures across the dorsal aspect. These sutures create a distinct criss-cross pattern over the rupture site, providing secondary reinforcement to the primary core sutures. This educational material is designed for orthopedic surgery training, focusing on maximizing tensile strength and stability during tendon healing.
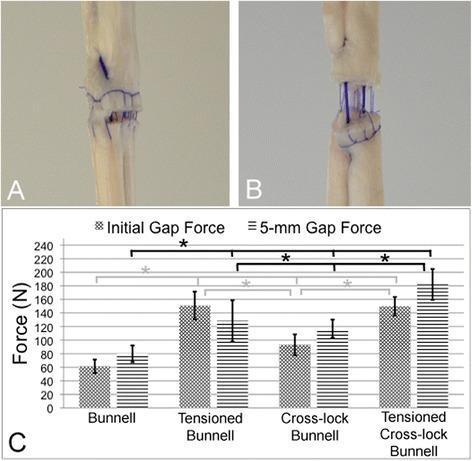
This composite educational resource consists of clinical photographs and a comparative bar chart demonstrating the biomechanical properties of different tendon repair techniques. Panel A shows a clinical photograph of a tendon repaired with a Bunnell suture pattern, displaying the characteristic ladder-like, horizontal dark blue suture passes across the pale fibrous tissue. Panel B illustrates a 5-mm gap formation between the proximal and distal tendon segments under mechanical stress, highlighting the vertical stretching of the core suture material. Panel C is a quantitative bar graph comparing 'Initial Gap Force' and '5-mm Gap Force' (measured in Newtons) across four surgical techniques: standard Bunnell, Tensioned Bunnell, Cross-lock Bunnell, and Tensioned Cross-lock Bunnell. The graph indicates that pretensioning and cross-locking configurations significantly increase the resistance to gap formation compared to the standard Bunnell technique. This content is designed for orthopaedic surgical education, focusing on tendon repair strength, suture morphology, and biomechanical failure thresholds.
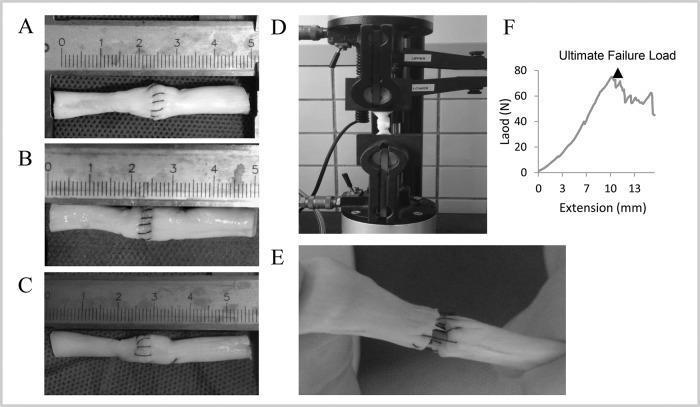
A multi-panel educational figure demonstrating biomechanical testing of porcine tendon repair techniques. Panels A-C provide close-up clinical photographs of three specific suture configurations: (A) Modified Kessler (MK) showing a classic boxed core suture with peritendinous reinforcement, (B) Interlock Suture (IS) exhibiting a continuous interlocking pattern for increased grip, and (C) Modified Kessler-Loop Lock (MKL) featuring boxed sutures with additional locking loops. Panel D displays the experimental setup with a repaired tendon secured vertically between the pneumatic grips of a mechanical testing machine (Instron model). Panel E shows the clinical manifestation of mechanical failure, characterized by a visible 2-mm gap formation and fraying of tendon fibers at the repair site under tension. Panel F is a line graph illustrating a typical load-deformation curve, plotting tensile Load (N) against Extension (mm), with a designated triangle marking the 'Ultimate Failure Load' at approximately 75N. This figure is used in orthopedic research and surgical training to compare the tensile strength and failure modes of different flexor tendon repair strategies.
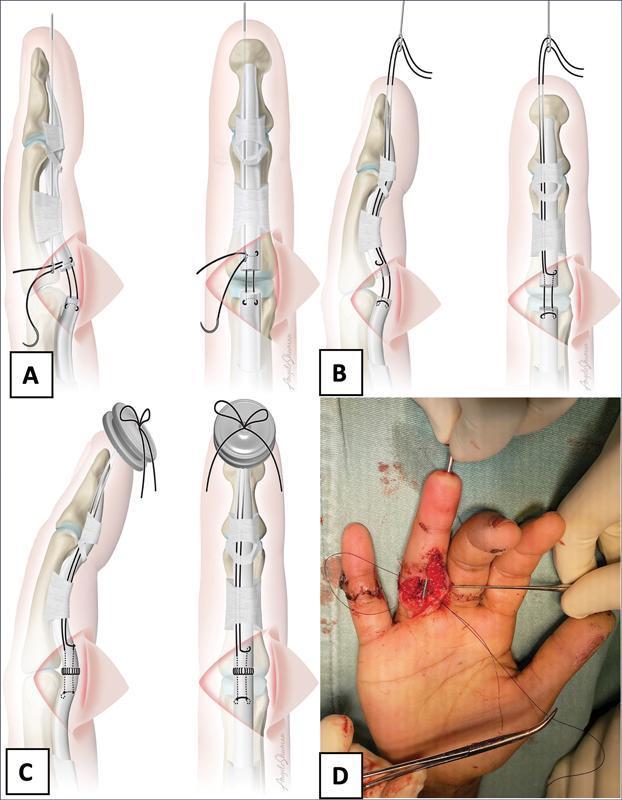
Educational panel illustrating a specialized pull-out suture technique for flexor digitorum profundus (FDP) tendon repair in the finger. A-C: Anatomical diagrams in lateral and frontal views. (A) Shows a modified Kessler-type suture applied to tendon stumps with a 1.4 mm diameter suture passer introduced through the digital pulp into the osteofibrous tunnel. (B) Demonstrates the suture passer guiding mononylon threads distally toward the fingertip. (C) Illustrates the final pull-out fixation where the suture ends are secured over a protective silicone button at the digital pulp tip, alongside an epitendinous suture at the repair site. This configuration shifts traction forces away from the primary repair zone. (D) Intraoperative clinical photograph showing the surgical field with the suture passer exiting the distal pulp and threads being managed through an open palmar-digital incision. The content demonstrates hand surgery techniques for Zone II tendon injuries, focusing on minimizing gap formation and allowing early active motion.
Types of Tendon Repairs in Orthopaedics
Introduction
- Easy placement of sutures in the tendon
- Secure suture knots
- Smooth juncture of tendon ends
- Minimal gapping at the repair site
- Minimal interference with tendon vascularity
- Sufficient strength throughout healing to permit early motion stress
Classification of Tendon Repairs
A. Based on Timing
| Type | Timing | Indication |
|---|---|---|
| Primary repair | Within 12-24 hours | Clean lacerations, no contamination |
| Delayed primary | 1-10 days | Slightly contaminated wounds |
| Secondary repair | >4 weeks | Missed or neglected injuries |
| Late reconstruction | After failed primary | Staged tendon grafting / tendon transfer |
B. Based on Method
- Direct tenorrhaphy (end-to-end)
- Tendon grafting (bridging a gap)
- Tendon transfer (rerouting a functional tendon)
- Tendon advancement (reattachment to bone)
Suture Configurations (Core Suture Techniques)
1. Two-strand Techniques
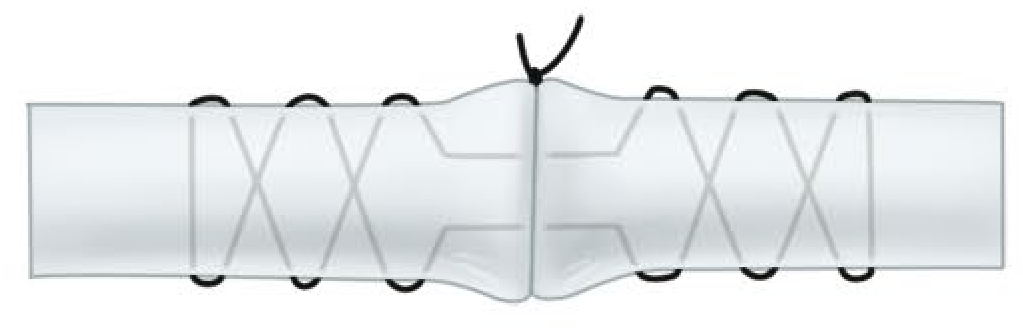
Bunnell Stitch
- Classic crisscross (zigzag) configuration through the tendon
- Suture criss-crosses within the tendon substance with loops exiting at the cut ends
- Disadvantage: Strangulates intra-tendinous blood supply; suture can "cut out" under tension
- Historically important but largely replaced by less ischaemic techniques
Modified Kessler (Tajima) Stitch
- Two strands cross the repair site with locking loops near the tendon ends
- Knot buried between the cut ends
- Most widely used two-strand technique
- Less ischaemic than Bunnell; good gap resistance
Tsuge Loop Stitch
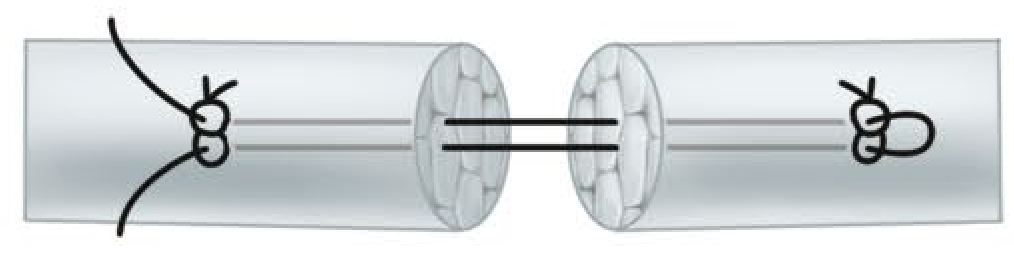
- A looped suture configuration
- Single needle technique; suture loops grip the tendon
- Self-locking under tension

Mason-Allen (Chicago) Stitch
- Combination of a horizontal mattress and locking loop
- Provides good grip with modest strand count
2. Four-strand Techniques
Savage Technique (Six-strand originally, adapted as four-strand)
- Multiple strands traverse the repair site in parallel
- High tensile strength; suture passes numbered and entered at 6 points
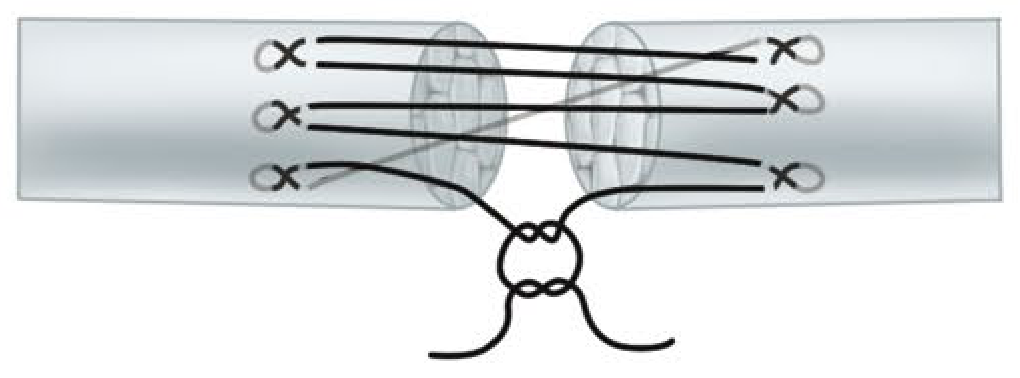
Lee Four-strand Technique
- Two separate sutures placed at right angles to each other
- Two knots within repair site
- Good strength; relatively easy to place
Four-strand Cruciate Repair
- Sutures cross in a cruciate (X) pattern at the repair site
- Available as standard cruciate or "cross-stitch locked" variant for higher resistance to gap formation
Indiana Four-strand Repair with Running Lock Suture
- Core suture with a running locking peripheral component built in
- Combines core purchase with peripheral friction
3. Six- and Eight-strand Techniques
Single-cross Grasping Six-strand
- Three parallel passes on each side locking together at the repair
- Allows early active mobilisation protocols
Double-loop (Tsuge-type multi-loop)
- Multiple loops of suture providing distributed purchase across tendon width
- Reduced point loading, preserving more vascularity
Epitendinous (Peripheral) Suture
- Adds 10-50% of total repair strength
- Smooths the repair site, reducing tendon-sheath friction
- Reduces gap formation significantly
- Placed with 5-0 or 6-0 monofilament (Prolene) as a running circumferential stitch, approximately 1-2 mm from the cut surface
- Techniques: simple running, cross-stitch, horizontal mattress, locking loop peripheral suture
Suture Material
| Material | Key Property |
|---|---|
| Braided polyester (Ticron, FiberWire) | Most widely used; good knot security, handles well |
| Monofilament nylon | Acceptable but allows earlier gap formation |
| Polydioxanone (PDS) | Comparable to polypropylene; slowly absorbable |
| Stainless steel | Highest tensile strength but difficult to handle; not suitable for fingers |
| Absorbable (Vicryl, catgut) | Lose strength too early - NOT recommended for tendon core repair |
Number of Strands - Evidence Summary
| Strand Count | Strength | Application |
|---|---|---|
| 2-strand | Weakest | Historical; only for passive motion protocols |
| 4-strand | Moderate-strong | Standard of care; permits early active motion |
| 6-strand | Strong | Preferred when space allows |
| 8-strand | Strongest | Selected cases; technically demanding |
Biomechanical Principles
- Gap formation >2 mm significantly impairs tendon healing and increases adhesion risk
- Locking loops (as in Kessler, Tajima) confer greater resistance to gap formation than non-locking (Bunnell)
- Cross-lock Bunnell maintains structural integrity under high tension far better than standard Bunnell
- Suture placement 1 cm from cut end optimises purchase without devascularising the repair zone
- Intratendinous crisscross sutures (Bunnell, Kleinert modification) jeopardise intratendinous blood supply - this is their main weakness
Special Techniques by Tendon Type
| Tendon | Preferred Technique |
|---|---|
| Flexor digitorum profundus (FDP) | Modified Kessler + epitendinous (Zone II); pull-out suture for avulsion |
| Extensor tendons | Figure-of-eight or horizontal mattress (thinner, flat tendons) |
| Achilles tendon | Krackow locking loop + modified Kessler + figure-of-eight reinforcement |
| Quadriceps/Patellar tendon | Krackow locking stitch; heavy non-absorbable suture through bone |
Modern Adjuncts
- Barbed sutures (knotless): As strong as 4-strand for epitendinous repair; biomechanical equivalence with 4-strand core in some studies
- Teno Fix device: Intratendinous crimped steel device; comparable to 4-strand cruciate with lower rupture rate in cadaver studies
- Connextions stapler: Quicker than suture; some studies show superior strength - insufficient clinical data for routine recommendation
Key Points for Exam
- Bunnell = classic but ischaemic; Kessler = most common 2-strand
- 4-strand minimum for early active motion; 6 or 8-strand for highest strength
- Epitendinous suture is mandatory - adds up to 50% strength and reduces friction
- Suture placement 1 cm from cut end; locking loops at tendon end
- Braided polyester (e.g., FiberWire, Ticron) is the material of choice
- Gap >2 mm = poor outcome; repair strength must exceed physiological loads
- No one core technique is superior when strand number is matched
Types of tendon repairs in Orthopaedics. For 10 marks in MS ortho exam
tendon repair suture techniques Kessler Bunnell Tsuge orthopaedics diagram
A multi-panel medical resource demonstrating surgical techniques for Achilles tendon repair. (A) Anatomical diagram illustrating the internal logic of a combined Krackow and Kessler suture approach. The Krackow technique shows interlocking peripheral loops, while the modified Kessler technique depicts a central core suture bridging the proximal and distal tendon segments. (B) Intraoperative clinical photograph showing a ruptured Achilles tendon being approximated. The tissue appears erythematous and frayed at the rupture site. Thin, dark non-absorbable sutures are woven through the tendon substance using the Krackow locking loop and modified Kessler techniques to align and stabilize the torn ends. (C) Clinical photograph of the completed repair reinforced with four figure-eight sutures across the dorsal aspect. These sutures create a distinct criss-cross pattern over the rupture site, providing secondary reinforcement to the primary core sutures. This educational material is designed for orthopedic surgery training, focusing on maximizing tensile strength and stability during tendon healing.
This orthopaedic diagnostic image consists of a series of six fluoroscopic panels demonstrating tendon repair biomechanics. The panels are organized into a 2x3 grid comparing two surgical suturing techniques—the Bunnell repair (top row) and the Cross-lock Bunnell (bottom row)—under three progressive load conditions: No tension, Low tension, and High tension. Radiopaque stainless steel wire is used to visualize the suture patterns within the tendon segments. In the Bunnell repair, increasing tension causes the distinct, loosely arranged loops to constrict and 'cut out' through the soft tissue, leading to significant longitudinal elongation and narrowing of the suture configuration. In contrast, the Cross-lock Bunnell row demonstrates a more stable, interwoven interlocking pattern. As tension increases in the Cross-lock group, the suture maintains better structural integrity and consistent apposition with minimal 'cut out' or longitudinal distortion compared to the standard Bunnell technique. White arrows indicate the direction of the applied axial load, illustrating the mechanical failure mechanism and resistance to gap formation in tendon surgery.
This clinical photograph demonstrates a surgical simulation model used for practicing tendon repair techniques. The model utilizes white, fibrous dental rolls as an inexpensive substitute for human tendons due to their comparable size, shape, and tactile feedback when suturing. Two vertical tape strips secure a horizontal dental roll to a flat surface, simulating a cut tendon end under tension. The image specifically illustrates the placement of core and epitendon sutures. A dark, thin suture thread is visible, forming a circumferential ring around the cylinder to demonstrate an epitendon suture placed approximately 2mm from the edge. Additionally, markings or needle entry points indicate the placement of a core suture at a 10mm distance. This educational setup is designed for surgical skills training in orthopedics or plastic surgery to master complex suturing patterns, such as the Kessler or modified Bunnell techniques, without the need for animal tissue.
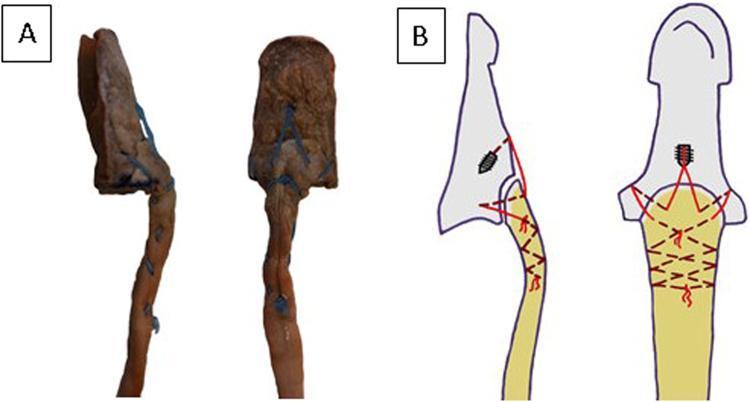
This educational image displays a clinical photograph and a corresponding anatomical diagram illustrating a surgical repair technique for a bony avulsion of the flexor digitorum profundus (FDP) tendon. Panel A shows lateral and volar views of a human cadaveric distal phalanx and FDP tendon. The repair utilizes blue suture material woven through the tendon and anchored to an avulsed bone fragment. Panel B provides a sagittal and volar schematic of a novel repair method using a suture anchor. The diagram depicts a threaded anchor embedded in the distal phalanx with red suture lines following a specific path: exiting the bone, passing through the reduced avulsed fragment, and securing the tendon using a Bunnell crisscross suture technique. Key educational concepts include the 'deadman theory' of anchor placement at a 45-degree angle and the use of tension banding principles to achieve stable interosseous attachment. This material is designed for orthopedic and hand surgery education, demonstrating techniques for managing Jersey Finger or similar distal phalanx tendon injuries.
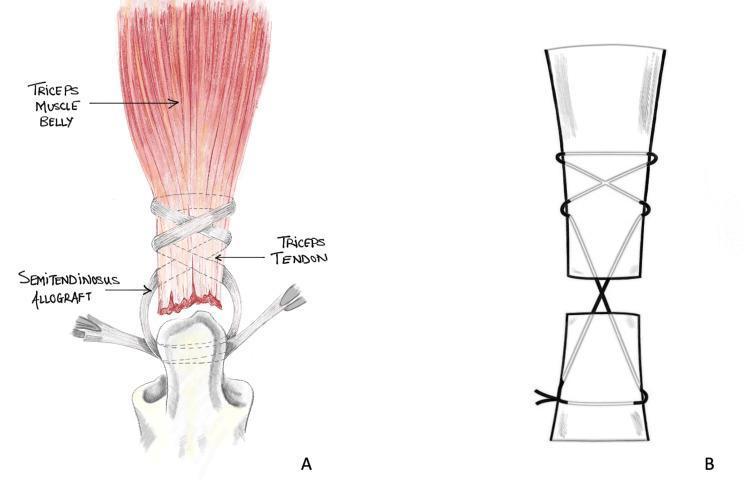
This orthopaedic illustration depicts the Bunnell suture repair technique used for triceps tendon ruptures. Image A is a detailed anatomical drawing showing the triceps muscle belly in red, distal triceps tendon, and a semitendinosus allograft. The allograft is looped around the triceps tendon and secured to the distal bone (olecranon) using the Bunnell technique. The repair features non-absorbable sutures woven in a characteristic criss-cross, figure-of-eight pattern (whipstitch) through the tendon substance to provide high tensile strength and minimize suture pullout. Image B provides a simplified schematic diagram of the same Bunnell stitch configuration, highlighting the 'X' shaped intersections of the suture and the horizontal locking components that bridge the gap between two ends of a ruptured tendon or a tendon-bone interface. This visual material is intended for orthopedic education regarding surgical management of tendon injuries and biomechanical stability in ligamentous repair.
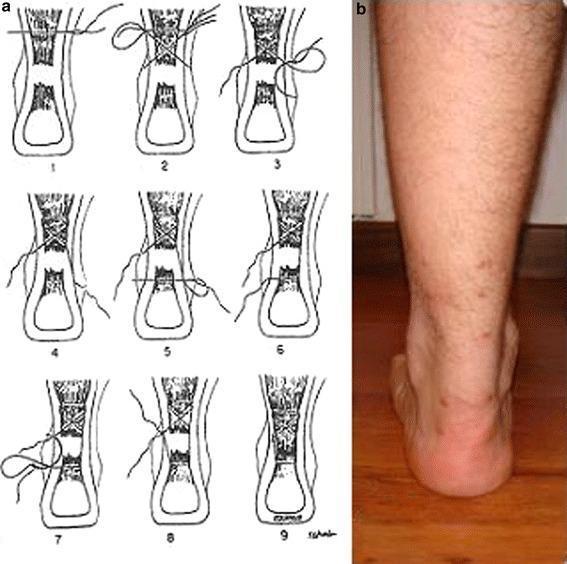
This composite image includes a percutaneous Achilles tendon repair schematic and a clinical follow-up photograph. Panel (a) presents a nine-step procedural diagram of the Ma and Griffith technique for acute Achilles tendon rupture. The line drawings illustrate the proximal and distal tendon stumps within the lower leg silhouette. The sequence details the percutaneous passage of sutures through the skin and tendon in a modified Bunnell-type weave, progressing from initial needle insertion (steps 1-3) to pulling the suture ends to approximate the tendon gap (steps 4-6) and final anchoring (steps 7-9). Panel (b) is a posterior clinical photograph of a patient’s right lower leg and ankle 90 days post-surgery. The image demonstrates a well-healed surgical site with minimal scarring, preserved calf contour, and a stable weight-bearing neutral foot position. The clinical focus is on minimally invasive orthopedic surgical techniques and the anatomical restoration of the gastroc-soleus complex.
Types of Tendon Repairs in Orthopaedics
MS Ortho Examination Answer (10 Marks)
Definition and Purpose
Strickland's Criteria for an Ideal Tendon Repair
- Easy placement of sutures in the tendon
- Secure suture knots
- Smooth juncture of tendon ends
- Minimal gapping at the repair site
- Minimal interference with tendon vascularity
- Sufficient strength throughout healing to permit early motion stress
I. Classification by Timing
| Type | Timing | Indication |
|---|---|---|
| Primary repair | Within 12-24 hours | Clean lacerations, no wound contamination |
| Delayed primary | 1-10 days | Slightly contaminated wounds |
| Secondary (late) repair | > 4 weeks | Missed/neglected injuries |
| Reconstruction | After failed primary | Staged tendon graft or transfer |
II. Classification by Method
- Direct end-to-end tenorrhaphy - most common; approximates cut ends directly
- Tendon grafting - bridges a gap using palmaris longus, plantaris, or toe extensors
- Tendon transfer - reroutes a functional tendon to restore a lost function
- Tendon advancement - reattaches a tendon to bone (e.g., distal phalanx avulsion)
III. Suture Configurations (Core Suture Techniques)
A. Two-Strand Techniques
1. Bunnell Stitch
- Classic crisscross (zigzag) suture passing through the tendon in an "X" pattern
- Knot is tied at one end, loops exit at the cut surface
- Disadvantage: Strangulates intratendinous blood supply; suture "cuts out" under high tension - historically important but largely replaced
2. Modified Kessler (Tajima) Stitch
- Two strands cross the repair site; locking loops grip the tendon near its cut ends
- Knot buried between the cut ends (Tajima modification)
- Most widely used two-strand technique - less ischaemic than Bunnell, good gap resistance
- Sutures locked with each exit from the tendon
3. Tsuge Loop Stitch
- Single-needle technique using a looped suture
- The loop self-tightens under tension, providing a locking grip
- Two knots placed within the tendon ends
4. Mason-Allen (Chicago) Stitch
- Combines a horizontal mattress suture with a locking component
- Good grip; used as a two-strand variant in the forearm/palm
B. Four-Strand Techniques
5. Lee Four-Strand Technique
- Two separate sutures placed at right angles to each other
- Two knots are placed within the repair site
- Good tensile strength, relatively straightforward to perform
6. Four-Strand Cruciate Repair
- Sutures cross in a cruciate (X) pattern at the repair site
- Available as a standard cruciate or "cross-stitch locked" variant
- Cruciate four-strand provides stronger resistance to gap formation and greater ultimate tensile strength than Kessler, Strickland, or Savage techniques (cadaver study)
7. Indiana Four-Strand Repair with Running Lock Suture
- Core suture combined with a built-in running peripheral locking component
- Combines core purchase with distributed friction
8. Augmented Becker / Becker Repair
- A modification providing high stiffness and strength
- Found to be the only two- or three-strand technique strong enough to tolerate forces in active motion rehabilitation
C. Six-Strand Techniques
9. Savage Technique (Adelaide / Six-Strand Repair)
- Three grasping stitches per tendon end, creating six strands crossing the repair
- 4-0 Ethibond suture used
- Needle inserted into tendon end, creating parallel locking loops
- High tensile strength; one of the strongest configurations described
10. Single-Cross Grasping Six-Strand
- Three parallel passes on each side, locking at the repair site
- Permits early active mobilisation protocols
11. Modified Double Tsuge / Double-Loop Techniques
- Multiple loops providing distributed purchase across tendon width
- Reduces point-loading, preserving more vascularity
D. Eight-Strand Techniques
- Reserved for large tendons requiring maximum strength
- Technically demanding; used where space allows
- Highest resistance to gap formation; permits most aggressive early motion
IV. Epitendinous (Peripheral) Suture
- Adds 10-50% of total repair strength
- Smooths the repair site, reducing tendon-sheath friction (critical in Zone II flexor tendons)
- Significantly reduces gap formation
- Placed with 5-0 or 6-0 monofilament (Prolene) as a circumferential running stitch, 1-2 mm from cut surface
- Peripheral sutures placed 2 mm from repair site are stronger than those at 1 mm
- Techniques include:
- Simple running
- Cross-stitch (interlocking horizontal mattress) - highest load to failure
- Running locking loop peripheral suture
- Epitenon-first technique (Fig. 71.12): peripheral suture placed first, then core suture inserted within the tendon - final knot buried within tendon
V. Suture Material
| Material | Key Property |
|---|---|
| Braided polyester (Ticron, FiberWire, Mersilene) | First choice - best handling, knot security, gap resistance |
| Polydioxanone (PDS) | As strong as polypropylene; slowly absorbable |
| Monofilament nylon/polypropylene | Acceptable; permits earlier gap formation than braided |
| Monofilament stainless steel | Highest tensile strength; poor handling, large knots - limited to distal forearm |
| Absorbable (Vicryl, catgut, PGA) | Not recommended - lose strength too early post-operatively |
- 3-0 suture for forearm, palm, larger digits - gives 2-3x fatigue strength over 4-0; recommended with early active motion protocols
- 4-0 suture for smaller digits
- A 3-0 is 52% stronger than a 4-0; a 4-0 is 66% stronger than a 5-0
VI. Strand Number - Strength Summary
| Strands | Strength | Clinical Use |
|---|---|---|
| 2-strand | Weakest | Historical; passive motion only |
| 4-strand | Moderate-strong | Minimum standard of care; early active motion |
| 6-strand | Strong | Preferred where space allows |
| 8-strand | Strongest | Maximum strength; technically demanding |
VII. Special Techniques by Tendon
| Tendon | Preferred Technique |
|---|---|
| Flexor digitorum profundus (Zone II) | Modified Kessler-Tajima + 6-0 epitendinous |
| FDP avulsion (Jersey finger) | Pull-out suture over button at fingertip |
| Achilles tendon | Krackow locking loop + modified Kessler + figure-of-eight reinforcement |
| Quadriceps/Patellar tendon | Krackow locking stitch; heavy non-absorbable through bone tunnels |
| Extensor tendons (thin/flat) | Figure-of-eight or horizontal mattress |
VIII. Biomechanical Key Points
- Gap >2 mm significantly impairs healing and increases adhesion risk
- Locking loops (Kessler, Tajima) resist gap formation better than non-locking (Bunnell)
- Bunnell/Kleinert-type intratendinous crisscross sutures jeopardise intratendinous vascularity - each vinculum supplies one tendon segment; intratendinous sutures further impair microcirculation
- Repair strength drops considerably in the first 10 days post-surgery
- Tendon strength gradually recovers; by 10-12 weeks considerable active forces can be applied
- Core sutures must not be used to approximate the ends - a partial epitendinous suture or tendon approximator/hypodermic needle is used first
Campbell's Concepts (Key Summary Points)
- Bunnell = classic, ischaemic, historical; Kessler = most common 2-strand, first choice when 2-strand needed
- 4-strand minimum for early active motion; 6 or 8-strand preferred for maximum strength
- Epitendinous suture is mandatory - adds up to 50% strength + reduces sheath friction
- Suture placed 1 cm from cut end; locking loops at tendon end prevent pull-through
- Braided polyester (FiberWire, Ticron) = material of choice for clinical practice
- No single core technique is superior when strand number is matched
- Smooth repair surface critical in Zone II flexor tendons to prevent sheath adhesions