Inguinal Hernia test
Reading File
Finding Sources
Finding Sources
Reading File
Reading File
Reading File
Reading File
Loading Image
Loading Image
Loading Image
I now have all the content needed for a comprehensive answer. Here is the full breakdown:
Clinical Tests for Inguinal Hernia
The two classical signs of an uncomplicated inguinal hernia are impulse on coughing and reducibility. Beyond these, several specific tests are used to confirm the diagnosis and differentiate direct from indirect hernias.
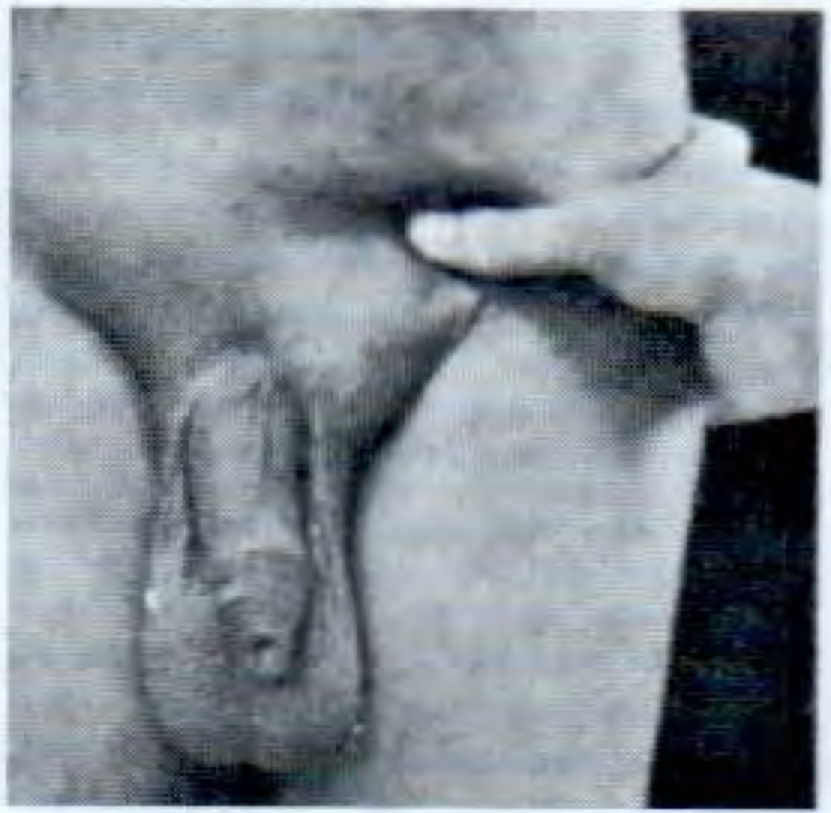
1. Impulse on Coughing
Position: Patient standing.
Place a finger over the superficial inguinal ring (or hold the root of the scrotum between index finger and thumb). Ask the patient to cough.
- A palpable expansile impulse confirms hernia.
- Impulse is absent in: strangulated hernia, incarcerated hernia, or when the neck is blocked by adhesions.
- When a swelling is already present, coughing will expand it (expansile impulse) and increase tension within it.
2. Zieman's Technique (Three-Finger Test)
Position: Patient standing, hernia must be completely reduced (no obvious swelling).
Place three fingers simultaneously:
- Index finger over the deep inguinal ring (½ inch above the mid-inguinal point - midpoint between ASIS and symphysis pubis)
- Middle finger over the superficial inguinal ring
- Ring finger over the saphenous opening (4 cm below and lateral to the pubic tubercle)
Ask the patient to cough or perform the Valsalva manoeuvre.
| Impulse felt on | Diagnosis |
|---|---|
| Index finger | Indirect inguinal hernia |
| Middle finger | Direct inguinal hernia |
| Ring finger | Femoral hernia |
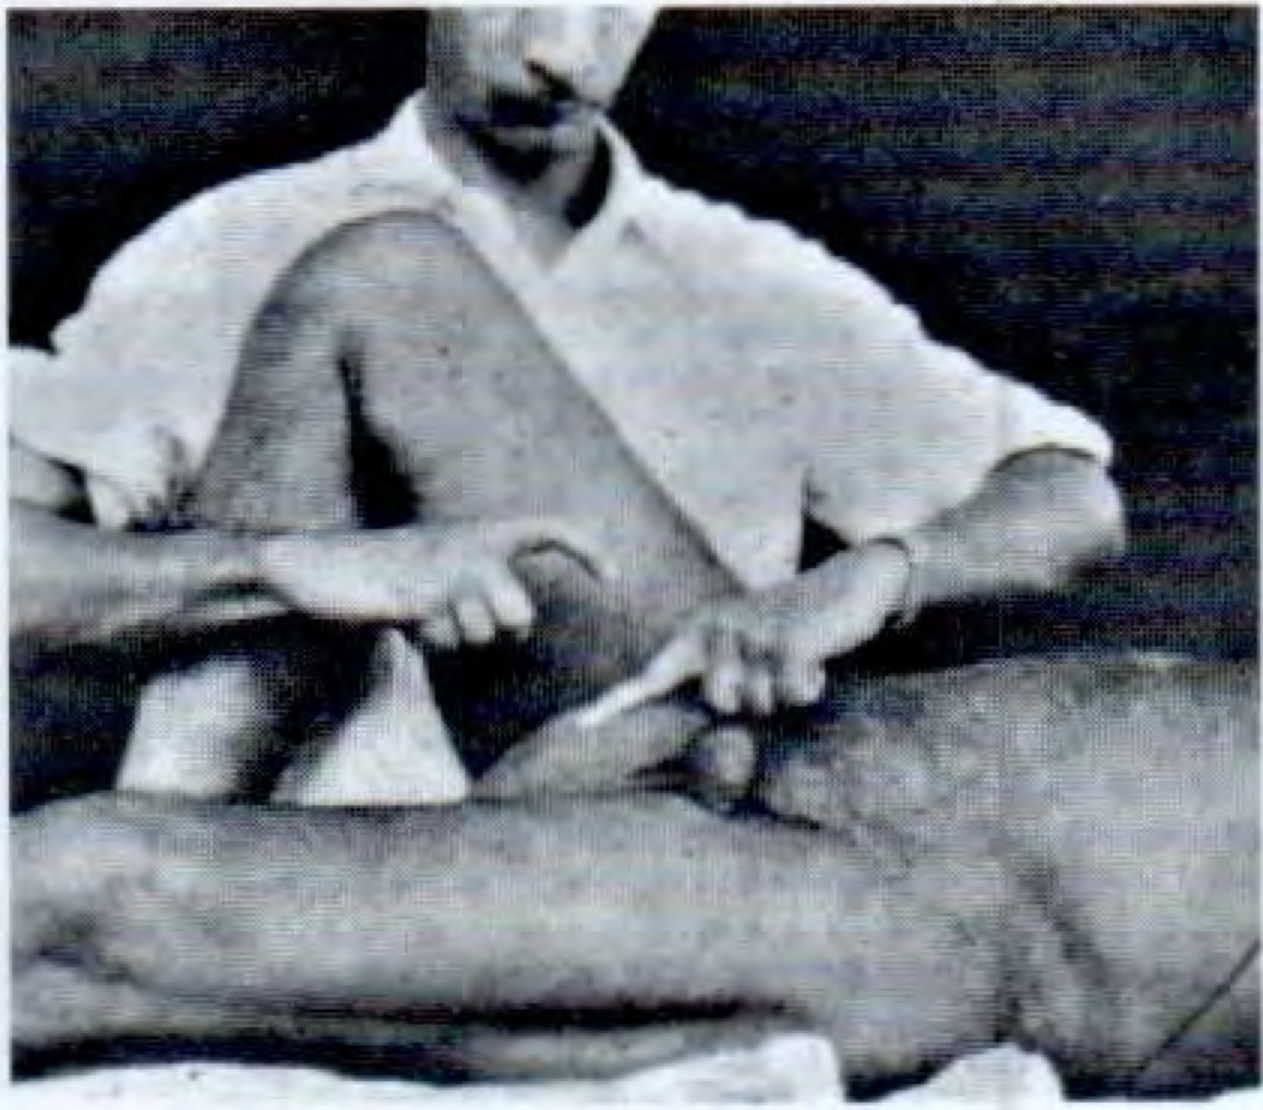
3. Invagination Test (Finger Invagination / Ring Palpation)
Position: Recumbent (preferred) or standing, after hernia is reduced.
The scrotal skin is invaginated with the examining finger and directed up along the spermatic cord into the inguinal canal until the tip of the finger reaches the superficial inguinal ring. The patient is then asked to cough.
- The normal ring is a triangular slit that admits only the tip of a finger.
- If more than one finger can be introduced easily, the ring is abnormally dilated.
- When the finger enters the ring - does it go directly backwards (direct hernia) or upwards, backwards, and outwards (indirect hernia)?
- Rotate the finger so the pulp looks backwards; ask the patient to cough:
- Impulse on the pulp = direct hernia
- Impulse on the tip = indirect (oblique) hernia
4. Ring Occlusion Test
Purpose: Confirmatory test to differentiate indirect from direct inguinal hernia.
Position: Patient standing, hernia must first be reduced.
Press the thumb firmly over the deep inguinal ring (½ inch above the midpoint between ASIS and symphysis pubis). Ask the patient to cough.

| Result | Interpretation |
|---|---|
| No bulge (hernia does not reappear) | Indirect hernia - it exits through the deep ring, which is now occluded |
| Bulge appears medial to the occluding thumb | Direct hernia - it pushes through the posterior wall of the canal, medial to the deep ring |
The same principle applies to femoral hernia: pressure over the femoral canal prevents its reappearance - this is the confirmatory test for femoral hernia.
5. Reducibility Test (Taxis)
Position: Patient lying supine. Flex, adduct, and internally rotate the thigh on the affected side (relaxes the oblique muscles and the superficial ring).
- Gently apply even pressure on the fundus of the sac, squeezing contents towards and through the superficial inguinal ring.
- Gurgling on reduction = enterocele (bowel content); first part is hard to reduce but the last part slips in easily.
- Omentocele: first part goes in easily, last part resists.
- If the hernia cannot be reduced = irreducible / obstructed / strangulated hernia.
6. Consistency Assessment
| Consistency | Content |
|---|---|
| Doughy and granular | Omentum (omentocele / epiplocele) |
| Elastic | Intestine (enterocele) |
| Tense and tender | Strangulated hernia |
7. Percussion Test
Percussion over the swelling:
- Resonant = enterocele (bowel)
- Dull = omentocele
8. Test in Children (Silk Glove Sign / Thickened Cord Sign)
In infants/children, a small inguinal hernia may be invisible due to a thick fat pad. Ask the child to jump from the examining table or make it cry (to raise intra-abdominal pressure).
Then palpate the spermatic cord as it emerges from the superficial ring. If a hernia is present, the cord will feel thicker than the opposite side due to the hernial sac. This is the silk glove sign (Gornall's test).
Summary Table
| Test | Position | Purpose |
|---|---|---|
| Impulse on coughing | Standing | Confirm hernia (two classical signs) |
| Reducibility | Lying | Confirm hernia, assess content |
| Zieman's technique | Standing, reduced | Classify: indirect / direct / femoral |
| Invagination test | Lying, reduced | Assess ring size; direct vs. indirect |
| Ring occlusion test | Standing, reduced | Confirm indirect vs. direct hernia |
| Percussion | Any | Identify content (bowel vs. omentum) |
| Thickened cord (children) | Standing | Detect hernia in infants |
Sources: S Das - A Manual on Clinical Surgery, 13th Edition; Bailey and Love's Short Practice of Surgery, 28th Edition; Schwartz's Principles of Surgery, 11th Edition
Open mesh hernioplasty step by step
Finding Sources
Finding Sources
Finding Sources
Finding Sources
Reading File
Reading File
Reading File
Reading File
Reading File
Reading File
Reading File
Reading File
Reading File
Loading Image
Loading Image
Loading Image
I have all the content and images needed. Here is the comprehensive step-by-step guide:
Open Mesh Hernioplasty (Lichtenstein-Amid Technique) - Step by Step
The Lichtenstein tension-free hernioplasty is the gold standard for open inguinal hernia repair, with a recurrence rate of only 1-1.6%. The inguinal floor is reinforced by a sheet of polypropylene mesh placed between the transversalis fascia and the external oblique aponeurosis - avoiding tissue tension entirely.
Preoperative Preparation
- Patient optimization: Stop smoking, control BMI and HbA1c before elective repair.
- Antibiotic prophylaxis: A single dose covering skin flora may be given (varies by institutional protocol).
- Chlorhexidine wash the night before; patient should NOT shave the site.
- Anesthesia: Local anesthesia with MAC sedation is preferred. A 50:50 mixture of 1% lidocaine + 0.5% bupivacaine with 1:200,000 epinephrine is used.
- 5 mL subdermal along incision line
- 5 mL intradermal
- 10 mL deep subcutaneous
- 10 mL subaponeurotic (beneath external oblique) - this bathes the ilioinguinal, iliohypogastric, and genitofemoral nerves
- Additional injection near pubic tubercle and neck of indirect sac as needed
Step 1 - Patient Positioning & Skin Incision
- Position: Supine, both arms abducted; surgeon stands on the side of the hernia.
- Incision: Oblique transverse skin incision, ~6 cm long, starting 1-2 cm above the pubic tubercle, extending along Langer lines toward the anterior superior iliac spine.
- Divide subcutaneous tissues; identify and ligate the superficial epigastric vein.
Step 2 - Opening the External Oblique Aponeurosis
- Expose the external oblique aponeurosis (EOA).
- Incise the EOA in the direction of its fibres from the superficial (external) inguinal ring extending laterally.
- Lower leaf of EOA is separated from the spermatic cord below.
- Upper leaf of EOA is freed from the underlying internal oblique until the internal oblique aponeurosis and conjoined tendon are exposed.
- Goal: create ample space on the floor of the inguinal canal - the mesh must overlap the internal oblique aponeurosis by at least 3 cm above the upper margin of the inguinal floor.
- Identify and protect the ilioinguinal and iliohypogastric nerves as they cross laterally within the canal.
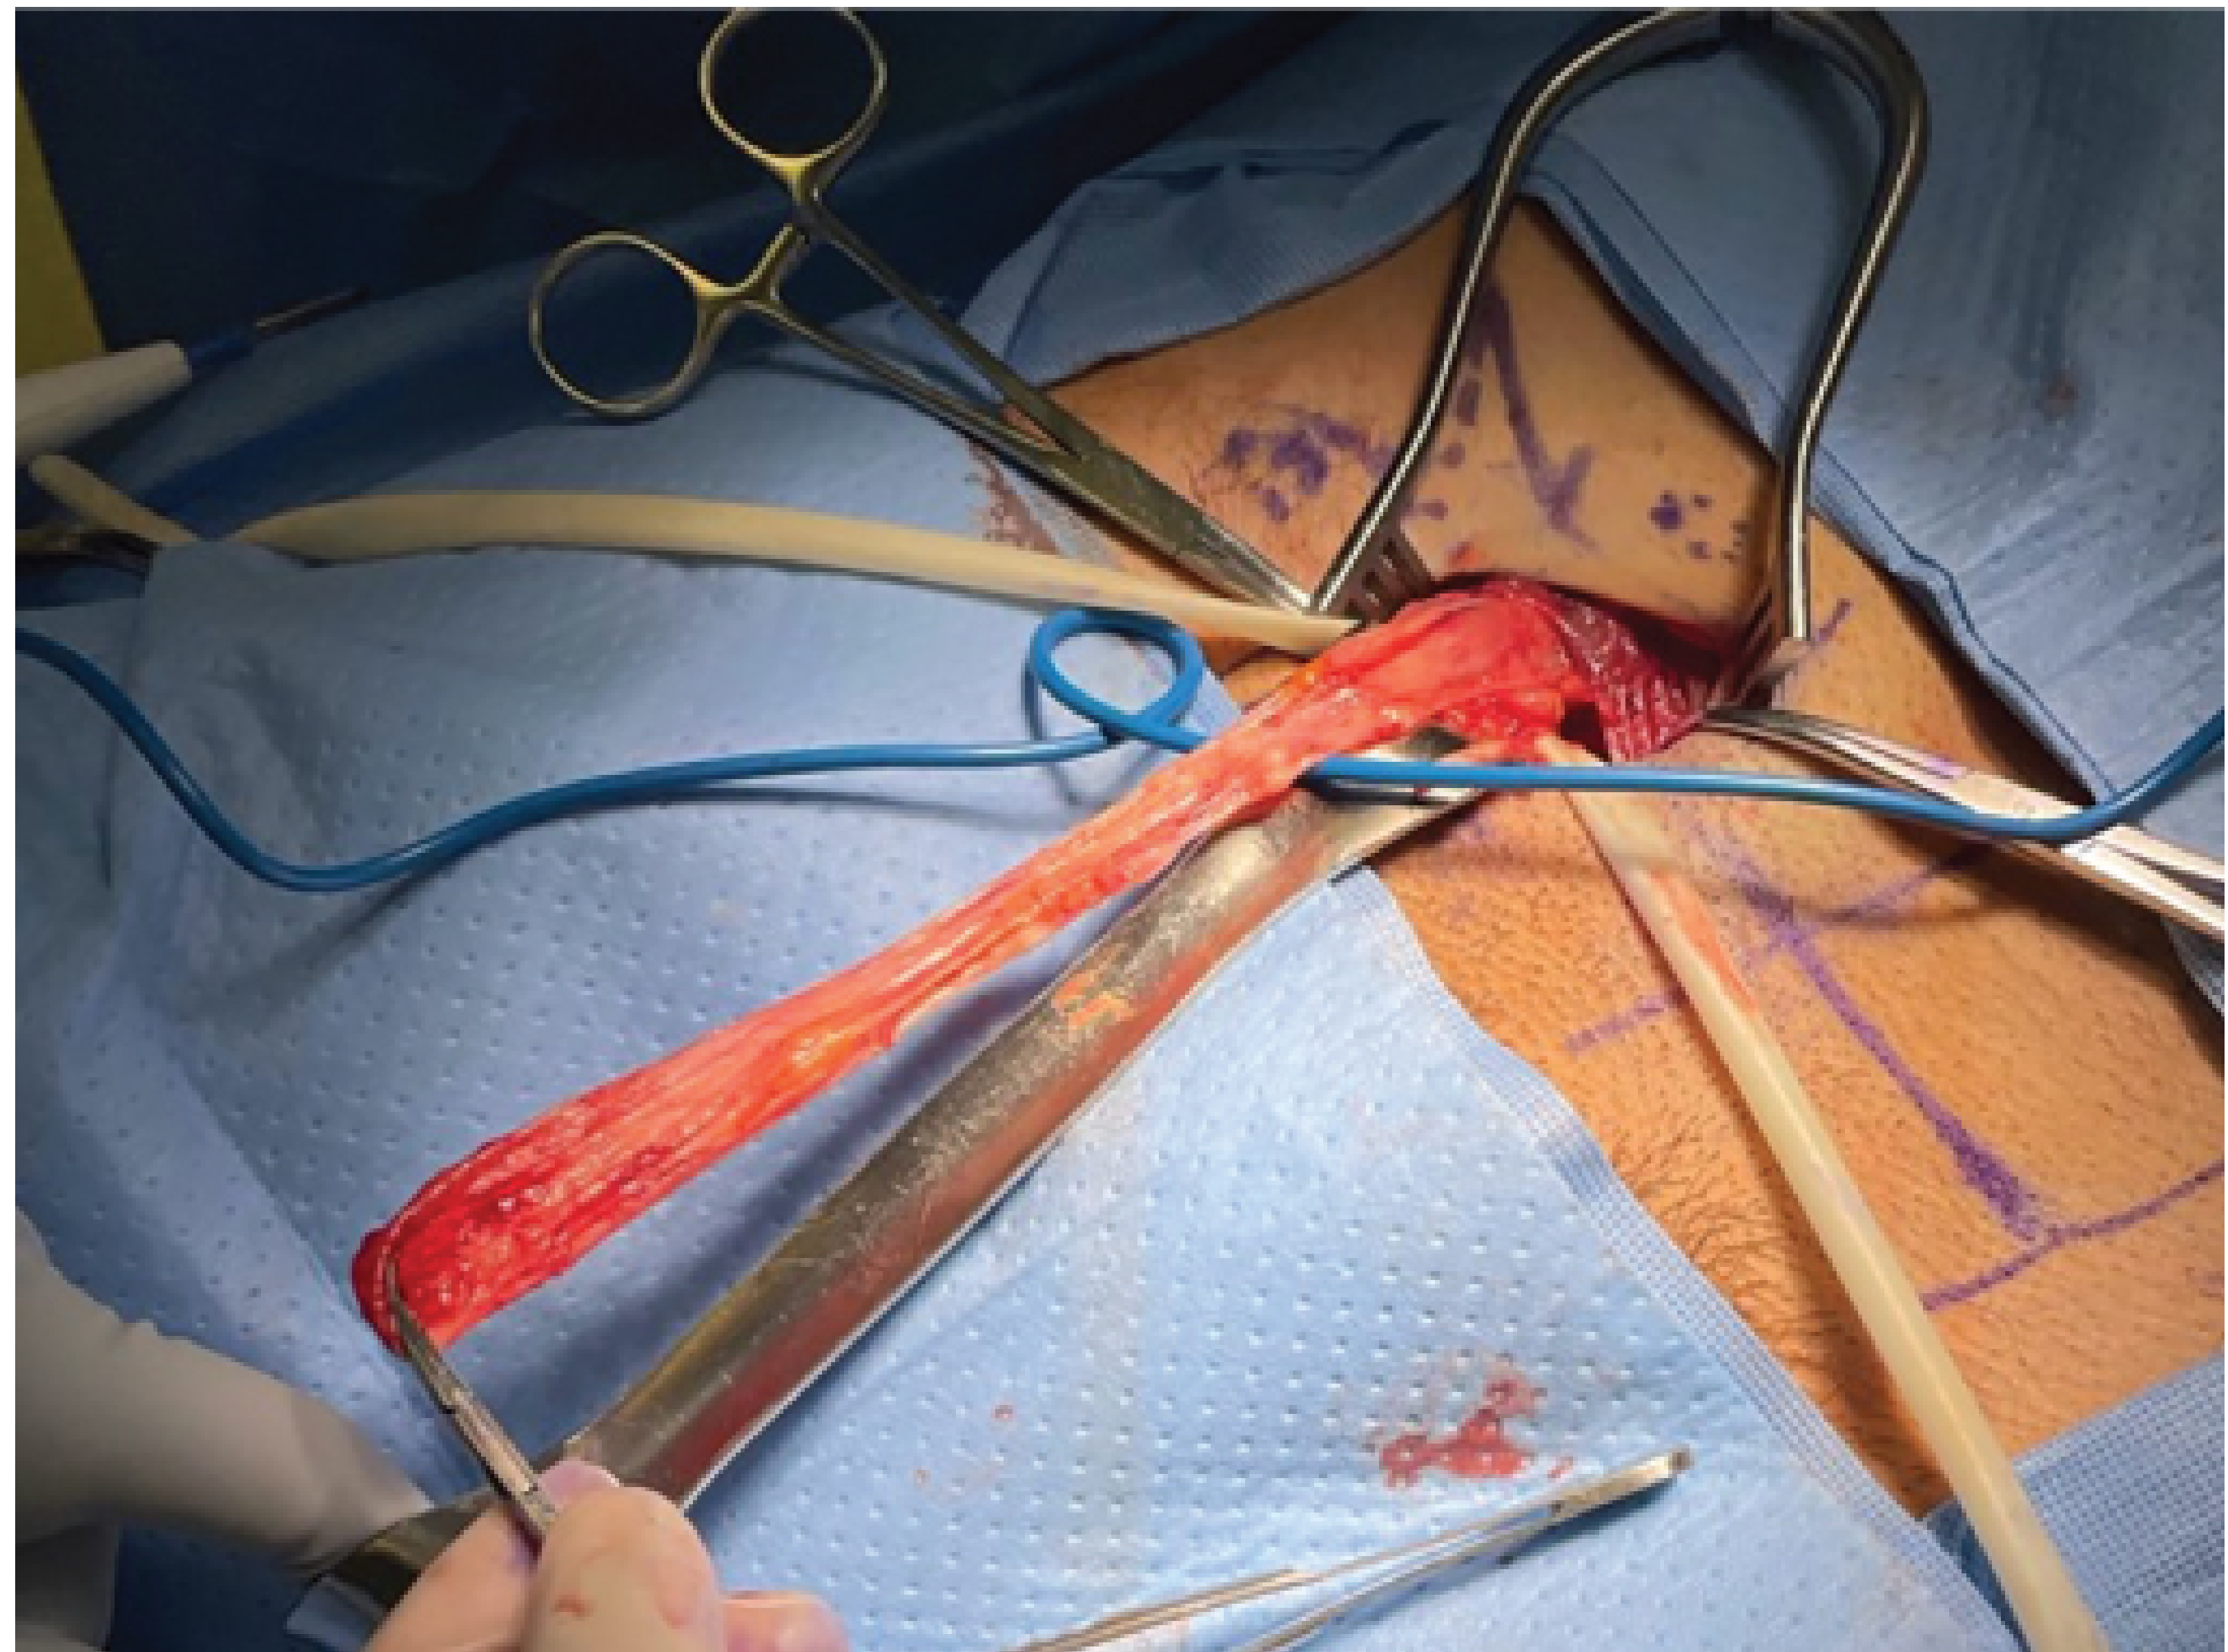
Step 3 - Cord Mobilization
- Separate the spermatic cord from the floor of the inguinal canal and the pubic bone, starting 2 cm caudal to the pubic tubercle.
- Use an atraumatic Kittner dissector (pledget) to lift the cord.
- Identify and preserve the ilioinguinal nerve along with cremasteric muscle fibres.
- Identify the blue external spermatic vein and the adjacent white genital branch of the genitofemoral nerve - both preserved in situ.
- Do not strip cremasteric fibres completely (unlike the older technique); complete stripping increases risk of chronic pain and orchialgia.
Step 4 - Hernia Sac Management
Indirect Hernia Sac:
- Incise the cremasteric sheath longitudinally at the level of the deep ring.
- Dissect the sac free from the cord toward the internal inguinal ring until it can be reduced back into the preperitoneal space.
- Reduce the sac without ligation - opening and ligating the sac may increase the risk of early postoperative complications without reducing recurrence.
Direct Hernia Sac:
- The direct sac (posterior wall bulge) is simply inverted without tension using a few absorbable sutures if needed.
Large Cord Lipoma:
- Any sizeable cord lipoma should be resected, as it may later be mistaken for recurrence.
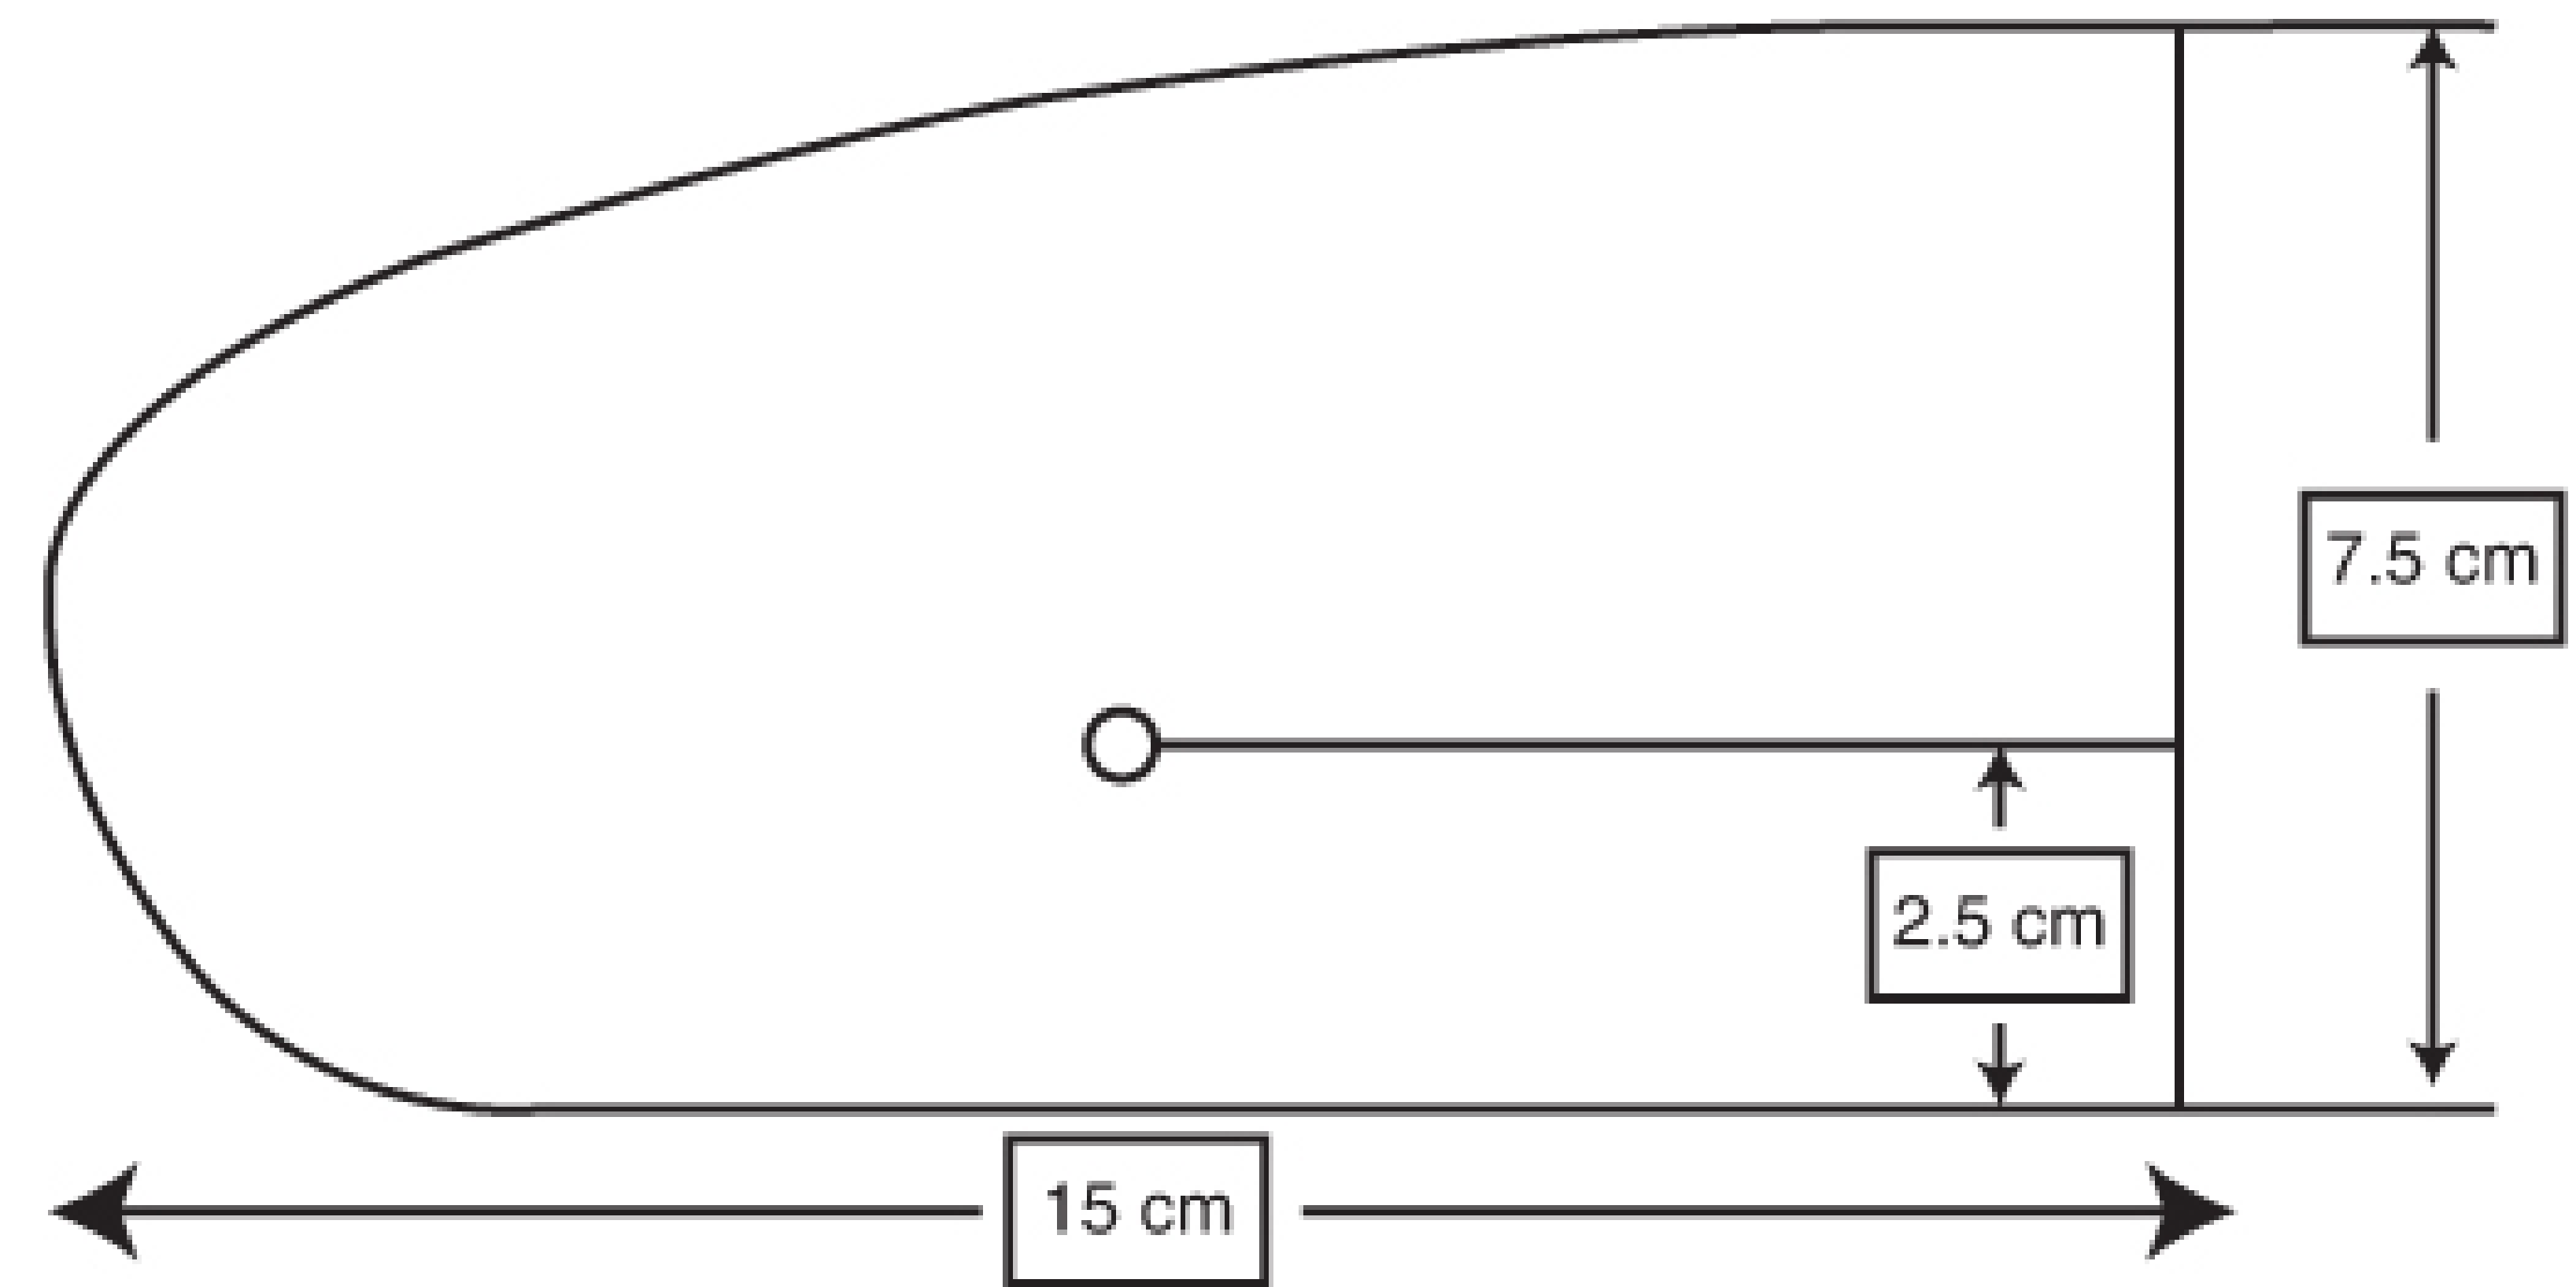
Step 5 - Mesh Selection and Trimming
- Use a 7.5 × 15 cm sheet of mid-weight flat polypropylene mesh (the "standard" Lichtenstein shape).
- The medial end is rounded to match the angle between the inguinal ligament and the rectus sheath at the pubic tubercle.
Step 6 - Mesh Placement and Fixation (Lower Edge)
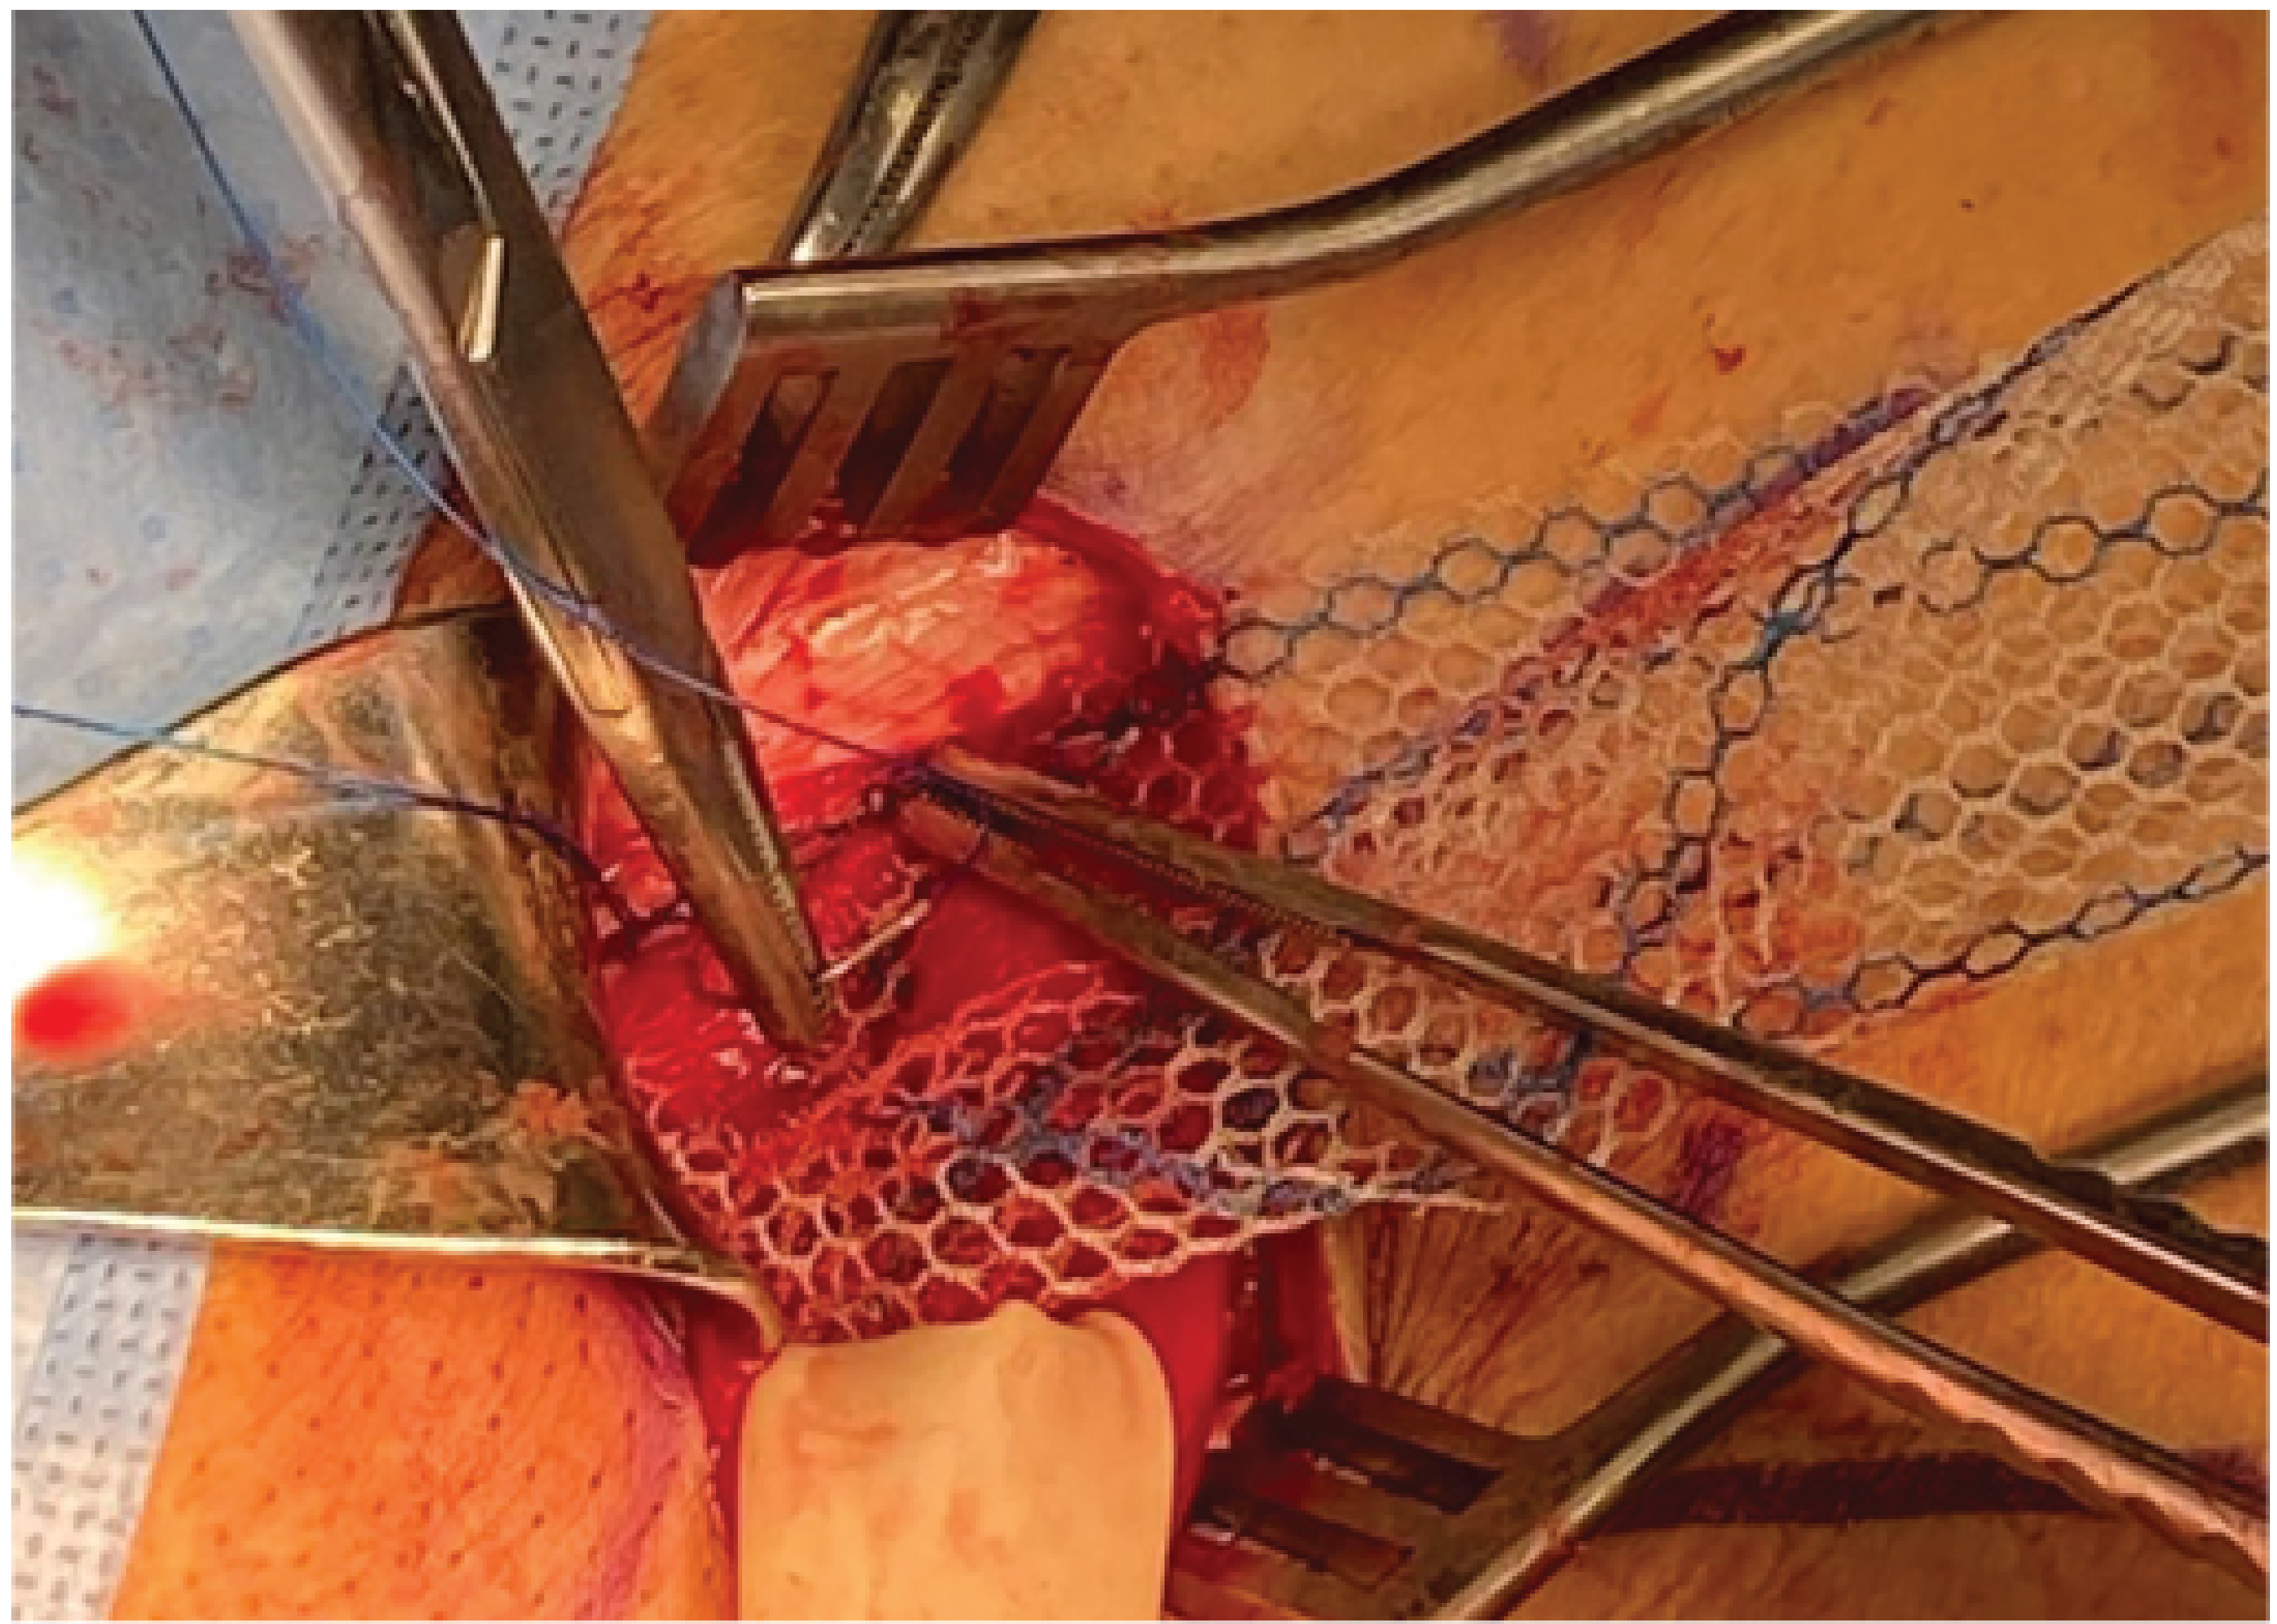
- The medial (rounded) end of the mesh is fixed with a 2-0 nonabsorbable monofilament suture starting at the insertion of the rectus sheath at the pubic bone.
- Overlap the symphysis pubis by 1.5-2 cm medially - this prevents inferomedial recurrence as mesh contracts over time.
- Avoid the periosteum of the pubic tubercle to prevent osteitis pubis.
- The same running suture continues laterally along the shelving edge of the inguinal ligament up to a point just lateral to the internal ring.
- Depth of bites carefully controlled to avoid the femoral artery and vein lying deep to the ligament.
- Do not extend too far laterally - risks injury to the femoral nerve.
Step 7 - Splitting the Mesh (Creating Tails for the Internal Ring)
- At the lateral end of the mesh, make a slit creating:
- Upper (wider) tail = approximately 2/3 of the mesh width
- Lower (narrower) tail = approximately 1/3 of the mesh width

- Grasp the wider upper tail with forceps and pass it from underneath the spermatic cord toward the patient's head - this positions the cord between the two tails.
- Cross the upper tail over the narrower lower tail and hold with a hemostat.
Step 8 - Fixation of the Upper Edge
- With cord retracted downward and upper leaf of EOA retracted upward, fix the upper edge of the mesh using typically 3 interrupted 2-0 absorbable sutures:
- One suture to the rectus sheath (medially)
- Others to the internal oblique aponeurosis medial to the internal ring
- Suture parallel to the iliohypogastric nerve direction and tie loosely to avoid nerve entrapment.
Step 9 - Recreating the Internal Ring
- Using a single nonabsorbable monofilament suture, fix the lower lateral edges and the overlapping tails of the mesh to the inguinal ligament just lateral to the last knot of the lower running suture.
- This recreates the internal ring around the spermatic cord.
- The neoring should accommodate the tip of forceps but not the surgeon's index finger (snug but not strangulating).
- Trim excess mesh laterally, leaving at least 4 cm beyond the internal ring to cover any coexisting interstitial or Spigelian hernia.
- Tuck this excess under the external oblique aponeurosis.
Step 10 - Closure
- External oblique aponeurosis is closed over the cord with a running absorbable suture, reconstructing the superficial inguinal ring.
- Scarpa's fascia is reapproximated with absorbable sutures.
- Skin is closed with a running absorbable subcuticular suture.
Postoperative Care
- Discharge: Same-day (day-case surgery).
- Activity: Normal ambulation and stair climbing immediately; avoid heavy Valsalva-type straining in the early postoperative period.
- Analgesia: Oral analgesics; local anaesthetic left in the canal before closure prolongs effect.
Key Anatomical Landmarks to Protect
| Structure | Location | Risk if Injured |
|---|---|---|
| Ilioinguinal nerve | Runs within inguinal canal | Chronic groin/scrotal pain |
| Iliohypogastric nerve | Runs along internal oblique | Numbness, chronic pain |
| Genital branch of genitofemoral nerve | Within cremasteric sheath | Cremasteric reflex loss, orchialgia |
| Femoral artery & vein | Deep to inguinal ligament | Catastrophic hemorrhage |
| Femoral nerve | Lateral to femoral vessels | Motor deficit (quadriceps) |
| Vas deferens & testicular vessels | Within spermatic cord | Testicular ischemia / atrophy |
Variations of Open Mesh Repair
| Technique | Key Feature | Notes |
|---|---|---|
| Lichtenstein-Amid | Flat mesh, anterior approach | Gold standard; recurrence 1-1.6% |
| Plug and Patch | Cone plug + flat onlay patch | Risk of plug migration/erosion; not recommended by HerniaSurge |
| Prolene Hernia System (PHS) | Bilayer dumbbell-shaped mesh | Reinforces both anterior and posterior to transversalis fascia |
| Open Preperitoneal (Stoppa) | Large chevron mesh via midline | Covers entire myopectineal orifice; bilateral repairs |
| TIPP/TREPP | Less invasive preperitoneal | Transinguinal/transrectus sheath approaches |
Sources: Fischer's Mastery of Surgery, 8th Edition (Chapter 220); Mulholland & Greenfield's Surgery, 7th Edition; Schwartz's Principles of Surgery, 11th Edition
This is a shared conversation. Sign in to Orris to start your own chat.