
Tendon Suturing techniques in orthopaedics for 10 marks. Give diagrams
tendon suturing techniques orthopaedics Kessler Bunnell
tendon repair suture technique diagram
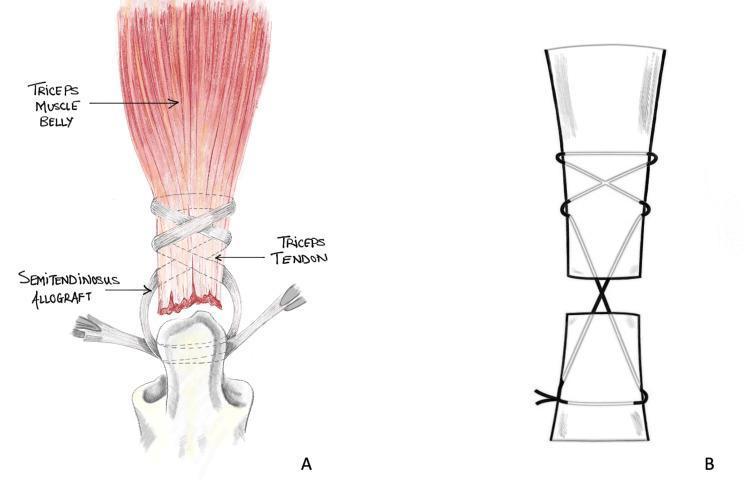
This orthopaedic illustration depicts the Bunnell suture repair technique used for triceps tendon ruptures. Image A is a detailed anatomical drawing showing the triceps muscle belly in red, distal triceps tendon, and a semitendinosus allograft. The allograft is looped around the triceps tendon and secured to the distal bone (olecranon) using the Bunnell technique. The repair features non-absorbable sutures woven in a characteristic criss-cross, figure-of-eight pattern (whipstitch) through the tendon substance to provide high tensile strength and minimize suture pullout. Image B provides a simplified schematic diagram of the same Bunnell stitch configuration, highlighting the 'X' shaped intersections of the suture and the horizontal locking components that bridge the gap between two ends of a ruptured tendon or a tendon-bone interface. This visual material is intended for orthopedic education regarding surgical management of tendon injuries and biomechanical stability in ligamentous repair.
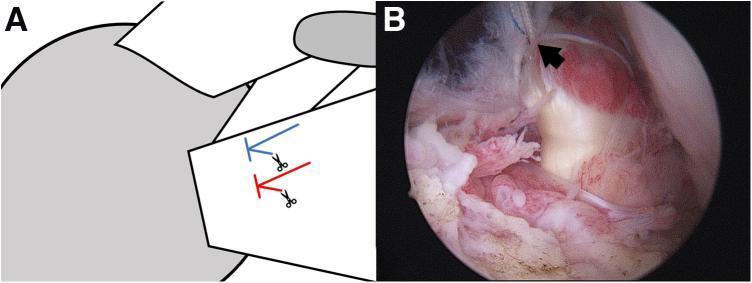
This composite educational graphic details a subscapularis tendon repair technique. Panel A is a simplified schematic diagram illustrating the management of two mattress sutures placed in the tendon stump. Scissor icons indicate the cutting of one limb from each mattress suture, while blue and red lines represent the remaining limbs retained for further repair stages. Panel B is an intra-operative arthroscopic photograph showing the corresponding surgical view within the shoulder joint. A black arrow in Panel B points to the two retained white, braided suture limbs emerging from the repaired subscapularis tendon. The surgical field displays the reddish-pink, fleshy texture of the tendon stump anchored to the lighter-colored bony footprint of the lesser tuberosity. This visual aids in understanding complex suture management during arthroscopic rotator cuff repair, specifically the transition between primary tendon fixation and subsequent suture bridging or comma tissue repair.
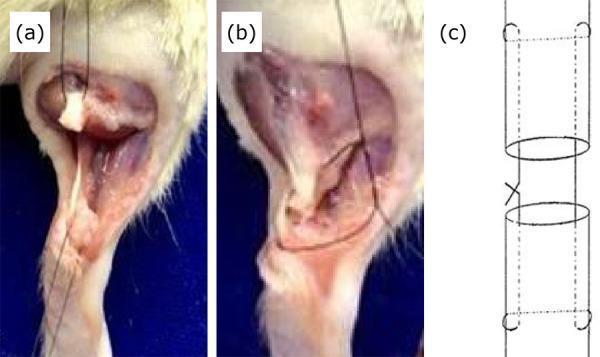
This composite image illustrates the surgical repair of an Achilles tendon injury, likely in an animal model, consisting of two clinical photographs and one schematic diagram. Frame (a) is a clinical photograph depicting a complete tenotomy where the Achilles tendon has been isolated and severed, showing the characteristic gap between the proximal and distal tendon ends within the surgical field. Frame (b) shows the subsequent tenorrhaphy procedure, with the tendon ends being re-approximated using monofilament sutures. Frame (c) provides a schematic representation of the modified Kessler stitch used for the repair. The diagram highlights the suture path, which includes longitudinal intratendinous passes and transverse interlocking loops (indicated by circles) that terminate in a knot. This specific suture technique is an orthopedic standard designed to maximize mechanical stability and resist gapping at the repair site by distributing tension across the tendon fibers. The content serves as an educational reference for orthopedic surgical techniques and tendon healing research.
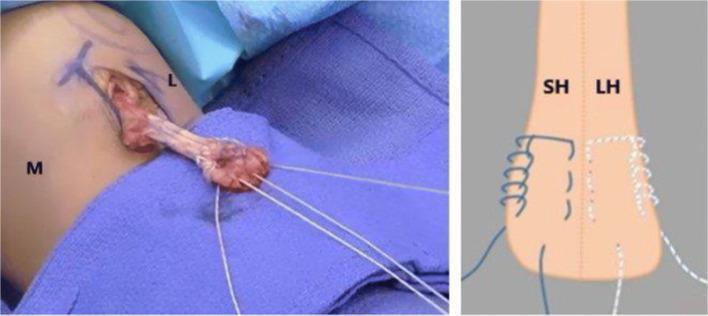
A composite image consisting of an intraoperative photograph (left) and a corresponding anatomical diagram (right) focusing on orthopedic surgical repair of the distal biceps tendon. The clinical photograph displays a surgical incision at the antecubital fossa with the distal biceps tendon exteriorized. The tendon is bifurcated into two distinct heads, labeled 'M' for medial and 'L' for lateral in the surgical field. Suture material is shown interlaced through each tendon head using a four-throw modified Krackow whipstitch technique, with long suture leads extending distally for eventual reattachment to the radial tuberosity. The anatomical diagram on the right provides a schematic representation of this technique, labeling the bifurcated tendon as 'SH' (short head) and 'LH' (long head). It illustrates the specific looping and locking mechanism of the Krackow stitch on each side of the tendon mid-substance, emphasizing the anatomical separation of the bifid distal biceps for anatomic footprint restoration during surgical reattachment.
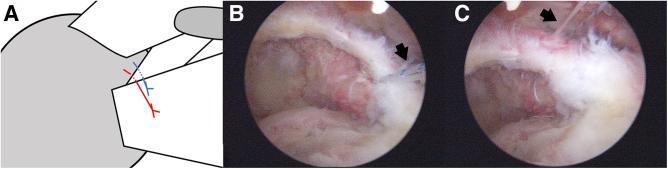
This composite educational material demonstrates the surgical management of a subscapularis tendon tear in the right shoulder, specifically focusing on the 'comma tissue' repair. Panel A provides an anatomical line diagram illustrating the relationship between the humeral head, subscapularis, and the arc-shaped comma tissue (superior glenohumeral ligament/coracohumeral ligament complex). Panel B is an arthroscopic image showing the subacromial space after initial subscapularis repair; two retained blue suture limbs (black arrow) are visible near the irregularly textured comma tissue. Panel C shows the same arthroscopic view following the completion of the comma tissue repair. The sutures (black arrow) have been passed through the tissue using an antegrade suture passer, effectively securing the comma tissue to the repaired tendon complex. This technique is used to restore the anatomical stability of the rotator cuff. The images demonstrate key landmarks including the humeral head, the subscapularis tendon stump, and the fibrous comma sign, highlighting the transition from initial suture retention to final tissue fixation.
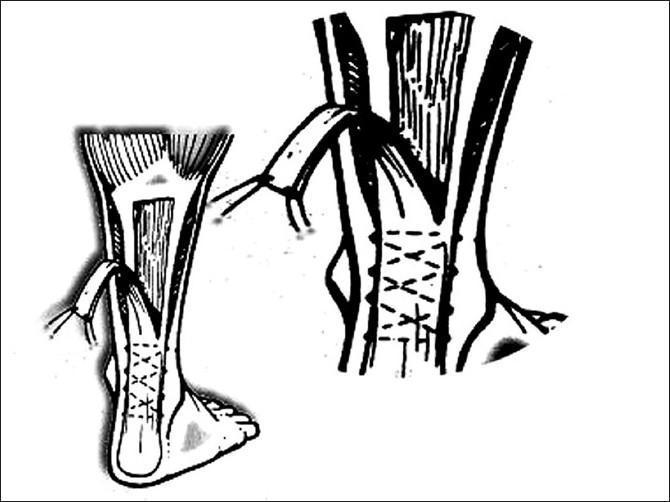
This medical illustration depicts a surgical technique for Achilles tendon repair reinforced with a gastrosoleus fascia turn-down flap. The line diagram is divided into two views showing the posterior aspect of the lower leg and ankle. The left view shows the harvest site of a longitudinal fascial strip from the gastrosoleus complex, which is reflected distally. The right view provides a detailed anatomical perspective of the repair site, where the Achilles tendon has been sutured using a series of three parallel, criss-cross (X-pattern) suture lines. The gastrosoleus fascia strip is illustrated as being rotated or twisted 180 degrees to overlay and reinforce the primary tendon repair site. This surgical algorithm is characteristic of chronic Achilles tendon rupture management, where local tissue transfer is utilized to bridge gaps or augment the structural integrity of the weakened tendon. The diagram highlights key surgical landmarks including the calcaneus, the Achilles tendon body, and the proximal gastrocnemius muscle belly.
Kessler suture flexor tendon repair finger
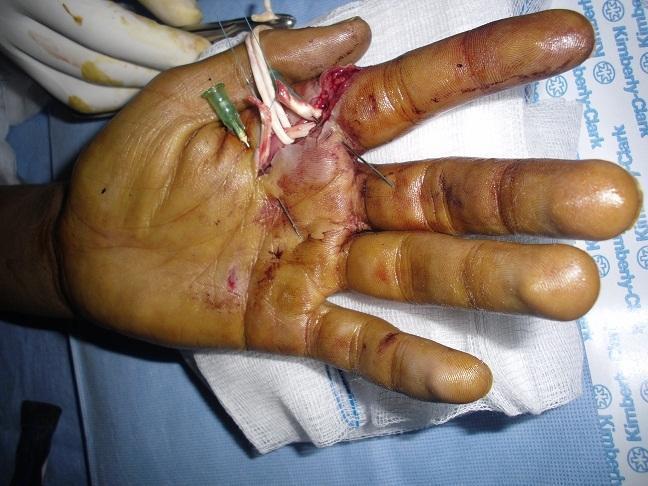
Clinical photograph of an intraoperative surgical procedure for flexor tendon repair in the hand. The image focuses on the palmar aspect, demonstrating the repair of a sectioned flexor tendon, specifically utilizing the modified Kessler suture technique. Visible components include exposed flexor tendons in Zone II, held and manipulated with surgical needles and sutures. A green-hubbed hypodermic needle is used for stabilization of the tendon ends. The surgical field shows a vertical incision near the base of the index finger and distal palmar crease, with sutures already placed in the surrounding skin. There is evidence of localized soft tissue trauma, bruising, and bloodstains. The background includes sterile surgical drapes, gauze, and a gloved hand, providing clinical context for orthopedic or plastic surgery training regarding hand trauma and tendon reconstruction.
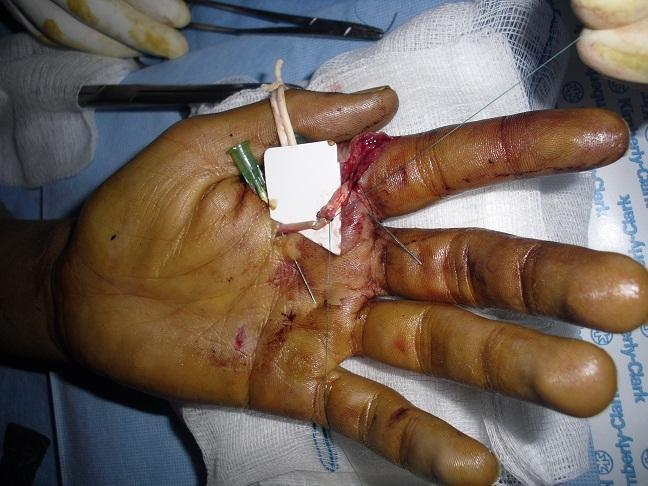
This clinical photograph captures an intraoperative view of an orthopedic surgical procedure on a human hand, specifically a flexor tendon repair in Zone II (the 'no man's land' of the hand). The image demonstrates the Kessler suture technique, a core suture method used to provide high tensile strength during tendon end-to-end anastomosis. Visible pathology includes a significant laceration across the base of the index finger and the distal palmar crease, with exposed underlying soft tissue and minor hemorrhage. Surgical instrumentation is present, including hypodermic needles used as temporary transfixion pins to stabilize the tendon ends and a white protective plate or background material used to isolate the surgical site. A rubber band traction system is also visible, likely part of a dynamic splinting or mobilization protocol (such as the Kleinert or Duran technique) to prevent post-operative adhesions. This visual is highly relevant for hand surgery education, specifically regarding primary flexor tendon reconstruction and intraoperative stabilization methods.
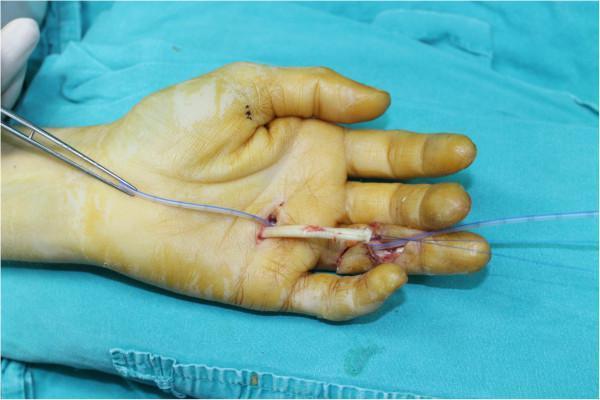
This clinical photograph demonstrates an intraoperative view of a flexor tendon repair in the hand. The patient's hand is shown in a supine position, prepared with a yellow-tinted antiseptic solution. Two surgical incisions are visible on the index finger: a proximal incision at the distal palmar crease near the metacarpophalangeal joint and a distal incision at the level of the distal interphalangeal joint. A blue-tinted 8-French (F) suction catheter is used as a conduit, passing through the tendon sheath tunnel. The proximal end of a retracted flexor tendon has been delivered through the palmar incision and is held by a 3-0 polypropylene half-modified Kessler suture, which is being threaded through the catheter. The surgical field highlights the technique for retrieving a retracted tendon and bypassing the pulley system without causing further trauma to the sheath. Forceps are used to guide the catheter and suture. The image serves as a pedagogical resource for orthopedic and hand surgeons regarding tendon reconstruction and suturing techniques.
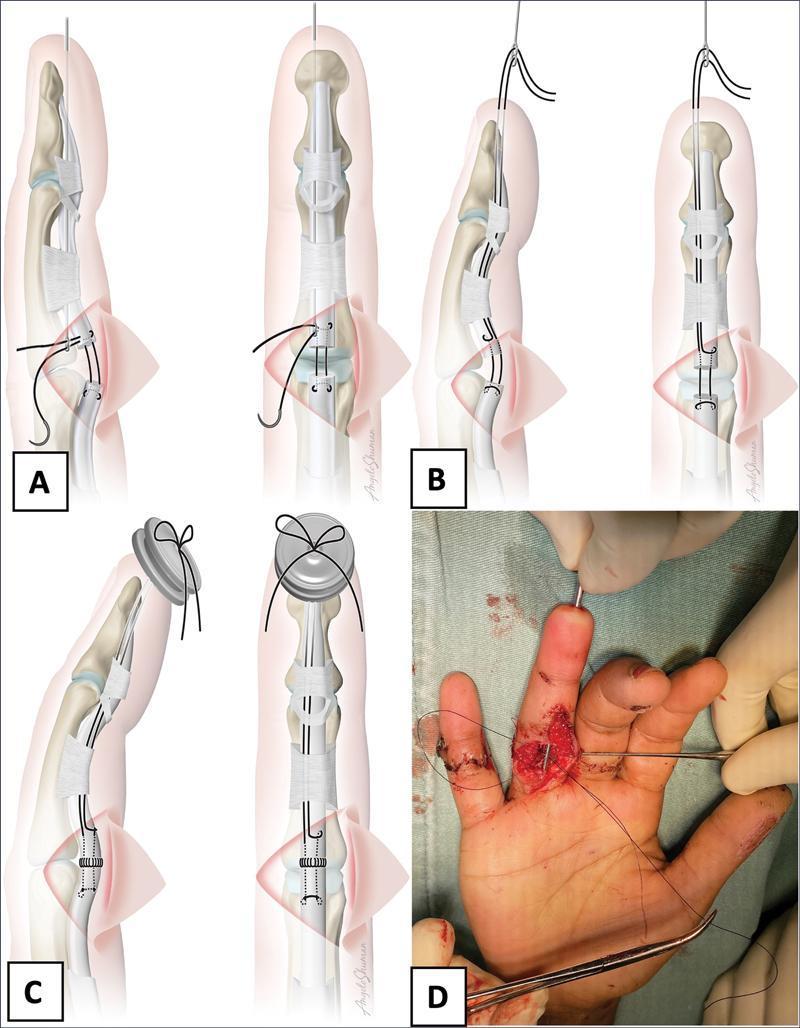
A multi-panel educational graphic demonstrating a modified pull-out suture technique for flexor digitorum profundus (FDP) tendon repair in the hand. Panels A, B, and C provide anatomical illustrations in lateral and anterior views, while panel D is a corresponding intraoperative clinical photograph. Panel A shows the introduction of a specialized 1.4 mm suture passer through the osteofibrous tunnel and digital pulp. Panel B illustrates the retrieval of 3-0 mononylon suture ends, previously secured to the proximal FDP stump via a modified Kessler tie, being guided distally toward the fingertip. Panel C depicts the final fixation of the pull-out sutures over a protective silicone button (shield) on the digital pulp, shifting traction forces away from the primary repair site. Panel D shows the clinical application, highlighting the mid-palmar incision, the suture passer exiting the distal tip of the third finger, and the use of surgical instruments to manage the suture threads. This technique is designed for hand surgery training, emphasizing tendon gliding preservation and soft tissue protection during early mobilization.
Tendon Suturing Techniques in Orthopaedics
Introduction
- Suture bites should be 0.7-1.0 cm from the cut end to prevent fraying
- At least 4 core strands are needed for early active mobilization protocols
- Knots should be buried within the repair or between cut ends to minimize catching within the pulley system
- Suture material: non-absorbable braided polyester (3-0 or 4-0); avoid silk, plain gut, chromic gut
Classification of Tendon Suture Techniques
A. Core (Central) Sutures
B. Peripheral (Epitendinous) Sutures
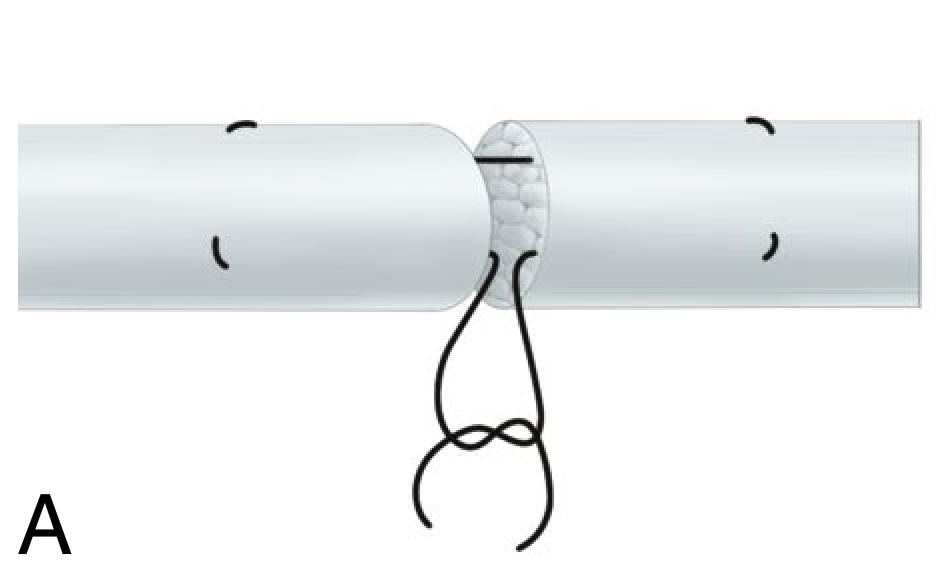
1. Modified Kessler Technique (Most Widely Used)
- Insert needle into the cut end of one tendon stump, pass longitudinally 0.7-1.0 cm proximally, exit laterally
- Make a transverse purchase across the tendon, re-enter and pass back toward the cut end
- The needle exits at the cut surface
- Repeat on the other tendon stump with the same or second suture
- Tie the knots between the two cut ends (buried knot)
- Finish with an epitendinous circumferential suture (5-0 or 6-0 nylon/polypropylene)
- Locking loops grip tendon fascicles - resists pullout
- Knot is buried between the cut ends - smooth repair
- Cadaver studies show it is the most widely reproducible and dependable technique
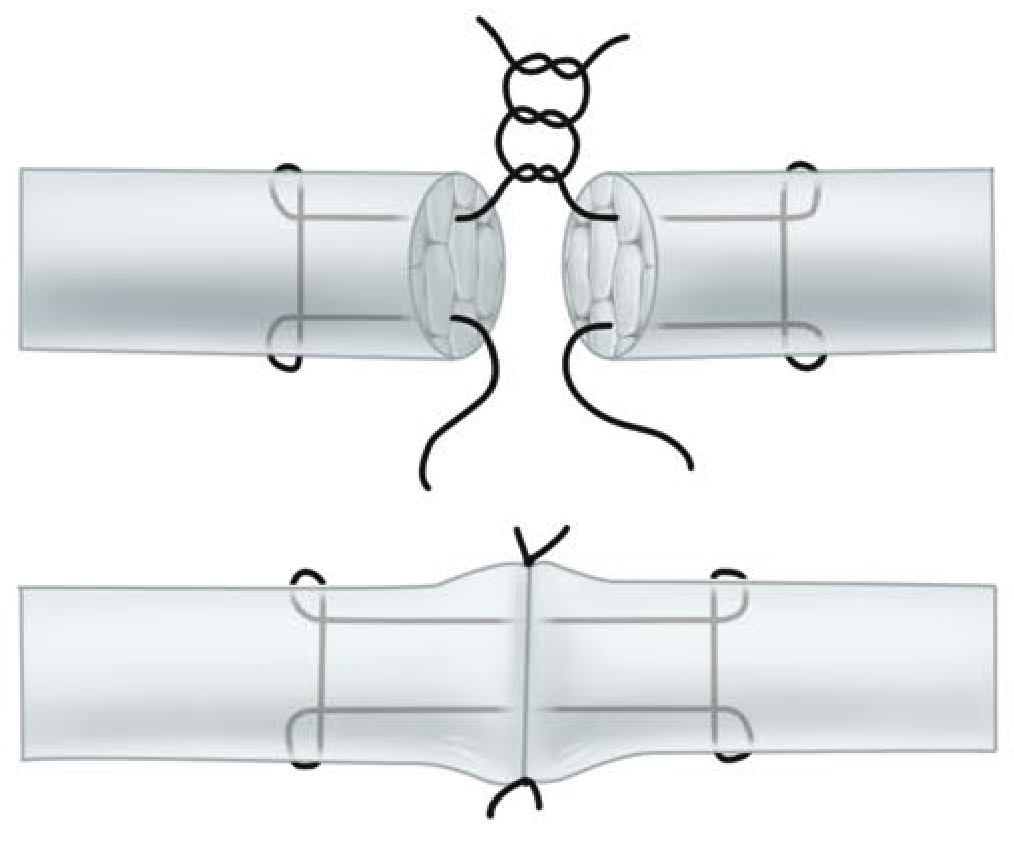
2. Modified Bunnell Technique
- Insert suture into tendon end, weave in a zigzag (figure-of-eight) pattern through the tendon substance
- Crosses the repair site at the core
- Weave the other half through the opposite stump
- Tie the ends at the repair site
- Characteristic criss-cross X-pattern through tendon substance
- High tensile strength - cadaver studies show superior strength for extensor tendon repairs
- More technically demanding than Kessler
- Historically the most widely described technique for flexor tendon repairs
3. Four-Strand Cruciate / Cross-Stitch Repair
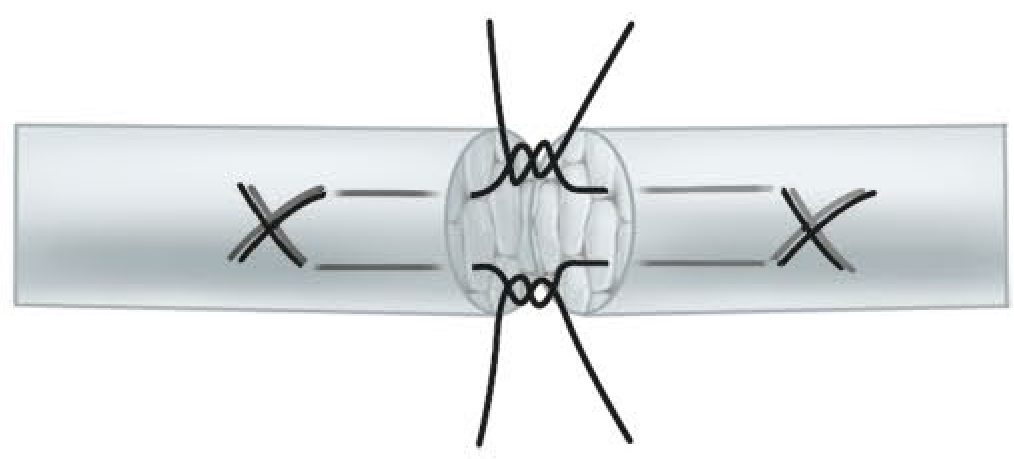
- Insert needle laterally into proximal tendon end on volar surface within 1 cm of repair site
- Run strand longitudinally across repair site; exit 1 cm past repair site distally
- Pass needle transversely in distal part, crossing the loop
- Reinsert into distal tendon end; cross repair site at dorsal surface; exit proximally
- Reintroduce suture transversely to make a loop
- Tie knot
- Repeat same passage on opposite side of tendon
- Complete with peripheral 6-0 monofilament polypropylene suture
4. Eight-Strand Repair (Winters and Gelberman)
- Insert needle at repair site, extend through posterolateral quadrant, exit 1 cm from cut tendon edge
- Working counterclockwise, anchor transversely in the distal tendon
- Complete first posterolateral rectangle by paralleling first suture pass
- Carry out same procedure in opposite tendon stump, completing a dorsal rectangle
- Advance needle into palmar half; complete configuration to achieve 8 strands across repair site
5. Modified Becker / Massachusetts General Hospital (MGH) Technique
6. Running Interlocking Horizontal Mattress (RIHM)
- Start with a simple running suture directed away from surgeon using 4-0 non-absorbable suture
- Using same suture, place running mattress directed back toward the operator
- Interlock each returning throw underneath the previously crossed suture
- Tie at the near end outside the tendon
- Significantly stiffer repair
- Less tendon shortening
- Less tendon exposure required
- Less time to perform
- Withstands forces of early active motion
- Recommended for extensor tendon zone 6 repairs
7. Multiple Looped Suture Repair (Campbell's Technique)
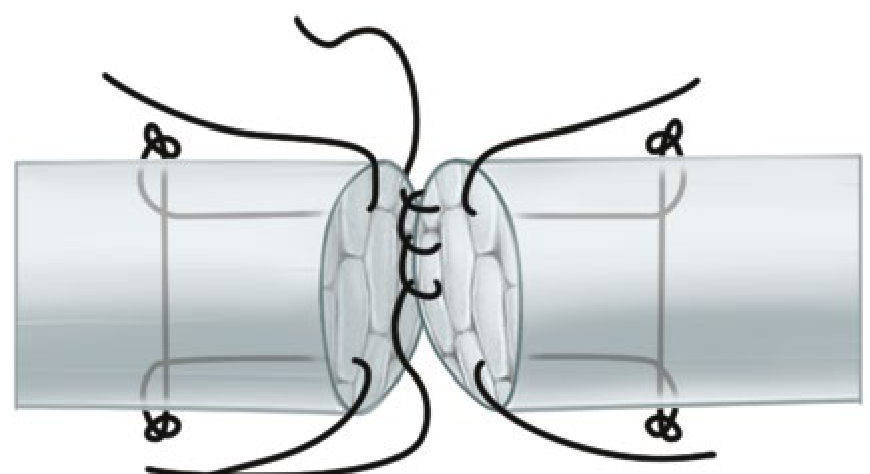
- Insert sutures (Tajima core configuration) into each tendon end
- Tie knots within the tendon
- Add a running-lock dorsal epitendinous suture (5-0 or 6-0 nylon)
- Complete the back wall suture
- Add horizontal mattress suture (4-0 braided polyester) to core configuration
- Tie all knots of core sutures
- Complete palmar running-lock peripheral epitendinous suture
8. Figure-of-Eight and Horizontal Mattress Sutures
- Simpler technique
- Less technically demanding
- Used in partial tendon lacerations (>60% cross-sectional involvement)
- 5-0 absorbable or non-absorbable suture
9. Epitendinous (Peripheral) Suture
- 5-0 or 6-0 nylon/polypropylene running cross-stitch circumferentially around repair
- Reduces bulk at repair site (prevents triggering in the pulley system)
- Adds 10-50% additional strength to the repair
- Smooth surface promotes tendon gliding
- Epitendon-first technique was found to be 22% stronger than modified Kessler alone
Modified Kessler Intraoperative Image
Summary Table
| Technique | Strands | Best Use | Key Feature |
|---|---|---|---|
| Modified Kessler | 2 | Flexor/extensor tendons, general | Locking grasp; buried knot |
| Modified Bunnell | 2 | Flexor, extensor; small tendons | Criss-cross weave; high strength |
| Modified Tsuge / Chung | 4 | Flexor tendons, active mobilization | Looped configuration; 4-strand |
| MGH / Augmented Becker | 4 | Flexor tendons | Best gap resistance |
| Winters-Gelberman | 8 | Maximum strength needed | Most strands; highest load |
| RIHM | 4 | Extensor zone 6 | Time-efficient; minimal shortening |
| Figure-of-eight | 2 | Small/flat tendons, partial cuts | Simple; fast |
| Epitendinous suture | - | All repairs (supplemental) | Always added; reduces bulk, adds strength |
Important Concepts for Exam
-
"No man's land" (Zone II) - Between A1 and A5 pulleys; historically worst prognosis because FDP and FDS run together in a tight sheath. Primary repair is now standard.
-
Strand number matters: 2-strand repairs are adequate for protected mobilization only. 4+ strands are required for early active motion protocols (Duran, Kleinert, Belfast, etc.).
-
Gap formation is the most common cause of repair failure. The locking configuration of the Kessler/Bunnell/cruciate techniques resists gap formation.
-
Primary repair: within 7-14 days (up to 21 days in clean wounds). Beyond 14 days: secondary repair with tendon grafting.
-
Suture material: Braided polyester (Ethibond) or braided nylon, 3-0 or 4-0 for core; 5-0 or 6-0 polypropylene/nylon for epitendinous layer. Avoid silk (reactive), plain/chromic gut (dissolves too early).
-
Postoperative rehabilitation: Early active mobilization protocols markedly reduce adhesion formation and improve outcomes compared to immobilization.
Provide images. Exactly where they are used
flexor tendon zones hand anatomy diagram
Kessler suture flexor tendon zone 2 no man's land repair
extensor tendon zones hand dorsum diagram
flexor tendon zones injury classification hand surgery
Achilles tendon repair surgical technique open
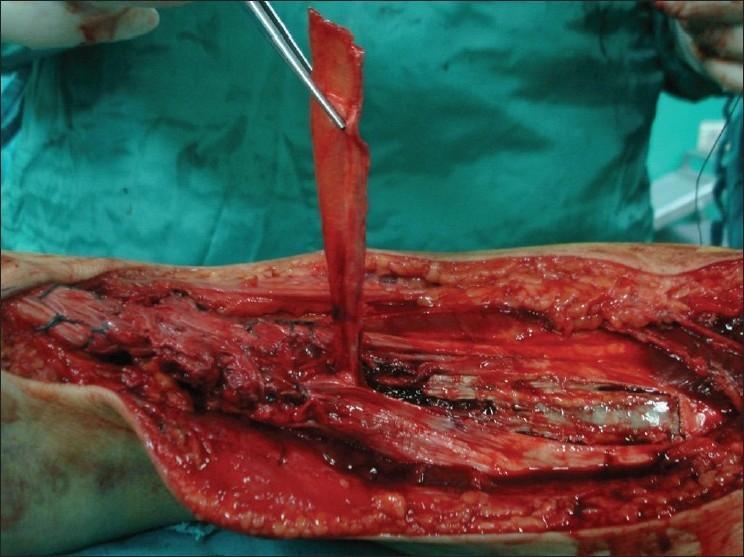
A peroperative clinical photograph demonstrating a surgical reconstruction of the Achilles tendon. The image shows an open surgical site on the posterior aspect of the lower leg. A surgical instrument is lifting a long, rectangular strip of gastrosoleus fascia, which appears as a thin, vascularized, light pink-to-red tissue flap. This fascial strip is being harvested as a pedicled graft to reinforce the Achilles tendon repair. The underlying surgical bed reveals deep dissection through subcutaneous adipose tissue and skeletal muscle, exhibiting a moist, reddish-brown texture with visible muscle fibers. This visual illustrates a specific orthopedic technique for managing chronic or complex Achilles tendon ruptures by using local fascial augmentation to bridge defects or strengthen the primary repair site.
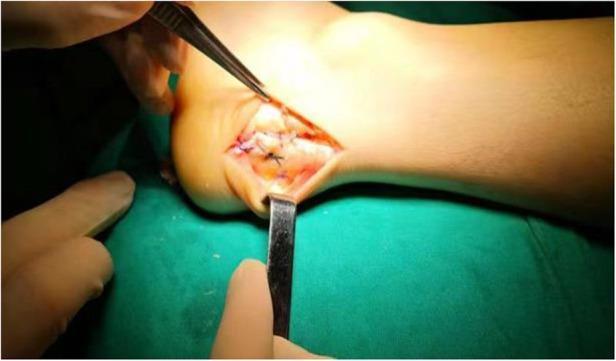
This clinical photograph shows an intraoperative view of an Achilles tendon reattachment procedure on a human heel. The surgical field is exposed via a lateral longitudinal incision near the calcaneal insertion. Metal surgical instruments, including a hand-held retractor and toothed forceps, are being used to provide visualization and tissue retraction. Within the open wound, the distal Achilles tendon is visible, secured to the calcaneus using a single-row suture anchor technique. Several dark, non-absorbable sutures are knotted over the white fibrous tendon tissue to maintain tension and proximity to the bone. The surrounding skin is draped with green surgical cloths and exhibits mild perisurgical erythema. This image serves as an educational reference for orthopedic foot and ankle surgery, specifically demonstrating the surgical management of insertional Achilles tendinopathy or Haglund deformity repair.
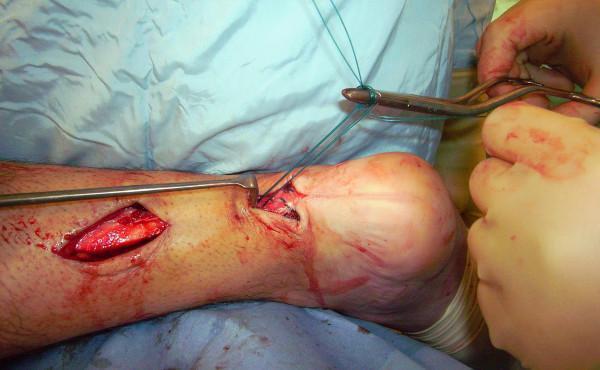
This clinical photograph captures an intraoperative view of an Achilles tendon reconstruction procedure on a patient in the prone position. Two longitudinal skin incisions are visible on the posterior aspect of the lower leg and ankle: a proximal incision exposing the gastrocnemius-soleus musculotendinous complex and a distal incision near the calcaneal insertion of the Achilles tendon. An intact skin bridge remains between the two surgical sites. The distal incision shows surgical manipulation with forceps holding a loop of green monofilament suture (identified as Maxon in context), which is being used to augment the tendon repair. A surgical retractor is positioned to maintain exposure of the proximal tendon stump. The surrounding tissue displays signs of acute surgical intervention, including minor bleeding and exposed subcutaneous fat. This image demonstrates a minimally invasive or limited-open technique for chronic or acute tendon rupture repair, emphasizing the anatomical localization of incisions to avoid the sural nerve while facilitating the passage of graft material or augmentation sutures.
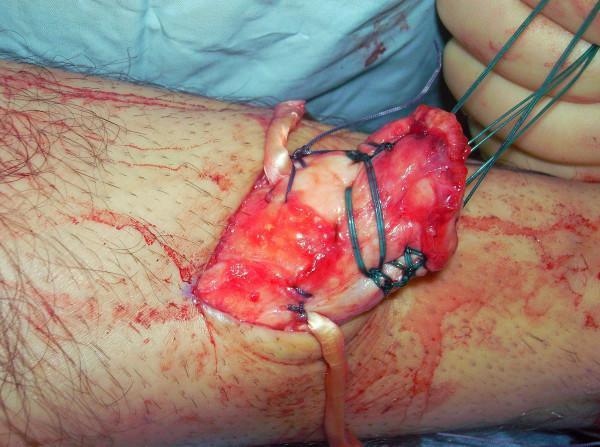
This clinical photograph captures an intraoperative view of an Achilles tendon (AT) reconstruction, specifically showing the integration of a semitendinosus tendon graft. The surgical site, located on a lower extremity, reveals an open longitudinal incision with exposed, erythematous, and fibrous connective tissue. A harvested semitendinosus tendon graft is being sutured to the substance of the proximal Achilles tendon stump. Multiple green monofilament and dark braided sutures are visible, used for tensioning and fixating the graft through a series of tenotomies. The surrounding skin shows surgical preparation with some hair removal and cutaneous blood staining. The image demonstrates a key stage in complex tendon repair, illustrating the surgical technique of using an autograft to bridge a large tendon defect or rupture. Visible features include the glistening white texture of the healthy tendon graft against the raw, hyperemic surgical field, as well as the precise placement of locking and tension sutures required for functional reconstruction.
extensor tendon repair hand dorsum finger zone
rotator cuff repair suture anchor shoulder
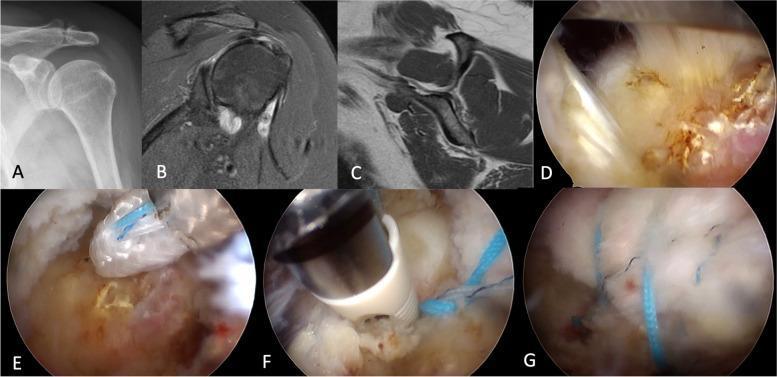
This composite figure illustrates the preoperative evaluation and intraoperative stages of a transosseous-equivalent suture-bridge (TOE-SB) repair for a supraspinatus rotator cuff tear. Panel A shows a plain X-ray of the shoulder. Panels B and C provide MRI views (axial and sagittal) displaying the soft tissue pathology and muscle quality. Panels D through G are arthroscopic intraoperative photographs detailing the surgical progression: (D) Visualization of a crescent-shaped supraspinatus tear at the footprint; (E) Insertion of an all-suture anchor into the medial row to establish the primary anchor point; (F) Fixation of sutures from the medial row to the lateral aspect of the greater tuberosity using knotless anchors; and (G) The final reconstructive construct, showing the completed suture bridge compressing the tendon back to its anatomical footprint. This material is designed for orthopedic surgical education, focusing on arthroscopic shoulder stabilization and rotator cuff repair techniques.
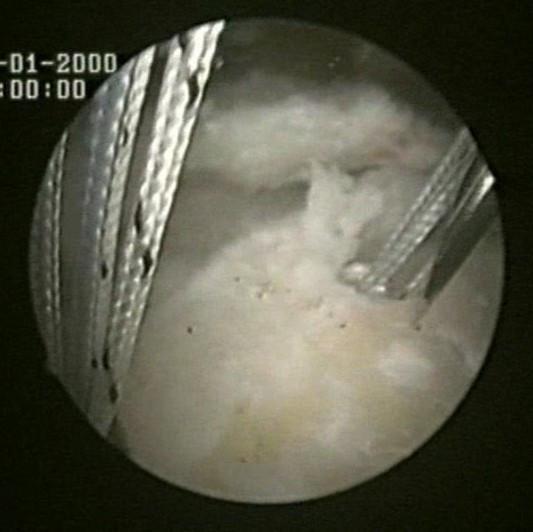
Arthroscopic clinical photograph of a shoulder rotator cuff repair procedure. The image depicts the medial row anchor placement lateral to the articular cartilage of the humeral head. Two Bio-Corkscrew suture anchors are visible, double-loaded with high-strength braided FiberWire sutures. The anchors are positioned in the anteromedial aspect of the footprint, fixed directly into the bone. Multiple strands of the sutures are shown extending from the anchor eyelets, appearing as parallel, braided lines against the light-colored, rounded humeral bone surface. Some soft tissue, likely representing the edge of the rotator cuff tendon, is visible adjacent to the surgical repair site. This image serves as a clinical reference for orthopedic surgical techniques, specifically demonstrating the foundational steps of a double-row or Roman Bridge construct for stabilizing tendon-to-bone interfaces in the shoulder.
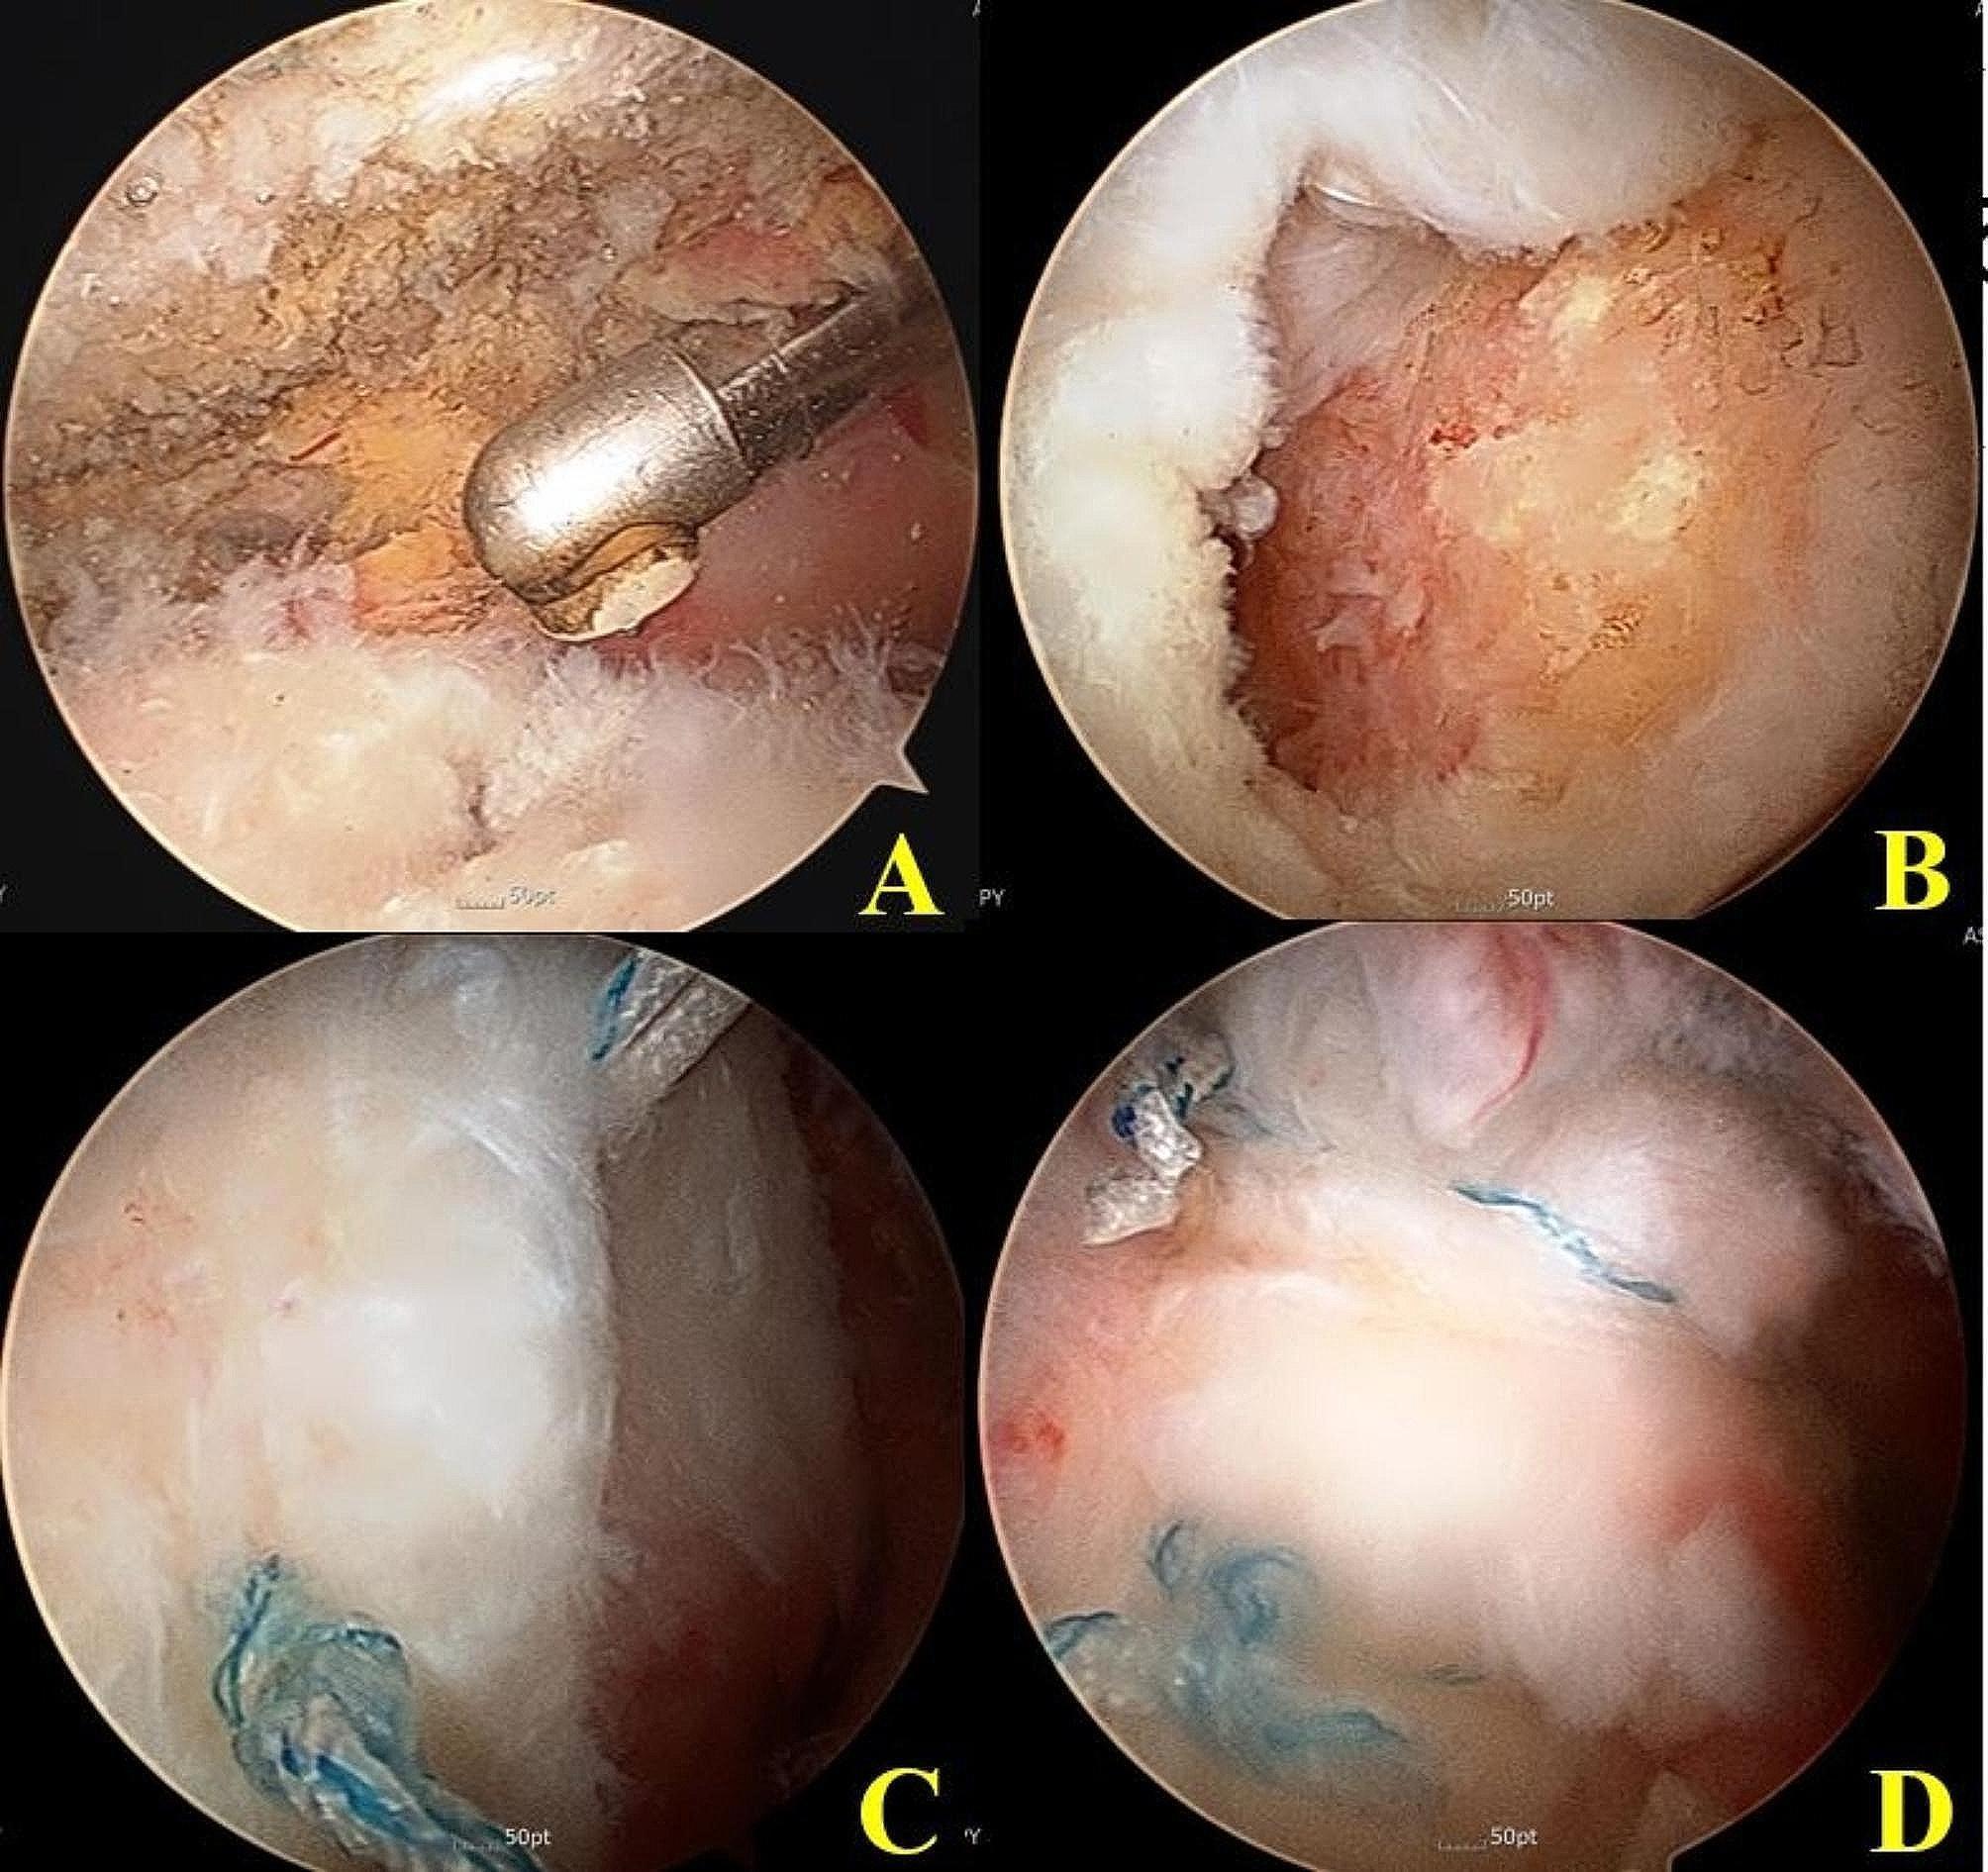
A series of four arthroscopic views (A-D) documenting a remnant-debriding rotator cuff repair procedure. Panel A shows a clinical photograph of the greater tuberosity (GT) footprint with remnant cuff tissue present, characterized by irregular, tan-reddish fibrous tissue, with a surgical debrider in view. Panel B illustrates the same anatomical region after complete debridement, revealing a smooth, uniform surface of exposed bone prepared for anchor insertion. Panels C and D demonstrate stages of a conventional suture bridge rotator cuff repair. Blue braided sutures are visible, showing the transition from medial row fixation with bundled suture material (C) to a completed lateral row bridge configuration (D), where horizontal suture lines are seen compressing the tendon against the GT footprint. These images serve as an educational comparison between initial footprint preparation and final mechanical construct in orthopedic shoulder surgery.
figure of eight suture small tendon repair