
Steps of TAH in detail
Reading File
TAH (Total Abdominal Hysterectomy) involves several well-defined surgical steps. Let me search the medical library for detailed coverage.
Searching sources...
Finding Sources
Finding Sources
Reading File
Finding Sources
Reading File
Finding Sources
Excellent - I found detailed content in Schwartz's Principles of Surgery. Let me read it along with the earlier Sabiston content.
Reading File
Reading File
Reading File
Loading Image
I now have all the detailed content needed from two authoritative surgical textbooks. Let me fetch a few more of the surgical step diagrams to include in the answer.
Loading Image
Loading Image
Loading Image
Loading Image
I now have comprehensive textbook content and surgical illustrations. Here is the full detailed answer:
Total Abdominal Hysterectomy (TAH) - Steps in Detail
Based on Sabiston Textbook of Surgery (Fig. 120.12) and Schwartz's Principles of Surgery (Fig. 41-12)
Pre-operative Preparation
- Patient is placed supine under general or regional anesthesia
- Foley catheter placed to decompress the bladder and monitor output
- Preoperative antibiotics administered (reduces SSI and vaginal cuff infection risk)
- Abdominal skin prep and draping
Step 1 - Abdominal Incision
Two options are available:
- Pfannenstiel (low transverse): Most common for benign disease; better cosmesis; less post-operative pain
- Vertical midline: Used when exposure is needed for large pathology, malignancy, or re-operative cases
After entering the peritoneum, the upper abdomen is inspected for extrapelvic disease. A suitable self-retaining retractor (e.g., Balfour, O'Connor-O'Sullivan) is placed in the incision for exposure.
Step 2 - Uterine Elevation and Exposure
The uterus is grasped at each cornu with Kocher or Kelly clamps and pulled up into the incision (anterior traction). This places the ligaments on tension and facilitates identification of surrounding structures. The bowel is packed out of the pelvis with moist laparotomy pads.
Step 3 - Division of the Round Ligaments
The round ligament is the first structure divided on each side. It is:
- Grasped laterally with a clamp
- Divided either directly with electrocautery or ligated with a delayed absorbable suture and then divided medial to the suture
This opens access to the broad ligament and retroperitoneal space.
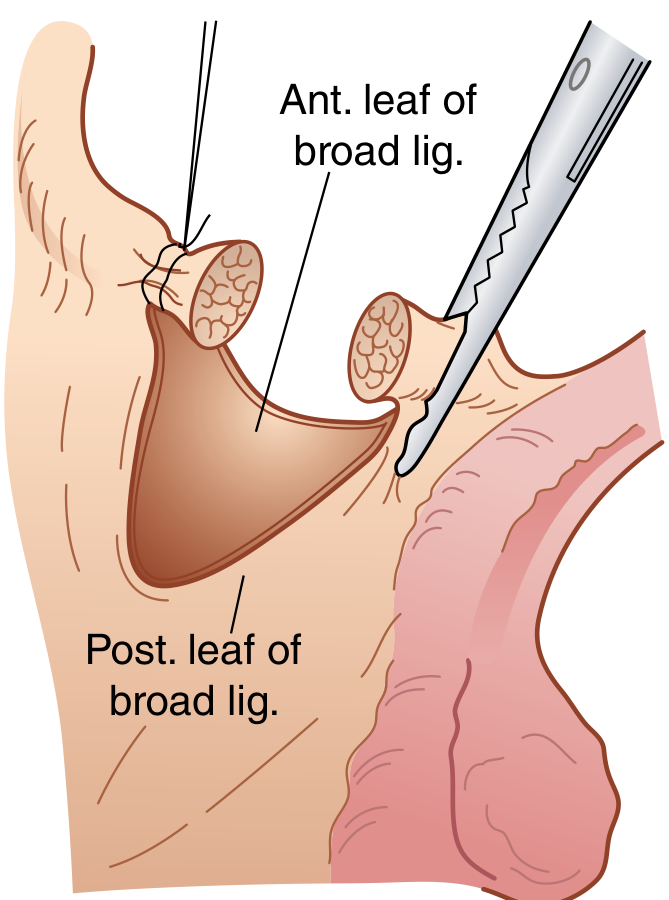
Step 4 - Incision of the Broad Ligament
Following round ligament division:
- The anterior leaf of the broad ligament is incised medially toward the level of the internal cervical os - this begins development of the bladder flap
- If ovaries are being removed: the posterior leaves of the broad ligament are also incised, and the retroperitoneal space is bluntly opened to identify the ureter on the medial leaf
The ureter must be identified at this stage to avoid injury - it courses medially along the medial leaf of the broad ligament and under the uterine artery ("water under the bridge").
Step 5 - Management of the Adnexa (two scenarios)
If ovaries and tubes are being REMOVED (bilateral salpingo-oophorectomy):
- After identifying and protecting the ureter, the infundibulopelvic (IP) ligament (which carries the ovarian vessels) is:
- Doubly clamped with curved Heaney or Zeppelin clamps
- Incised with curved Mayo scissors between the clamps
- Both pedicles are doubly ligated (free tie + suture ligation)
If ovaries are being LEFT in place (ovarian conservation):
- An opening is created below the utero-ovarian ligament and fallopian tube
- The fallopian tube and utero-ovarian ligament are clamped, cut, and ligated bilaterally with two curved Kelly or Heaney clamps
For opportunistic salpingectomy (tubes removed, ovaries kept), the tube is excised at its isthmic-cornual junction and along the mesosalpinx, with the utero-ovarian ligament preserved.
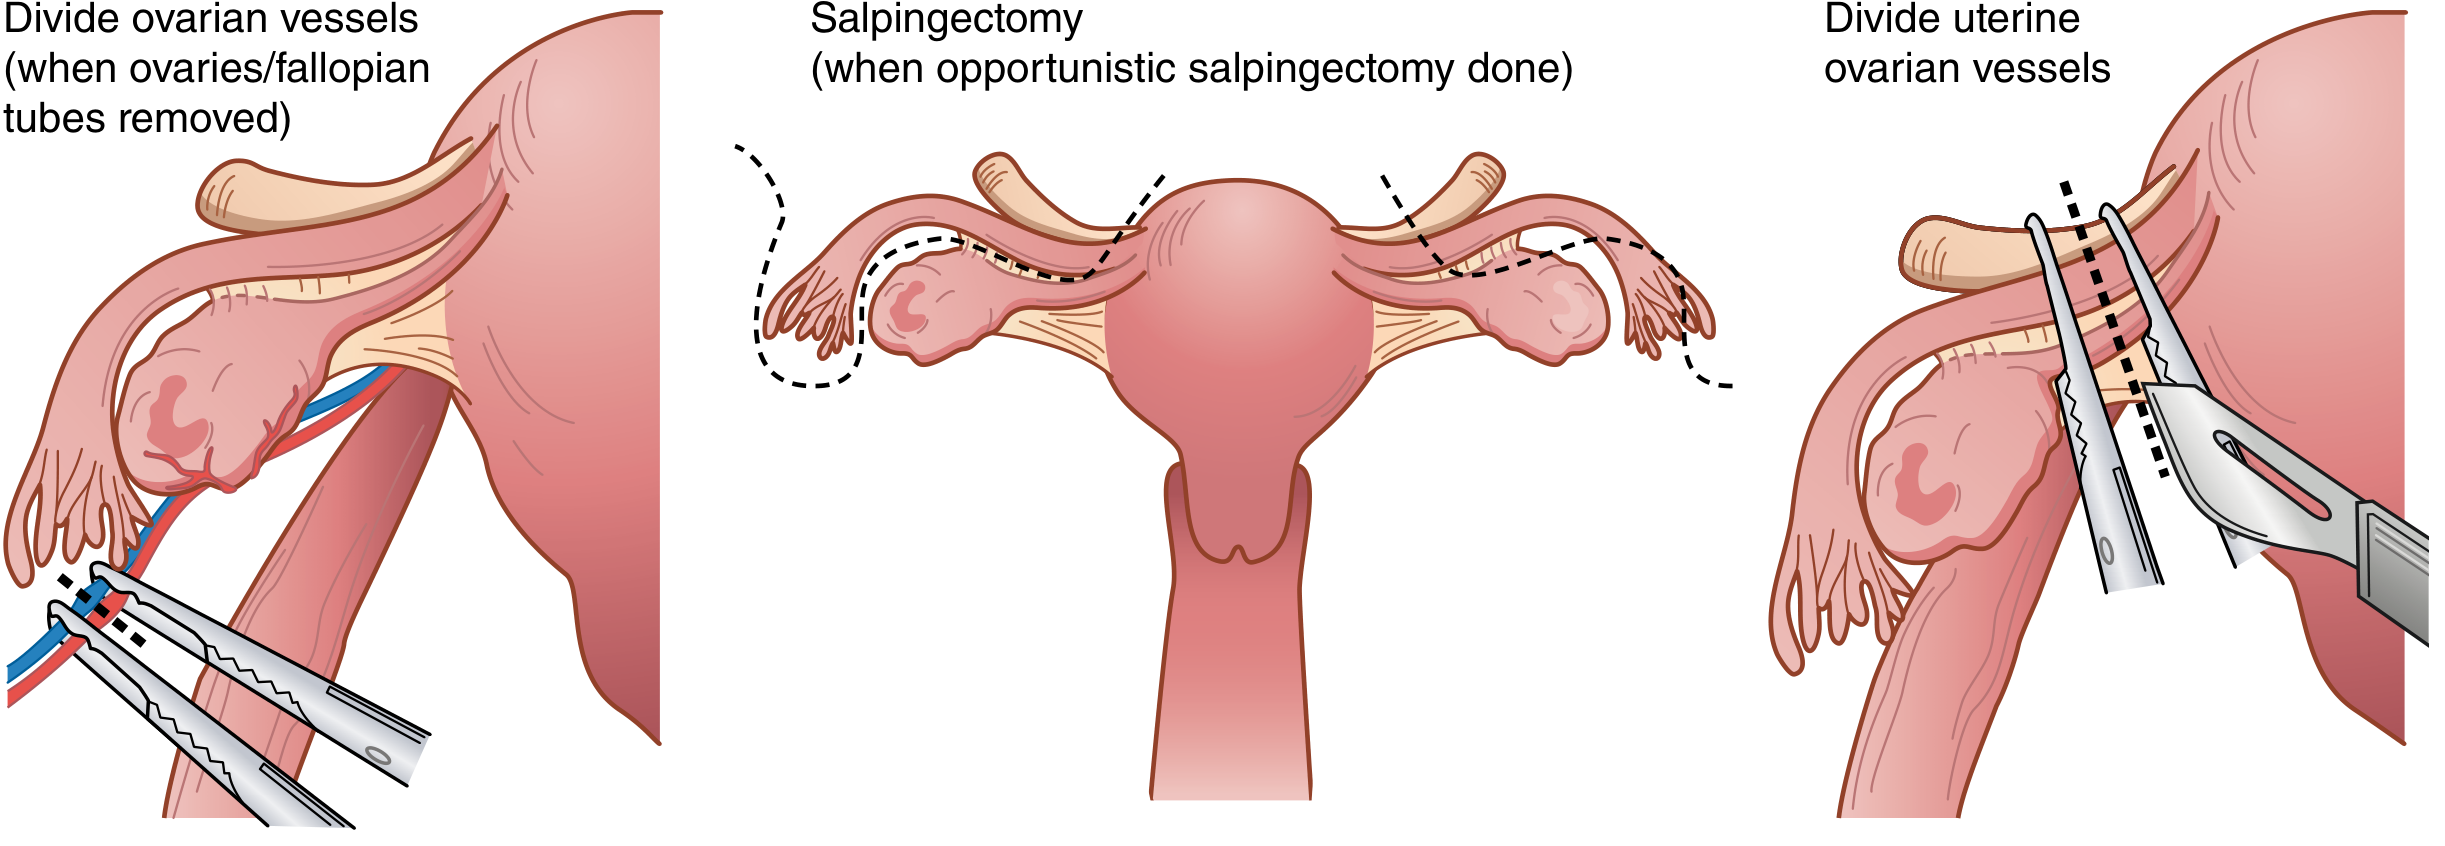
Step 6 - Bladder Mobilization (Creation of Bladder Flap)
This is a safety-critical step to protect the bladder and ureters:
- The vesicouterine peritoneum (bladder reflection) is incised transversely, just above the bladder dome
- The bladder is sharply dissected off the anterior surface of the uterus and cervix using Metzenbaum scissors or electrocautery
- The bladder is pushed and retracted inferiorly below the level of the cervix before clamping the uterine vessels
Incomplete mobilization is a common cause of bladder injury.
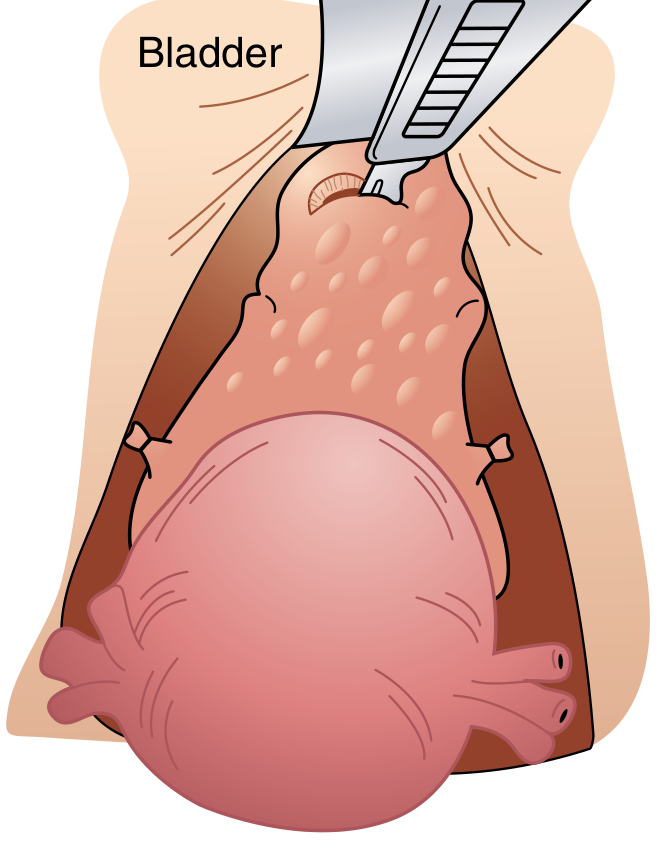
Step 7 - Division of Uterine Vessels
With the bladder well below the cervix:
- A curved Heaney or Zeppelin clamp is placed across the uterine vessels bilaterally at the level of the internal cervical os, perpendicular to the uterus
- The pedicle is cut and suture ligated (transfixion suture preferred to prevent slippage)
- This is the most vascular step - careful clamping prevents catastrophic hemorrhage
- The ureter, at this point, passes approximately 1-2 cm lateral to the cervix - the clamp must stay close to the uterus
Step 8 - Division of the Cardinal and Uterosacral Ligaments
After the uterine vessels are secured:
- Cardinal ligaments (Mackenrodt's ligaments) are serially clamped, cut, and suture ligated bilaterally in progressive bites, working inferiorly toward the cervix
- Uterosacral ligaments are similarly clamped, cut, and ligated
- Serial (stepwise) clamping prevents excessive tissue in each bite, reducing risk of slippage
These ligaments form the major support of the cervix and upper vagina. The uterosacral ligament pedicles are later used for vaginal vault support (McCall culdoplasty or incorporated into the vault closure angles).
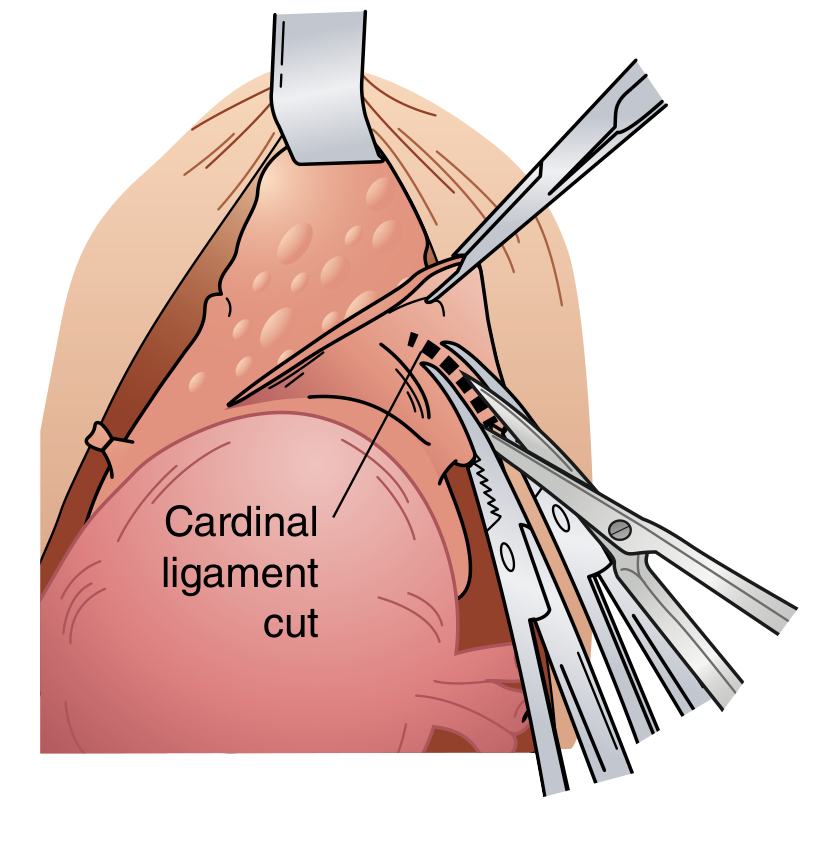
Step 9 - Colpotomy (Vaginal Entry and Cervix Removal)
Once both sides are clear of tissue at the level of the external cervical os:
Method 1 (Clamp technique):
- Curved clamps are placed across the vagina medial to the prior pedicles, just below the cervix, from both sides to meet in the middle
- Curved scissors cut just above the clamps to amputate the cervix from the vagina
Method 2 (Direct sharp incision):
- A direct sharp incision into the vagina just below the cervix
- The incision is extended circumferentially around the cervix with curved scissors until completely freed
- Allis clamps are placed on the vaginal edges for visualization
The uterus, cervix, and adnexa (if removed) are then delivered as the specimen.
Step 10 - Vaginal Cuff Closure
The open vaginal cuff is closed to restore anatomy and prevent vault dehiscence:
- Lateral angle sutures (Heaney transfixion stitches) are placed first at each vaginal corner - these also incorporate the ipsilateral uterosacral ligament pedicle for apical support (prevents vault prolapse)
- The remainder of the cuff is closed with running suture, interrupted sutures, or figure-of-eight sutures using an absorbable material (e.g., 0-Vicryl or 0-PDS)
- Some surgeons leave the cuff open (open cuff technique) to allow drainage; others close it completely
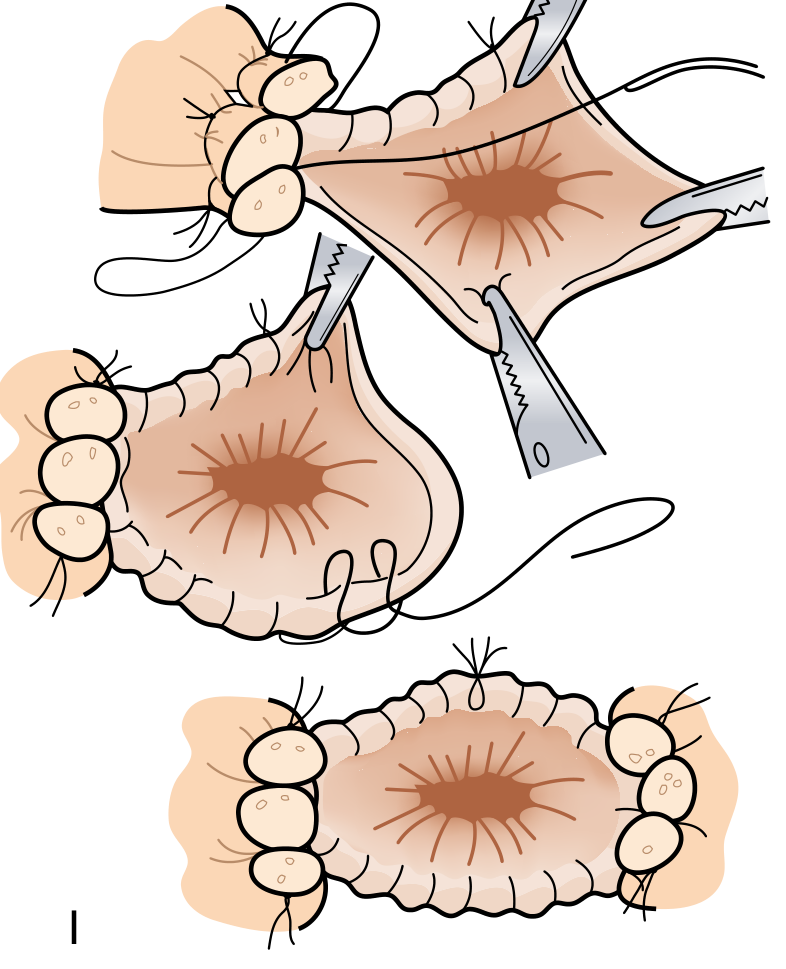
Step 11 - Hemostasis and Pelvic Inspection
After cuff closure:
- The entire operative field is inspected systematically for hemostasis
- All pedicles (round ligament, IP ligament or utero-ovarian, uterine vessels, cardinal, uterosacral, vaginal angles) are examined
- Any bleeding is controlled with suture ligation or electrocautery
- Pelvic reperitonization is not mandatory (evidence does not support routine closure of the pelvic peritoneum)
- Packs are removed and the bowel returned to the pelvis
Step 12 - Abdominal Wall Closure
- Fascia is closed in a running fashion with a heavy delayed absorbable suture (e.g., PDS or looped PDS) or permanent suture (Nylon, Prolene)
- Subcutaneous tissue may be irrigated
- Skin is closed with staples, subcuticular suture, or skin closure strips depending on surgeon preference
Summary of Key Steps (Figure 120.12, Sabiston)
| Step | Structure |
|---|---|
| A | Transection of round ligament |
| B | Incision of anterior and posterior broad ligament |
| C | Dissection of bladder off cervix |
| D | Division of ovarian vessels (if BSO) |
| E | Opportunistic salpingectomy (if performed) |
| F | Transection of utero-ovarian vessels (if ovaries conserved) |
| G | Division of uterine vessels, cardinal ligaments, and uterosacral ligaments |
| H | Incision of vagina and excision of specimen (colpotomy) |
| I | Closure of vaginal cuff |
Key Anatomical Dangers
| Structure at risk | Point of danger | Prevention |
|---|---|---|
| Ureter | Step 4 (broad ligament), Step 7 (uterine artery) | Retroperitoneal dissection, ureter identification before clamping |
| Bladder | Step 6 (bladder mobilization), Step 9 (colpotomy) | Full bladder dissection below cervix before colpotomy |
| Bowel (rectum, sigmoid) | Posterior peritoneal dissection | Careful sharp dissection, avoid blunt tearing |
| Inferior epigastric vessels | Abdominal incision | Lateral dissection awareness |
Sources: Sabiston Textbook of Surgery: The Biological Basis of Modern Surgical Practice, Fig. 120.12 (Steps A-I); Schwartz's Principles of Surgery, 11th Edition, Fig. 41-12
How to locate round ligament in surgery
The round ligament runs from the uterine cornua, through the broad ligament, exits via the deep inguinal ring, and inserts into the labium majus. Intraoperatively it appears as a cord-like fibromuscular band, whitish in color, visible in the anterior leaf of the broad ligament. It is typically the first structure identified and divided in TAH.
Searching sources...
Finding Sources
Finding Sources
Reading File
Reading File
Loading Image
Loading Image
Loading Image
Excellent - I have everything needed for a thorough answer. Here it is:
How to Locate the Round Ligament in Surgery
Anatomy Recap (Why It Matters)
The round ligament is a fibromuscular cord that is the distal remnant of the gubernaculum. Its surgical course:
- Originates at the uterine cornua (anterolateral, just below and anterior to the fallopian tube insertion)
- Travels anterolaterally through the anterior leaf of the broad ligament
- Enters the deep inguinal ring
- Traverses the inguinal canal
- Inserts as fine connective tissue strands into the labium majus
This makes it the most anteriorly placed structure at the uterine cornua - a key landmark.
Surgical Identification - Step by Step
1. Enter the Abdomen and Place the Uterus on Stretch
After opening the peritoneum, grasp the uterus at each cornu with Kocher clamps and pull it superiorly and anteriorly into the wound. This stretches all the cornual structures tight (round ligament, fallopian tube, utero-ovarian ligament), making them easily visible as distinct cord-like bands fanning out from each side of the uterus.
2. Identify the Anterior, Lateral Surface of the Broad Ligament
Look at the peritoneal reflection covering the anterior and lateral surface of the uterus. The round ligament is the most anterior and inferior of the three structures exiting the cornua:
| Structure | Position at cornua | Direction of travel |
|---|---|---|
| Round ligament | Most anterior & inferior | Anterolateral toward deep inguinal ring |
| Fallopian tube | Superior, arching laterally | Lateral toward fimbriae |
| Utero-ovarian ligament | Posterior to tube | Posterior toward ovary |
The round ligament is clearly visible as a white, cord-like band running under the peritoneum in the anterior leaf of the broad ligament, heading toward the lateral pelvic wall.
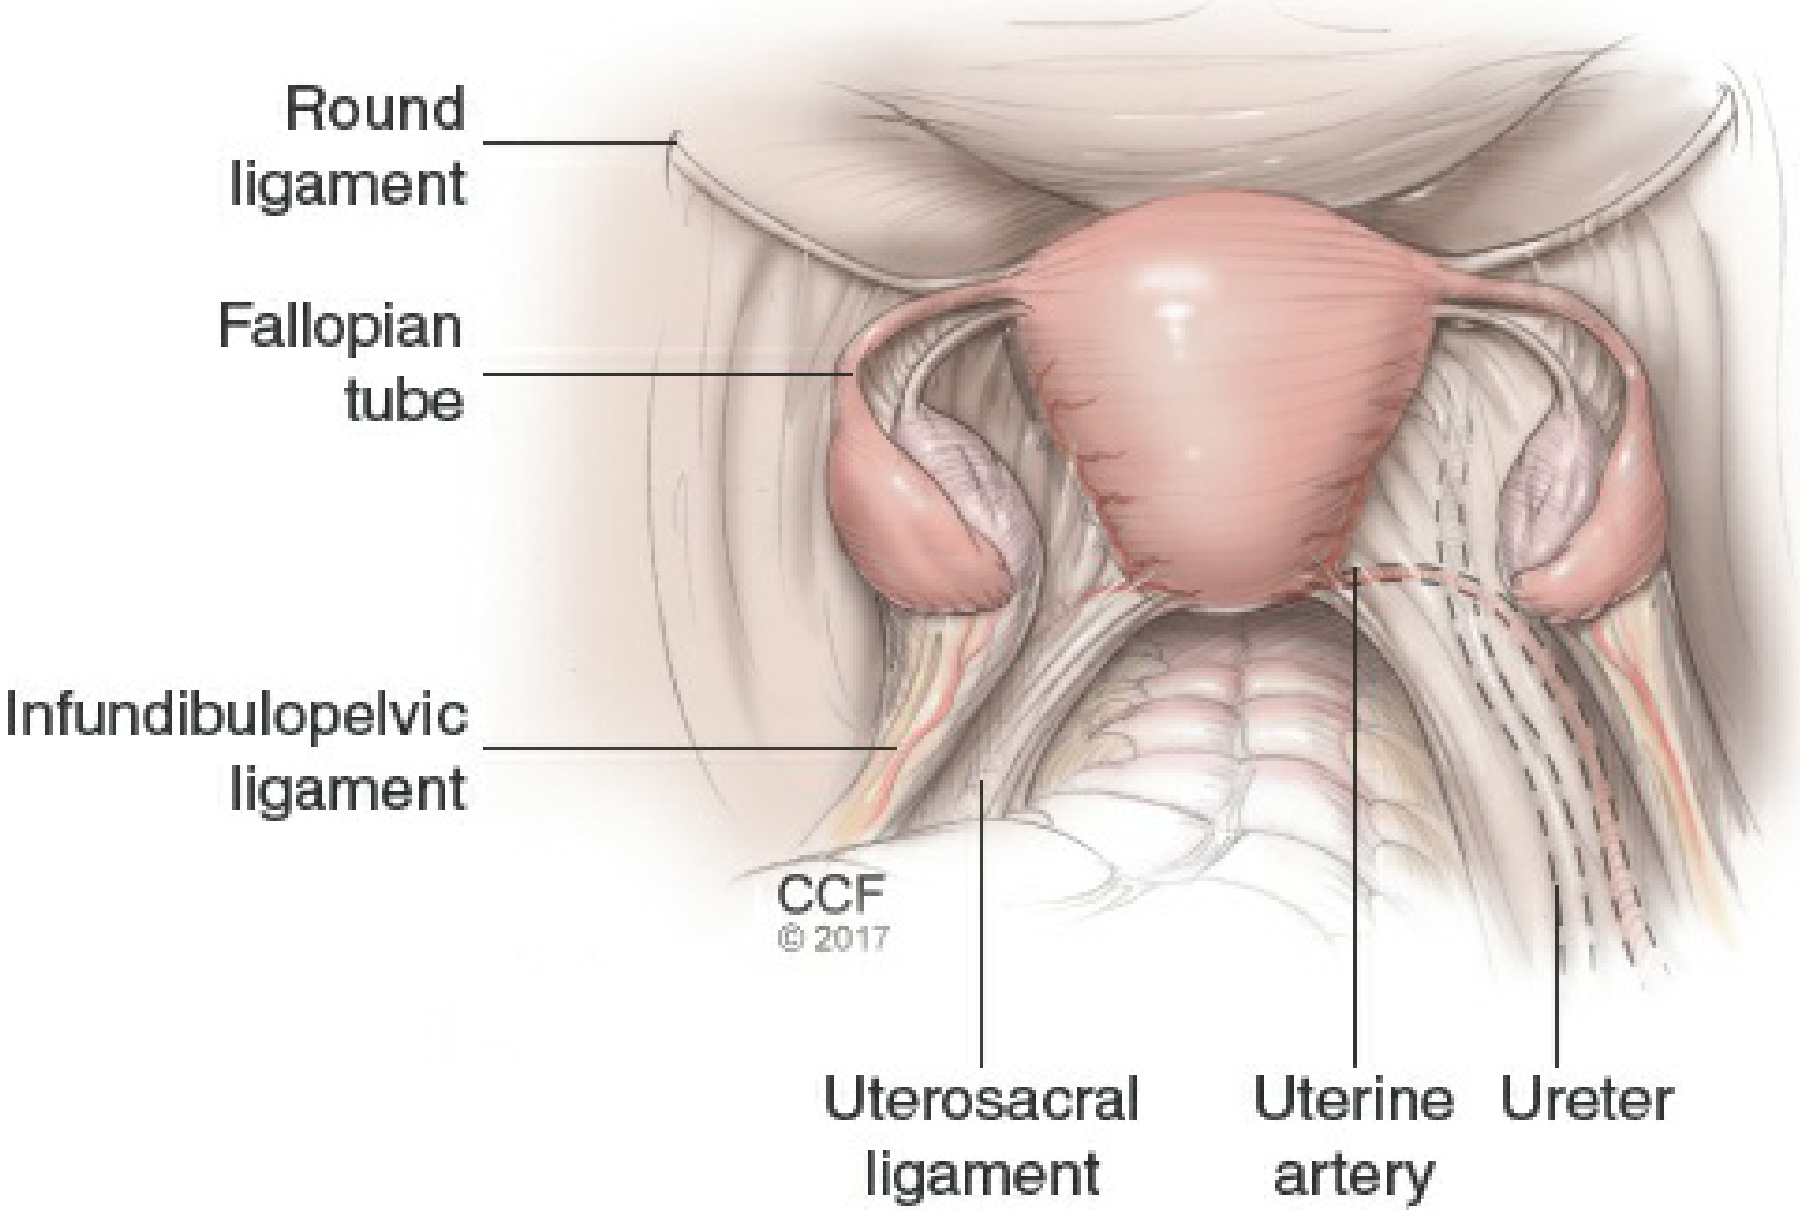
3. Apply Lateral Uterine Traction (Key Trick)
Deviate the uterus to the contralateral side (e.g., push it left to identify the right round ligament). This puts the ipsilateral round ligament under tension, making it stand out as a taut cord traveling from the cornua laterally toward the deep inguinal ring. The ligament becomes very easy to see and grasp.
4. Distinguish it From the Fallopian Tube
This is the most common source of confusion for trainees:
| Feature | Round ligament | Fallopian tube |
|---|---|---|
| Position | Anterior and inferior at cornua | Superior and posterior at cornua |
| Appearance | Solid cord, no lumen | Has a lumen; slightly tortuous with fimbriated end |
| Direction | Heads laterally and downward toward inguinal ring | Heads laterally and upward arching over ovary |
| Feel | Firm fibromuscular band | Softer, tubular |
A simple intraoperative check: trace the structure - if it leads toward the inguinal ring (lateral pelvic wall), it is the round ligament. If it ends in fimbriae over the ovary, it is the tube.
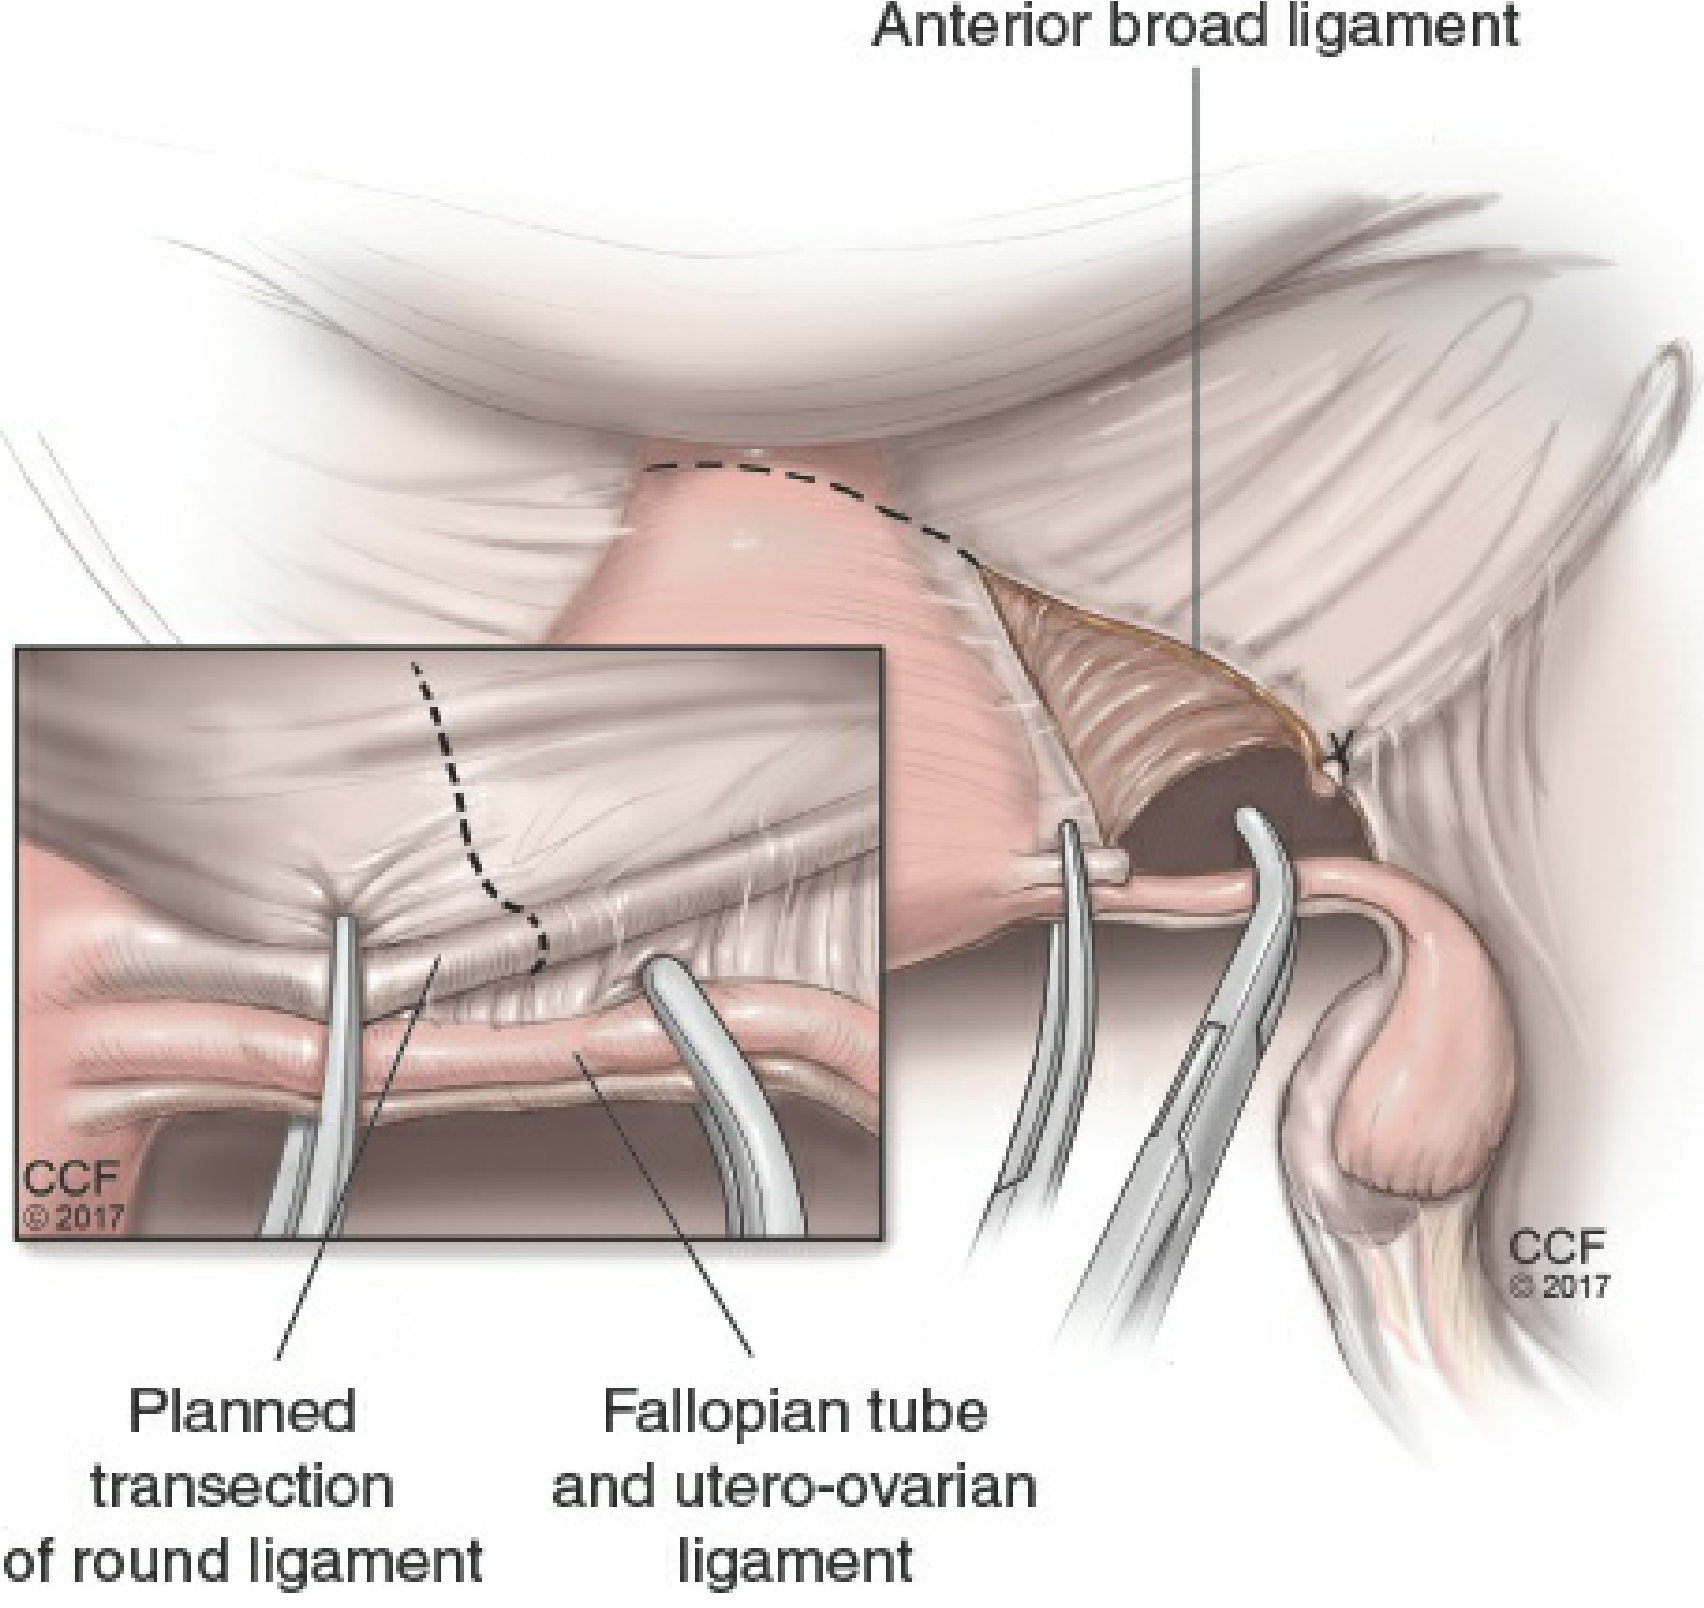
5. Grasp and Divide
Once identified:
- Grasp it with a curved clamp laterally (away from the cornua), placing one clamp on the cornual/specimen side and one on the lateral/pelvic wall side
- Divide between the clamps with scissors or electrocautery
- The lateral stump is ligated with a delayed absorbable suture or secured with diathermy
- Dividing it immediately opens up the anterior and posterior leaves of the broad ligament for the subsequent steps
In Laparoscopy
The same principles apply. With the uterine manipulator providing traction and countertraction, the round ligament is seen under laparoscopic view as the cord-like peritoneal fold running anterolaterally from each cornua. It is grasped with a laparoscopic grasper and divided with a vessel-sealing device or monopolar scissors.
Anatomical Diagram (Cross Section - Inguinal Canal Course)
This Gray's Anatomy illustration shows the round ligament's relationship to surrounding structures as it enters the inguinal canal:
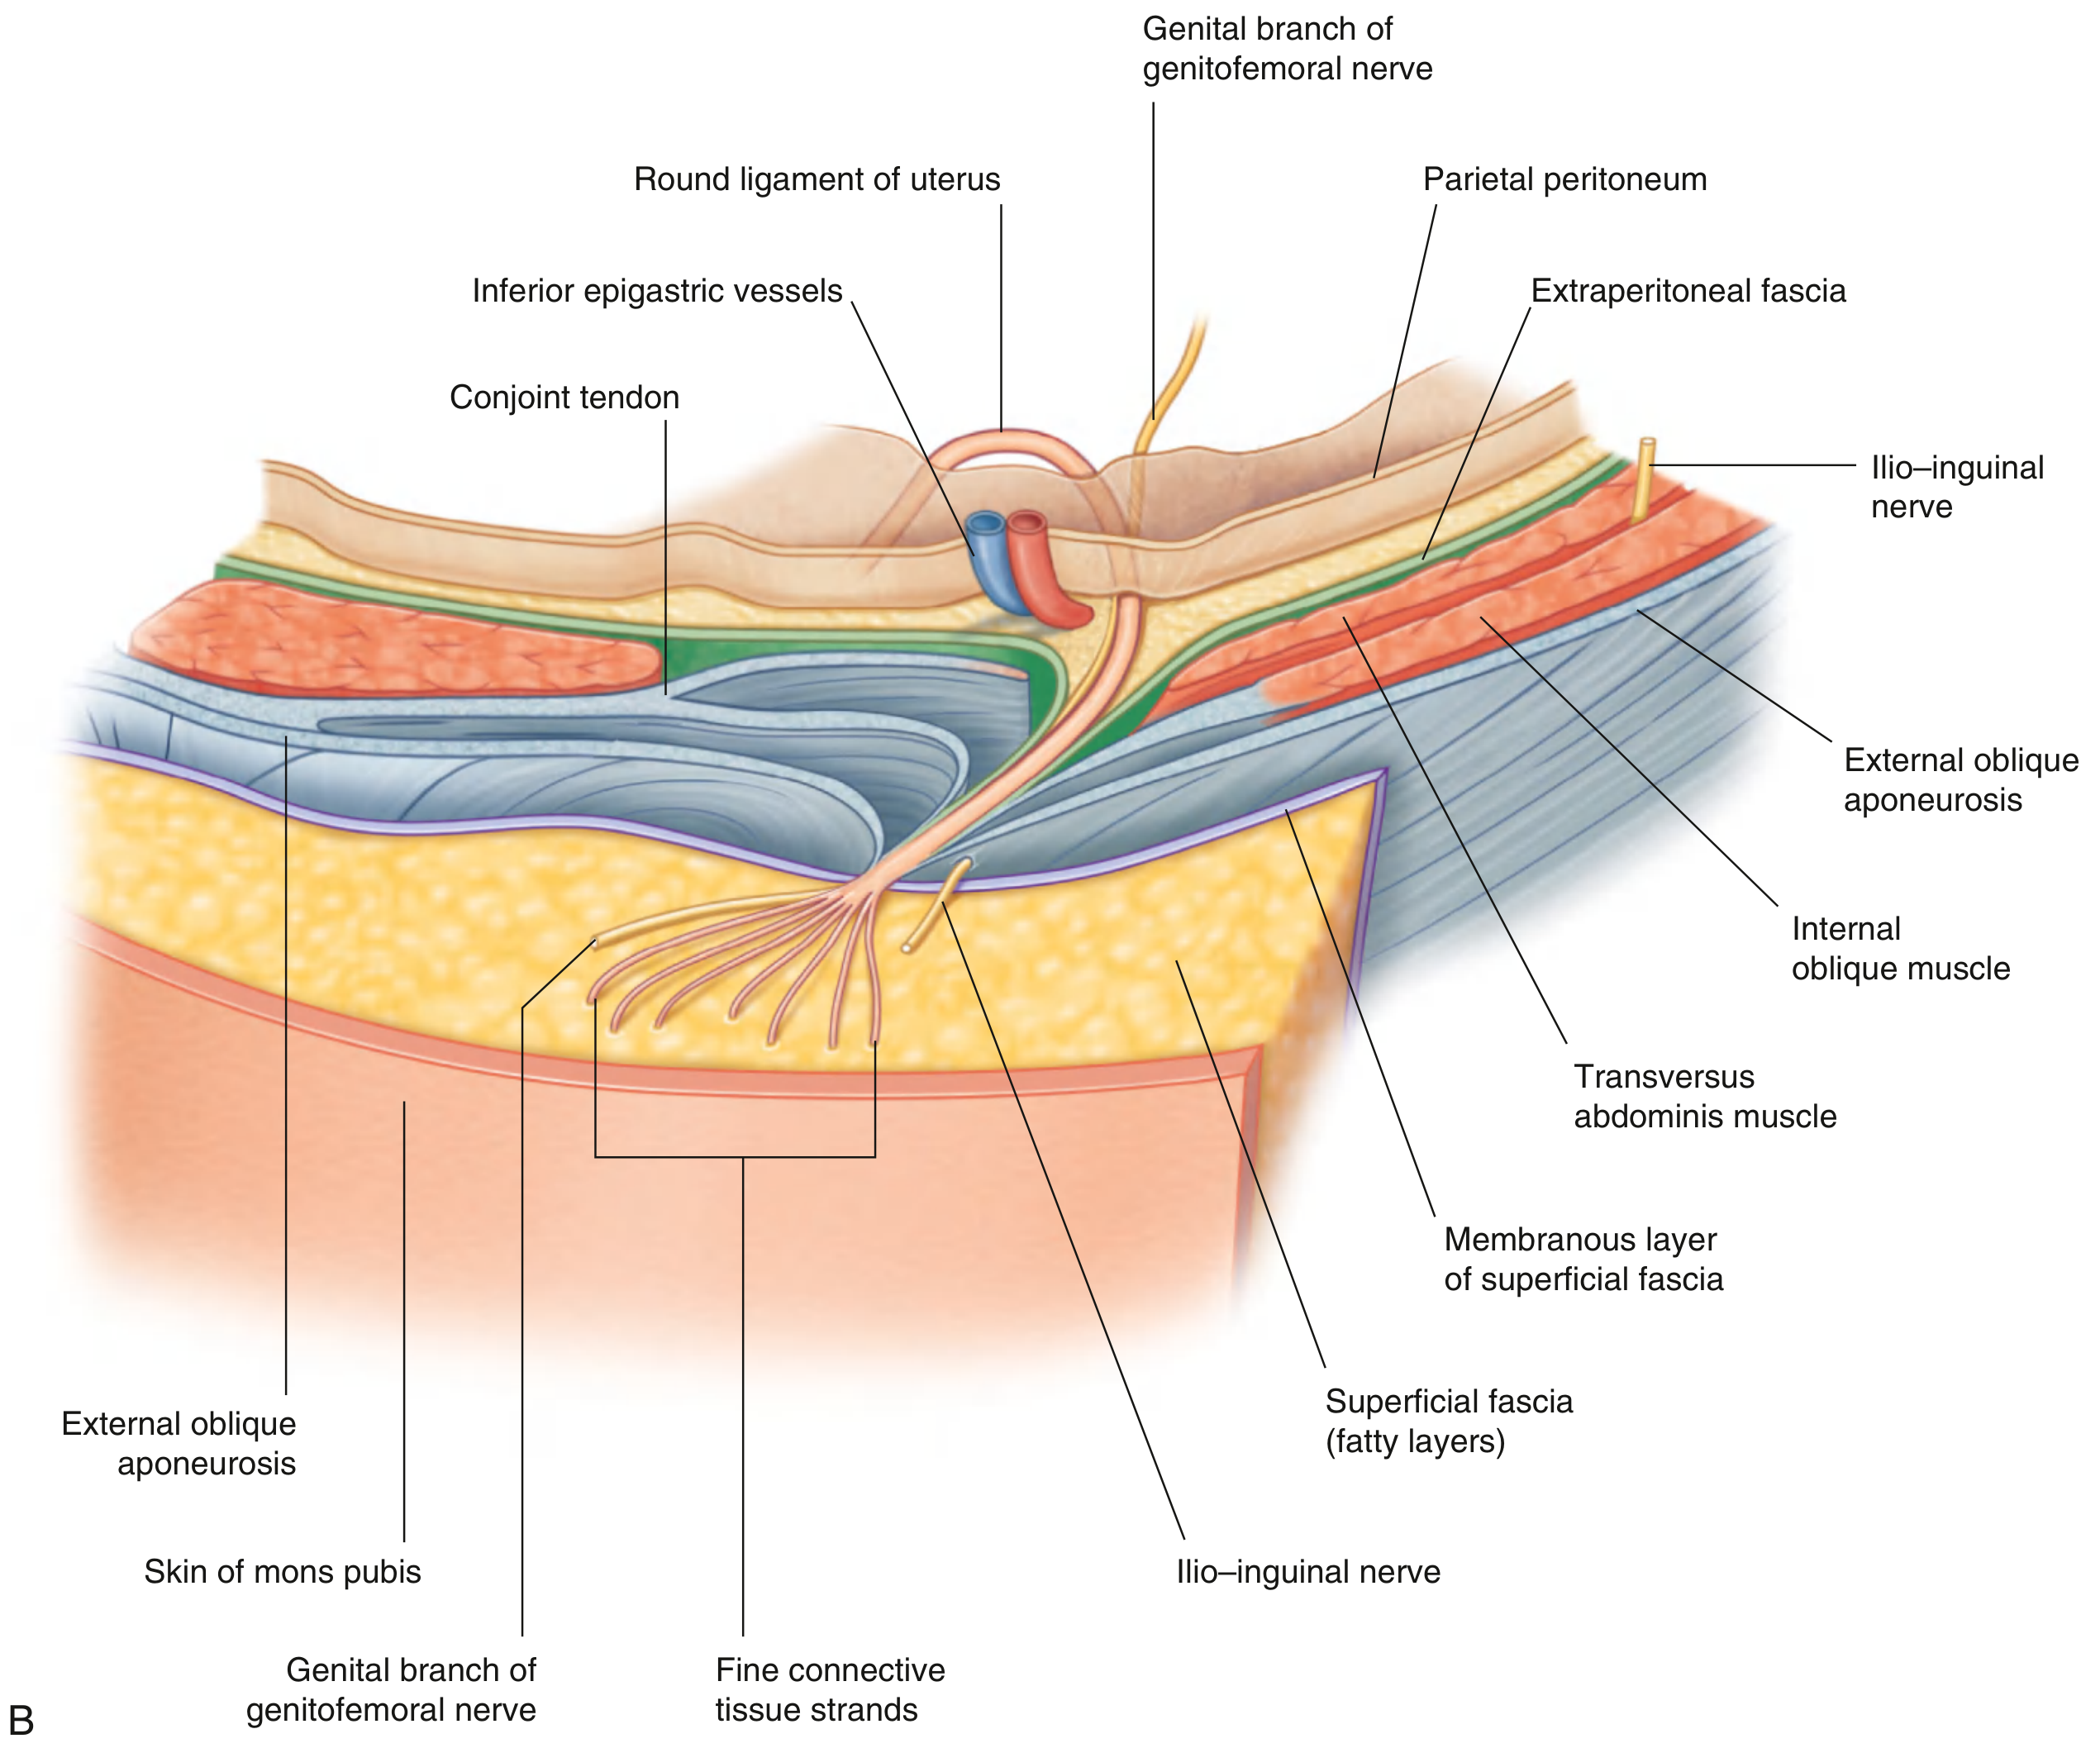
Summary
| Step | Action |
|---|---|
| 1 | Elevate uterus into wound with Kocher clamps |
| 2 | Deviate uterus to opposite side to stretch the ligament |
| 3 | Look for the most anterior, inferior cord at the uterine cornua |
| 4 | Confirm it runs toward the deep inguinal ring, not the fimbriae |
| 5 | Clamp laterally and divide - this opens the broad ligament for the rest of the dissection |
Sources: Berek & Novak's Gynecology, Fig. 27-1 & 27-2; Gray's Anatomy for Students, Fig. 4.47B
Step 4 explain with anatomy
The user is asking about Step 4 from the previous answer - distinguishing the round ligament from the fallopian tube, explained with anatomy. Let me get detailed anatomical content from the textbooks.
Searching sources...
Finding Sources
Finding Sources
Finding Sources
Finding Sources
Reading File
Finding Sources
Finding Sources
Finding Sources
Reading File
Reading File
Now let me fetch the key anatomy diagrams - the internal genitalia figure from Sabiston and the color atlas tube anatomy images.
Loading Image
Finding Sources
Reading File
Finding Sources
Loading Image
Loading Image
I now have all the anatomy and surgical images needed. Here is the detailed explanation:
Step 4 - Distinguishing Round Ligament from Fallopian Tube: Anatomy Explained
The confusion arises because both structures originate from the same point - the uterine cornua - and run laterally. Understanding their anatomy in depth resolves this completely.
The Uterine Cornua: What Exits From It?
The cornua (Latin: "horn") is the superolateral angle of the uterus where three structures converge and exit:
| Structure | Embryological origin | What it is |
|---|---|---|
| Round ligament | Distal gubernaculum | Fibromuscular cord; no lumen |
| Fallopian tube (isthmus) | Paramesonephric (Müllerian) duct | Hollow muscular tube; has a lumen |
| Utero-ovarian ligament | Proximal gubernaculum | Fibromuscular cord connecting uterus to ovary |
All three fan out laterally from the same small area of the cornua. This is why incorrect identification is a real operative risk.
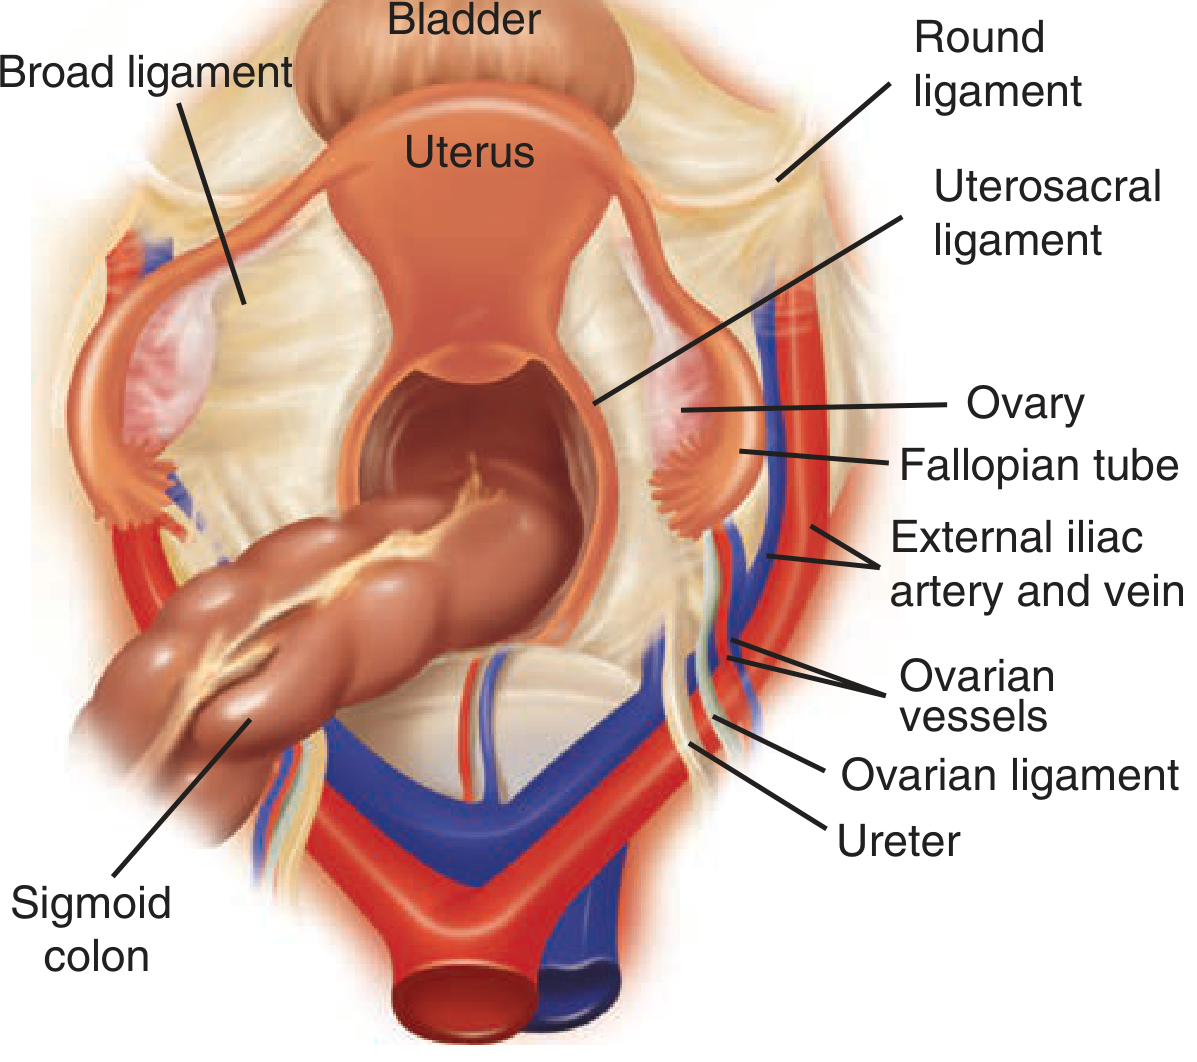
Anatomy of the Round Ligament
- Origin: Anterolateral wall of the uterus, just below and anterior to the fallopian tube insertion at the cornua
- Course: Travels within the anterior leaf of the broad ligament, heading anterolaterally toward the lateral pelvic wall
- Exit: Passes over the external iliac vessels, enters the deep inguinal ring, traverses the inguinal canal, and terminates as fine connective tissue strands in the labium majus
- Structure: Solid fibromuscular cord - smooth muscle + fibrous tissue. No lumen. Homolog of the male gubernaculum/spermatic cord
- Position within broad ligament: It lies inferior and anterior within the broad ligament, in the lower portion of the anterior leaf
- Blood supply: Artery of the round ligament (branch of the inferior epigastric artery = Sampson's artery)
Anatomy of the Fallopian Tube
The fallopian tube (uterine tube/salpinx) arises from the upper lateral cornua, just superior and posterior to the round ligament insertion. It has 4 parts:
| Part | Length | Features |
|---|---|---|
| Interstitial (intramural) | ~1 cm | Passes through the myometrium; narrowest lumen (1 mm) |
| Isthmus | ~3 cm | Narrow, straight - exits the cornua medially; this is what you see near the uterus |
| Ampulla | ~6-8 cm | Thin-walled, tortuous and curving; where fertilization occurs |
| Infundibulum | ~1-2 cm | Funnel-shaped; ends in fimbriae; the fimbria ovarica attaches to the ovary |
- Course: Arises from the cornua and arches laterally and upward, coursing along the superior border of the broad ligament (within the mesosalpinx), ending near the ovary
- Structure: Hollow muscular tube - 3 layers (mucosa with ciliated columnar epithelium, muscularis, serosa). Has a visible lumen on cut section
- Position: Runs in the superior free edge of the broad ligament (upper border), covered by mesosalpinx
The Key Anatomical Difference - Visualized
Here is the surgical view with all three cornual structures labeled:
Looking at this image:
- The round ligament exits the cornua anteriorly and runs toward the anterior abdominal wall / inguinal ring (downward and forward)
- The fallopian tube exits the cornua superiorly and curves posterolaterally over the ovary (upward and back)
- The ovarian ligament (utero-ovarian ligament) connects the uterus to the posterior aspect of the ovary - it is posterior to the tube at the cornua
The Surgical "How to Tell Them Apart" - Anatomy-Based Rules
Rule 1: Position at the cornua
Stand at the cornua and look at the three structures - from front to back:
- Round ligament - most anterior and inferior
- Fallopian tube - superior (at the very top of the cornua)
- Utero-ovarian ligament - posterior to the tube
Rule 2: Direction of travel
| Structure | Direction from cornua |
|---|---|
| Round ligament | Anterolaterally and inferiorly - curves toward inguinal region; disappears under the peritoneum toward the anterior abdominal wall |
| Fallopian tube | Superolaterally - arches over and around the ovary; you can see the fimbriated end draping over the ovary |
| Utero-ovarian ligament | Posterolaterally - short cord directly attaching to the ovarian hilum |
Rule 3: Appearance
| Feature | Round ligament | Fallopian tube |
|---|---|---|
| Cross-section | Solid - no lumen visible | Hollow - lumen visible; tube-like |
| Surface texture | Smooth, cord-like, white-cream | Slightly rugose/tortuous, pink-tan |
| Free end | Disappears into inguinal ring | Ends in fimbriae (finger-like fronds) |
| Feel on palpation | Firm, fibrous, doesn't compress | Softer, slightly compressible |
| Mobility | Relatively taut | More mobile and floppy distally |
Rule 4: The "Trace the Tube" Test
When in doubt intraoperatively - gently pick up the structure and follow it:
- If it leads toward the inguinal ring and anterior abdominal wall → Round ligament
- If it leads to fimbriae draped over the ovary → Fallopian tube
The broad ligament envelops both structures. As the fallopian tube arises from the upper free border of the broad ligament, it tends to be more free and mobile. The round ligament arises from the lower anterior portion of the broad ligament and is more tightly applied.
The Broad Ligament - The "Envelope" Containing Both
The broad ligament is a double-layer peritoneal fold extending laterally from the uterus to the pelvic wall. It is divided into three functional parts:
| Part | Contents |
|---|---|
| Mesosalpinx (upper) | Fallopian tube - in the superior free edge |
| Mesovarium (middle) | Ovary attached here posteriorly |
| Mesometrium (lower/bulk) | Uterine vessels, round ligament, ureter below |
The round ligament runs through the mesometrium (lower broad ligament), while the fallopian tube runs along the mesosalpinx (superior free edge of the broad ligament). This vertical separation within the broad ligament is the most reliable anatomical guide.
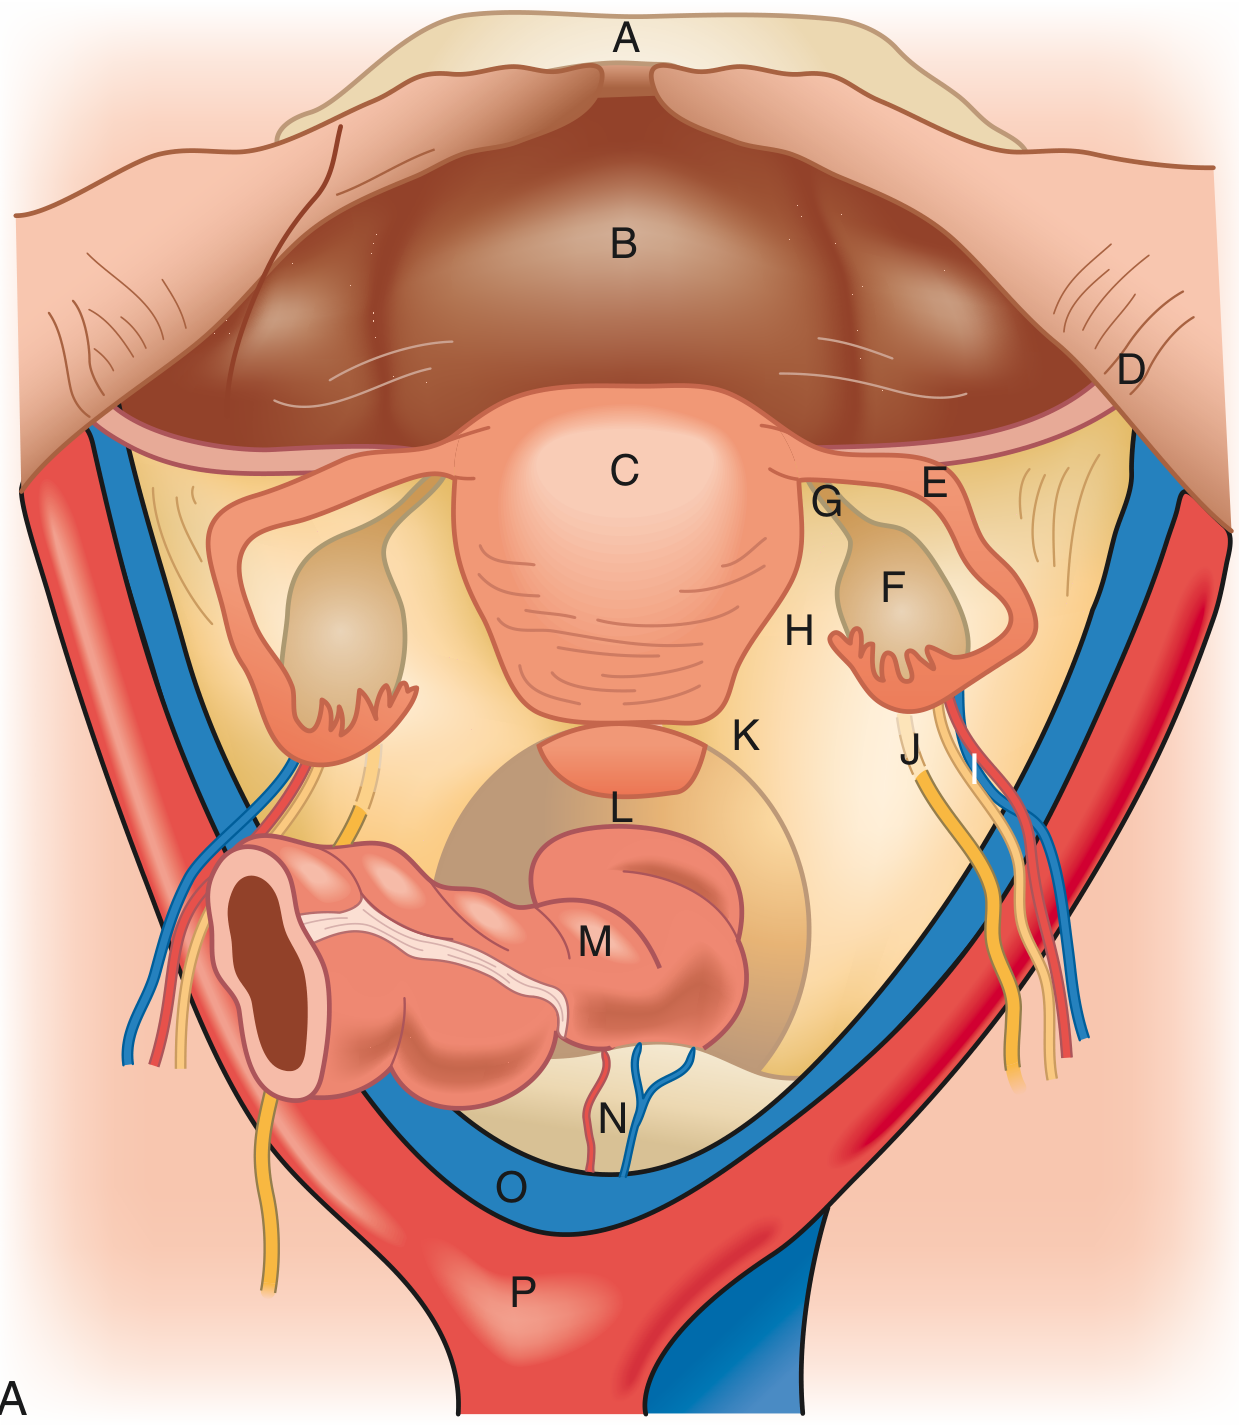
In this classic anterior view (Sabiston Fig. 120.2):
- D (round ligament) is seen as the lower cord exiting the cornua anterolaterally
- E (fallopian tube) arches superiorly over F (ovary)
- G (utero-ovarian ligament) connects the ovary posteriorly to the uterus
- H (broad ligament) is the tent-like peritoneal sheet enveloping all these structures
Summary Mnemonic: "RAT" at the Cornua
Working from anterior to posterior at the uterine cornua:
- R - Round ligament (most anterior, inferior, solid, goes to inguinal ring)
- A - (Nothing between R and T at cornua; tube is right above)
- T - Tube / fallopian tube (superior, hollow, goes to fimbriae and ovary)
Plus posterior to tube: Utero-ovarian ligament → ovary
Dividing the round ligament first, which is the most anterior and safest structure, opens up the broad ligament cleanly and exposes the space needed to safely identify the tube, ovarian ligament, and ureter for the remaining steps.
Sources: Schwartz's Principles of Surgery 11th Ed., Fig. 41-5; Sabiston Textbook of Surgery, Fig. 120.2; Berek & Novak's Gynecology, Fig. 27-1; Color Atlas of Human Anatomy Vol. 2; Campbell-Walsh-Wein Urology
This is a shared conversation. Sign in to Orris to start your own chat.