Functional cast bracing
Reading File
Finding Sources
Finding Sources
Searching PubMed
functional cast bracing fracture
Finding Sources
Finding Sources
Reading File
Reading File
Reading File
Loading Image
Finding Sources
Reading File
I now have comprehensive material from the textbooks. Let me compile the full answer.
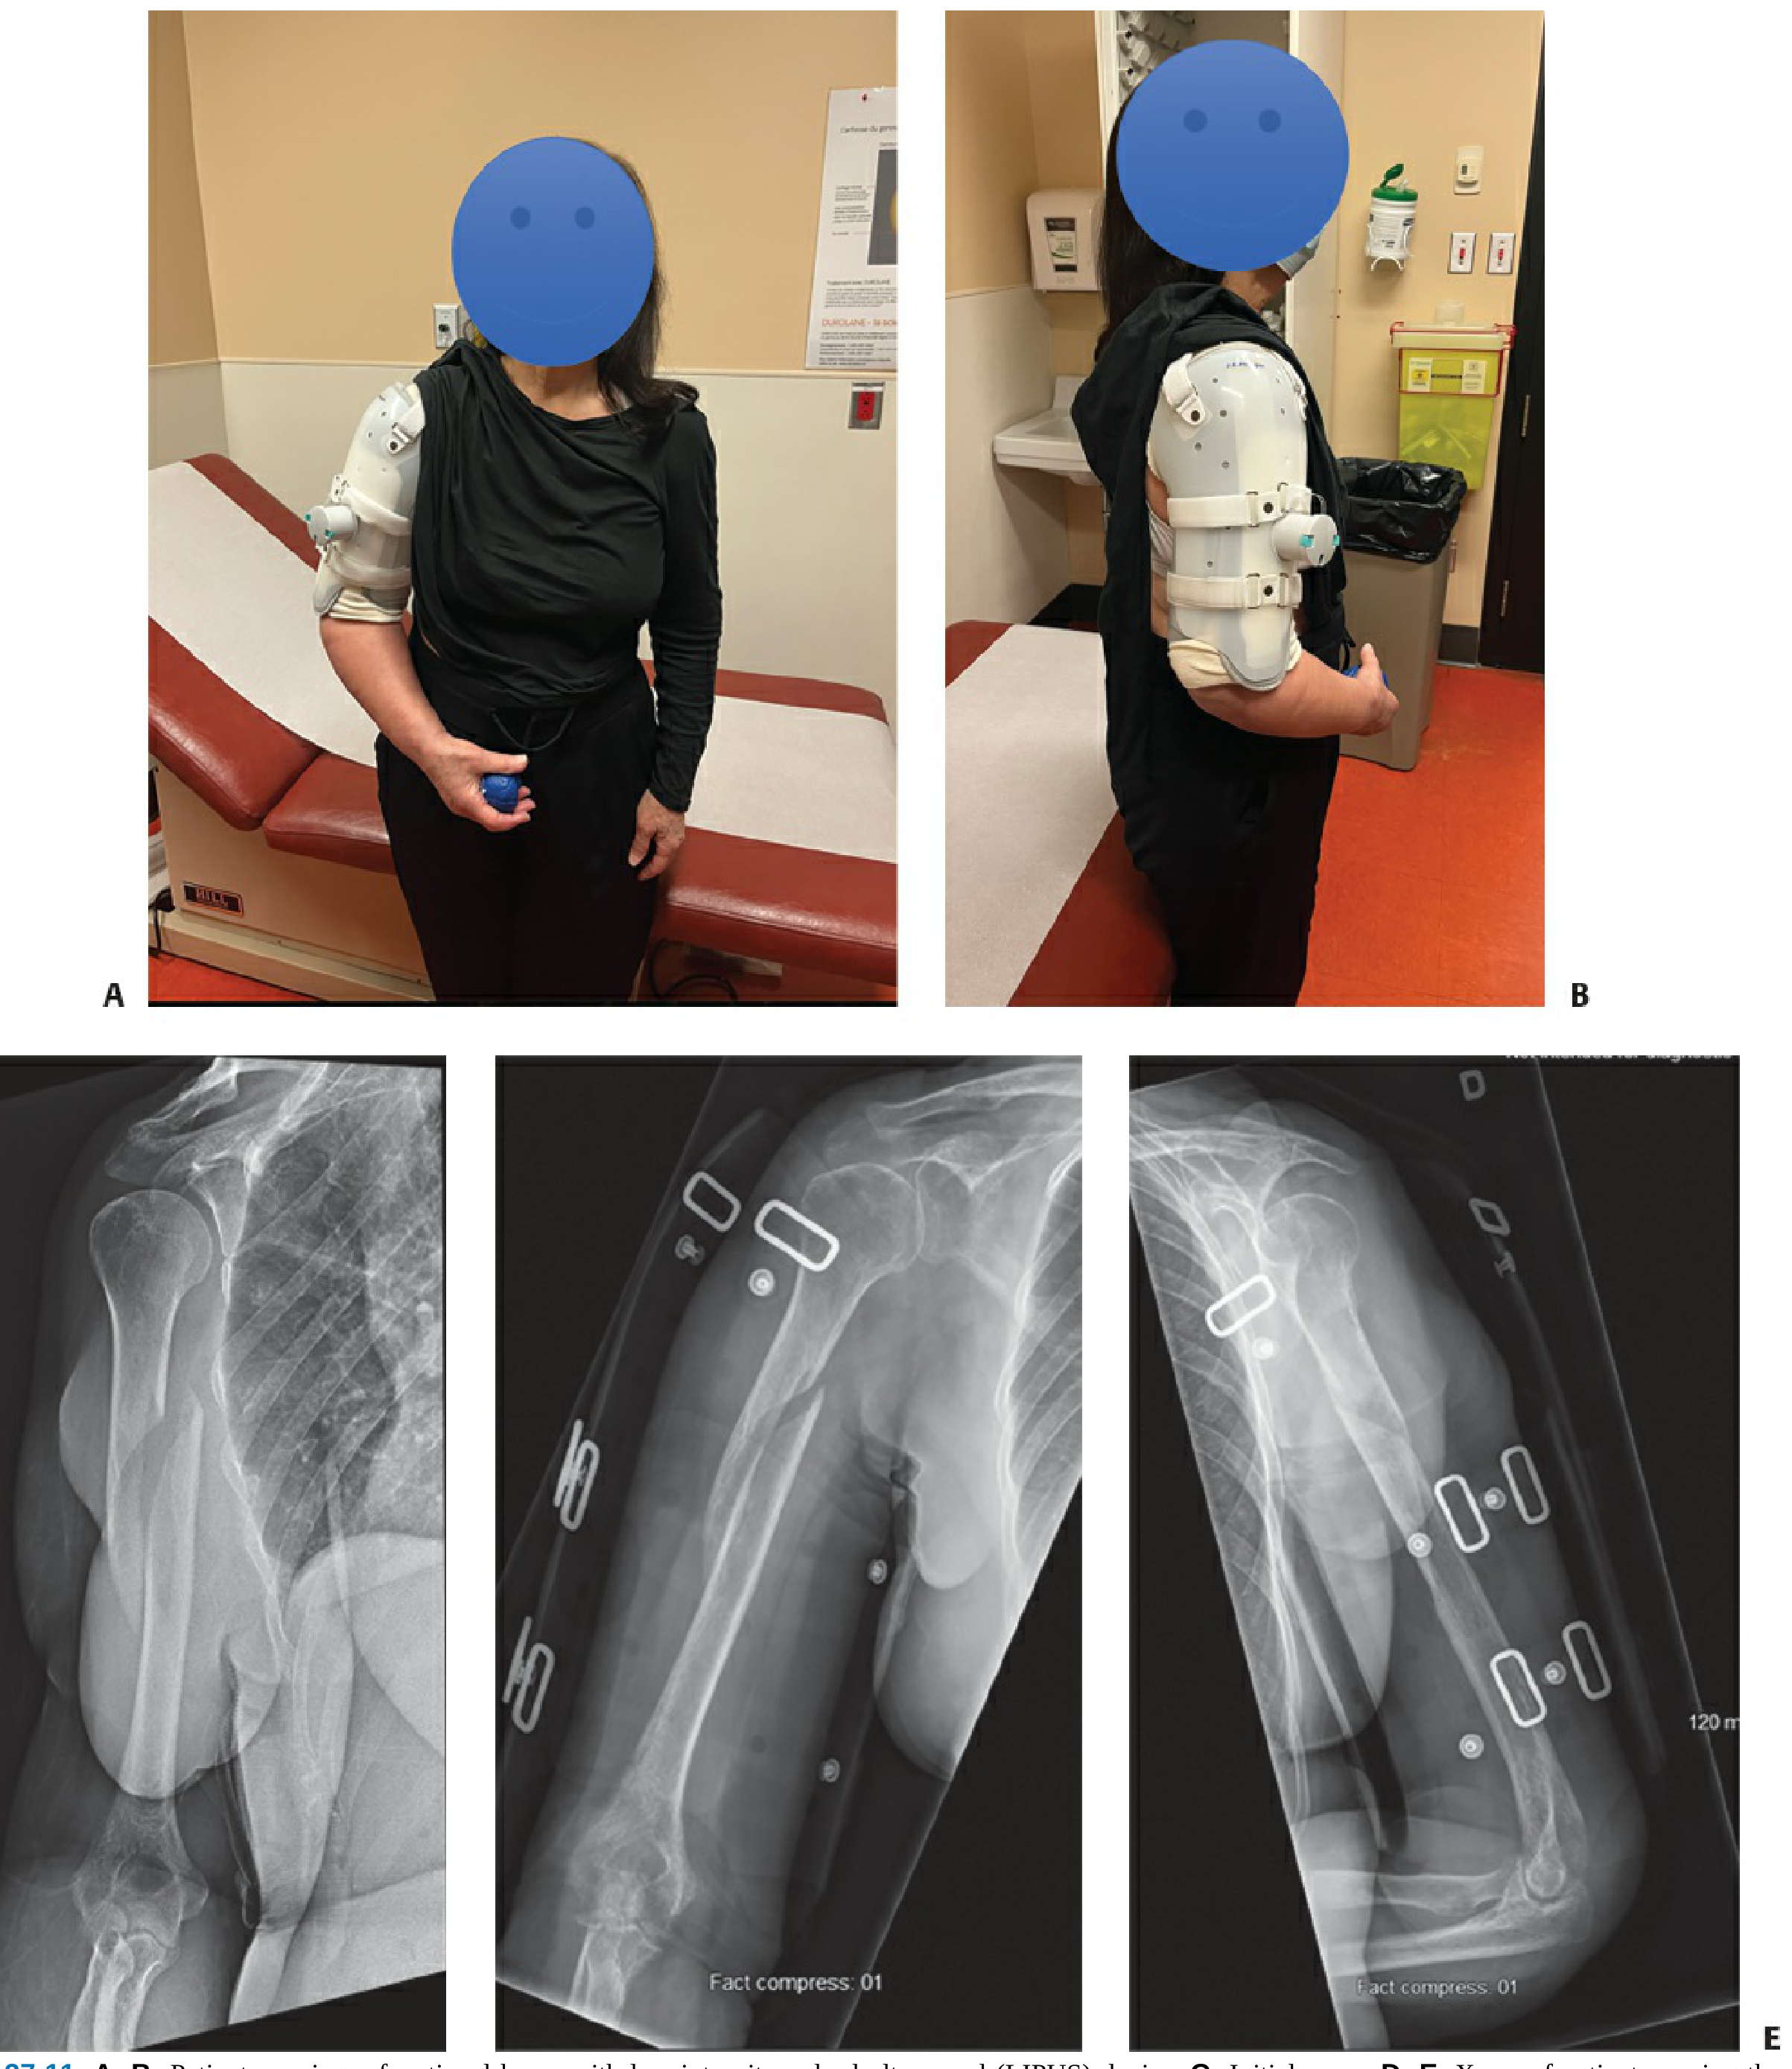
Functional Cast Bracing
Functional cast bracing (also called functional fracture bracing or the Sarmiento brace) is a nonoperative fracture management technique that permits controlled motion at the joints adjacent to a fracture while simultaneously providing circumferential soft-tissue compression to stabilize the fracture site. It was first described by Augusto Sarmiento in the 1960s-1970s and remains a cornerstone of conservative fracture management.
Principle and Mechanism
The fundamental principle rests on hydraulic stabilization: the brace applies circumferential pressure to the surrounding muscle bellies and soft tissues, which are essentially non-compressible fluid-containing structures. This creates a hydraulic splinting effect that maintains fracture alignment without rigid immobilization of the entire limb.
Two additional mechanisms contribute:
- Muscle contraction forces generated during functional activity produce compressive loads across the fracture, which stimulate callus formation and secondary bone healing.
- Gravity-assisted alignment - particularly relevant for the humerus, where gravity keeps the hanging arm in distraction and corrects angulation.
A tight, well-contoured fit is essential; the brace must be periodically adjusted as post-injury swelling resolves and the limb atrophies.
"The theory behind how bracing and cast immobilization maintain tibia alignment centers around the hydraulic pressure exerted on the fracture by circumferential forces on the noncompressible fluid-based tissues of the leg." - Rockwood and Green's Fractures in Adults, 10th ed.
Construction
A functional brace typically consists of:
- Two plastic (polypropylene) shells, applied medially/laterally or anteriorly/posteriorly
- Adjustable Velcro straps that can be tightened to achieve a custom fit
- A cotton stockinette worn underneath to protect skin
- For the humerus: a collar-and-cuff sling is used alongside the brace
The brace is not applied acutely because swelling in the fresh injury would cause significant pain under circumferential compression. The standard approach is:
- Acute phase (0-7 days): Temporary immobilization with a coaptation splint, hanging arm cast, or sling and swathe
- Transition (day 7-10 / once swelling subsides): Switch to the functional brace
- Rehabilitation phase: Progressive joint motion and weight bearing encouraged
Clinical Applications
1. Humeral Shaft Fractures (Most Common Use)
First described by Sarmiento et al. in 1977 for this indication. The brace is the standard nonoperative treatment for diaphyseal humeral fractures.
Outcomes (Sarmiento's series of 620 patients):
- Nonunion rate: 2.6% overall (1.5% closed, 5.8% open fractures)
- Mean healing time: 9.5 weeks (closed), 14 weeks (open)
-
80% had <15 degrees anterior/posterior angulation
- 88.6% lost <10 degrees shoulder motion; 92% lost <10 degrees elbow motion
- Average varus angulation: 9° (transverse), 4° (oblique), 8° (comminuted)
Acceptable deformity thresholds:
- Varus/valgus: up to 15-20 degrees (debatable)
- Anterior/posterior: up to 20 degrees
- Malrotation: up to 30 degrees
- Shortening: up to 3 cm (with some bone contact maintained)
Patient instructions during bracing:
- Daily elbow flexion-extension to prevent stiffness
- Pendulum shoulder movements from the start
- Avoid resting the arm on a chair arm, table, or lap (causes varus angulation)
- Avoid active abduction and elevation exercises early
- Regular skin inspection and cleaning (fungal infection risk)
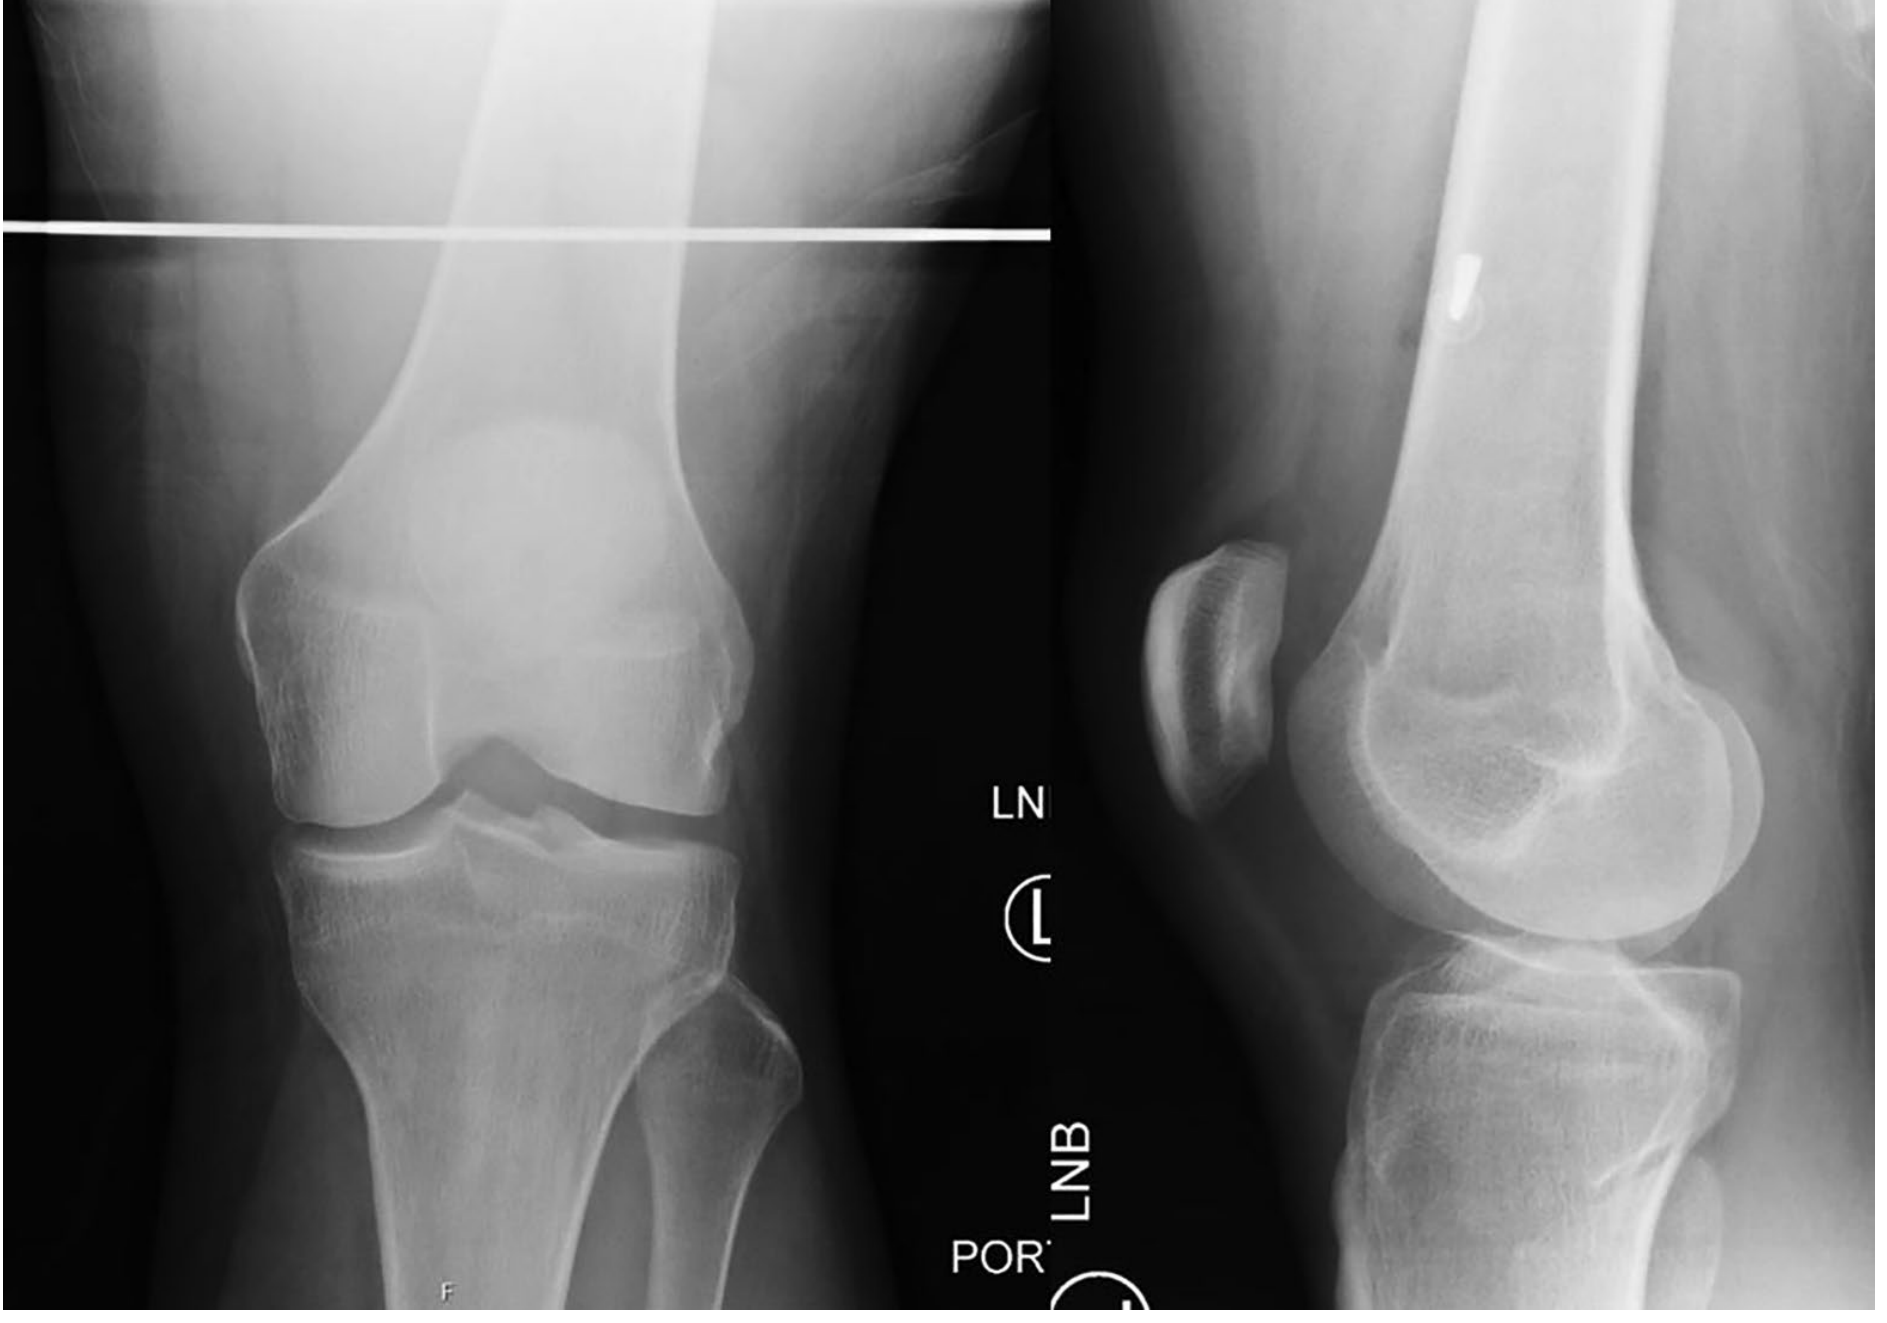
2. Tibial Shaft Fractures
One of Sarmiento's original applications. The sequence:
- Long leg cast or splint for 2-4 weeks (until swelling reduces and early callus forms)
- Transition to short leg patellar tendon-bearing (PTB) cast or fabricated functional brace
The functional brace has an advantage over a PTB cast in that it allows both ankle and knee motion, promoting earlier functional rehabilitation. Early weight bearing is actively encouraged, as it generates compressive forces that stimulate fracture healing.
Outcomes (Sarmiento's series of 1,000 closed tibia fractures):
- Nonunion rate: 1.1%
- 94% healed with ≤12 mm shortening
- 90% healed with ≤6 degrees angulation
- Mean final shortening: 4.3 mm (strongly correlated with initial shortening - suggesting that initial shortening is not improved by bracing)
Poorer prognosis factors for tibia bracing:
- Open fractures
- Initial shortening >12 mm
- Intact fibula (risk of late angular deformity)
3. Other Applications
- Forearm (radius/ulna) fractures - less common, more challenging due to rotation
- Femoral shaft fractures - historically used, now largely replaced by intramedullary nailing
- Isolated lateral malleolar fractures (Weber A / SAD I) - functional bracing or cast with comparable outcomes
Indications
| Situation | Notes |
|---|---|
| Closed, acute humeral diaphyseal fractures | Primary indication |
| Open humeral fractures (without neurovascular injury) | Can be managed with bracing once wound is controlled |
| Humeral fractures with radial nerve palsy | Not in isolation a contraindication to bracing; most recover |
| Closed tibial shaft fractures | Widely used |
| Segmental tibial fractures | Acceptable results reported |
| Polytrauma patients | Relative - weigh against need for early mobility |
Contraindications
Relative/Absolute for Functional Bracing:
- Pathologic fractures
- Nonunion (pre-existing)
- Significant vascular injury
- Soft tissue injury that physically precludes brace application
- Noncompliant patient (compliance is essential)
- Ipsilateral forearm or elbow fractures (for humeral bracing)
- Initial shortening >12 mm (tibia)
Note on obesity and large breasts: Earlier literature listed these as contraindications for humeral bracing, but modern evidence does not support this - these are not current contraindications per Rockwood & Green's 10th edition.
Complications
| Complication | Comment |
|---|---|
| Malunion | Most common - varus angulation for humerus |
| Nonunion | Low rate overall; higher in AO type A humeral fractures (~15%) and proximal third location |
| Skin irritation / fungal infection | Requires regular brace hygiene |
| Joint stiffness | Prevented by early motion exercises |
| Failure of conservative management | ~10-20% eventually require surgery |
Risk factors for nonunion in humeral shaft fractures:
- AO type A (transverse) pattern
- Proximal third location
- Large interfragmentary gap
- Absence of bridging callus at 6 weeks
When to Convert to Surgery
Failure of nonoperative management is indicated by:
- Open fracture with instability or contamination
- Unstable fracture pattern (severe comminution, segmental)
- Ipsilateral forearm or elbow injury ("floating elbow")
- Polytrauma requiring early limb mobilization
- Progressive or unacceptable deformity on serial radiographs
- Persistent nonunion
Recent Evidence
Two recent systematic reviews are relevant:
- Zhou et al. 2025 (PMID 40069691) - compared cast immobilization vs. removable braces in ankle fractures
- Spaans et al. 2026 (PMID 41950582) - compared cast immobilization vs. early functional treatment after surgical fixation of ankle fractures (found early functional treatment favored for wound healing)
These suggest a trend toward early functional treatment over rigid immobilization in contemporary orthopedics, consistent with the principles underlying functional bracing.
Sources:
- Rockwood and Green's Fractures in Adults, 10th ed. 2025 - Chapters 37 (Humeral Shaft), 63 (Tibial Shaft)
- Sabiston Textbook of Surgery, Chapter 40 (Humeral shaft fractures)
- Bailey and Love's Short Practice of Surgery, 28th ed.
bohlers brown splint
Finding Sources
Finding Sources
Searching the Web
Bohler Brown splint orthopedic traction frame uses setup
Reading Web Page
https://orthonotes.in/wiki/bohler-braun-splint
Finding Sources
Finding Sources
Searching the Web
Bohler Braun splint vs Thomas splint comparison nursing care pin sites
Reading File
I have comprehensive information. Here is the full answer:
Böhler-Braun Splint
Eponym and History
The Böhler-Braun splint (also written "Bohler Brown" or "BB splint") is named after two surgeons:
- Lorenz Böhler (1885-1973) - Austrian trauma surgeon who added the proximal pulleys for femoral traction
- Heinrich Braun (1862-1934) - German surgeon who designed the original single-pulley frame for distal tibial/calcaneal traction
Böhler's modification converted the basic Braun splint into a multi-pulley system capable of applying traction in different directions for different fracture levels - hence "Böhler-Braun."
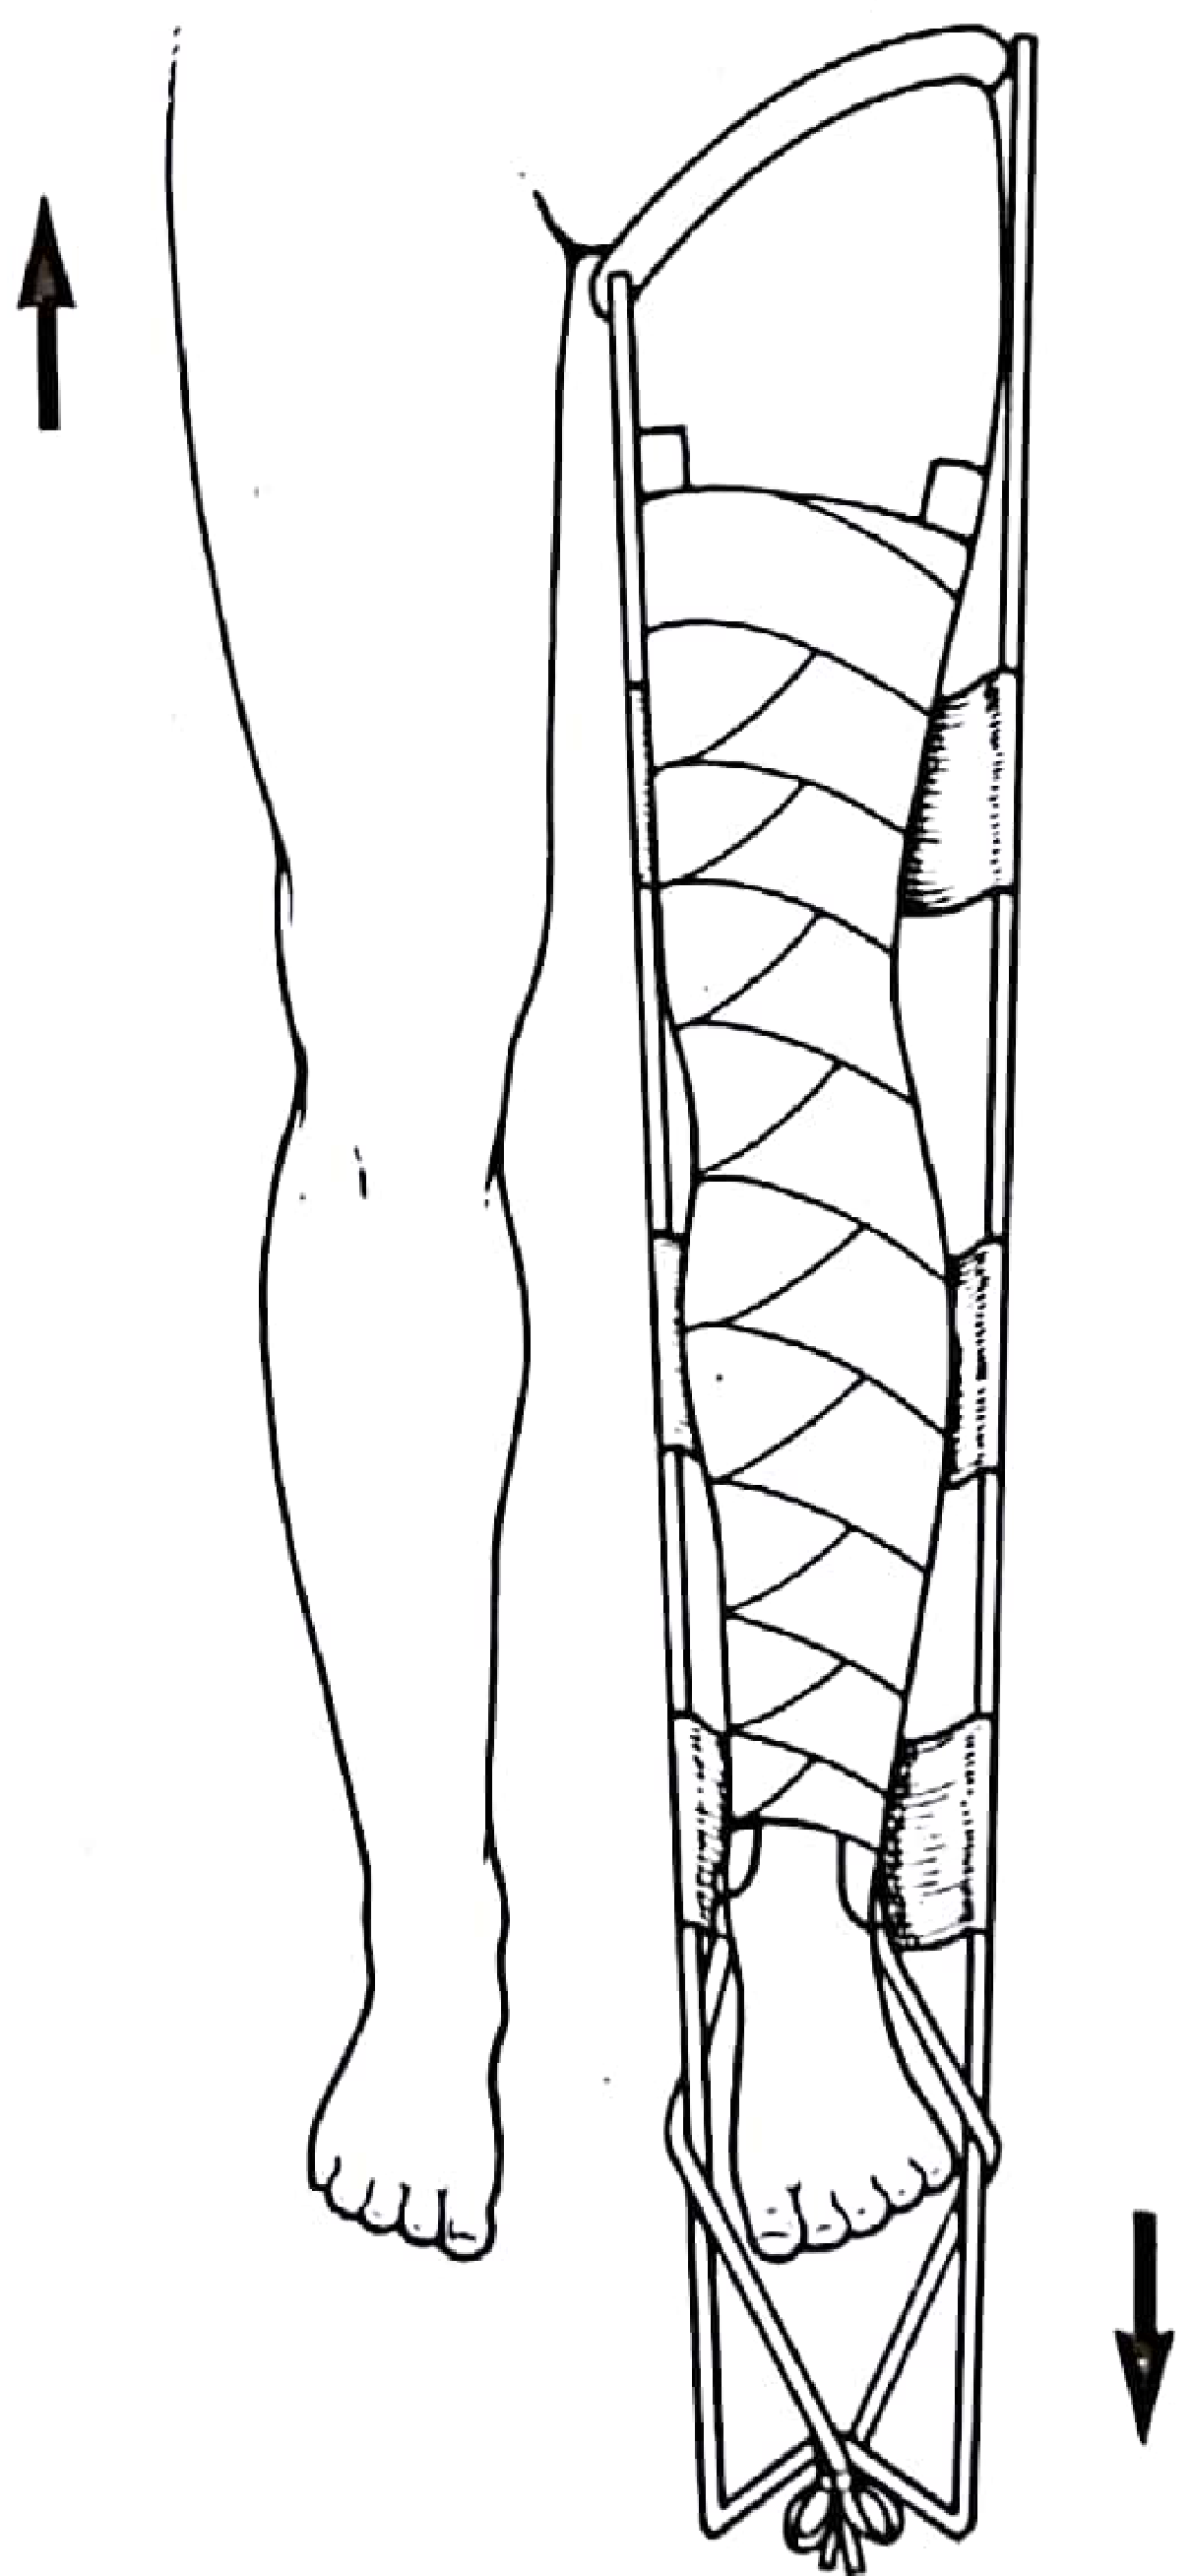
What It Is
A fixed metal frame apparatus used in orthopaedic wards to provide balanced skeletal (or skin) traction to the lower limb. Unlike the Thomas splint - which is portable and used primarily for field immobilization and transport - the Böhler-Braun frame is:
- Hospital/ward based
- Fixed to the bed
- Designed for continuous definitive or bridging traction
It supports the limb at approximately 45° hip flexion and 45-90° knee flexion, which:
- Relaxes the iliopsoas, reducing the tendency of the proximal fragment to flex in femoral shaft fractures
- Allows the patient to be nursed comfortably (can turn, use bedpan)
- Provides access for wound care and dressings
- Directs traction force along the line of the femoral shaft
Structure
The frame consists of an iron/steel frame with a system of 4 pulleys that allow traction to be applied at different angles:
| Pulley Position | Direction | Used For |
|---|---|---|
| 1st - Lowermost | Upward/distal | Tibia and fibula fractures (calcaneal pin) |
| 2nd from bottom | Slightly proximal angle | Supracondylar fractures of femur |
| 3rd - directed away from patient | Along femoral shaft | Femoral shaft fractures (middle third) |
| 4th - Topmost, directed toward patient | Dorsiflexion force | Prevents foot drop |
The limb rests on canvas slings stretched between the frame bars. Crucially, this is a balanced suspension system - the patient's limb rests on the frame rather than pulling against a fixed ring (contrast with the Thomas splint's ring countertraction at the ischial tuberosity).
Traction Application
Skeletal traction is used via a:
- Steinmann pin, Denham pin, or Böhler pin (threaded centrally to resist migration)
- Attached to a stirrup/bow, connected by cord over a pulley to hanging weights
Pin Insertion Sites
| Fracture | Pin Site | Anatomical Landmark |
|---|---|---|
| Femoral shaft | Proximal tibia (tibial tuberosity) in adults | 2-3 cm distal to tibial tuberosity (avoids patellar tendon) |
| Femoral shaft | Just above femoral condyles in children | Avoids distal femoral physis |
| Tibial shaft / ankle | Calcaneal tuberosity | Inserted lateral to medial |
| Distal femur | Distal femur (lateral cortex) | 2 cm proximal to superior pole of patella, posterior to midline |
Traction weight: approximately 1/10 of body weight (typically 5-10 kg for adults). Weights must hang freely - not resting on the floor or bed frame.
Indications
With Traction
- Femoral shaft fractures - pre-operative bridging (to IM nailing within 24-48 hrs); maintains length and reduces pain
- Subtrochanteric femur fractures
- Supracondylar fractures of the femur
- Tibial shaft fractures with displacement/overlap
- Acetabular fractures - skeletal traction to maintain femoral head in socket and prevent superior migration while awaiting ORIF (typically 3-14 days post-injury)
- Paediatric femoral fractures (>10 years, >15-20 kg - when Gallows traction inappropriate)
- Hip dislocations (occasionally, post-reduction)
Without Traction
- Open/compound fractures without overlap - for wound dressing and care
- Soft tissue injuries to the leg
- Cellulitis, gangrene, amputation stump - elevation and rest
- Post-operative elevation of the limb
Advantages
- Traction unit is self-contained (mobile traction possible for transport within ward)
- Limb held in comfortable, physiological position
- Angle of traction changeable by rerouting the pulley - no need to change the entire arrangement
- Simultaneous traction through calcaneal and tibial tuberosity pins possible
- Full access for wound care, dressings, and examination
- Patient can be turned for nursing care and linen change
- Allows bedpan use
Disadvantages and Complications
| Complication | Mechanism | Prevention/Management |
|---|---|---|
| Pressure sores (heel most common, also sacrum, elbows) | Prolonged immobility over bony prominences | Gel heel protectors; 2-hourly repositioning; pressure-relief mattress; inspect at every nursing observation |
| Pin site infection (Staphylococcus aureus most common) | Bacteria migrate along pin track; can progress to osteomyelitis | Daily pin site care (chlorhexidine or saline); no occlusive dressings; early antibiotics for superficial infection; remove pin if deep infection |
| Common peroneal nerve palsy | Compression at fibular neck by frame or sling | Padding at fibular neck; regular neurovascular checks |
| Joint stiffness / contracture | Prolonged immobility of knee and ankle | Regular physiotherapy; ankle mobilization; static quadriceps exercises |
| DVT / pulmonary embolism | Immobility | Anticoagulation; compression stockings to unaffected limb |
| Hypostatic pneumonia | Recumbency | Chest physiotherapy |
| Urinary/bowel difficulties | Bedbound position | Careful nursing; catheterization if needed |
| Muscle wasting | Disuse | Isometric exercises; minimize traction duration |
| Loss of reduction | Inadequate weight or malaligned pulleys | Regular portable X-rays; adjust weight/direction accordingly |
Key principle: In modern practice, the Böhler-Braun is a bridge to surgery, not a definitive treatment. For femoral shaft fractures, IM nailing should proceed within 24-48 hours. Prolonged traction dramatically increases DVT, pressure sore, knee stiffness, and muscle wasting risk.
Monitoring - The 5 P's
A useful aide-mémoire for ward monitoring of a patient on traction:
- Pulse / pins and needles - distal neurovascular status: sensation, pulse, capillary refill, pain on passive dorsiflexion (compartment syndrome)
- Pressure sores - heel, ischium, other bony prominences
- Pin tract infection - pain, swelling, redness, discharge at pin sites
- Physiotherapy - ankle mobilization (prevent equinus/foot drop), anti-foot drop splint at night, static quadriceps, knee mobilization
- Portable radiograph - biweekly (or as needed) in first 2 weeks, then weekly; adjust weight and traction direction accordingly
Comparison: Böhler-Braun vs Thomas Splint
| Feature | Böhler-Braun | Thomas Splint |
|---|---|---|
| Setting | Ward/hospital (fixed to bed) | Field/ambulance/transport (portable) |
| Countertraction | Patient's own body weight via pulleys | Ring presses on ischial tuberosity |
| Traction type | Skeletal (preferred) or skin | Skin or skeletal |
| Adjustability | High - angle changeable without rearrangement | Limited |
| Wound access | Excellent | Limited by ring |
| Comfort | Good (no uncomfortable ring) | Ring can cause discomfort, especially in elderly |
| Primary use | Definitive ward traction / pre-op bridge | Emergency immobilization and transport |
Nursing Care Summary
- Ensure weights hang freely at all times (not touching bed or floor)
- Cord must run freely over pulleys without kinking
- Slings should support but not constrict; reposition slings regularly
- Heel must NOT rest on the frame - use gel heel protector
- Turn patient toward the splint for back care and linen changes (split sheet technique - two folded sheets, one proximal and one distal to the splint)
- Apply anti-embolism stocking to the unaffected leg
- Passive patellar mobilization to prevent patellofemoral adhesions
- Chest physiotherapy to prevent pulmonary complications
- In supracondylar femoral fractures: pad the fracture site to prevent angulation; avoid padding at the knee joint (which can cause angulation)
Sources: Indian Orthopaedic Research Group; Orthonotes (Böhler-Braun Splint - Set-up, updated Apr 2026); Bailey and Love's Short Practice of Surgery 28th ed.
Thomas splint
Finding Sources
Finding Sources
Searching the Web
Thomas splint orthopedic parts indications application technique complications
Reading File
Reading File
Reading File
Reading File
Loading Image
Reading Web Page
https://orthopaedicprinciples.com/everything-about-the-thoma…
I have comprehensive information from textbooks and reliable orthopaedic sources. Here is the full answer:
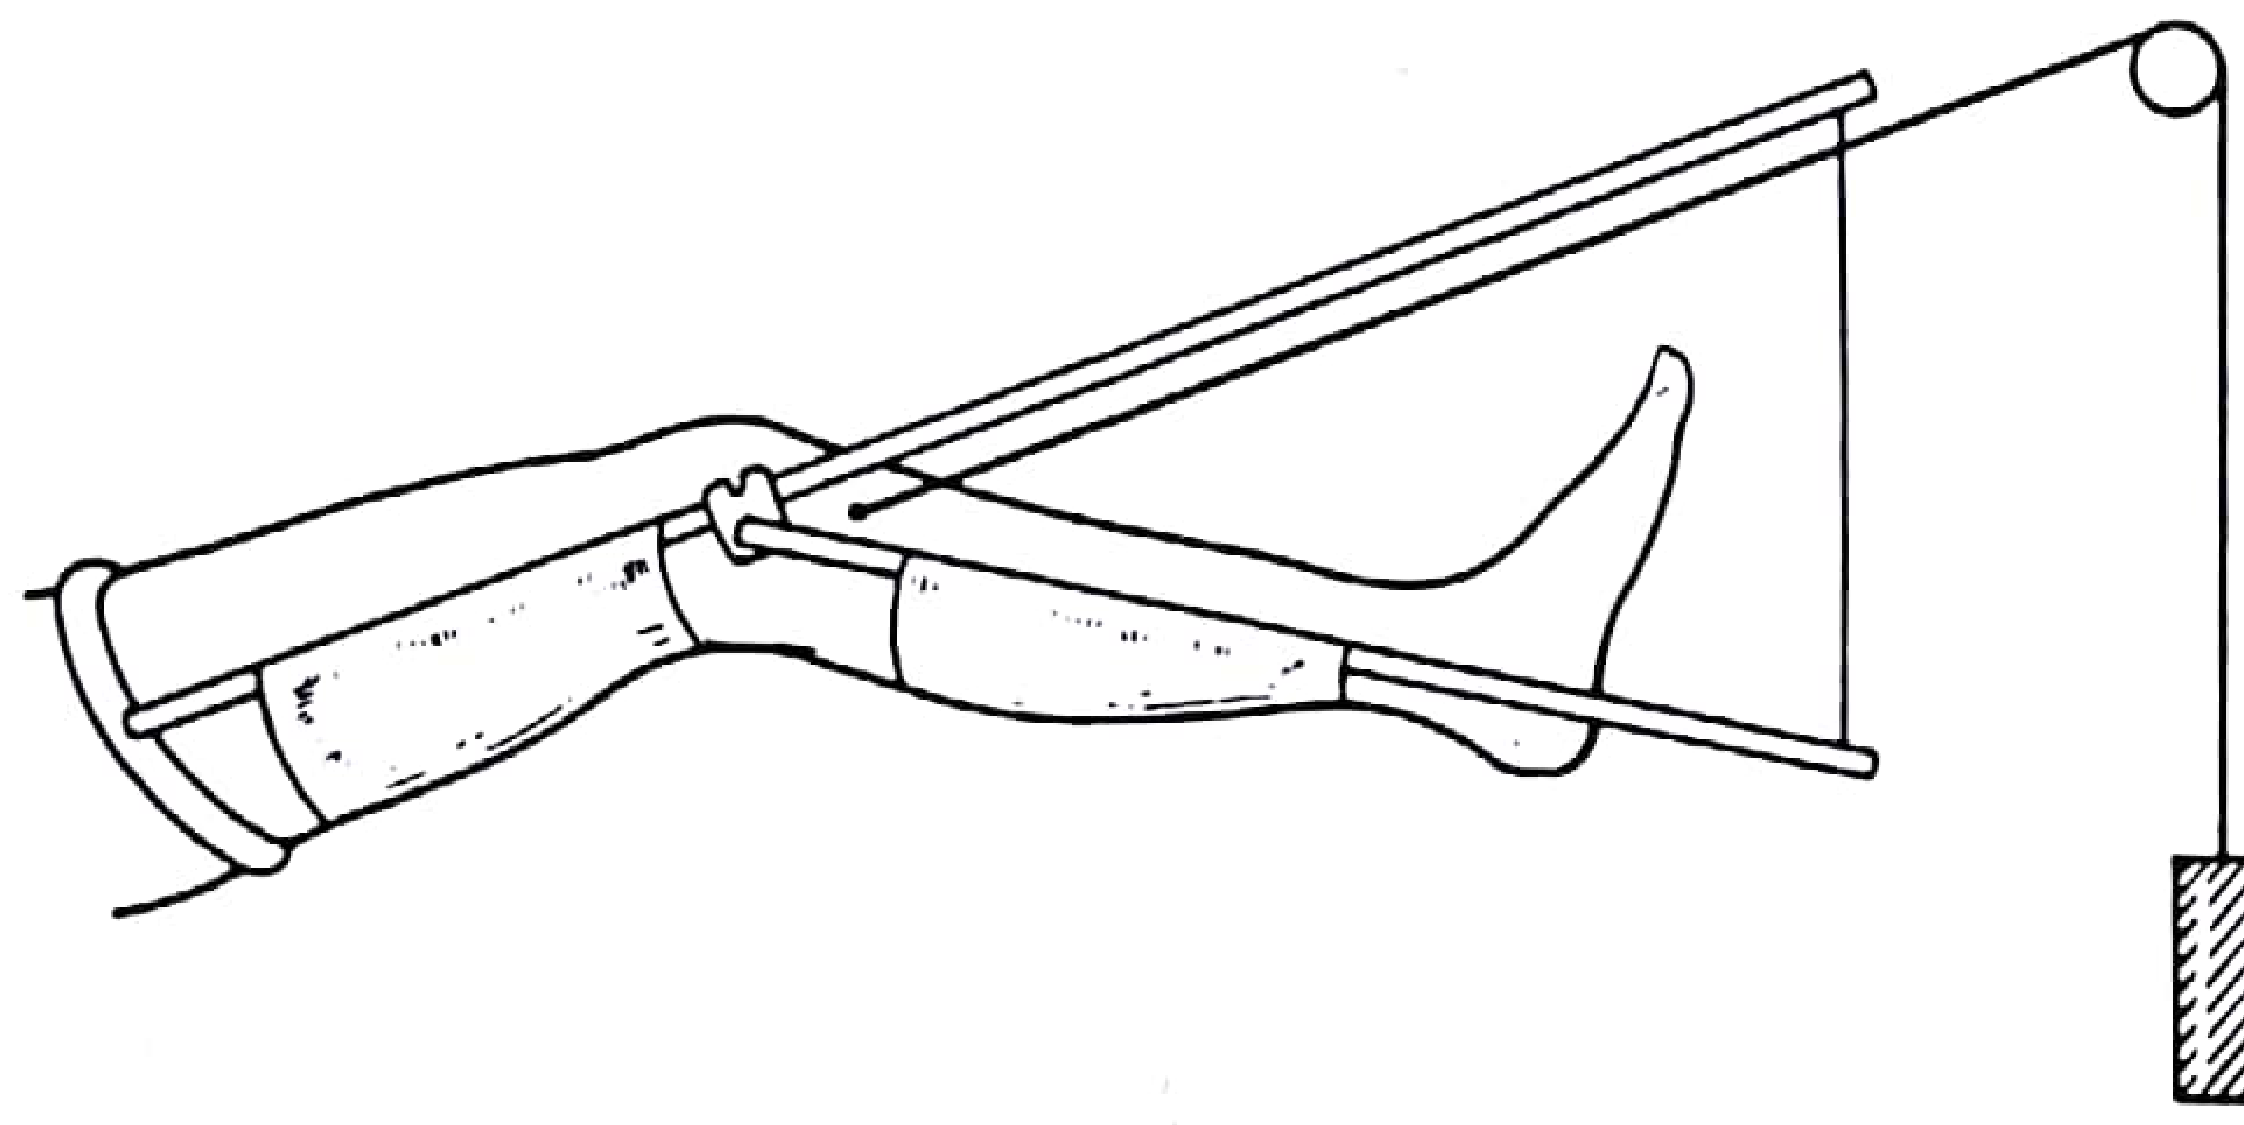
Thomas Splint
History and Original Design
The Thomas splint was originally described by Hugh Owen Thomas (1834-1891), a Welsh orthopaedic surgeon, as a knee appliance for the ambulant management of chronic inflammation of the knee joint (tuberculosis of the knee). It was not originally designed for fractures.
Its use for femoral shaft fractures became widespread during World War I, when Harvey Cushing and Robert Jones adapted it for battlefield use. Robert Jones reported the mortality from femoral shaft fractures dropped from ~80% (Boer War) to ~20% after widespread Thomas splint use in WWI - one of the most dramatic demonstrations of splint effectiveness in military surgery. A further modification by Cril adapted it specifically for proximal femoral fractures.
Parts of the Thomas Splint
| Part | Description |
|---|---|
| Proximal padded oval ring | Fits around the root of the thigh against the ischial tuberosity; provides the countertraction force |
| Inner side bar | Set at an angle of 120° to the padded ring |
| Outer side bar | Protrudes 2 inches (5 cm) below the padded ring to clear the prominent greater trochanter |
| W-piece / cross-piece | Joins the two side bars at the distal end; traction tapes are tied over this |
| Canvas/linen slings | Three slings tied to the side bars, supporting the thigh, knee, and just above the heel |
The ring is oval, not circular - designed to fit the oblique circumference of the upper thigh. The asymmetry of the side bars (outer longer) accommodates the greater trochanter.
Sizing the Splint
Two measurements are required:
-
Ring size - Measure the oblique circumference of the thigh immediately below the gluteal fold and ischial tuberosity. This equals the internal circumference of the padded ring. If oedema is present, add 2 inches to the measured value.
-
Length - Measure distance from the crotch (ischial tuberosity) to the heel, then add 6-9 inches (15-23 cm). This gives the length of the inner side bar. The distal end must protrude beyond the foot to allow traction to be applied, and must end at least 2.5 inches (6 cm) above the heel to avoid pressure on the Achilles tendon.
Indications
- Femoral shaft fractures - primary indication (emergency and ward use)
- Subtrochanteric fractures (with modification)
- Distal femoral / supracondylar fractures (with pin through upper tibia)
- Septic arthritis of the knee (original use - rest and immobilization)
- Emergency field immobilization and transport of any lower limb fracture (first aid)
Contraindications / Exclusions:
- Neck of femur or pelvic fractures (ring cannot be fitted correctly)
- Supracondylar femoral fracture or fractures involving the knee joint (ring position interferes)
- Fractures of the ankle or foot
- Large wounds in the buttock/thigh that would prevent fitting the ring
- Partial amputation with only marginal tissue connecting the distal limb (skin traction contraindicated)
- Patient refusal
Preparation of the Splint
Before application, prepare three slings from non-stretch bandage (or commercial Velcro slings), placed:
- Under the thigh
- Under the knee (with a small pad allowing ~5° knee flexion)
- Just above the tendo calcaneus (heel must NOT rest on the sling - leaves it free)
Cover these with Tubigrip or soft padding (two layers of Gamgee) for comfort.
Application Technique
Analgesia first: A fascia iliaca block or femoral nerve block should be given before application where possible. At minimum, adequate systemic analgesia.
Requires at least 2 trained persons.
-
Apply skin traction extensions (Elastoplast/adhesive foam strapping, 7.5-10 cm wide) to each side of the limb - the outer strip placed slightly posteriorly, the inner strip slightly anteriorly. This arrangement counteracts the tendency for external rotation at the fracture site.
-
Secure extensions with circumferential crepe bandages ending just above the malleoli. Orthopaedic felt pads hold the extension tapes away from the malleoli to prevent pressure sores.
-
One person maintains manual longitudinal traction while the splint is passed over the foot and slid up the limb.
-
Push the splint gently up to the ischial tuberosity. Maintain a 1-finger gap around the entire circumference of the padded ring (too tight = pressure necrosis; too loose = no countertraction).
-
Pass the outer traction tape over the lateral bar and the inner tape under the medial bar (further resisting external rotation tendency).
-
Tie tapes over the distal W-piece. If more traction is needed, a wooden bar may be used as a windlass (Spanish windlass technique) to increase tension.
-
Adjust slings to support the limb comfortably, with the knee in slight flexion.
Check daily: Position of the ring, state of slings and tapes, skin condition, neurovascular status.
Types of Traction with the Thomas Splint
Fixed Traction (Thomas's Original Method)
- Traction force generated by tying the skin extension tapes to the distal end of the splint - force is contained within the splint itself
- Countertraction comes from ring pressure on the ischial tuberosity
- Self-contained system - portable, ideal for field/transport use
- The traction and counterforce are within a closed system
- Used to maintain reduction once achieved
Sliding (Dynamic/Balanced) Traction
- Tapes/cords connect the traction pin to hanging weights over a pulley at the foot of the bed
- Countertraction provided by patient's own body weight - the foot end of the bed is elevated so the upward component of body weight acts as counter-traction
- Amount of bed elevation is proportional to the traction weight used
- Allows physiological muscle activity and more comfortable nursing
- Used in ward setting for prolonged traction
Thomas Splint with Pearson Knee Attachment
In young, muscular patients, skin traction alone cannot overcome powerful thigh muscles. Skeletal traction is then needed via a Steinmann pin through the upper tibia (just below the tibial tubercle, 2 cm behind the anterior border).
For this, a Pearson knee attachment is added - a second, smaller Thomas-type splint component hinged at the knee level, supporting the lower leg. This:
- Allows the knee to be held in flexion (more comfortable and reduces proximal fragment flexion deformity)
- The angle of knee flexion can be adjusted by varying the two splint components
- A balanced traction cord connects over the Steinmann pin stirrup
- Traction weight: no more than 10 lb (4.5 kg) - over-distraction is harmful; reduce to 5 lb after 2-3 weeks
Steinmann Pin Insertion Sites
| Site | Landmark | Notes |
|---|---|---|
| Upper tibia (most common) | 2-3 cm distal to tibial tuberosity, 2 cm behind anterior border | Avoids patellar tendon; inserted lateral to medial |
| Lower tibia | 4-5 cm above tip of medial malleolus, 2 cm behind anterior border | For tibial fractures |
| Calcaneum | 3 cm in front of and 3 cm above the heel point | For tibial/ankle fractures |
Pin inserted from lateral to medial at the tibia. The stirrup must move freely on the pin - if the pin rotates in bone, sepsis and loosening follow.
Manipulation of Fracture on Thomas Splint
Manipulation is indicated when bony apposition is lost. Technique depends on the deformity:
| Deformity | Correction |
|---|---|
| Proximal fragment abducted | Apply traction and abduct the whole limb in the splint |
| Proximal fragment adducted | Traction alone usually corrects this |
| Proximal fragment in flexion | Abduct the limb and raise it to bring the proximal fragment into alignment |
| Posterior sagging at fracture site | Increase padding in the posterior aspect under the fracture |
Complications and Aftercare
Pressure Sores
- Proximal: perineum, groin, ischial tuberosity - from ring pressure. Relieved by increasing traction tension.
- Distal: Achilles tendon, over malleoli, under the heel - from sling/tape pressure. Prevented by adequate padding and ensuring heel is free.
Neurovascular
- Common peroneal nerve palsy - compression at fibular neck by slings or bandages
- Compartment syndrome - pain on passive dorsiflexion is a warning sign
- Distal pulse and capillary refill checked regularly
Other Complications
- Pin site infection (with skeletal traction) - Staphylococcus aureus; daily pin care
- Joint stiffness (knee, ankle) - physiotherapy essential
- DVT / pulmonary embolism - anticoagulation; anti-embolism stockings on unaffected limb
- Over-distraction - too much traction weight; non-union risk
- Malrotation - inadequate correction of external rotation tendency
- Hypostatic pneumonia - chest physio required
Comparison: Fixed vs Sliding Traction
| Feature | Fixed Traction | Sliding Traction |
|---|---|---|
| Countertraction source | Ring on ischial tuberosity | Patient's body weight (tilted bed) |
| Portability | Yes - self-contained | No - requires bed and pulley |
| Setting | Field / transport / ambulance | Ward / hospital |
| Adjustability | Windlass only | Weight changes |
| Comfort | Less (ring pressure) | More (no fixed ring pressure) |
| Use | Acute field immobilization, maintaining reduction | Prolonged ward traction |
Key Facts Summary
- Originally designed for TB knee (ambulant use) - repurposed for femoral shaft fractures in WWI
- Ring is oval, at 120° to the inner side bar, outer bar protrudes 2 cm to clear the greater trochanter
- 1 finger gap around ring at ischial tuberosity
- Distal end must be 2.5 inches above the heel
- Outer tape over lateral bar, inner tape under medial bar - to prevent external rotation
- Pearson attachment + skeletal pin needed for muscular young patients
- Maximum traction weight with skeletal pin: ~10 lb; reduce to 5 lb after 2-3 weeks
- Unlike the Böhler-Braun: Thomas splint is portable and suitable for pre-hospital transport; Böhler-Braun is hospital-fixed with a superior pulley system for prolonged ward traction
Sources: Pye's Surgical Handicraft 22nd ed. (Application of Thomas Splint, pp. 196, 185); Rockwood and Green's Fractures in Adults 10th ed. 2025; Bailey and Love's Short Practice of Surgery 28th ed.; OrthopaedicPrinciples.com; IAEM Clinical Guideline for Thomas Splint (2023)
skeletal traction
Finding Sources
Finding Sources
Searching the Web
skeletal traction orthopedics types sites technique complications indications
Reading File
Reading File
Finding Sources
Reading Web Page
https://pmc.ncbi.nlm.nih.gov/articles/PMC7515792
Finding Sources
Finding Sources
Finding Sources
Reading File
Reading File
Reading File
Reading File
Loading Image
Excellent - I have comprehensive material from four textbooks. Here is the full structured answer:
Skeletal Traction
Definition
Skeletal traction is the application of a pulling (tensile) force directly to bone via a metal pin, wire, or screw inserted percutaneously, with the traction force transmitted through a cord-and-pulley-weight system. It differs from skin traction, where the force is applied through adhesive strapping on the skin surface.
"Traction is defined as a stretching force on a limb to pull a fracture straight." - Bailey and Love's Short Practice of Surgery, 28th ed.
Principles of Traction
All traction systems require two forces:
- The traction force - applied to the limb (via pin/skin)
- The countertraction force - resists the traction to prevent the patient sliding
Countertraction is provided by either:
- The patient's own body weight (in sliding/balanced traction, bed tilted)
- A fixed point on the patient's body (e.g., ring of Thomas splint on ischial tuberosity - fixed traction)
Skeletal vs Skin Traction
| Feature | Skeletal Traction | Skin Traction |
|---|---|---|
| Application site | Through bone (pin/wire) | Adhesive strapping on skin |
| Maximum safe load | High (up to 15 kg or more) | Low (~4-5 kg) |
| Duration | Weeks (prolonged use) | Short-term only |
| Invasiveness | Invasive (pin insertion) | Non-invasive |
| Main complication | Pin site infection | Skin breakdown, pressure necrosis |
| Best for | Young muscular patients; prolonged traction; polytrauma awaiting surgery | Elderly; short-term; children |
"Skeletal traction is generally more effective and a safer option for patients in which the traction is intended to remain in place for a longer period of time (i.e., polytrauma patients who may not be cleared for surgery)." - Sabiston Textbook of Surgery
Types of Traction
1. Fixed Traction
- Force and countertraction are self-contained within the splint
- Best example: Thomas splint - cord tightened to splint end (windlass), ring bears on ischial tuberosity
- Portable - patient can be transported
- Used for: acute field immobilization, emergency transport
2. Sliding (Balanced/Dynamic) Traction
- Traction force: hanging weights over a pulley at the foot of the bed
- Countertraction: patient's own body weight (foot of bed elevated)
- Patient confined to bed but joint motion possible if system is carefully arranged
- Used for: prolonged ward traction (on Thomas splint with Pearson attachment, or Böhler-Braun frame)
3. 90-90 Skeletal Traction (Paediatric)
- Hip and knee each held at 90° flexion
- Pin in distal femur or proximal tibia
- Used in children: proximal femoral fractures, paediatric femur fractures (>2 years, too large for Gallows traction)
- Pins must be placed parallel to the axis of the knee joint (oblique pins cause varus or valgus deformity)
- Avoid short-leg cast for traction application - risk of compartment syndrome from compression when femur shortens after anaesthesia
4. Hamilton-Russell Traction
- A pulley system designed so the resultant pull acts in line with the femur regardless of limb position
- Used for: fractures of the upper femur and hip conditions
- Can be applied via skin extensions or a tibial pin
5. Gallows (Bryant's) Traction
- Both legs suspended vertically by skin traction, buttocks just lifted off bed
- Used in: children under 2 years with femoral shaft fractures
- Contraindicated in children >2 years or >15-20 kg (risk of vascular complications from elevation)
6. Skull Tong / Halo Traction
- For cervical spine fractures and dislocations
- Gardner-Wells tongs or halo device inserted through skull outer table
- Still used acutely for cervical spine management
Indications for Skeletal Traction
| Indication | Pin Site Used |
|---|---|
| Femoral shaft fractures (pre-op or definitive) | Proximal tibia or distal femur |
| Subtrochanteric femur fractures | Proximal tibia |
| Acetabular fractures (awaiting ORIF) | Distal femur |
| Unstable hip dislocations | Distal femur |
| Supracondylar femur fractures | Proximal tibia |
| Tibial plateau fractures | Calcaneum |
| Midshaft / distal tibia fractures | Calcaneum |
| Distal tibia / pilon fractures | Calcaneum |
| Humeral shaft / supracondylar humerus | Olecranon |
| Forearm / distal radius fractures | Metacarpal |
| Cervical spine fractures | Skull (Gardner-Wells tongs) |
Note: In modern practice, skeletal traction has been largely replaced by IM nailing and ORIF. It is now primarily a bridging measure to surgery (within 24-48 hours), not a definitive treatment for most fractures.
Pin Types
Steinmann Pin
- Solid, smooth, non-threaded metal pin
- Inserted using a hand chuck or power drill
- Disadvantage: can rotate in bone if stirrup is not free-moving → causes bone erosion and sepsis
Denham Pin (Threaded)
- Has a central threaded section that engages cortical bone
- Resists axial migration more reliably than Steinmann pin
- Preferred when prolonged traction is anticipated
Kirschner Wire (K-wire)
- Thin flexible wire (0.9-2.5 mm)
- Used for lighter traction loads (metacarpal traction, paediatric patients)
- 5/64-inch Steinmann pin equivalent used in children for 90-90 traction
Pin Insertion Sites and Technique
| Site | Landmark | "Safe Zone" / Key Danger | Direction | Indication |
|---|---|---|---|---|
| Proximal tibia | 2-3 cm distal to tibial tuberosity, 2 cm posterior to anterior border | Common peroneal nerve (fibular neck) | Lateral to medial | Distal femur / supracondylar femur fractures |
| Distal femur | 2 cm proximal to superior pole of patella; 2-3 fingerbreadths medial to midline = adductor tubercle level | Femoral artery in adductor canal (stay posterior to midline) | Medial to lateral | Proximal/mid-shaft femur, acetabular fractures, hip dislocations |
| Calcaneum | 2/3 of distance from medial malleolus to posterior tip of calcaneus | Medial calcaneal nerve, sural nerve, posterior tibial bundle - insert medial to lateral | Medial to lateral | Distal tibia, pilon, tibial shaft fractures |
| Distal tibia | 5 cm above ankle | Saphenous vein, superficial peroneal nerve | - | Tibial plateau / mid-shaft tibia |
| Olecranon | 3 cm distal to the tip of olecranon | Ulnar nerve (stays medial - insert lateral to medial) | Lateral to medial | Humeral shaft / supracondylar humerus |
| Metacarpal | 2.5 cm proximal to MCP joint | Digital nerves and vessels | - | Forearm / distal radius fractures |
General Insertion Technique
- Full aseptic precautions (gown, gloves, sterile drape) - preferably in theatre
- Local anaesthesia to skin and periosteum on both sides (entry and exit points)
- Small stab incision on entry side (lateral for most lower limb pins)
- Blunt dissection down to bone with artery forceps
- Pin advanced perpendicular to bone long axis, in the coronal plane, with limb in neutral
- When skin tents on far side, make second stab incision before pin exits
- Pin confirmed on fluoroscopy to ensure correct position and not intra-articular
- Stirrup/bow applied - must move freely on pin (if the stirrup grips, the pin rotates → osteomyelitis)
- Wounds covered with benzoin tincture or dry dressings
- Post-procedure radiograph to confirm alignment and weight adjusted
"It is important that the stirrup through which the traction is applied should move freely on the pin, otherwise the pin rotates in the bone and sepsis and loosening follow." - Pye's Surgical Handicraft, 22nd ed.
Traction Weights
| Site / Purpose | Weight |
|---|---|
| Skeletal traction - general | ~1/10 body weight (5-10 kg in adults) |
| Thomas splint with skeletal pin | Max 10 lb (~4.5 kg); reduce to 5 lb after 2-3 weeks |
| Skin traction (general) | Max 4-5 kg |
| Children (90-90 traction) | Lighter; adjust to fracture reduction on X-ray |
Weights must hang freely - not resting on floor or bed frame - or traction force is lost.
Over-distraction is harmful and causes non-union risk.
Monitoring - "Safe Zones" Checklist
The mnemonic used in ward monitoring is the 5 P's (see Böhler-Braun section), applicable to all skeletal traction:
- Pulse / Pins and needles - distal NV status, pain on passive stretch (compartment syndrome)
- Pressure sores - heel, sacrum, elbows
- Pin tract - infection signs: redness, swelling, discharge, loosening
- Physiotherapy - ankle pumps, static quadriceps, joint mobilization
- Portable radiographs - biweekly in first 2 weeks; adjust weights as needed
Complications
Pin-Related
| Complication | Notes |
|---|---|
| Pin site infection (most common) | Rate ~0.6% when short-term; Staph. aureus; can lead to osteomyelitis if pin moves. Daily pin care (chlorhexidine/saline), no occlusive dressings |
| Pin-tract osteomyelitis | From deep infection tracking; may require pin removal |
| Septic arthritis | If pin placed intra-articularly |
| Cortical stress fracture | Pin holes act as stress risers; rare |
| Neurovascular injury | If "safe zone" not respected (e.g., common peroneal palsy with proximal tibia pin, ulnar nerve with olecranon pin) |
| Pin migration | Threaded Denham pins resist this better |
Traction-Related
| Complication | Notes |
|---|---|
| Pressure sores | Heel most common; regular repositioning, gel protectors |
| DVT / pulmonary embolism | Immobility; prophylactic anticoagulation essential |
| Hypostatic pneumonia | Chest physiotherapy |
| Joint stiffness / muscle wasting | From prolonged immobility; physiotherapy throughout |
| Over-distraction / non-union | Excessive weight or prolonged use |
| Malunion / malalignment | Inadequate radiographic monitoring |
| Compartment syndrome | Especially in 90-90 spica technique with short-leg cast - avoid this method |
| Urinary retention | From bedbound position |
Advantages and Disadvantages Summary
| Advantages | Disadvantages |
|---|---|
| No wound in the zone of injury | Restricts patient mobility |
| No interference with fracture biology | Expensive in hospital time (prolonged admission) |
| Materials cheap and adjustable | Skin pressure complications |
| Can be used in infected/open fractures | Pin site infection risk |
| Bridge to surgery when patient unstable | Thromboembolic risk |
Modern Role of Skeletal Traction
Per Rockwood and Green's 10th ed.: "Intramedullary nailing gradually grew more popular and essentially superseded traction as the treatment of choice for femoral fractures in the 1970s and 1980s." Today, skeletal traction is primarily:
- A bridging measure to definitive surgery (IM nail, ORIF) within 24-48 hours
- Used in resource-limited settings where fixation is unavailable
- Still first-line for cervical spine fracture-dislocations
- Pre-operative traction for acetabular fractures (maintains femoral head position)
- Paediatric 90-90 traction for specific age groups
- Still relevant for open/infected fractures where implants are contraindicated
Sources: Pye's Surgical Handicraft 22nd ed.; Bailey and Love's Short Practice of Surgery 28th ed.; Sabiston Textbook of Surgery; Rockwood and Green's Fractures in Adults 10th ed. 2025; Campbell's Operative Orthopaedics 15th ed. 2026; "Keeping the Traction on in Orthopaedics," PMC7515792
PTB prothesis
Finding Sources
Finding Sources
Searching the Web
PTB patellar tendon bearing prosthesis components socket design weight bearing areas pressure tolerant intolerant
Your credits are exhausted. You can purchase a top-up or subscribe to a plan to continue using Orris. If you're already subscribed, your daily credits will reset tomorrow.
This is a shared conversation. Sign in to Orris to start your own chat.