
Charcot triad
Charcot triad refers to fever, jaundice, and right upper quadrant pain - the classic presentation of ascending cholangitis caused by biliary obstruction (usually a stone) with superimposed bacterial infection. It's present in roughly 50-70% of cholangitis cases.
Searching sources...
Reading File
Finding Sources
Searching PubMed
"Charcot triad" cholangitis
Reading File
Reading File
Reading File
Reading File
Here is a thorough summary of Charcot triad, compiled from multiple authoritative surgical and gastroenterology textbooks:
Charcot Triad
Definition
Charcot triad is the classic clinical hallmark of acute ascending cholangitis, consisting of three features:
- Fever (with chills/rigors)
- Right upper quadrant (RUQ) pain
- Jaundice
It was first described by Jean-Martin Charcot in the context of biliary sepsis from bile duct obstruction.
Pathophysiology
Bile duct obstruction (most commonly from choledocholithiasis, but also from biliary strictures, parasitic infections, or congenital abnormalities) is necessary but not sufficient to cause cholangitis. Cholangitis occurs when a bacteria-containing bile duct becomes obstructed, raising intraluminal biliary pressure and driving bacteria into the hepatic venous circulation. The degree of bacteremia is directly proportional to the biliary pressure.
Common causative organisms:
- E. coli, Klebsiella, Pseudomonas, Proteus, enterococci (aerobic gram-negatives dominate)
- Anaerobes (Bacteroides fragilis, Clostridium perfringens) in ~15% of cases, usually accompanying aerobes
Frequency of Individual Signs
Individual signs are NOT universally present. Evidence-based data across studies shows:
| Feature | Frequency |
|---|---|
| Fever (≥38°C) | 77-95% |
| RUQ pain | 68-90% |
| Jaundice (clinically detectable) | 79-80% |
| Full Charcot triad (all 3) | 42-75% |
So while the triad is the hallmark, it is present in only about half to two-thirds of patients. Older adults may present atypically - with confusion, lethargy, and delirium alone.
Reynolds Pentad
Adding hypotension and altered mental status (confusion) to Charcot triad gives the Reynolds pentad, which signals severe suppurative cholangitis with gram-negative septicemia. This warrants rapid intervention.
Charcot triad + hypotension + confusion = Reynolds pentad
Laboratory Findings
| Lab | Typical Finding |
|---|---|
| WBC | Elevated in 73-80%; even normal WBC may show bandemia on smear |
| Serum bilirubin | >2 mg/dL in 80%; elevated in 87% |
| Alkaline phosphatase | Elevated in 91% |
| Blood cultures | Positive in 74% - bacteremia is exceptionally common; start antibiotics promptly |
| Serum amylase | May be elevated if concurrent pancreatitis |
Diagnosis
- ERCP is the definitive diagnostic and therapeutic test - allows imaging, sphincterotomy, and stone extraction simultaneously; >90% sensitive, 99% specific
- MRCP / EUS are highly accurate (90-100% sensitivity and specificity) non-invasive alternatives for detecting CBD stones
- Abdominal CT is useful to exclude complications (abscess, pancreatitis) but is not reliable for detecting CBD stones (~75% sensitive)
- Transabdominal ultrasound is insensitive for choledocholithiasis; shows dilated CBD in only 25% of cases
Management
- Immediate: IV fluid resuscitation, blood cultures, broad-spectrum IV antibiotics
- Mild: single agent (e.g. cefoxitin 2 g IV q6-8h)
- Severe: combination therapy (gentamicin + ampicillin + metronidazole, or piperacillin-tazobactam 3.375 g q6h, or meropenem 1 g q8h if resistant organisms suspected)
-
Reassess at 6-12 hours: Most cases improve with antibiotics alone. If the patient deteriorates (worsening fever, confusion, hypotension), emergent biliary decompression is mandatory
-
Biliary drainage: ERCP with stone extraction or biliary stenting is the preferred method; associated with dramatically lower morbidity and mortality compared to emergency surgery. If ERCP fails, percutaneous transhepatic cholangiography (THC) is the alternative.
Tokyo Guidelines - Severity of Acute Cholangitis
| Criterion | Threshold |
|---|---|
| WBC | >12,000 or <4,000 /μL |
| Temperature | >39°C |
| Age | ≥75 years |
| Total bilirubin | ≥5 mg/dL |
| Albumin | <0.73 × lower limit of normal |
Increasing numbers of these factors correlate with higher mortality. Regardless of severity, prompt antibiotics and biliary drainage are required.
Note on Other Contexts
The term "Charcot triad" is also used in multiple sclerosis (nystagmus, intention tremor, scanning speech) - a completely different triad. When used without qualification in a surgical/GI context, it always refers to the cholangitis triad described above.
Sources:
- Sleisenger and Fordtran's Gastrointestinal and Liver Disease, Chapter 65
- Yamada's Textbook of Gastroenterology, 7th ed., Chapter 102
- Symptom to Diagnosis: An Evidence-Based Guide, 4th ed.
- Washington Manual of Medical Therapeutics
- Rosen's Emergency Medicine
Seldinger technique
The Seldinger technique is a method for gaining percutaneous access to blood vessels (or other hollow structures) using a needle, guidewire, and dilator/catheter sequence. It was described by Sven-Ivar Seldinger in 1953 and is the foundation of virtually all modern vascular and interventional access procedures.
Searching sources...
Finding Sources
Finding Sources
Reading File
Reading File
Reading File
Reading File
Finding Sources
Reading File
Finding Sources
Reading File
Reading File
Loading Image
Reading File
Loading Image
Here is a comprehensive summary of the Seldinger technique, drawn from multiple authoritative surgical and emergency medicine textbooks:
The Seldinger Technique
History and Principle
The Seldinger technique (also called the "guidewire technique") was introduced by Swedish radiologist Sven-Ivar Seldinger in 1953. It revolutionized percutaneous vascular access by eliminating the need for surgical cutdown. The core principle: access a vessel or cavity with a needle, then exchange the needle for a catheter over a guidewire, avoiding the risks of a large initial puncture.
The overwhelming majority of central venous catheters (CVCs) placed today use this technique. It is also applied to arterial cannulation, chest tube insertion, pericardiocentesis, suprapubic catheterization, percutaneous abscess drainage, ERCP, and interventional radiology.
Equipment
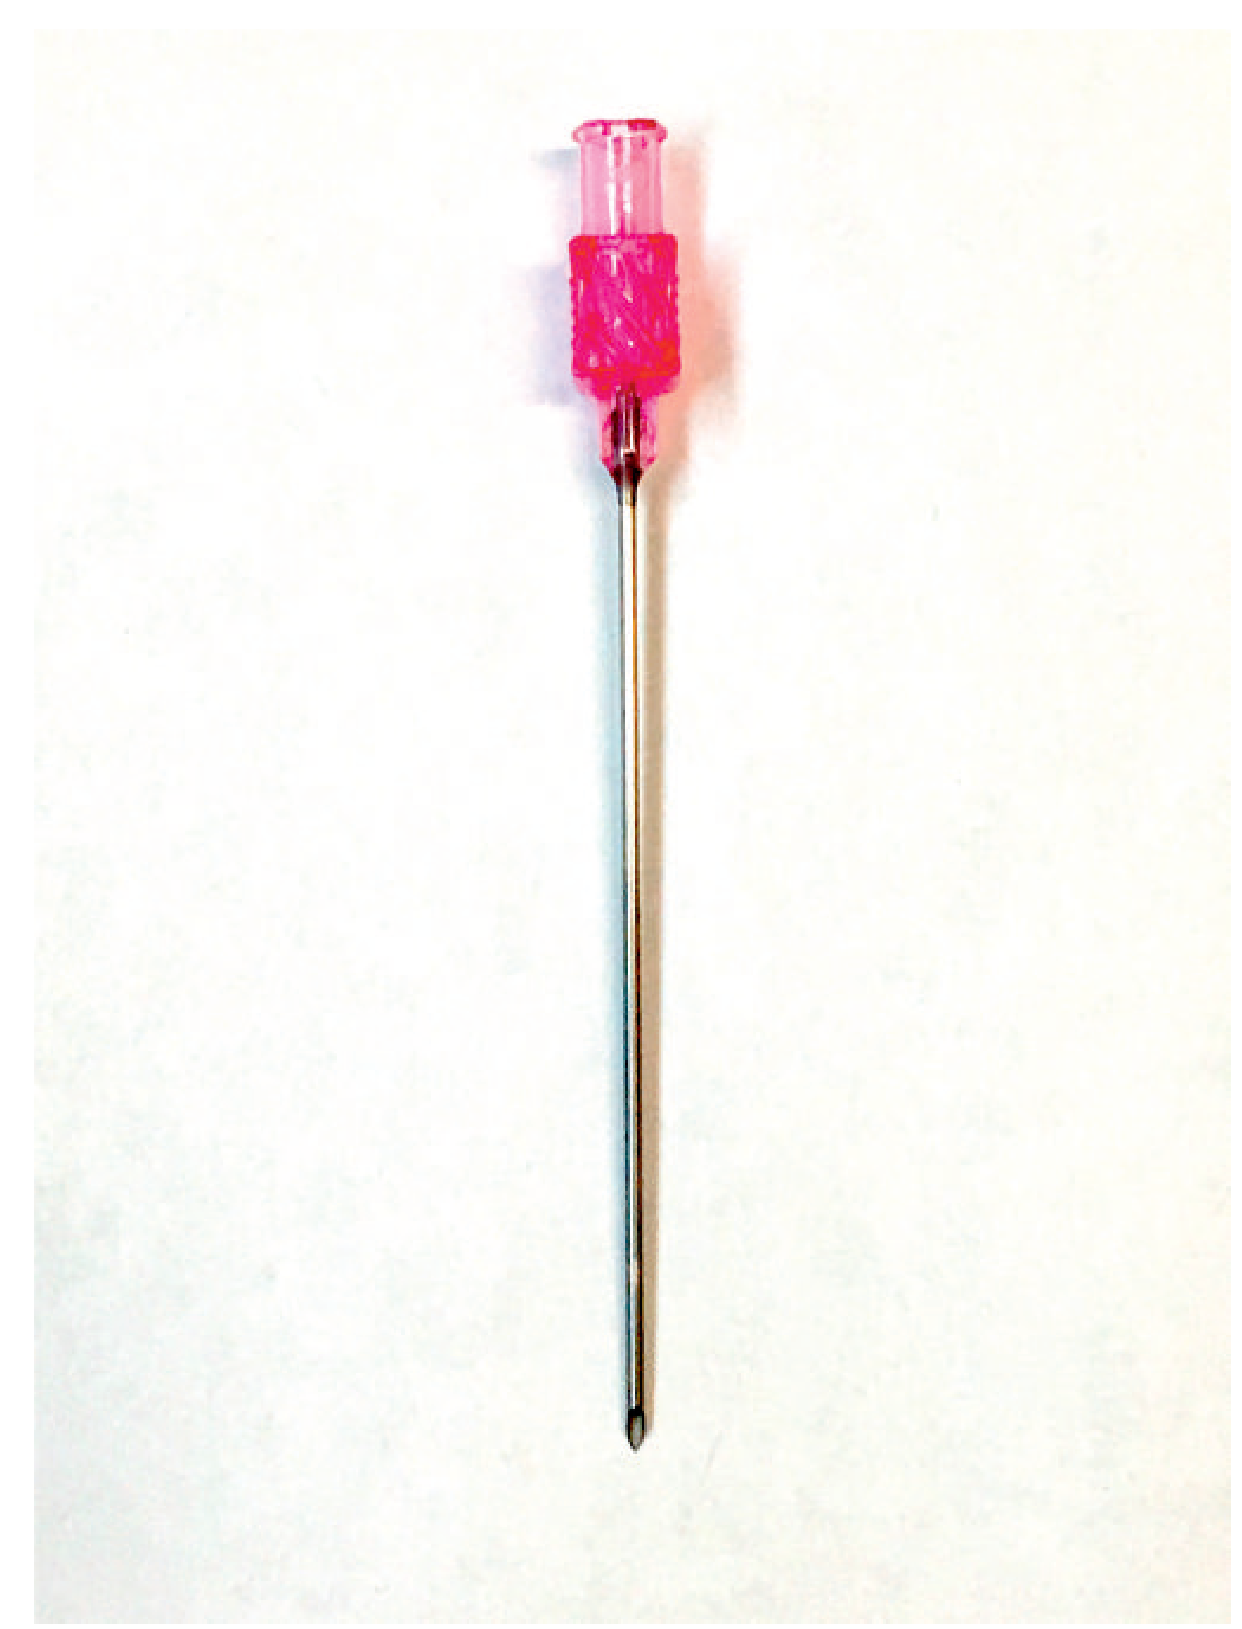
- Introducing/access needle - typically an 18-gauge hollow needle with a beveled tip (the "Seldinger needle")
- Guidewire - usually a J-tipped flexible wire (the J-tip reduces risk of vessel wall injury and false passage)
- Vessel dilator(s) - used to serially dilate the tract to accommodate the catheter
- Catheter - the final device placed through the tract
The current iteration of the Seldinger needle: a hollow 18-G needle with a bevel that should be oriented anteriorly for each puncture.
Step-by-Step Procedure
The following describes the classic steps for central venous catheterization (internal jugular approach), which illustrates all the key steps:
1. Patient positioning
- Trendelenburg position (head down) to distend the neck veins and reduce the risk of air embolism
2. Full aseptic preparation
- Hand scrub, sterile gloves, gown, mask, cap, eye protection
- Bactericidal skin prep (alcohol-based preferred), full sterile drapes
3. Identify the target vessel
- Ultrasound guidance is strongly recommended to distinguish vein from artery (veins collapse with probe pressure; arteries do not)
- The internal jugular (IJ) vein and carotid artery (CA) must be clearly distinguished from each other
4. Local anesthesia
- Infiltrate the skin and subcutaneous tissue at the puncture site with lidocaine
5. Needle insertion and vein entry
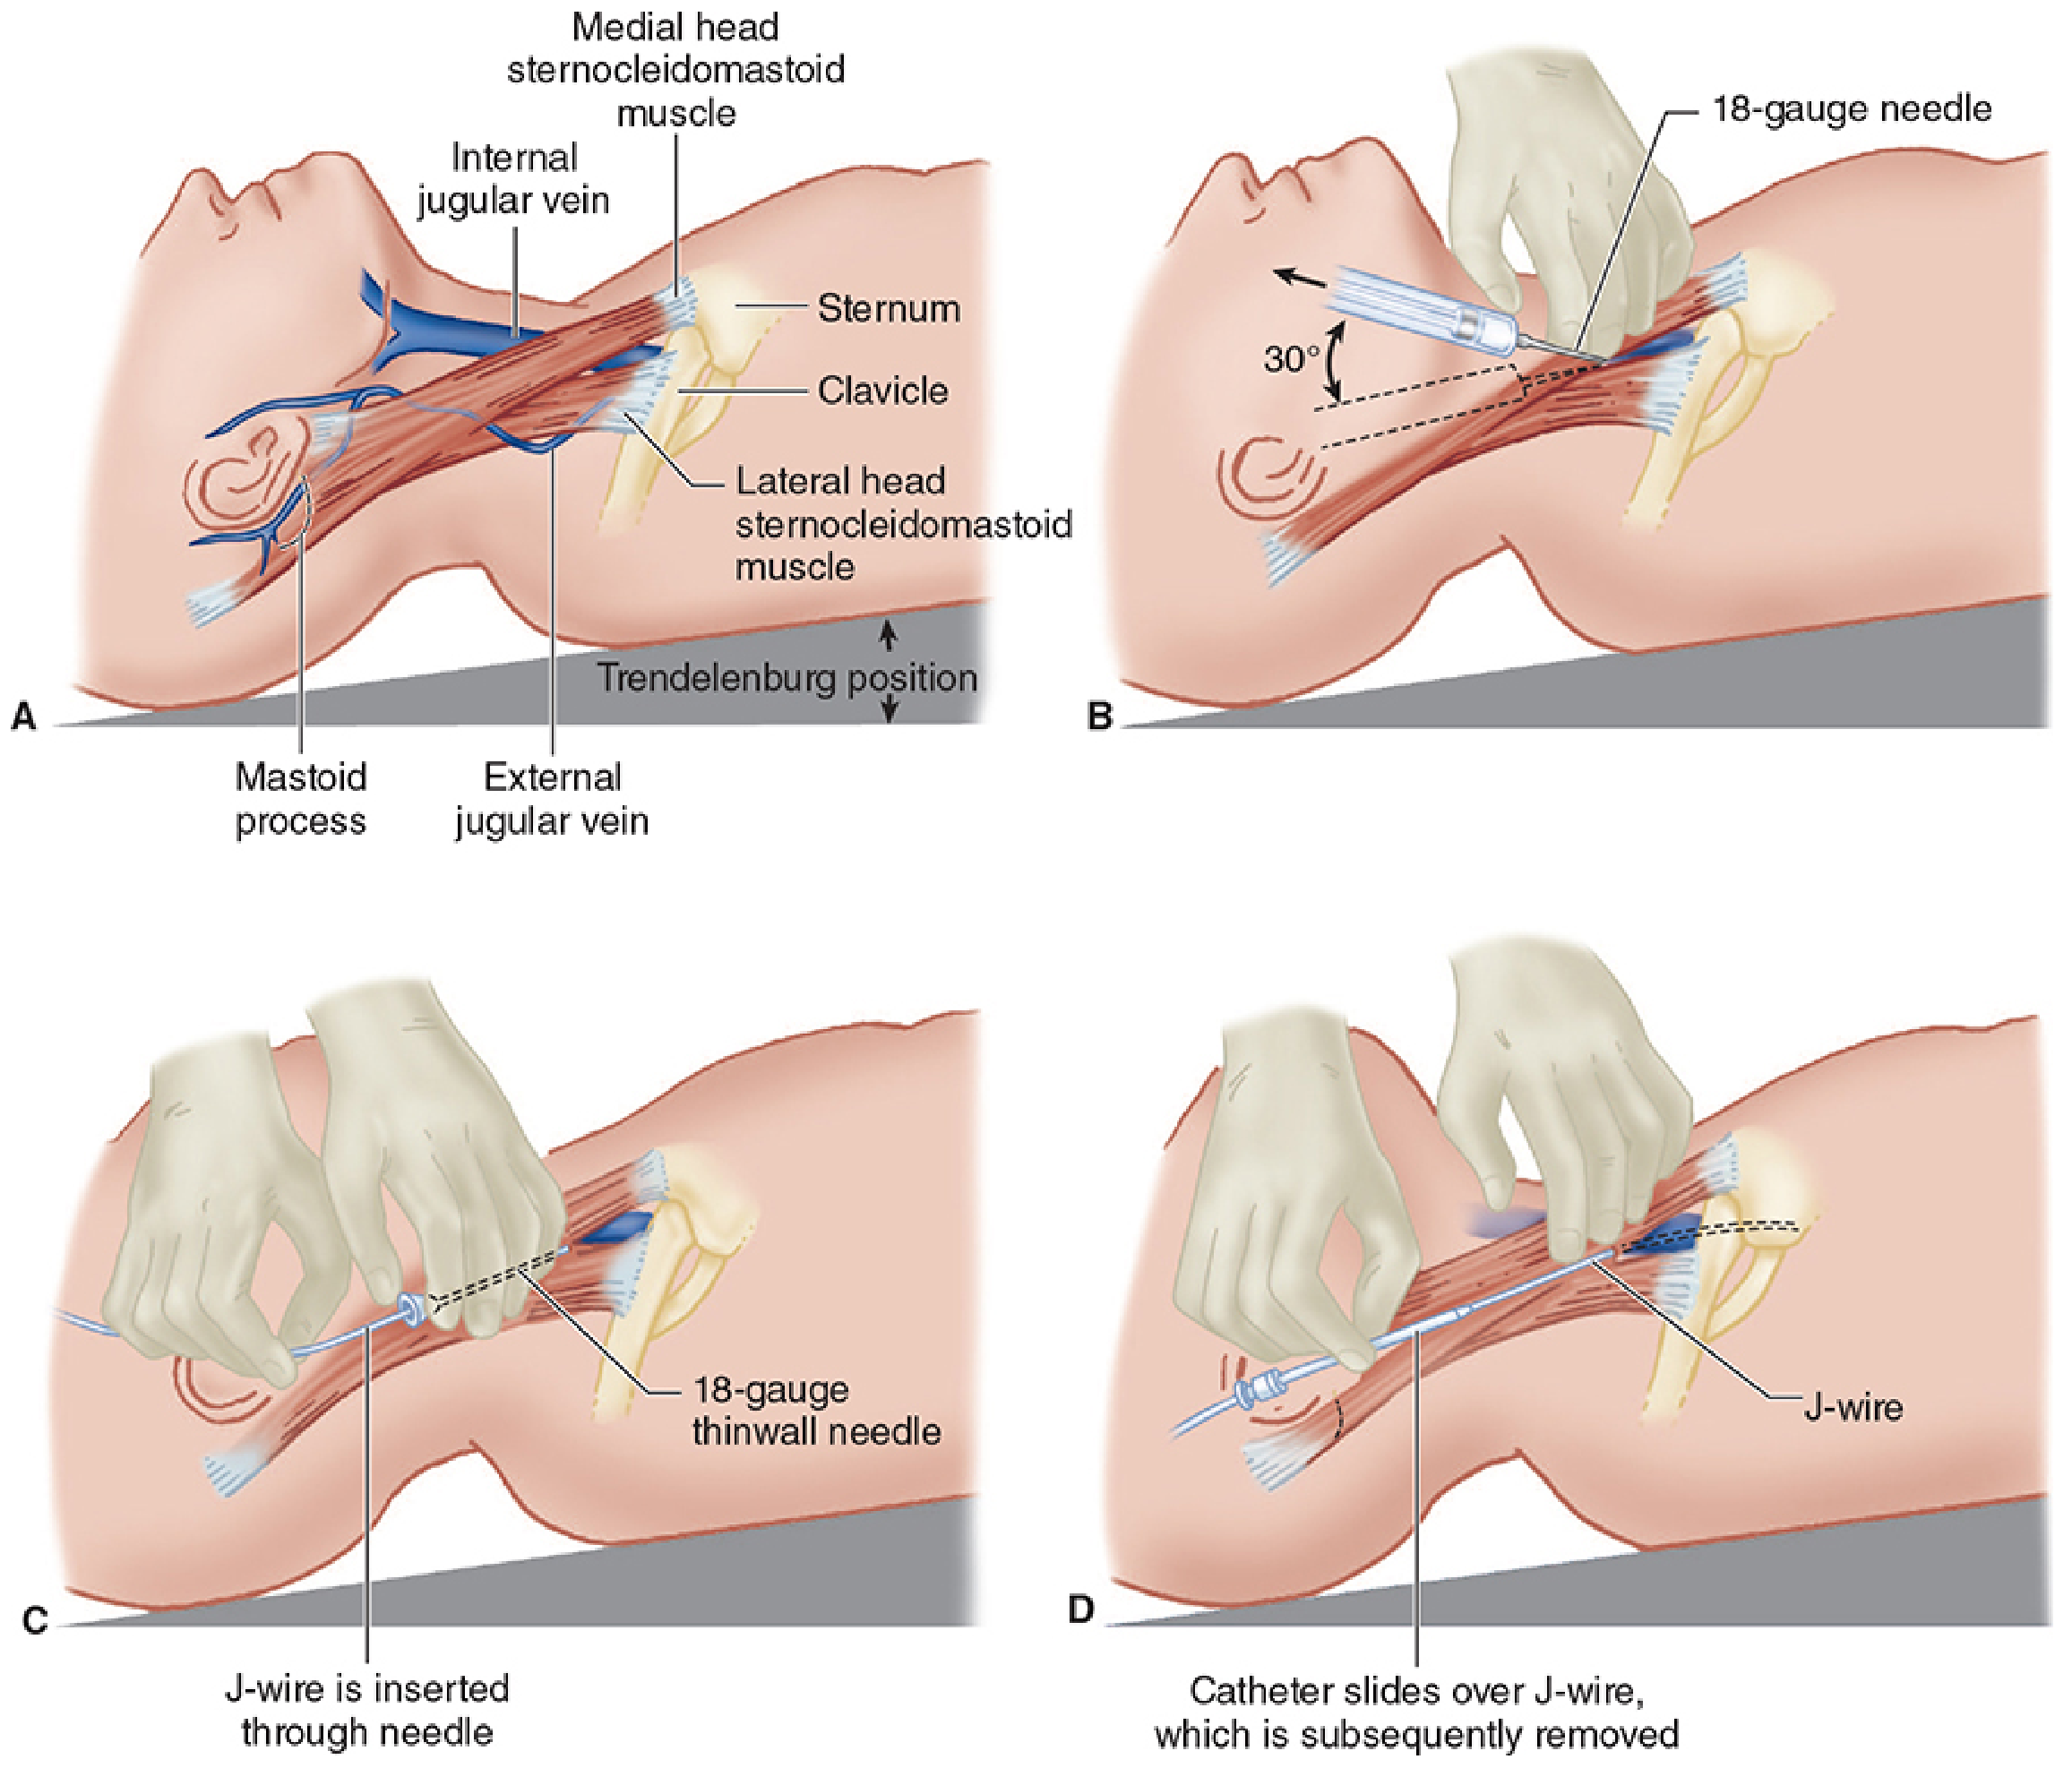
- Advance the 18-gauge introducing needle with an attached syringe, applying steady negative pressure
- For IJ: angle 30° to skin, aiming just lateral to the carotid pulse, directed toward the ipsilateral nipple
- Blood aspirates freely into the syringe when the vessel is entered
- Confirm venous (not arterial) cannulation - blood should be non-pulsatile and dark; however, color alone can be misleading (especially in shock or hypoxia). Pressure measurement via IV extension tubing acting as a manometer is more reliable
6. Syringe removal and guidewire insertion
- Cap the needle hub with a thumb before passing the wire (to prevent air embolism)
- Insert the flexible (J) end of the guidewire through the needle hub - it must thread smoothly without resistance
- NEVER force the wire - if resistance is felt, re-attach syringe, aspirate blood, and reconfirm position
- Advance the wire to appropriate depth; always maintain a firm grip on the external end of the wire at all times
- Remove the needle while keeping the wire in place
7. Skin incision
- Make a small nick at the insertion site (width of the catheter, through the full dermis) to facilitate dilator and catheter passage
8. Dilatation
- Thread the dilator over the guidewire and advance it several centimeters into the vessel with a rotating motion
- The external end of the wire must always protrude from the dilator
- Remove the dilator
9. Catheter placement
- Flush all catheter ports with saline
- Advance the catheter over the guidewire
- Remove the guidewire - place a thumb over the open port until capped
10. Secure and confirm
- Aspirate blood from each port to confirm patency
- Secure catheter with sutures; apply sterile dressing
- Chest radiograph to confirm tip position (should be at the SVC-right atrial junction, not within the heart chambers)
Sites for Central Venous Access
| Site | Key Points |
|---|---|
| Right internal jugular | Best combination of accessibility and safety; most common site |
| Left internal jugular | Increased risk of pleural effusion, chylothorax |
| Subclavian | Higher risk of pneumothorax on insertion; lower infection risk long-term |
| Femoral | Easy access; higher risk of line-related sepsis |
| External jugular | Accessible but higher failure rate due to acute angle into great veins |
Applications Beyond CVC Placement
The Seldinger technique is the standard approach for:
| Procedure | Notes |
|---|---|
| Arterial cannulation | Radial, femoral arteries; dilate tract only, not the artery itself |
| Chest tube insertion | Used in small-bore (Seldinger) chest drains (10-14 Fr); preferred over large open drains in pneumothorax |
| Pericardiocentesis / pericardial drain | Fuhrman catheter placed via Seldinger |
| Percutaneous abscess drainage | Needle → wire → serial dilation → drainage catheter; allows repositioning unlike trocar technique |
| Surgical cricothyrotomy | Modified Seldinger (Melker kit) for emergency airway |
| Suprapubic catheterization | Seldinger or trocar technique |
| Peritoneal dialysis catheter | With fluoroscopy guidance |
| Interventional radiology / angiography | Foundation of all endovascular procedures |
Important Safety Rules
- Never force the guidewire - resistance means the wire is not intraluminal
- Always maintain control of the external wire tip throughout the entire procedure - losing the wire can result in it embolizing into the circulation
- Do not use hydrophilic (coated/glide) wires with beveled Seldinger needles - the polyurethane coating can be sheared off and embolize distally
- Confirm venous vs. arterial entry before dilating - use pressure measurement or ultrasound, not just blood color
- Dilate the tract, not the artery - for arterial cannulation, avoid over-dilation to prevent blood loss and arterial injury
Complications
| Complication | Notes |
|---|---|
| Arterial puncture | Most common; risk of hematoma, stroke (carotid), retroperitoneal bleed (femoral) |
| Pneumothorax | Especially with subclavian approach |
| Air embolism | Prevented by Trendelenburg position and thumb over open hub |
| Line infection / sepsis | Risk increases with duration; femoral > IJ > subclavian |
| Guidewire embolism | If external wire tip is not held at all times |
| Pleural effusion / chylothorax | Left-sided IJ approach |
| Cardiac arrhythmia | If wire advanced too far into right heart |
| Catheter tip malposition | Confirmed and corrected with post-procedure chest X-ray |
Sources:
- Morgan & Mikhail's Clinical Anesthesiology, 7th ed.
- Roberts and Hedges' Clinical Procedures in Emergency Medicine
- Pfenninger and Fowler's Procedures for Primary Care, 3rd ed.
- Grainger & Allison's Diagnostic Radiology
- Fischer's Mastery of Surgery, 8th ed.
Bilroth procedures
Billroth I and II are the two classic partial gastrectomy reconstructions. Billroth I (gastroduodenostomy) reconnects the gastric remnant directly to the duodenum end-to-end. Billroth II (gastrojejunostomy) closes the duodenal stump and creates an anastomosis between the gastric remnant and a loop of jejunum. Both were originally designed for peptic ulcer disease but are now more commonly used after resection for gastric cancer.
Searching sources...
Finding Sources
Reading File
Reading File
Reading File
Finding Sources
Reading File
Reading File
Finding Sources
Finding Sources
Reading File
Reading File
Loading Image
Finding Sources
Reading File
Finding Sources
I now have comprehensive material from multiple authoritative sources. Here is the full answer:
Billroth Procedures
Historical Background
Theodor Billroth, an Austrian surgeon, performed the first successful partial gastrectomy in 1881 (Billroth I) and described the second reconstruction in 1885 (Billroth II). These operations were originally developed for peptic ulcer disease (PUD) and later adapted for gastric cancer. Today, with H. pylori eradication and PPIs dramatically reducing the need for surgical PUD treatment, Billroth procedures are performed mainly for gastric malignancy and occasionally for complicated PUD.
The Three Major Reconstructions After Distal Gastrectomy
Billroth I - Gastroduodenostomy
What it is: The gastric remnant is anastomosed directly end-to-end with the duodenum, restoring near-normal GI anatomy and keeping the duodenum in the food stream.
Technique:
- A Kocher maneuver is performed first to mobilize the duodenum and minimize anastomotic tension
- The lower portion of the gastric staple line is opened, and the duodenal stump is anastomosed end-to-end in two layers (posterior layer of interrupted 3-0 silk Lembert seromuscular sutures, then inner Vicryl sutures with Connell inversion anteriorly)
- The junction where the anastomotic suture line meets the gastric staple line is termed the "angle of sorrow" - a site prone to leakage
- Preservation of posterior gastric and short gastric vessels is critical for blood supply; a 3 cm distance between the anastomosis and the gastric staple line prevents ischemia
Advantages:
- Single anastomosis (simpler, faster)
- Maintains duodenum in food stream (better iron, calcium, and fat-soluble vitamin absorption)
- Lower rates of dumping, reflux gastritis, malnutrition, and gallstones vs. Billroth II
- Preferred in Japan for distal gastrectomy
Disadvantages / When NOT feasible:
- Requires a tension-free anastomosis - not possible when duodenal scarring is severe, or when a larger gastric resection is needed (e.g., distal gastric cancer requiring wide margins)
- In the US, traditionally avoided after cancer resection due to concern for anastomotic recurrence
Indications: Type I gastric ulcer (lesser curve body), duodenal/pyloric channel ulcer with minimal scarring
Billroth II - Gastrojejunostomy (Loop Gastrojejunostomy)
What it is: The duodenal stump is closed (stapled or oversewn), and the gastric remnant is anastomosed to a loop of proximal jejunum, creating:
- An afferent loop (carries bile and pancreatic secretions from the duodenum toward the stomach)
- An efferent loop (carries food from the stomach distally)
The anastomosis can be placed in an antecolic (in front of the transverse colon) or retrocolic (through the transverse mesocolon) fashion.
Advantages:
- Technically easier than Billroth I; provides tension-free anastomosis even after extensive resection
- Does not require duodenal mobilization
Disadvantages:
- Higher complication rate than Billroth I
- Does not preserve the duodenum in the food stream
- Associated with bile reflux gastritis, dumping syndrome, afferent loop syndrome, internal hernia, marginal ulceration
- Bile reflux is greatest after Billroth II (compared to Billroth I or vagotomy + pyloroplasty)
Indications: When Billroth I is not feasible - extensive duodenal scarring, larger resections for cancer, technically challenging anatomy
Roux-en-Y Gastrojejunostomy
Introduced to address the complications of Billroth II. The jejunum is divided 30-50 cm from the ligament of Treitz; a jejunojejunostomy is created 60-70 cm along the Roux limb; the Roux limb is then brought up to the gastric remnant (antecolic or retrocolic).
- Advantages: Reduced bile/alkaline reflux, lower remnant gastritis, better quality of life long-term, lower risk of gastric cancer recurrence
- Disadvantages: Two anastomoses needed, more complex; associated with Roux stasis syndrome (delayed gastric emptying), stomal ulcers, cholelithiasis
- After antrectomy leaving a 60-70% gastric remnant, routine Roux-en-Y should be avoided due to risk of marginal ulceration and gastric stasis - it is best suited after near-total or total gastrectomy
Side-by-Side Comparison
| Feature | Billroth I | Billroth II | Roux-en-Y |
|---|---|---|---|
| Anastomoses | 1 (gastroduodenal) | 1 (gastrojejunal) + duodenal closure | 2 (gastrojejunal + jejunojejunal) |
| Duodenum in food stream | Yes | No | No |
| Operative time | Shortest | Intermediate | Longest |
| Bile reflux | Intermediate | Greatest | Least |
| Dumping syndrome risk | Lower | Higher | Intermediate |
| Afferent loop syndrome | No | Yes | No |
| Remnant gastritis | Lower | Higher | Lowest |
| Internal hernia risk | Low | Moderate | Moderate |
| Preferred in cancer | Japan | US (historically) | Increasingly preferred |
(From Fischer's Mastery of Surgery and Schwartz's Principles of Surgery)
Complications of Billroth Procedures
Dumping Syndrome (~20% after distal gastrectomy)
Most common after Billroth II; less after Billroth I; least after Roux-en-Y.
- Early dumping (15-30 min after meals): Crampy pain, nausea, diarrhea, tachycardia, palpitations, diaphoresis, light-headedness. Mechanism: rapid emptying of hyperosmolar gastric contents into the small bowel, fluid shift into the gut lumen, plasma volume contraction, release of vasoactive hormones (VIP, neurotensin, motilin)
- Late dumping (90 min to 3 hours after meals): Vasomotor symptoms from reactive hypoglycemia (hyperinsulinemic response to rapid carbohydrate absorption)
- Treatment: Low-carbohydrate, high-fiber/protein diet; separate liquids from solids; octreotide for severe cases; conversion to Roux-en-Y if refractory
Afferent Loop Syndrome (Billroth II specific)
- Chronic (common): Bacterial overgrowth in the stagnant afferent limb → bloating, diarrhea, fat malabsorption, vitamin B12 deficiency. Treat with antibiotics; surgery if refractory.
- Acute (less common): Severe epigastric pain 20-60 min after eating, relieved by bilious vomiting (without food content). Caused by partial obstruction of the afferent loop. Requires surgical revision or conversion to Roux-en-Y.
Alkaline (Bile) Reflux Gastritis
- Bile and pancreatic juices reflux into the stomach remnant; greatest after Billroth II
- Presents with epigastric pain, bilious vomiting, and anemia
- Medical treatment is largely ineffective
- Definitive treatment: conversion to Roux-en-Y gastrojejunostomy with a 50 cm intestinal limb to divert bile away from the stomach
Marginal (Stomal) Ulcer
- Develops at or near the gastrojejunal anastomosis
- Presenting symptom: epigastric pain (>90%)
- Causes: incomplete vagotomy, retained antrum (elevated gastrin), H. pylori, NSAIDs
- Nonoperative management (PPIs, H. pylori eradication) successful in ~90%
- Surgery (Graham patch) for perforation, hemorrhage, or refractory cases
Efferent Loop Obstruction / Internal Hernia
- Efferent loop hernias are ~3x more common than afferent loop hernias
- CT is the imaging of choice; surgical revision is required
Remnant Gastric Cancer
- Reported in up to 9% after partial gastrectomy
- Risk increases 15-20 years after surgery
- Surveillance with endoscopy is recommended
Other Complications
- Postvagotomy diarrhea (if vagotomy performed)
- Iron and B12 deficiency anemia (duodenum bypassed in Billroth II)
- Osteoporosis / osteomalacia (calcium and vitamin D malabsorption)
- Cholelithiasis
Billroth I Anastomosis - Surgical Illustration
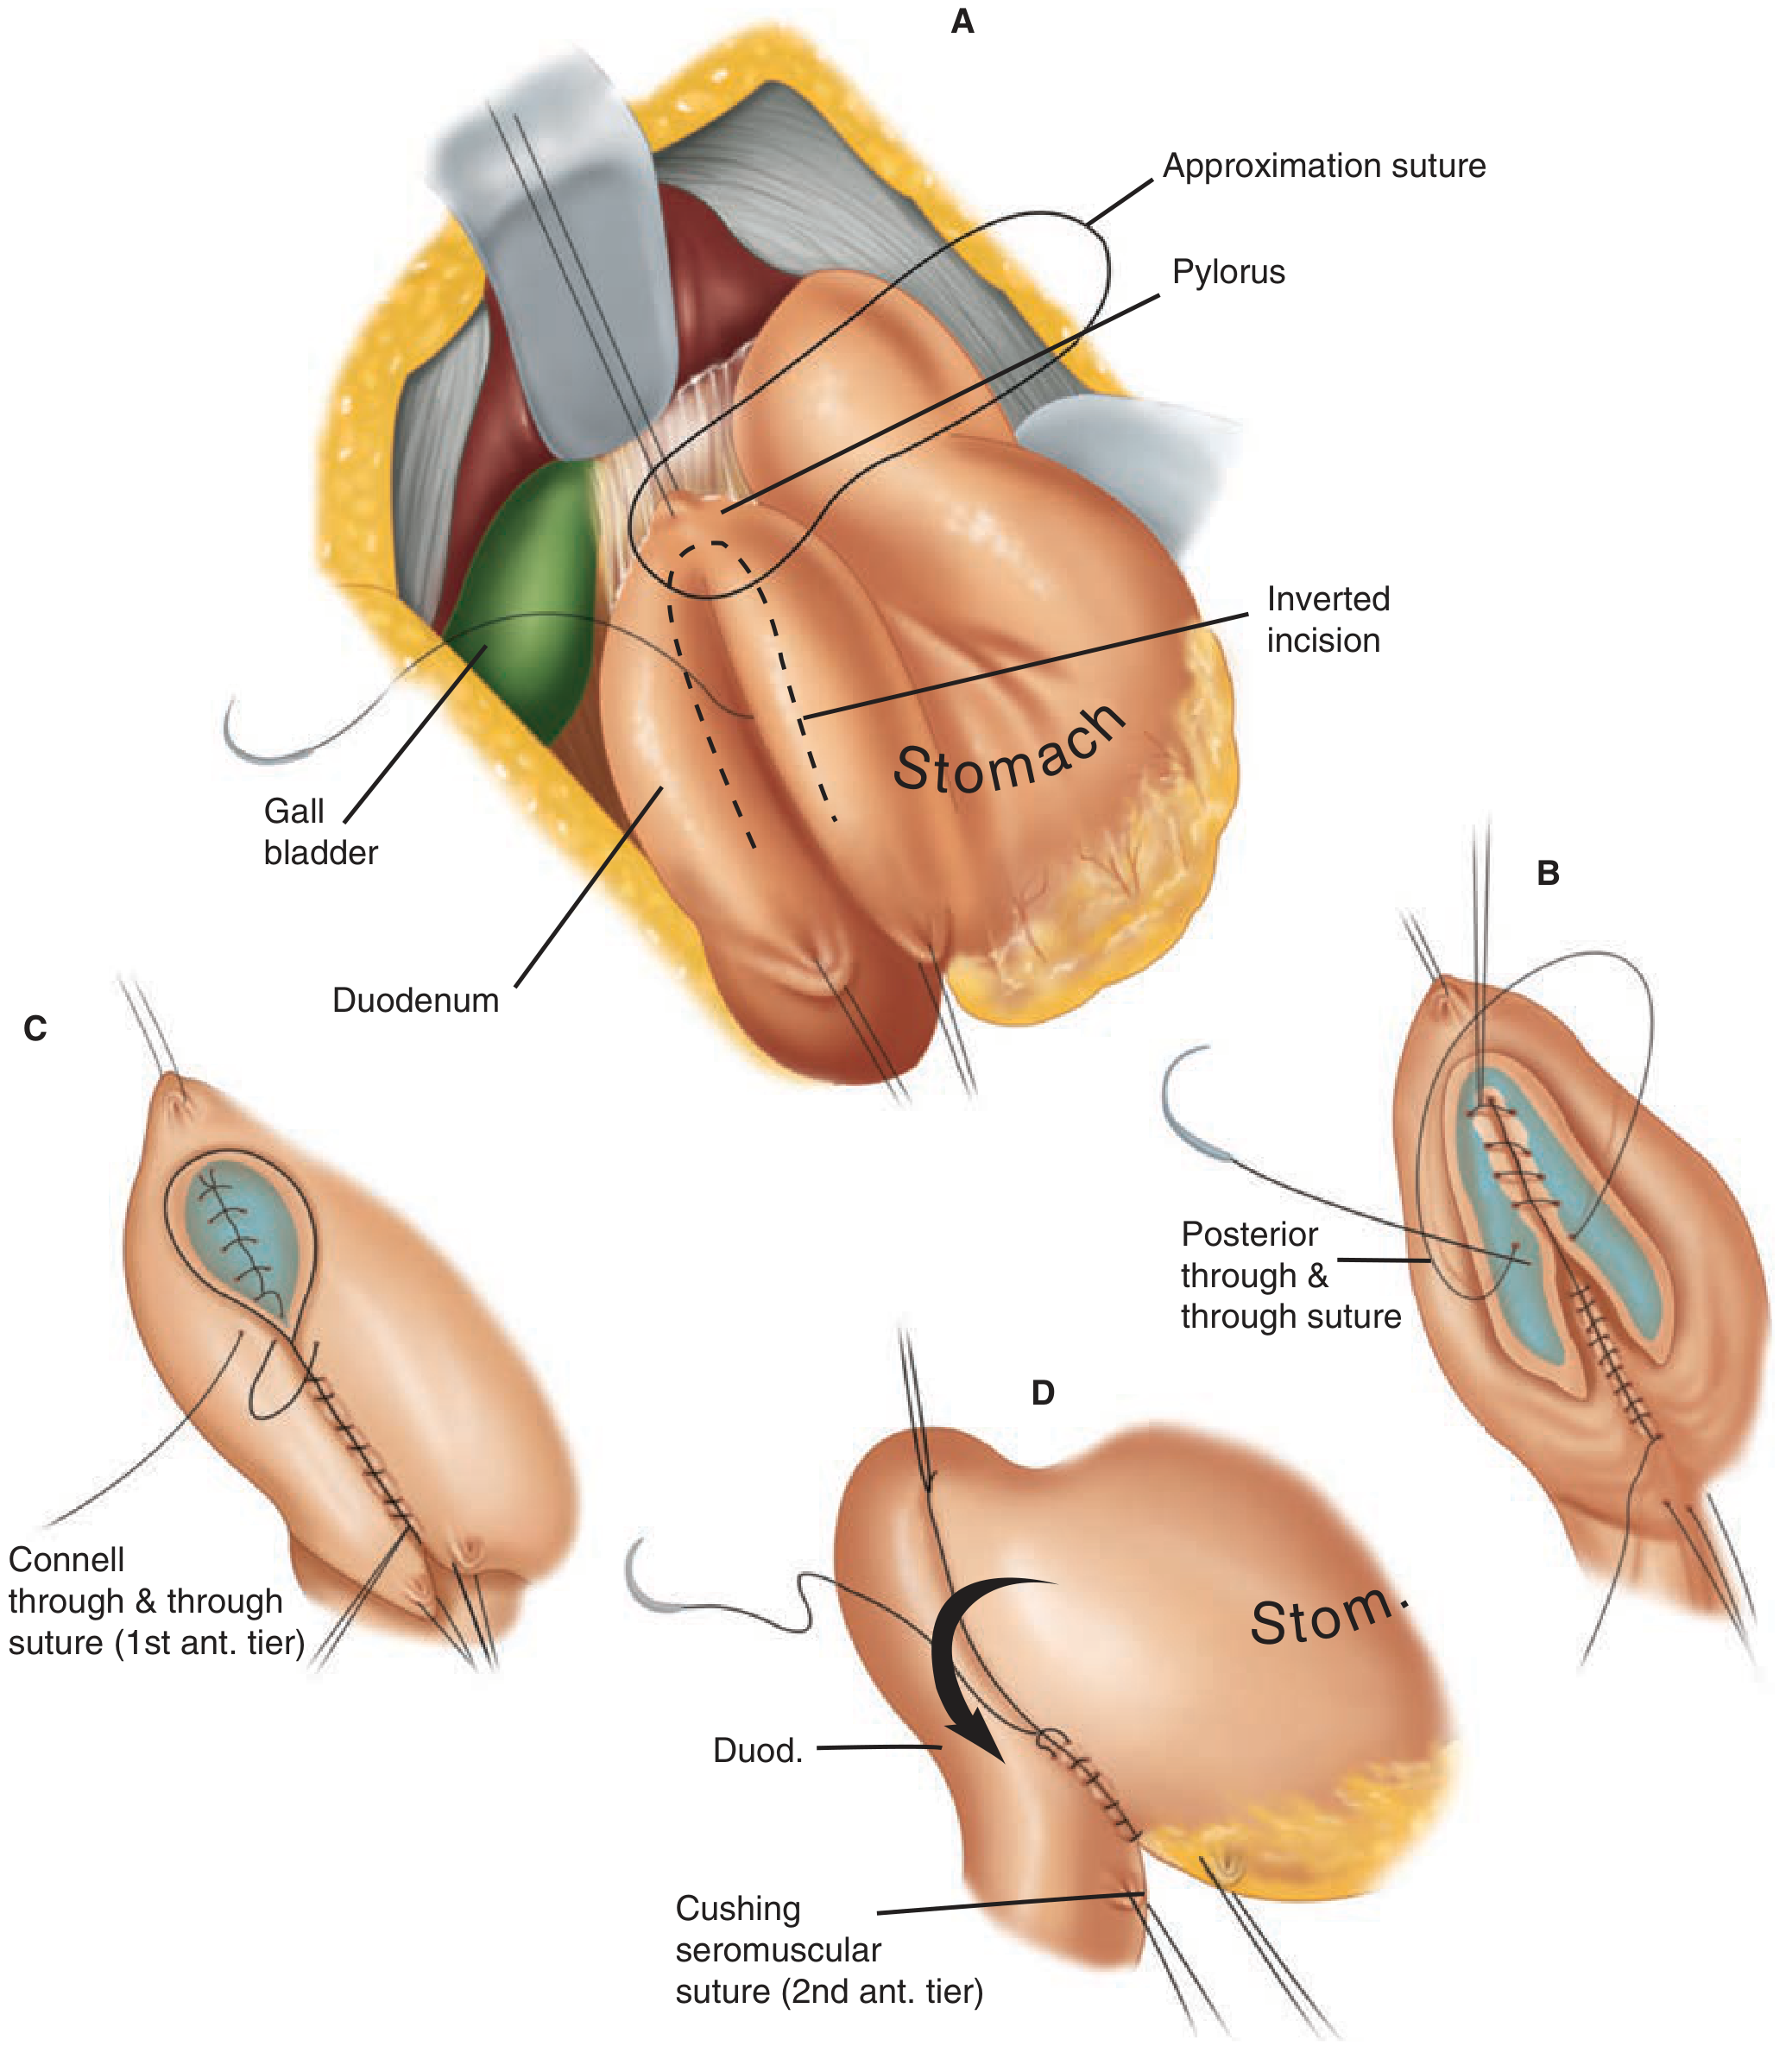
Billroth I operation - gastroduodenostomy in two layers. A: stomach, duodenum, and gallbladder anatomy; B: posterior through-and-through sutures; C: Connell anterior inner layer; D: Cushing seromuscular outer anterior layer.
Sources:
- Fischer's Mastery of Surgery, 8th ed.
- Schwartz's Principles of Surgery, 11th ed.
- Maingot's Abdominal Operations
- Harrison's Principles of Internal Medicine, 22nd ed.
- Sleisenger and Fordtran's Gastrointestinal and Liver Disease
- Tintinalli's Emergency Medicine
This is a shared conversation. Sign in to Orris to start your own chat.