
List of instruments: Allis tissue forceps Curved allis Mosquito forceps Tooth forceps Chittal forceps Needle holder Sponge holding Forceps: Simple forceps Rubber catheter Folley’s catheter Cannula Tracheal tube Straight scissor Artery forceps Scissors Proctoscope Suture material Dressing material Ryle’s tube Catheter Dressing tray Kidney tray Dressing drum Auroscope Stethoscope Measuring tape Hammer Ophthalmoscope Tonometer Dental instruments ENT instruments Infant feeding tube Laryngoscope Retractor Sim’s speculum Each description with diagram Standard textbooks onlyyy
Allis tissue forceps surgical instrument
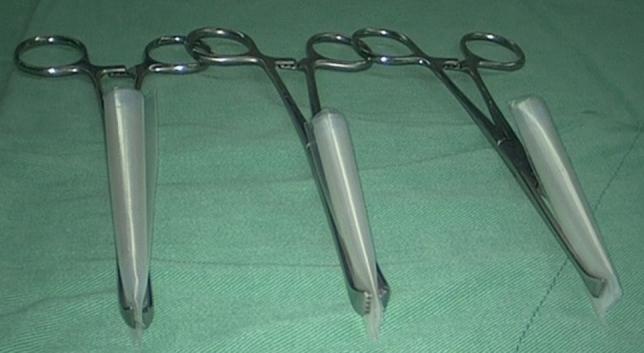
This clinical photograph demonstrates a specific intraoperative preparation technique for Seprafilm, a bioresorbable adhesion barrier used in abdominal and pelvic surgery. The image shows three individual Allis tissue forceps, each securely gripping a tube-shaped roll. Each roll consists of a segment of Seprafilm placed within a sterile, clear plastic sleeve and rolled tightly to facilitate laparoscopic delivery. The Allis forceps are positioned with their interlocking teeth at the distal end of the rolls to maintain the cylindrical shape and allow for controlled insertion through a surgical port or small incision site. This visual serves as a procedural guide for surgical staff in preparing surgical materials to prevent postoperative adhesions. The instruments and prepared rolls are displayed on a standard green sterile surgical drape, indicating a sterile operating room environment.

A sequence of four intraoperative clinical photographs (a-d) demonstrating the surgical resection and extraction of a subdeltoid lipoma from a human shoulder. The surgical field is prepared with blue and yellow sterile drapes, and several arthroscopic portals with orange caps are visible. (a) An Allis forceps is inserted through an extended 2.5 cm superolateral portal to grasp the underlying mass. (b-c) The yellowish, lobulated, and well-circumscribed lipomatous mass is progressively delivered through the incision. The texture of the lesion is characteristic of mature adipose tissue, showing a soft, fatty, and nodular appearance. (d) Final delivery of the specimen using the Allis forceps. The procedure illustrates the transition from arthroscopic identification to open extraction via a minimally invasive portal extension. This educational sequence highlights surgical technique for deep soft-tissue tumor removal, focusing on instrument use and tissue morphology within the orthopedic surgical domain.
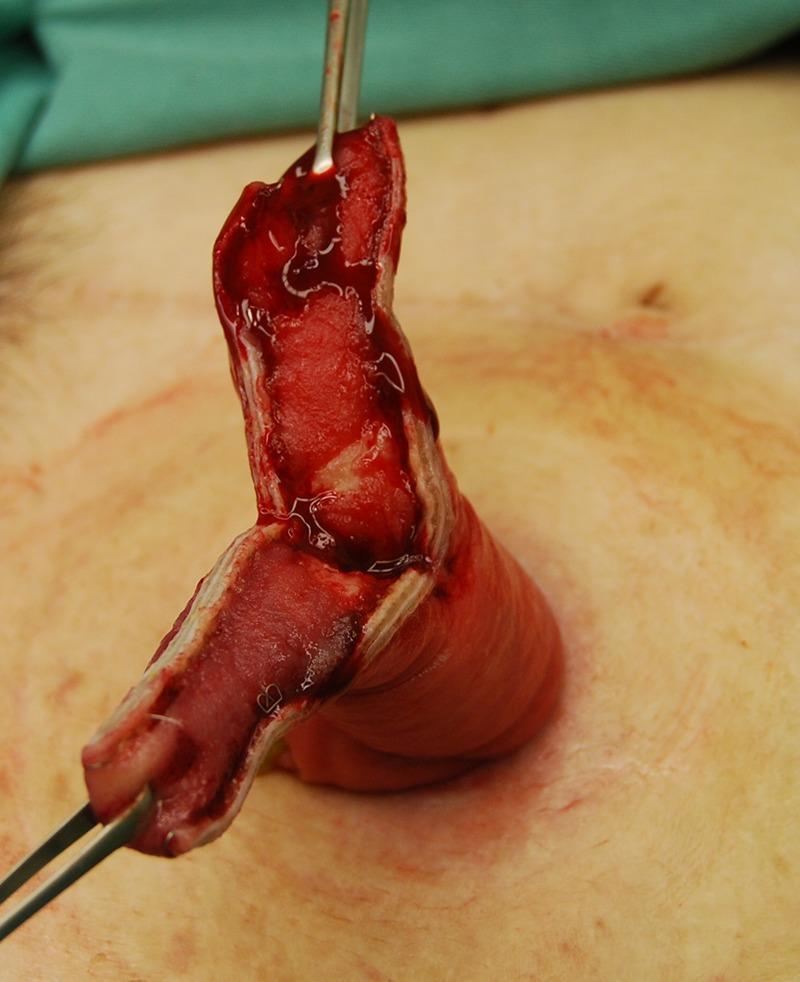
This clinical photograph captures an intraoperative view of a surgical procedure to revise a prolapsed stoma, likely an ileostomy. The image displays a segment of prolapsed, reddish, edematous intestinal tissue that has been longitudinally incised. Allis forceps are being utilized to grasp and elevate the cut edges of the intestinal wall, facilitating visualization of the lumen and the thickness of the bowel wall. The tissue appears hyperemic and fleshy with visible fresh blood on the surgical margins, consistent with a recent incision. The surrounding skin of the abdominal wall is visible, showing typical post-cleansing discoloration. This visual demonstrates a key step in the surgical management of stomal prolapse, where a linear stapler or manual resection is used to reduce the redundant, herniated bowel segment to a functional length, typically 4-5 cm above the skin level. The focus is on surgical technique and the anatomical manifestation of stomal complications in a clinical setting.
mosquito forceps artery forceps surgical instruments
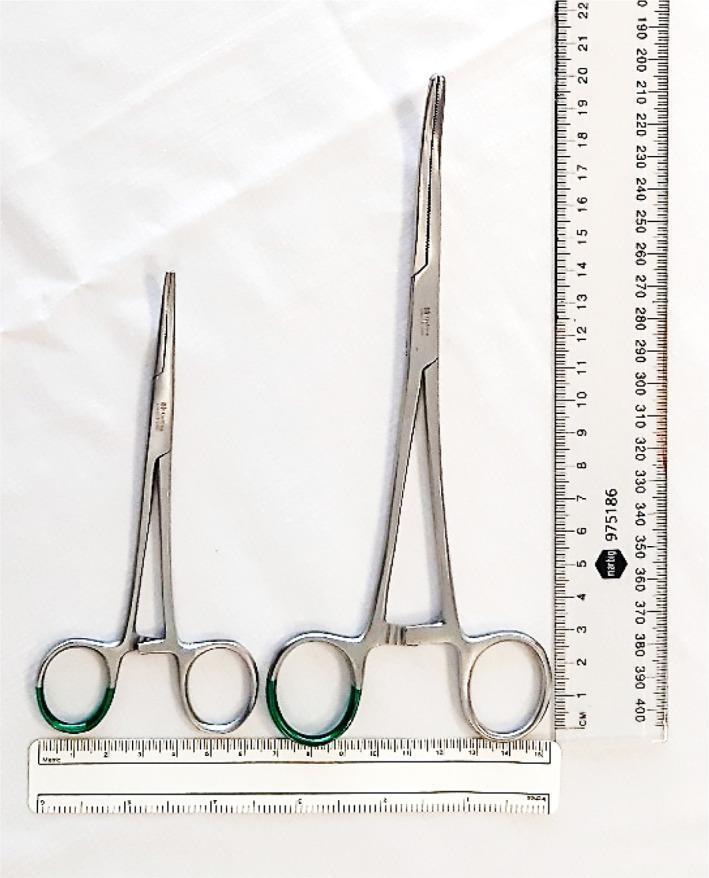
A top-down clinical photograph providing a side-by-side comparison of two common surgical hemostatic instruments: fine artery forceps (left) and Kelly clamps (right). Both stainless steel instruments feature finger rings with green identifiers, a ratchet locking mechanism, and longitudinal serrated jaws. The fine artery forceps on the left measure approximately 13.5 cm in total length with a delicate, tapered tip design. In contrast, the Kelly clamps on the right are significantly larger, measuring approximately 20 cm in length with broader, more robust jaws and a blunter tip. Rulers placed horizontally and vertically facilitate a scale comparison of the dimensions. This visual is intended to demonstrate the physical differences in instrument size and tip surface area, which are critical factors in surgical procedures such as parietal pleural puncture for chest tube insertion, where smaller instruments allow for more precise control and reduced force during tissue penetration.
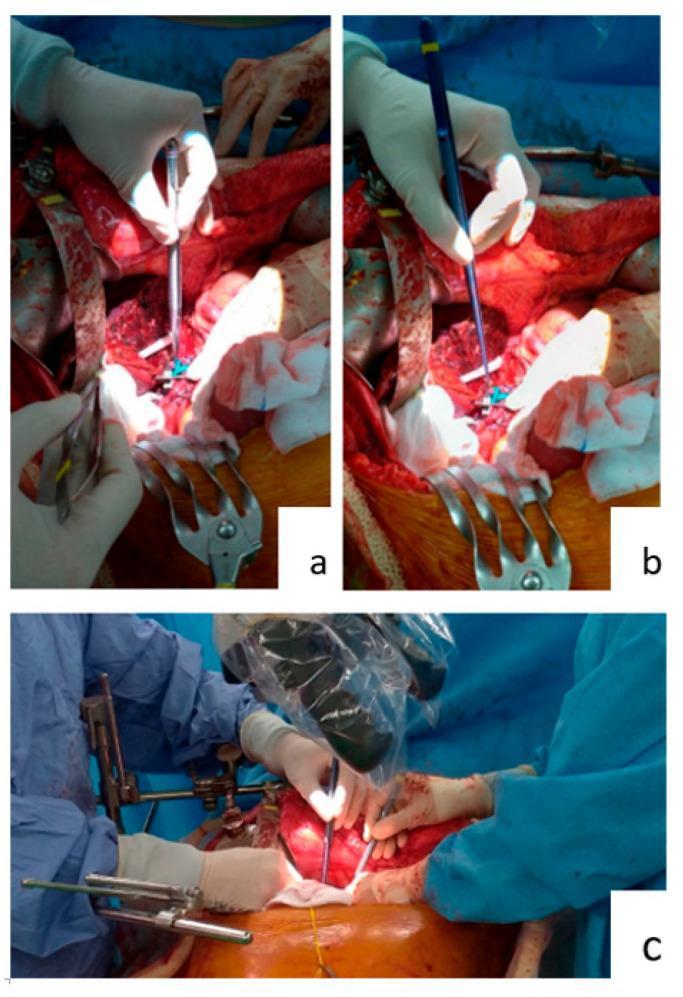
A series of clinical photographs illustrating the use of different surgical forceps during a complex abdominal procedure, specifically hepatic artery anastomosis. Image (a) shows a surgeon using standard 15 cm long metallic silver forceps; the shorter length forces the surgeon's hand deep into the operative field, resulting in a more cramped, pinched grip against the palm. Image (b) demonstrates the use of 25 cm long micro-forceps, characterized by a blue-coated finish and significant longitudinal reach. This instrument allows the surgeon to maintain a more relaxed, upright hand position further from the anatomical structures, providing better leverage and visibility. Image (c) displays a collaborative surgical field where both the primary surgeon and the first assistant are utilizing long micro-forceps simultaneously under a surgical microscope. This configuration highlights the ergonomic advantage of longer instruments in deep surgical sites, such as those obstructed by the ribcage, enabling precise tissue manipulation and suturing without the hands of the surgical team crowding the central operative view.
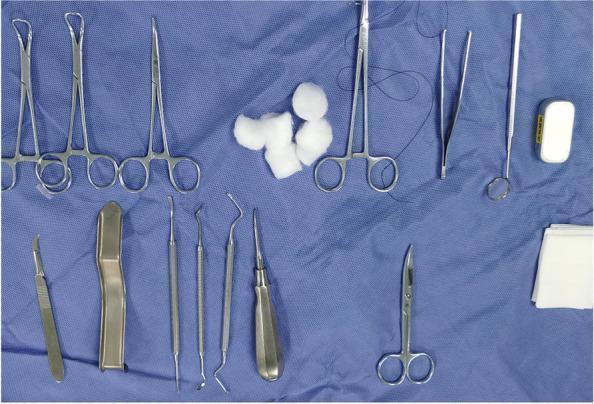
A top-down clinical photograph displays a standardized preoperative surgical tray for an oral and maxillofacial procedure, specifically a third molar extraction. The instruments are arranged on a sterile blue surgical drape. Visible metallic instruments include towel clamps (Backhaus), various hemostatic forceps (mosquito or Kelly style), and needle holders, one of which is loaded with a black silk or synthetic suture. Specialized dental instruments include a periosteal elevator, dental explorers, a mouth mirror, and a straight root elevator with a thick ergonomic handle. Additionally, a surgical scalpel with a #15 blade and a pair of curved Iris or Metzenbaum-style scissors are present. Consumable supplies include several cotton wool rolls and a stack of folded sterile gauze pads. The set demonstrates the essential armamentarium for achieving flap reflection, bone removal, tooth sectioning, and soft tissue closure in dental surgery.
needle holder sponge holding forceps surgical tray
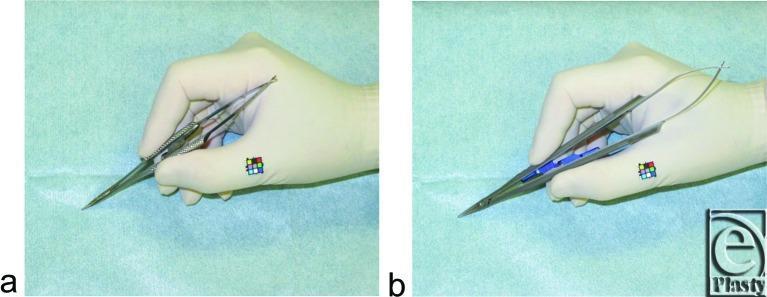
A side-by-side comparison of two surgical needle holders being held by a gloved hand, demonstrating ergonomic grip differences in surgical technique. Image (a) depicts a Webster needle holder, a traditional scissor-type instrument with finger rings and a ratcheted handle, held with a palm-in-hand or 'scissor grip' using the thumb and ring finger for stability. Image (b) shows a newly developed 19 cm pen-type needle holder, which is an enlarged version of a micro needle holder. It is held with a 'pen grip' or thenar grip, utilizing the thumb and index finger for fine motor control and precision. This comparison illustrates different ergonomic approaches to suturing, often used in plastic surgery and microsurgery to manage muscle fatigue and enhance needle manipulation during delicate procedures like skin or vessel closure. The clinical focus is on the instrumentation used for fine skin-suturing tasks and the resulting forearm muscle activity required for different holding methods.
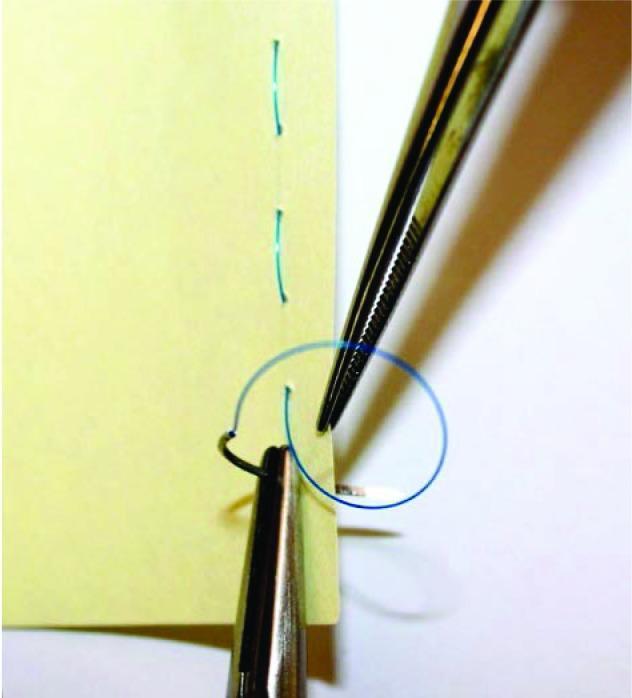
This clinical educational photograph demonstrates basic surgical suturing techniques using a simulated model. The image depicts a yellow synthetic material serving as a tissue analog, showing two parallel lines of previously placed green interrupted sutures. Two primary surgical instruments are visible: a needle holder (hemostat) and a pair of serrated tissue forceps (Adson or similar). The needle holder is shown grasping a curved surgical needle which has passed through the material, trailing a blue monofilament suture. The tissue forceps are positioned to stabilize the edge of the material and manipulate the suture loop to facilitate knot tying. This visual is designed for medical training to illustrate hand-instrument coordination, suture placement, and the mechanics of instrument-assisted knot tying in a controlled, non-biological environment. It serves as a foundational resource for teaching surgical skills and wound closure principles to medical students and surgical residents.
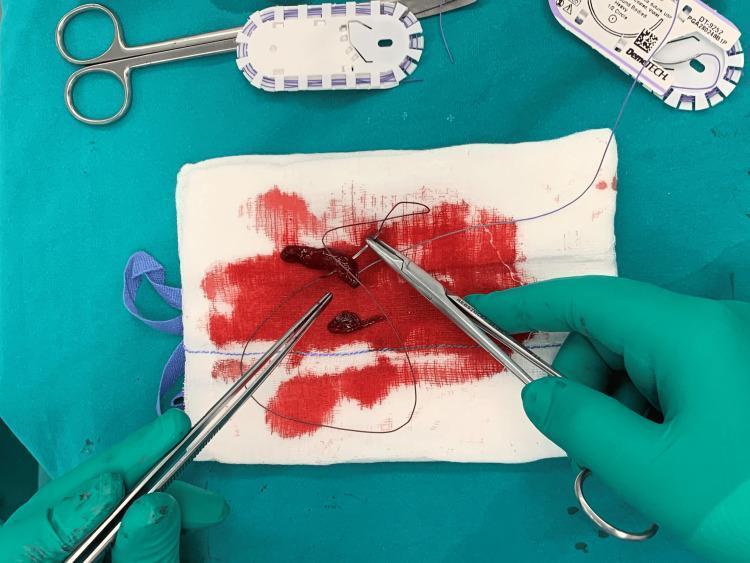
This clinical photograph illustrates a key step in an orthopedic surgical procedure, specifically the preparation of an autologous fibrin clot for meniscal repair. Centrally, two dark, gelatinous fibrin clots are positioned on a blood-stained sterile white sponge. A surgeon, wearing green sterile gloves, is using surgical forceps and a needle holder to thread fine, purple absorbable sutures through the ends of the fibrin clots. These sutures serve as traction or 'shuttling' lines to facilitate the precise intra-articular delivery of the clot into a meniscal gap during arthroscopy. The background consists of a green surgical drape, with additional surgical instruments, including scissors and suture packaging, visible. This technique is used in sports medicine to enhance the biological healing environment for meniscal tears by delivering concentrated growth factors directly to the avascular zones of the meniscus.
Foley catheter Ryle's tube rubber catheter urinary catheterization
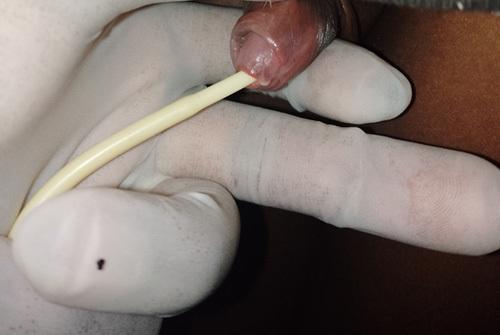
A clinical photograph depicting a post-procedural state in the urological management of acute urinary retention. The image shows a close-up of the male external genitalia, specifically the glans penis, with a Foley-type urethral catheter successfully inserted into the urethral meatus. The catheter is a smooth, flexible, pale-yellow tube. The glans appears slightly erythematous, consistent with recent clinical intervention. A gloved hand, belonging to a medical professional, is shown stabilizing the penis to secure the catheter's position. This visual demonstrates the clinical resolution following the extraction of an obstructing urethral stone via meatotomy. The image is intended for educational purposes in surgical and emergency medicine, illustrating catheterization technique and postoperative outcomes for obstructive uropathy in the male lower urinary tract.
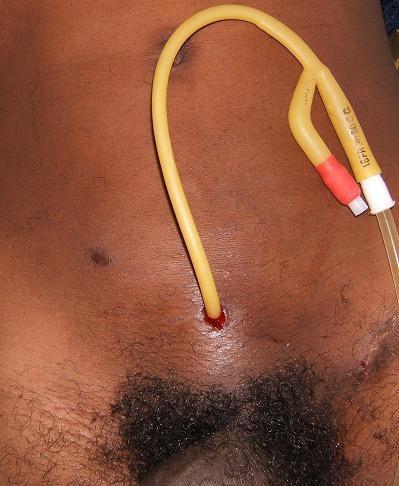
This clinical photograph shows a percutaneous suprapubic cystostomy (SPC) in a male patient. A yellow latex Foley catheter is seen entering the lower abdominal wall midline, approximately 2 centimeters superior to the symphysis pubis. The insertion site shows a small amount of serosanguinous fluid, typical of a recent procedural entry point. The distal end of the catheter features a classic Y-shaped bifurcation: one port, marked with '16FR', is connected to a clear urinary drainage tube via a white plastic connector, while the side port used for balloon inflation is equipped with a red-orange valve. This visual serves as an educational example of a suprapubic catheter placement for temporary or permanent bladder drainage in cases of urinary retention where urethral catheterization is contraindicated or unsuccessful. The image highlights the anatomical positioning and the physical components of the catheter hardware in a post-operative clinical setting.
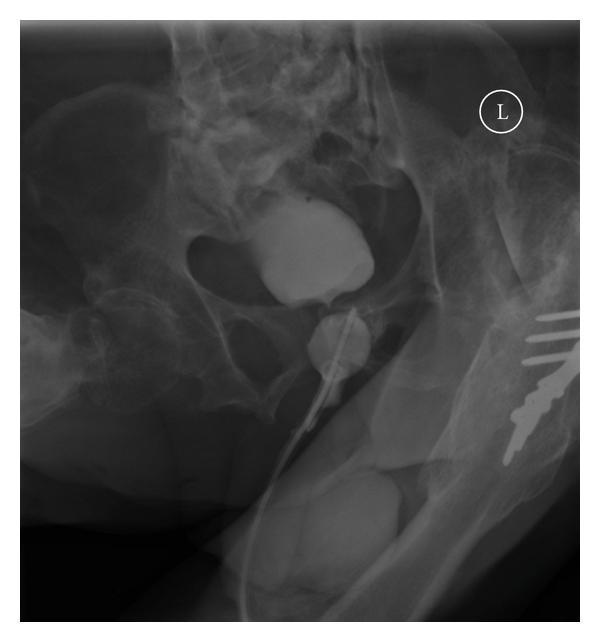
This diagnostic X-ray (cystogram) of the pelvis illustrates a complication of urethral catheterization in a patient with paraplegia. The radiograph shows the urinary bladder filled with radiopaque contrast media, appearing small in capacity. Crucially, the Foley catheter's balloon, also inflated with contrast for visualization, is clearly positioned within the proximal urethra rather than inside the bladder lumen. The catheter tip appears to extend beyond the balloon but remains outside the main bladder cavity. The surrounding pelvic anatomy is visible, including the iliac bones, sacrum, and pubic symphysis, providing a frame of reference for the malpositioned balloon. Surgical hardware, likely orthopedic plates and screws, is visible on the right side of the pelvic girdle. A laterality marker 'L' is present in the upper right quadrant. This image serves as a clinical example of urethral malpositioning of an indwelling catheter, a risk in patients with small-capacity bladders or anatomical abnormalities like false passages.
proctoscope laryngoscope tracheal tube endotracheal intubation instruments
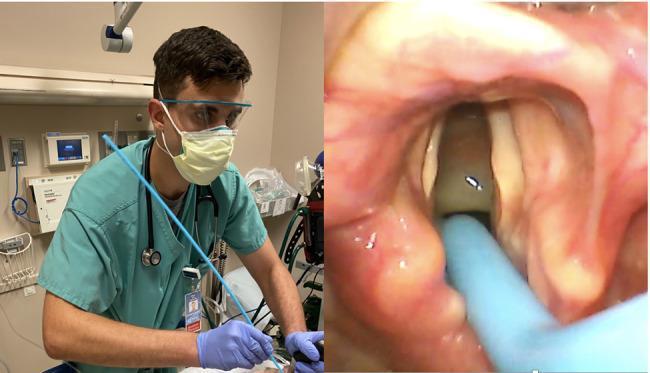
This composite clinical photograph illustrates an endotracheal intubation procedure using a tracheal tube introducer (bougie). The left panel shows the clinical setup where an emergency medicine resident, in appropriate personal protective equipment (mask, eye protection, and gloves), is performing the procedure. He is holding a blue bougie with his right arm adducted to optimize the angle of insertion. The right panel displays the corresponding real-time video laryngoscope view within the oropharynx. This internal view reveals the epiglottis, arytenoids, and the vocal cords (Cormack-Lehane Grade 2a). The blue tip of the bougie is visible passing through the glottic opening into the trachea, demonstrating successful placement. The content emphasizes the relationship between clinician ergonomics, specifically shoulder position, and the successful navigation of airway adjuncts during rapid sequence intubation (RSI) for respiratory failure.
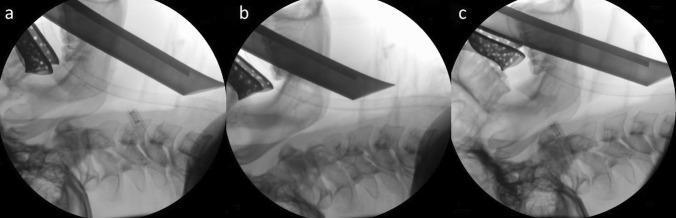
A series of three lateral intra-operative X-ray radiographs (labeled a, b, and c) demonstrating the anatomical alignment of the head and neck during tracheal intubation in three distinct positions: (a) sniffing position, (b) simple head extension, and (c) hyperextension. Each image shows a radiopaque Macintosh laryngoscope blade inserted into the oropharynx, with the tip situated in the vallecula to elevate the epiglottis. An endotracheal tube is visible passing through the larynx into the trachea. The radiographs illustrate the varying maxillopharyngeal angles and the relative spatial relationships between the cervical spine (C1-C7), mandible, hyoid bone, and laryngeal structures. In position (a), the characteristic 'sniffing' posture shows flexion of the lower cervical spine and extension at the atlanto-occipital joint. Positions (b) and (c) show progressive degrees of global cervical extension. This comparison is used in anesthesiology to evaluate the optimization of the laryngeal view and ease of intubation based on patient positioning.

This sequence of clinical images demonstrates the four steps of endotracheal intubation (ETI) using a polycarbonate barrier box on an airway trainer manikin. The setup is designed to minimize aerosol exposure during airway management. Step 1: An operator wearing personal protective equipment (PPE), including blue gloves, inserts hands through the rear access ports of the transparent box to begin laryngoscopy. Step 2: The operator uses a Macintosh blade laryngoscope to visualize the glottis while an assistant provides a 7.0 mm cuffed endotracheal tube through a side port. Step 3: The operator inserts the tracheal tube into the trachea. Step 4: The tube is secured, the cuff is inflated, and an Ambu-Bag (manual resuscitator) is connected to begin positive-pressure ventilation. The images highlight the ergonomic constraints and procedural adjustments required when performing direct laryngoscopy within a confined barrier enclosure, commonly utilized in protocols for highly infectious respiratory diseases such as COVID-19.
Sim's speculum vaginal speculum retractor surgical instrument
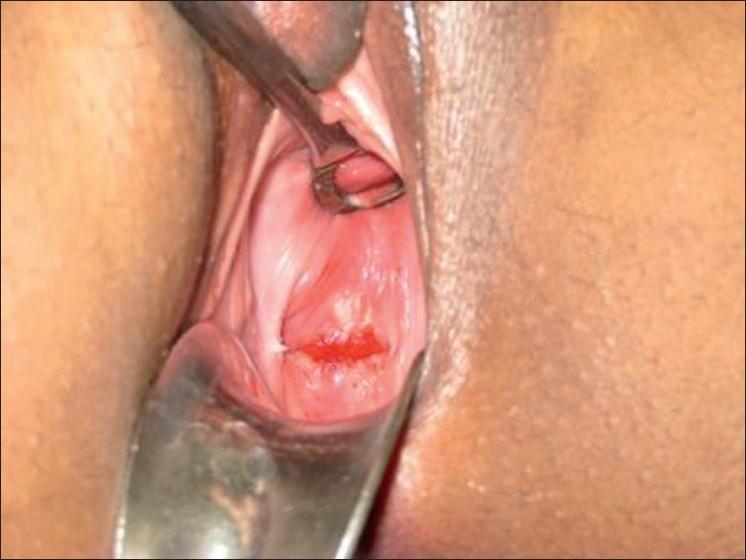
This clinical photograph displays a per speculum examination of the vaginal canal and vault. The metal blades of a bivalve speculum are used to retract the vaginal walls, providing clear visualization of the surgical site. Centrally, at the vaginal vault, there is a distinct, linear horizontal area of bright red granulation tissue or a healing ulcer. The surrounding vaginal mucosa appears pale pink with normal rugae, while the central lesion demonstrates an altered, more friable texture and vivid erythema. A surgical instrument, possibly a probe or retractor, is visible at the top of the frame, assisting in the exposure of the tissue. This image is used in a gynecological context to document post-operative healing following a hysterectomy and subsequent vault dehiscence or trauma, illustrating the transition from a through-and-through defect (rent) to a healing, intact vault.
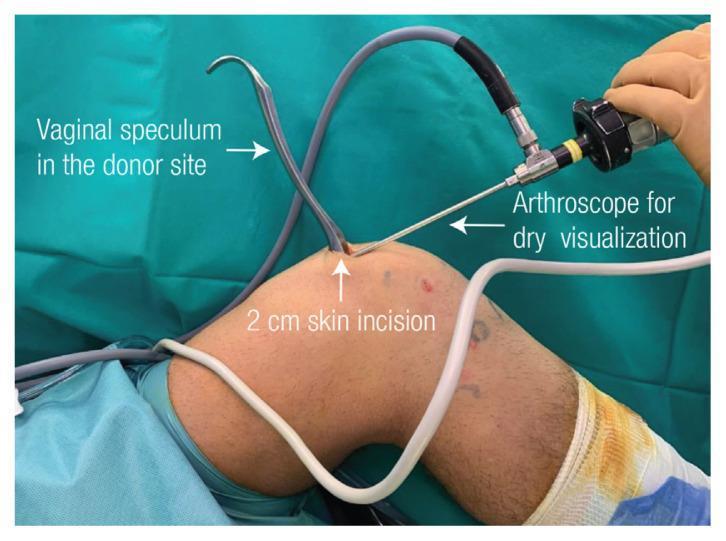
This clinical photograph captures a surgical procedure on a human right knee, specifically the donor site for a quadriceps tendon (QT) graft. The image illustrates an innovative surgical technique where a simple vaginal speculum is repurposed as a retractor. The speculum's metal blades are inserted into a 2-cm longitudinal skin incision located approximately 1 cm proximal to the superior pole of the patella. By expanding the subcutaneous space, the speculum acts as a 'tent' to facilitate 'dry arthroscopy,' which is being performed with a hand-held arthroscope inserted through the same incision. The arthroscope is connected to a thick gray image transmission cable and a white light source cable. This setup allows for clear visualization of the quadriceps tendon borders and the myotendinous junction without fluid distension, supporting precise graft harvesting and side-to-side defect closure. The procedure is shown in an intraoperative setting with green sterile draping and the patient's knee in a flexed position, highlighting technical adaptations in orthopedic surgery.
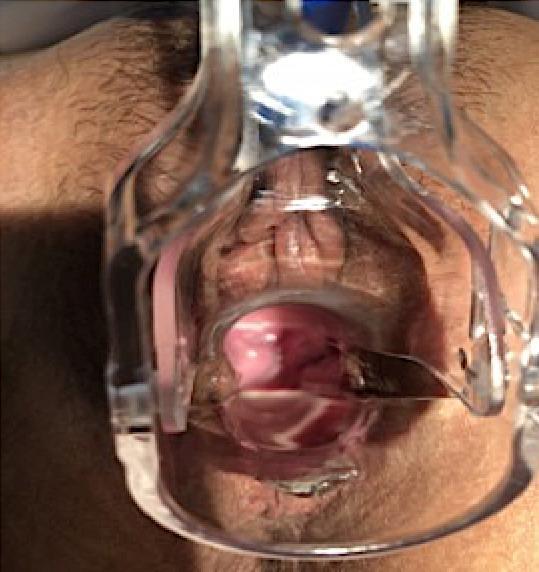
This clinical photograph displays a pelvic examination using a transparent plastic Graves speculum. The focus is on the vaginal vault of a patient who previously underwent a total laparoscopic hysterectomy. The image illustrates a well-healed vaginal cuff, characterized by pink, healthy-appearing mucosal tissue at the apex with a clear surgical line showing complete closure. There is no evidence of erythema, discharge, or recurrent dehiscence. A metal surgical instrument is visible within the speculum, used for retraction or manipulation to enhance the view of the vaginal apex. The surrounding external genitalia and perineum appear normal, with standard skin pigmentation and typical distribution of pubic hair. This image serves as an educational reference for normal post-operative healing following the repair of a vaginal cuff dehiscence, demonstrating the expected integrity and caliber of the vaginal canal after successful surgical intervention.
ophthalmoscope tonometer eye examination instrument
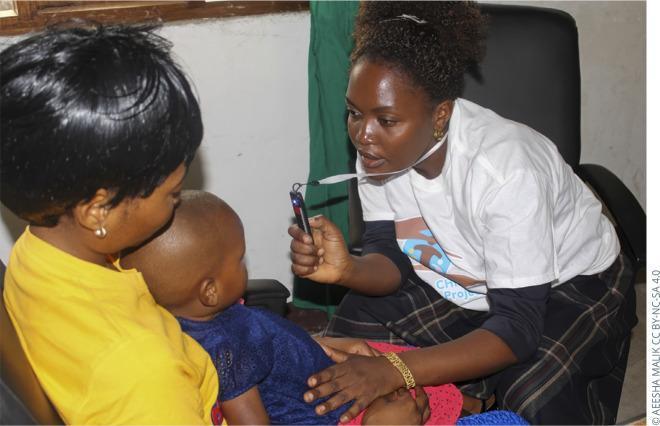
This clinical photograph illustrates a pediatric ophthalmic examination using the Arclight, a low-cost, portable, solar-powered direct ophthalmoscope and otoscope. The image shows a healthcare professional in a clinical setting in Tanzania performing an eye screening on a young child who is being held by a caregiver. The examiner is holding the slender, black, handheld device in her right hand, positioned at a close working distance to the child's eye to assess the red reflex or perform a fundoscopic examination. The device features a white neck lanyard for easy accessibility during field screenings. This visual demonstrates the practical application of frugal innovation in global health settings for the early detection of ocular conditions such as cataracts, retinoblastoma, and refractive errors in pediatric populations. The clinical focus is on the technique of direct ophthalmoscopy and the use of specialized diagnostic tools adapted for resource-limited environments.
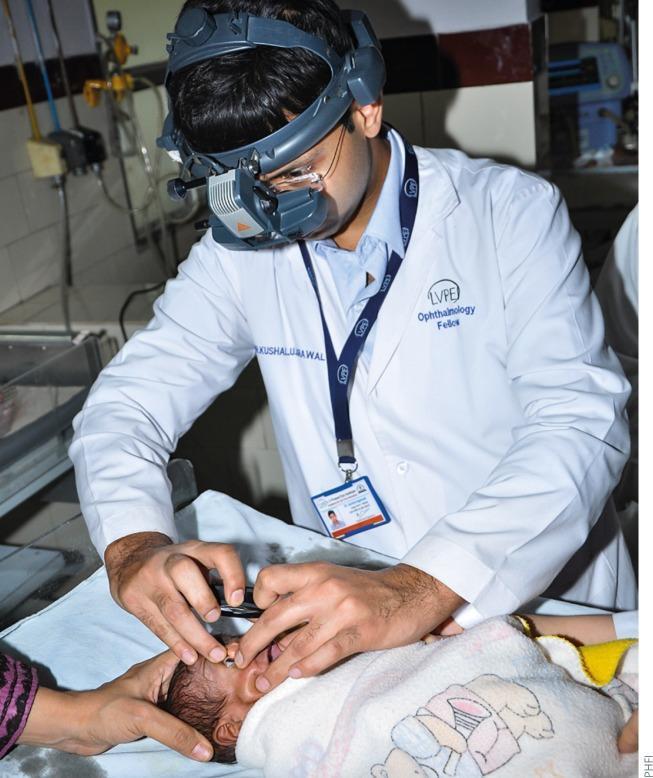
This clinical photograph illustrates a pediatric ophthalmology examination for Retinopathy of Prematurity (ROP) screening. The clinician, identified as an ophthalmology fellow in a white lab coat, is utilizing a head-mounted indirect ophthalmoscope with an integrated light source to visualize the internal structures of the infant's eye. The neonatal patient is positioned supine on a padded surface, with the head stabilized by an assistant's hand. To facilitate a clear view of the fundus, the ophthalmologist is using an eyelid speculum to keep the infant's eye open while holding a condensing lens (not fully visible) over the eye. The image demonstrates the standard technique for binocular indirect ophthalmoscopy (BIO) in a neonatal setting, which is critical for identifying peripheral retinal vascular abnormalities such as ridge formation, extraretinal fibrovascular proliferation, or 'plus disease' in premature infants. This modality is the traditional gold standard for ROP screening, allowing for a wide-field, three-dimensional view of the retina.
auroscope otoscope ear examination stethoscope reflex hammer
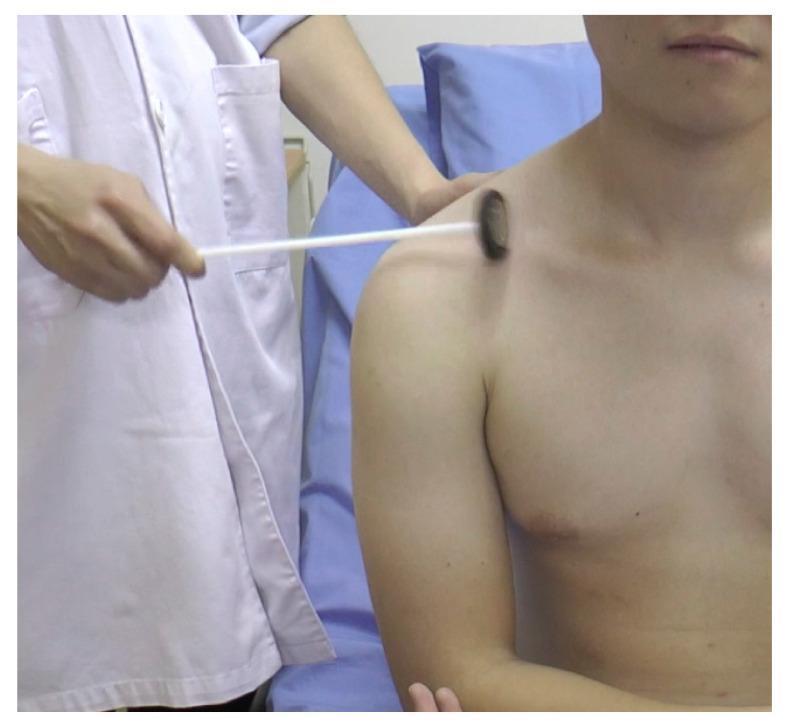
This clinical photograph demonstrates a procedural aspect of a neurological physical examination. An examiner, wearing a white lab coat, is shown performing percussion using a reflex hammer on a male patient. The reflex hammer features a dark, cylindrical rubber head mounted perpendicularly onto a long, slender, light-colored handle. The hammer head is making contact with the skin over the lateral aspect of the right clavicle, near the acromioclavicular region. This technique is often utilized in clinical settings to elicit periosteal or deep tendon reflexes to assess the integrity of the peripheral nervous system and spinal cord segments. The patient is in a seated position with the upper torso exposed, allowing for clear visualization of the anatomical landmarks of the shoulder and chest wall during the diagnostic maneuver.
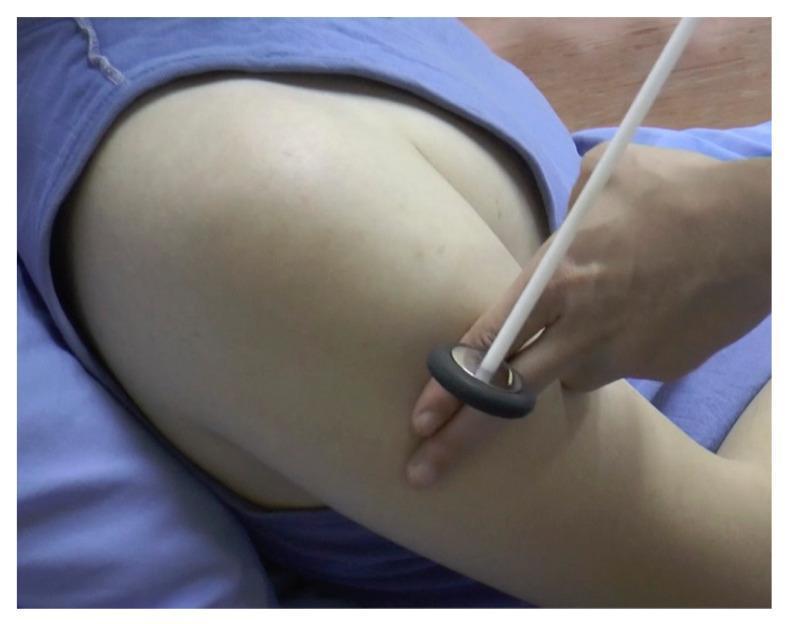
This clinical procedural photograph demonstrates the technique for eliciting a deep tendon reflex in the upper extremity, specifically targeting the deltoid tendon. A healthcare provider is shown using a Babinski-style reflex hammer, characterized by a slender, light-colored handle and a circular, disk-shaped head with a dark rubberized peripheral ring. The examiner's hand holds the handle between the thumb and fingers to provide a controlled, swinging motion. The patient is positioned supine, with the shoulder and upper arm exposed. The reflex hammer's head is shown at the point of impact on the lateral aspect of the upper arm, near the insertion of the deltoid muscle. This procedure is fundamental in a neurological examination to assess the integrity of the C5 and C6 spinal nerve roots and the axillary nerve. The image serves as an educational tool for medical students and clinicians to visualize proper tool handling and anatomical targeting for upper limb reflex testing.
dressing tray kidney tray dressing drum surgical supplies
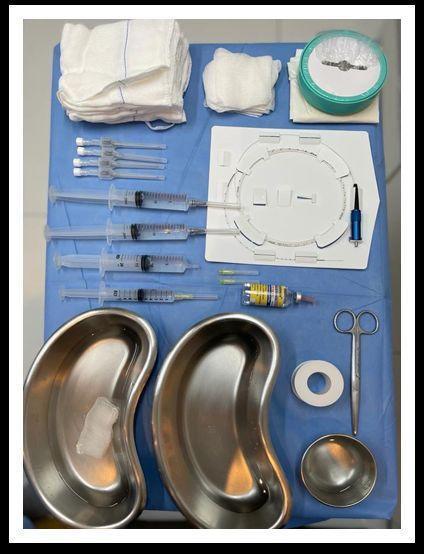
This clinical photograph displays a surgical tray organized for Assisted Total Thermal Ablation (ATTA) of varicose veins, highlighting the materials required for endovenous laser therapy and tumescent anesthesia. The sterile blue field contains several large-volume luer lock syringes (likely 20 mL) pre-filled with clear fluid for tumescent solution and smaller syringes for anesthetic blebs. Visible instruments include intravenous catheters (likely 14G or 16G), a radial laser fiber coiled on its card with a blue connector, and multiple hypodermic needles. Surgical stainless steel equipment includes two kidney basins, one containing sterile gauze, and a small specimen bowl. Additional supplies include a multi-dose vial of local anesthetic with yellow labeling, surgical tape, scissors, and various stacks of sterile gauze pads. This image serves as an educational resource for perioperative nursing and vascular surgery trainees to recognize the standardized tray setup for endolaser procedures.
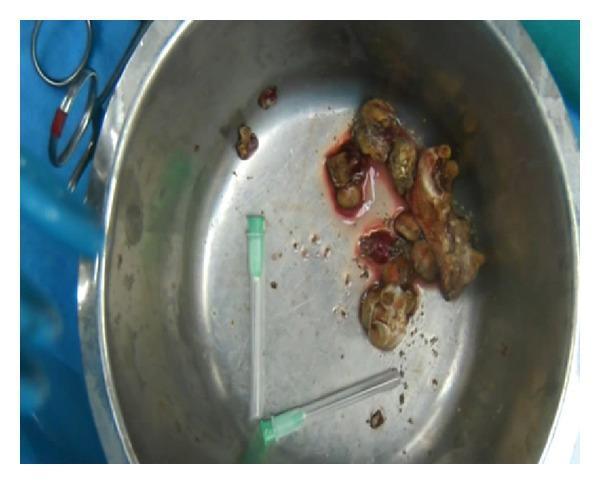
An intraoperative clinical photograph showing a collection of removed kidney stones placed in a stainless steel surgical tray. The primary specimen is a large staghorn calculus characterized by its irregular, branched morphology that reflects the shape of the renal pelvis and calyces. Multiple smaller fragmented calculi and gravel-like debris are also visible. The stones exhibit a variegated color palette ranging from light tan and yellowish-brown to dark brown, with visible traces of blood and biological tissue adherent to the surfaces. For scale and context, the tray contains surgical instruments, including a pair of scissors partially visible in the upper left and two hypodermic needles with green hubs. This image illustrates the typical gross appearance of large-scale urolithiasis following a surgical procedure like an anatrophic nephrolithotomy or percutaneous nephrolithotomy.
Surgical & Clinical Instruments - Complete Reference
GRASPING / HOLDING FORCEPS
1. Allis Tissue Forceps
- Medium-weight, ratcheted clamp with multiple interlocking fine teeth at the tip
- The teeth interdigitate to grip tissue firmly without cutting
- Available in straight and curved versions
- Finger-ring handles with a ratchet lock to maintain grip
- Length: typically 15-23 cm
- Grasping fascia, skin edges, and dense fibrous tissue
- Holding bowel edges, stomach wall, and bladder during surgery
- Holding the cervix during gynecological procedures
- Delivering specimens through ports or incisions
2. Curved Allis Forceps
- Identical in design to straight Allis forceps but with a curved jaw
- The curve allows access at angles not possible with straight forceps
- Same ratchet locking mechanism and interlocking teeth
- Grasping tissue in deep cavities or around curved structures
- Pelvic surgery, rectal procedures
- Retrieving specimens from body cavities at an angle
3. Mosquito Forceps (Halsted Mosquito Forceps)
- Very small, delicate, ratcheted hemostatic clamp
- Fine, fully serrated jaws - the serrations are horizontal (transverse)
- Tip is extremely fine and pointed
- Available in straight and curved versions
- Length: 12.5 cm (the smallest standard hemostat)
- Clamping tiny blood vessels and capillaries
- Pediatric and delicate surgeries
- Grasping fine sutures or small tissue pedicles
- Dissection of delicate planes
4. Tooth Forceps (Toothed Dissecting Forceps / Rat-Tooth Forceps)
- Thumb/tissue forceps with 1x2 or 2x3 interlocking teeth at the tip
- No ratchet - spring tension keeps tips together
- Held between thumb and index finger like a pen
- Available in various sizes
- Grasping skin and tough fibrous tissues
- Suturing skin (holding skin edges)
- Handling dense fascia, tendons, periosteum
- Should NOT be used on bowel or delicate viscera (causes trauma)
5. Chittle Forceps (Cheatle Forceps / Chittal Forceps)
- Long-handled, ring-handled forceps with a long jaw
- Specially designed to be stored in disinfectant solution in a tall jar
- The joint is near the tips (reversed from usual forceps) so the handles splay open when not squeezed
- Made entirely of metal (no rubber/plastic parts)
- Lifting and transferring sterile instruments from drums and containers without contaminating them
- A ward/sterilization room instrument - not a surgical instrument per se
- Transferring dressings, swabs, and packs from sterile drums to sterile trays
6. Needle Holder (Mayo-Hegar / Mathieu)
- Ratcheted, scissor-like instrument with short, robust, serrated or cross-hatched jaws
- Jaws are wide and strong to grip a curved needle without slipping
- Available in various lengths; tip may be tungsten carbide-inserts (gold handle rings indicate this)
- Common types: Mayo-Hegar (most common), Mathieu (spring-loaded, no rings), Webster (for fine work)
- Holding and driving curved suture needles through tissue
- The needle is clamped at its midpoint (or 2/3 from the tip)
- Used alongside dissecting forceps for suturing
7. Sponge Holding Forceps (Ring Forceps / Foerster Forceps)
- Long-handled, ratcheted forceps with large oval rings at the tips
- The rings are smooth (no teeth) to hold gauze/swabs atraumatically
- Length: 24-36 cm; handles have finger rings with ratchet
- Also called "ring forceps" or "swab holders"
- Holding gauze swabs (sponges) for mopping, cleaning the operative field
- Applying antiseptic solution to skin during prep (the "sponge stick")
- Holding bowel or delicate viscera with gauze protection
- Packing cavities with gauze
8. Simple (Plain) Forceps - Non-Toothed Dissecting Forceps
- Spring-action thumb forceps with flat, serrated (but toothless) tips
- Held like a pen between thumb and index finger
- Tips have fine transverse serrations for grip without teeth
- Available in multiple lengths and jaw widths
- Handling delicate tissues: bowel, vessels, peritoneum
- Picking up sutures and needles
- Dressing wounds (tissue forceps for wound care)
- Any situation where toothed forceps would damage the tissue
HEMOSTATIC CLAMPS
9. Artery Forceps (Hemostatic Forceps / Spencer Wells / Rochester-Pean)
- Ratcheted clamp, similar to mosquito forceps but larger and heavier
- Fully serrated (transverse ridges) along the entire jaw length
- Available straight and curved; multiple sizes
- Common types: Spencer Wells, Kocher (has teeth at tip), Rochester-Pean
- Clamping and ligating blood vessels
- Achieving hemostasis by clamping bleeding points before tying a ligature
- Dissection by blunt technique ("spreading" with closed jaws, then opening)
- Kocher forceps additionally grip dense tissue with their teeth
CUTTING INSTRUMENTS
10. Straight Scissors (Mayo Scissors)
- Heavy, straight-bladed scissors with blunt or sharp tips
- The blades are straight from pivot to tip
- One blade may be serrated to prevent tissue slipping
- Length: typically 14-17 cm
- Cutting sutures (the classic "suture scissors")
- Cutting tough fascia, scar tissue, and dense structures
- NOT for cutting delicate tissues - use Metzenbaum scissors for that
11. (Curved) Scissors - Metzenbaum Scissors
- Lighter than Mayo scissors; long handles with relatively short, curved blades
- Blades are curved to allow access in curved planes
- Very fine and delicate tips
- Blunt and sharp dissection of delicate tissues
- Cutting thin tissue planes, peritoneum, vessels
- The workhorse scissors in most open and laparoscopic procedures
CATHETERS & TUBES
12. Rubber Catheter
- Soft, flexible tube made of latex rubber
- Simple design: a hollow tube with one or two eyes (side holes) near the rounded tip
- Comes in French gauge (Fr) sizes; larger number = larger diameter
- Does not have an inflatable balloon (unlike Foley)
- Urinary catheterization (short-term or single use - in-and-out catheterization)
- Draining body fluids from cavities
- Irrigating wounds
- Used when repeated catheterization is needed but indwelling catheter is not
13. Foley's Catheter (Balloon Catheter)
- Flexible silicone or latex catheter with an inflatable balloon near the tip
- Has 2-3 lumens: one for urine drainage, one for balloon inflation, occasionally one for irrigation
- The balloon (typically 5-30 mL) anchors the catheter in the bladder
- Available in sizes 8-30 Fr
- Standard indwelling urinary catheter
- Continuous bladder drainage (post-operative, urinary retention, monitoring urine output)
- Suprapubic catheterization
- Continuous bladder irrigation (3-way Foley)
- Balloon inflated with sterile water after confirming placement in bladder
14. Cannula
- A hollow tube designed to be inserted into the body, through which instruments, fluids, or gases can pass
- A trocar (sharp introducer) is often used to insert the cannula, then removed
- Available in various sizes (measured in mm diameter)
- Types: IV cannula (peripheral venous), laparoscopic cannula/port (5 mm, 10 mm, 12 mm), nasal cannula (for oxygen)
- Laparoscopic surgery: ports for instrument passage and insufflation
- IV access: peripheral IV cannula for fluids/medications
- Oxygen delivery: nasal cannula
- Drainage of cavities
15. Tracheal (Endotracheal) Tube
- Flexible, transparent PVC tube with an inflatable cuff near the tip (in cuffed tubes)
- Murphy eye: a side hole near the tip to maintain airflow if the main opening is obstructed
- The cuff, when inflated, seals the trachea to prevent aspiration and allows positive-pressure ventilation
- Available in sizes 2.5-9.0 mm internal diameter; size 7.0-8.0 for adult females, 8.0-9.0 for adult males
- Has centimeter markings along its length
- Endotracheal intubation for general anesthesia
- Mechanical ventilation
- Airway protection in unconscious patients
- Introduced with a laryngoscope

16. Ryle's Tube (Nasogastric Tube)
- Thin, flexible PVC or silicone tube, French gauge 10-18
- Has a radiopaque line for X-ray confirmation of placement
- Markings at 45, 55, 65 cm from the tip to estimate insertion depth
- Has a rounded, closed tip with multiple side holes for drainage/feeding
- Named after John Ryle (described nasogastric intubation in 1921)
- Gastric decompression (bowel obstruction, post-operative ileus)
- Enteral feeding when the patient cannot swallow
- Drug administration
- Gastric lavage (poisoning)
- Aspiration of gastric contents to prevent aspiration pneumonia
17. Infant Feeding Tube
- Very small diameter (Fr 5-8) soft, flexible, nasogastric-type tube
- Shorter than adult nasogastric tubes
- Made of soft silicone or PVC to minimize nasal/pharyngeal trauma
- Radiopaque stripe for X-ray verification
- Enteral nutrition in neonates and infants who cannot suckle
- Premature infants, low birth weight babies
- Conditions impairing suck-swallow reflex (tracheo-oesophageal fistula repair, cleft palate, neurological impairment)
DIAGNOSTIC / EXAMINATION INSTRUMENTS
18. Proctoscope
- A rigid, hollow, cylindrical metal or plastic tube, open at the proximal end
- Comes with a removable obturator (solid cone-shaped insert) for insertion
- Length: ~7 cm for anoscope; 25-30 cm for rigid sigmoidoscope
- Has a light source attachment
- Internal diameter ~2-2.5 cm
- Direct visualization of the anal canal and lower rectum
- Diagnosis of hemorrhoids, anal fissures, polyps, rectal tumors
- Determining the true level of rectal lesions (more accurate than flexible sigmoidoscope)
- Detorsion of sigmoid volvulus
- Biopsy of rectal lesions
- Rubber-band ligation of hemorrhoids
19. Auroscope (Otoscope)
- A handheld instrument with a light source, magnifying lens, and a funnel-shaped speculum
- Battery-powered handle with an attached speculum (various sizes: 2, 3, 4, 5 mm)
- Pneumatic otoscope has a rubber bulb to insufflate air for testing tympanic membrane mobility
- Provides 3-5x magnification
- Examination of the external auditory canal and tympanic membrane
- Diagnosing otitis externa, otitis media, perforations, wax (cerumen impaction), foreign bodies
- Assessing tympanic membrane landmarks (cone of light, handle of malleus)
20. Stethoscope
- Acoustic medical device for auscultation
- Components: earpieces (binaural), tubing, chest piece
- Chest piece has two sides:
- Diaphragm (flat, larger): higher frequency sounds (breath sounds, normal heart sounds, bowel sounds)
- Bell (concave, smaller): lower frequency sounds (S3, S4 heart sounds, mitral stenosis murmur)
- Electronic stethoscopes amplify sounds electronically
- Cardiac auscultation (heart sounds, murmurs)
- Respiratory auscultation (breath sounds, wheeze, crepitations)
- Abdominal auscultation (bowel sounds, bruits)
- Blood pressure measurement (Korotkoff sounds with sphygmomanometer)
- Confirming NG tube placement, ETT placement
21. Ophthalmoscope (Direct Ophthalmoscope)
- Handheld instrument with a built-in light source and rotating lens disc
- The lens disc has multiple plus (+) and minus (-) lenses measured in diopters
- The aperture selector has options: large beam, small beam, slit, red-free filter, cobalt-blue filter
- Provides 15x magnification of the retina
- Direct ophthalmoscope gives an upright image; indirect gives an inverted, wider-field image
- Fundoscopy: examination of the optic disc, retina, macula, vessels
- Diagnosing papilledema (raised ICP), diabetic retinopathy, hypertensive retinopathy, retinal detachment, optic atrophy
- Assessment of the red reflex (screening for cataract, retinoblastoma in children)
22. Tonometer
- Instrument for measuring intraocular pressure (IOP)
- Types:
- Goldmann Applanation Tonometer (gold standard): slit-lamp mounted; measures force needed to flatten a 3.06 mm area of cornea; requires topical anesthesia and fluorescein
- Non-contact (Air-puff) Tonometer: no contact with eye; less accurate but useful for screening
- Schiotz Tonometer (indentation type): handheld; a weighted plunger indents the cornea; older type
- Normal IOP: 10-21 mmHg
- Screening and monitoring of glaucoma
- Diagnosing acute angle-closure glaucoma (IOP typically >40 mmHg)
- Follow-up of patients on anti-glaucoma drops
23. Measuring Tape / Tape Measure
- Flexible, non-stretch measuring tape, typically 150 cm
- Marked in centimeters and millimeters (or inches on reverse)
- Usually made of fiberglass or paper; disposable types available for clinical use
- Measuring fundal height in obstetrics
- Measuring limb circumference (lymphoedema, deep vein thrombosis assessment)
- Measuring head circumference (neonates - OFC)
- Measuring wound dimensions and skin lesions
- Measuring abdominal girth (ascites follow-up)
24. Percussion Hammer (Reflex Hammer / Tendon Hammer)
- Handle (metal, plastic, or rubber) with a rubber head
- Types:
- Taylor (tomahawk/triangular): wedge-shaped rubber head; most common
- Babinski (Queens Square): circular rubber-headed hammer on a long handle
- Trommer: like Babinski but with a smaller head
- The rubber head absorbs some impact to deliver a brief, consistent tap
- Eliciting deep tendon (myotatic) reflexes: biceps (C5-6), brachioradialis (C5-6), triceps (C7), knee/patellar (L3-4), ankle/Achilles (S1)
- Percussing the chest and abdomen (using the handle end or the flat of the hand)
- Assessing plantar reflexes
25. Laryngoscope
- A rigid or flexible instrument with a light source for visualizing the larynx
- Direct (rigid) laryngoscope: Handle + interchangeable blade:
- Macintosh blade (curved): most widely used; tip sits in vallecula (anterior to epiglottis); lifts epiglottis indirectly
- Miller blade (straight): tip goes posterior to epiglottis, lifting it directly; preferred in children
- Blades in sizes 0-4 (size 3 for average adult)
- Handle contains batteries for the light bulb in the blade
- Fiberoptic vs conventional bulb types
- Video laryngoscope: camera on blade transmits image to screen (GlideScope, McGrath)
- Endotracheal intubation (primary use)
- Visualizing the airway in difficult/failed intubation
- Removal of foreign bodies from the larynx/upper airway
- Direct laryngoscopy for ENT examination
26. Retractor
- Instruments that hold wound edges apart to expose the operative field
- Types:
- Handheld retractors (require an assistant):
- Langenbeck: shallow blade on an angled handle; most common
- Deaver: deep, curved blade; for deep abdominal retraction
- Army-Navy (US Army): double-ended, S-shaped
- Cat's paw / Rake retractor: toothed rake end
- Self-retaining retractors (no assistant needed):
- Weitlaner: hinged, ratcheted, with sharp or blunt prongs
- Balfour / Finochietto: large frame with central blade for abdominal surgery
- Gelpi: for deep wound retraction
- Handheld retractors (require an assistant):
- Retracting skin edges, muscle, and abdominal wall to expose deeper structures
- Essential for visualization and safe dissection
27. Sims' Speculum (Vaginal Speculum - Sims Type)
- A single-blade, L-shaped or duckbill-shaped metal speculum
- The blade is concave (trough-shaped) to sit against the posterior vaginal wall
- Comes with a smaller anterior blade (Auvard speculum type) or used with an anterior retractor
- Used with the patient in Sims' (left lateral) position
- Examination of the vaginal walls and cervix when lying lateral
- Assessing uterovaginal prolapse (cystocele, rectocele, uterine prolapse)
- Colporrhaphy (vaginal repair operations)
- Used alongside anterior retractor to provide 360-degree view
- Contrast with Cusco/bivalve speculum (used in lithotomy for cervical smear, IUD insertion)
CONSUMABLES & CONTAINERS
28. Suture Material
| Property | Types |
|---|---|
| Absorbable | Catgut (plain, chromic), Vicryl (polyglactin 910), Dexon, Monocryl, PDS |
| Non-absorbable | Silk, Nylon (Ethilon), Prolene (polypropylene), Mersilene, Stainless steel |
| Monofilament | Nylon, Prolene, Monocryl, PDS - less infection risk |
| Braided | Silk, Vicryl, Ethibond - easier handling, more tissue drag |
- Skin: Prolene/Nylon (non-absorbable, monofilament)
- Bowel: Vicryl or PDS
- Vessels: Prolene
- Deep tissues: Vicryl or PDS (absorbable)
- Infected wounds: monofilament preferred
29. Dressing Material
| Material | Description | Use |
|---|---|---|
| Gauze | Woven cotton; non-adherent or plain | Primary wound dressing, packing |
| Paraffin gauze (Jelonet) | Tulle gras; impregnated gauze | Burns, superficial wounds (non-adherent) |
| Crepe bandage | Elastic woven cotton | Compression, retaining dressings |
| Adhesive plaster / Elastoplast | Self-adhesive cotton or elastic | Securing dressings |
| Absorbent cotton wool | Raw cotton; soft and absorbent | Padding, wound cushioning |
| Hydrocolloid (Duoderm) | Occlusive gel-forming dressing | Pressure sores, chronic wounds |
| Alginate | Seaweed-derived; highly absorbent | Heavily exuding wounds |
30. Dressing Tray
- Rectangular stainless steel tray, typically 25 x 15 x 3 cm
- Shallow sides to allow easy access
- Sterilized before use
- Gauze pieces (cut or folded)
- Dissecting forceps (2 pairs - one for sterile items, one for wound)
- Scissors
- Kidney tray (for waste)
- Cleaning solution (Normal saline, Betadine, Hydrogen peroxide)
- Sterile gloves or no-touch technique applied
31. Kidney Tray (Emesis Basin / Kidney Dish)
- Kidney-shaped (reniform) stainless steel or plastic dish
- The curved shape fits comfortably against the patient's body
- Comes in various sizes (100-800 mL)
- Receiving soiled dressings, used swabs, discarded materials during procedures
- Collecting emesis (vomit), blood, or body fluids
- Holding instruments during procedures
- Used beside the patient's head during nasogastric tube insertion
32. Dressing Drum (Drum Container)
- Cylindrical stainless steel container with a lid
- Has adjustable side vents (perforations) that can be opened or closed
- Open vents during sterilization (in autoclave) to allow steam penetration
- Close vents after sterilization to maintain sterility
- Lined with a linen sheet or kraft paper
- Storing and sterilizing gauze, dressings, cotton wool, and linen supplies
- After steam sterilization, closed drum keeps contents sterile for days to weeks
- The sterility indicator tape changes color when adequate sterilization has occurred
ENT & SPECIALIZED INSTRUMENTS
33. ENT Instruments (General Set)
| Instrument | Description | Use |
|---|---|---|
| Nasal speculum (Thudichum) | Bivalve spring speculum with short blades | Anterior rhinoscopy (nasal cavity exam) |
| Postnasal mirror | Small angled mirror on a long handle | Posterior rhinoscopy, nasopharynx |
| Tongue depressor | Flat wooden/metal spatula | Oropharynx examination |
| Jobson Horne probe | Wire probe with a small ring at one end | Ear wax removal, ear examination |
| Tuning forks (256, 512 Hz) | Steel fork producing a pure tone | Rinne test, Weber test (hearing assessment) |
| Head mirror | Concave mirror on a headband | Focuses reflected light into cavities |
| Aural syringe | Large metal syringe | Ear irrigation for wax removal |
| Nasal packing | BIPP gauze, Merocel pack | Epistaxis management |
34. Dental Instruments (General Set)
| Instrument | Description | Use |
|---|---|---|
| Dental mirror | Small angled mirror on a handle | Indirect visualization of tooth surfaces |
| Dental probe / Explorer | Pointed, curved metal instrument | Detecting caries, calculus, probing gingival pockets |
| Dental tweezers (College pliers) | Angled cotton-wool tweezers | Placing/removing cotton rolls, small items |
| Dental excavator | Spoon-shaped blade | Removing soft carious dentine |
| Sickle/Curette scaler | Hook-shaped | Scaling subgingival calculus |
| Periosteal elevator (Molt) | Flat and pointed ends | Raising mucoperiosteal flaps |
| Extraction forceps | Various shapes for upper/lower, anterior/posterior teeth | Tooth extraction |
| Elevators (Cryer, Warwick James) | Lever-type instruments | Luxating/elevating teeth before extraction |
| Burs and handpiece | Rotating cutting instruments | Cavity preparation, tooth removal |
QUICK REFERENCE SUMMARY TABLE
| Instrument | Category | Key Feature | Primary Use |
|---|---|---|---|
| Allis forceps | Grasping | Interlocking teeth, ratchet | Dense tissue holding |
| Curved Allis | Grasping | Curved jaw | Deep/angled access |
| Mosquito forceps | Hemostat | Very fine tip, fully serrated | Tiny vessels |
| Tooth forceps | Dissecting | 1x2 teeth, no ratchet | Skin/fascia grasping |
| Chittle forceps | Sterile transfer | Long, stored in disinfectant | Moving sterile items |
| Needle holder | Suturing | Short, heavy serrated jaw | Driving suture needles |
| Sponge holder | Swab holding | Large oval rings, ratchet | Swabbing/mopping field |
| Simple forceps | Dissecting | Flat serrated tip, no teeth | Delicate tissue |
| Rubber catheter | Drainage | Soft latex, no balloon | Short-term urethral drainage |
| Foley catheter | Drainage | Inflatable balloon | Indwelling bladder drainage |
| Cannula | Access | Hollow tube + trocar | IV access/laparoscopic ports |
| Tracheal tube | Airway | PVC, inflatable cuff | Endotracheal intubation |
| Straight scissors | Cutting | Heavy, straight blades | Cutting sutures/fascia |
| Scissors (curved) | Cutting | Curved, light blades | Tissue dissection |
| Artery forceps | Hemostat | Fully serrated, ratchet | Vessel clamping |
| Proctoscope | Endoscopy | Rigid hollow tube | Anorectal examination |
| Suture material | Consumable | Absorbable/non-absorbable | Wound closure |
| Dressing material | Consumable | Various types | Wound dressing |
| Ryle's tube | GI | Soft NG tube, side holes | Gastric drainage/feeding |
| Catheter | Drainage | Various types | Body fluid drainage |
| Dressing tray | Container | Stainless steel, flat | Sterile procedure setup |
| Kidney tray | Container | Reniform shape | Waste/fluid collection |
| Dressing drum | Storage | Cylindrical, vented | Sterilizing/storing linens |
| Auroscope | Diagnostic | Light + magnifying lens | Ear examination |
| Stethoscope | Diagnostic | Diaphragm + bell | Auscultation |
| Measuring tape | Diagnostic | 150 cm flexible tape | Body measurements |
| Hammer | Diagnostic | Rubber head | DTR testing |
| Ophthalmoscope | Diagnostic | Light + lens disc | Fundoscopy |
| Tonometer | Diagnostic | Applanation/indentation | Intraocular pressure |
| Dental instruments | Dental | Various | Dental examination/surgery |
| ENT instruments | ENT | Various | ENT examination/surgery |
| Infant feeding tube | GI/Neonatal | Very small bore (Fr 5-8) | Neonatal enteral feeding |
| Laryngoscope | Airway | Handle + curved/straight blade | Intubation/larynx visualization |
| Retractor | Exposure | Handheld or self-retaining | Holding wound open |
| Sims' speculum | Gynecology | Single concave blade | Vaginal/prolapse examination |
Instrument diagram
Which instrument(s) would you like a diagram for?
Clean medical illustration showing labeled diagrams of 4 surgical grasping forceps on white background: 1) Allis Tissue Forceps - straight, with interlocking fine teeth at tip, finger rings, ratchet lock, labeled parts (finger ring, ratchet, shaft, interlocking teeth); 2) Curved Allis Forceps - same as Allis but with curved jaws; 3) Mosquito Forceps (Halsted) - very fine delicate hemostatic clamp, straight and curved versions side by side, tiny pointed tips, full transverse serrations, labeled (fine tip, serrated jaw, ratchet); 4) Artery Forceps (Spencer Wells) - larger hemostatic clamp, fully serrated jaws, finger rings, ratchet lock, labeled parts. All instruments drawn in detailed black-and-white line art style with clear labels and arrows. Title at top: "SURGICAL GRASPING & HEMOSTATIC FORCEPS"
Clean medical illustration showing labeled diagrams of 4 surgical instruments on white background: 1) Needle Holder (Mayo-Hegar) - short heavy serrated jaws, finger rings, ratchet, labeled (box joint, ratchet, short heavy jaw with cross-hatching, finger ring); 2) Sponge Holding Forceps (Foerster/Ring Forceps) - long handled, large oval rings at tips, ratchet, labeled (oval ring tip, long shaft, ratchet, finger ring); 3) Tooth Forceps (Rat-tooth dissecting forceps) - spring action, 1x2 interlocking teeth at tip, no ratchet, labeled (1x2 teeth, spring action, no lock); 4) Simple/Plain Forceps (non-toothed) - flat serrated tips, spring action, no teeth, labeled (flat serrated tip, spring action). All detailed black-and-white medical line art with arrows and labels. Title: "NEEDLE HOLDER, SPONGE HOLDER & DISSECTING FORCEPS"
Clean medical illustration showing labeled diagrams of 4 cutting and clamping instruments on white background: 1) Mayo Scissors (Straight) - heavy straight blades, blunt tips, labeled (straight blade, blunt tip, pivot screw, finger rings); 2) Metzenbaum Scissors (Curved) - long handles, short curved delicate blades, labeled (curved blade, long handle ratio, fine tip); 3) Chittle Forceps (Cheatle Forceps) - very long handles, joint near tip end (inverted), tips splay open at rest, stored in jar of disinfectant shown beside it, labeled (long handles, joint near tip, tips splay open at rest, disinfectant jar); 4) Kocher Forceps - heavy artery forceps with teeth at tip plus transverse serrations, labeled (teeth at tip, transverse serrations, ratchet). All detailed black-and-white medical line art with arrows and labels. Title: "SCISSORS, CHITTLE FORCEPS & KOCHER FORCEPS"
Clean medical illustration showing labeled diagrams of catheters and tubes on white background: 1) Rubber Catheter - simple hollow latex tube, rounded tip with 2 side holes (eyes), no balloon, labeled (rounded tip, drainage eyes, hollow lumen, French gauge markings); 2) Foley Catheter - flexible tube with inflatable balloon near tip, Y-shaped bifurcation at proximal end showing drainage port and balloon inflation port, labeled (inflatable balloon, drainage eyes, drainage lumen, balloon inflation port, 3-way version also shown); 3) Ryle's Tube (Nasogastric Tube) - long thin flexible tube, multiple side holes near closed rounded tip, cm markings at 45/55/65cm, radiopaque stripe, labeled (closed rounded tip, side holes, radiopaque stripe, cm markings, funnel connector end); 4) Infant Feeding Tube - very small bore version of NG tube, Fr 5-8, labeled (very small caliber, soft tip, side holes). All black-and-white line art with arrows and labels. Title: "CATHETERS AND NASOGASTRIC TUBES"
Clean medical illustration showing labeled diagrams of airway and access instruments on white background: 1) Endotracheal Tube (Tracheal Tube) - transparent PVC tube with inflatable cuff near tip, Murphy eye (side hole), pilot balloon with one-way valve, connector at proximal end, cm markings along length, labeled (cuff, Murphy eye, pilot balloon, 15mm connector, cm markings, beveled tip); 2) Cannula - IV peripheral cannula showing needle inside plastic catheter, wings, injection port, labeled (plastic catheter, metal stylet/trocar, injection port, wings); 3) Laparoscopic Trocar/Cannula - cylindrical port with sharp trocar, valve mechanism, labeled (trocar tip, valve, port body, gas insufflation port); 4) Macintosh Laryngoscope - handle with batteries, curved blade with light at tip, labeled (handle, blade, light source, flange, tip, C-shaped cross section). All detailed black-and-white medical line art with arrows and labels. Title: "TRACHEAL TUBE, CANNULA & LARYNGOSCOPE"
Clean medical illustration showing labeled diagrams of diagnostic examination instruments on white background: 1) Proctoscope - rigid hollow cylinder with removable cone-shaped obturator beside it, light attachment slot, labeled (hollow barrel, obturator, light slot, proximal open end, length 7-25cm); 2) Auroscope/Otoscope - handheld instrument, handle with battery, head with magnifying lens, attached ear speculum (funnel-shaped), labeled (ear speculum, magnifying lens, light source, handle, pneumatic bulb attachment); 3) Stethoscope - full diagram showing binaural earpieces, metal ear tubes, Y-tubing, chest piece with diaphragm side and bell side labeled, (earpieces, spring, tubing, chest piece, diaphragm large flat side, bell smaller concave side); 4) Percussion/Reflex Hammer - Taylor hammer with triangular rubber head, and Babinski hammer with round head shown beside it, labeled (rubber head, handle, types). All detailed black-and-white medical line art with arrows and labels. Title: "PROCTOSCOPE, AUROSCOPE, STETHOSCOPE & REFLEX HAMMER"