
Pleural tapping procedure
Reading File
Now let me search the medical library for pleural tapping content in parallel:
Finding Sources
Finding Sources
Excellent results. Let me now read the most comprehensive sources in parallel:
Reading File
Reading File
Reading File
Now let me read the Pfenninger procedures book (most hands-on clinical detail) and the Harrison's entry, plus fetch key images:
Reading File
Reading File
Let me read more of the Pfenninger detailed procedure text and fetch relevant images:
Reading File
Loading Image
Loading Image
Let me fetch the patient positioning image and read the remaining procedural steps:
Loading Image
Reading File
I now have comprehensive information to write a thorough response. Let me compile everything.
Pleural Tapping (Thoracentesis)
Thoracentesis (pleural tapping) is the aspiration of fluid or air from the pleural space. It is performed for diagnostic evaluation of a pleural effusion, or therapeutically to relieve dyspnea caused by a large effusion.
Indications
Diagnostic thoracentesis:
- New pleural effusion of unknown cause
- Evaluation for infection, malignancy, or systemic disease
Therapeutic thoracentesis:
- Symptomatic large pleural effusion causing dyspnea or hypoxemia
- Relief of tension hydrothorax
Contraindications
Relative contraindications:
-
Loculated effusion (use real-time ultrasound guidance)
-
Coagulopathy / anticoagulation - Note: Evidence does not support routine correction of INR or platelet count before the procedure when ultrasound-guided. A large retrospective study of 1,009 ultrasound-guided thoracenteses found no significant difference in bleeding rates even with mean INR of 1.9 and platelets <50 x10⁹/L
-
Patients on clopidogrel (some increased bleeding risk reported)
-
Mechanical ventilation (higher pneumothorax risk)
-
Small effusion (<10 mm on lateral decubitus film) - requires ultrasound guidance
-
Skin infection overlying the intended insertion site
-
Roberts and Hedges' Clinical Procedures in Emergency Medicine, p. 1724
Equipment
| Category | Items |
|---|---|
| Skin prep | Povidone-iodine or chlorhexidine, fenestrated drape/sterile towels |
| Anesthesia | 10-mL syringe, 25-gauge needle, 22-gauge 1.5" needle, 1-2% lidocaine with epinephrine |
| Aspiration | 50-mL Luer-Lok syringe with 3-way stopcock; 18-gauge 2.5" needle (for air) or 15-gauge 2.5" needle (for fluid); alternatively a 16-gauge catheter-over-needle |
| Drainage | 500-1000 mL vacuum bottles, sterile tubing |
| Specimens | Red-top tube (chemistry), lavender-top tube (cell count/differential), aerobic + anaerobic blood culture bottles, cytology tube (10-50 mL red-top), green-top if needed, blood gas syringe on ice for pH |
| Monitoring | Pulse oximetry, telemetry, BP cuff (for large effusions or cardiopulmonary disease) |
- Pfenninger and Fowler's Procedures for Primary Care, p. 682
Patient Positioning
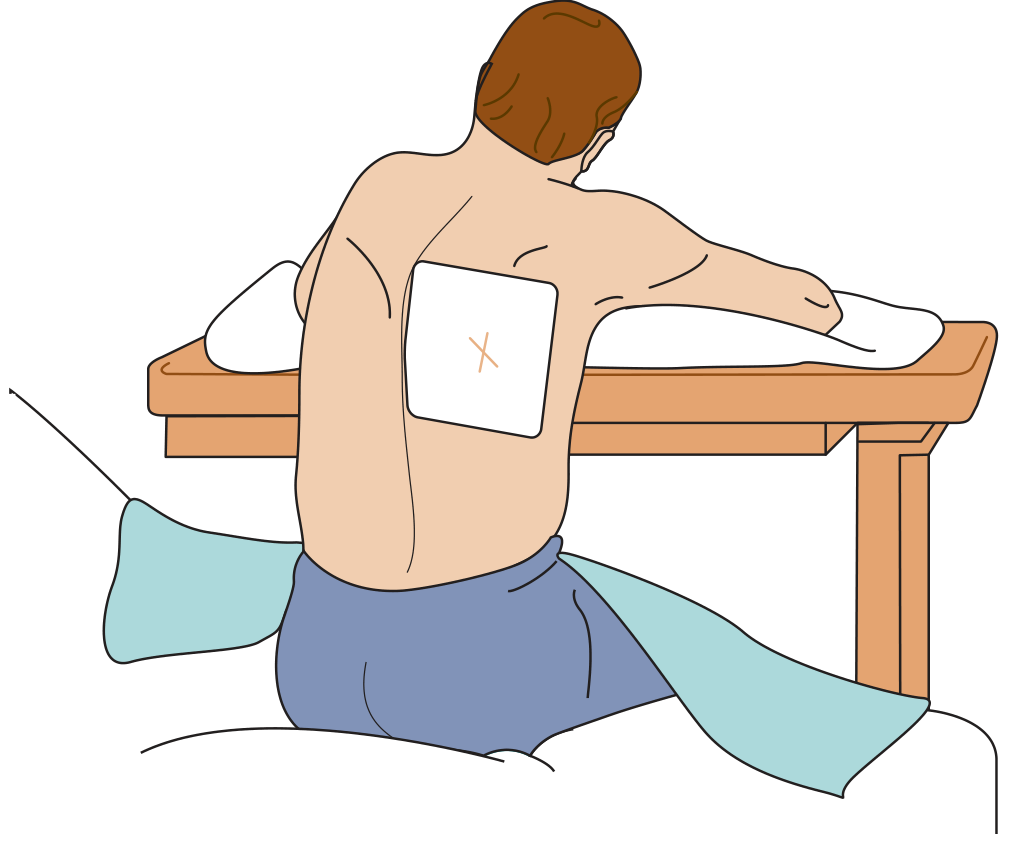
Figure: Standard seated position for thoracentesis. The patient sits upright leaning forward with arms supported on a padded table, keeping the back vertical so pleural fluid settles posteriorly.
-
Preferred position: Patient seated upright, leaning slightly forward with arms resting on a padded table. This keeps free-flowing fluid in the posterior dependent location.
-
Debilitated/supine patients: Lateral decubitus position, lying on the side of the effusion, back near the bed edge. Access is via the mid-scapular or posterior axillary line.
-
Important: Do not change patient position between the final ultrasound scan and needle insertion, as fluid can shift.
-
Pfenninger and Fowler's Procedures for Primary Care, p. 682
Ultrasound Guidance
Ultrasound-guided thoracentesis is the current standard of care and is strongly recommended:
- Identifies a safe insertion site, depth, and angle of entry
- Reduces pneumothorax risk (supported by meta-analysis)
- Identifies aberrant intercostal vessels using a vascular probe
- Simple pleural fluid appears anechoic (black) between the parietal and visceral pleura
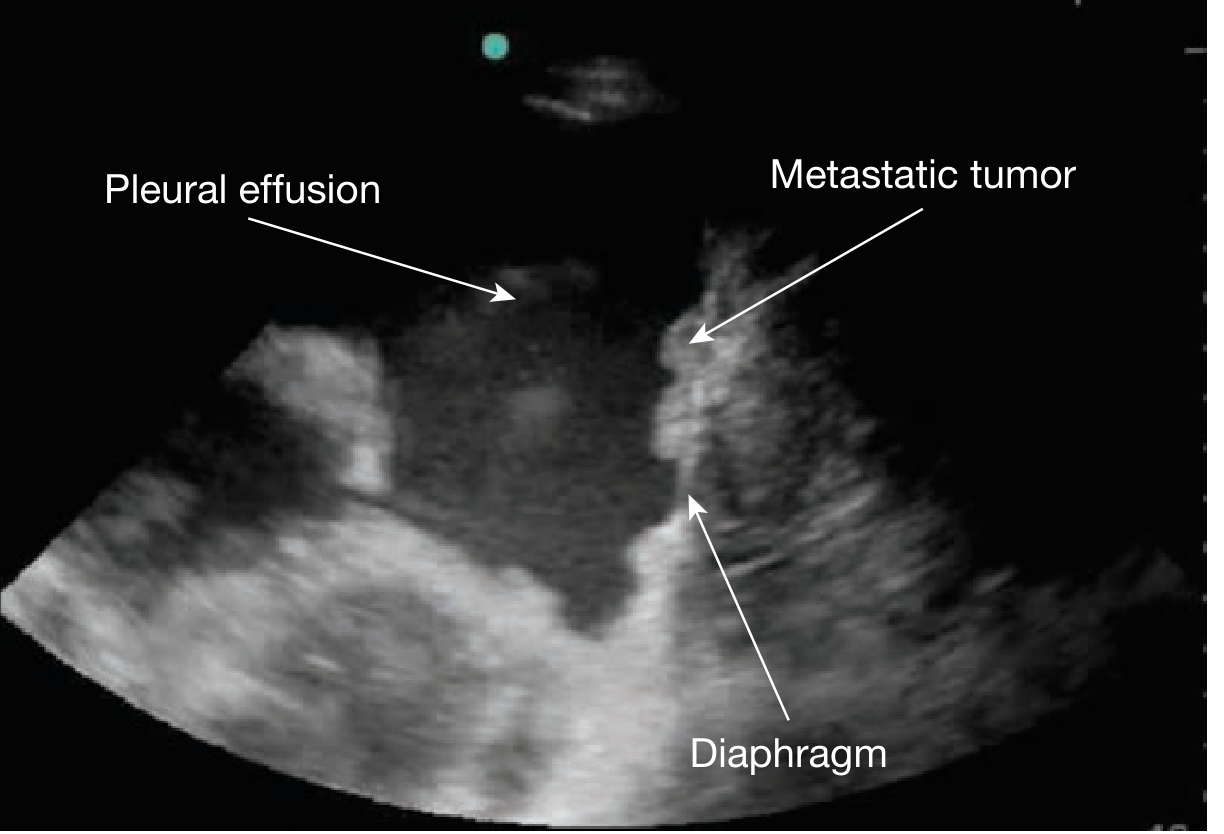
Figure: Ultrasound showing left pleural effusion (anechoic) with metastatic tumor on the diaphragm (5 MHz transducer, 5th intercostal space, left midaxillary line).
-
The "curtain sign" - intermittent respirophasic movement of lung into the needle path - means insertion is unsafe at that point; choose a different site
-
Echogenic material or septations suggest a complex exudate or loculated effusion
-
Pleural thickening >3 mm suggests an exudative effusion
-
After the procedure, scan the anterior chest for lung sliding to exclude pneumothorax
-
Fishman's Pulmonary Diseases and Disorders; Murray & Nadel's Textbook of Respiratory Medicine, p. 586
Step-by-Step Procedure
Step 1 - Site Selection
- Identify the effusion by percussion (dullness), auscultation (reduced breath sounds), and chest radiograph (PA, lateral, lateral decubitus views)
- Select the insertion site one to two interspaces below the upper fluid level, 5-10 cm lateral to the spine
- Never insert below the 8th intercostal space posteriorly (risk of liver, spleen, or diaphragm laceration)
- Never puncture medial to the mid-clavicular line (risk of internal mammary vessel injury)
- Mark the site with a marker or firm pressure from a needle hub
- Perform a time-out to verify patient identity and correct side
Step 2 - Skin Preparation and Draping
- Apply povidone-iodine or chlorhexidine to a wide area
- Drape with a fenestrated sterile drape or sterile towels
- Maintain full sterile technique throughout
Step 3 - Local Anaesthesia
- Raise a skin wheal with 1-2% lidocaine using a 25-gauge needle
- Switch to a 22-gauge 1.5" needle; angle it slightly downward toward the superior border of the rib
- "Walk" the needle over the top of the rib (avoids the neurovascular bundle which runs in the costal groove under the rib below)
- Aspirate and inject as you advance through the intercostal muscle layers
- Continue advancing until a "pop" is felt (or fluid/air is aspirated), confirming pleural space entry
- Note the depth; optionally clamp the needle at skin level to mark depth
- Withdraw the anesthesia needle
If no fluid is obtained at this stage, ultrasound guidance is mandatory before proceeding.
Step 4 - Needle/Catheter Insertion
- With the larger aspiration needle (18-gauge for air, 15-gauge for fluid) or catheter-over-needle assembly attached to a 50-mL syringe and 3-way stopcock:
- Pierce skin at the marked site
- Advance the needle over the superior rib surface (same principle as anesthesia)
- Aspirate continuously while advancing; stop advancing once pleural fluid is obtained
- If using catheter-over-needle: slide the catheter off the needle into the pleural space, then withdraw the needle
- Stabilize the shaft with the non-dominant hand during advancement to prevent over-penetration
Step 5 - Fluid Aspiration
Diagnostic tap:
- Collect ~60 mL into a syringe for analysis
- Distribute to specimen tubes immediately
Therapeutic tap:
- Connect tubing to vacuum bottles
- Use the 3-way stopcock to direct flow between the pleural space and the drainage container
- Maximum volume: <1.5 L per session (to minimize risk of re-expansion pulmonary oedema)
- Stop immediately if the patient develops cough, dyspnea, or chest pain (may indicate lung re-expansion or non-expandable lung)
Step 6 - Removal and Dressing
- Ask the patient to perform a Valsalva manoeuvre or hum (raises intrathoracic pressure to minimize air entry)
- Remove the needle/catheter at end-expiration
- Apply an occlusive dressing over the site
- Keep dressing on for 24 hours
Post-Procedure Management
-
Check pulse oximetry after the procedure; hypoxaemia is common due to V/Q mismatch in the re-expanded lung. Provide supplemental oxygen as needed.
-
Post-procedure chest radiograph is NOT routinely required. It IS indicated if:
- Air was aspirated during the procedure
- Patient is on mechanical ventilation
- Patient develops cough, chest pain, hypoxia, or dyspnoea
- Multiple needle passes were made
-
Instruct patient to report increased shortness of breath, fever, or redness at the puncture site
-
Pfenninger and Fowler's Procedures for Primary Care, p. 682-684
Pleural Fluid Analysis
| Test | Tubes | Purpose |
|---|---|---|
| Protein, LDH, glucose | Red-top | Light's criteria (transudate vs exudate) |
| Cell count + differential | Lavender-top (EDTA) | Infection, malignancy |
| Gram stain + culture | Aerobic/anaerobic blood culture bottles | Bacterial, fungal infection |
| Cytology | Large red-top (10-50 mL) | Malignant cells |
| pH | Blood gas syringe on ice, analyze within 1 hour | Empyema, parapneumonic effusion |
| Amylase | Green-top | Pancreatitis, oesophageal rupture |
Visual inspection clues:
- Blood-stained: trauma, malignancy, pulmonary infarction, pneumonia
- White/milky: lipid-rich (chylothorax or pseudochylothorax)
- Purulent, malodorous: empyema
- Food particles: oesophageal rupture
Light's Criteria (exudate if any one criterion met):
-
Pleural fluid protein/serum protein >0.5
-
Pleural fluid LDH/serum LDH >0.6
-
Pleural fluid LDH >2/3 upper limit of normal serum LDH
-
Roberts and Hedges' Clinical Procedures in Emergency Medicine, p. 257
Complications
| Complication | Rate | Prevention |
|---|---|---|
| Pneumothorax | 3-20% (most common); requires chest tube ~20% of the time | Ultrasound guidance; advance needle only as far as needed; use catheter-over-needle |
| Re-expansion pulmonary oedema | Rare but serious | Limit drainage to <1.5 L; stop if cough/dyspnoea develops |
| Haemothorax | Rare | Insert just above the rib; never medial to mid-clavicular line |
| Liver/spleen/diaphragm laceration | Rare | Never insert below 8th ICS posteriorly |
| Infection/empyema | Low | Strict sterile technique; avoid infected skin |
| Catheter fragment left in pleural space | Rare | Never withdraw catheter back over the needle |
| Hypovolaemia | Large effusions | Drain slowly, limit volume |
| Pain | Common | Adequate local anaesthesia, especially at the pleura |
- Pfenninger and Fowler's Procedures for Primary Care, p. 684
Key Safety Rules (Summary)
- Always insert just above the rib - never below it (neurovascular bundle runs in the costal groove inferiorly)
- Always use ultrasound guidance for small, loculated, or high-risk effusions
- Never insert below the 8th intercostal space posteriorly
- Never puncture medial to the mid-clavicular line
- Never withdraw a catheter back over the needle (catheter shear)
- Limit therapeutic drainage to <1.5 L per session
- Do a time-out before the procedure
Hemorrhagic stroke with severe abdominal distension
Reading File
This is a complex multi-system clinical scenario - hemorrhagic stroke combined with severe abdominal distension. I need to consider the neurological, GI, and critical care dimensions simultaneously.
Quick answer: The combination of hemorrhagic stroke with severe abdominal distension is a critical scenario. The abdominal distension in this context most likely reflects acute gastric dilatation or paralytic ileus (neurogenic gut dysmotility from the stroke), stress-related GI complications, or - if the patient is anticoagulated - intra-abdominal hemorrhage. Managing both simultaneously is challenging because treatments for one may worsen the other (e.g., anticoagulation reversal, ICP management vs. abdominal decompression).
Searching sources...
Finding Sources
Finding Sources
Finding Sources
Let me broaden the search across the specific components of this scenario:
Finding Sources
Finding Sources
Finding Sources
Reading File
Finding Sources
Finding Sources
Reading File
Finding Sources
Reading File
Reading File
Searching the Web
hemorrhagic stroke abdominal distension ileus management ICP interaction
Let me read the ICH management section fully and search for the critical abdominal-ICP interaction:
Reading File
Searching PubMed
intracerebral hemorrhage abdominal compartment syndrome intracranial pressure
I now have rich material to compose a comprehensive clinical answer. Let me synthesize everything.
Hemorrhagic Stroke with Severe Abdominal Distension
This is a critical multi-system scenario requiring simultaneous neurological and abdominal management. Understanding the interaction between raised intracranial pressure (ICP) and raised intra-abdominal pressure (IAP) is the crux of safe management.
Why Abdominal Distension Occurs in Hemorrhagic Stroke
Severe abdominal distension in the setting of hemorrhagic stroke has several potential causes, which must be rapidly distinguished:
1. Neurogenic (Paralytic) Ileus - Most Common
- Stroke-related autonomic dysfunction disrupts normal gut motility
- The enteric nervous system relies on intact CNS-autonomic signaling; mass lesions (especially brainstem, thalamic, or large hemispheric hemorrhages) suppress normal peristaltic drive
- Immobility, sedation, and opioid analgesia all compound the problem
- Presents with progressive abdominal distension, absent bowel sounds, intolerance of enteral feeding
2. Acute Gastric Dilatation
- Rapid gastric distension from swallowed air, loss of gag reflex, or mask ventilation prior to intubation
- Can cause respiratory compromise and aspiration
3. Cushing's (Stress) Ulcer with GI Hemorrhage
- Brain injury - especially raised ICP - drives vagal hyperactivity and gastric acid hypersecretion
- ICH patients are at significant risk of upper GI bleeding
- Can present with abdominal distension from an ileus triggered by GI blood irritating the bowel
4. Intra-abdominal Hemorrhage (in anticoagulated patients)
- ICH may coexist with systemic anticoagulation (e.g., warfarin, NOACs)
- Retroperitoneal or intraperitoneal bleeding following anticoagulation reversal or traumatic fall can cause massive distension
- Must be actively excluded if the patient was anticoagulated or had a fall
5. Abdominal Compartment Syndrome (ACS)
- Rare but life-threatening; can develop from massive fluid resuscitation in a critically ill stroke patient
- IAP >20 mmHg with new organ dysfunction defines ACS
- Critically important because raised IAP directly raises ICP (via raised intrathoracic pressure - impaired venous drainage - raised CVP - impaired cerebral venous outflow)
The ICP-IAP Interaction: A Critical Danger
This is the most dangerous physiological consequence of combining these two conditions:
Raised IAP
    → Elevates diaphragm
    → Raises intrathoracic pressure
    → Impairs superior vena caval return and jugular venous drainage
    → Raises central venous pressure (CVP)
    → Impairs cerebral venous outflow
    → RAISES INTRACRANIAL PRESSURE (ICP)
    → Reduces cerebral perfusion pressure (CPP = MAP - ICP)
    → Worsens secondary brain injury
This feedback loop means that inadequately treated abdominal distension will directly worsen the hemorrhagic stroke outcomes by raising ICP and reducing CPP.
- Plum and Posner's Diagnosis and Treatment of Stupor and Coma; Current Surgical Therapy 14e
Initial Assessment
Immediate priorities
| Step | Action |
|---|---|
| Airway | Secure airway early - distension + neurological compromise = high aspiration risk |
| Neurological | GCS, pupils, focal deficits; ICH score (GCS + volume + location + IVH + age) |
| Abdominal | Distension, bowel sounds, peritonism, tenderness, flank bruising (Grey Turner's sign) |
| Imaging | Non-contrast CT head (already done for ICH); add CT abdomen/pelvis with contrast to exclude intra-abdominal hemorrhage, bowel obstruction |
| Monitoring | ICP monitor (if GCS ≤8 or IVH), intra-abdominal pressure measurement via Foley catheter |
ICH Scoring (Primary ICH Score)
| Variable | Points |
|---|---|
| GCS 13-15 | 0; GCS 5-12 = 1; GCS 3-4 = 2 |
| ICH volume ≥30 mL | 1 |
| Intraventricular extension | 1 |
| Infratentorial location | 1 |
| Age ≥80 | 1 |
-
Score 0-1: ~0% 30-day mortality; Score 4-6: ~97% 30-day mortality
-
Plum and Posner's Diagnosis and Treatment of Stupor and Coma, p. 570
Management of Hemorrhagic Stroke (ICH)
1. Blood Pressure Control
- Target systolic BP ≤140 mmHg (IV nicardipine 5-15 mg/hr infusion, or labetalol 20-80 mg IV bolus)
- If SBP >220 mmHg, more aggressive reduction is warranted
- Avoid excessive reduction - impaired autoregulation in ICH makes the brain pressure-passive; CPP target of 50-70 mmHg
- Risk factors for hematoma expansion: uncontrolled hypertension, hyperglycemia, antithrombotic use, large initial volume, liver disease
2. Coagulopathy Reversal (Urgent)
- Anticoagulant-associated ICH requires emergent reversal:
- Warfarin: IV Vitamin K + 4-factor PCC (prothrombin complex concentrate) - faster than FFP
- Dabigatran: Idarucizumab
- Factor Xa inhibitors (rivaroxaban, apixaban): Andexanet alfa or 4-factor PCC
- Heparin: Protamine sulfate
- Antiplatelet drugs: Platelet transfusion may be considered but evidence is limited
3. ICP Management
- Elevate head of bed 30-45° (CRITICAL NOTE: abdominal distension may be worsened by this; maintain if ICP is the priority)
- Avoid hypotonic fluids (worsen cerebral oedema)
- Osmotherapy: IV mannitol 0.25-1.0 g/kg, or 23.4% hypertonic saline
- External ventricular drain (EVD) if intraventricular hemorrhage or hydrocephalus
- Target ICP <20-22 mmHg; CPP 50-70 mmHg
- Avoid Valsalva manoeuvres, coughing, straining - all raise ICP
4. Surgical Intervention
- Cerebellar hemorrhage >3 cm causing brainstem compression or hydrocephalus: emergent surgical evacuation
- Supratentorial ICH: surgical benefit remains limited; consider for young patients with accessible lobar hemorrhage and neurological deterioration
- External ventricular drainage for symptomatic obstructive hydrocephalus
5. Seizure Management
- Non-convulsive status epilepticus occurs frequently in ICH; continuous EEG monitoring is recommended for patients with unexplained impaired consciousness
- Prophylactic anticonvulsants are NOT routinely recommended
- Treat confirmed seizures with levetiracetam or valproate
6. General Critical Care
-
Strict normoglycaemia (hyperglycaemia worsens ICH outcomes)
-
Normothermia (fever raises cerebral metabolic demand)
-
DVT prophylaxis: intermittent pneumatic compression devices (NOT pharmacological initially, given active bleeding)
-
ICU admission with arterial line and central venous access
-
Plum and Posner's Diagnosis and Treatment of Stupor and Coma, p. 571
Management of Severe Abdominal Distension
Step 1 - Nasogastric (NG) Tube Decompression (FIRST PRIORITY)
- Insert NG tube immediately for:
- Gastric decompression (reduces IAP and aspiration risk)
- Administration of enteral medications (including antiepileptics, antihypertensives)
- Enteral feeding when ileus resolves
Step 2 - Identify the Cause
- CT abdomen/pelvis to exclude:
- Mechanical small/large bowel obstruction (requires surgical referral)
- Intra-abdominal/retroperitoneal hemorrhage
- Mesenteric ischemia (rare but catastrophic)
- Plain abdominal X-ray: air-fluid levels, massively dilated colon (Ogilvie's syndrome)
Step 3 - Treat Paralytic Ileus / Neurogenic Gut Dysmotility
- Correct electrolytes: hypokalaemia, hypomagnesaemia, and hypophosphataemia all inhibit gut motility - correct urgently
- Reduce or eliminate opioids where neurologically safe
- Avoid excessive IV fluid hydration (bowel oedema worsens ileus)
- Early mobilisation as neurological status allows
- Consider neostigmine 2 mg IV (under cardiac monitoring) for acute colonic pseudo-obstruction (Ogilvie's syndrome) if caecal diameter >12 cm and no response to conservative measures
Step 4 - Intra-abdominal Pressure Monitoring
- Measure IAP via Foley catheter (instil 25 mL saline, measure pressure at end-expiration)
- IAP grading:
- Grade I: 12-15 mmHg
- Grade II: 16-20 mmHg
- Grade III: 21-25 mmHg
- Grade IV: >25 mmHg = Abdominal Compartment Syndrome
- If ACS develops: decompressive laparotomy is the definitive treatment (and directly reduces ICP in the process)
Combined Management: Competing Priorities
This is where the clinical complexity peaks:
| Problem | Standard Treatment | Conflict with ICH |
|---|---|---|
| Coagulopathy reversal for ICH | PCC, vitamin K | Potentially worsens bleeding if intra-abdominal haemorrhage is present |
| Head-of-bed elevation 30-45° | Reduces ICP | May worsen abdominal discomfort but is generally maintained |
| NG tube insertion | Decompresses abdomen | Requires care if severe vomiting/raised ICP (risk of aspiration; consider RSI) |
| Mannitol for ICP | Osmotic diuresis | May cause hypovolaemia, worsening gut ischaemia if IAP is high |
| Laparotomy for ACS | Reduces IAP and ICP | Requires general anaesthesia in a patient with active ICH and coagulopathy - high risk |
| DVT prophylaxis | Enoxaparin | Contraindicated acutely in hemorrhagic stroke |
Key Decision Framework:
- Secure airway first - both conditions (reduced GCS from ICH + distension from ileus) independently mandate early intubation
- NG decompression is non-negotiable - reduces IAP, reduces aspiration risk, enables medication delivery
- Reverse coagulopathy urgently for ICH - this is the single most impactful acute intervention
- Monitor IAP continuously - IAP >20 mmHg in a patient with impaired cerebral autoregulation is a neuro-emergency
- Do not allow IAP to rise unchecked - the ICP consequences are direct and severe
- Neurosurgical + General Surgery involvement simultaneously if ACS develops alongside ICH
Summary: Priority Action List
| Priority | Action | Rationale |
|---|---|---|
| 1 | Secure airway (RSI intubation) | Protects against aspiration; allows ICP management |
| 2 | Non-contrast CT head + CT abdomen/pelvis | Define ICH; exclude intra-abdominal bleed/obstruction |
| 3 | Reverse anticoagulation (if applicable) | Most impactful intervention in anticoagulant-associated ICH |
| 4 | Insert NG tube - decompress stomach | Reduces IAP, prevents aspiration |
| 5 | IV antihypertensive (nicardipine/labetalol) | Target SBP ≤140 mmHg |
| 6 | Measure IAP via Foley catheter | Track ICP-IAP interaction |
| 7 | Correct K+, Mg²+, glucose, temperature | Reduce ICP worsening factors and ileus perpetuating factors |
| 8 | EVD if IVH/hydrocephalus | Direct ICP control |
| 9 | ICU admission, ICP monitoring, continuous EEG | Comprehensive neuro-critical care |
| 10 | Stress ulcer prophylaxis (PPI) | Prevent Cushing's ulcer bleeding |
- Plum and Posner's Diagnosis and Treatment of Stupor and Coma, p. 571-572; StatPearls - Hemorrhagic Stroke Overview
Give furthur managemeng of abdominal distension
Reading File
Searching sources...
The question is specifically about further (detailed, step-by-step) management of abdominal distension in a critically ill patient - covering paralytic ileus, acute colonic pseudo-obstruction, abdominal compartment syndrome, and related GI complications. Let me search in parallel across all relevant topics.
Finding Sources
Finding Sources
Finding Sources
Finding Sources
Finding Sources
Reading File
Reading File
Finding Sources
Reading File
Reading File
Finding Sources
Reading File
Finding Sources
Loading Image
Finding Sources
I now have all the material needed for a comprehensive, structured response on further management of abdominal distension. Let me compose it.
Further Management of Abdominal Distension (in Hemorrhagic Stroke)
Management is staged based on severity, cause, and whether the patient is progressing to abdominal compartment syndrome (ACS). It follows a stepwise escalation from non-invasive to surgical.
Step 1: Continuous Monitoring and Serial Assessment
Intra-abdominal Pressure (IAP) Measurement
The single most important monitoring parameter. Physical examination alone is unreliable - a tense abdomen does not always indicate high IAP, and severe IAH can exist without obvious signs.
Technique: Trans-bladder (intravesical) pressure monitoring
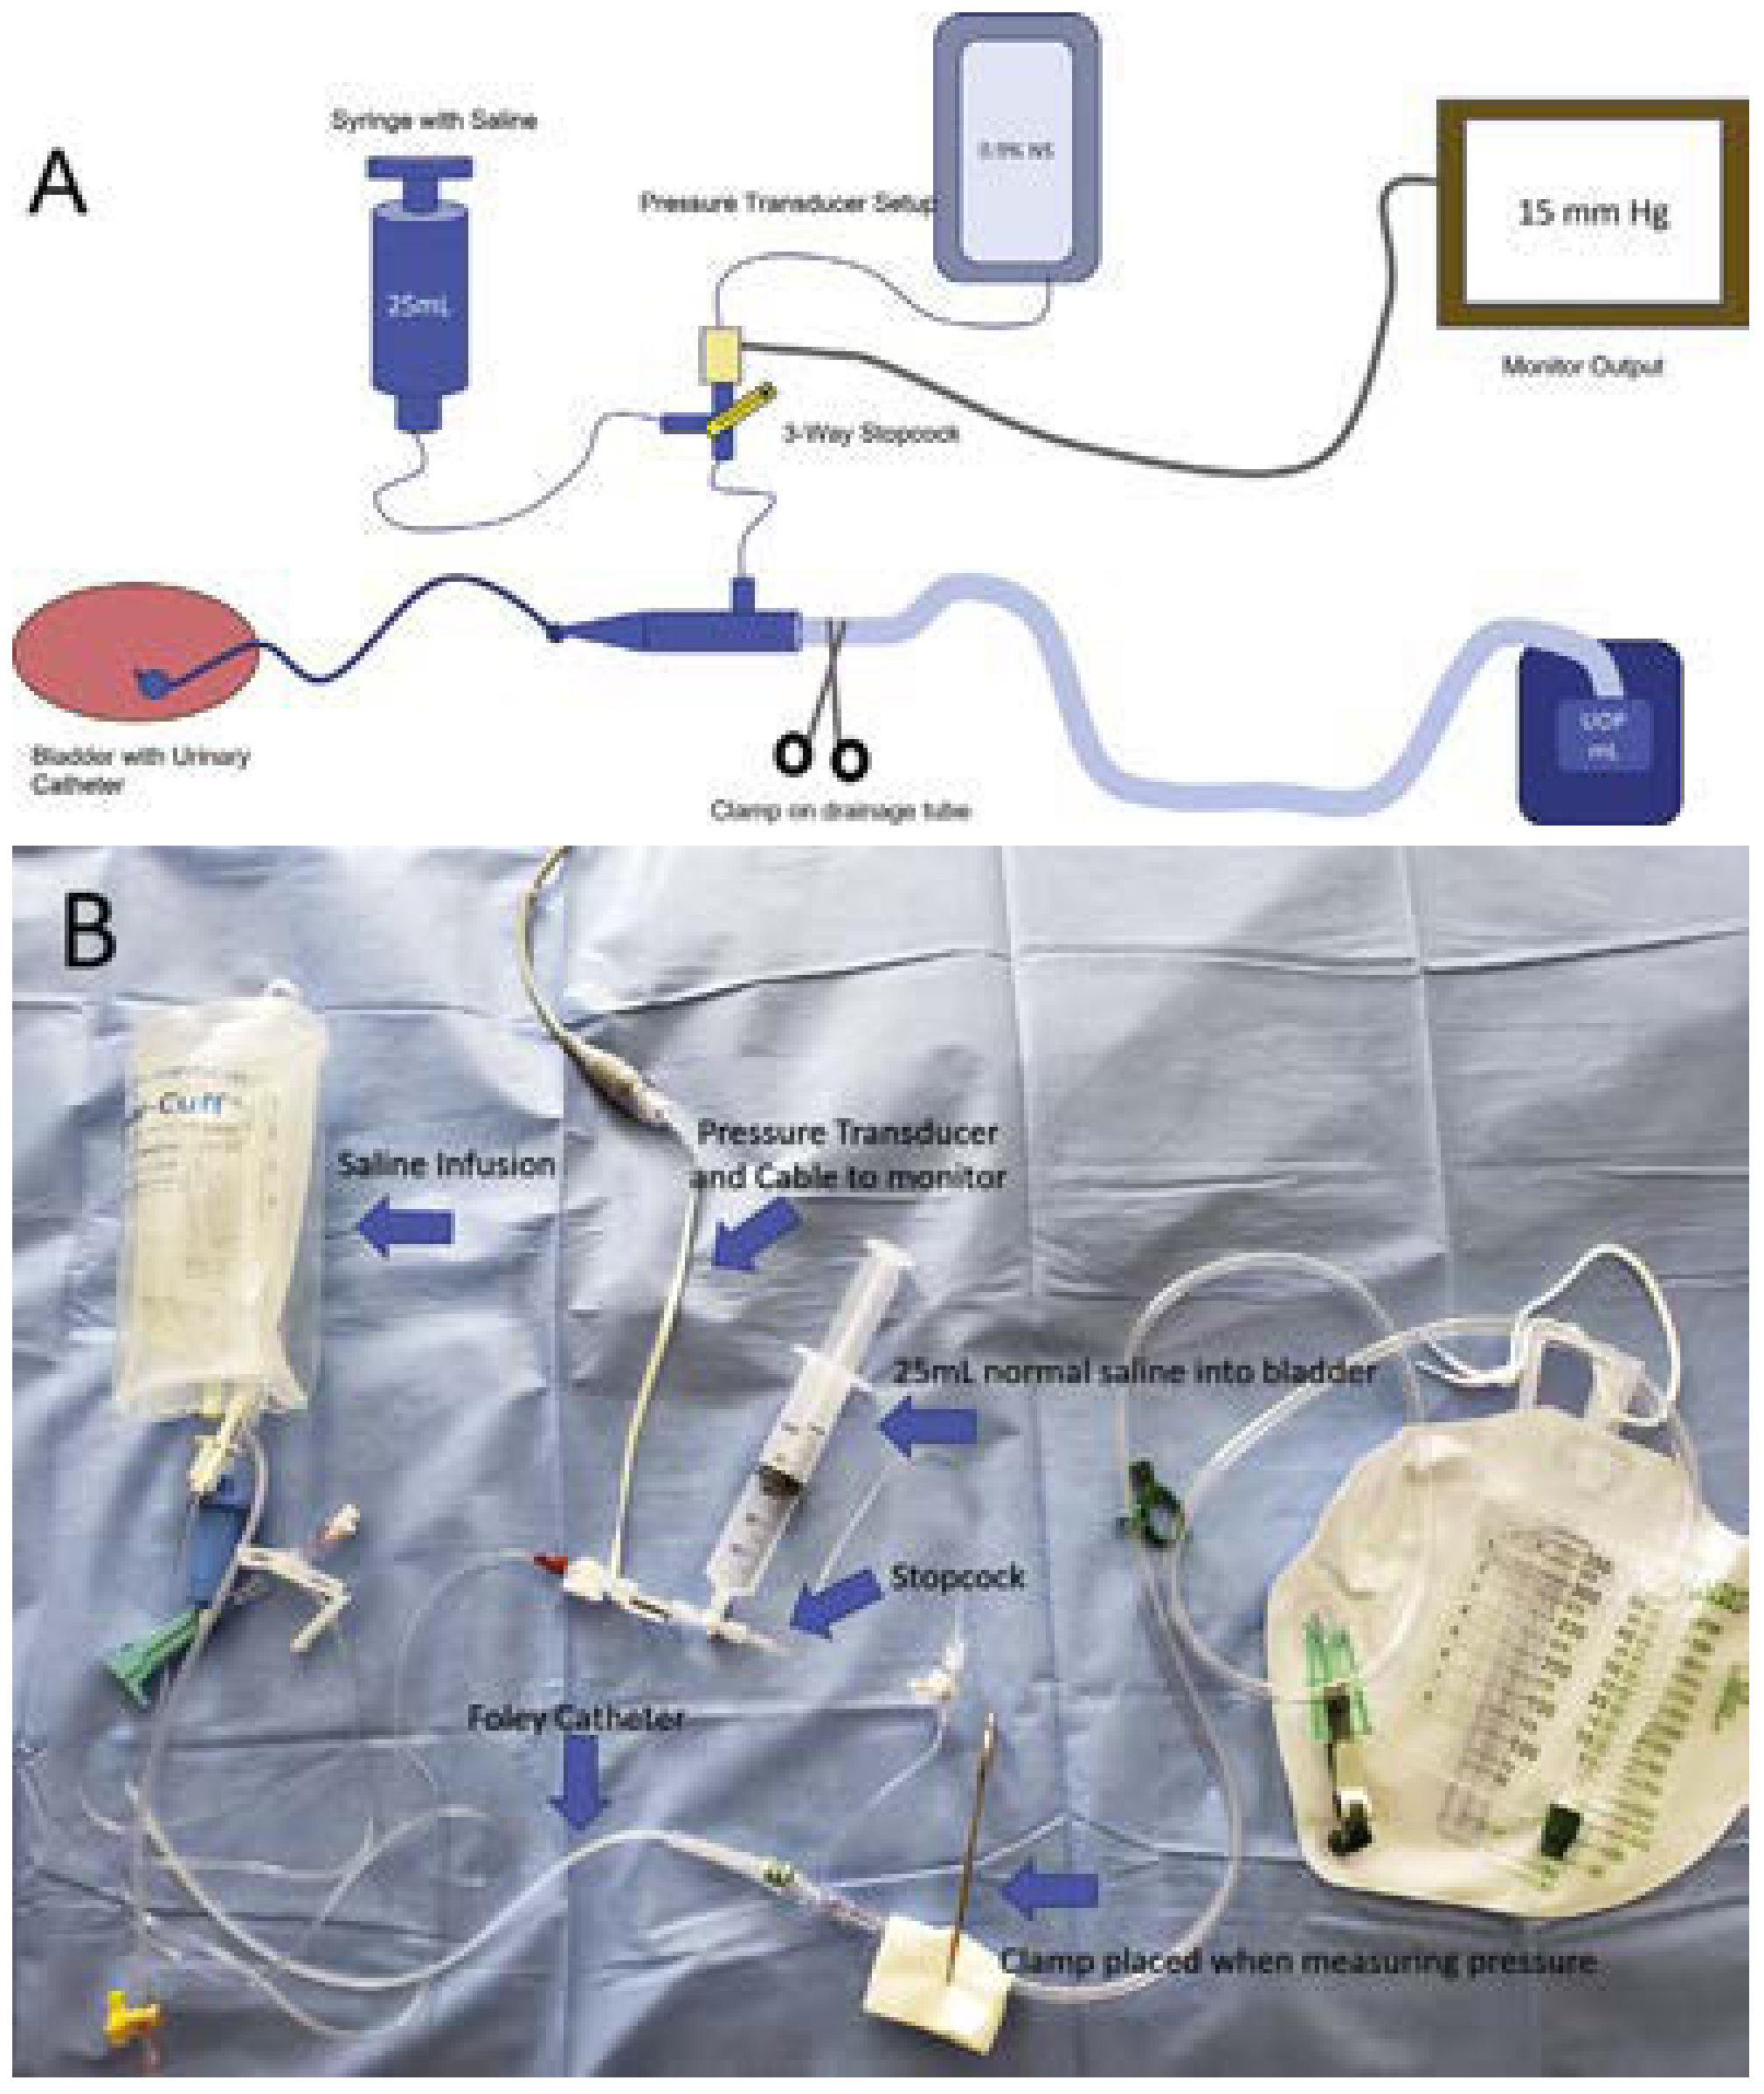
Figure: Setup for bladder pressure measurement. Instil 25 mL normal saline into the empty bladder via the Foley catheter through a 3-way stopcock, clamp the drainage tubing, and transduce the pressure at end-expiration with the patient supine.
IAP Grading (WSACS):
| Grade | IAP (mmHg) | IAP (cmH₂O) | Clinical Significance |
|---|---|---|---|
| Grade I | 12-15 | 16-21 | Monitor; conservative management |
| Grade II | 16-20 | 22-27 | Active non-surgical decompression |
| Grade III | 21-25 | 28-34 | Prepare for surgical decompression |
| Grade IV | >25 | >35 | Near-ACS; escalate urgently |
| ACS | >20 sustained | - | + new organ dysfunction = surgical emergency |
-
Measure IAP every 4-6 hours in at-risk patients
-
Abdominal Perfusion Pressure (APP) = MAP - IAP; target APP >60 mmHg
-
Monitor for organ dysfunction signatures: ↑peak airway pressure, ↓urine output, ↑lactate, ↑creatinine, ↑ICP
-
Current Surgical Therapy 14e, p. 1418-1419
Step 2: Non-Surgical Decompression Measures (First-Line)
A. Gastric and Luminal Decompression
- Nasogastric (NG) tube: Insert if not already done. Decompress gastric content and swallowed air. Leave on free drainage. Confirm position on X-ray.
- Rectal tube: For large bowel gas accumulation (especially Ogilvie's syndrome/acute colonic pseudo-obstruction). Insert a large bore flatus/rectal tube and connect to a bag. Can achieve dramatic reduction in colonic distension.
- Both maneuvers have direct evidence of reducing IAP.
B. Correct Electrolyte and Metabolic Derangements
These perpetuate ileus and must be corrected urgently:
| Deficiency | Effect | Target |
|---|---|---|
| Hypokalaemia | Reduces smooth muscle contractility | K⁺ >4.0 mmol/L |
| Hypomagnesaemia | Impairs K⁺ correction; inhibits motility | Mg²⁺ >0.8 mmol/L |
| Hypophosphataemia | Muscle weakness, diaphragmatic failure | PO₄ >0.8 mmol/L |
| Hyperglycaemia | Delays gastric emptying | BSL 6-10 mmol/L |
| Hypothyroidism | Rare but causes severe ileus | Screen TSH if no clear cause |
C. Prokinetic Agents
| Drug | Mechanism | Dose | Use in this context |
|---|---|---|---|
| Metoclopramide | D₂ antagonist + 5-HT₄ agonist | 10 mg IV/IM 8-hourly | Upper GI motility; gastroparesis - use cautiously (CNS side effects) |
| Erythromycin | Motilin receptor agonist | 250 mg IV 8-hourly | Gastric emptying; short-term use (ototoxicity, cardiac QT risk) |
| Neostigmine | Acetylcholinesterase inhibitor | 2 mg IV slow over 3-5 min | Acute colonic pseudo-obstruction - single most effective agent; requires cardiac monitoring (bradycardia, bronchospasm); response within 30 min |
| Alvimopan | Peripheral MOR antagonist | 12 mg oral | Postoperative ileus (limited ICU use) |
| Prucalopride | 5-HT₄ agonist | 1-2 mg oral once daily | Intestinal pseudo-obstruction (oral only) |
Caution with neostigmine in ICH: Bradycardia is a common side effect. Have atropine (0.6 mg IV) available at the bedside. Avoid if the patient has active bronchospasm, mechanical obstruction, or severe bradycardia at baseline. The benefit of lowering IAP (and thus ICP) generally outweighs the risk if colonic pseudo-obstruction is the cause.
- Goodman & Gilman's Pharmacological Basis of Therapeutics
D. Optimise Fluid Management
- Avoid excessive IV crystalloid - each litre of crystalloid worsens visceral and bowel wall oedema, which directly raises IAP
- Use balanced crystalloids (Hartmann's/Ringer's Lactate) over normal saline (less bowel oedema)
- Consider colloid or albumin replacement if hypovolaemic (less oedema-promoting)
- Reassess fluid balance 4-hourly; target euvolaemia, not liberal positive balance
- If the patient has ascites: consider ultrafiltration (in renal failure context) or therapeutic paracentesis to directly reduce IAP
E. Body Positioning
- Elevate head of bed 30-45° (already mandated for ICP management in ICH) - this is compatible with abdominal management
- Avoid Trendelenburg position - worsens IAP and ICP simultaneously
- Lateral decubitus or prone positioning may improve abdominal drainage in selected cases but is rarely feasible in active ICH
F. Remove or Reduce Aggravating Medications
- Opioids: Reduce or substitute with non-opioid analgesia (paracetamol, low-dose ketamine, regional nerve blocks where feasible) - opioids are the most potent inhibitors of gut motility in ICU
- Anticholinergics: Avoid atropine, hyoscine, tricyclics
- Vasopressors: High-dose noradrenaline reduces mesenteric blood flow and worsens ileus - optimise to minimum effective dose
Step 3: Specific Cause-Directed Interventions
A. Acute Colonic Pseudo-Obstruction (Ogilvie's Syndrome)
Presentation: massively dilated colon (especially caecum >12 cm on AXR), absent bowel sounds, no mechanical obstruction on CT.
Management ladder:
- All Step 2 measures above
- Neostigmine 2 mg IV (first-line pharmacological - 80-90% response rate)
- If no response after 24h: colonoscopic decompression (place decompression tube in right colon; do not insufflate)
- If perforation or ischaemia: surgical caecostomy or right hemicolectomy
Caecal diameter threshold for intervention:
-
12 cm: pharmacological treatment mandatory
-
14 cm or rapidly expanding: colonoscopic decompression should not be delayed
- Perforation risk rises sharply above these thresholds
B. Large-Volume Ascites Contributing to Distension
If CT shows significant free fluid/ascites as a major contributor to distension and IAP:
- Percutaneous image-guided paracentesis (bedside, ultrasound-guided) can drain large volumes directly - reduces IAP and ICP in the same procedure
- Drain >1 L to have significant IAP impact (Comprehensive Clinical Nephrology)
- Replace with IV albumin (6-8 g per litre drained beyond 5 L) to prevent post-paracentesis circulatory dysfunction
- Coordinate with assessment of any coagulopathy before drainage in ICH context
C. Intra-abdominal Hemorrhage / Haematoma
- If CT confirms retroperitoneal or intraperitoneal bleed:
- Ensure coagulopathy is reversed (already underway for ICH)
- If actively bleeding: CT angiography to identify bleeding vessel; IR-guided embolisation as first-line (avoids general anaesthesia risk)
- If haematoma is causing ACS without active bleeding: percutaneous drain after coagulopathy corrected
- Surgery is last resort given concurrent active ICH
Step 4: Escalation to Surgical Decompression (ACS)
When IAP is sustained >20 mmHg AND new organ dysfunction is present (rising creatinine, worsening hypoxia, ↑ICP, metabolic acidosis, ↓cardiac output) - this is true ACS and is a surgical emergency.
Decompressive Laparotomy
- Definitive treatment for ACS
- Generous midline incision through skin AND fascia
- Limited incision is inadequate (analogous to fasciotomy for limb compartment syndrome)
- Abdomen left open (damage control approach) with temporary closure
Intraoperative Confirmation of ACS Diagnosis:
- Immediate improvement in haemodynamics on fascial opening
- Drop in peak airway pressures on ventilator
- Fall in ICP (most relevant in this ICH context)
- Improvement in urine output
Bedside Decompression (when OR transport is impossible):
Indicated if the patient has:
- Hemodynamic instability preventing transport
- Severely elevated ICP preventing safe movement
- Respiratory failure requiring very high ventilator settings
A sharp bedside laparotomy with immediate temporary closure is performed; patient then transferred to OR when stabilised.
Temporary Abdominal Closure Options:
| Method | Description |
|---|---|
| Bogota bag | Sterile plastic bag sutured to skin; simple, inexpensive |
| Barker vacuum pack | Fenestrated polyethylene sheet + saline-soaked towels + closed suction drains |
| Commercial negative pressure (AbThera) | Pre-packaged polyurethane foam + adhesive drape + portable vacuum pump; preferred if available |
Negative pressure dressings are recommended by current expert consensus as they promote higher rates of primary fascial closure.
- Current Surgical Therapy 14e, p. 1417-1422
Step 5: Post-Decompression Management
After Laparotomy/Decompression:
- Continue IAP monitoring - recurrent ACS can develop, especially if resuscitation continues or sepsis develops
- Plan for definitive abdominal closure once oedema resolves (usually 48-72h if cause controlled)
- Staged closure with progressive fascial reapproximation at each return to OR
- Nutritional support: start low-rate enteral nutrition as soon as bowel sounds return; avoid prolonged parenteral-only nutrition (worsens gut mucosal atrophy and ileus)
- Abdominal domain restoration: if abdomen cannot be closed primarily, consider component separation or biological mesh
Special Considerations in Concurrent ICH
| IAP Management Action | Impact on ICH | Guidance |
|---|---|---|
| NG decompression | ↓ IAP → ↓ ICP | Always do; high priority |
| Neostigmine for ileus | Bradycardia risk | Use with monitoring; keep atropine ready |
| Paracentesis | ↓ IAP → direct ↓ ICP | Beneficial; coordinate with coagulation status |
| Decompressive laparotomy | ↓ IAP → ↓ ICP (most powerful) | General anaesthesia risk in active ICH; weigh against cerebral perfusion preservation |
| Avoid excess crystalloid | Limits bowel oedema | Also limits cerebral oedema - dual benefit |
| Prokinetics (metoclopramide) | ↑ gut motility | CNS extrapyramidal risk; use cautiously |
The core principle: any reduction in IAP directly reduces ICP in a patient with impaired cerebral autoregulation. This means aggressive, stepwise abdominal decompression is not just abdominal care - it is active neuroprotection.
NAVA mode in macquet
Reading File
Quick answer: NAVA (Neurally Adjusted Ventilatory Assist) is a mode of mechanical ventilation where the ventilator's assist is triggered and proportional to the electrical activity of the diaphragm (Edi), detected by a special nasogastric catheter with embedded electrodes. On the Maquet (now Getinge) SERVO-i/SERVO-U ventilators, NAVA provides breath-by-breath synchrony with the patient's neural respiratory drive, reducing patient-ventilator asynchrony and potentially lowering the risk of over-assistance and VILI.
Searching sources...
Finding Sources
Finding Sources
Searching the Web
NAVA mode Maquet SERVO ventilator Edi catheter setup settings clinical guide
Reading File
Reading Web Page
https://www.ncbi.nlm.nih.gov/books/NBK572111
Finding Sources
Searching the Web
NAVA mode SERVO-i SERVO-u NIV NAVA Edi catheter positioning troubleshooting backup ventilation
Reading Web Page
https://icdn.tradew.com/file/201606/1569362/pdf/7325015.pdf
I now have comprehensive, authoritative information from the official Getinge/Maquet SERVO study guide and SERVO-U user manual. Let me compile a complete, practical guide.
NAVA Mode on Maquet (Getinge) SERVO Ventilators
NAVA - Neurally Adjusted Ventilatory Assist is available on the Maquet/Getinge SERVO-i and SERVO-U ventilators. It is the only ventilator platform in the world that supports NAVA. The mode is available for invasive ventilation, and as NIV NAVA for non-invasive ventilation.
Core Principle
NAVA delivers inspiratory pressure assist that is directly proportional to the electrical activity of the diaphragm (Edi):
P_peak = NAVA level × (Edi_peak − Edi_min) + PEEPFor NIV NAVA: P_peak = NAVA level × (Edi_peak − Edi_min) + PEEP + 2 cmH₂O
-
Edi (μV) = electrical signal of diaphragm crura, detected by the Edi catheter
-
NAVA level (cmH₂O/μV) = the "gain" factor - how much pressure per μV of Edi signal
-
The bigger the patient's neural effort → the larger the Edi → the larger the pressure delivered
-
This creates breath-by-breath proportional synchrony between neural drive and ventilator output
-
Murray & Nadel's Textbook of Respiratory Medicine; SERVO-U User Manual v4.0
Required Equipment
| Component | Description |
|---|---|
| Edi Module | Inserts into SERVO-i/SERVO-U slot; processes the diaphragm EMG signal |
| Edi Cable | Connects Edi module to Edi catheter |
| Edi Catheter | Single-use nasogastric feeding tube with 9 miniaturised EMG electrodes; sized by patient weight/height |
Edi Catheter Sizes:
| Patient weight | Catheter size |
|---|---|
| 500g - 1.5 kg (neonate) | 6 Fr / 49 cm |
| 1.0 - 2.0 kg (neonate) | 6 Fr / 50 cm |
| >2.0 kg (neonate/paed) | 8 Fr / 100 cm |
| Paediatric/Adult | 8-16 Fr (per manufacturer weight chart) |
The catheter must be removed before any MRI examination.
Step-by-Step NAVA Workflow on SERVO-i / SERVO-U
Step 1 - Hardware Setup
- Insert the Edi Module into the designated slot on the SERVO ventilator
- Connect the Edi Cable to the Edi Module
- Run the Edi Module function check (automatic self-test on SERVO-U; manual test plug on SERVO-i)
- Wait for "Edi Module test passed" message. If it fails, replace the cable/module and retest.
Step 2 - Calculate Insertion Depth (NEX Measurement)
- Measure NEX (Nose-Ear-Xiphoid) distance in cm
- Use the SERVO's built-in CALCULATION TOOL (in the Neural Access menu):
- Enter catheter size, insertion route (oral/nasal), and NEX measurement
- The ventilator calculates the correct insertion depth (Y cm)
- Alternatively, use the Edi catheter measuring tape
Step 3 - Insert the Edi Catheter
- Dip the Edi catheter tip in water for a few seconds to activate pre-lubrication
- Insert nasally or orally to the calculated depth
- Connect the catheter's cable connector to the Edi Cable
Step 4 - Position the Edi Catheter (CRITICAL STEP)
Correct positioning is confirmed using ECG waveform pattern recognition on the SERVO screen:
Open Neural Access → Edi Catheter Positioning
Correct position - look for:
- Top 2 leads: P waves and QRS complexes clearly visible (near the heart - atria above diaphragm)
- Bottom 2 leads: P waves disappear and QRS amplitude decreases (below the diaphragm)
- 2 middle leads highlighted in PINK/BLUE during inspiration - this means the electrodes are spanning the diaphragm correctly
Adjustment guide:
| Finding | Action |
|---|---|
| P waves visible on ALL leads | Catheter too HIGH - push in further |
| No P waves, dampened QRS on ALL leads | Catheter too LOW - pull back |
| Pink highlights on BOTTOM leads | Push catheter in further |
| Pink highlights on TOP leads | Pull catheter back |
| Pink highlights centred on 2nd and 3rd leads | CORRECT POSITION - secure catheter |
Once correctly positioned, note and document the insertion length. Secure catheter firmly to prevent displacement.
Step 5 - Evaluate the Edi Signal
Before switching to NAVA, assess the Edi signal quality:
- The signal should be 2-20 μV at baseline
- Check for Edi deflections (upward spikes with each breath)
- If the signal is flat/absent: troubleshoot before proceeding (see below)
Set Edi scale to 20 μV (fixed scale recommended for consistent monitoring)
Step 6 - Set Initial NAVA Level (NAVA Preview)
- While still in the current conventional mode, open Neural Access → NAVA Preview
- Two waveforms are displayed simultaneously:
- Grey curve: estimated pressure based on current Edi × NAVA level
- Yellow curve: actual current airway pressure in the conventional mode
- Adjust the NAVA level until the grey (estimated NAVA) curve approximately matches the yellow (current conventional) curve
- Starting rule: Set the initial NAVA level equal to (or slightly below) the current pressure support level
- e.g. if currently on PSV 12 cmH₂O, start NAVA level around 1.0-1.5 cmH₂O/μV
- Press "Close" to transfer the NAVA level to the NAVA mode window
Optional: Perform an expiratory hold and verify that a positive Edi deflection coincides with a negative airway pressure deflection (confirms neural-pneumatic coupling)
Step 7 - Select NAVA Mode and Set All Parameters
Open "Select Ventilation Mode" → NAVA
Parameters to set:
| Parameter | Default | Range | Guidance |
|---|---|---|---|
| NAVA level (cmH₂O/μV) | 1.0 | 0-30 | Titrate to Edi_peak 5-15 μV |
| PEEP (cmH₂O) | Same as previous mode | 0-50 | Carry over from previous mode |
| FiO₂ (%) | Same as previous mode | 21-100 | Carry over from previous mode |
| Edi Trigger (μV) | 0.5 | 0-2 | Leave at default 0.5 μV |
| Backup PC (cmH₂O above PEEP) | - | - | Set to achieve adequate backup VT |
| Backup RR (breaths/min) | - | - | Set appropriate for patient |
| Apnea time (s) | - | - | Time before backup activates |
| Backup I:E or Ti | - | - | Set appropriate ratio |
All backup settings must be configured before switching to NAVA. The ventilator will not allow NAVA without backup parameters set.
Press "Accept" to begin NAVA ventilation.
Understanding the Key Parameters
Edi Signal Values
| Parameter | Definition | Goal Range | Interpretation |
|---|---|---|---|
| Edi Peak | Peak neural inspiratory effort per breath | 5-15 μV (most centres target 10-15 μV) | Reflects work of breathing |
| Edi Min | Tonic (resting) diaphragm activity between breaths | <3 μV | Represents end-expiratory lung volume (EELV/FRC) |
- Edi_peak <5 μV: Patient over-assisted → decrease NAVA level by 0.1-0.2 cmH₂O/μV
- Edi_peak >20 μV: Patient under-assisted → increase NAVA level by 0.1-0.2 cmH₂O/μV
- Edi_min >5 μV: Lung under-recruited, PEEP too low → increase PEEP by 1 cmH₂O
NAVA Level Titration
The NAVA level is a gain factor, not a pressure ceiling:
- Higher NAVA level → more support per μV → Edi typically falls (negative feedback mechanism)
- Lower NAVA level → less support → Edi rises (patient works harder)
- This self-regulation is a key safety feature of NAVA - the patient's neural drive naturally self-limits over-assistance
Titration increments: 0.1-0.2 cmH₂O/μV at a time
Typical range: 0.5-3.0 cmH₂O/μV (exceptions exist)
Edi Trigger
- Default 0.5 μV
- Must exceed background noise variability (~<0.5 μV baseline noise)
- Too low (<0.5 μV): Over-triggering on noise; auto-triggers; resets apnea timer (patient may appear to be breathing when apnoeic)
- Too high (>1.5-2 μV): Missed triggers; patient effort not detected
Backup Ventilation
- Activates automatically when apnea time elapses without Edi signal
- Switches to Pressure Control at the backup PC level and rate
- Ensures safety if patient becomes apnoeic (CNS depression, oversedation, sleep apnea)
- NIV NAVA: Trigger cannot be manually set - it is automatically set by the ventilator
NAVA vs Conventional Modes
| Feature | PSV / PC | NAVA |
|---|---|---|
| Trigger | Pneumatic (flow/pressure) | Neural (Edi) |
| Cycling off | Flow-based (set %) | Neural (end of Edi deflection) |
| Delivered pressure | Fixed preset | Variable; proportional to Edi |
| Response to increased effort | None (fixed pressure) | More support (proportional) |
| Synchrony | Subject to trigger delays, auto-PEEP | Beat-by-beat neural synchrony |
| Protection from over-assist | None | Self-regulating via neural feedback |
Edi-Guided PEEP Titration
A unique NAVA feature: PEEP can be adjusted using Edi min as feedback.
- Increase PEEP in small steps; assess Edi min after respiratory drive stabilises
- If Edi min falls: PEEP is appropriate (lung recruits, FRC improves)
- If Edi min rises or stays high at low PEEP: lung atelectasis is driving tonic activity; increase PEEP
NIV NAVA (Non-Invasive NAVA)
Available on SERVO-i and SERVO-U with a mask interface:
- Same Edi catheter and principles apply
- Pressure delivered: NAVA level × (Edi_peak − Edi_min) + PEEP + 2 cmH₂O (extra 2 cmH₂O to compensate for mask leak)
- Edi trigger is automatically set in NIV NAVA (not manually adjustable)
- Particularly useful for NIV weaning and acute hypercapnic respiratory failure with intact neural drive
Troubleshooting
Low or No Edi Signal
| Cause | Action |
|---|---|
| Catheter mispositioned | Re-check positioning window; adjust insertion depth |
| Over-sedation | Reduce sedation; assess neurological status |
| Muscle relaxants in effect | Wait for clearance; check TOF monitoring |
| Patient hyperventilated | Check ABG/EtCO₂; CO₂ is the primary respiratory drive stimulus |
| Phrenic nerve injury / neurological disorder | NAVA may not be appropriate in this patient |
| Patient over-assisted | Reduce NAVA level to allow Edi to rise |
Increased Edi Signal (Edi_peak >20 μV)
| Cause | Action |
|---|---|
| NAVA level too low (under-assisted) | Increase NAVA level 0.1-0.2 cmH₂O/μV |
| PEEP too low / atelectasis | Increase PEEP; consider recruitment manoeuvre |
| Airway secretions / obstruction | Suction; physiotherapy |
| Worsening disease | Re-assess; consider switching mode |
| Acidosis / hypercapnia | Check ABG; metabolic acidosis drives neural effort |
Autotriggering (Phantom Breaths)
- Edi trigger set too low → raise to 1.0-1.5 μV
- Distinguish from true respiratory effort
Frequent Switching to NAVA (PS) Backup
- Patient using accessory muscles triggering pneumatic sensor
- PS flow trigger too sensitive → change to pressure trigger or adjust sensitivity
- Set pneumatic trigger at -8 cmH₂O or below to ensure Edi trigger takes precedence
Weaning from NAVA
- Consider weaning when: patient stable, minimal work of breathing, FiO₂ <0.30, PEEP ≤5, Edi peak averaging ~10 μV
- Decrease NAVA level in 0.2-0.3 cmH₂O/μV increments every 2-4 hours
- Observe Edi peak for 15-20 min after each change
- If Edi peak rises significantly: return to previous NAVA level
- Consider extubation when NAVA level ≤0.5 cmH₂O/μV with acceptable Edi peak and VT
- After extubation: keep catheter in place for 2 hours to monitor WOB trend via Edi
Clinical Advantages of NAVA
- Improved patient-ventilator synchrony - eliminates trigger delays, premature cycling, and delayed cycling caused by pneumatic triggers
- Proportional unloading - prevents both over-assistance (causing diaphragm atrophy) and under-assistance (causing fatigue)
- Self-regulation - patient's neural feedback loop naturally prevents runaway pressure delivery
- Real-time WOB monitoring - Edi is a continuous, objective marker of respiratory drive and effort
- Edi-guided PEEP titration - uses physiology (not mechanics alone) to set PEEP
- Applicable across all ages - neonate, paediatric, and adult populations
This is a shared conversation. Sign in to Orris to start your own chat.