
New admission under Dr Ravikumar sir (Emergency ot booked for today) Brundha N 27/F MH01107338 Insurance 512 C/o pain and swelling in her left ankle since 1 day Patient gives a/h/o skid and fall from 2 wheeler on 15/07/2026 at around 9:30 am near Ramaiah degree college following which she sustained injury to her right ankle and started c/o pain sudden in onset,non progressive,associated with swelling around the ankle,aggravated on movements and relieved on immobilisation and taking medications No H/o head injury/LOC/ENT bleed No known comorbs Diagnosis-Right ankle bimalleolar fracture Plan-Right lateral malleolus ORIF + plating and medial malleolus cc screw fixation I’m scrubbing in for this , everything I need to know
Surgical Scrub Guide
Right Ankle Bimalleolar Fracture - ORIF
PATIENT SNAPSHOT
| Injury | Skid and fall from 2-wheeler, 15/07/2026, ~09:30 hrs |
| Diagnosis | Right ankle bimalleolar fracture |
| Plan | Right lateral malleolus ORIF + plating; Medial malleolus CC screw fixation |
| Time from injury | ~30 hours - within acceptable early ORIF window |
| Comorbidities | Nil |
| Anaesthesia | Spinal/GA (discuss with anaesthetist) |
WHY ORIF IS INDICATED
- ~10% nonunion with closed treatment
- 20% have intraarticular injuries to talus/tibia that are missed without surgical exploration
- Randomized prospective long-term studies confirm superior outcomes with ORIF over nonoperative treatment for bimalleolar fractures
TIMING NOTE
DANIS-WEBER CLASSIFICATION (know before you scrub)
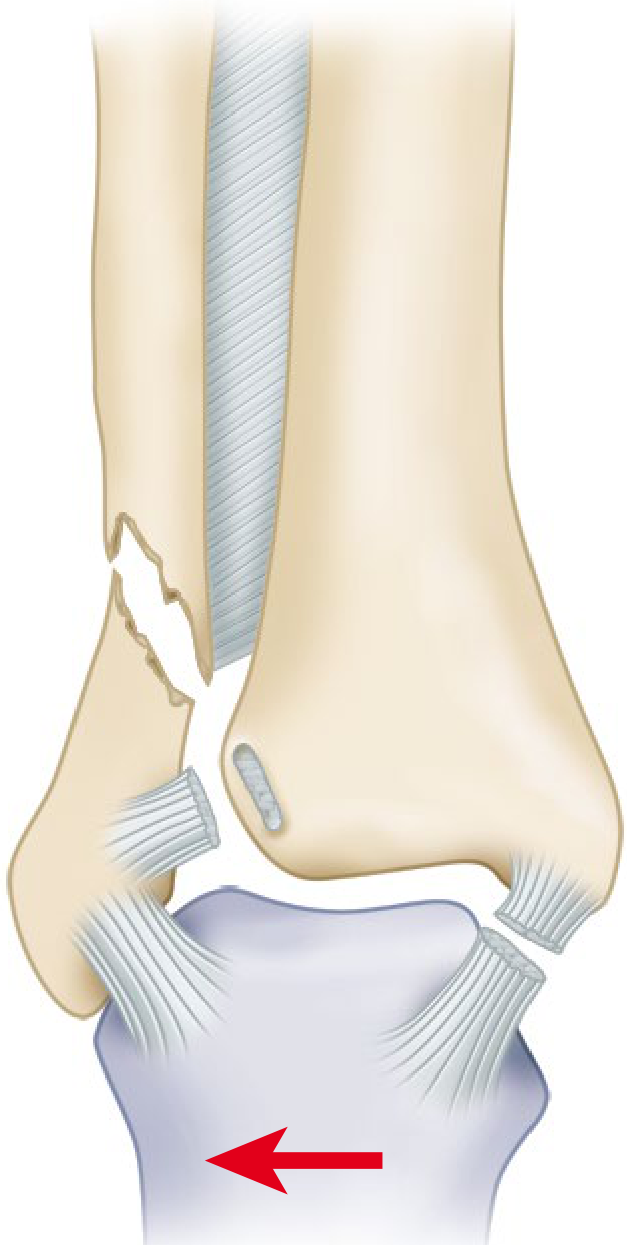
- Type A - fibula fracture at or below the plafond (infrasyndesmotic) - internal rotation + adduction mechanism
- Type B - oblique fibula fracture at level of syndesmosis (transsyndesmotic) - external rotation mechanism - most common, likely what Brundha has
- Type C - fibula fracture above the syndesmosis (suprasyndesmotic) - syndesmosis always disrupted
SETUP & POSITIONING
- Position: Supine, ipsilateral hip bumped to internally rotate the limb OR lateral decubitus depending on surgeon preference
- Tourniquet: Upper thigh pneumatic tourniquet (inflate ~250-300 mmHg or 100 mmHg above systolic)
- C-arm: Standard ankle views - AP, mortise (15-20° internal rotation), lateral
- Limb prep: Knee to toes, free-draped
- Table: Radiolucent
IMPLANTS TO HAVE READY
Lateral Malleolus (Fibula)
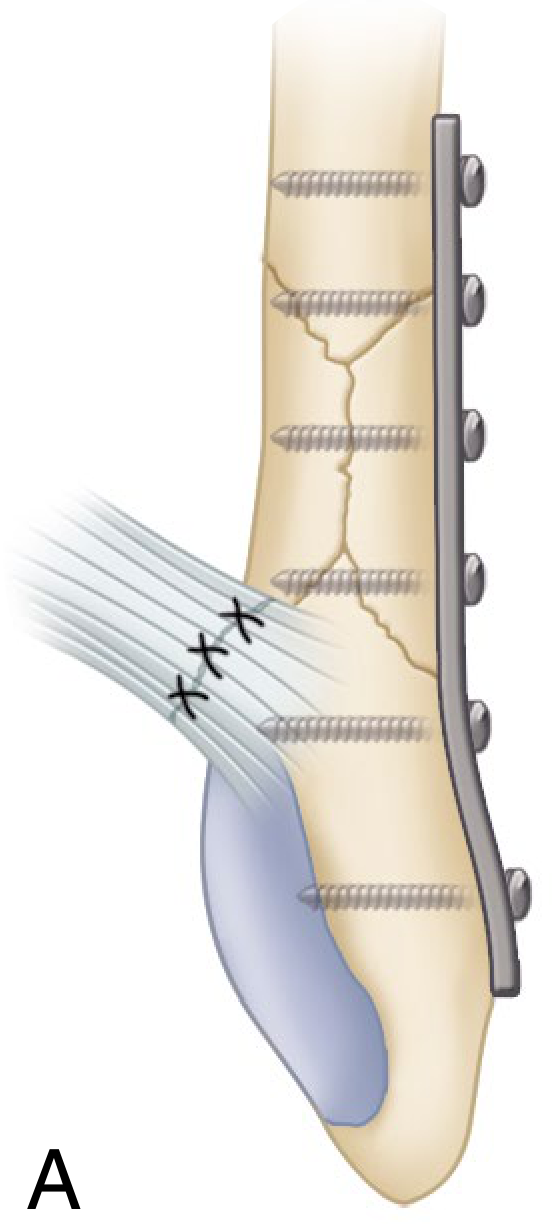
- 1/3 semitubular plate, 3.5 mm (standard lateral plating) - most common construct
- 3.5 mm cortical screws (multiple lengths - have 30 mm to 55 mm range)
- 3.5 mm lag screws (if oblique fracture - interfragmentary compression before plating)
- Optional: Posterior antiglide plate if posterolateral approach chosen
Medial Malleolus (CC Screw)
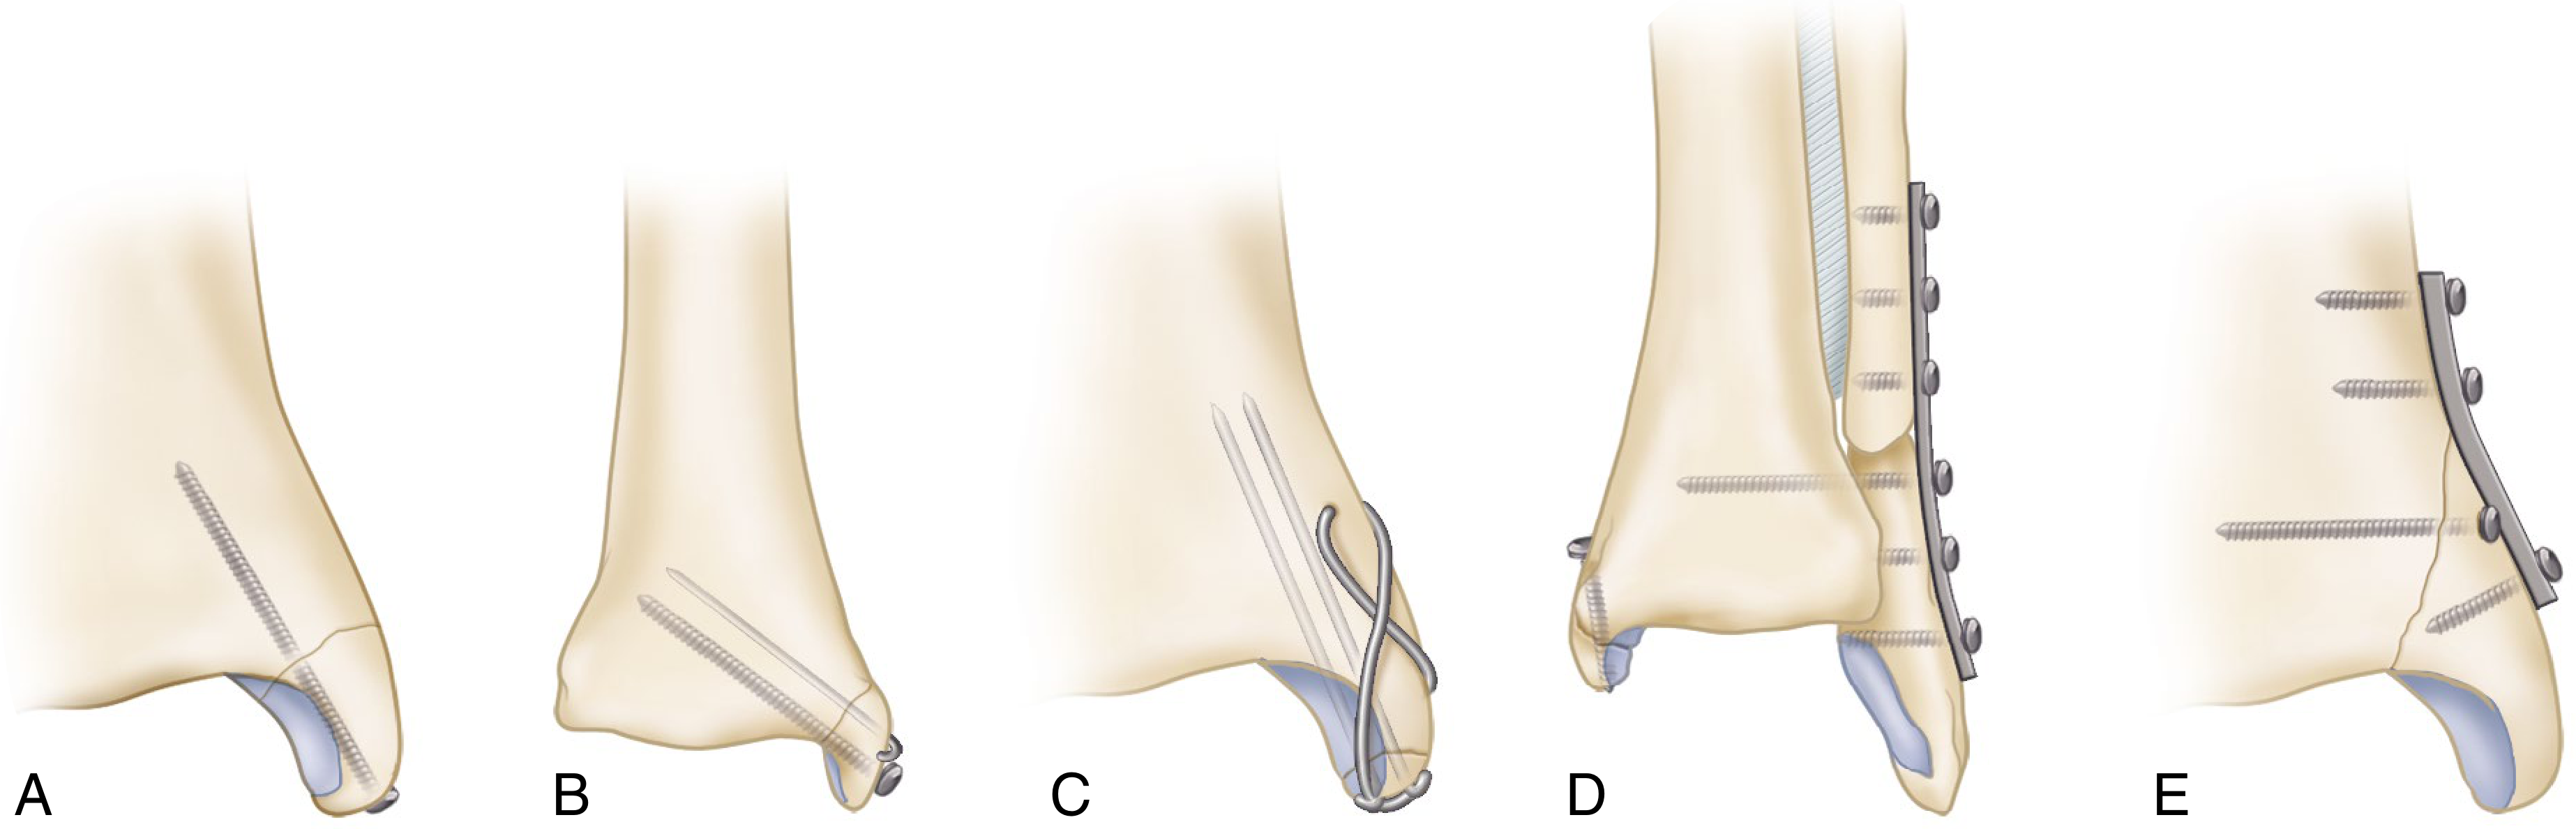
- Two 4.0 mm cannulated cancellous (CC) screws - standard fixation, oriented perpendicular to fracture line
- Guidewires x2 (for CC screws)
- Alternative: 3.5 mm bicortical lag screws or tension band wiring if fragment is small
Syndesmosis (Have Available - assess intraoperatively)
- One or two 3.5 mm or 4.5 mm cortical syndesmotic screws (quadricortical or tricortical)
- Usually placed 2-4 cm above the plafond, through distal plate hole if possible
- Assess with Cotton test + external rotation stress under fluoro after lateral fixation
SURGICAL SEQUENCE (Campbell's Technique 59.1)
Step 1 - Lateral Malleolus First (standard order)
Fix lateral before medial UNLESS the lateral is comminuted, in which case fix medial first to avoid over-reduction of the coronal plane.
-
Incision: Lateral longitudinal incision over distal fibula
- Protect the superficial peroneal nerve - identify and retract
- Alternatively: posterolateral incision for antiglide plating (avoids palpable implant over lateral surface)
- Expose fibula extraperiosteally
-
Fracture reduction:
- Reduce fracture and hold with reduction clamp / K-wires provisionally
- If oblique fracture with good bone stock - place one or two 3.5 mm lag screws anterior to posterior (1 cm apart, at least 1 cm from fracture line) for interfragmentary compression first
-
Plate application:
- Apply 1/3 semitubular plate to lateral surface of fibula
- Proximal screws: bicortical fixation (3.5 mm cortical)
- Distal screws: bicortical where possible
- Confirm length, rotation and alignment on fluoroscopy (AP + mortise + lateral)
-
Intraoperative syndesmosis assessment (Cotton test + external rotation stress):
- Hook the fibula and pull laterally while stabilizing the tibia
- >3-4 mm displacement = syndesmotic fixation needed
- If stable: proceed to medial side
- If unstable: place syndesmotic screw through distal plate hole, 2-4 cm above plafond, parallel to joint (NOT in dorsiflexion)
Step 2 - Medial Malleolus (CC Screw Fixation - Technique 59.2)
-
Incision: Medial longitudinal incision directly over medial malleolus, curving slightly anteriorly
- Protect the saphenous nerve and vein anteriorly
- Identify fracture, clear hematoma and any soft tissue interposition (periosteum can block reduction - clean the fracture site)
-
Reduction:
- Direct reduction with periosteal elevator
- Hold with two K-wires bent to stay out of the way (as per AO technique, Fig 59.6)
-
Guidewire placement (for cannulated screws):
- Drill 3.2 mm guide hole perpendicular to fracture line
- Measure depth
- Two parallel guidewires
-
Screw insertion:
- Insert two 4.0 mm CC screws without tapping
- Screws oriented perpendicular to fracture - lag effect for compression
- Remove K-wires after screws tightened
- If fragment tends to rotate: add a smaller screw or K-wire
-
Confirm on fluoroscopy: Mortise view - assess medial clear space (normal ≤4 mm), tibiotalar congruence, screw position (should not enter joint)
FLUOROSCOPIC CHECKPOINTS
| View | What to check |
|---|---|
| Mortise (15-20° IR) | Medial clear space ≤4 mm; symmetric joint space; talar shift |
| AP | Fibular length restored; distal tip of fibula at level of talar dome |
| Lateral | No anterior talar translation; no posterior malleolus displacement |
NERVES AT RISK - KNOW BEFORE YOU CUT
| Nerve | Location | Risk |
|---|---|---|
| Superficial peroneal nerve | Lateral approach, crosses fibula ~10 cm above tip | Lateral incision - identify and protect |
| Sural nerve | Posterior to lateral malleolus | Posterolateral approach |
| Saphenous nerve + GSV | Anterior to medial malleolus | Medial incision |
| Deep peroneal nerve | Anterior compartment | Minimal risk with standard approach |
SYNDESMOTIC FIXATION - QUICK REFERENCE
- Fibula fracture above the distal tibiofibular joint (Weber C)
- Cotton test positive (>3-4 mm displacement)
- External rotation stress test positive on fluoro after lateral fixation
- Syndesmotic disruption extending >5 cm proximal to plafond
- 1-2 cortical screws (3.5 or 4.5 mm), placed 2-4 cm above plafond
- Through both fibular cortices + 1 or 2 tibial cortices
- Ankle in neutral/slight dorsiflexion during placement (prevents over-compression)
- Reduce syndesmosis with pointed reduction forceps before drilling
- Confirm fibular position in incisura on axial fluoro/CT if uncertain
INSTRUMENTS NEEDED
- Standard trauma set
- Small fragment set (3.5 mm screws, 1/3 tubular plates)
- Cannulated screw set (4.0 mm CC for medial malleolus)
- Large pointed reduction forceps x2
- Bone hook
- K-wires (1.6 mm and 2.0 mm)
- Drill bits: 3.2 mm (for CC guidewire / screw prep), 2.5 mm
- Depth gauge, tap (if non-cannulated)
- C-arm
- Small Hohmann retractors x2
POSTOPERATIVE PLAN (standard)
- Below-knee backslab initially (wait for swelling to settle)
- Non-weight bearing x 6 weeks
- Convert to boot at 6 weeks if union progressing
- Partial WB at 6-8 weeks, full WB at 10-12 weeks
- Physiotherapy for ROM and strengthening
POTENTIAL INTRAOPERATIVE ISSUES
| Situation | What to do |
|---|---|
| Comminuted lateral malleolus | Fix medial malleolus first; use bridge plating / fibula nail for lateral |
| Small medial malleolar fragment | Use K-wire + single screw, or tension band wiring |
| Positive Cotton test after lateral fixation | Add syndesmotic screw before closing |
| Cannot achieve medial clear space | Check for soft tissue interposition (periosteum, deltoid) in fracture gap |
| Fracture blisters / skin compromise noticed on table | Consider staged procedure or wound VAC |
What about trimalleolar fracture , what will happen posteriroly
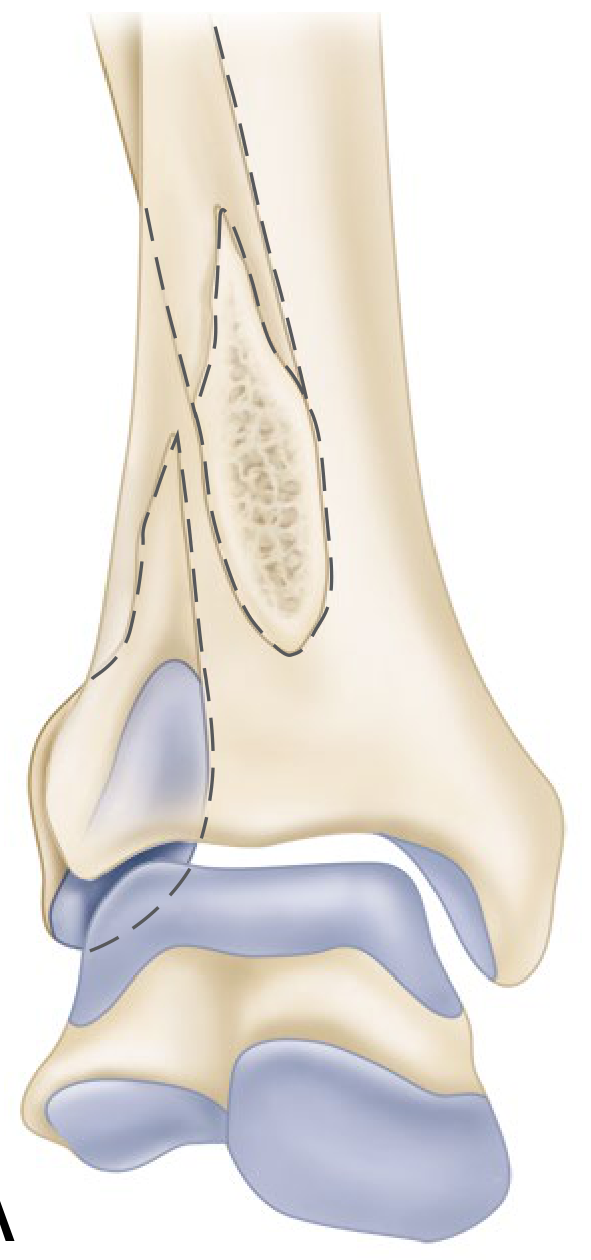
Trimalleolar Fracture - The Posterior Malleolus (Volkmann's Fragment)
WHAT IS IT?
- Posterior displacement of the talus
- Lateral displacement of the talus
- External rotation + supination of the foot
- Loss of tibiotalar contact area = rapid post-traumatic arthritis if left unreduced
DO YOU FIX IT? - THE DECISION
| Situation | Action |
|---|---|
| Fragment <25% AND fibula reduced anatomically | Often reduces spontaneously (PITFL pulls it down with fibula) - check fluoro |
| Fragment <25% AND talus is posteriorly subluxed | Fix it regardless of size |
| Fragment >25% of articular surface | ORIF mandatory |
| Step-off or gap >2-3 mm after fixing fibula | ORIF mandatory |
| Any posterior instability on exam | ORIF mandatory |
Key insight: Fixing the posterior malleolus provides greater syndesmotic stability than a syndesmotic screw - it reconstructs the native PITFL attachment.
THE POSTERIOR MALLEOLUS FRAGMENT
SURGICAL SEQUENCE - CRITICAL POINT
Fix the posterior malleolus FIRST before lateral or medial malleolus (if it requires fixation).
APPROACHES TO THE POSTERIOR MALLEOLUS
Option 1 - Posterolateral Approach (most common, preferred for laterally located fragments)
- Incision: 7.5 cm longitudinal, lateral to the Achilles tendon
- Internervous plane: between peroneal tendons (lateral) and Achilles/FHL (medial)
- Steps:
- Protect the sural nerve
- Retract Achilles tendon medially, peroneal tendons laterally
- Elevate flexor hallucis longus (FHL) off the posterior tibia - FHL is your depth guide to the posterior malleolus
- Expose the posterior tibial surface directly
- Advantage: Can fix posterior malleolus AND lateral malleolus through the same posterolateral window simultaneously
Option 2 - Posteromedial Approach (for medially located fragments)
- Incision: Posteromedial, adjacent to Achilles, posterior to the medial malleolus
- Incise posterior tibial tendon sheath adjacent to posterior border of tibia
- Displace the medial malleolar fragment and dissect subperiosteally to access posterior malleolus
- Limitation: Fixation is limited to screws or minifragment plates (less mechanical advantage)
Option 3 - Indirect reduction from anteromedial + anterior-to-posterior screws
- Used for smaller fragments
- K-wires inserted 1-3 cm above anterior tibial lip, directed anterior to posterior
- Small fragment screws from anterior to posterior
FIXATION TECHNIQUE (Campbell's Technique 59.4)
If approaching posterolaterally (preferred for large fragments):
- Establish normal tibiotalar relationship - anterior traction on foot, adduction and inversion
- Use a joystick to correct the proximal displacement of the posterior lip
- Hold reduction with K-wires
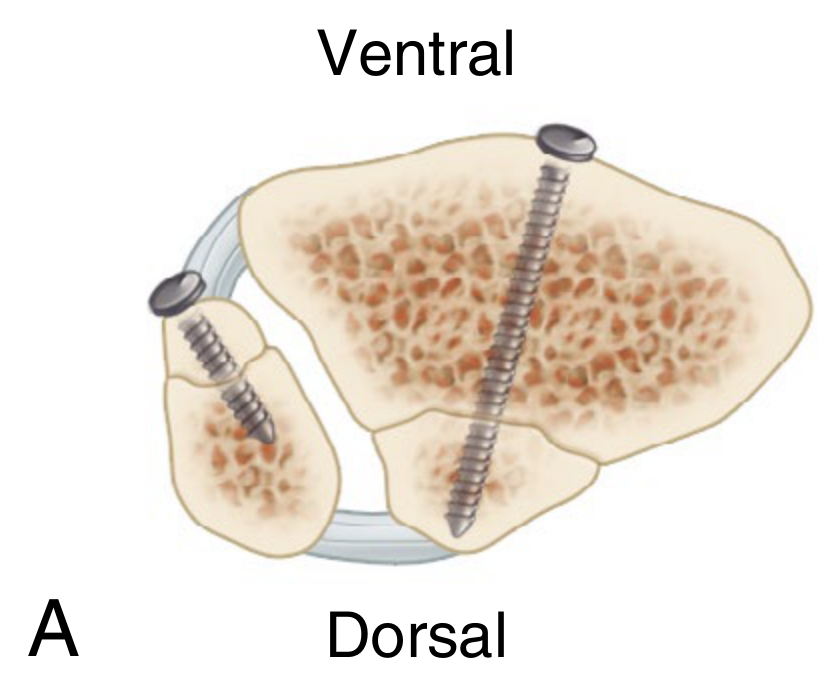
- Fix with one or two lag screws from posterior to anterior into tibial metaphysis
- Posterior antiglide plate - preferred for biomechanical advantage (small buttress/minifragment plate applied to posterior tibial surface)
If approaching anterior to posterior (for small fragments):
- Two K-wires from anterior, 1-3 cm above anterior tibial lip, directed posteriorly to engage fragment
- Drill through both fragments, measure depth, insert small fragment screw with lag technique (over-drill anterior cortex if not using a partially-threaded screw)
- Avoid partially-threaded screw from anterior to posterior - the threads will sit across the fracture and not compress it; use a fully threaded screw in lag technique instead
IMPLANTS TO ADD TO YOUR TRAY (if trimalleolar)
| Implant | Use |
|---|---|
| Minifragment / small fragment screws (2.7 mm or 3.5 mm) | Posterior to anterior lag screws |
| Posterior antiglide plate (small T-plate or 1/3 tubular bent) | Direct posterolateral fixation |
| Steinmann pin + Jacobs chuck/traction bow | Calcaneal traction for distraction |
| Joystick K-wire (2.0 mm) | Fragment manipulation |
STRUCTURES AT RISK - POSTERIOR APPROACHES
| Structure | Posterolateral | Posteromedial |
|---|---|---|
| Sural nerve | At risk - identify and protect | Less risk |
| Peroneal tendons | Retracted laterally | Not in field |
| FHL | Elevated off posterior tibia | Not primary |
| Posterior tibial nerve + vessels | Less risk with care | At risk medially |
| Lesser saphenous vein | Runs with sural nerve | - |
AFTER POSTERIOR FIXATION
- Proceed to lateral malleolus ORIF + plating (same posterolateral wound can handle both)
- Then medial malleolus CC screw fixation via anteromedial incision
- Inspect articular surface through anteromedial incision at the end to confirm anatomic reduction
- Assess syndesmosis - in a trimalleolar fracture, fixing the posterior malleolus may render the syndesmosis stable (because PITFL is now re-tensioned) - still do Cotton test to confirm
QUICK MEMORY AID
TRIMALLEOLAR = Bi + Posterior lip (Volkmann's)
Fragment pulled by PITFL → posterolateral location
Fix >25% articular surface OR any posterior talar subluxation
Sequence: Posterior FIRST → Lateral → Medial
Approach: Posterolateral (lateral to Achilles) - protect sural nerve, retract FHL
Fix: Posterior to anterior lag screws OR posterior antiglide plate