
Tension band principle with diagram
Reading File
The tension band principle converts tensile forces on the convex side of a bone into compressive forces at the fracture site, promoting healing. It is classically applied in patella and olecranon fractures.
Searching sources...
Finding Sources
Searching the Web
tension band wiring principle orthopaedics diagram explanation
Reading File
Loading Image
Loading Image
Now let me get the specific tension band constructs text and a diagram directly from the textbook:
Reading File
Loading Image
Loading Image
Loading Image
Excellent - I now have everything needed for a thorough answer with diagrams. Here is the full explanation:
Tension Band Principle
Core Concept
The tension band principle states that a device placed on the tension (convex) side of an eccentrically loaded bone converts tensile forces into compressive forces at the fracture site. This exploits the fact that compression promotes bone healing, while tension disrupts it.
Understanding Eccentric Loading
When a bone is subjected to bending, the two cortices behave differently:
- Tension side (convex): under tensile (pulling/distracting) stress - this is where fractures tend to gap open
- Compression side (concave): under compressive stress - this tends to remain intact
Diagrams
Diagram 1 - The core principle (tension band on convex side closes the gap; wrong side opens it):
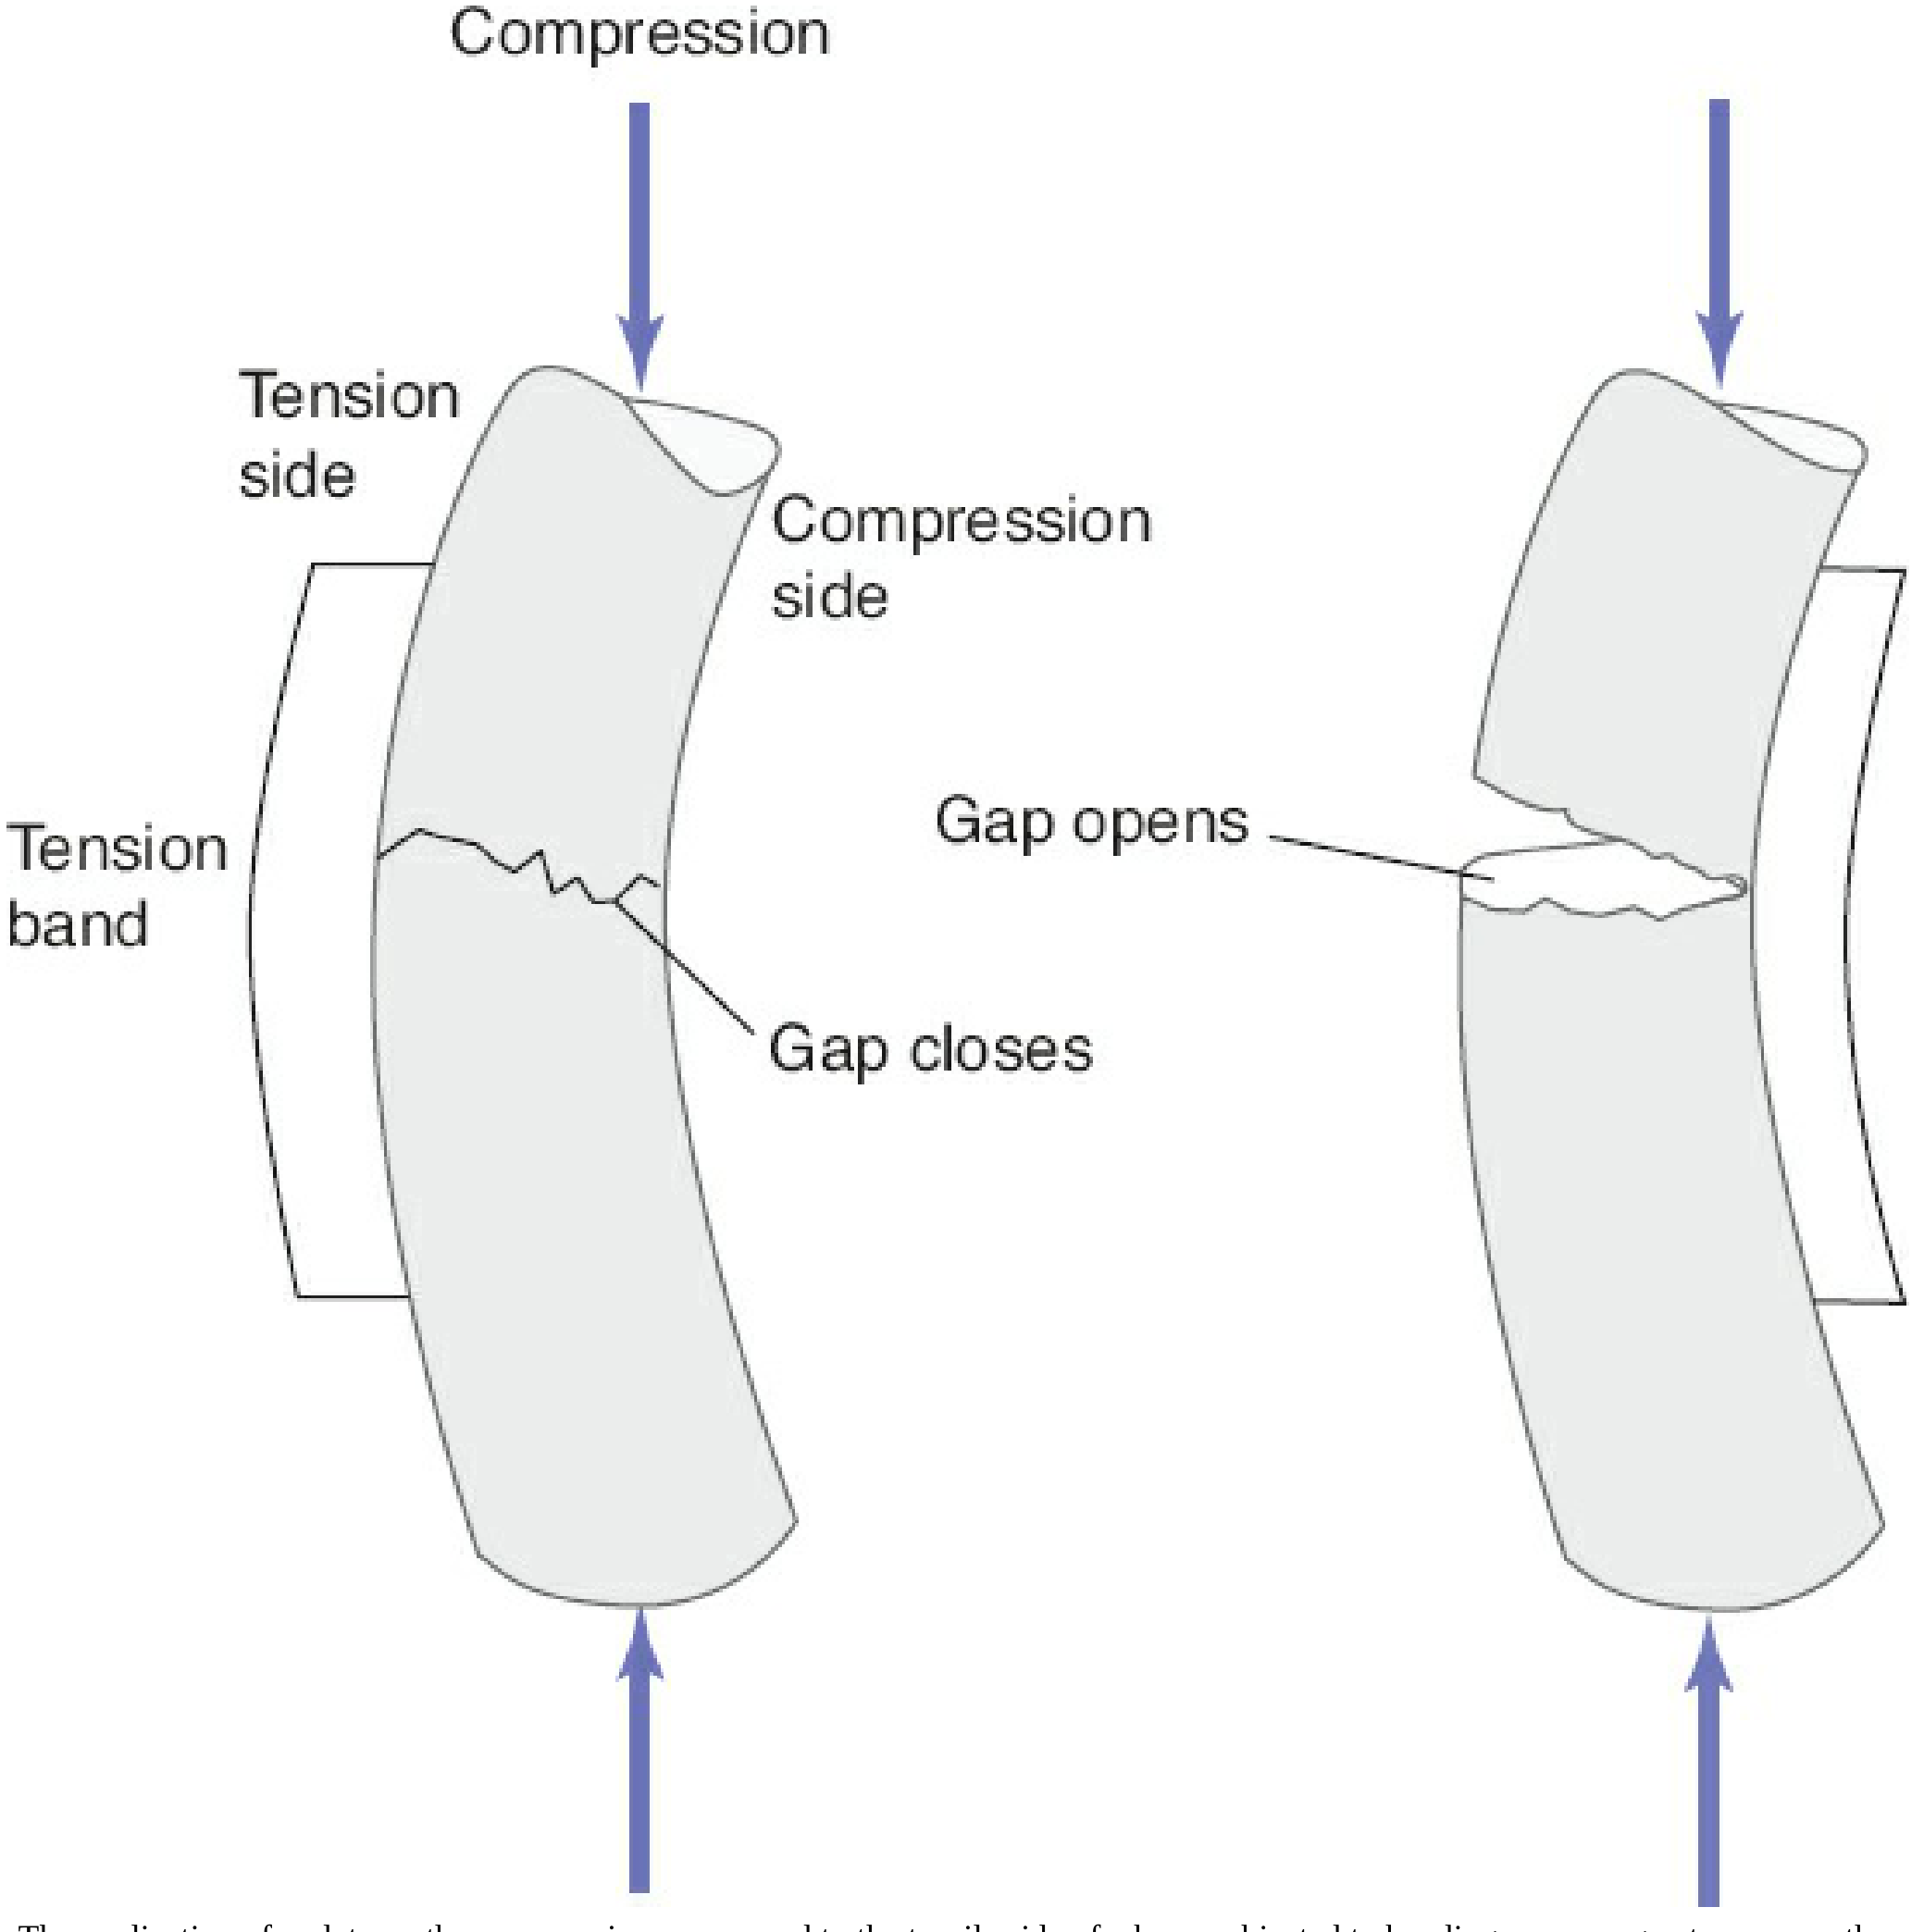
Left: Tension band applied to the tension (convex) side - gap CLOSES, fracture is compressed. Right: Implant placed on compression side - gap OPENS.
Diagram 2 - Tension band plate on lateral femur (varus bending model):
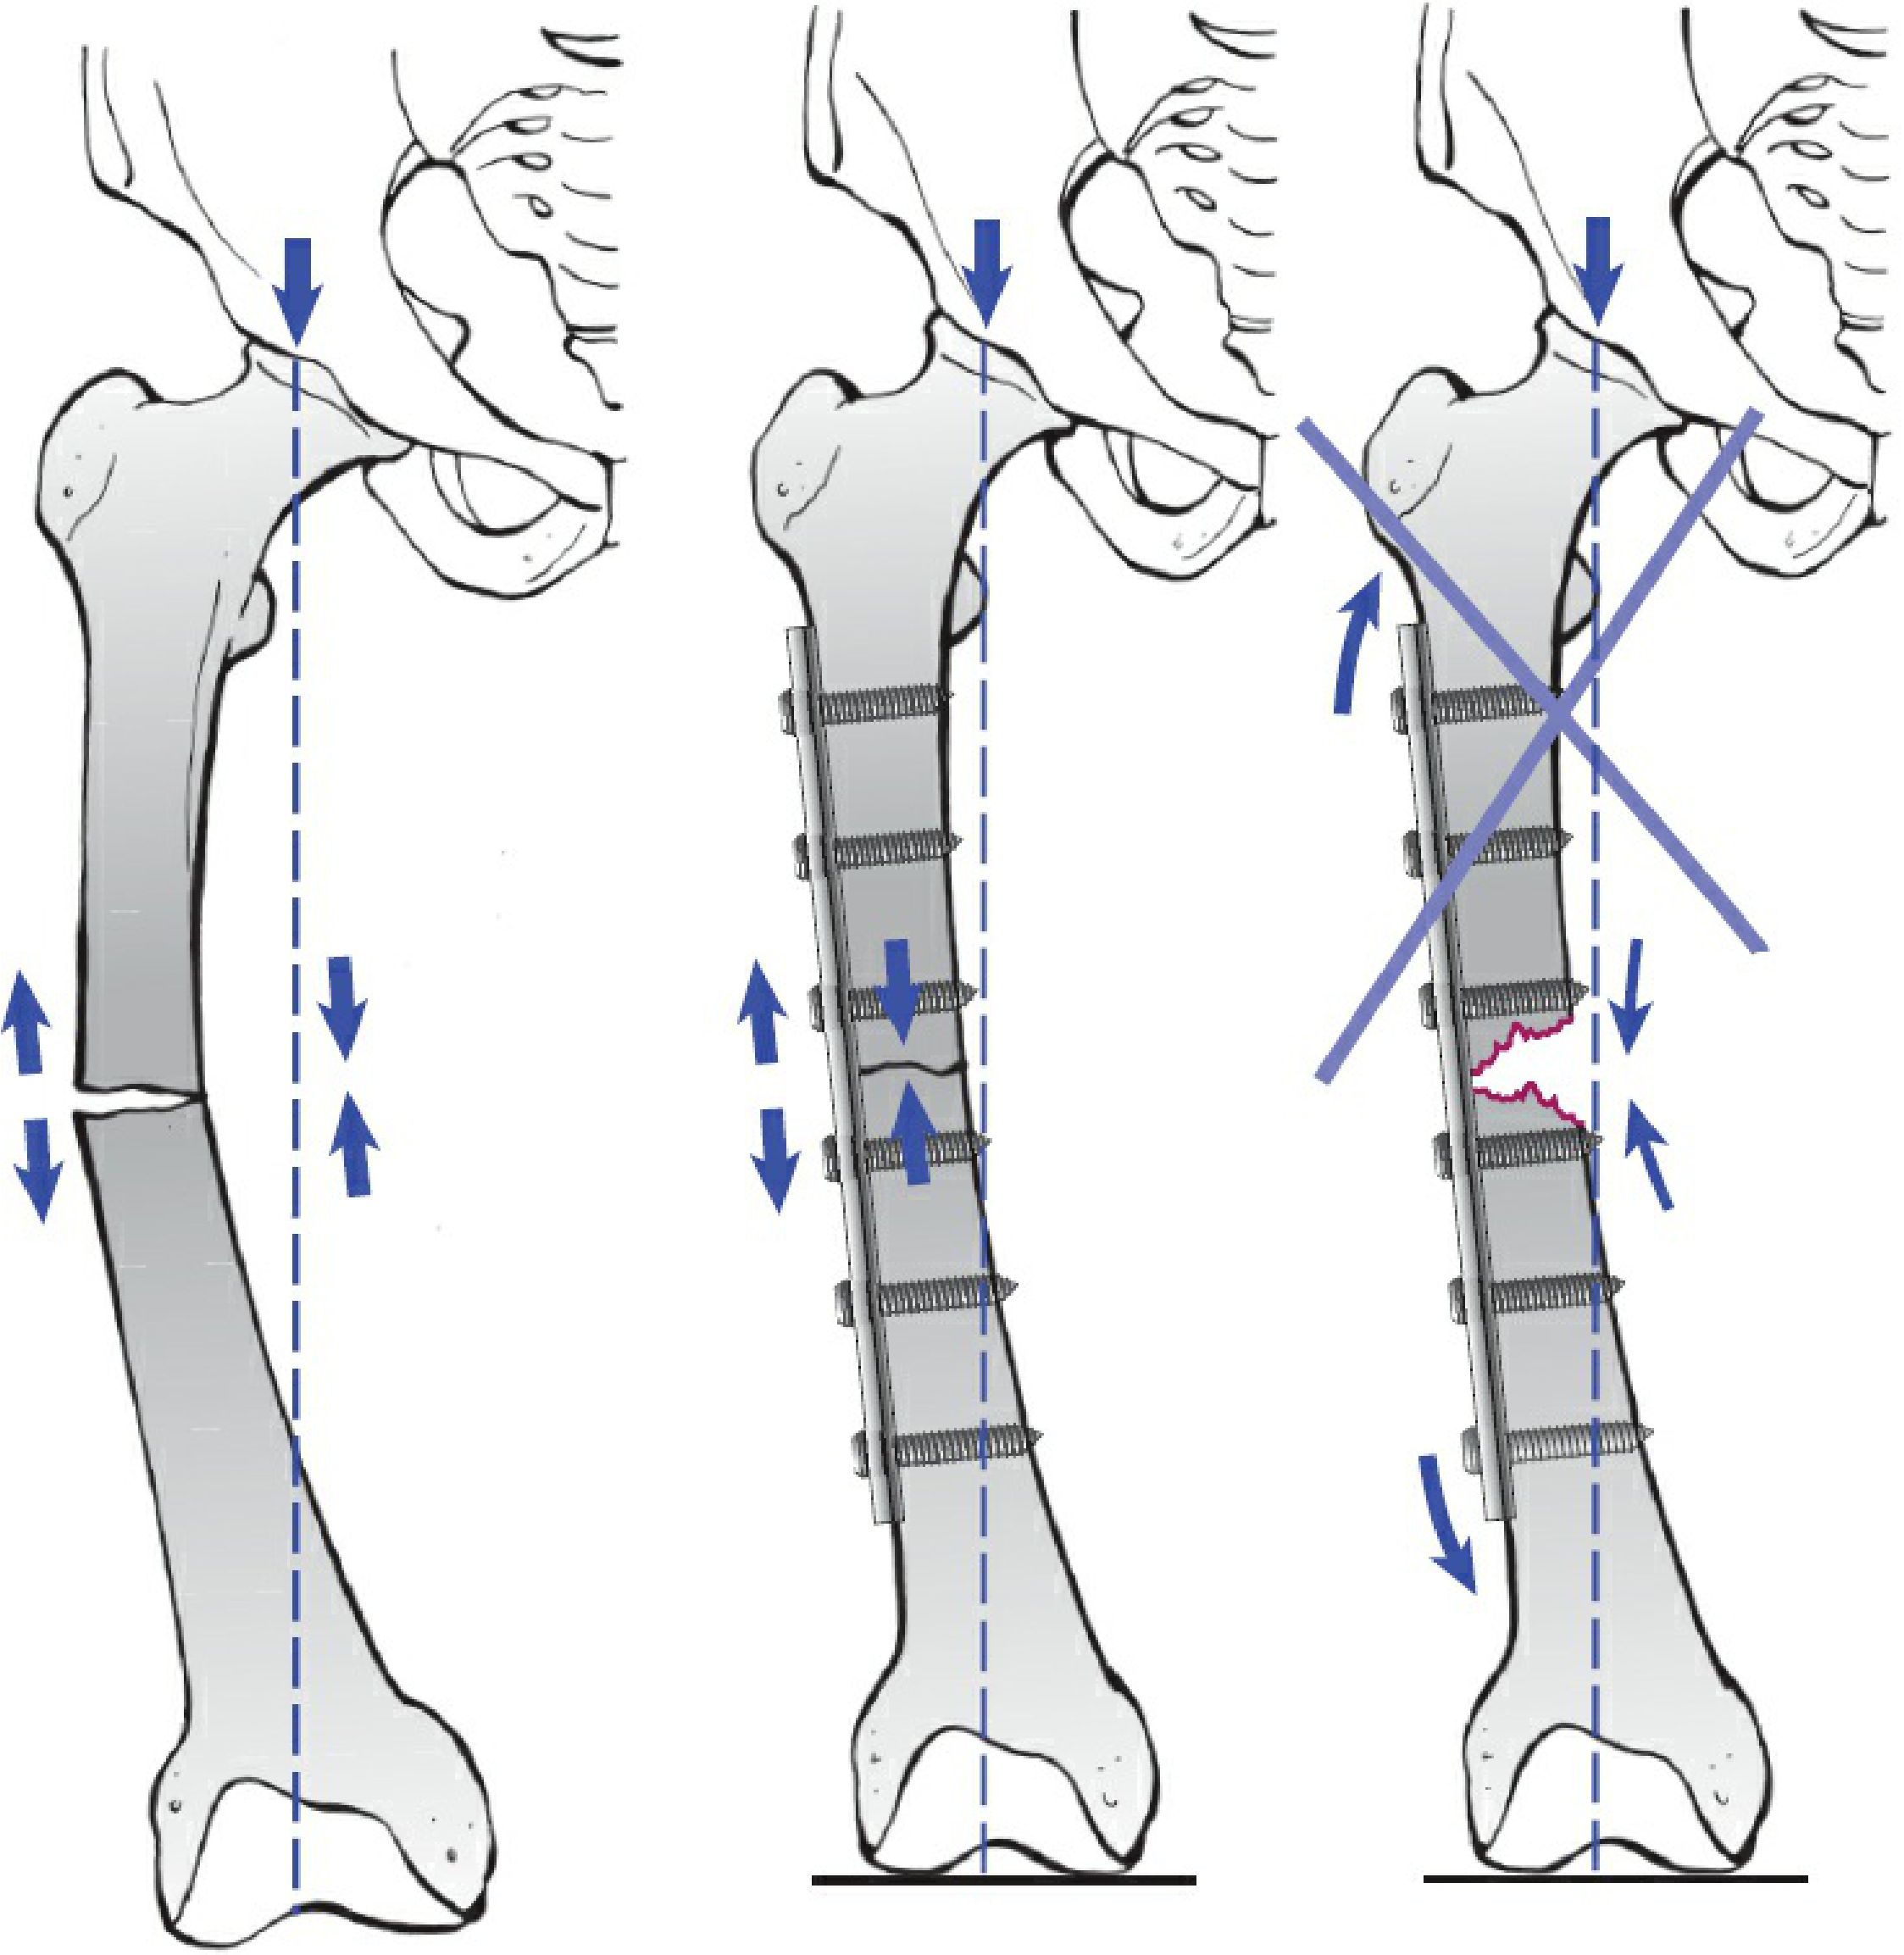
Left: Eccentric bending forces on femur. Middle: Lateral plate as tension band - compresses the fracture. Right: Medial cortex must be intact; if missing, the plate fatigues and fails (red line = plate fracture).
Diagram 3 - Classic AO illustration (olecranon / proximal humerus):

(a) Without a tension band: 100 kg load produces 90 kg/cm² tension and only 10 kg/cm² compression - fracture gaps on the tension side. (b) With a tension band (spring/wire): tensile force is neutralized and converted entirely to compression across the fracture plane.
Diagram 4 - AO plate as tension band on femur:
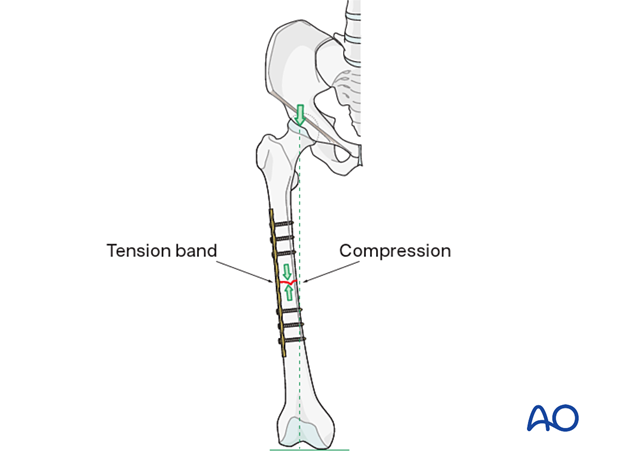
The lateral plate acts as a tension band under varus bending, producing compression at the medial fracture site.
Prerequisites for the Principle to Work
For a tension band construct to function correctly, two conditions must be met:
- Eccentric loading - the fracture must be subjected to bending, not pure axial load
- Intact compression cortex - the concave (compression) side must be intact or reconstructed. If there is comminution or a gap on the compression cortex, there is no fulcrum, and the implant bears all the load - it will eventually fatigue and fail
Practical Applications
| Site | Mechanism | How Tension Band Works |
|---|---|---|
| Patella | Quadriceps pull the proximal fragment (tension side = anterior) | Figure-of-8 wire over K-wires on anterior surface converts quad pull into fracture compression |
| Olecranon | Triceps pull the proximal fragment (tension side = posterior) | Figure-of-8 wire/plate on posterior surface converts triceps pull into elbow compression |
| Femoral shaft | Varus bending during walking (tension side = lateral) | Lateral plate acts as tension band; medial cortex is the compression side |
| Medial malleolus | Deltoid ligament pull (tension side = medial) | Tension band wiring converts ligament pull into compression |
Implants Used as Tension Bands
- Cerclage wire (figure-of-8) wrapped around K-wires - classic for patella and olecranon
- Plates - applied to the tension surface (most versatile)
- Cannulated screws with wire - modified tension band for patella/olecranon
- Suture anchors / non-absorbable sutures - used in osteosuture/tension band fixation in osteoporotic bone
Key Takeaway
A tension band does not rigidly neutralize forces. Instead, it redirects them - every tensile force generated by muscle contraction or loading is redirected as compression across the fracture surface. This means that patient movement and muscle activity actually enhance fracture healing rather than disrupt it - the hallmark of this elegant biomechanical principle.
Sources: Rockwood and Green's Fractures in Adults, 10th ed. 2025, p. 480-482; AO Surgery Reference - Tension Band Principles
Tensio band principle indication , contraindication , complication
Tension band wiring is indicated for eccentrically loaded fractures (patella, olecranon), contraindicated in comminuted fractures, and complications include wire migration, hardware prominence, and loss of fixation.
Searching sources...
Finding Sources
Searching the Web
tension band wiring indications contraindications complications orthopaedics
Reading File
Reading File
Reading File
Finding Sources
Finding Sources
Reading Web Page
https://boneandspine.com/tension-band-wiring
Finding Sources
Finding Sources
I have all the information needed. Here is the complete answer:
Tension Band Wiring - Indications, Contraindications & Complications
INDICATIONS
Fundamental Prerequisite
For TBW to be applicable, all three conditions must be present:
- Eccentrically loaded bone - bending forces present at the fracture site
- Simple (non-comminuted) transverse fracture pattern - fragments must be large enough for wire purchase
- Intact or reconstructable compression cortex - the opposite cortex must act as a fulcrum
Specific Indications
| Site | Muscle/Force | Tension Side | Notes |
|---|---|---|---|
| Patella | Quadriceps / patellar tendon | Anterior surface | Most common TBW application; converts extensor force into articular compression |
| Olecranon | Triceps | Posterior surface | Only for simple fractures proximal to coronoid; fracture must be stable |
| Greater trochanter | Abductors (gluteus medius/minimus) | Lateral surface | Isolated greater trochanter avulsion |
| Medial malleolus | Deltoid ligament pull | Medial surface | Small transverse avulsion fractures |
| Lesser tuberosity of humerus | Subscapularis pull | Anterior | Avulsion fractures |
| Greater tuberosity of humerus | Rotator cuff pull | Superior/posterior | Avulsion fractures |
| Lateral malleolus | Fibular ligament disruption | - | Selected patterns |
| Medial epicondyle | Forearm flexor pull | Medial elbow | Avulsion fractures |
General rule: TBW is suitable for any avulsion-type fracture where a strong muscle or ligament pulls a bony fragment away - the tension band converts that pull into interfragmentary compression.
CONTRAINDICATIONS
Absolute Contraindications
| Contraindication | Reason |
|---|---|
| Comminution at the fracture site | No stable fulcrum - construct is mechanically unstable; implant will fatigue and fail |
| Deficient/absent compression cortex | Tension band requires an intact opposite cortex to produce compression; without it, all load goes through the wire |
| Fractures distal to the coronoid (olecranon) | Elbow becomes unstable; plating is required |
| Osteoporotic bone (relative) | K-wires cut through soft bone; wires pull out rather than provide fixation |
| Open contaminated fractures (relative) | Hardware infection risk is high; external fixation preferred |
| Elbow instability / transolecranon fracture-dislocation | Plating needed to restore stability |
Relative Contraindications
- Very small/thin bone fragments (insufficient bone stock for wire)
- Fractures with associated ligamentous instability of the joint
- Active infection at operative site
- Severe soft tissue damage overlying the hardware site
COMPLICATIONS
Intraoperative
- Malreduction - failure to achieve anatomic articular surface alignment
- Nerve injury (ulnar/median) - if K-wires exit too far on anteromedial ulna during olecranon TBW
- Biceps tuberosity impingement - if wires exit laterally during olecranon fixation, can cause heterotopic ossification and radioulnar synostosis
Early Postoperative
-
Loss of fixation / fixation failure
- Most common in comminuted fractures (where TBW was wrongly applied)
- K-wire backing out
- Wire breakage
-
Wound complications / infection - hardware is subcutaneous with minimal soft tissue cover (especially olecranon/patella)
Late Complications
| Complication | Details |
|---|---|
| Hardware prominence | Most common complication - K-wires and wire knots are subcutaneous and palpable/painful; reported in >50% of olecranon cases |
| Wire migration | K-wires can migrate proximally (olecranon) or distally (patella); can threaten neurovascular structures |
| Hardware removal | Required in >50% of patients due to prominence/migration - the biggest clinical drawback of TBW |
| Nonunion | Secondary to loss of fixation or inadequate fracture compression |
| Malunion | Articular step-off if reduction was inadequate |
| Post-traumatic arthritis | Reported in ~1/3 of olecranon TBW cases at long follow-up, more common with associated elbow instability |
| Bursa formation | Chronic irritation over wire knots/K-wire ends |
| Synostosis (radioulnar) | If K-wires placed too laterally during olecranon fixation |
Pitfalls and Prevention (from Rockwood & Green)
| Pitfall | Prevention |
|---|---|
| Loss of fixation | Anatomic reduction; use only for simple fractures |
| Prominent hardware | Bury K-wire tips under triceps; bury cerclage wire knots |
| Biceps tuberosity impingement / synostosis | Avoid lateral placement of K-wires |
| Ulnar/median nerve injury | Avoid excessive K-wire length through anteromedial cortex |
Key Clinical Points
- Hardware removal rates for olecranon TBW approach 50-70% - some surgeons now prefer plates to avoid this
- A recent prospective RCT comparing plate fixation vs TBW for olecranon fractures found similar clinical outcomes but lower hardware removal rates with plating
- Early active mobilization is not just permitted after TBW - it is essential for the principle to work, as muscle contraction drives compression across the fracture
- In osteoporotic bone, cannulated screws with suture tape (modified tension band) perform better than K-wire + stainless steel wire constructs
Sources: Rockwood and Green's Fractures in Adults, 10th ed. 2025, pp. 1299-1364; Campbell's Operative Orthopaedics, 15th ed. 2026, pp. 1164-1194; AO Surgery Reference - Tension Band
Cubitus valgus deformity - dome cut , milch osteotomy , step cut
Cubitus valgus is typically corrected by lateral closing wedge osteotomy of the distal humerus. The dome, Milch, and step-cut osteotomies are specific configurations used for this correction.
Searching sources...
Finding Sources
Searching the Web
cubitus valgus dome osteotomy milch osteotomy step cut osteotomy distal humerus correction
Reading File
Loading Image
Loading Image
Finding Sources
Loading Image
Loading Image
Finding Sources
Searching the Web
Milch osteotomy cubitus valgus technique diagram distal humerus dome osteotomy elbow
Reading File
Loading Image
Loading Image
Loading Image
Loading Image
Reading Web Page
https://pmc.ncbi.nlm.nih.gov/articles/PMC7513644
I now have excellent diagrams and textbook material. Let me compile the comprehensive answer:
Cubitus Valgus Deformity - Surgical Correction
Background
Cubitus valgus = increased carrying angle of the elbow (normal = 5-15° in males, 10-25° in females). Most common cause is nonunion or growth arrest of lateral humeral condyle fracture in children.
Consequences if untreated:
- Cosmetic deformity
- Tardy ulnar nerve palsy (most feared - develops years later due to chronic stretching of ulnar nerve)
- Reduced elbow ROM
- Elbow instability (in severe cases)
Goal of surgery: Restore normal carrying angle by medializing the distal humeral axis - i.e., varus-producing osteotomy at the distal humerus.
Pre-operative Planning - Calculating the Correction Angle
Using the Carrying Angle Method:
- Measure the preoperative carrying angle on a standing AP radiograph
- Normal carrying angle = ~10-15°
- Correction needed = Preoperative angle - 10° (normal)
From the textbook - Campbell's (Fig. 38.32A):
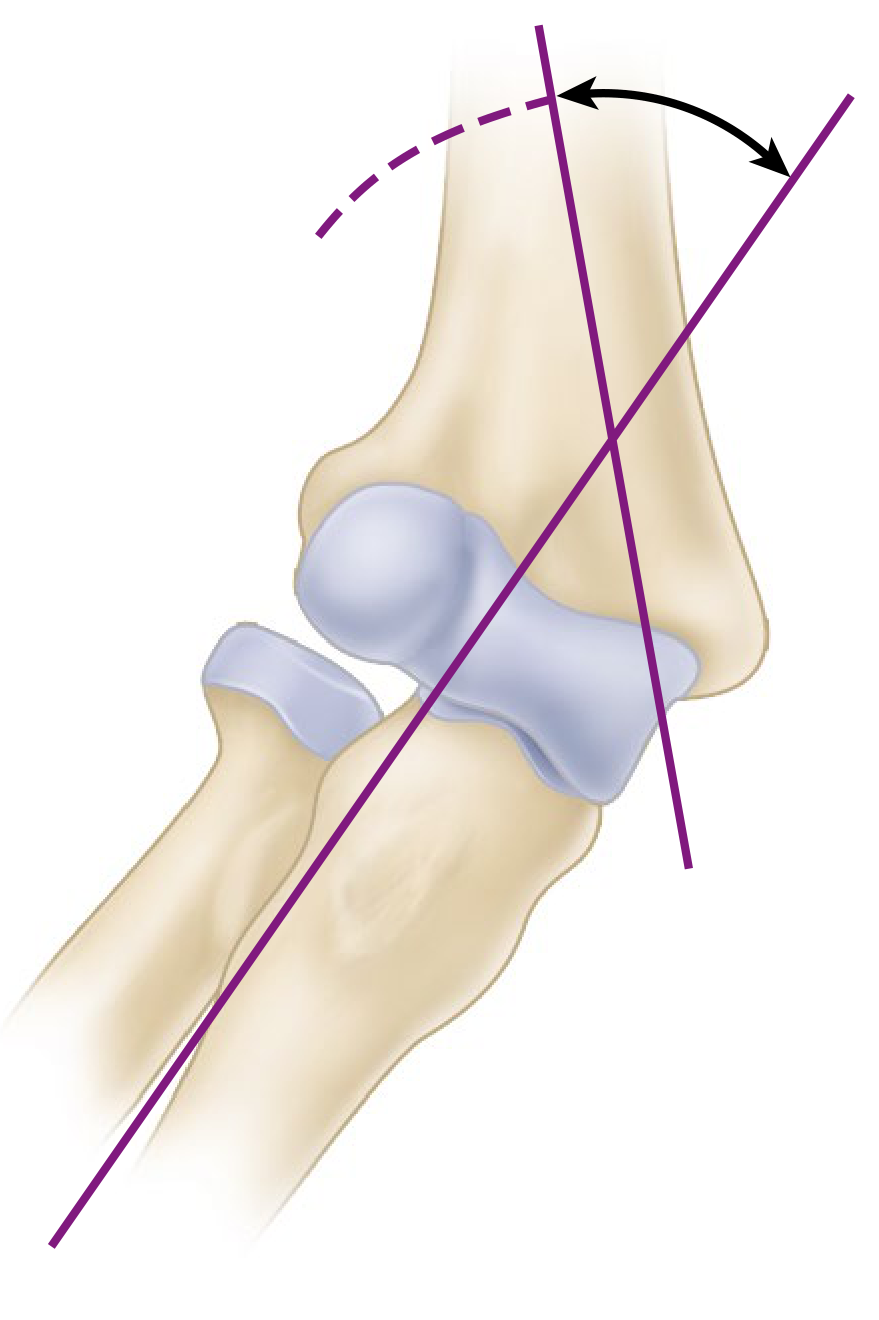
Cubitus valgus secondary to nonunion of lateral humeral condyle. Axes of humerus and forearm drawn showing abnormal carrying angle.
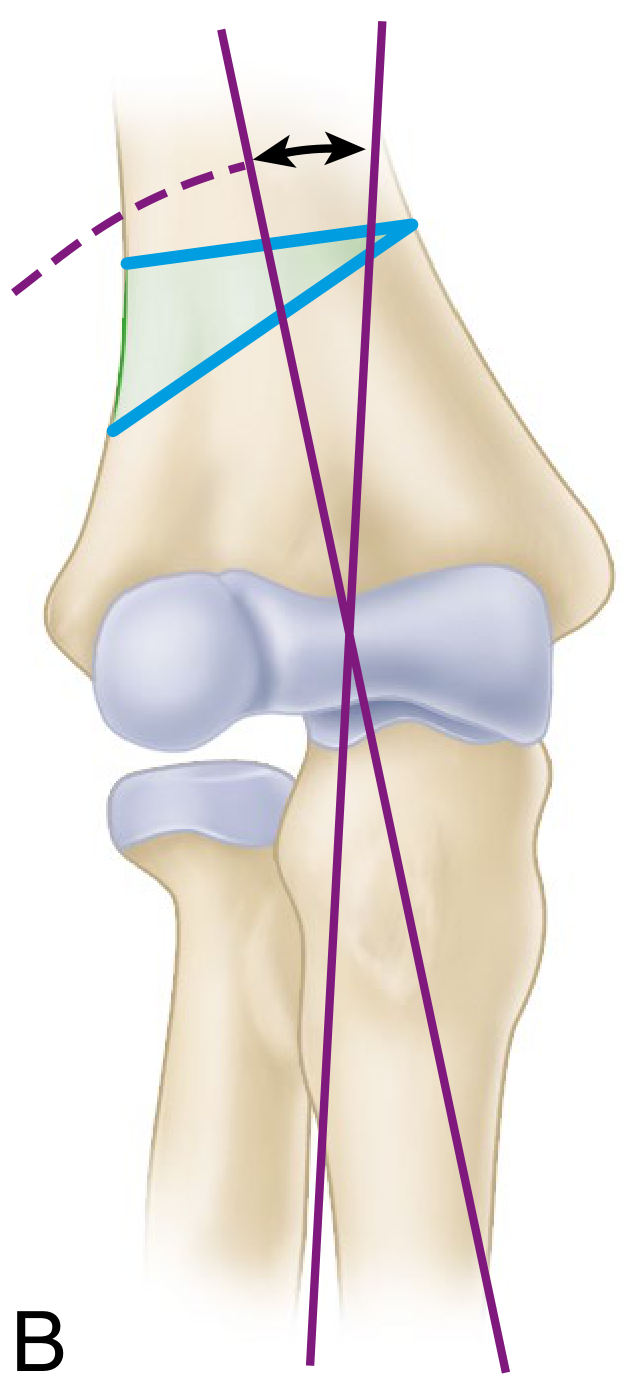
Opening wedge osteotomy laterally (Milch technique) to restore alignment. Blue lines = planned osteotomy cuts; green shading = wedge of bone to be opened.
Types of Osteotomy
1. MILCH OSTEOTOMY (Displacement / Opening Wedge Osteotomy)
Described by: Charles Milch (1936)
Type: Medial displacement / lateral opening wedge osteotomy
Principle:
- A transverse (or slightly oblique) osteotomy is made in the distal humeral metaphysis just proximal to the condyles
- The distal fragment is displaced medially (for cubitus valgus) to restore the normal carrying angle
- The lateral cortex opens like a hinge; the medial cortex shifts to restore alignment
Diagram (from Campbell's - Fig. 38.33):
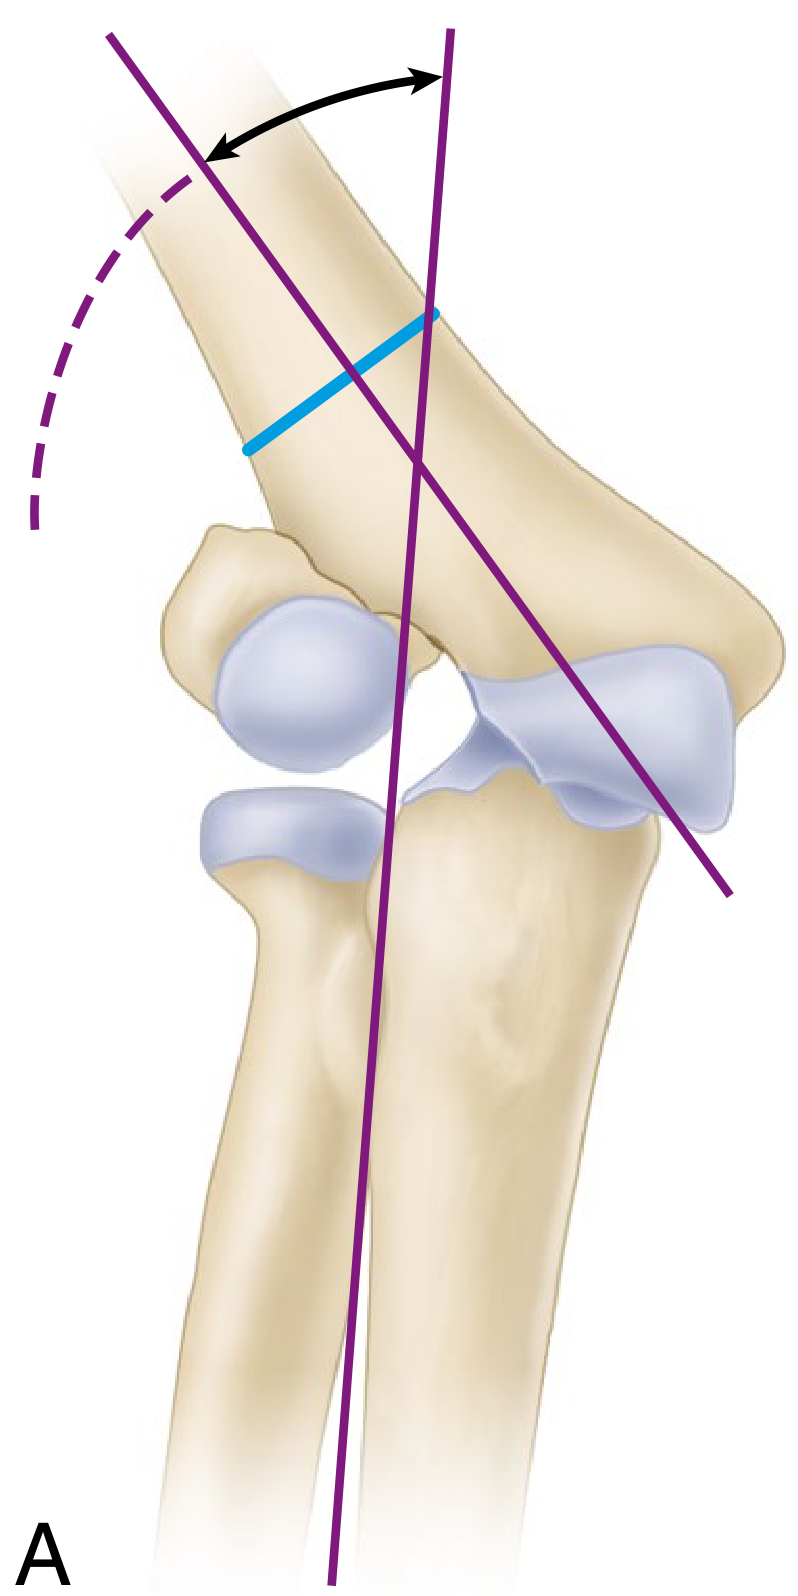
A: Cubitus valgus - axis deviation demonstrated. Blue line = level of transverse osteotomy.
B: Opening wedge laterally - distal fragment displaced medially; correction achieved by closing the angular deformity.
Technique (Campbell's - Technique 38.7):
- Posterior muscle-splitting approach to distal humerus; protect radial nerve proximally
- Split triceps fibers; identify ulnar nerve (transpose anteriorly if tardy ulnar nerve palsy present)
- Transverse osteotomy at the level of intersection of forearm axis with lateral humeral cortex
- Notch the inferior surface of proximal fragment to receive apex of distal fragment
- Move distal fragment medially (for valgus correction) until normal carrying angle is restored
- Confirm correction radiographically with elbow in extension
- Fix with two crossed K-wires or cannulated screws
- Long arm cast for 4-6 weeks
Advantages:
- Technically straightforward
- Preserves bone stock (no bone removed)
- Allows correction of large deformities
Disadvantages:
- Potential lateral gap (requires bone graft in opening wedge variant)
- Risk of lateral cortex fracture
- Some rotational instability
2. DOME OSTEOTOMY (Barrel Vault / French Osteotomy)
Described by: Aron 1961; modified by various authors
Type: Curvilinear (dome-shaped / semicircular) osteotomy
Principle:
- Instead of a flat cut, the osteotomy is made as a curved (dome-shaped) cut centered on the axis of rotation within the distal humeral metaphysis
- The dome shape allows rotation of the distal fragment in any plane without changing the overall bone length
- The cut is made like the arc of a circle; the distal fragment can be rotated under the proximal dome without creating a gap or limb shortening
Diagram:

A: Pre-correction - dome (dashed arc) drawn in distal humeral metaphysis centered on rotation axis. B: After correction - distal fragment rotated under dome, restoring alignment without bone loss.
Technique:
- Posterior approach to distal humerus
- Draw the planned correction angle on the bone using a template
- Make multiple drill holes along the planned dome (arc) at the supracondylar level
- Connect holes with osteotome to create curved cut
- Rotate the distal fragment until deformity is corrected
- Fixation with crossed K-wires or plate
Advantages:
- No limb shortening (bone ends remain congruent after rotation)
- Stable construct - curved surface resists shortening
- Can simultaneously correct angular deformity in multiple planes (valgus + internal rotation)
- Excellent cosmetic result - no lateral condylar prominence
Disadvantages:
- Technically demanding (requires precise arc-cut planning)
- Risk of hinge fracture if curve not executed correctly
- Longer operative time
3. STEP-CUT OSTEOTOMY (DeRosa and Graziano)
Described by: DeRosa and Graziano (1996)
Type: Modified lateral closing wedge with translational step
Principle:
- A combination of a transverse cut and a short longitudinal (step) cut
- The step configuration allows the distal fragment to both angulate (varus correction) and translate medially simultaneously
- The bone surfaces lock together (the "step") providing inherent rotational stability
Diagram:
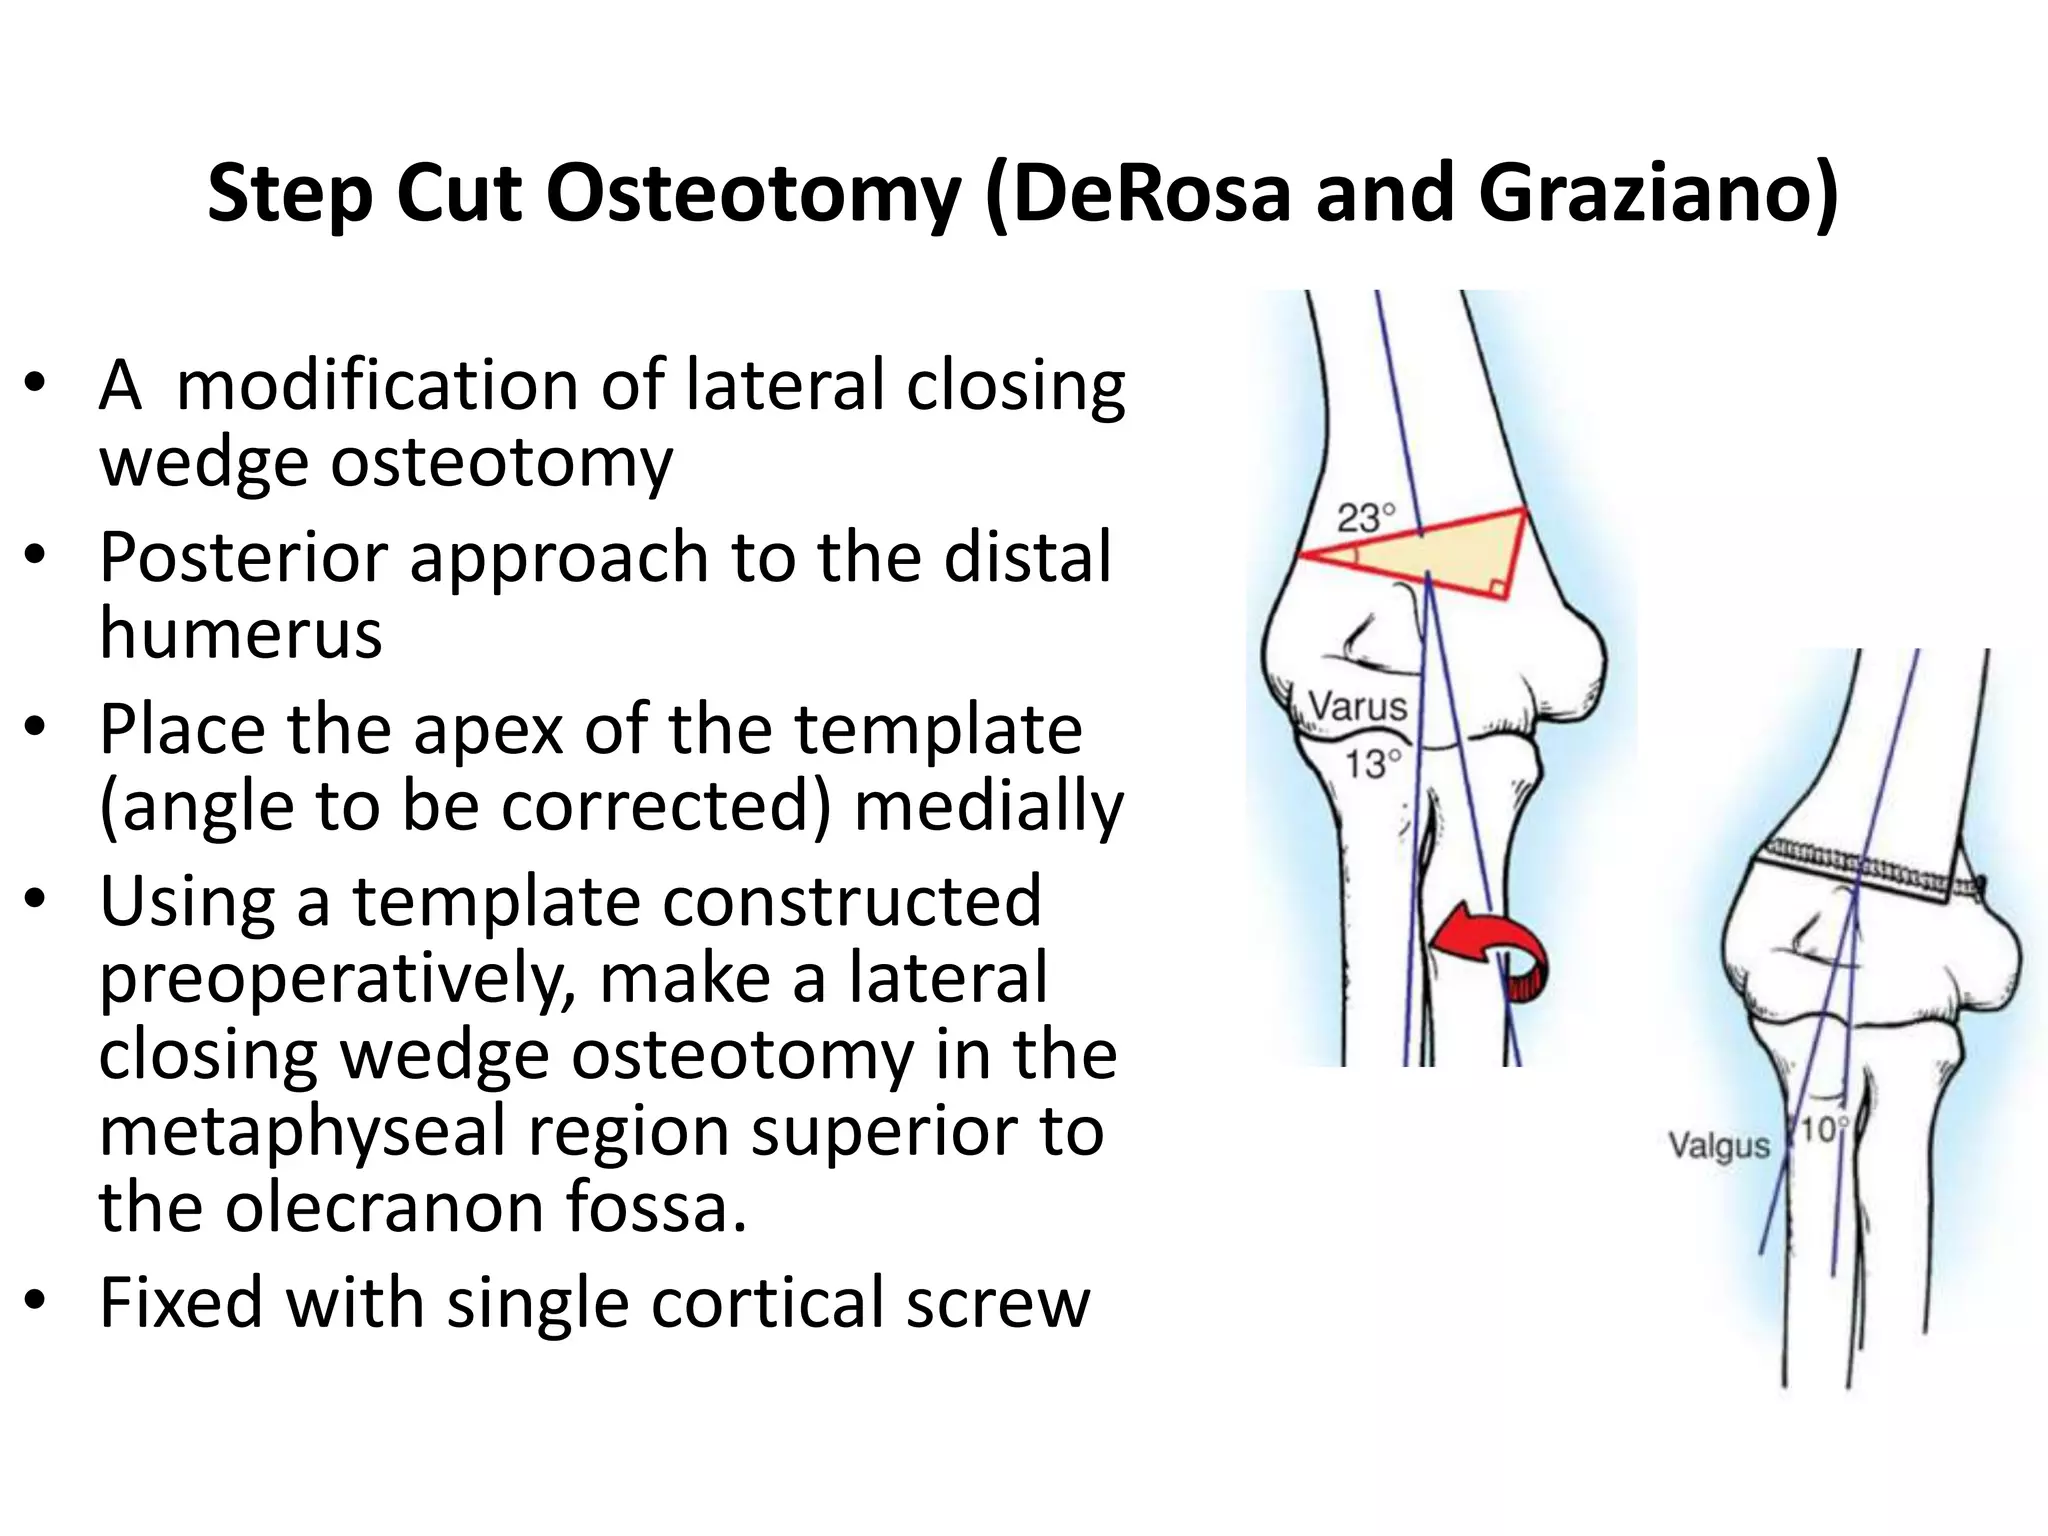
Step-cut osteotomy: lateral closing wedge at metaphyseal region superior to olecranon fossa; apex of correction placed medially; fixed with single cortical screw.
Technique:
- Posterior approach to distal humerus
- Draw the correction wedge preoperatively (apex medially, base laterally)
- Make a transverse cut proximally, then a short longitudinal ("step") cut, then complete the wedge
- Close the wedge laterally - angular correction + medial translation simultaneously
- Fixation with a single cortical screw (or crossed K-wires)
Advantages:
- Inherent rotational stability - the step prevents rotation, so less hardware needed
- No lateral bony prominence
- Avoids shortening through step translation
- Simpler fixation (single screw may suffice)
- Good correction of both angular deformity and internal rotation component
Disadvantages:
- More complex bone cut than simple wedge
- Requires accurate preoperative templating
- Moderate learning curve
Comparison Table
| Feature | Milch Osteotomy | Dome Osteotomy | Step-Cut Osteotomy |
|---|---|---|---|
| Cut shape | Transverse / oblique | Curved/arc | Transverse + longitudinal step |
| Bone removal | None (opening) or wedge (closing) | None | Lateral wedge |
| Limb shortening | Yes (closing wedge) / No (opening) | No | Minimal |
| Lateral prominence | May increase | Corrects | Corrects |
| Rotational stability | Moderate | Good | Excellent (self-locking) |
| 3D correction | No | Yes | Partial |
| Technical difficulty | Low | High | Moderate |
| Fixation needed | K-wires / screws | K-wires / plate | Single screw / K-wires |
| Best for | Simple valgus, large corrections | Valgus + rotational deformity | Valgus + cosmesis |
Tardy Ulnar Nerve Palsy - Management
When cubitus valgus is accompanied by tardy ulnar nerve palsy (TUNP):
- Deformity correction alone (any osteotomy) often relieves ulnar nerve tension
- Anterior transposition of ulnar nerve is not always mandatory if the corrective osteotomy is done well - the nerve becomes lax after deformity correction
- However, anterior transposition should be added if: pre-operative TUNP is severe, nerve subluxation is present, or nerve shows no recovery post-osteotomy
Sources: Campbell's Operative Orthopaedics, 15th ed. 2026, pp. 8469-8491; Rockwood and Green's Fractures in Adults, 10th ed. 2025; AO Surgery Reference - Tension Band Principles; PMC - Milch Osteotomy and TUNP
This is a shared conversation. Sign in to Orris to start your own chat.