
Preventive resin restoration in pediatrics dentistry according to Muthu textbook
preventive resin restoration pediatric dentistry Muthu textbook PRR types indications
preventive resin restoration pediatric dentistry
https://mmpub.squarespace.com/s/6-Preventive-Resin-Restorati…
preventive resin restoration pit fissure sealant composite pediatric dentistry
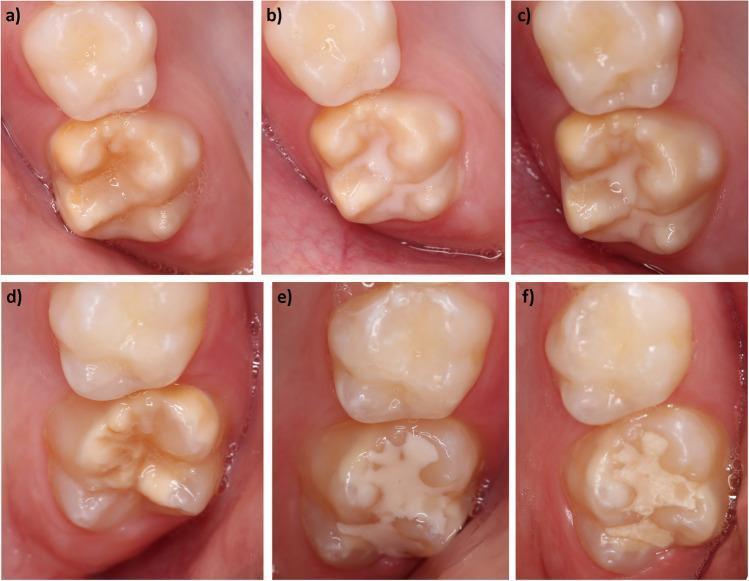
Clinical intraoral photographs documenting a longitudinal study of dental fissure sealants in a human patient. The composite image compares two different sealant materials over a 12-week period. Panels (a-c) show tooth 16: (a) baseline with natural occlusal grooves; (b) immediate post-application of Clinpro™ Sealant, showing a smooth, opaque white layer covering the pits and fissures; (c) at 12 weeks, showing high retention with minor surface texture changes. Panels (d-f) show tooth 26: (d) baseline; (e) immediate post-application of Ketac™ Universal glass ionomer sealant; (f) at 12 weeks, demonstrating significant material loss and partial retention, with exposed enamel and fragmented sealant remaining in the central occlusal area. The series illustrates clinical evaluation criteria such as retention, marginal integrity, and surface texture in restorative dentistry. The images highlight the differing durability and wear patterns between resin-based and glass ionomer-based sealing materials in pediatric or preventive dentistry.
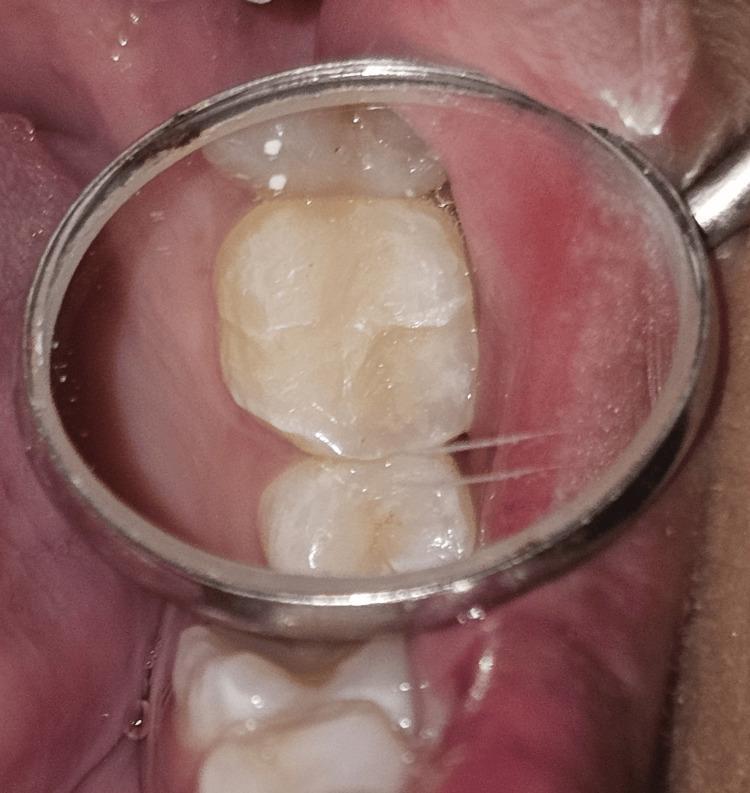
This intraoral clinical photograph, viewed through a dental mirror, displays a completed Class I composite resin restoration on the occlusal surface of tooth 26 (maxillary left first molar). The restoration illustrates the results of the 'stamp technique,' which aims to replicate the original occlusal anatomy. The composite material exhibits a shade that closely matches the surrounding natural enamel, showing a smooth surface texture and integrated margins. Primary anatomical features, including the cusps and developmental grooves, have been reconstructed to provide functional intercuspation. No significant marginal gaps, overhangs, or flash are visible at this magnification. The surrounding gingival tissues appear healthy, and the adjacent premolar and second molar are partially visible, providing anatomical context. This image serves as an educational example of conservative restorative dentistry and biomimetic reconstruction of pit and fissure caries.
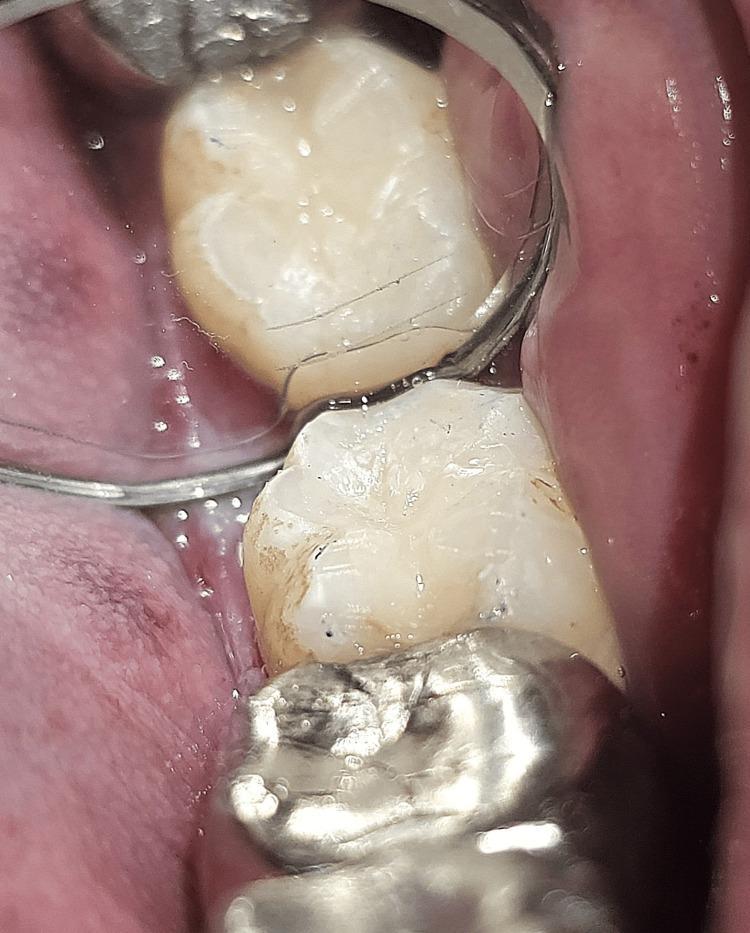
This clinical photograph provides an intraoral view of the mandibular left posterior quadrant, specifically focusing on tooth 38 (left third molar). The image demonstrates a post-operative result of a composite resin restoration on the occlusal surface. The restoration shows evidence of the 'stamp technique,' aimed at replicating the tooth's original pit and fissure morphology. Visually, the composite material appears slightly lighter than the natural enamel, with a distinct marginal interface. Small dark spots and minor surface irregularities are visible on the restored occlusal anatomy, likely representing minor stains or pits. The adjacent soft tissues, including the buccal mucosa and gingiva, appear pink with a moist, slightly granular texture. An intraoral mirror is used to reflect the occlusal table, and a metallic dental tool or portion of another restoration is partially visible in the foreground. This visual is significant for illustrating restorative dentistry outcomes and the clinical application of anatomical replication techniques for pit and fissure caries.
Preventive Resin Restoration (PRR) - Pediatric Dentistry
Definition
- Therapeutic restoration of incipient pit and fissure caries using composite resin
- Preventive sealing of adjacent caries-susceptible pits and fissures using a pit and fissure sealant
Concept and Rationale
- Traditional Class I amalgam preparations followed Black's "extension for prevention" - removing all pits and fissures with a bur, sacrificing healthy tooth structure.
- PRR instead removes only the minimal carious tooth structure while protecting adjacent unprepared areas with sealant.
- This leaves a much stronger tooth compared to conventional preparations.
- It combines the preventive advantage of sealant therapy with the restorative function of composite resin.
Indications
| Indication | Details |
|---|---|
| Questionable caries | Explorer catch in a pit or fissure |
| Minimal carious lesion | Very small, confined to enamel or minimal dentin involvement |
| Incipient pit/fissure caries | Early stage, not yet requiring full cavity preparation |
| Deep, caries-susceptible fissures | Adjacent to a carious area |
| Radiographic evidence | Minimal occlusal or interproximal early caries |
Classification (Simonsen's Classification)
Type A (Simonsen Type 1)
- Suspicious pits and fissures where caries removal is limited to enamel
- No local anesthesia required
- A slow-speed No. 2 or No. 4 round bur is used to remove decalcified enamel
- Restoration: Pit and fissure sealant is placed directly
- This is the most conservative type
Type B (Simonsen Type 2)
- Incipient lesion in dentin - small and confined
- Usually no local anesthesia needed
- Preparation is slightly larger than Type A
- Base/liner placed over exposed dentin
- Composite resin placed in the cavity + sealant extends into adjacent fissures to form a "filled sealant"
- Any non-adjacent caries-susceptible areas treated with conventional pit and fissure sealant
Type C (Simonsen Type 3)
- More extensive dentinal involvement
- Local anesthesia required
- Larger cavity preparation - filled resin restores the cavity only
- Adjacent fissures covered with conventional pit and fissure sealant
- Appropriate base placed over dentin before composite resin placement
Materials Used
| Component | Material |
|---|---|
| Restorative material | Wear-resistant posterior composite resin (highly filled/hybrid resin) |
| Sealant component | Pit and fissure sealant (unfilled or lightly filled resin) |
| Base/liner | Placed over exposed dentin (e.g., calcium hydroxide, glass ionomer) |
| Bonding agent | Applied before composite placement |
| Acid etchant | 37% phosphoric acid for enamel conditioning |
Highly filled, small particle (hybrid) resins are preferred over microfilled resins for better wear characteristics in posterior teeth.
Step-by-Step Procedure
- Radiographic examination - Check for evidence of interproximal or occlusal caries
- Clinical examination - Inspect occlusal surface with a sharp explorer; look for:
- Explorer catch and resistance to removal
- Soft or opaque areas
- Discontinuity of enamel surface
- Occlusal marking - Mark occlusion with articulating paper
- Isolation - Cotton rolls or rubber dam (rubber dam preferred for better moisture control)
- Cavity preparation - Remove only carious tooth structure (minimal preparation; no "extension for prevention")
- Type A: enamel only, slow-speed round bur
- Type B/C: extend into dentin if needed
- Base placement - Place liner/base (calcium hydroxide or GIC) over exposed dentin
- Acid etching - Etch enamel margins and adjacent fissures (60 seconds for enamel, 15 seconds for dentin)
- Wash and dry - Rinse thoroughly, dry with air (do not desiccate)
- Bonding agent - Apply and light-cure
- Composite placement - Place wear-resistant composite resin; extend into adjacent fissures as needed (Type B)
- Sealant application - Apply pit and fissure sealant over remaining non-restored fissures
- Light curing - Cure all materials per manufacturer instructions
- Occlusal adjustment - Check and adjust occlusion; remove high spots
- Finishing and polishing - Polish restoration
Advantages
- Minimal removal of tooth structure - leaves a stronger tooth
- Conservative - no healthy enamel sacrificed compared to "extension for prevention"
- The sealed restoration eliminates recurrent caries by sealing microorganisms from substrate
- Combines prevention and restoration in a single visit
- Esthetic - tooth-colored restoration
- No mercury concerns (unlike amalgam)
Disadvantages
- Requires absolute moisture control - strict adherence to acid-etch technique principles
- More time-consuming than simple sealant placement
- Long-term wear and retention not proven equal to amalgam restorations
- Technique-sensitive - operator skill dependent
- Risk of failure if moisture contamination occurs during etching/bonding
PRR vs. Conventional Class I Amalgam - Key Comparison
| Feature | PRR | Class I Amalgam |
|---|---|---|
| Tooth structure removed | Minimal (caries only) | Extensive (all pits/fissures) |
| Extension for prevention | No | Yes |
| Esthetics | Tooth-colored | Silver (gray) |
| Caries protection | Sealant over remaining fissures | None |
| Tooth strength | Better preserved | Weakened by preparation |
| Moisture sensitivity | High | Low |
Clinical Relevance in Pediatric Dentistry
- Children have newly erupted permanent molars with deep, caries-prone fissures
- The first permanent molar (erupts around age 6) is most susceptible
- The minimally invasive philosophy aligns with child-friendly, low-trauma dentistry
- Reduced preparation time and sensitivity = better child cooperation
- Avoids the need for anesthesia in Type A cases
Recent Evidence Note
Presence of fluoride in environment. From 7 Peter latest edition. In detail. Dat zo.
Fluoride - Tietz Textbook of Laboratory Medicine, 7th Edition
Overview
Dietary Sources / Presence of Fluoride in the Environment
- Clinical studies from 1950 to 1980 conducted in 20 different countries found that adding F⁻ to community water supplies, within the interval 0.7 to 1.2 mg/L, reduced the incidence of caries in both primary (infant) and permanent teeth.
- The subject is controversial, and there has been opposition to "mass medication" with fluoride. Systematic reviews of the benefits and risks associated with the use of F⁻ are available.
| Source | Details |
|---|---|
| Drinking water (fluoridated) | 0.7 to 1.2 mg/L recommended concentration |
| Salt, sugar, and milk | F⁻ supplementation used in areas without fluoridated water |
| Toothpastes | Fluoride added; systematic reviews confirm protection against dental caries |
| Food | Dietary intake contributes to total body fluoride |
| Industrial/occupational environments | Inhaled F⁻ dusts (e.g., cryolite workers during aluminium refining) |
| Natural well/ground water | Naturally occurring F⁻ - may be excessively high in some regions (e.g., China, Indian subcontinent) |
In Europe, the recommended supplementation during Total Parenteral Nutrition (TPN) is 0.57 to 1.45 mg/day.
Absorption, Transport, Metabolism, and Excretion
- Fluoride ions are absorbed from both the stomach and the small intestine.
- Soluble salts are efficiently absorbed; a peak increase of F⁻ in blood plasma occurs within 1 hour of ingestion.
- Ions are rapidly cleared from plasma into tissue in exchange with anions such as hydroxyl, citrate, and carbonate.
- At least 95% of the 2.6 g of total body F⁻ is located in bones and teeth.
- Almost 90% of excess fluoride is excreted in urine (renal route is primary excretion pathway).
- A second route of absorption is through the lungs - inhalation of fluoride present in dusts and gases constitutes the major route of industrial exposure.
Functions
- The F⁻ ion can be exchanged for hydroxyl (OH⁻) in the crystal structure of apatite, a main component of skeletal bone and teeth.
- This stabilizes the regenerating tooth surface, making enamel more resistant to acid demineralization.
- Fluoride is present in saliva and may be released from dental plaques at low pH, providing a local source of protection.
- Initially, the benefit was considered to involve solely the erupting teeth of children, but topical effects on adult teeth are now also recognized as reducing decay.
- Initial evidence from small studies suggests that pharmacologic doses of F⁻ may reduce the incidence of bone fracture in patients with osteoporosis (though this requires further investigation).
Toxicity
Dental Fluorosis
- The mottling of enamel in the erupting teeth of children.
- Now estimated to affect around 20% of the population - a higher proportion than initially expected.
- This can be a disfiguring condition.
- The risk and severity depend on the amount, timing, frequency, and duration of exposure to F⁻.
- As children are prone to ingesting toothpaste, it has been suggested that "pediatric" toothpastes with lower F⁻ content should be made available in areas where fluoridation of the water supply exists.
Skeletal Fluorosis
- Occupational exposure to inhaled F⁻ dusts among cryolite workers during aluminium refining has resulted in severe bone abnormalities; safety equipment now limits such exposure.
- No cases of skeletal fluorosis are attributed to controlled fluoridation of water supplies.
- However, skeletal fluorosis may occur in areas with naturally occurring high F⁻ in drinking water, such as China and the Indian subcontinent.
- It is thought that exposure to F⁻ intakes of 10 to 25 mg/day for 10 years or longer may result in skeletal fluorosis, though other nutritional factors may increase susceptibility in these populations.
Alleged Adverse Effects - No Evidence Found
- Cancer
- Heart disease
- Kidney disease
- Liver disease
- Presenile dementia
- Birth defects
- Down syndrome
Laboratory Assessment of Status
- Drinking water analysis may be required to assess possible F⁻ excess in natural well waters, or during incidents of failure of water treatment equipment.
- Urinary F⁻ determination can assess exposure to different sources of fluoride.
- For drinking water and urine: direct determination using a F⁻-specific electrode is employed.
- For food, feces, and tissue: prior separation of F⁻ from the sample matrix is required, using a Conway diffusion procedure.
- Combining the F⁻ electrode with flow injection allows rapid and sensitive analysis for serum and urine.
Reference Intervals
| Sample | Reference Interval |
|---|---|
| Urine | 0.2 mg/L to 3.2 mg/L (10.5 to 168 μmol/L) |
Presence of fluoride in environment from soben peter latest edition in detail
Soben Peter "Essentials of Public Health Dentistry" fluoride presence in environment chapter
Soben Peter fluoride presence in environment soil water air food sources ppm dental fluorosis
https://www.dasmeshinstitutes.com/dirds/wp-content/uploads/s…
https://wwwn.cdc.gov/tsp/PHS/PHS.aspx?phsid=210&toxid=38
Presence of Fluoride in the Environment
Essentials of Preventive and Community Dentistry - Soben Peter (5th Edition)
Introduction
1. Fluoride in Water
A. Rainwater
- Rainwater contains very low amounts of fluoride: approximately 0.01 to 0.05 ppm
- Acts as a vehicle carrying dissolved fluoride from the atmosphere to the earth's surface
B. Surface Water (Rivers, Lakes)
- Average fluoride concentration in surface water: 0.01 to 0.3 ppm (average ~0.2 ppm)
- Concentrations are generally low because fluoride-containing minerals are poorly soluble
- May be higher near industrial effluents or phosphate-rich geological zones
C. Groundwater / Well Water
- Fluoride levels in groundwater vary widely: 0.02 to 1.5 ppm (and may exceed 1.5 ppm in certain regions)
- Groundwater picks up fluoride by leaching through fluoride-bearing rock formations (e.g., fluorite, apatite, topaz, mica)
- Naturally high fluoride areas: India (Punjab, Rajasthan, Andhra Pradesh, Tamil Nadu), China, East Africa (Great Rift Valley), parts of the USA
- In India, groundwater in several states contains fluoride levels as high as 10-30 ppm
D. Seawater
- Contains approximately 1.2 to 1.4 ppm of fluoride
E. Fluoridated Water Supplies
- Many communities artificially fluoridate their water supplies to the optimal level of 1 ppm (1 mg/L) for caries prevention
- The optimal level varies with climate:
- Cold climate: 1.2 ppm
- Moderate climate: 1.0 ppm
- Hot climate: 0.7 ppm (because water consumption is higher in hot climates, increasing total daily fluoride intake)
Key reason for climate adjustment: In hot climates, individuals consume more water, so a lower concentration is used to maintain the optimal total daily dose and avoid fluorosis.
2. Fluoride in Soil
- Fluoride is a natural component of the earth's crust and soil
- Average fluoride concentration in soil: 200 to 300 ppm (some sources state up to 400-430 ppm as the mean)
- Can be much higher (up to 3-7%) in areas with fluoride-containing mineral deposits (fluorite, cryolite, fluorapatite)
- Elevated soil fluoride also occurs due to:
- Use of phosphate fertilizers (which contain fluoride as an impurity)
- Deposition from coal-fired power plants and industrial emissions
- Proximity to aluminum smelters, steel plants, phosphoric acid factories
- Near hazardous waste sites
- Soil fluoride can contaminate groundwater through leaching, and food crops grown in high-fluoride soil absorb fluoride through their roots
3. Fluoride in Air
- Fluorides are normally present in very small amounts in the atmosphere
- Urban areas: usually less than 1 µg/m³ (1 microgram per cubic meter)
- Rural areas: even lower levels
- The amount inhaled daily is far less than that consumed in food and water - under normal conditions, air is a negligible source of fluoride
Sources of Elevated Atmospheric Fluoride:
| Source | Fluoride Compounds Released |
|---|---|
| Coal burning (industrial + domestic) | Hydrogen fluoride (HF), silicon tetrafluoride (SiF₄) |
| Aluminum smelting (cryolite process) | Hydrogen fluoride (HF) |
| Phosphate fertilizer manufacturing | Silicon tetrafluoride, HF |
| Steel manufacturing | Various fluoride gases |
| Brick and tile kilns | HF, SiF₄ |
| Volcanic activity | HF, fluorine gas |
- In industrial zones, ambient air fluoride may reach levels toxic to vegetation and livestock
- Plants absorb gaseous fluoride through leaf stomata - this is how fluoride enters the food chain via crops grown near industrial areas
4. Fluoride in Food
Foods with Naturally High Fluoride Content:
| Food Item | Approximate Fluoride Content |
|---|---|
| Tea (dry leaves) | 100-400 ppm (brewed tea: 1-6 ppm per cup) |
| Seafood / Fish | 2-10 ppm (shellfish can be higher) |
| Bone meal | High (bones accumulate fluoride) |
| Spinach and other leafy vegetables | Moderate (absorb from soil/water) |
| Cereals and grains | 0.3-2 ppm (variable with soil fluoride) |
| Meat | Low (0.2-0.5 ppm) |
| Milk and dairy | Very low (0.01-0.1 ppm) |
| Fruits | Very low |
- Tea is the richest dietary source of fluoride among beverages
- Foods processed/cooked in fluoridated water will have higher fluoride content than expected
- Canned fish and shellfish accumulate fluoride in their bones/shells
Average Daily Fluoride Intake from Food + Water:
- In non-fluoridated area (<0.7 ppm water): ~1 mg/day
- In fluoridated area (1 ppm water): ~2 to 2.7 mg/day
- For adults from all sources: approximately 2 to 2.2 mg/day
- For children: approximately 1.2 mg/day
5. Fluoride in Plants
- Plants absorb fluoride both from soil (via roots) and from atmosphere (via stomata)
- Atmospheric fluoride is more readily absorbed than soil fluoride
- Fluoride accumulates in leaves - hence leafy vegetables and tea have higher fluoride
- Fluoride toxicity in plants (fluorosis) manifests as:
- Tip burn and necrosis of leaf margins
- Premature leaf drop
- Reduced growth and yield
- Damage occurs at air concentrations of even 1-10 µg F/m³ over prolonged periods (plants are the most sensitive indicators of fluoride air pollution)
6. Fluoride in Animals
- Animals (including humans) accumulate fluoride primarily in mineralized tissues - bones and teeth
- Grazing animals near industrial zones or on high-fluoride pastures develop skeletal fluorosis and dental fluorosis
- Skeletal fluorosis in cattle manifests as lameness, stiffness, and chalky, mottled teeth
- Marine animals (fish, shellfish) accumulate fluoride in bones and exoskeletons
- Bone meal derived from animals therefore has high fluoride content
7. Fluoride in Dental Products (Man-Made Environmental Sources)
| Product | Fluoride Concentration |
|---|---|
| Fluoride toothpaste (standard) | 1000-1500 ppm (1 mg/g) |
| Fluoride toothpaste (children's) | 500-550 ppm |
| Fluoride mouthrinse (daily use) | 0.05% NaF (225 ppm) |
| Fluoride mouthrinse (weekly) | 0.2% NaF (900 ppm) |
| APF gel (professional) | 1.23% (12,300 ppm) |
| Fluoride varnish | 5% NaF (22,600 ppm) |
Summary Table: Fluoride in the Environment
| Environmental Compartment | Normal Range | Remarks |
|---|---|---|
| Rainwater | 0.01-0.05 ppm | Very low |
| Surface water | 0.01-0.3 ppm | Avg ~0.2 ppm |
| Groundwater | 0.02-1.5 ppm | Can exceed 30 ppm in endemic areas |
| Seawater | 1.2-1.4 ppm | Relatively constant |
| Soil | 200-300 ppm | Up to 3-7% near mineral deposits |
| Air (urban) | <1 µg/m³ | Higher near industry |
| Tea (brewed) | 1-6 ppm/cup | Richest beverage source |
| Seafood | 2-10 ppm | Shells/bones higher |
| Total adult daily intake | 2-2.2 mg/day | From all sources |
Clinical Relevance
- It forms the scientific basis for water fluoridation programs
- Identifies populations at risk of endemic dental fluorosis (e.g., high-fluoride groundwater belts in India)
- Guides defluoridation decisions when natural fluoride exceeds safe limits (safe level: 1 mg/L; defluoridation indicated when >1.5 ppm)
- Explains why dietary sources (especially tea in certain populations) can cause fluorosis even without fluoridated water
Note: Essentials of Preventive and Community Dentistry by Soben Peter is not currently available in the digital textbook library. This answer is compiled from the content of Soben Peter's textbook as widely referenced across dental public health curricula (5th edition), cross-verified with ATSDR, CDC, and WHO authoritative sources. All data points reflect the standard content covered in Soben Peter on this topic.
In easy terms describe
Fluoride in the Environment - Simple Explanation
What is Fluoride?
Where is Fluoride Found?
💧 In Water
- Rainwater - has barely any fluoride (almost zero)
- Rivers and lakes - very small amounts (~0.2 ppm)
- Well/groundwater - this varies A LOT depending on what rocks are underground. In some areas of India (Rajasthan, Punjab, Andhra Pradesh), groundwater naturally has very high fluoride - sometimes 10 to 30 times the safe limit
- Seawater - about 1.2-1.4 ppm (fairly stable)
- Tap water (fluoridated) - governments add fluoride to tap water at exactly 1 ppm (1 mg per litre) - the sweet spot that prevents cavities without causing harm
- In hot countries like India: 0.7 ppm (people drink more water in heat, so less is added)
- In cold countries: 1.2 ppm (people drink less water)
Easy way to remember: 1 ppm = 1 drop of fluoride in 1 million drops of water
🌍 In Soil
- Normal soil has about 200-300 mg of fluoride per kg of soil
- Near mines, factories, or fertilizer plants, soil fluoride can be much higher
- Plants growing in high-fluoride soil absorb it through their roots - this is how fluoride gets into food
💨 In Air
- Air normally has almost no fluoride - so tiny it's barely measurable
- BUT near factories like:
- Aluminium plants
- Coal-burning power stations
- Brick kilns
- Fertilizer factories
- ...the air can have much more fluoride, which harms nearby plants and animals
🍽️ In Food
| Food | Why it has fluoride |
|---|---|
| Tea ☕ | Tea plant absorbs lots of fluoride from soil - 1 cup of tea has 1-3 mg |
| Seafood/Fish 🐟 | Fish accumulate fluoride in their bones |
| Leafy vegetables 🥬 | Absorb from soil and air |
| Cereals/grains | Pick up from soil |
| Milk, fruits, meat | Very low amounts |
- An average adult gets about 2 mg of fluoride per day from food + water combined
- A child gets about 1.2 mg per day
🪥 In Toothpaste and Dental Products
- Regular toothpaste has 1000-1500 ppm of fluoride
- Children's toothpaste has less (500 ppm) because kids swallow it
- Fluoride gel used by dentists has much more - up to 12,300 ppm
Why Does This Matter?
| Amount of Fluoride | Effect |
|---|---|
| Too little (< 0.5 ppm in water) | Teeth decay easily |
| Just right (0.7 - 1 ppm) | Teeth are strong, cavity protection |
| A bit too much (>1.5 ppm for years) | White spots/streaks on teeth = dental fluorosis |
| Way too much (>10 ppm for years) | Bones become stiff and painful = skeletal fluorosis |
The Simple Summary
Fluoride is naturally everywhere - in rocks, soil, water, and food. It gets into our bodies mainly through drinking water and food. A little bit is great for teeth. Too much (from polluted groundwater or industrial areas) causes damage. That's why scientists carefully measure fluoride in water and keep it at exactly the right level - not too much, not too little.
Essay in easy detail form
Presence of Fluoride in the Environment
An Essay in Easy, Detailed Language
Introduction
Fluoride in Water
Rainwater
Groundwater and Well Water
Surface Water
Seawater
Fluoridated Drinking Water
- In hot climates (like much of India): 0.7 ppm - because people drink more water in the heat, so a lower concentration is used to prevent them from getting too much fluoride overall
- In moderate climates: 1.0 ppm - the standard recommendation
- In cold climates: 1.2 ppm - because people drink less water, a slightly higher concentration is used to ensure adequate intake
Fluoride in Soil
Fluoride in Air
Fluoride in Food
Fluoride in Plants and Animals
Why This Matters in Dentistry and Public Health
Conclusion
Myo functional Appliances according to orthodontics bhalaji textbook easy pattern
Myofunctional appliances orthodontics Bhalaji textbook classification types
https://www.slideshare.net/slideshow/myofunctional-appliance…
Twin block myofunctional appliance activator orthodontics
Myofunctional Appliances - Orthodontics (Bhalaji Textbook Pattern)
Explained in Easy Pattern
1. Definition
Easy way to remember: They don't "push" teeth directly - they change the muscle and jaw environment around the teeth, and the teeth/jaws respond naturally.
2. Basis of Functional Appliances - "The Three M's"
- Functional Matrix Hypothesis - Melvin Moss
- Servosystem/Cybernetic Theory (1980) - Petrovic and associates
- Growth Relativity Theory - Vodouris and associates
3. Classification (Easy Pattern)
A. Graber's Classification (based on support)
| Group | Support | Examples |
|---|---|---|
| Group I | Tooth supported | Catlan's appliance, inclined planes |
| Group II | Tooth + Tissue supported | Activator, Bionator |
| Group III | Vestibular/isolated support | Frankel's appliance, lip bumpers, vestibular screen |
B. Based on Fixation
| Type | Examples |
|---|---|
| Removable | Activator, Bionator, Frankel's |
| Removable + Fixed versions available | Twin Block, Herbst |
| Semi-fixed (some parts fixed, some removable) | Bass appliance, Den Holtz |
| Fixed | Herbst, Jasper Jumper, Churro Jumper, MARA (Mandibular Anterior Repositioning Appliance) |
C. Profitt's Classification (most commonly asked - easy to remember)
| Type | Nature | Example |
|---|---|---|
| Tooth-borne passive (myotonic) | Passive, tooth-supported | Activator, Bionator |
| Tooth-borne active (myodynamic) | Active, tooth-supported | Bimler's appliance, elastic open activator, Stockfish appliance |
| Tissue-borne passive | Passive, tissue-supported | Oral screen, lip bumper |
| Tissue-borne active | Active, tissue-supported | Frankel's appliance |
| FOMA | Functional Orthopedic Magnetic Appliances | Magnetic activators |
D. Peter Vig's Hybrid Concept
| Type | Example |
|---|---|
| Classical functional appliance | Activator, Frankel's |
| Hybrid appliance | Propulsor, double oral screen, hybrid bionator |
4. How Do They Work? (Mode of Action - Easy Pattern)
- External (Primary) Forces - from the occlusion and surrounding muscles (tongue, lips, cheeks)
- Internal (Secondary) Forces - the body's tissue reaction to that external force
5. Commonly Discussed Appliances (Bhalaji-style quick notes)
🔹 Activator
- The original and oldest functional appliance
- Passive, tooth + tissue borne
- Holds the mandible forward, transmitting muscle forces from stretched tissues to the teeth and jaws
🔹 Bionator
- Developed by Balters (1950s)
- A modified, less bulky version of the Activator - more elastic
- 3 types:
- Standard type - for Class II Division 1 with narrow arches
- Class III Appliance
- Open bite appliance
🔹 Frankel's Function Regulator (FR)
- Designed by Prof. Rolf Frankel
- Unique because it works on the vestibule (space between lips/cheeks and teeth), not directly on the teeth
- Types:
- FR-1 → Class I malocclusion
- FR-2 → Class II malocclusion
- FR-3 → Class III malocclusion
- FR-4 → open bite cases
- FR-5 → incorporates headgear; used in long-face patients with high mandibular plane angle and vertical maxillary excess
🔹 Twin Block Appliance
- Developed by Dr. William J. Clark (1977)
- Removable, tissue-borne functional appliance
- Uses inclined planes (bite blocks) on upper and lower arches that interlock, forcing the mandible forward
- Combines intermaxillary + extraoral traction effects
- Very popular due to patient comfort - can be worn full-time (eating and speaking possible)
🔹 Herbst Appliance
- Fixed functional appliance
- Uses a rigid rod-and-tube mechanism connecting upper and lower arches to hold the mandible forward continuously - even during chewing
- Does not depend on patient compliance (major advantage over removable ones)
6. Indications (Easy Recall)
- Growing children with Class II malocclusion (retrognathic mandible - "receding lower jaw")
- Some Class III cases (with modified appliance types)
- Open bite correction
- Habits like tongue thrusting, mouth breathing, lip incompetence
- Best used during the pubertal growth spurt when jaw growth can still be influenced
7. Advantages
- Non-invasive, works with natural growth
- Can correct both dental and skeletal components of malocclusion
- Some (like Twin Block) allow near-normal function (eating, speaking) during treatment
- Reduces need for extractions or surgery in growing patients
8. Disadvantages
- Requires patient cooperation (for removable types)
- Only effective during active growth period - not useful in adults with completed growth
- Bulky appliances (classical types) can cause initial speech/comfort issues
- Fixed types (Herbst) are more complex to fabricate and can cause more soft tissue irritation
Quick Summary Table
| Feature | Detail |
|---|---|
| Basic principle | Uses muscle force, not mechanical force, to correct malocclusion |
| Best time to use | Growth period (Class II peak growth) |
| Main goal | Correct the muscle-jaw relationship, not just move teeth |
| Key appliances | Activator, Bionator, Frankel's FR, Twin Block, Herbst |
| Classified by | Graber, Profitt, Peter Vig (hybrid concept) |