Triceps sparing, trap approach , campbell approach step by step with flow chart and images

Reading File
Finding Sources
Finding Sources
Finding Sources
Finding Sources
Finding Sources
Finding Sources
Reading File
Reading File
Reading File
Reading File
Reading File
Reading File
Reading File
Reading File
Finding Sources
Finding Sources
Reading File
Loading Image
Loading Image
Reading File
Loading Image
Reading File
Reading File
Loading Image
Reading File
Reading File
Generating Image

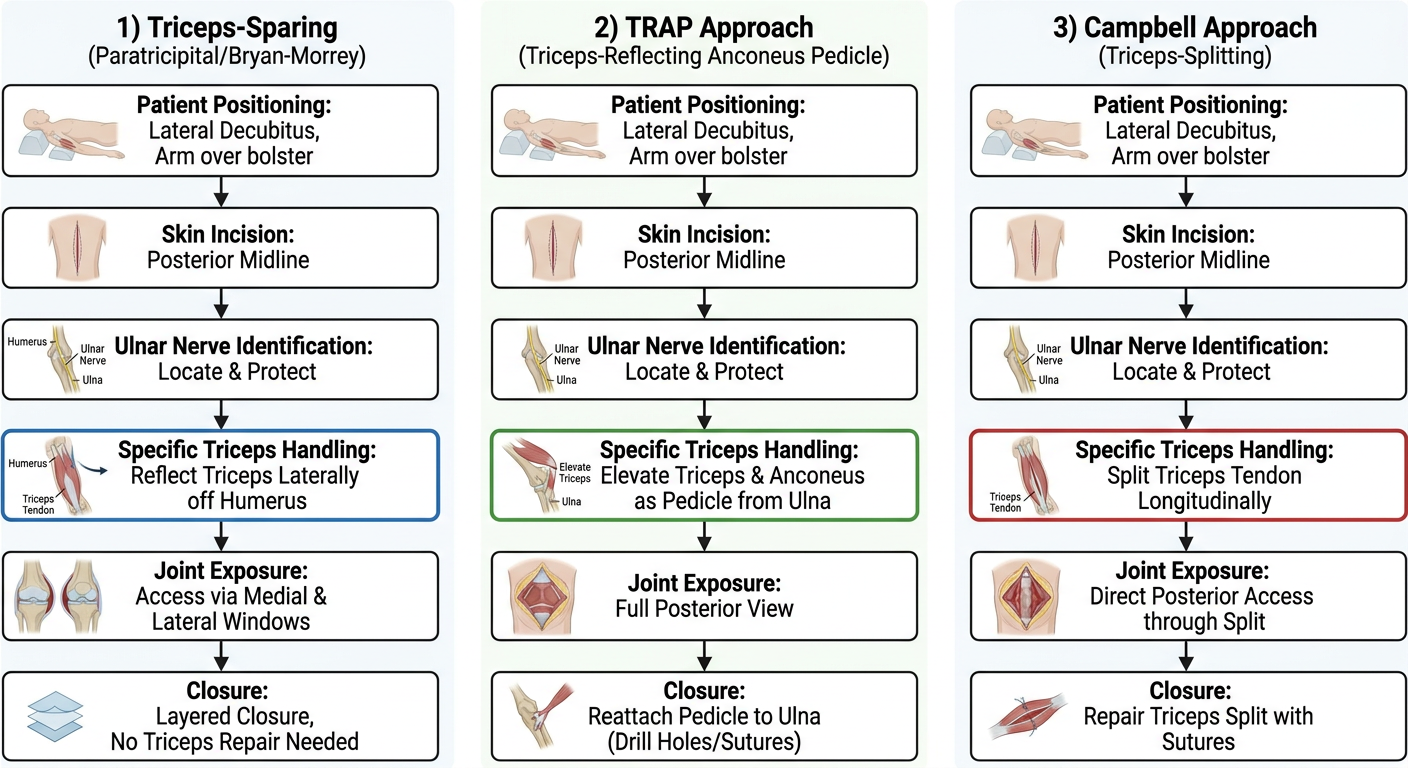
A detailed surgical flowchart comparing three posterior elbow approaches: 1) Triceps-Sparing (Paratricipital/Bryan-Morrey), 2) TRAP Approach (Triceps-Reflecting Anconeus Pedicle), and 3) Campbell Approach (Triceps-Splitting). Each approach shown as a vertical step-by-step flowchart with boxes and arrows. Steps include: patient positioning, skin incision, ulnar nerve identification, specific triceps handling, joint exposure, and closure. Key differences highlighted in colored boxes. Medical illustration style, clean white background, labeled anatomical structures.

Loading Image
I now have all the content I need. Here is the comprehensive answer:

Posterior Elbow Approaches: Triceps-Sparing, TRAP, and Campbell - Step by Step


Overview Comparison Table

FeatureTriceps-Sparing (Paratricipital)TRAP ApproachCampbell Approach
Also known asBryan-Morrey, BilaterotricipitalTriceps-Reflecting Anconeus PedicleTriceps-Splitting
Triceps handlingNot disrupted - windows created on each sideCompletely detached with anconeus as pedicleMidline split through tendon
Articular exposureLimited (columns + olecranon fossa)Good (entire posterior joint)Moderate (improvable with olecranon tip excision)
Early motionYes - allowed immediatelyRestricted (triceps reattachment)Restricted (triceps repair)
Key riskLimited visualization in C3 fracturesTriceps dehiscence, extensor weaknessExtensor mechanism disruption
Best indicationsOTA/AO types A2, A3, B1, B2, C1-C2; TEATEA, complex articular fracturesORIF with conversion option to TEA

Flowchart

Surgical Approaches Flowchart

1. TRICEPS-SPARING APPROACH (Paratricipital / Bryan-Morrey)

First described by Alonso-Llames (1972); popularized by Bryan and Morrey for TEA
Concept: Two surgical windows are created on either side of the triceps - medial and lateral - WITHOUT disturbing the triceps insertion on the olecranon.

Step-by-Step

Step 1 - Positioning
  • Patient supine; bolster under ipsilateral scapula; elbow rests on chest bolster
  • Sterile tourniquet applied; prophylactic IV antibiotics before inflation
Step 2 - Skin Incision
  • Posterior longitudinal midline incision centered over the olecranon
  • Raise full-thickness medial and lateral fasciocutaneous flaps
Step 3 - Ulnar Nerve
  • Identify and mobilize the ulnar nerve in its groove
  • Prepare for anterior subcutaneous transposition (protects nerve throughout)
Step 4 - Medial Window
  • Develop interval between the triceps muscle and the medial intermuscular septum
  • Excise the medial intermuscular septum to create working space
  • Elevate the triceps muscle off the posterior surface of the distal humerus subperiosteally
  • Exposes: medial column, olecranon fossa, posterior trochlea
Step 5 - Lateral Window
  • Elevate triceps off the lateral intermuscular septum and posterior humerus
  • The anconeus is also elevated in continuity, preserving its neurovascular supply
  • Exposes: lateral column, olecranon fossa, posterior trochlea
Step 6 - Joint Access (for TEA)
  • Release MCL and LCL to allow dislocation for implant insertion
  • Deliver distal humeral shaft under the triceps
Step 7 - Closure
  • Triceps insertion is intact - no tendon repair required
  • Early active range of motion is permitted postoperatively
Advantages:
  • Triceps tendon insertion completely preserved - no postoperative extension restriction
  • No olecranon osteotomy risk (nonunion, hardware complications)
  • Preserves anconeus innervation (dynamic posterolateral stability)
  • Can be converted to olecranon osteotomy if needed
  • Preferred approach for planned-TEA in elderly with unrepairable distal humerus fractures
Disadvantages:
  • Limited articular visualization - inadequate for C3 fractures
  • More complex dissection
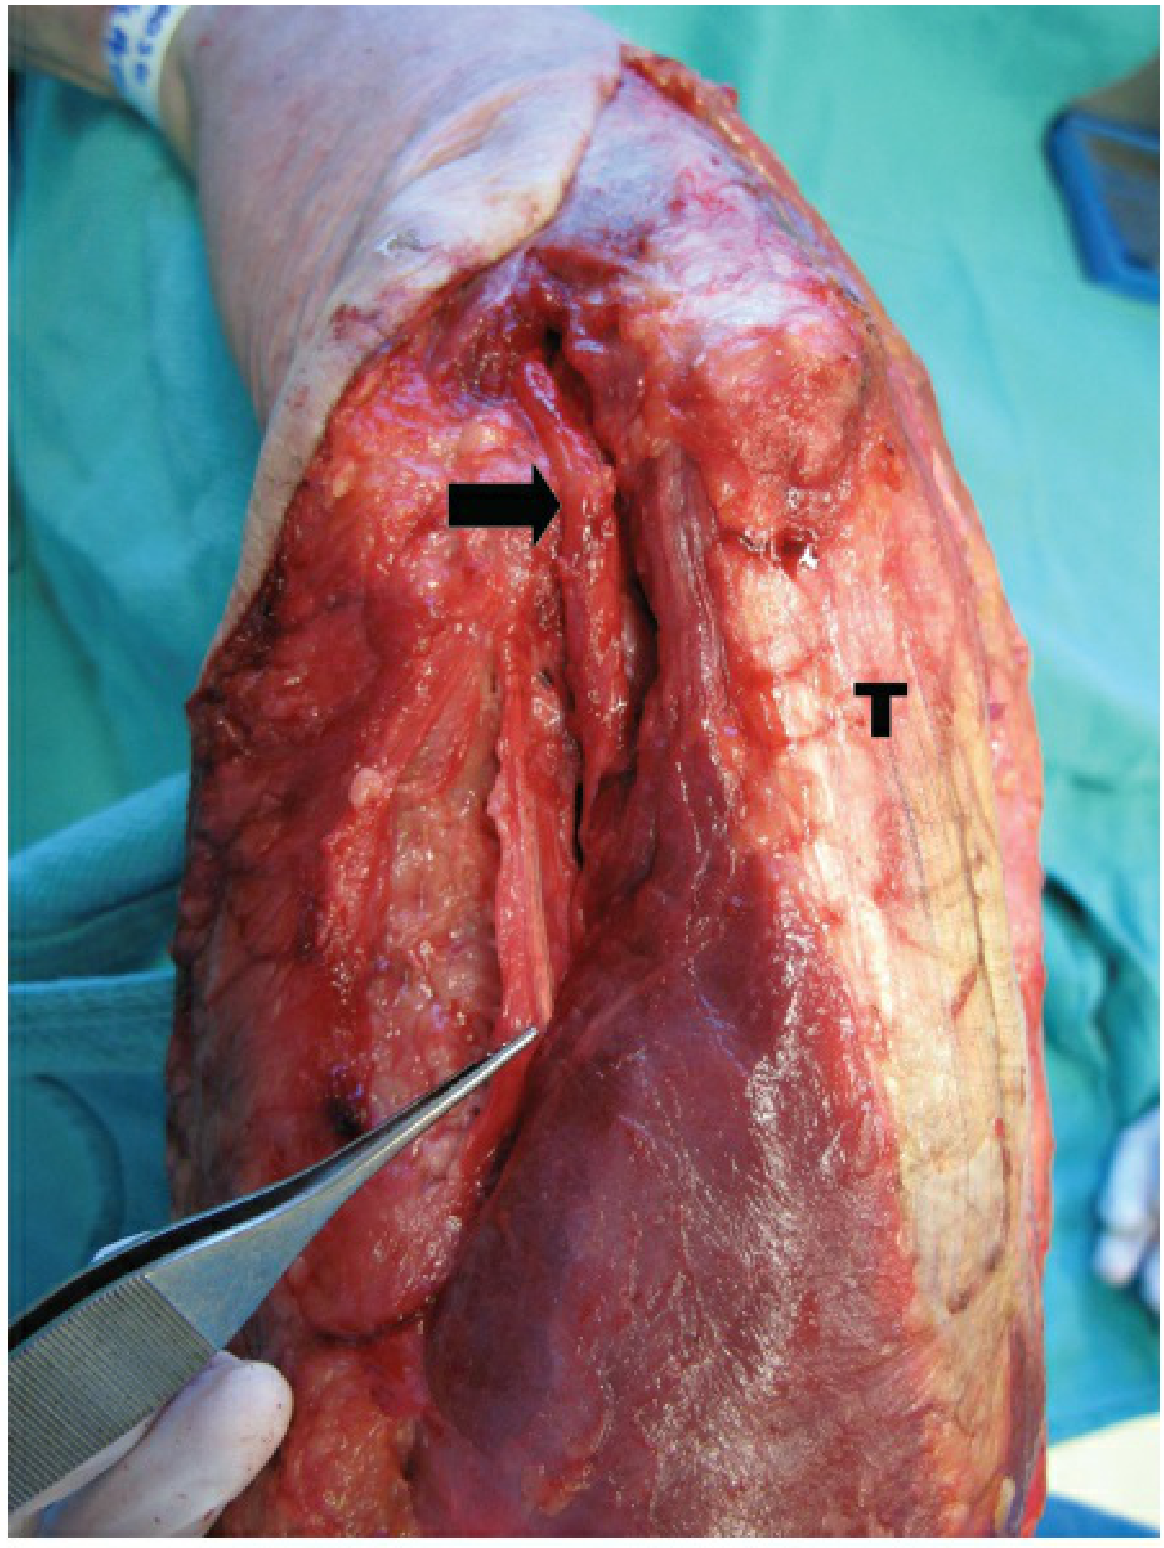
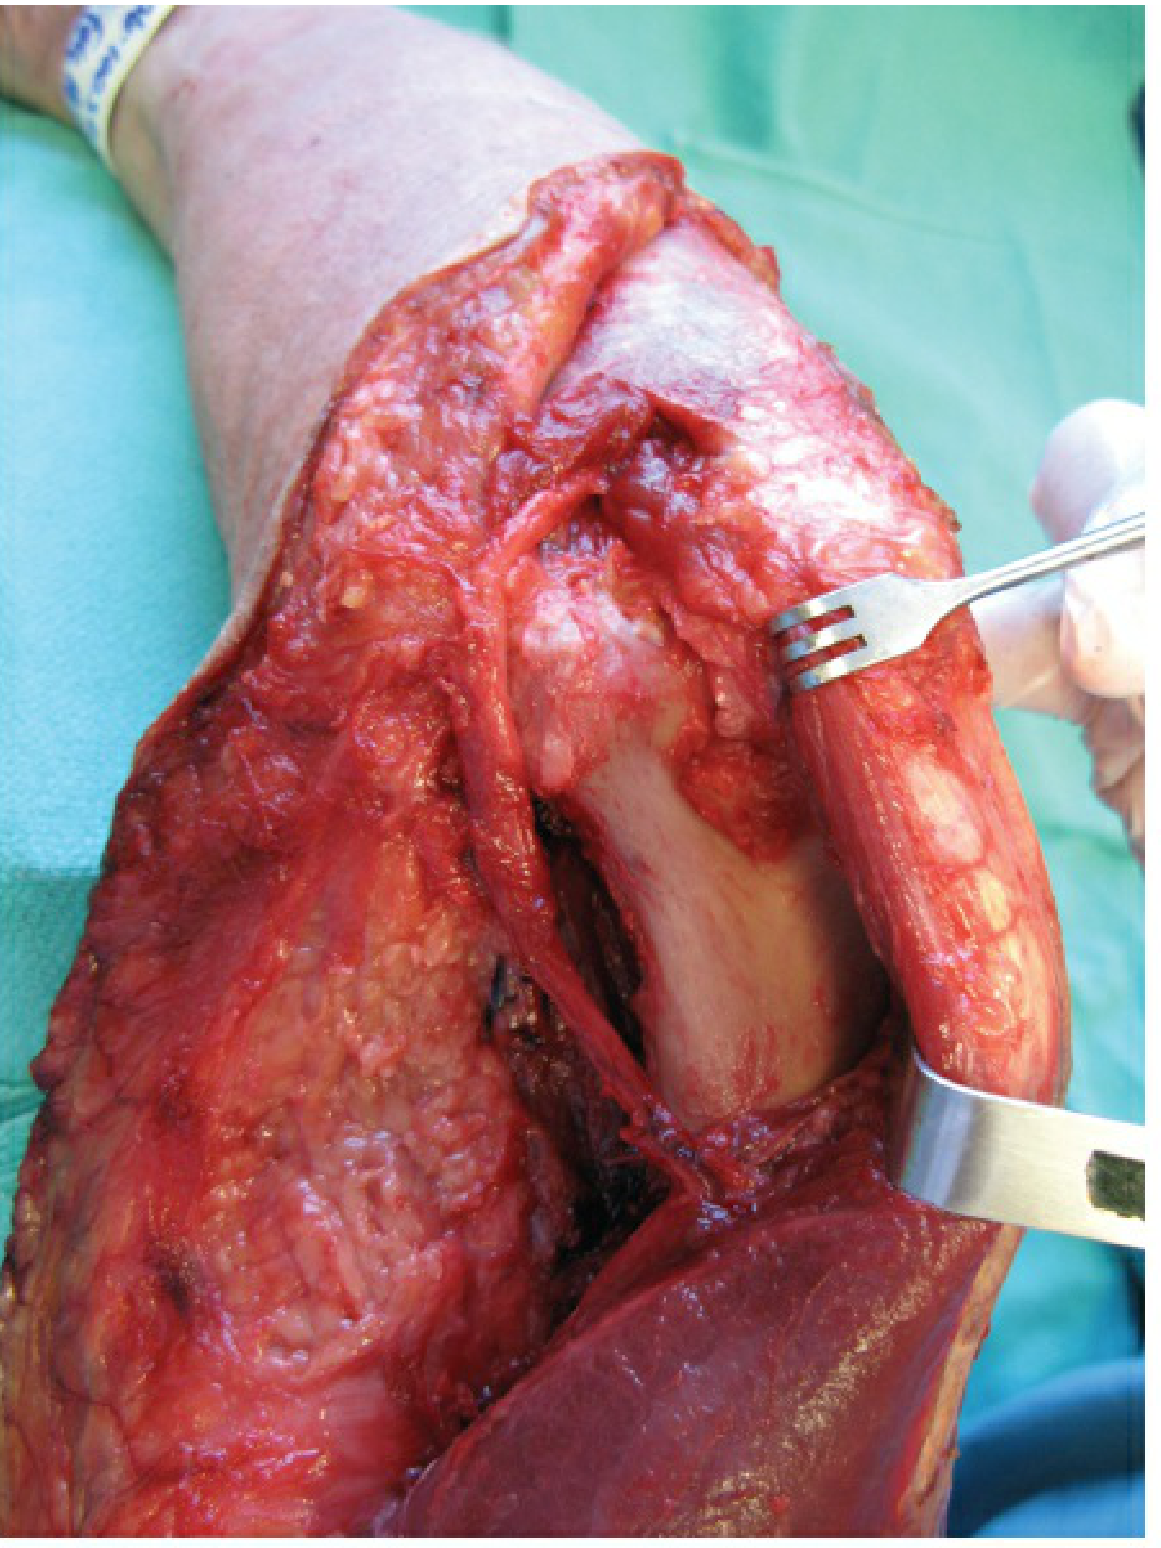
Paratricipital approach intraoperative photo - medial window showing ulnar nerve (arrow) and triceps (T) elevated off the distal humerus
Fig: Paratricipital approach - medial window. Arrow = ulnar nerve; T = triceps muscle elevated off distal humerus. (Rockwood & Green's Fractures, 10th ed)

2. TRAP APPROACH (Triceps-Reflecting Anconeus Pedicle)

Described by O'Driscoll; elevates triceps and anconeus as a single vascularized pedicle
Concept: Triceps is completely detached from the proximal ulna as a flap that is contiguous with the anconeus, preserving the anconeus neurovascular pedicle. The flap is reflected proximally.

Step-by-Step

Step 1 - Positioning
  • Lateral decubitus or prone, arm over a support; tourniquet applied
Step 2 - Skin Incision
  • Posterior longitudinal midline incision
  • Raise medial and lateral fasciocutaneous flaps
Step 3 - Ulnar Nerve
  • Identify ulnar nerve medially and protect throughout
Step 4 - Lateral Flap (Anconeus) - Kocher Interval
  • Use Kocher interval (between ECU and anconeus) to elevate the anconeus
  • Elevate anconeus off the lateral epicondyle and posterior lateral humerus
  • This forms the distal lateral portion of the pedicle flap
  • Preserves radial nerve supply to anconeus (enters from proximal)
Step 5 - Medial Flap
  • Subperiosteal dissection from the subcutaneous border of the ulna medially
  • Creates medial portion of the combined triceps-anconeus flap
Step 6 - Reflect the Flap Proximally
  • Anconeus flap is reflected proximally to expose the triceps insertion
  • Triceps insertion is then sharply released from the olecranon
  • The entire triceps-anconeus unit is reflected proximally
  • Full posterior elbow joint is now visible, including:
    • Trochlear sulcus (used as articular template for reduction)
    • Posterior capitellum
    • Olecranon fossa
Step 7 - ORIF / TEA as Required
Step 8 - Closure
  • Reattach the triceps-anconeus flap to the olecranon via transosseous sutures
  • Postoperative triceps protection required (typically 6 weeks)
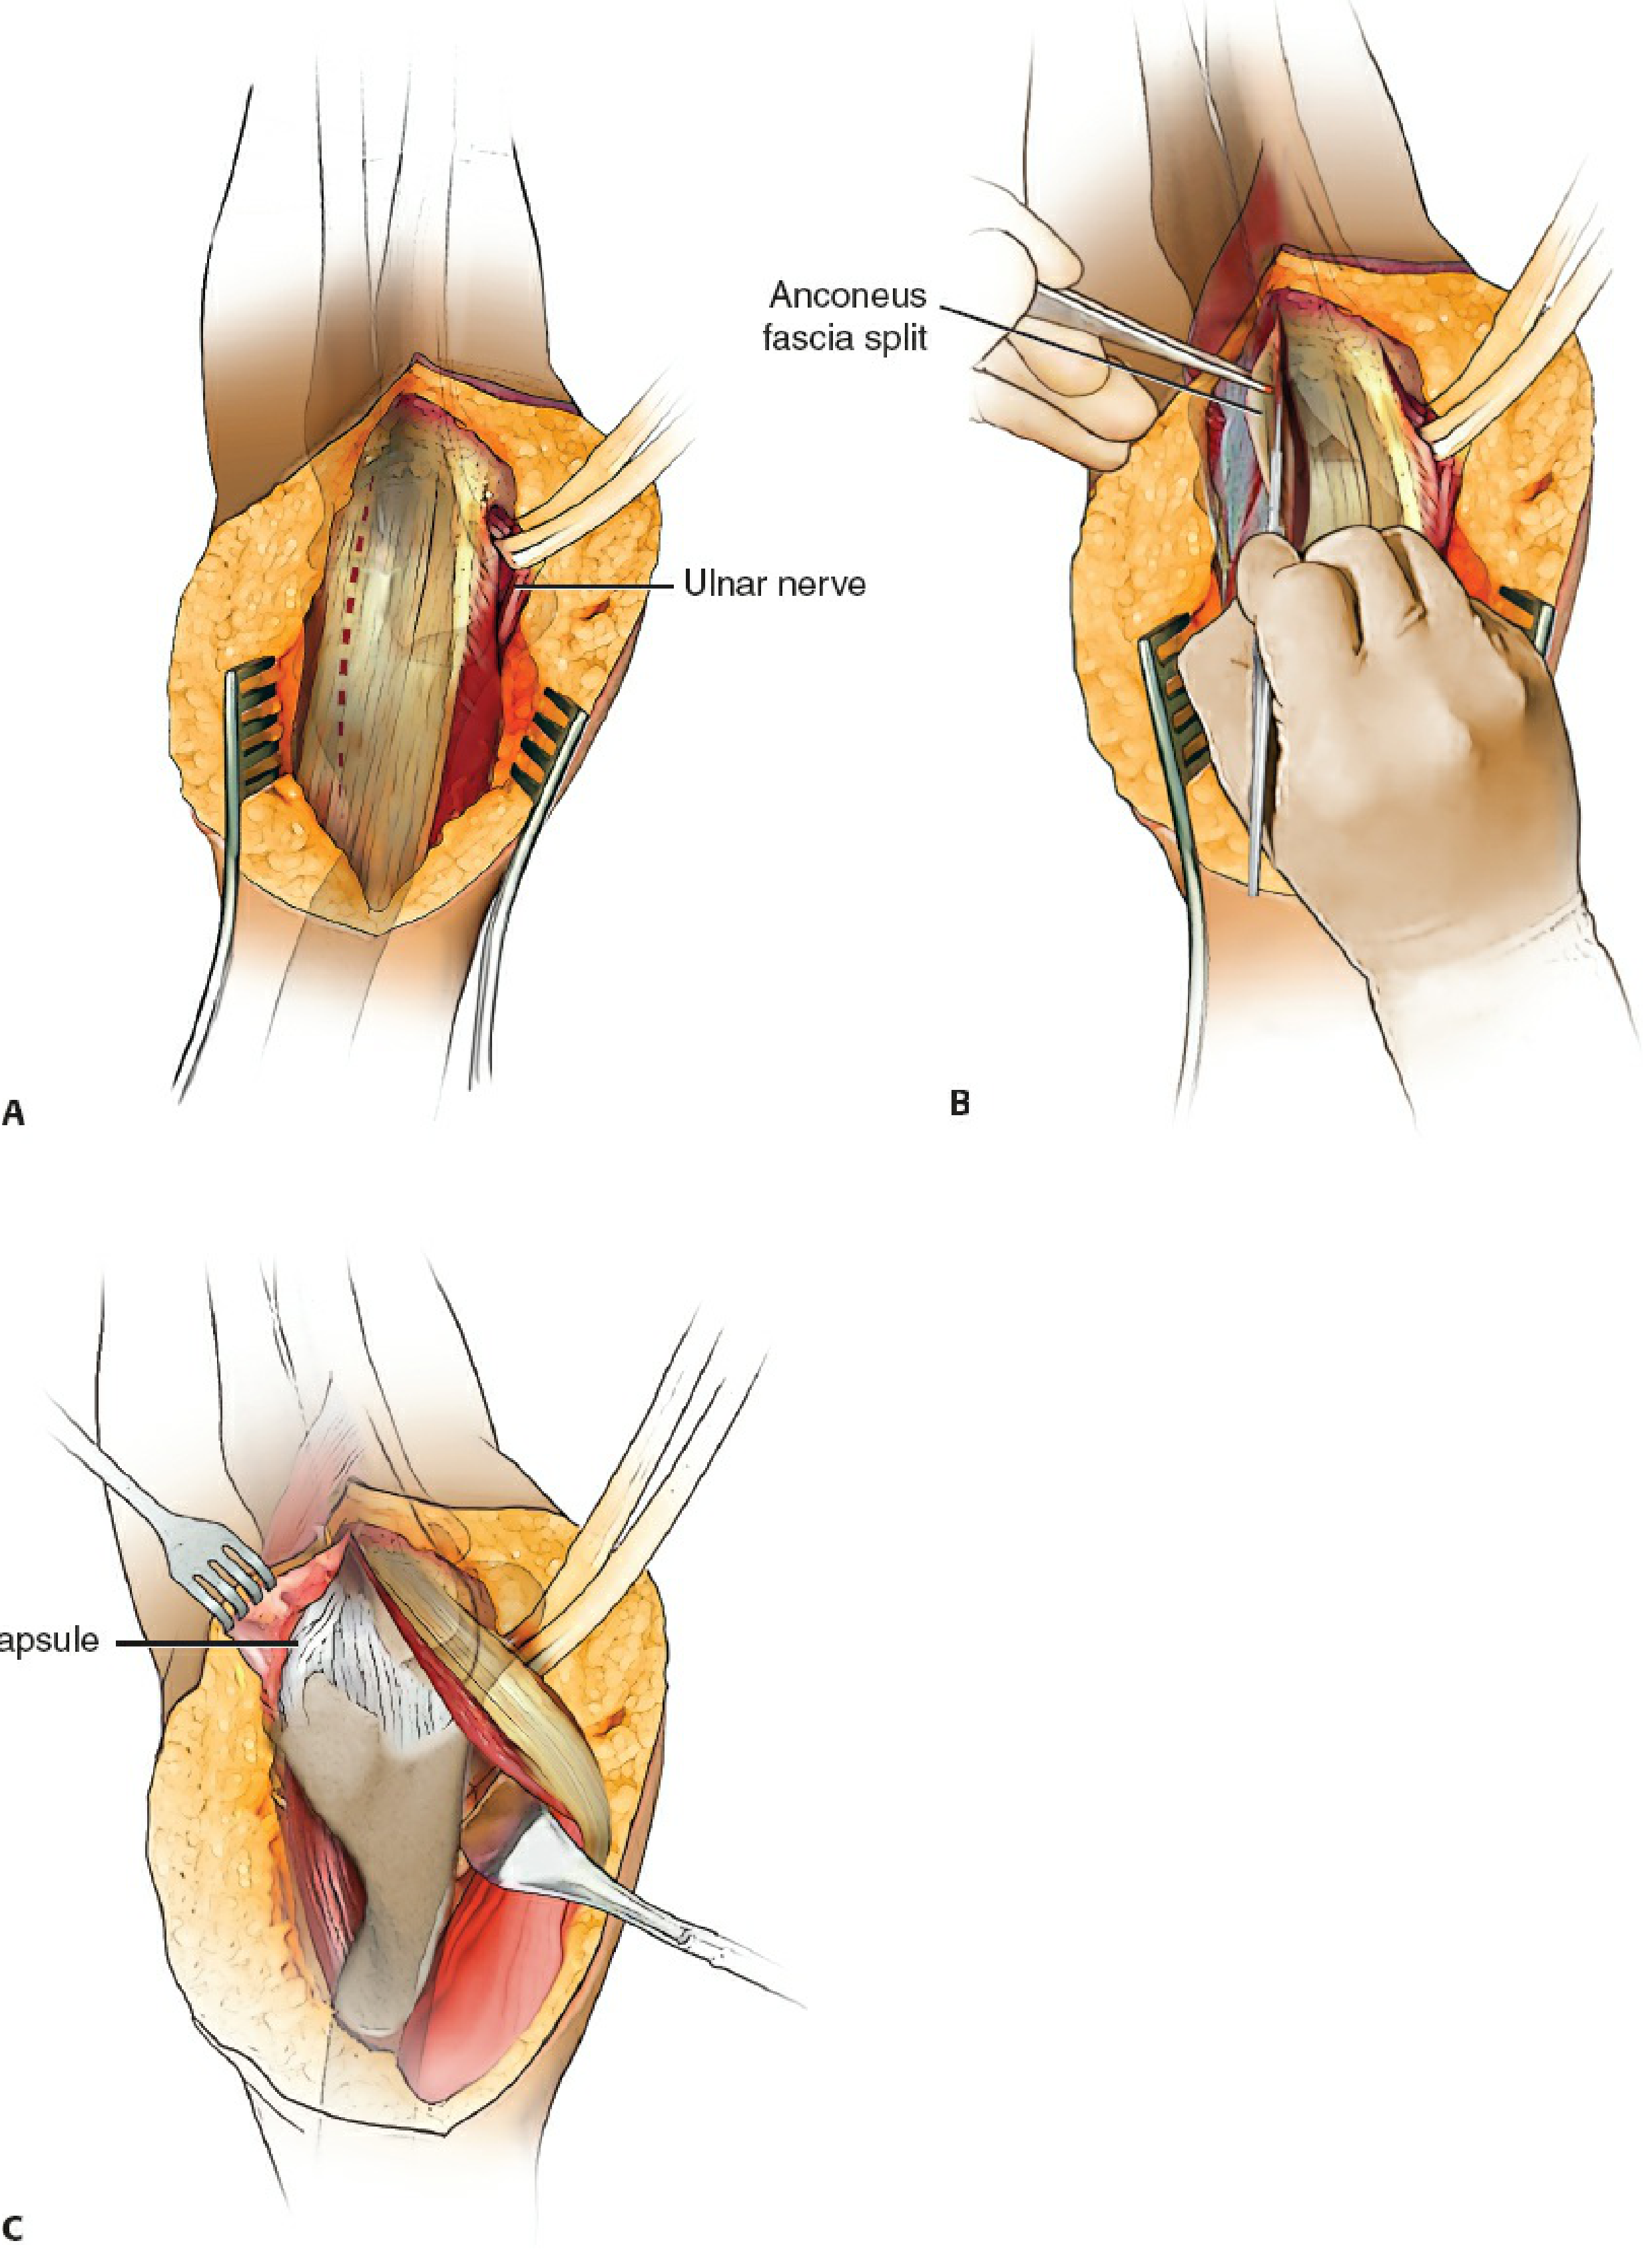
TRAP and Lateral Paraolecranon approach - Step A shows ulnar nerve identification; B shows anconeus fascia split; C shows joint capsule exposed
Fig: Lateral paraolecranon approach (modification of TRAP principle) - A: Ulnar nerve identified; B: Anconeus fascia split 3-5mm lateral to ulna; C: Joint capsule exposed. (Rockwood & Green's Fractures, 10th ed)
Advantages:
  • Good posterior elbow exposure (better than paratricipital)
  • Avoids olecranon osteotomy complications
  • Anconeus neurovascular supply is preserved (blood supply from radial nerve enters proximally - safe when reflecting distally)
  • Trochlear sulcus visible for articular reduction template
Disadvantages:
  • Triceps completely released - risk of triceps dehiscence and extensor weakness
  • Requires postoperative extensor mechanism protection
  • More demanding technique than Campbell approach

3. CAMPBELL APPROACH (Triceps-Splitting)

The original Campbell approach uses a midline split through the triceps tendon and medial head
Concept: The triceps tendon and muscle belly are split longitudinally in the midline, and the halves are reflected medially and laterally to expose the posterior distal humerus and elbow joint.

Step-by-Step

Step 1 - Positioning
  • Patient lateral decubitus or prone
  • Arm draped free; sterile tourniquet applied
  • For the elbow: arm positioned over a support with elbow flexed ~90°
Step 2 - Skin Incision
  • Posterior midline longitudinal incision
  • Proximal extent: ~10-12 cm above olecranon tip
  • Distal extent: along subcutaneous border of ulna as needed
  • Raise full-thickness medial and lateral fasciocutaneous flaps
Step 3 - Ulnar Nerve
  • Identify ulnar nerve in its groove medially
  • Protect throughout the procedure
Step 4 - Triceps Split
  • Split the triceps tendon in the midline longitudinally
  • Extend the split through the medial head of triceps proximally
  • Distally, the split can be extended through the triceps insertion on the olecranon
    • Release Sharpey fibers at the olecranon to create medial and lateral fasciotendinous sleeves
  • Subperiosteal dissection from the midline outward on both the medial and lateral columns
Step 5 - Articular Exposure
  • Flex the elbow to improve articular visualization
  • Partially excise the olecranon tip if further articular access is needed
  • Exposes: medial column, lateral column, olecranon fossa, posterior trochlea
Step 6 - Proximal Extension (if needed)
  • The split can be extended proximally to the level of the radial nerve as it crosses the humeral shaft in the spiral groove
Step 7 - Articular Surface Work (ORIF or TEA)
  • For ORIF: medial and lateral collateral ligaments are preserved
  • For TEA conversion: MCL and LCL may be released for dislocation
Step 8 - Closure
  • Repair triceps tendon to olecranon via transosseous nonabsorbable braided sutures
  • Some modifications (Gschwend) incorporate a flake of olecranon bone to improve healing
  • Postoperative protection of the triceps repair required
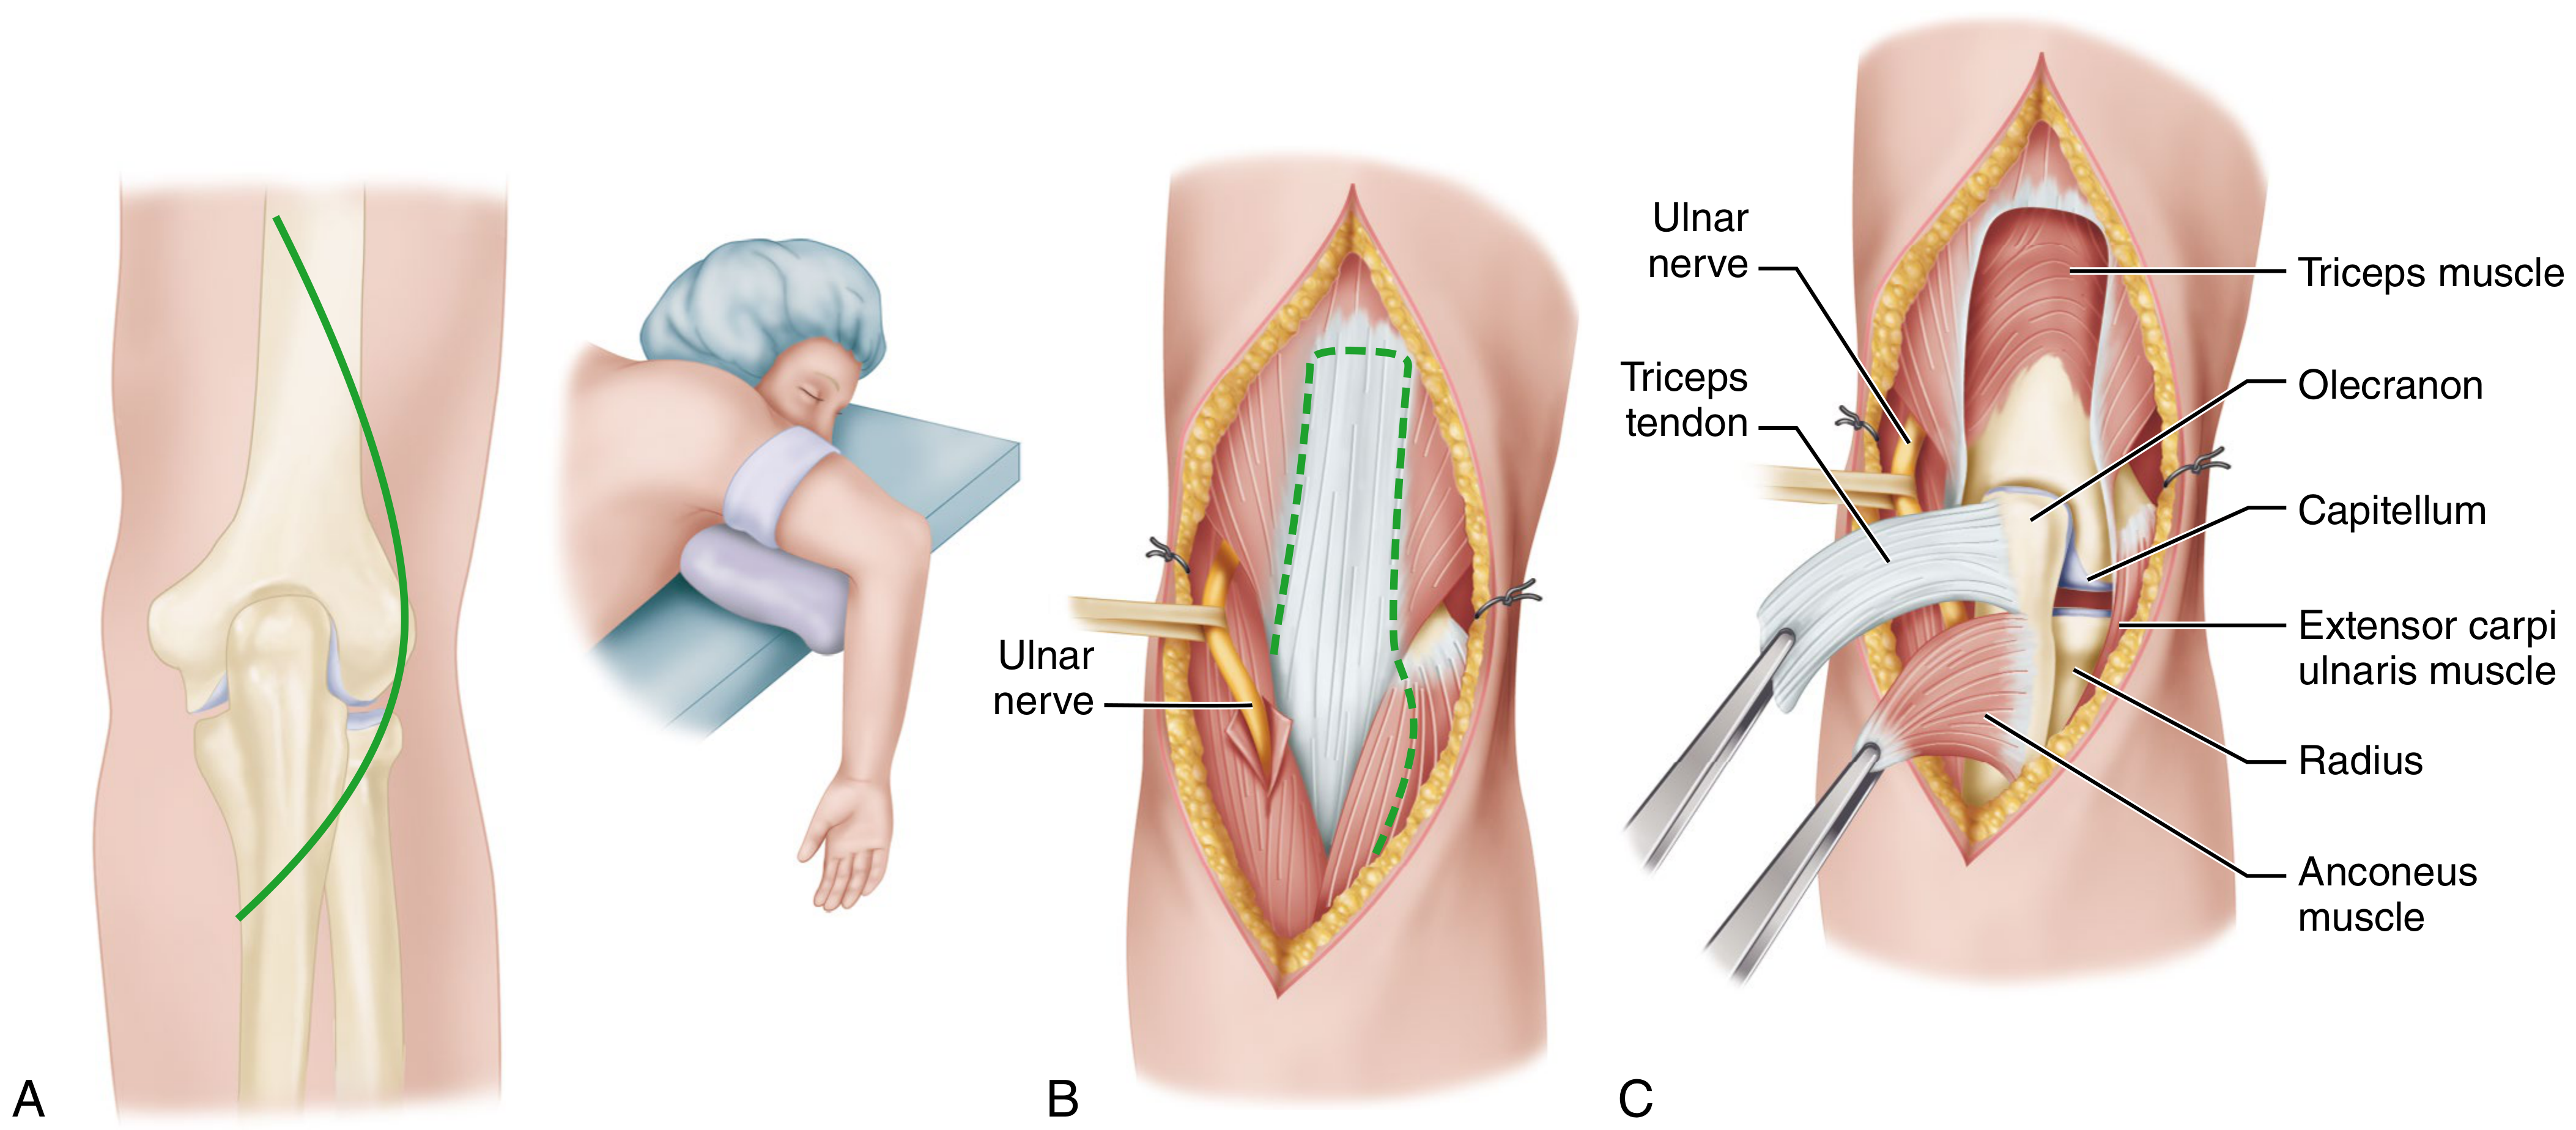
Campbell's Operative Orthopaedics: Wadsworth extensile posterolateral approach - showing triceps reflected (B = tongue flap fashioned) and exposure of elbow joint with labeled structures - ulnar nerve, anconeus, ECU, radius, capitellum, olecranon
Fig: From Campbell's Operative Orthopaedics 15th Ed - Posterior elbow exposure showing triceps tongue reflected (B), with full anatomic exposure (C). Ulnar nerve, anconeus, ECU, and bony landmarks labeled.
Advantages:
  • Technically easiest of the three approaches
  • Good visualization for both ORIF and TEA
  • Most familiar approach for trauma surgeons
  • Easy intraoperative conversion from ORIF to TEA
  • Extensile - can expose entire posterior humeral shaft to radial nerve level
Disadvantages:
  • Disrupts triceps insertion - postoperative extension protection required (typically 4-6 weeks)
  • Risk of extensor mechanism failure/avulsion
  • Limited articular exposure compared to olecranon osteotomy

Summary of Surgical Approaches to the Posterior Elbow

(Table 1.1 - Campbell's Operative Orthopaedics 15th Ed)
AuthorTissue PlaneTriceps Status
CampbellMidline triceps splitSplit - disrupted
CampbellTriceps aponeurosis tongueTongue flap - disrupted
WadsworthTriceps aponeurosis tongue + full deep headTongue flap
Bryan-MorreyElevate triceps mechanism from medial olecranon, reflect laterallyReflected (not split)
BoydLateral border triceps/ulna + anconeus/ECULateral reflection
Muller/MacAuslandOlecranon osteotomy (transverse or chevron)Intact

Anatomical Key Points for All Three Approaches

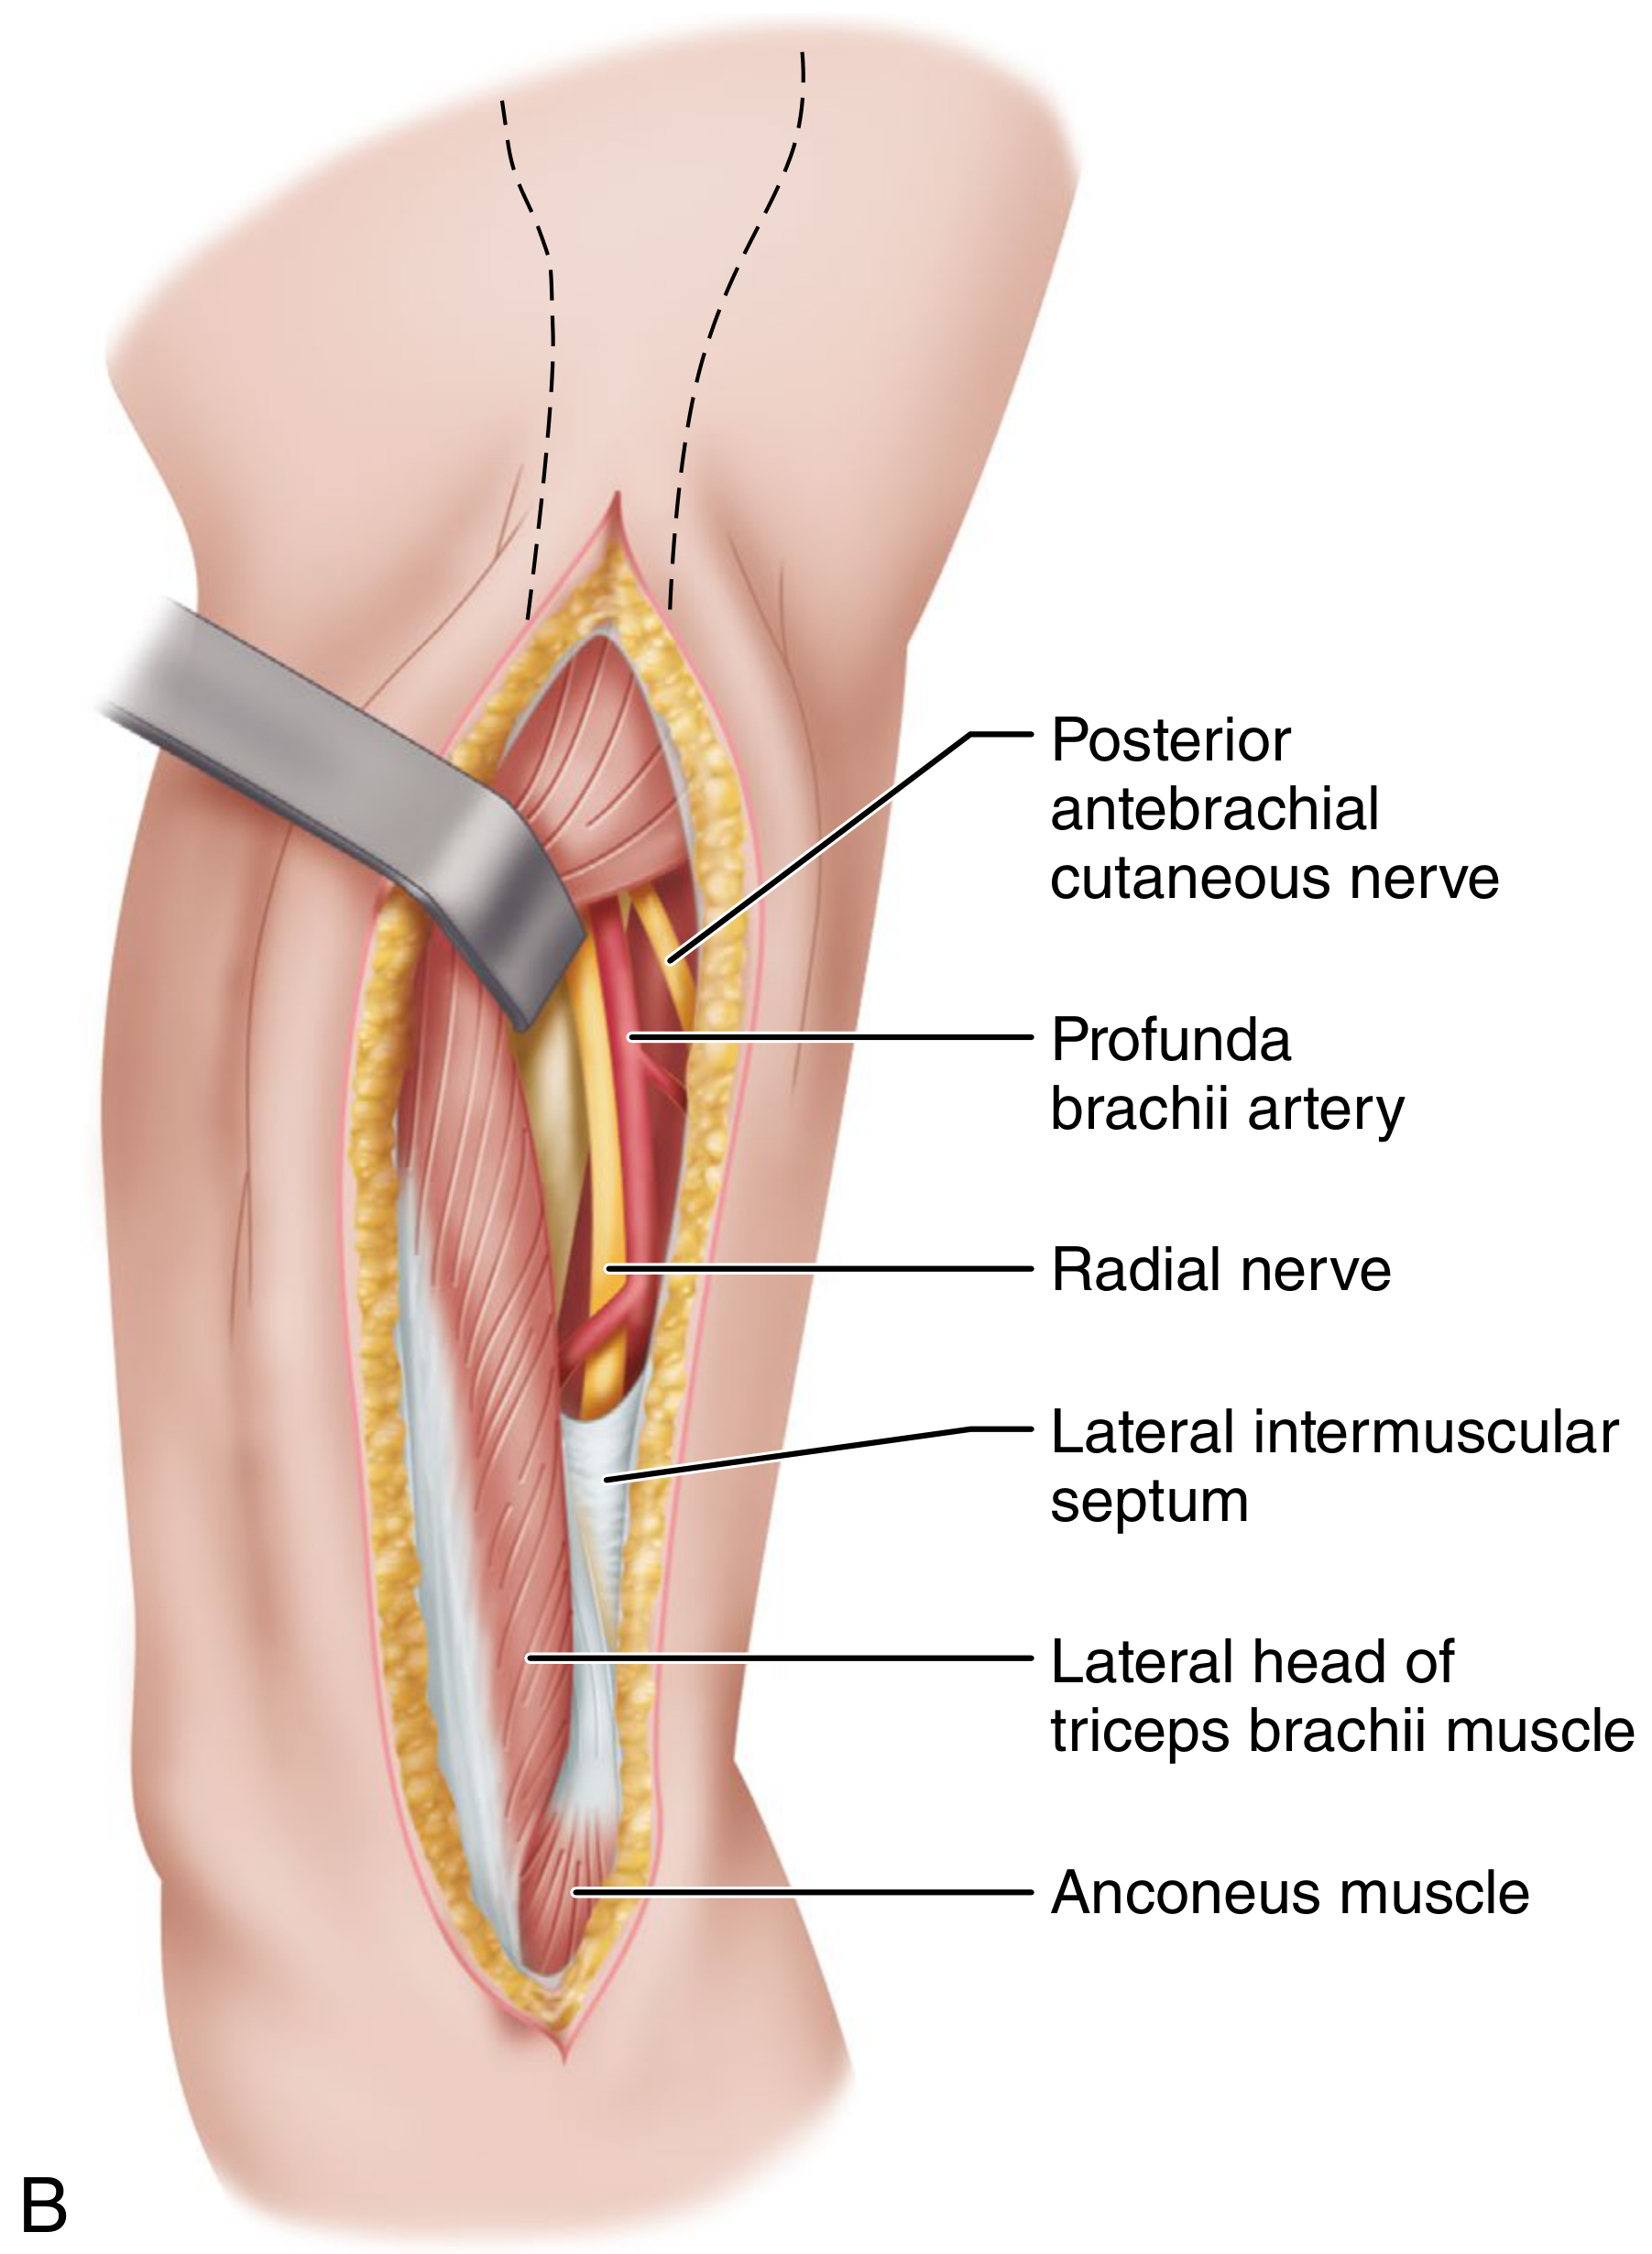
Posterolateral approach - B: Lateral head of triceps, radial nerve, profunda brachii artery, lateral intermuscular septum, anconeus labeled; C: Triceps retracted medially exposing posterior humerus
Fig: Posterolateral elbow anatomy - key neurovascular structures encountered in all posterior approaches. Note: radial nerve, profunda brachii, lateral intermuscular septum.
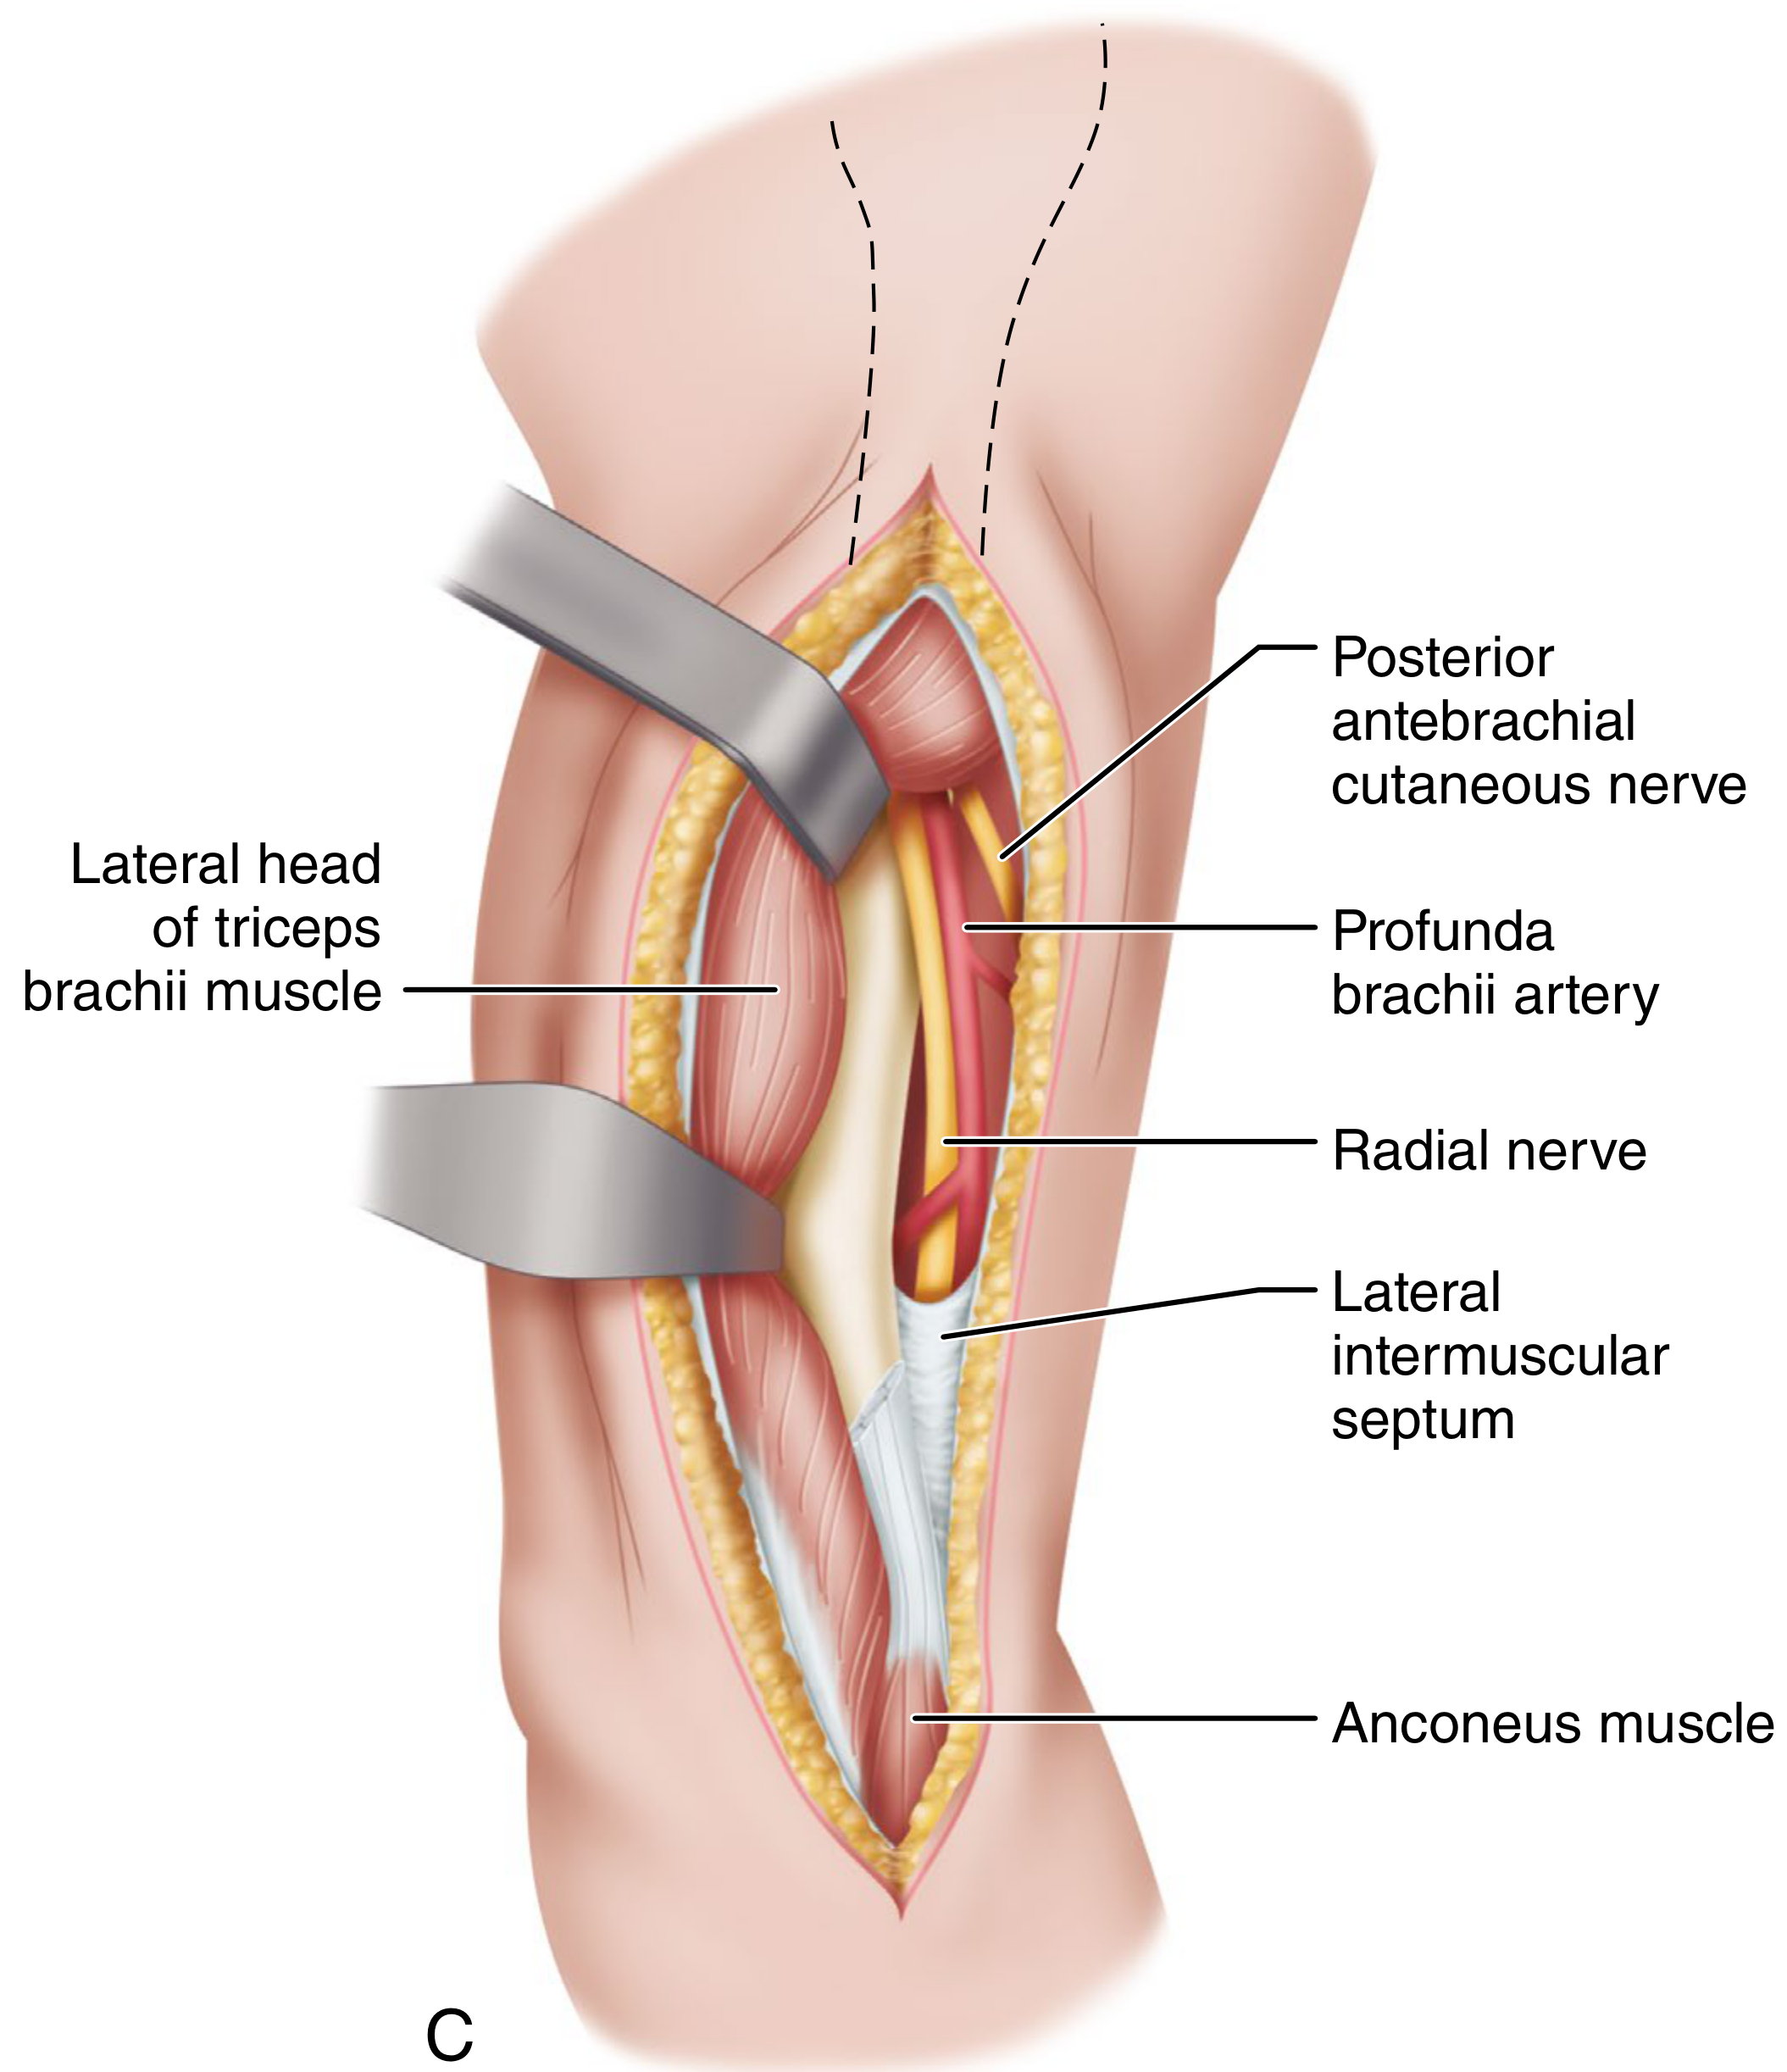
Triceps, lateral head - close-up of lateral head of triceps with radial nerve and lateral intermuscular septum in posterolateral approach
Fig: Detailed view of posterolateral arm - lateral head of triceps retracted, radial nerve and profunda brachii artery visible. (Campbell's Operative Orthopaedics 15th Ed)
Ulnar nerve - must be identified and protected in ALL posterior approaches; usually transposed anteriorly subcutaneously.
Radial nerve - crosses the humeral shaft in the spiral groove at approximately the junction of the middle and distal thirds; at risk in proximal extensions of any posterior approach.
Anconeus - provides dynamic posterolateral stability; its nerve supply (radial nerve, entering proximally) is preserved in the TRAP approach because the flap is reflected proximally to distally.

When to Use Which Approach

DISTAL HUMERUS FRACTURE
        |
        ├── Elderly patient, TEA planned directly
        |       └── TRICEPS-SPARING (Paratricipital)
        |           - Fastest to TEA
        |           - Early motion
        |
        ├── ORIF planned, possible TEA conversion
        |   ├── Less comminuted (C1-C2) → TRICEPS-SPARING or CAMPBELL
        |   └── High comminution, full ORIF attempt → CAMPBELL
        |       - Best ORIF visualization
        |       - Easy conversion to TEA
        |
        ├── Complex articular (C3), need full joint view
        |       └── TRAP approach OR Olecranon Osteotomy
        |           (TRAP avoids osteotomy complications)
        |
        └── Associated complete triceps laceration
                └── VAN GORDER (Triceps Tongue) with V-Y plasty

Create a detailed surgical video script or step-by-step guide for one specific approach

Asking for Preferences
Finding Sources
Finding Sources
Finding Sources
Reading File
Reading File
Reading File
Finding Sources
Finding Sources
Loading Image
Loading Image
Reading File
Loading Image
Reading File
Reading File
Loading Image
I now have all the material needed for a full surgical video script. Here it is:

🎬 SURGICAL VIDEO SCRIPT

Triceps-Sparing Paratricipital Approach for Distal Humerus Fracture ORIF

A Step-by-Step Operative Guide

Indication: OTA/AO Types A2, A3, B1, B2, C1, C2 distal humerus fractures Based on: Rockwood & Green's Fractures in Adults (10th Ed, 2025) | Campbell's Operative Orthopaedics (15th Ed, 2026)

PREOPERATIVE DECISION ALGORITHM

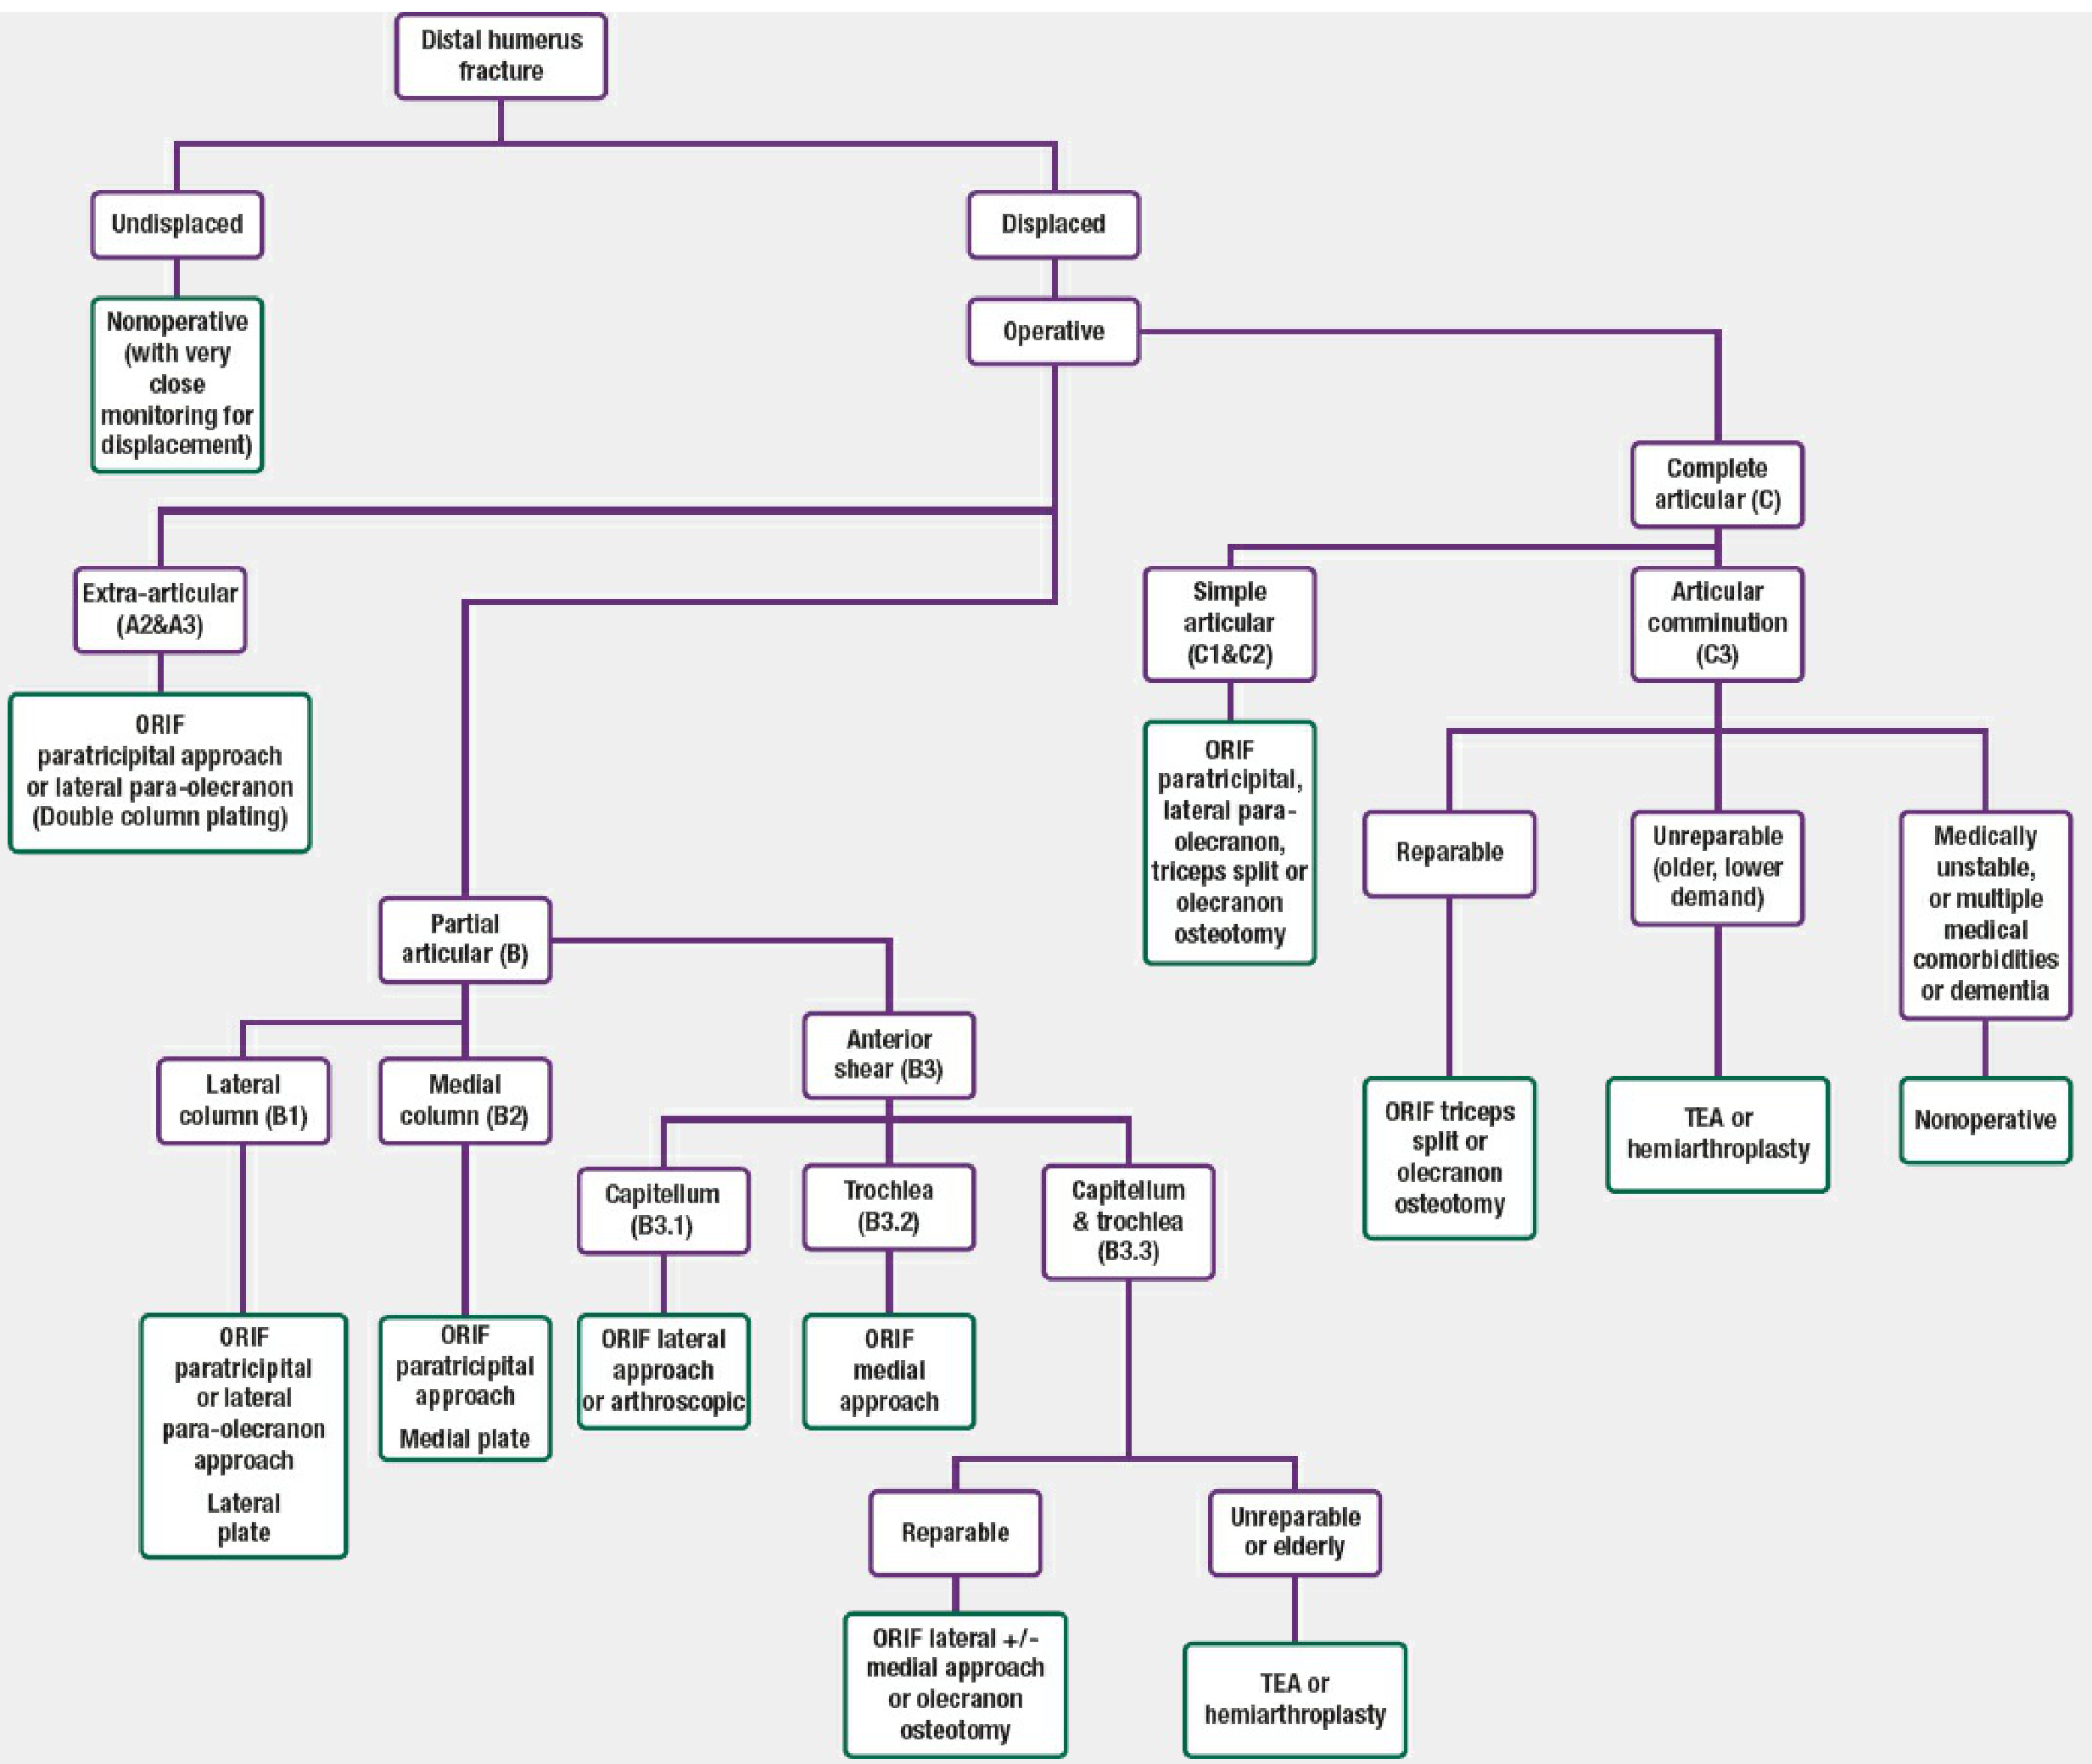
Distal humerus fracture treatment algorithm - shows paratricipital approach indicated for extra-articular (A2/A3), partial articular (B1/B2), and simple complete articular (C1/C2) fractures
Authors' preferred treatment algorithm - paratricipital approach is indicated for A2, A3, B1, B2, C1, and C2 fractures. (Rockwood & Green's, 10th Ed)

SCENE 1 - OPERATING ROOM SETUP & PREOPERATIVE CHECKLIST

[VIDEO CUE: Wide shot of OR, patient on table]
NARRATOR: "Before inflating the tourniquet, complete the following checklist:"

Preoperative Checklist

ItemDetail
ImagingAP + lateral elbow XR; CT scan with 3D for complex patterns
TemplatingConfirm implant sizes available (locking plates - parallel or orthogonal)
AntibioticsIV cephalosporin 30 min before tourniquet inflation
TourniquetSterile tourniquet applied to arm; do NOT inflate until antibiotics given
EquipmentLocking plate system, K-wires (1.6 mm and 2.0 mm), headless compression screws, mini-fragment plates for small osteochondral fragments
Neuro checkDocument preoperative ulnar nerve and radial nerve status

SCENE 2 - PATIENT POSITIONING

[VIDEO CUE: Close-up of patient positioning setup]
NARRATOR: "Two acceptable positions. We will use the supine position with a chest bolster."
Option A - Supine (preferred):
  1. Place patient supine on the operating table
  2. Place a bolster under the ipsilateral scapula to elevate the shoulder
  3. Rest the elbow on a sterile rolled sheet on the patient's chest - this supports the arm throughout the case and allows an assistant to adjust position
  4. Surgeon and assistant stand on the side of the injury
  5. Scrub nurse and arthroplasty/implant table on the contralateral side
Option B - Lateral Decubitus:
  • Place on a bean bag with elbow flexed over an arthroscopy positioner
  • Useful when no surgical assistant is available
🎯 Tip: The supine position is preferred as the nurse can dynamically assist with arm positioning during reduction maneuvers.

SCENE 3 - SKIN INCISION

[VIDEO CUE: Posterior view of elbow, skin marked]
NARRATOR: "The skin incision is the same for all posterior elbow approaches. A single posterior midline incision."

Steps:

3.1 Mark the tip of the olecranon and the medial epicondyle as landmarks.
3.2 Plan a posterior midline longitudinal incision:
  • Extends 10-12 cm proximal to the olecranon tip (following the posterior midline of the arm)
  • Curves slightly medial to the olecranon tip to avoid direct pressure over the incision
  • Extends 5-6 cm distally along the subcutaneous border of the ulna
3.3 Incise skin with a #10 blade in one pass down to subcutaneous fat.
3.4 Raise full-thickness fasciocutaneous flaps both medially and laterally:
  • Use sharp dissection in the subdermal plane
  • Keep flaps thick to protect the blood supply
  • Expose the full posterior elbow and distal arm
⚠️ Hazard: Avoid multiple thin-plane flaps. A single full-thickness medial flap and a single full-thickness lateral flap minimizes skin necrosis risk.

SCENE 4 - ULNAR NERVE IDENTIFICATION AND MOBILIZATION

[VIDEO CUE: Close-up of medial side of elbow]
NARRATOR: "The ulnar nerve must be identified and protected before any further dissection. This is non-negotiable."

Steps:

4.1 Palpate the medial epicondyle and cubital tunnel.
4.2 Incise the cubital tunnel retinaculum longitudinally.
4.3 Identify the ulnar nerve in its groove posterior to the medial epicondyle.
4.4 Pass a vessel loop (blue) around the nerve - this remains in view throughout the entire procedure.
4.5 Free the nerve proximally (5-6 cm into the arm, releasing the medial intermuscular septum if needed) and distally (3-4 cm into the forearm, releasing the roof of the flexor carpi ulnaris).
4.6 Transpose the nerve anteriorly subcutaneously and secure with a loose suture to the anterior skin flap to keep it out of the operative field.
Paratricipital approach - medial side - ulnar nerve (arrow) identified, triceps (T) visible, medial intermuscular septum about to be excised
Fig 39-19A: Paratricipital approach - ulnar nerve (arrow) identified medially. T = triceps. (Rockwood & Green's, 10th Ed)
⚠️ Hazard: Traction injury to the ulnar nerve is the most common neurologic complication. Never retract it under tension. Check vessel loop position at every stage.

SCENE 5 - MEDIAL WINDOW (FIRST SURGICAL WINDOW)

[VIDEO CUE: Medial side of elbow, triceps visible]
NARRATOR: "We now create the medial window by developing the interval between the triceps muscle and the medial intermuscular septum. The triceps insertion on the olecranon is never touched."

Steps:

5.1 Identify the medial intermuscular septum - the fascial band separating the anterior and posterior compartments of the arm on the medial side.
5.2 With Metzenbaum scissors, develop the plane between the medial border of the triceps and the medial intermuscular septum.
5.3 Excise the medial intermuscular septum - this is necessary to create adequate working space and to allow the triceps to be displaced laterally. Use sharp scissors and electrocautery.
⚠️ Hazard: The ulnar nerve runs just anterior to this septum. It must be fully protected before excising the septum. Confirm the vessel loop position before proceeding.
5.4 Using a periosteal elevator, perform subperiosteal elevation of the triceps muscle off the posterior surface of the distal humerus, working from medial to lateral.
5.5 Continue elevation proximally along the medial column and posterior shaft as needed.
5.6 Place a Hohmann retractor or blunt retractor on the medial column to hold the triceps laterally.
Exposure achieved through medial window:
  • Medial column of the distal humerus
  • Medial aspect of the olecranon fossa
  • Posterior aspect of the medial trochlea
Paratricipital approach - medial window - medial intermuscular septum (forceps) excised, triceps elevated off posterior distal humerus, showing medial column exposure
Fig 39-19B: Medial intermuscular septum (forceps) excised. Triceps elevated off posterior distal humerus. (Rockwood & Green's, 10th Ed)

SCENE 6 - LATERAL WINDOW (SECOND SURGICAL WINDOW)

[VIDEO CUE: Lateral side of elbow, anconeus visible]
NARRATOR: "We now create the lateral window. The anconeus is elevated in continuity with the triceps. Its nerve supply is preserved because it enters the muscle proximally."

Steps:

6.1 On the lateral side, identify the lateral head of the triceps and the anconeus muscle.
6.2 Develop the plane between the lateral border of the triceps/anconeus and the lateral intermuscular septum.
6.3 Elevate the triceps and anconeus together off the lateral intermuscular septum and the posterior surface of the lateral column using a periosteal elevator.
6.4 Continue subperiosteal elevation distally - the anconeus is lifted off the lateral epicondyle and the posterior lateral humerus.
6.5 Place a retractor on the lateral column.
Exposure achieved through lateral window:
  • Lateral column of the distal humerus
  • Lateral aspect of the olecranon fossa
  • Posterior capitellum and lateral trochlea
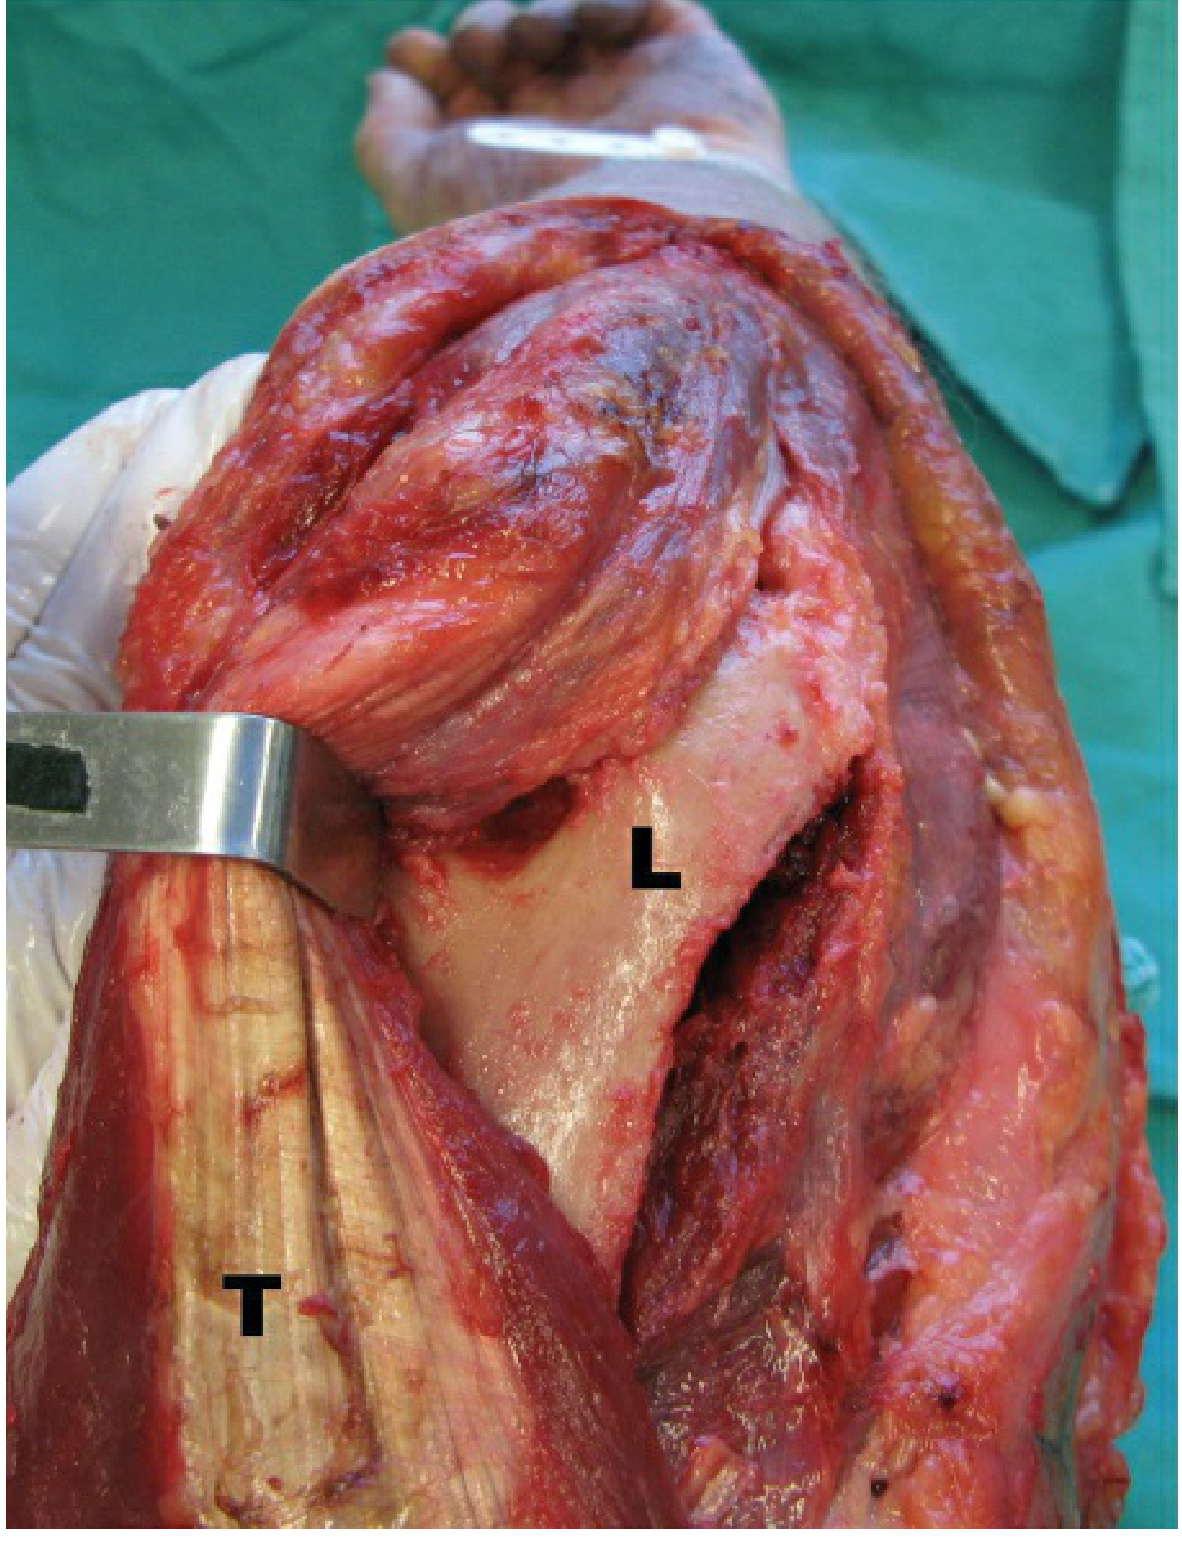
Paratricipital approach - lateral window - triceps (T) and anconeus elevated off posterior humerus, exposing lateral column (L) and olecranon fossa
Fig 39-19C: Triceps (T) elevated laterally. L = lateral column and olecranon fossa exposed. (Rockwood & Green's, 10th Ed)
⚠️ Hazard: The radial nerve enters the posterior compartment through the lateral intermuscular septum at the junction of the middle and distal thirds of the humerus (~7-10 cm above the lateral epicondyle). Do not extend the lateral dissection proximal to this level without formally identifying the nerve.

SCENE 7 - FRACTURE ASSESSMENT AND PROVISIONAL REDUCTION

[VIDEO CUE: Posterior view of distal humerus with fracture visible]
NARRATOR: "With both windows open, the medial and lateral columns are visible. The triceps remains fully intact on the olecranon, obscuring the direct articular surface - but we can work through both windows to reconstruct the columns."

Steps:

7.1 Remove all hematoma and small non-viable bony fragments with irrigation and curette.
7.2 Identify all major fracture fragments through the medial and lateral windows.
7.3 For articular fractures (C1/C2): use the medial window to visualize the trochlea and the lateral window to visualize the capitellum.
7.4 Flex the elbow 90-100° - this opens up the olecranon fossa and improves posterior articular visualization through both windows.
7.5 Use 1.6 mm K-wires as joysticks to manipulate articular fragments into anatomic position.
7.6 Use a large reduction clamp (tenaculum) to compress the articular fragments together.
7.7 Confirm provisional reduction by direct visualization and fluoroscopy.
🎯 Tip: If articular visualization is insufficient through the paratricipital windows alone, a third Boyd interval window can be added between the anconeus and the lateral olecranon. This gives additional articular exposure without touching the triceps insertion. If still insufficient, convert to olecranon osteotomy at this point.

SCENE 8 - DEFINITIVE FIXATION

[VIDEO CUE: Intraoperative - reduction maintained, plates being applied]
NARRATOR: "Fixation proceeds in two stages: articular segment reconstruction first, then shaft fixation."

Stage 8A - Articular Segment Reconstruction

8A.1 Once anatomic articular reduction is confirmed, provisionally fix the articular segment with 1.6 mm K-wires drilled across the fracture.
8A.2 Insert small-diameter screws (2.0-2.7 mm headless compression or countersunk) along the capitellar-trochlear axis to compress and hold the articular segment as a unit.
  • Screws pass from lateral to medial through the capitellum and trochlea
  • Trajectory should be perpendicular to the fracture line
  • Countersink screw heads to avoid articular prominence
8A.3 Small osteochondral fragments exposed anteriorly can be accessed by internally rotating the appropriate column fragment to see the anterior articular surface.
🎯 Tip: Supplementary implants for small fragments - mini-fragment plates, headless compression screws (e.g., Acutrak), or bioabsorbable pins. These must be placed so they do not block subsequent bicolumnar plate application.

Stage 8B - Column Fixation (Shaft to Articular Segment)

NARRATOR: "The articular segment is now rigidly fixed. We attach it to the humeral shaft using bicolumnar plating."
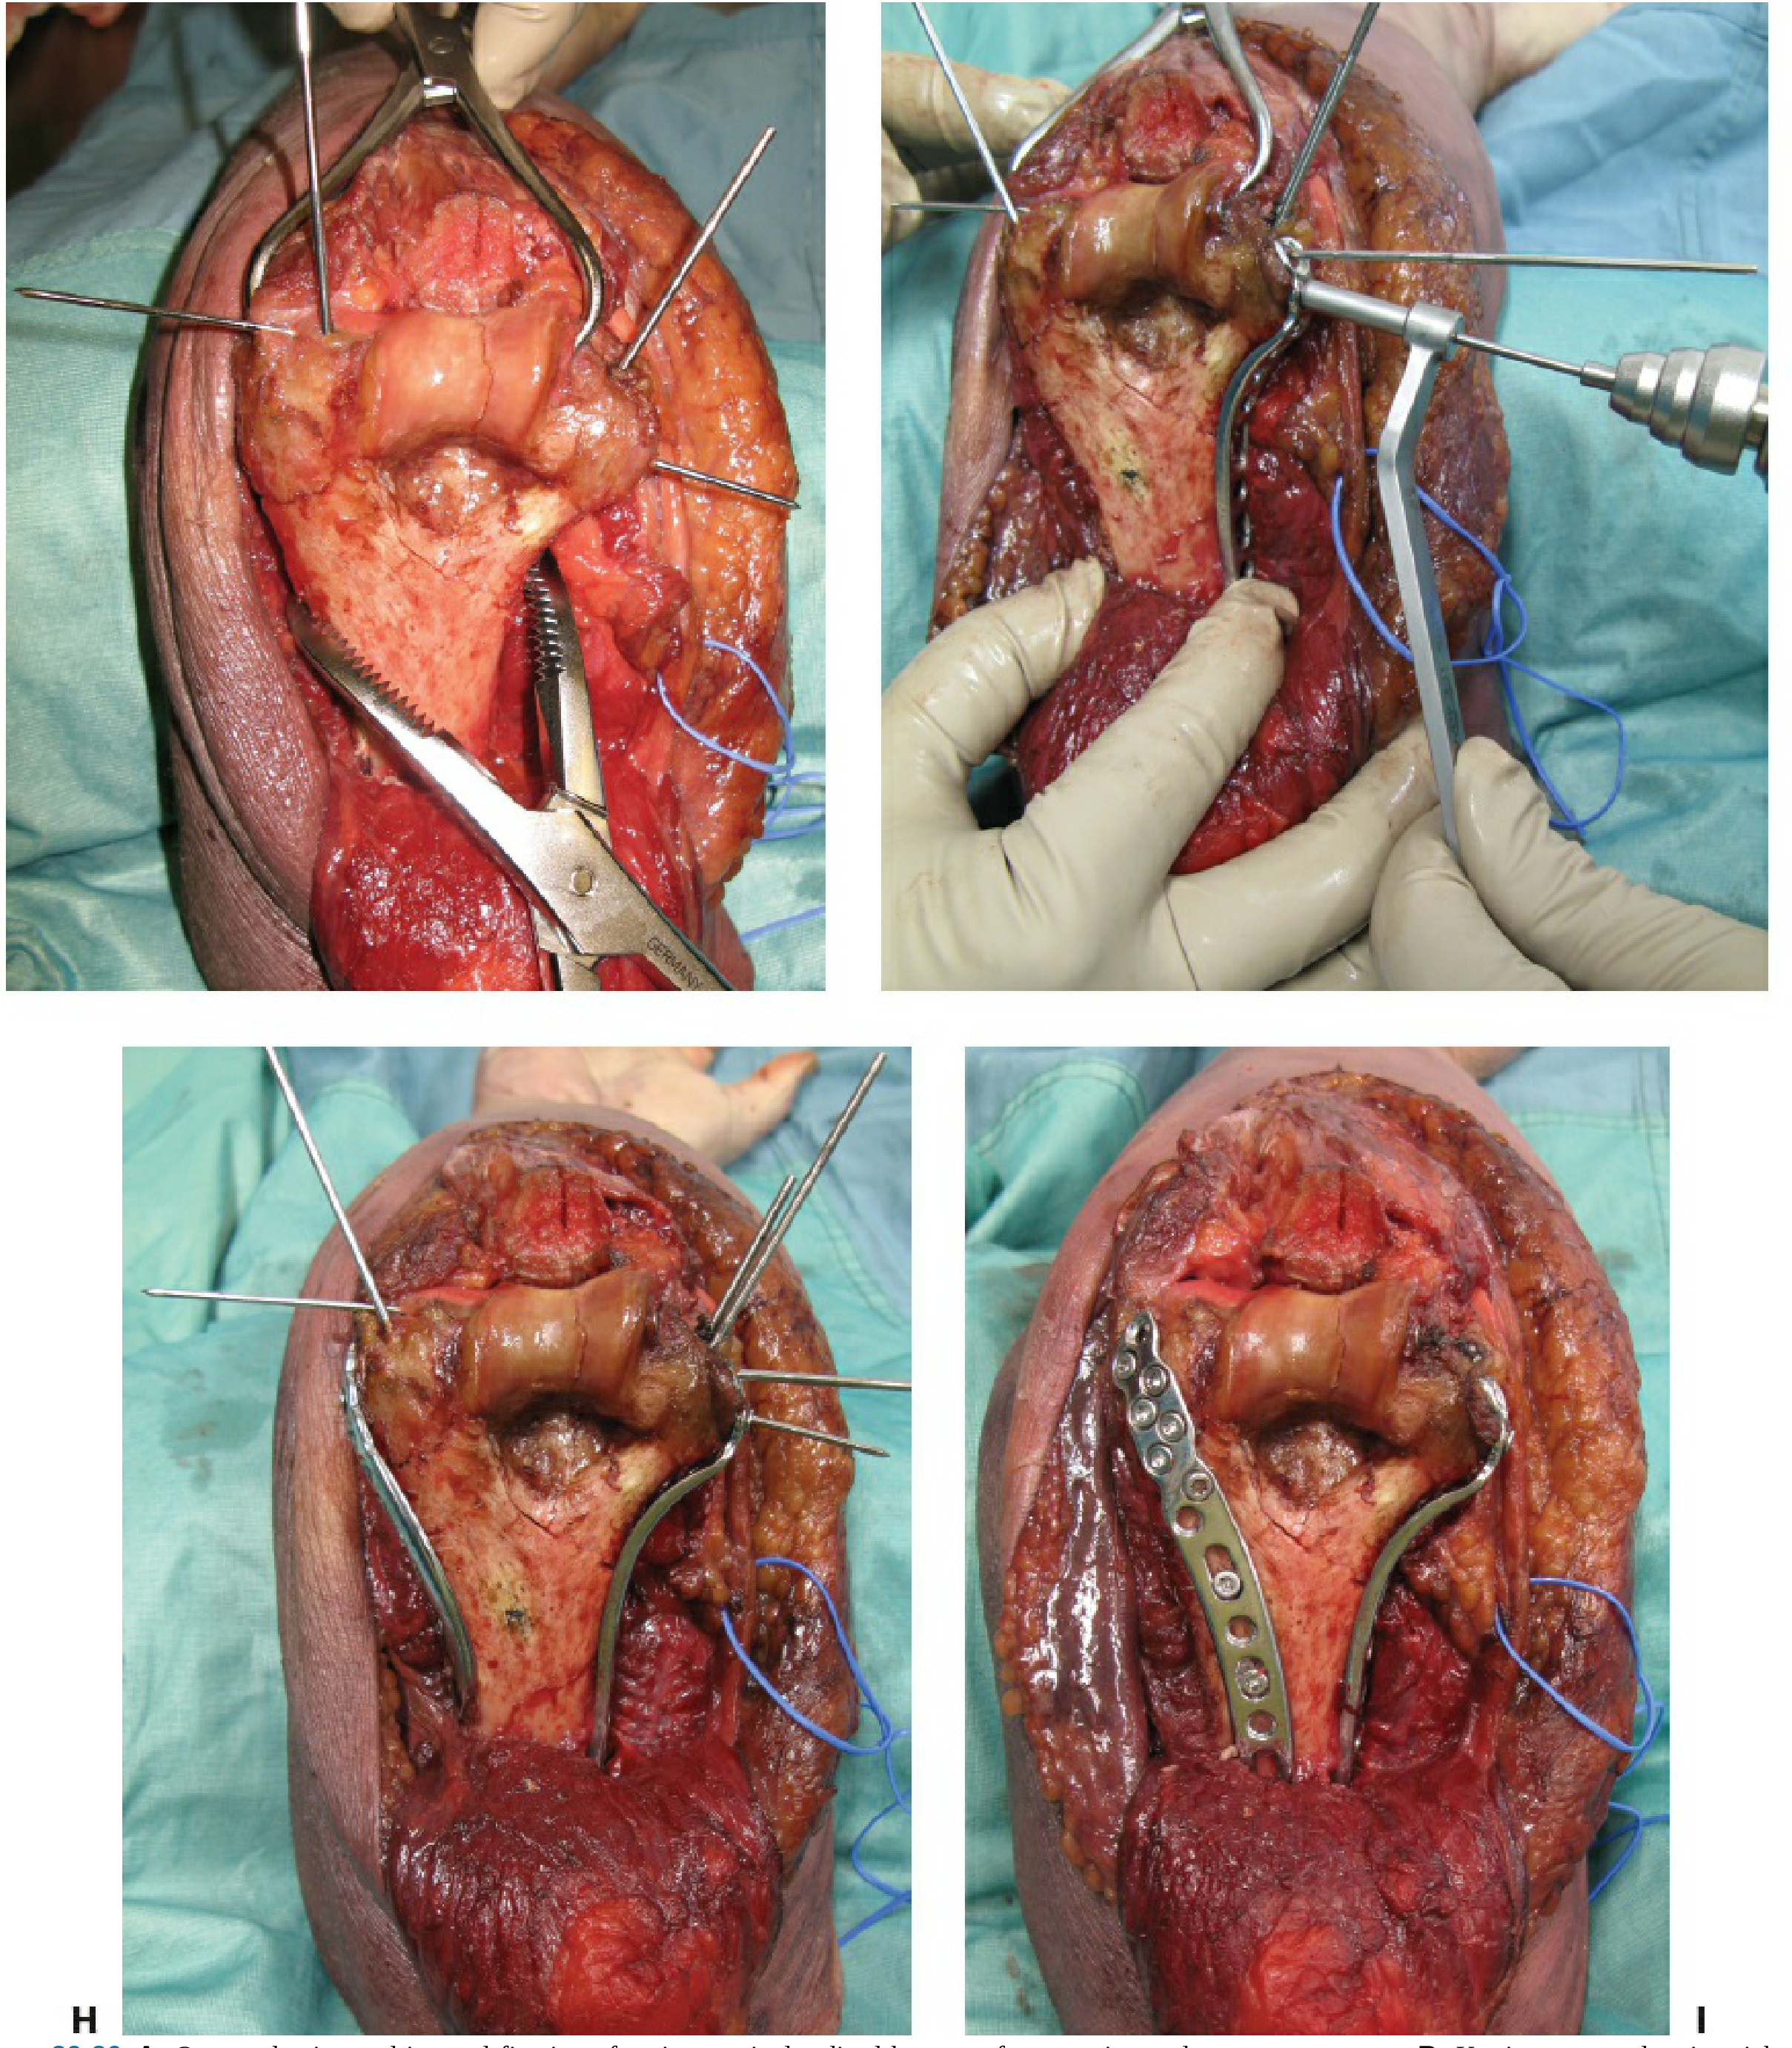
ORIF of distal humerus - H: Articular reduction maintained with K-wires and tenaculum. I: Parallel bicolumnar plates applied through the paratricipital windows.
Fig 39-26H/I: Articular reduction maintained with K-wires (H). Parallel bicolumnar plates applied (I). Note: blue loops = ulnar nerve protected. (Rockwood & Green's, 10th Ed)
Plating Technique - Parallel Plating (Preferred):
8B.1 Select anatomically precontoured medial column plate and lateral column plate.
8B.2 Contour plates as needed to fit the distal humerus anatomy.
8B.3 Place the medial plate along the medial column - applied through the medial window.
8B.4 Place the lateral plate along the lateral column - applied through the lateral window.
  • In parallel plating: both plates lie roughly in the same coronal plane, one on each column
  • Plates should interdigitate distally so screws from one plate pass between screws from the other
8B.5 Screw insertion principles:
  • Insert as many screws as possible through the plates into the articular segment
  • Screws should be as long as possible to engage maximum bone stock
  • Screws should engage as many articular fragments as possible
  • Do NOT place screws through the olecranon fossa - this causes impingement and blocks extension
8B.6 Tighten all screws sequentially. Confirm fixation rigidity by applying varus/valgus stress.
8B.7 Final fluoroscopic check: AP and lateral images. Confirm:
  • Articular congruence
  • Column alignment
  • Screw length (no intra-articular prominence)
  • No olecranon fossa screw
🎯 Tip: Orthogonal plating (90-90 configuration - one medial, one posterolateral) is equally effective biomechanically. Choose based on fracture pattern and surgeon familiarity. Triple plating adds a third implant for highly comminuted C3 patterns.

SCENE 9 - INTRAOPERATIVE CONVERSION CHECK

[VIDEO CUE: Surgeon pausing, looking at fixation]
NARRATOR: "Before closing, confirm the fixation is satisfactory. If rigid fixation cannot be achieved, particularly in elderly patients, conversion to TEA via the same approach is possible without modification - a key advantage of the triceps-sparing approach."
Convert to TEA if:
  • Fixation is biomechanically insufficient
  • Patient is elderly with high articular comminution
  • Bone quality precludes adequate screw purchase
If converting: Release MCL and LCL to allow joint dislocation. Proceed to TEA implantation per implant manual.

SCENE 10 - WOUND CLOSURE

[VIDEO CUE: Final fixation confirmed, moving to closure]
NARRATOR: "Closure is straightforward because the triceps was never detached. No tendon repair is needed."

Steps:

10.1 Thoroughly irrigate the wound with 3L of saline.
10.2 Remove all provisional K-wires used only for positioning (leave any used for final fixation).
10.3 Reposition the ulnar nerve:
  • If previously transposed anteriorly, now decide final position: anterior subcutaneous transposition vs. replace in groove
  • Most surgeons perform formal anterior subcutaneous transposition when the nerve has been fully mobilized
  • Secure the transposed nerve with a loose fascial sling (avoid tight constriction)
10.4 Release the tourniquet. Achieve hemostasis with electrocautery.
10.5 Place a drain (optional) if significant dead space.
10.6 Deep layer closure: Suture the deep fascia over both the medial and lateral windows with interrupted absorbable sutures (Vicryl 0). The triceps insertion on the olecranon is intact and requires no repair.
10.7 Subcutaneous layer: Interrupted absorbable sutures (Vicryl 2-0).
10.8 Skin closure: Interrupted nylon or staples.
10.9 Padded posterior splint with elbow at 90° flexion.

SCENE 11 - POSTOPERATIVE PROTOCOL

[VIDEO CUE: Patient in recovery, arm elevated]
TimeAction
Day 0-1Elevation, ice. Check neurovascular status (ulnar nerve - sensation little finger, intrinsic power).
Day 1-2Remove drain. Active hand and wrist exercises immediately.
Week 1Wound check. Begin active-assisted elbow flexion-extension - this is the key advantage of the triceps-sparing approach.
Week 2Suture/staple removal. Continue active ROM.
Week 4-6Progress to light resistive exercises.
Week 8-12Radiographic union check. Progress loading as tolerated.
6 monthsReturn to full activity if healed.
🎯 Key Advantage: Because the triceps insertion is completely intact, there is no postoperative extension restriction. Active elbow extension is permitted from day 1. This is the primary clinical advantage over the Campbell and TRAP approaches.

SCENE 12 - POTENTIAL PITFALLS AND HOW TO AVOID THEM

PitfallHow It HappensPrevention
Ulnar nerve injuryTraction, cautery near nerveVessel loop always visible; no retraction under tension
Radial nerve injuryProximal extension of lateral dissectionStay distal to 7-8 cm above lateral epicondyle
Insufficient exposureC3 fracture attempted via this approachKnow limits - convert to olecranon osteotomy early, not late
Intra-articular screwsScrews too long in articular segmentMeasure carefully; AP/lateral fluoro before tightening
Olecranon fossa screwScrew placed in wrong trajectoryPre-plan screw trajectory; check on lateral fluoro
Hardware prominenceLateral plate in thin patientConsider posterolateral plate for high supracondylar fractures
Skin necrosisThin flaps, excessive retractionAlways raise full-thickness fasciocutaneous flaps
StiffnessDelayed mobilizationStart active ROM day 1 - no triceps repair = no restriction

COMPLETE SURGICAL CHECKLIST (Quick Reference)

PRE-OP
  □ CT reviewed, fracture classified (AO type)
  □ Implants templated and available
  □ IV antibiotics given before tourniquet inflation
  □ Ulnar nerve baseline documented

POSITIONING
  □ Supine, ipsilateral scapula bolster
  □ Elbow on chest bolster
  □ Sterile tourniquet applied

APPROACH
  □ Posterior midline skin incision (curve medial to olecranon tip)
  □ Full-thickness fasciocutaneous flaps raised
  □ Ulnar nerve identified, vessel-looped, transposed anteriorly
  □ Cubital tunnel retinaculum released
  □ MEDIAL WINDOW: interval between triceps and MIS developed
  □ Medial intermuscular septum EXCISED
  □ Triceps elevated subperiosteally off medial column
  □ LATERAL WINDOW: triceps/anconeus elevated off lateral column
  □ Radial nerve level confirmed - do not dissect proximal

REDUCTION
  □ Hematoma irrigated
  □ Articular fragments identified
  □ K-wire joysticks used
  □ Elbow flexed 90° to improve visualization
  □ Provisional reduction confirmed on fluoroscopy

FIXATION
  □ Articular screw(s) along capitellar-trochlear axis
  □ Parallel (or orthogonal) bicolumnar plates applied
  □ Maximum screws into articular segment
  □ No screws in olecranon fossa
  □ Final AP + lateral fluoroscopy - articular congruence confirmed

CLOSURE
  □ Tourniquet released, hemostasis
  □ Ulnar nerve transposition secured
  □ Deep fascia closed - NO triceps repair needed
  □ Skin closed
  □ Posterior splint 90°

POST-OP
  □ Neurovascular check (ulnar nerve first)
  □ Elevation and ice
  □ Active ROM started day 1

Sources: Rockwood and Green's Fractures in Adults 10th Ed 2025, Campbell's Operative Orthopaedics 15th Ed 2026, Alonso-Llames (1972) original description, Gerwin et al. extensile modification.

Generate same for trap approach

Finding Sources
Finding Sources
Finding Sources
Reading File
Finding Sources
Finding Sources
Finding Sources
Reading File
Finding Sources
Loading Image
Loading Image
Loading Image
Reading File
Loading Image
Loading Image
Reading File
I now have all textbook content and all three intraoperative TRAP approach images. Here is the full surgical video script:

🎬 SURGICAL VIDEO SCRIPT

TRAP Approach (Triceps-Reflecting Anconeus Pedicle) for Distal Humerus Fracture ORIF

A Step-by-Step Operative Guide

Described by: O'Driscoll Indication: OTA/AO type C (complete articular) distal humerus fractures; complex intra-articular patterns; cases where olecranon osteotomy complications must be avoided Key principle: Triceps and anconeus are reflected proximally together as a single vascularized pedicle flap, preserving the anconeus neurovascular supply while achieving wide posterior joint exposure Based on: Rockwood & Green's Fractures in Adults (10th Ed, 2025) | Campbell's Operative Orthopaedics (15th Ed, 2026)

WHY THE TRAP APPROACH?

FeatureParatricipitalTRAPOlecranon Osteotomy
Articular exposureLimitedGood - full posterior jointBest (58% articular surface)
Triceps statusIntactReflected off ulnaIntact (osteotomy not triceps)
Olecranon osteotomyNoneNoneRequired
Trochlear sulcus visibleNoYes - used as reduction templateYes
Early motionYesRestricted (6 weeks)Restricted (osteotomy healing)
Osteotomy complicationsNoneNoneNonunion, hardware pain (27%)
Best forA2/A3, B1/B2, C1/C2C2/C3 ORIF, complex articularC3, maximum articular exposure

SCENE 1 - PREOPERATIVE SETUP & CHECKLIST

[VIDEO CUE: Overhead OR shot]

Indications for the TRAP Approach

  • Intra-articular distal humerus fractures with moderate-to-high articular comminution where direct trochlear visualization is needed
  • Cases where the surgeon wishes to avoid olecranon osteotomy complications (nonunion, hardware, ulnar nerve neuritis - reported at 33% in osteotomy series)
  • Complex articular fractures where the trochlear sulcus is needed as a reduction template
  • Intraoperative conversion from ORIF to TEA remains possible through the same exposure

Preoperative Checklist

ItemDetail
ImagingAP + lateral elbow XR; CT scan with 3D reconstructions mandatory for C-type fractures
TemplatingBicolumnar locking plates (parallel and orthogonal systems), headless compression screws, mini-fragment set
AntibioticsIV cephalosporin 30 min before tourniquet
TourniquetSterile pneumatic tourniquet to arm
Neuro baselineDocument ulnar nerve (little finger sensation, intrinsic power) and radial nerve (wrist/finger extension)
ContingencyHave olecranon osteotomy instruments available if further exposure needed
⚠️ Important: Pre-brief the team that this approach involves complete triceps detachment. Postoperative extension restriction will be in place for 6 weeks. All team members should be aware.

SCENE 2 - PATIENT POSITIONING

[VIDEO CUE: Patient being positioned]
NARRATOR: "The TRAP approach is most commonly performed in the lateral decubitus position, though supine with a chest bolster is equally acceptable."
Preferred - Lateral Decubitus:
  1. Patient in lateral decubitus on a bean bag or padded support
  2. Operative arm draped free over an arthroscopy arm positioner or padded support, elbow flexed approximately 90°
  3. Arm positioned so elbow hangs free, allowing gravity-assisted retraction during the approach
  4. Tourniquet on the upper arm, sterile field from mid-arm distally
  5. Surgeon stands posterior to the patient; assistant on the opposite side
Alternative - Supine:
  • Bolster under ipsilateral scapula
  • Elbow rests on a folded sterile sheet on the patient's chest
🎯 Tip: The lateral decubitus position allows the arm to be repositioned (pronated/supinated, flexed/extended) freely during different phases - essential for visualizing anterior articular fragments via internal rotation of column fragments.

SCENE 3 - SKIN INCISION

[VIDEO CUE: Posterior elbow marked with pen]
NARRATOR: "The posterior midline incision is identical to all posterior elbow approaches."

Steps:

3.1 Mark bony landmarks with a marking pen:
  • Tip of the olecranon
  • Medial epicondyle
  • Lateral epicondyle
3.2 Plan a posterior midline longitudinal incision:
  • Begin 10-12 cm proximal to the olecranon tip, in the posterior midline of the arm
  • Curve slightly medial to the olecranon tip (avoids direct pressure over the incision post-op)
  • Extend distally 6-8 cm along the subcutaneous border of the ulna (this distal extension is important for the TRAP - you need access along the full length of the ulnar border)
3.3 Infiltrate subcutaneous tissue with 1:200,000 adrenaline solution to minimize bleeding.
3.4 Incise skin with a #10 blade to subcutaneous fat in a single pass.
3.5 Raise full-thickness fasciocutaneous flaps medially and laterally:
  • Maintain the plane immediately on the deep fascia
  • Thick flaps protect the subdermal plexus and reduce wound healing complications
  • Expose the olecranon, medial epicondyle, and lateral epicondyle fully
⚠️ Hazard: The medial antebrachial cutaneous nerve branches cross the medial flap distally. Protect them during flap elevation to avoid dysesthesia.

SCENE 4 - ULNAR NERVE IDENTIFICATION AND TRANSPOSITION

[VIDEO CUE: Medial side of elbow, forceps lifting the nerve]
NARRATOR: "Ulnar nerve identification is the first and most critical step before any further dissection. It must be protected at every subsequent stage."

Steps:

4.1 Palpate the medial epicondyle and cubital tunnel retinaculum (Osborne's ligament).
4.2 Incise the cubital tunnel retinaculum longitudinally with scissors.
4.3 Identify the ulnar nerve in its groove immediately posterior to the medial epicondyle.
  • Bluish-white cord, approximately 4-5 mm diameter
  • First branch (to FCU) exits ~3 cm distal to the epicondyle
4.4 Pass a vessel loop (yellow) around the nerve immediately.
4.5 Mobilize the nerve proximally - release the medial intermuscular septum for 5-6 cm into the arm using scissors (this septum must be excised during the medial dissection anyway and releasing it now protects the nerve).
4.6 Mobilize the nerve distally into the forearm - release the FCU fascial roof for 3-4 cm. Identify but preserve the first motor branch to FCU.
4.7 Transpose the ulnar nerve anteriorly subcutaneous and secure with a loose suture to the anterior flap. The vessel loop remains visible throughout.
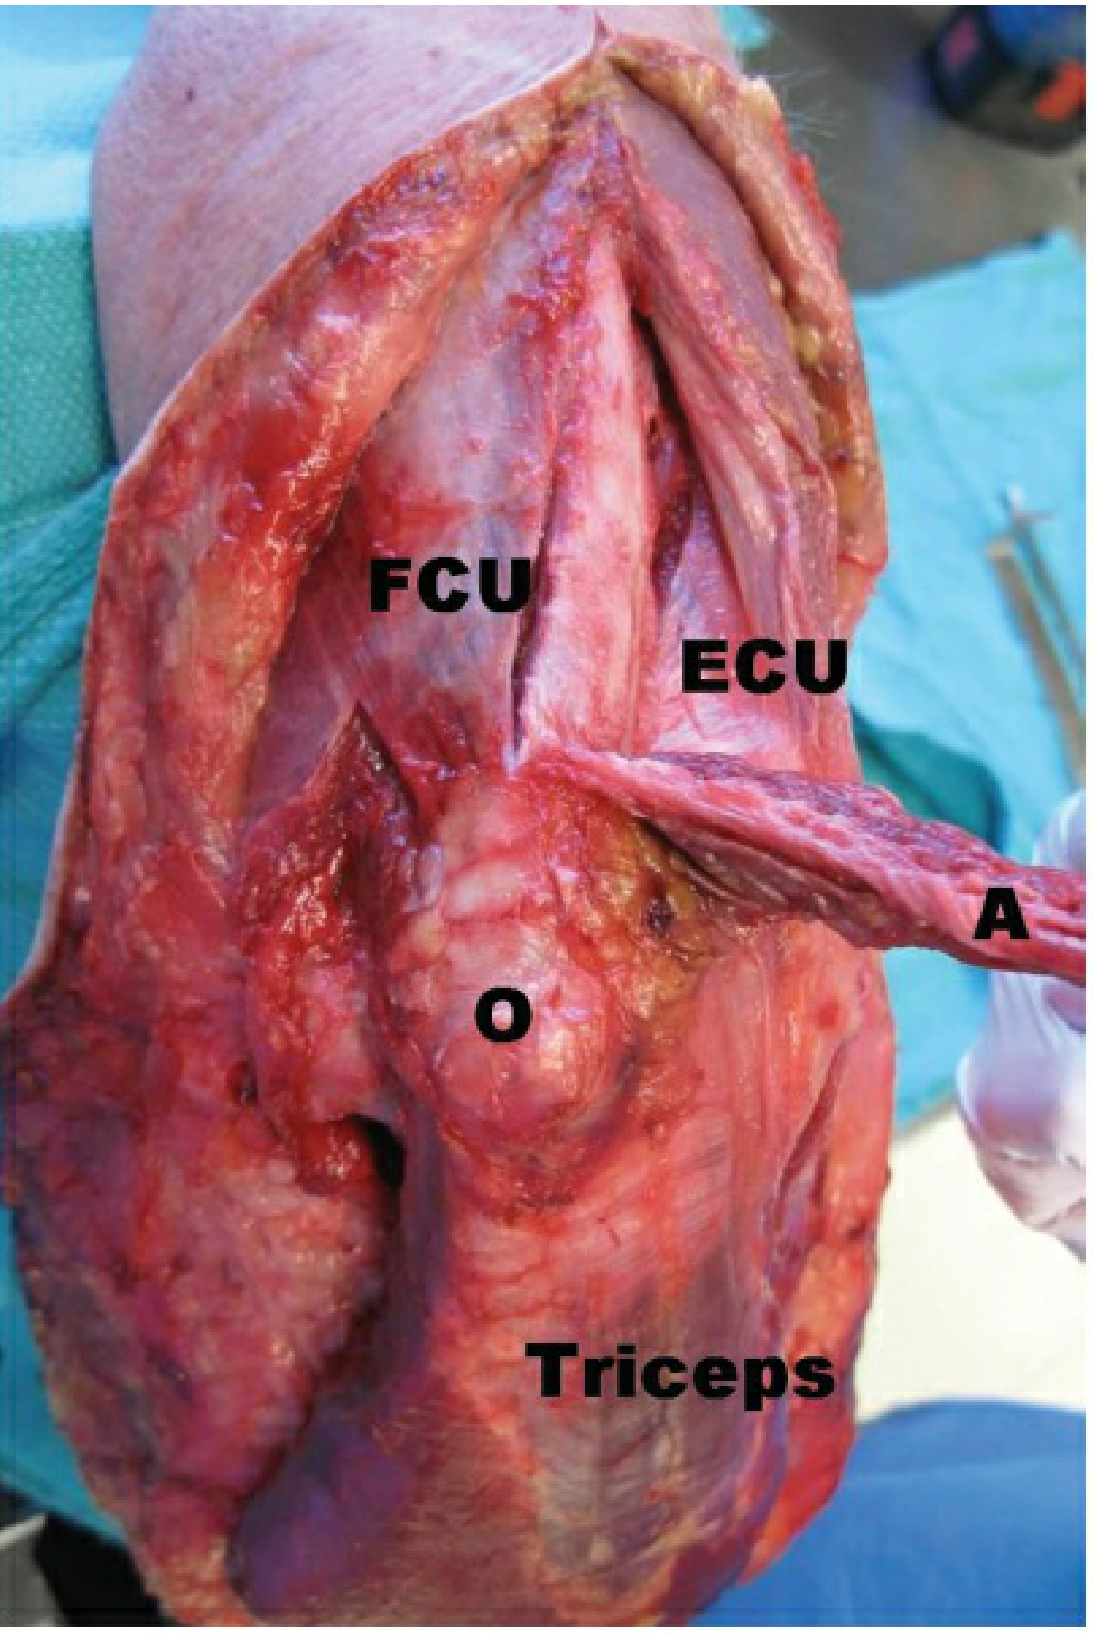
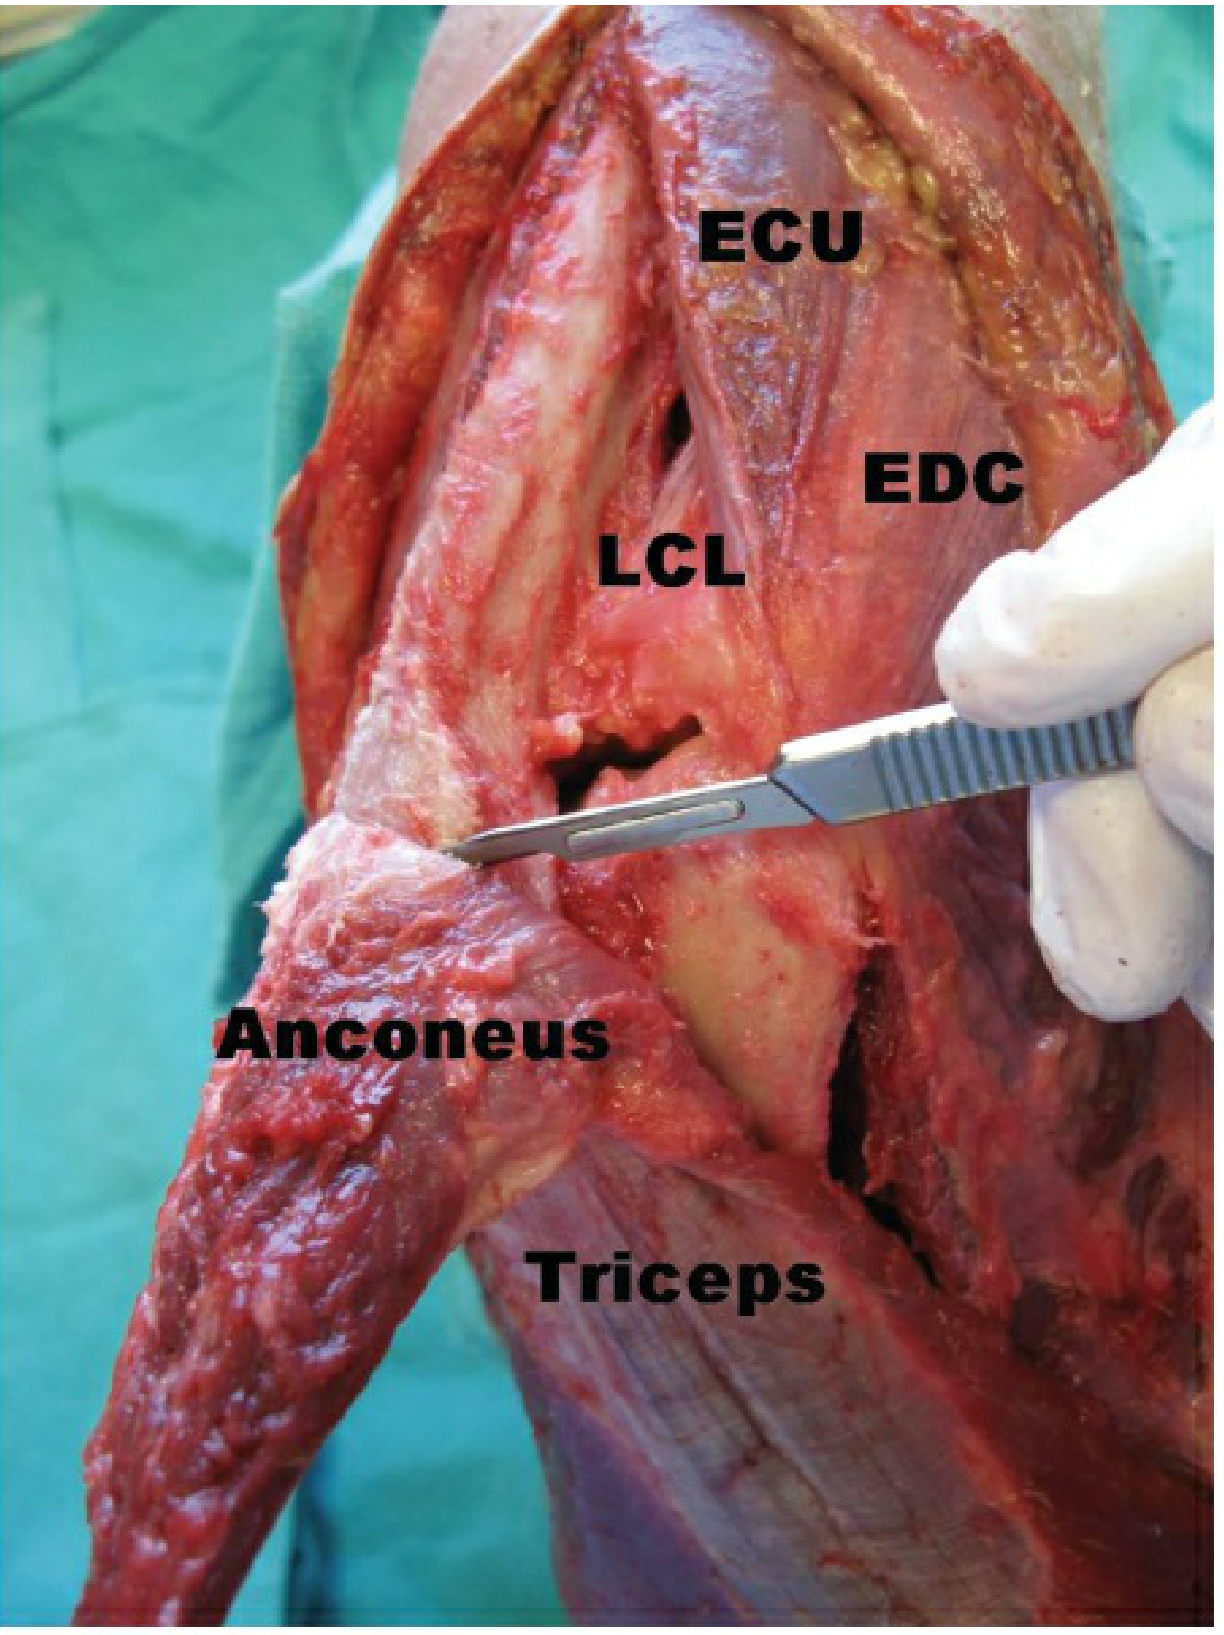
TRAP approach - Step A: Kocher interval (ECU/anconeus) developed. Anconeus (A) reflected proximally. O = olecranon. FCU and ECU labeled. Triceps visible distally.
Fig 39-22A: TRAP approach - lateral side. Kocher interval used to elevate anconeus (A). O = olecranon tip. FCU = flexor carpi ulnaris (medial side visible). ECU = extensor carpi ulnaris (lateral). Triceps = distal muscle belly. (Rockwood & Green's, 10th Ed)
⚠️ Critical: Ulnar nerve neuritis was reported in 0% of TRAP/triceps-tongue cases vs 33% in olecranon osteotomy cases. The TRAP approach's zero neuritis rate depends on meticulous nerve handling.

SCENE 5 - LATERAL FLAP: KOCHER INTERVAL AND ANCONEUS ELEVATION

[VIDEO CUE: Lateral elbow, surgeon working Kocher interval]
NARRATOR: "The TRAP flap is built from the lateral side first using the Kocher interval. This is the foundation of the entire approach."

Understanding the Key Anatomy First:

  • Kocher interval = the surgical plane between ECU (extensor carpi ulnaris) and anconeus
  • The interval is marked by a thin fat stripe running longitudinally, or by the perforating branches of the recurrent posterior interosseous artery
  • The anconeus originates from the lateral epicondyle and inserts broadly on the posterior ulna
  • The anconeus receives its nerve supply (branch of radial nerve) proximally - therefore, reflecting it distally-to-proximally is safe and preserves innervation

Steps:

5.1 Identify the Kocher interval on the lateral side of the elbow:
  • Palpate the lateral epicondyle
  • The interval runs from the lateral epicondyle distally along the posterior-lateral forearm
  • Look for the thin fat stripe between ECU (anterior) and anconeus (posterior)
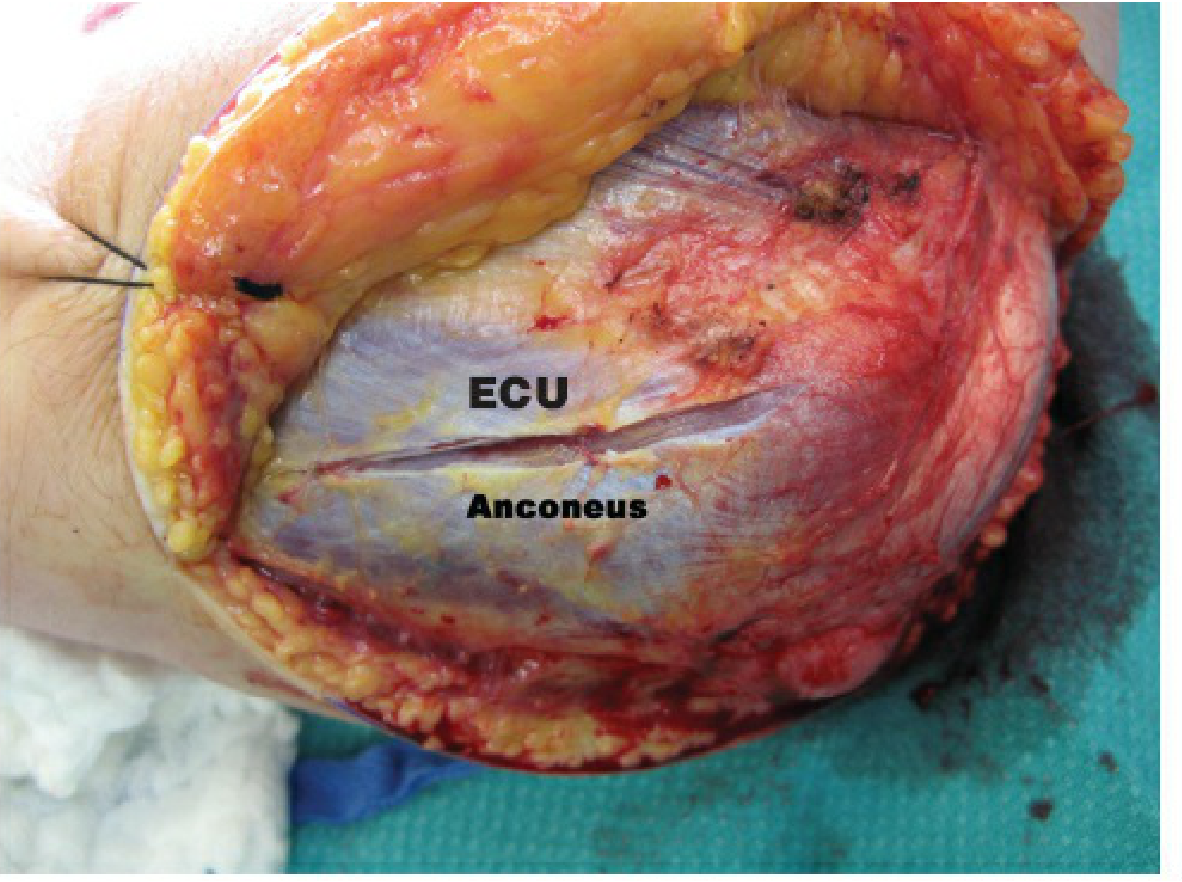
Kocher interval anatomy - ECU (extensor carpi ulnaris) and Anconeus labeled clearly, thin interval between them visible as a fascial line
Fig 39-23B: ECU and anconeus labeled. The Kocher interval lies between these two muscles. (Rockwood & Green's, 10th Ed)
5.2 Incise the fascia in the Kocher interval with scissors from the lateral epicondyle distally along the lateral ulna.
5.3 Develop the interval by bluntly undermining the anconeus using scissors and a periosteal elevator - this exposes the elbow joint capsule and the lateral ulnar collateral ligament (LUCL) beneath.
⚠️ Hazard: The posterior interosseous nerve (PIN) lies at risk if the interval is extended distally below the radial neck. Pronate the forearm during distal extension - this moves the PIN anteriorly and increases the safe working distance.
5.4 Elevate the anconeus off the lateral epicondyle and posterior lateral humerus subperiosteally using a periosteal elevator. Work from distal to proximal.
5.5 Continue subperiosteal elevation to free the anconeus from the lateral border and posterior surface of the ulna (distal-to-proximal direction).
5.6 The anconeus is now mobilized as the distal lateral portion of the TRAP flap. It is reflected proximally toward the olecranon, tethered at its origin from the lateral epicondyle.

SCENE 6 - MEDIAL FLAP: SUBPERIOSTEAL DISSECTION FROM THE ULNAR BORDER

[VIDEO CUE: Medial side, periosteal elevator on subcutaneous ulna border]
NARRATOR: "We now develop the medial portion of the combined triceps-anconeus flap by stripping the triceps and soft tissues off the medial ulna subperiosteally."

Steps:

6.1 On the medial side, identify the subcutaneous border of the ulna (the palpable sharp ridge running from olecranon to the ulnar styloid).
6.2 Incise the periosteum and triceps attachment along the medial ulnar border with a scalpel, starting 4-5 cm distal to the olecranon tip and working proximally.
6.3 Elevate the periosteum and overlying soft tissues off the medial ulna using a periosteal elevator, working in a subperiosteal plane from medial-to-lateral across the posterior ulna.
6.4 Continue the subperiosteal elevation across the posterior surface of the proximal ulna toward the midline.
6.5 Connect the medial dissection to the lateral (Kocher) dissection across the posterior ulna - the two planes now meet in the midline of the posterior ulna.
🎯 Tip: Keep the dissection strictly subperiosteal throughout. Staying on bone avoids injury to the ulnar nerve (medially) and PIN (laterally), and keeps the flap vascular.

SCENE 7 - REFLECTING THE TRICEPS-ANCONEUS FLAP PROXIMALLY

[VIDEO CUE: The critical moment - flap reflected en bloc upward]
NARRATOR: "The anconeus flap is now reflected proximally. This exposes the triceps insertion on the olecranon, which is then sharply released. The entire triceps-anconeus unit is lifted off the elbow joint."

Steps:

7.1 With the medial and lateral flap components mobilized and connected, reflect the combined anconeus + proximal ulnar periosteum flap proximally toward the olecranon. The olecranon tip is now exposed.
7.2 The triceps insertion on the olecranon tip is now visible from below/laterally.
7.3 Sharply release the triceps tendon insertion from the olecranon with a scalpel or electrocautery, cutting directly off the bone:
  • Keep the release as close to bone as possible to preserve maximum tendon length for later reattachment
  • Release proceeds from lateral to medial across the entire olecranon footprint
TRAP approach - Step B: Anconeus flap (A) reflected proximally. Scalpel/scissors sharply releasing triceps insertion from olecranon. Triceps belly visible. LCL, ECU, EDC labeled on lateral side.
Fig 39-22B: Triceps insertion being sharply released from olecranon. Anconeus (A) and triceps both visible. LCL = lateral collateral ligament; ECU = extensor carpi ulnaris; EDC = extensor digitorum communis. (Rockwood & Green's, 10th Ed)
7.4 Continue to elevate the triceps muscle off the posterior surface of the distal humerus using a periosteal elevator, working proximally along the posterior shaft.
7.5 The entire triceps-anconeus unit is now reflected proximally, hinged at the proximal triceps musculotendinous junction. Hold it with a moist gauze and a proximal retractor.
7.6 The posterior elbow joint is now fully exposed:
  • Entire olecranon fossa
  • Both medial and lateral columns
  • Trochlear sulcus (key articular landmark - used as reduction template)
  • Posterior capitellum
  • Posterior trochlea
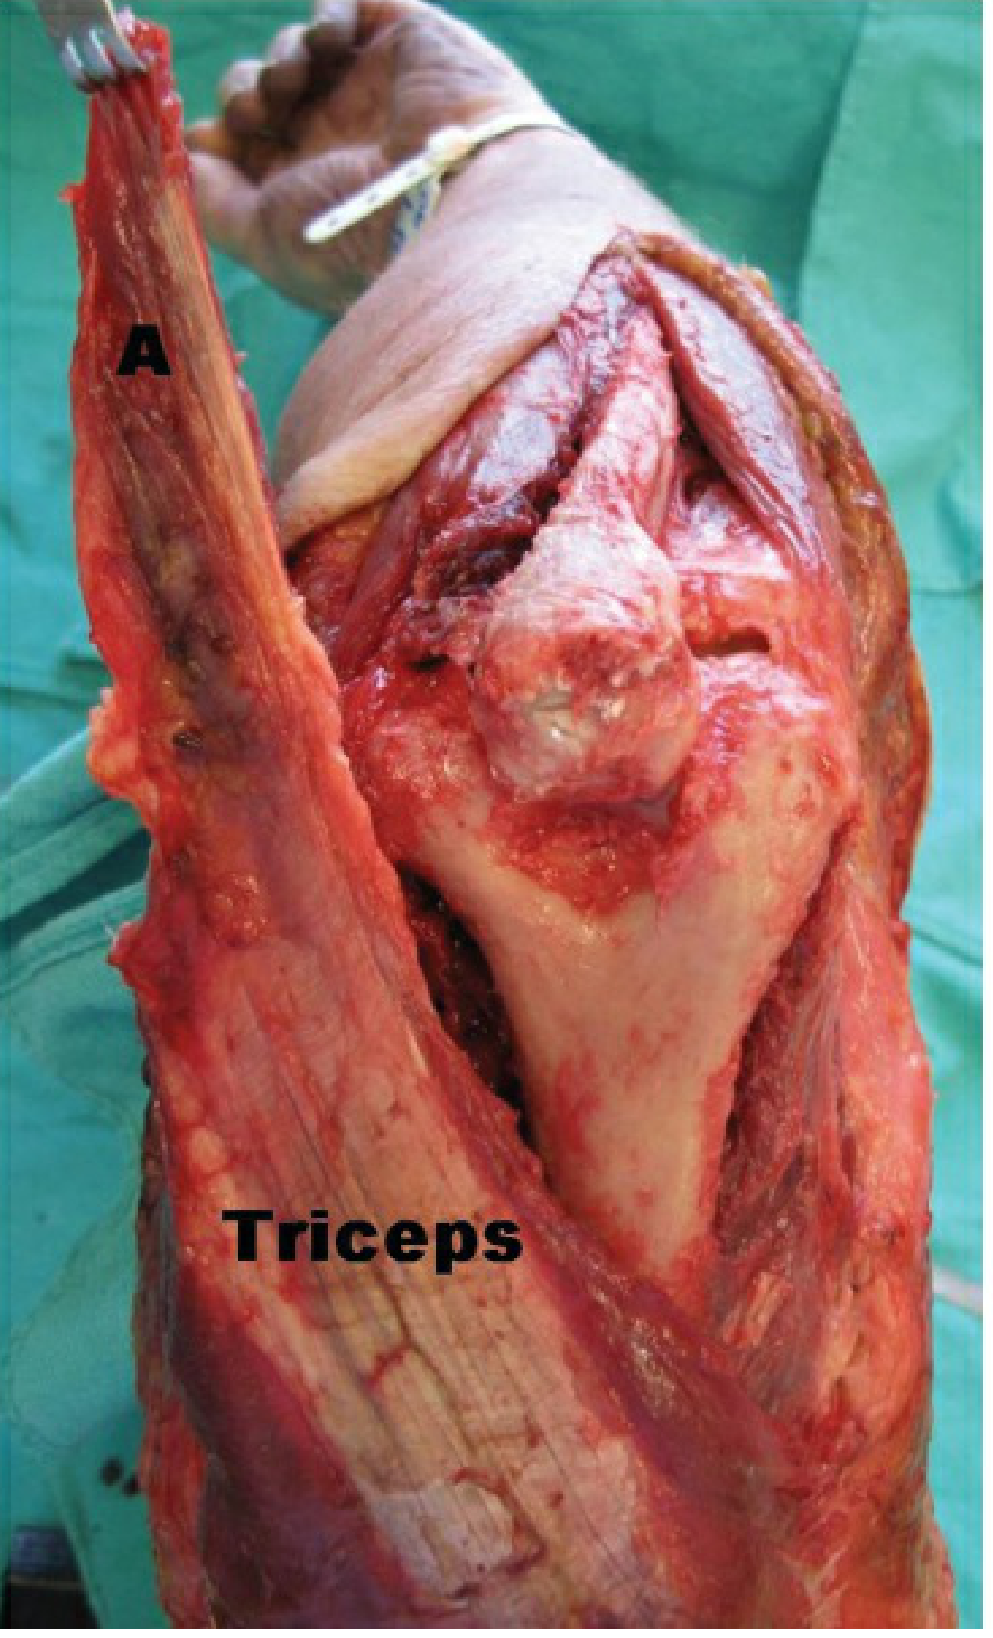
TRAP approach - Step C: Entire triceps-anconeus flap (Triceps label) fully reflected proximally. A = anconeus pedicle. Full posterior joint surface visible including the distal humeral articular surface and olecranon fossa.
Fig 39-22C: Complete TRAP flap reflected. A = anconeus. Triceps = reflected proximal muscle belly. Full posterior elbow joint exposure achieved. (Rockwood & Green's, 10th Ed)
🎯 The Signature Advantage: The trochlear sulcus is now directly visible and can be used as a template for articular reduction - a unique benefit of the TRAP approach not available with the paratricipital or triceps-splitting approaches.
⚠️ Hazard: Keep the vessel loop on the ulnar nerve visible at all times. With the entire posterior joint now open, it is easy to lose sight of the nerve especially when placing retractors medially.

SCENE 8 - FRACTURE ASSESSMENT, REDUCTION, AND FIXATION

[VIDEO CUE: Wide posterior joint exposure with fracture fragments visible]
NARRATOR: "With the entire posterior elbow visible, we systematically reduce and fix the articular fracture using the trochlear sulcus as our primary reference landmark."

Stage 8A - Fracture Inventory

8A.1 Irrigate thoroughly to remove hematoma and identify all fracture fragments.
8A.2 Map fracture anatomy against the preoperative CT:
  • Identify the capitellar fragment (lateral)
  • Identify the trochlear fragment(s) (medial)
  • Identify any free osteochondral fragments
  • Confirm the trochlear sulcus is identifiable - this is the central reference point
8A.3 Tag any small osteochondral fragments with a provisional suture or K-wire stub to prevent them being lost during the case.

Stage 8B - Articular Reconstruction: Trochlea-First Strategy

8B.1 Begin with the trochlear sulcus as the foundation of the reduction. It is the keystone of the distal humerus articular surface.
8B.2 Use 1.6 mm K-wires as joysticks to manipulate the trochlear and capitellar fragments.
8B.3 Reduce the capitellar and trochlear fragments together, restoring the spool-shaped articular block:
  • The trochlear sulcus must be anatomically restored
  • The capitellar articular surface must be flush with the lateral trochlear ridge
8B.4 Apply a large reduction tenaculum to compress the fragments, clamping across the condyles.
8B.5 Confirm provisional reduction fluoroscopically (AP and lateral).
8B.6 Provisionally fix with 1.6-2.0 mm K-wires passed across the articular block.
8B.7 Insert definitive articular screws (headless compression screws 3.0-4.0 mm, or small-diameter lag screws) along the capitellar-trochlear axis - lateral to medial, perpendicular to the fracture plane:
  • Countersink screw heads to avoid articular prominence
  • Confirm screw length on fluoroscopy (must not protrude beyond medial cortex)
8B.8 For small anterior osteochondral fragments: internally rotate the relevant column fragment to expose the anterior articular surface. Fix with headless compression screws, mini-plates, or bioabsorbable pins as appropriate.

Stage 8C - Column Fixation: Articular Segment to Shaft

NARRATOR: "The articular block is now reconstructed. We attach it to the humeral shaft with bicolumnar plating."
8C.1 Reduce the reconstructed articular block to the humeral shaft using long bicortical K-wires (2.0 mm) placed provisionally up each column.
8C.2 Confirm reduction fluoroscopically - AP and lateral.
8C.3 Apply anatomically precontoured bicolumnar plates:
Parallel plating technique (preferred):
  • Medial column plate along the medial column
  • Lateral column plate along the lateral column
  • Plates sit roughly in the same coronal plane; distal screws from each plate interdigitate
Orthogonal plating technique (alternative):
  • One plate on the posterior medial column
  • One plate on the posterolateral column (90° to the first plate)
8C.4 Distal screw fixation principles:
  • Insert as many screws as possible through both plates into the articular segment
  • Screws should be as long as possible, spanning the full width of the articular segment
  • Each screw should engage as many articular fragments as possible
  • Avoid the olecranon fossa - screws through the fossa cause impingement and block full extension
8C.5 Shaft fixation:
  • Insert the first diaphyseal screw eccentrically in the plate's shaft holes to compress the supracondylar fracture site
  • Fill remaining shaft holes with locking or cortical screws
  • Minimum 3 bicortical shaft screws each side above the fracture
8C.6 Final fluoroscopy: AP, lateral, and oblique views to confirm:
  • Articular congruence
  • Column reduction and alignment
  • All screw lengths safe (no articular prominence, none through olecranon fossa)
  • Carrying angle approximately correct
🎯 Tip: The TRAP approach allows the trochlear sulcus to guide articular reduction. Unlike the paratricipital approach where the articular surface is obscured by the intact triceps, here you can directly visualize and confirm articular congruence under direct vision before plating.

SCENE 9 - CHECK RANGE OF MOTION UNDER DIRECT VISION

[VIDEO CUE: Elbow moved through arc of motion]
NARRATOR: "Before closure, assess intraoperative range of motion and confirm no impingement."
9.1 With the tourniquet still inflated (or released), gently flex and extend the elbow.
  • Normal flexion arc: 0-140° should be achievable
  • Listen and feel for any crepitus or bony block
9.2 If impingement in extension is felt, examine the olecranon fossa fluoroscopically for:
  • Screw in olecranon fossa (remove and replace)
  • Residual small bony fragment in the fossa (remove)
  • Olecranon tip overhang (partial tip excision)
9.3 Confirm stability: apply varus/valgus and posterolateral rotatory stress - fixation should be rigid.

SCENE 10 - WOUND CLOSURE

[VIDEO CUE: Final fixation confirmed, tourniquet released]
NARRATOR: "Closure of the TRAP approach requires secure reattachment of the triceps-anconeus flap to the olecranon. This is the most critical part of the closure."

Steps:

10.1 Release the tourniquet. Achieve hemostasis with bipolar electrocautery. Irrigate copiously (3L normal saline).
10.2 Remove all provisional K-wires not serving as final fixation.
10.3 Ulnar nerve final position:
  • Confirm the ulnar nerve is positioned in the anterior subcutaneous transposition
  • Secure the transposition with a loose Z-plasty fascial sling (2-0 Vicryl) - the sling must allow finger to pass under it without resistance
  • Remove the vessel loop
10.4 TRICEPS-ANCONEUS FLAP REATTACHMENT - The critical step:
10.4a Drill 2-3 transosseous bone tunnels through the olecranon with a 2.0 mm drill:
  • One tunnel on the medial side of the olecranon
  • One tunnel on the lateral side
  • Optional third tunnel in the middle
  • Tunnel orientation: from posterior (dorsal) olecranon surface through to the anterior (articular) surface of the triceps footprint
10.4b Pass non-absorbable braided sutures (FiberWire #2 or equivalent) through the bone tunnels using a suture passer.
10.4c Pass the corresponding sutures through the triceps tendon in a locking Krackow or Bunnell configuration - capture maximum tendon.
10.4d With the elbow in full extension, tie the sutures firmly over the olecranon. Tension the repair with the elbow extended to maximize tendon purchase and prevent gap formation.
⚠️ Critical: Triceps dehiscence is the most feared complication of the TRAP approach. A weak or inadequate repair here directly leads to extensor mechanism failure. Use the strongest available suture; do not spare the number of passes.
10.4e Check repair integrity: hold the arm up with elbow extended and then flex it - the tendon repair should be visibly and palpably taut in extension.
10.5 Close the Kocher interval fascia with interrupted 0 Vicryl sutures - reapproximate the ECU/anconeus fascia.
10.6 Close the deep posterior fascia medially and laterally with interrupted absorbable sutures.
10.7 Place a surgical drain (optional, but recommended given the extensive dissection).
10.8 Subcutaneous layer: interrupted Vicryl 2-0.
10.9 Skin: interrupted nylon or staples.
10.10 Apply a padded posterior plaster splint with the elbow at 30-45° of flexion (not full extension) to reduce wound tension. This will be adjusted at the first dressing change.

SCENE 11 - POSTOPERATIVE PROTOCOL

[VIDEO CUE: Patient in recovery with arm splinted and elevated]
Key difference from paratricipital approach: Because the triceps was fully detached and reattached, elbow extension is restricted for 6 weeks to protect the triceps repair.
Time PointProtocol
Day 0-1Elevation at heart level. Ice. Check ulnar nerve (little finger sensation + adduction), radial nerve (finger/wrist extension).
Day 1-2Remove drain. Wound check. Active hand and wrist exercises immediately.
Week 1Convert splint to hinged elbow brace locked at 30-90° arc. Begin passive assisted flexion. No active extension.
Week 2Suture/staple removal. Increase flexion range passively.
Week 3-4Brace arc extended: 0-110° passively assisted. Gentle active-assisted flexion only.
Week 6Radiograph to confirm fracture healing and triceps attachment. Begin active elbow extension carefully if healed. Remove brace restriction.
Week 8-12Progressive resistive exercises. Functional activities.
6 monthsReturn to full activity if healed.

SCENE 12 - PITFALLS AND HOW TO AVOID THEM

PitfallMechanismPrevention
Triceps dehiscenceWeak transosseous repair; early unrestricted motionKrackow suture through bone tunnels; FiberWire #2; brace restricted to 6 weeks; counsel patient
Extensor mechanism weaknessDehiscence, poor healing, premature loadingProtect repair; delay active extension to week 6
Ulnar nerve injuryTraction during flap reflection; unrecognized during medial periosteal stripVessel loop always visible; transpose before starting the flap
PIN injuryKocher interval taken too far distallyPronate forearm when working distally; stay proximal to radial neck
Anconeus devascularizationFlap reflected distal-to-proximal (wrong direction)Always reflect from distal-to-proximal; nerve and blood supply enter from proximal
Inadequate articular exposureFlap not fully mobilized mediallyEnsure full medial subperiosteal elevation before reflecting
Olecranon fossa screwsMisdirected distal plate screwsPre-plan screw trajectories; lateral fluoroscopy before tightening
Intra-articular screw prominenceArticular screws too longMeasure depth; AP and oblique fluoroscopy
Wound necrosisThin flaps, excessive tensionFull-thickness fasciocutaneous flaps; splint at 30-45° not full extension
StiffnessDelayed physiotherapy, inadequate bony fixationBegin passive ROM week 1; active ROM week 6

COMPLETE SURGICAL CHECKLIST (Quick Reference Card)

PRE-OP
  □ CT reviewed, fracture pattern mapped (AO/OTA type)
  □ Trochlear sulcus identifiable on CT (landmark for reduction)
  □ Bicolumnar plates templated; headless screw set available
  □ Contingency plan if conversion to TEA needed
  □ IV antibiotics before tourniquet inflation
  □ Ulnar nerve baseline documented

POSITIONING
  □ Lateral decubitus or supine with chest bolster
  □ Arm draped free
  □ Sterile tourniquet applied

APPROACH
  □ Posterior midline incision - curves medial to olecranon tip
  □ Extends distally 6-8 cm along subcutaneous ulnar border
  □ Full-thickness fasciocutaneous flaps raised medially and laterally
  □ Ulnar nerve identified, vessel-looped, anterior subcutaneous transposition
  □ LATERAL: Kocher interval (ECU/anconeus) incised; anconeus elevated from lateral epicondyle and lateral ulna, distal-to-proximal
  □ Forearm pronated during distal dissection (protects PIN)
  □ MEDIAL: Periosteal elevation off medial ulnar border, medial-to-lateral across posterior ulna
  □ Medial and lateral planes connected across posterior ulna
  □ Anconeus flap reflected proximally → triceps insertion exposed
  □ Triceps insertion sharply released from olecranon (close to bone)
  □ Triceps muscle elevated subperiosteally off posterior distal humerus
  □ Full posterior joint exposed; trochlear sulcus identified

REDUCTION & FIXATION
  □ Fracture hematoma irrigated
  □ All fragments inventoried vs. preop CT
  □ Trochlear sulcus used as primary reduction reference
  □ K-wire joysticks for fragment manipulation
  □ Articular segment reduced and provisionally K-wired
  □ Fluoroscopy confirms provisional reduction
  □ Definitive articular screws (capitellar-trochlear axis)
  □ Parallel or orthogonal bicolumnar plates applied
  □ Maximum screws into articular segment
  □ First diaphyseal screw eccentric (fracture compression)
  □ No screws in olecranon fossa
  □ Final AP + lateral + oblique fluoroscopy
  □ Intraoperative ROM check - no impingement

CLOSURE
  □ Tourniquet released; hemostasis; 3L irrigation
  □ Ulnar nerve transposition secured (fascial sling, finger passes freely)
  □ Vessel loop removed
  □ Transosseous bone tunnels drilled in olecranon (2-3 tunnels)
  □ Triceps reattached with FiberWire #2 Krackow through bone tunnels
  □ Repair tensioned in full extension and tied
  □ Repair integrity tested (flex/extend cycle under direct vision)
  □ Kocher interval fascia closed
  □ Deep fascia closed
  □ Drain placed
  □ Skin closed
  □ Posterior splint at 30-45° flexion

POST-OP
  □ Neurovascular check (ulnar nerve first)
  □ Elevation and ice
  □ Active hand/wrist exercises from day 1
  □ Elbow extension restricted 6 weeks (hinged brace)
  □ Active elbow extension begins week 6 (after radiograph)

TRAP vs PARATRICIPITAL - SIDE-BY-SIDE SUMMARY

StepParatricipitalTRAP
Ulnar nerveAnterior transpositionAnterior transposition
TricepsNever touched - windows around itFully detached from olecranon
AnconeusElevated off lateral column onlyElevated from Kocher interval + reflected en bloc with triceps
Articular viewColumns + fossa (triceps obscures joint)Full posterior joint + trochlear sulcus visible
Key reduction toolFluoroscopyDirect trochlear sulcus visualization
Closure - tricepsNo repair neededTransosseous suture reattachment
Active extensionDay 1Week 6
Brace requirementNoneHinged brace 0-6 weeks
Dehiscence riskNonePresent - primary concern

Sources: Rockwood and Green's Fractures in Adults 10th Ed 2025, Campbell's Operative Orthopaedics 15th Ed 2026, O'Driscoll original description of the TRAP approach.

Generate same for triceps sparing approach

Finding Sources
Finding Sources
Finding Sources
Reading File
Reading File
Reading File
Finding Sources
This is a shared conversation. Sign in to Orris to start your own chat.