
Per vaginal examination
Reading File
Per vaginal (PV) examination is a clinical assessment of the female genital tract via the vagina, used to evaluate the cervix, uterus, adnexa, and pelvic structures.
Searching sources...
Finding Sources
Finding Sources
Finding Sources
Finding Sources
Reading File
Reading File
Reading File
Reading File
Loading Image
Loading Image
Loading Image
Loading Image
Here is a complete, structured overview of the Per Vaginal (PV) Examination, drawn from Berek & Novak's Gynecology and Roberts and Hedges' Clinical Procedures in Emergency Medicine.
Per Vaginal (PV) Examination
Indications
- Lower abdominal / pelvic pain
- Vaginal discharge or bleeding
- Suspected sexually transmitted infection (STI)
- Evaluation of uterus, adnexa, and cervix
- Retained foreign body
- Bartholin abscess / cyst
- Antenatal assessment (cervical dilation, effacement, presenting part)
Patient Preparation
- Explain each step beforehand: "You will feel me touch your inner thighs, then the area around your vagina."
- Position: dorsal lithotomy - feet in stirrups, buttocks at the lower edge of the table.
- Drape the legs for dignity; depress the drape over the abdomen to allow eye contact and communication.
- Raise the head of the table if possible to promote relaxation.
- Ensure adequate lighting.
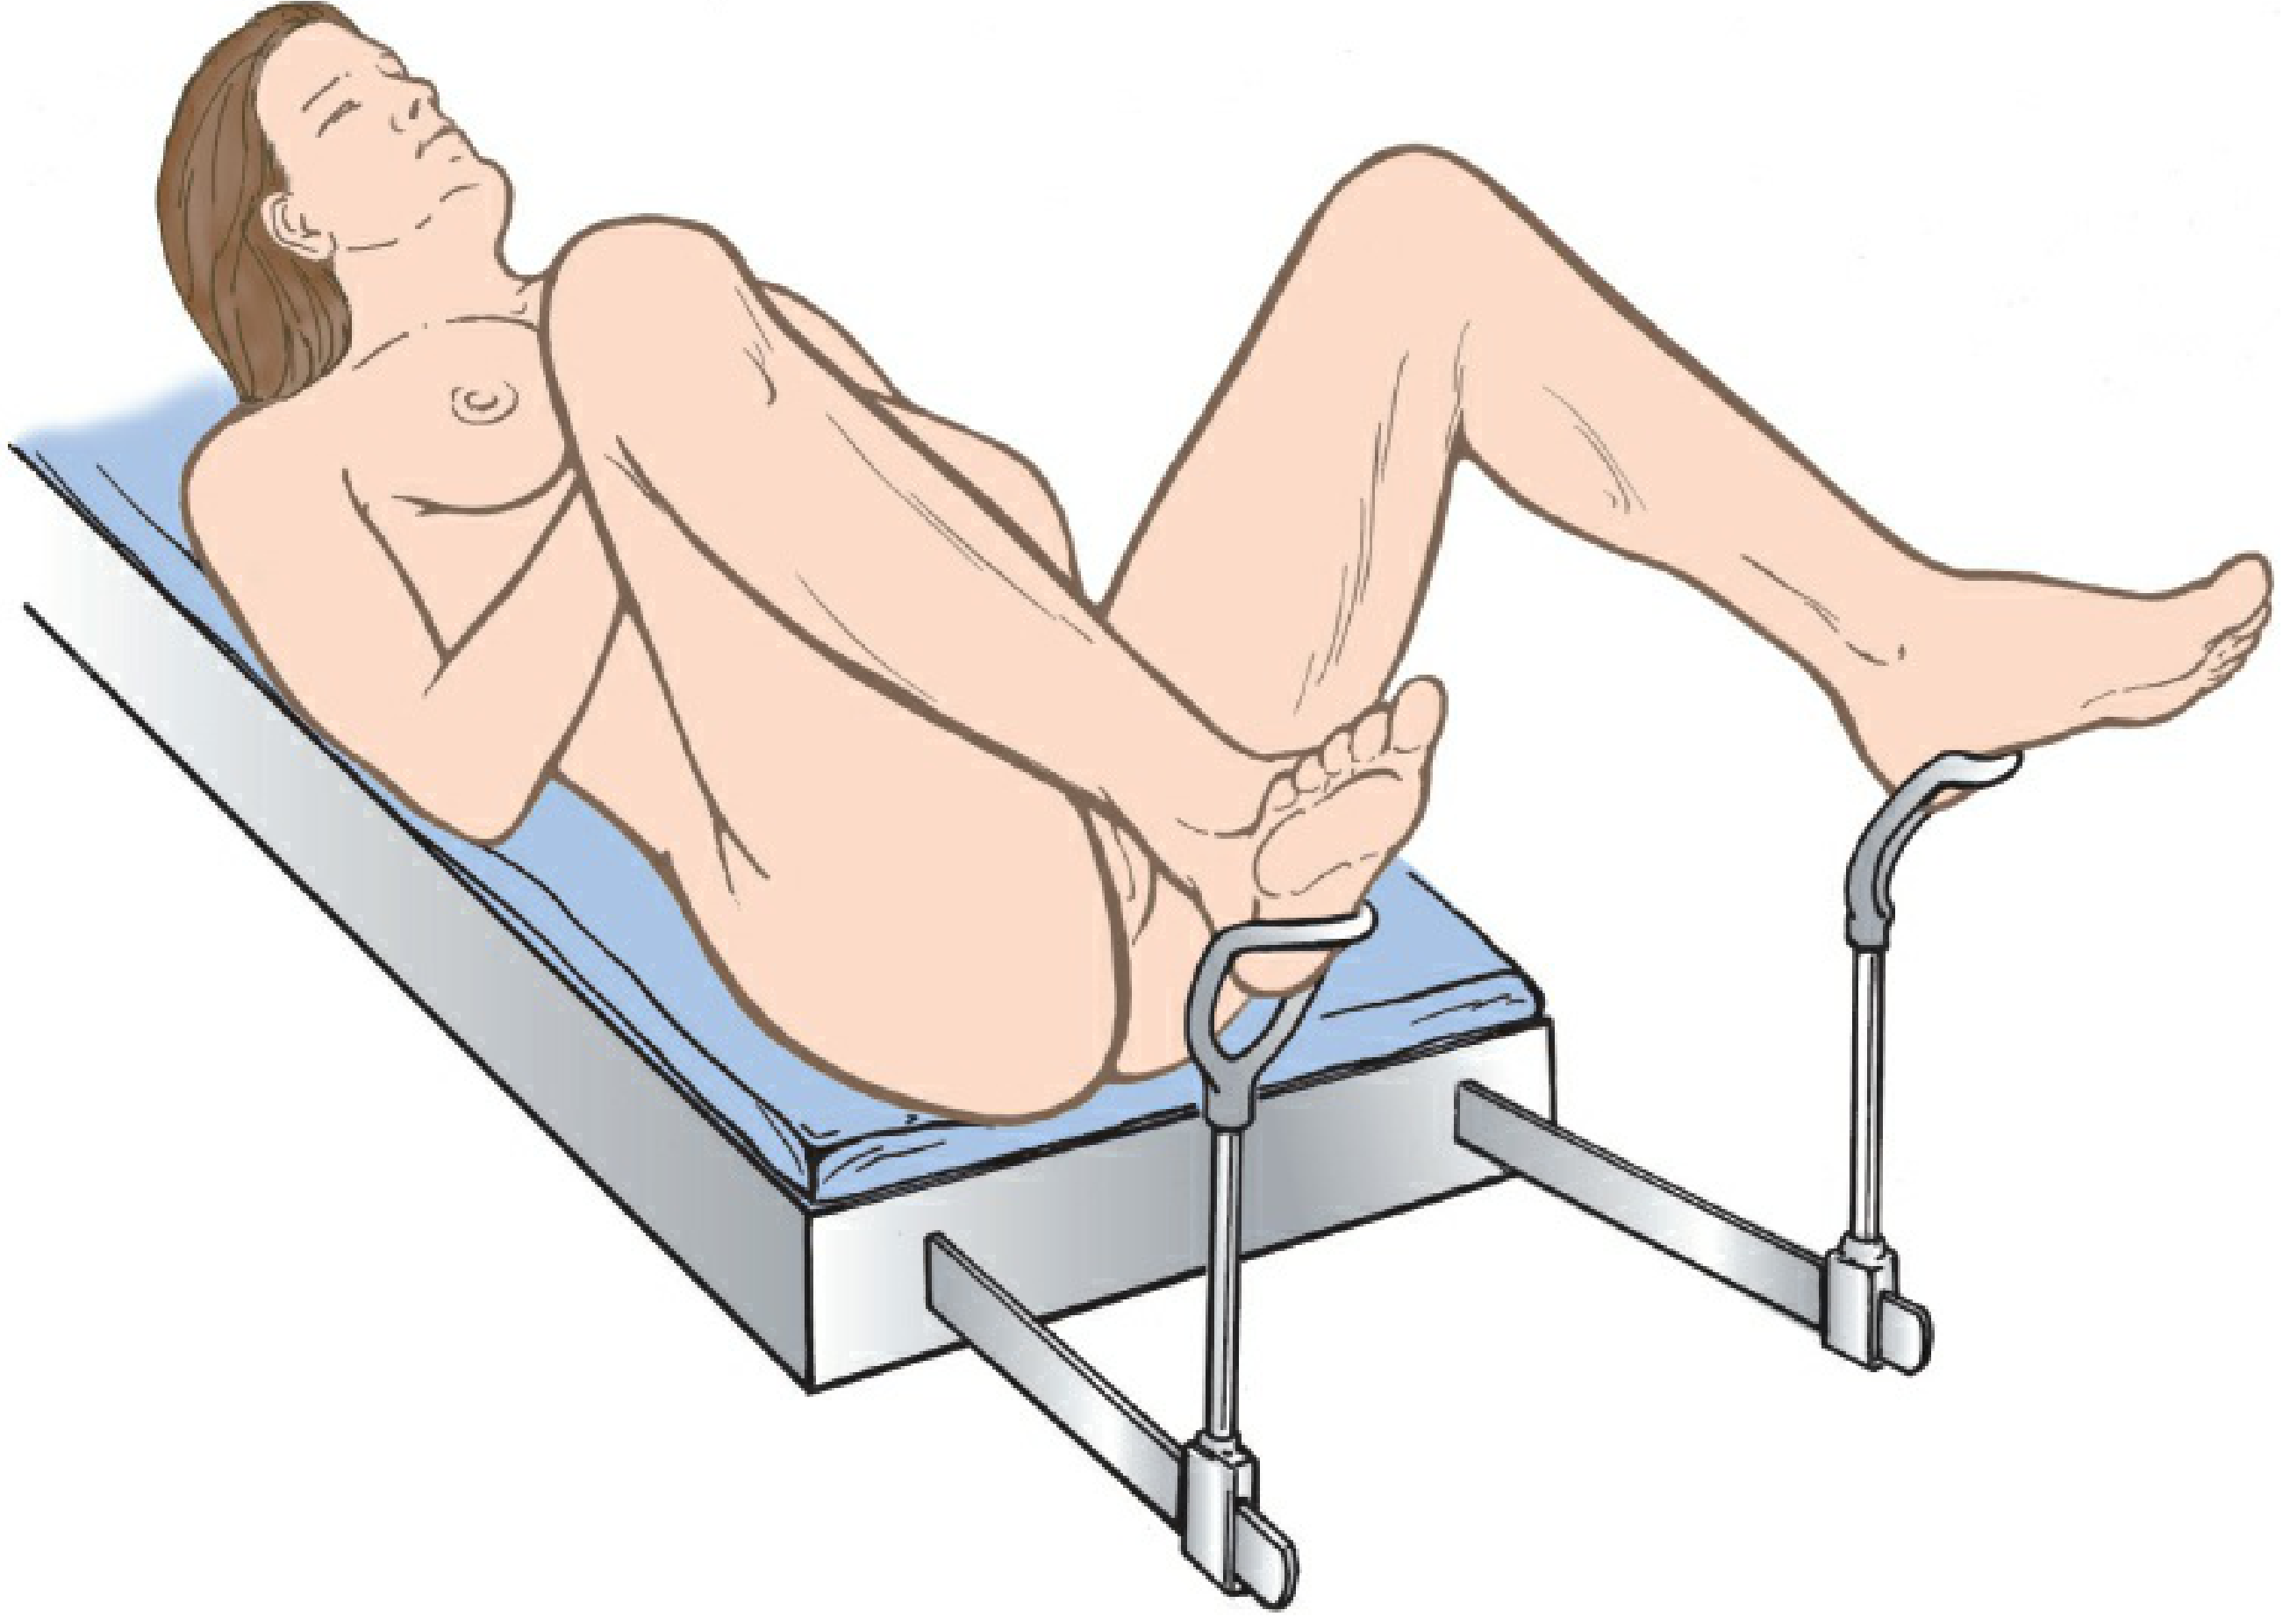
Alternative positions: If stirrups are unavailable, a padded bedpan under the buttocks with feet together and knees separated works. If lithotomy is not possible, the knee-chest position can be used.
Equipment
| Item | Purpose |
|---|---|
| Vaginal specula (various sizes) | Visualise vagina and cervix |
| Gloves | Standard precaution |
| Surgical lubricant | Speculum and bimanual insertion |
| Adequate lighting | Visualisation |
| pH paper, slides, KOH 10%, normal saline | Wet mount / vaginal discharge evaluation |
| Swabs / transport medium | STI sampling (chlamydia, gonorrhoea) |
| Ring forceps / Kelly clamp | Removal of foreign bodies |
Step 1: External Inspection (Vulva and Perineum)
Carefully inspect:
- Labia majora - fatty folds; thicker in children, thinner post-menopause
- Labia minora - hairless, pink; anteriorly form the clitoral hood, posteriorly join at the fourchette
- Clitoris and urethral meatus (just posterior to clitoris)
- Hymen - separates external genitalia from vagina
- Bartholin glands - at the lower posterior third of the vagina; not palpable if normal
- Perineum and perianal area
Note: erythema, pigmentation, masses, ulcers, excoriations, ecchymosis, discharge, or lesions. Any unidentified lesion should be biopsied.
Step 2: Speculum Examination
Speculum Selection
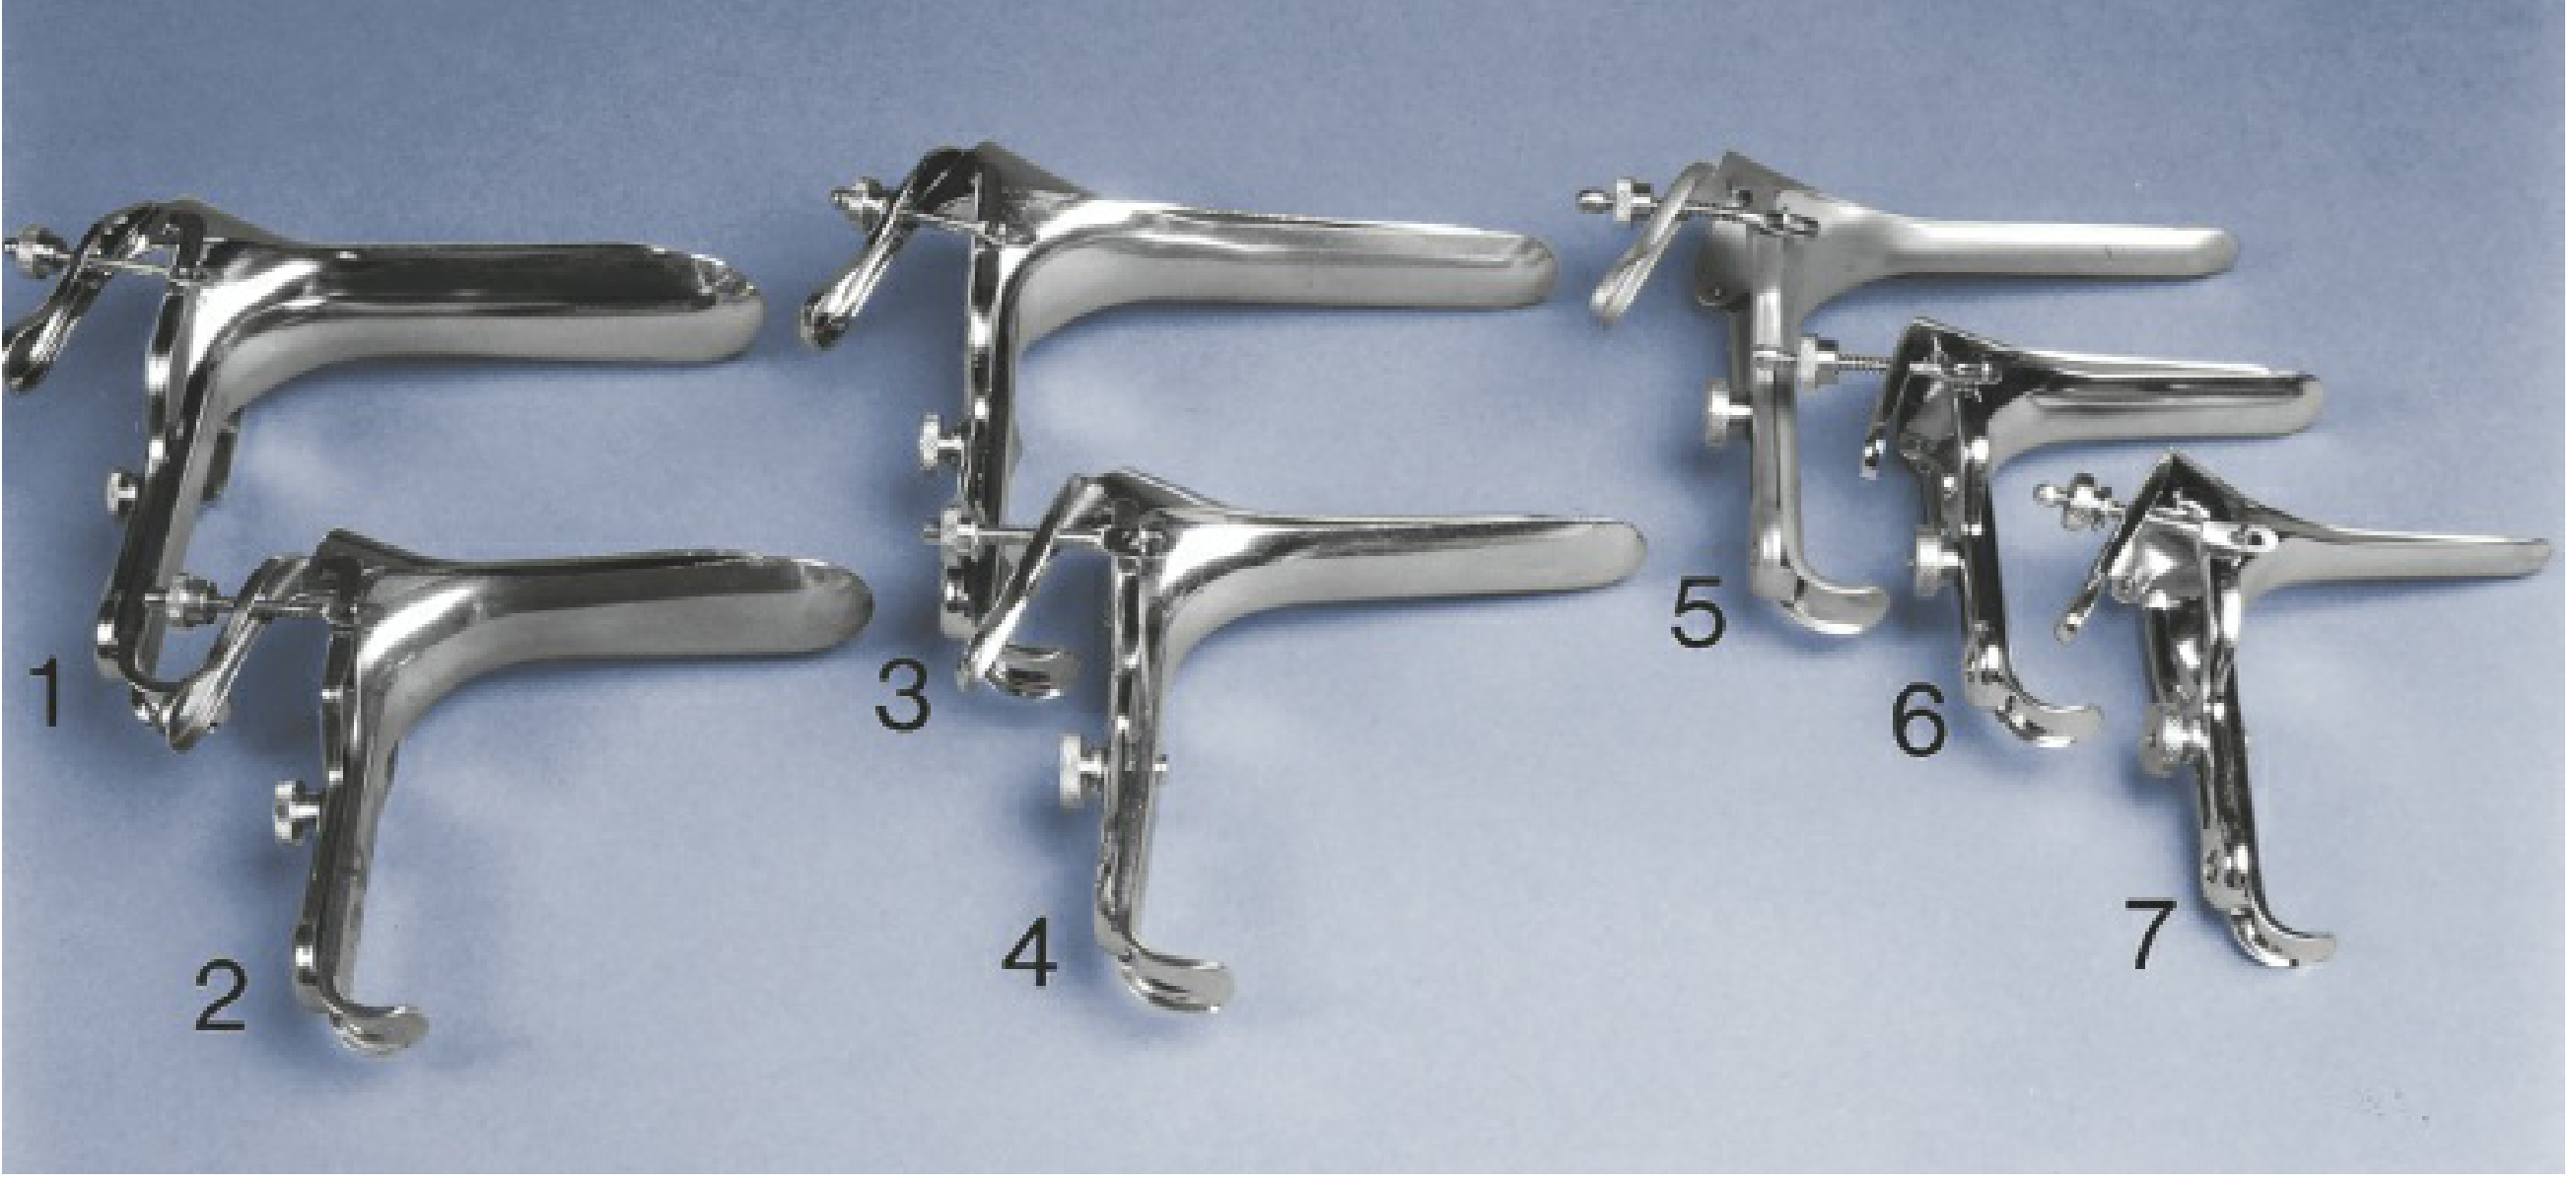
| Patient Type | Speculum of Choice |
|---|---|
| Sexually active adult | Pederson (regular) |
| Lax walls, pregnant, needs biopsy | Graves (larger) |
| Nulliparous / virginal | Huffman / Smith-Pederson |
| Elderly or narrow introitus | Pediatric |
| Obese / multiparous | Graves |
- Warm metal speculums to body temperature before insertion.
- If cervical cytology (Pap smear) is planned, lubricate with water only (not gel).
- Otherwise, use surgical lubricant.
Insertion Technique
- Separate the labia to expose the introitus.
- Insert the speculum at full length in the posterior direction, following the vaginal axis.
- Open the blades to visualise the cervix.
- If the cervix is not seen, withdraw, palpate the cervix with one finger to find its direction, then reinsert the speculum.
What to Inspect on Speculum Exam
Cervix:
- Normal: pink, smooth
- Non-parous cervical os: smooth and circular (2-3 cm diameter, 2-4 cm length)
- Parous os: fissured, oval, slightly irregular
- Cervix usually faces posteriorly (80%) but may be anterior (20%)
- Look at the squamocolumnar junction - white lesion that does not wipe off suggests dysplasia, carcinoma in situ, or condyloma acuminatum
- Purulent discharge from os: suggests PID / cervicitis
Vaginal walls (inspect as speculum is slowly withdrawn):
- Normal mucosa: reddish-pink
- In pregnancy: may appear dusky/cyanotic (Chadwick's sign)
- Note discharge, bleeding, polyps, or lesions
Collect samples (before removing speculum): swabs for STI, vaginal pH, wet mount slides.
Step 3: Bimanual Examination
After removing the speculum, apply lubricant to the glove.
- Right-handed clinician: insert index ± middle finger of the right hand into the vagina; place left hand on the abdomen for counter-pressure.
- Use one finger if the introitus is narrow.
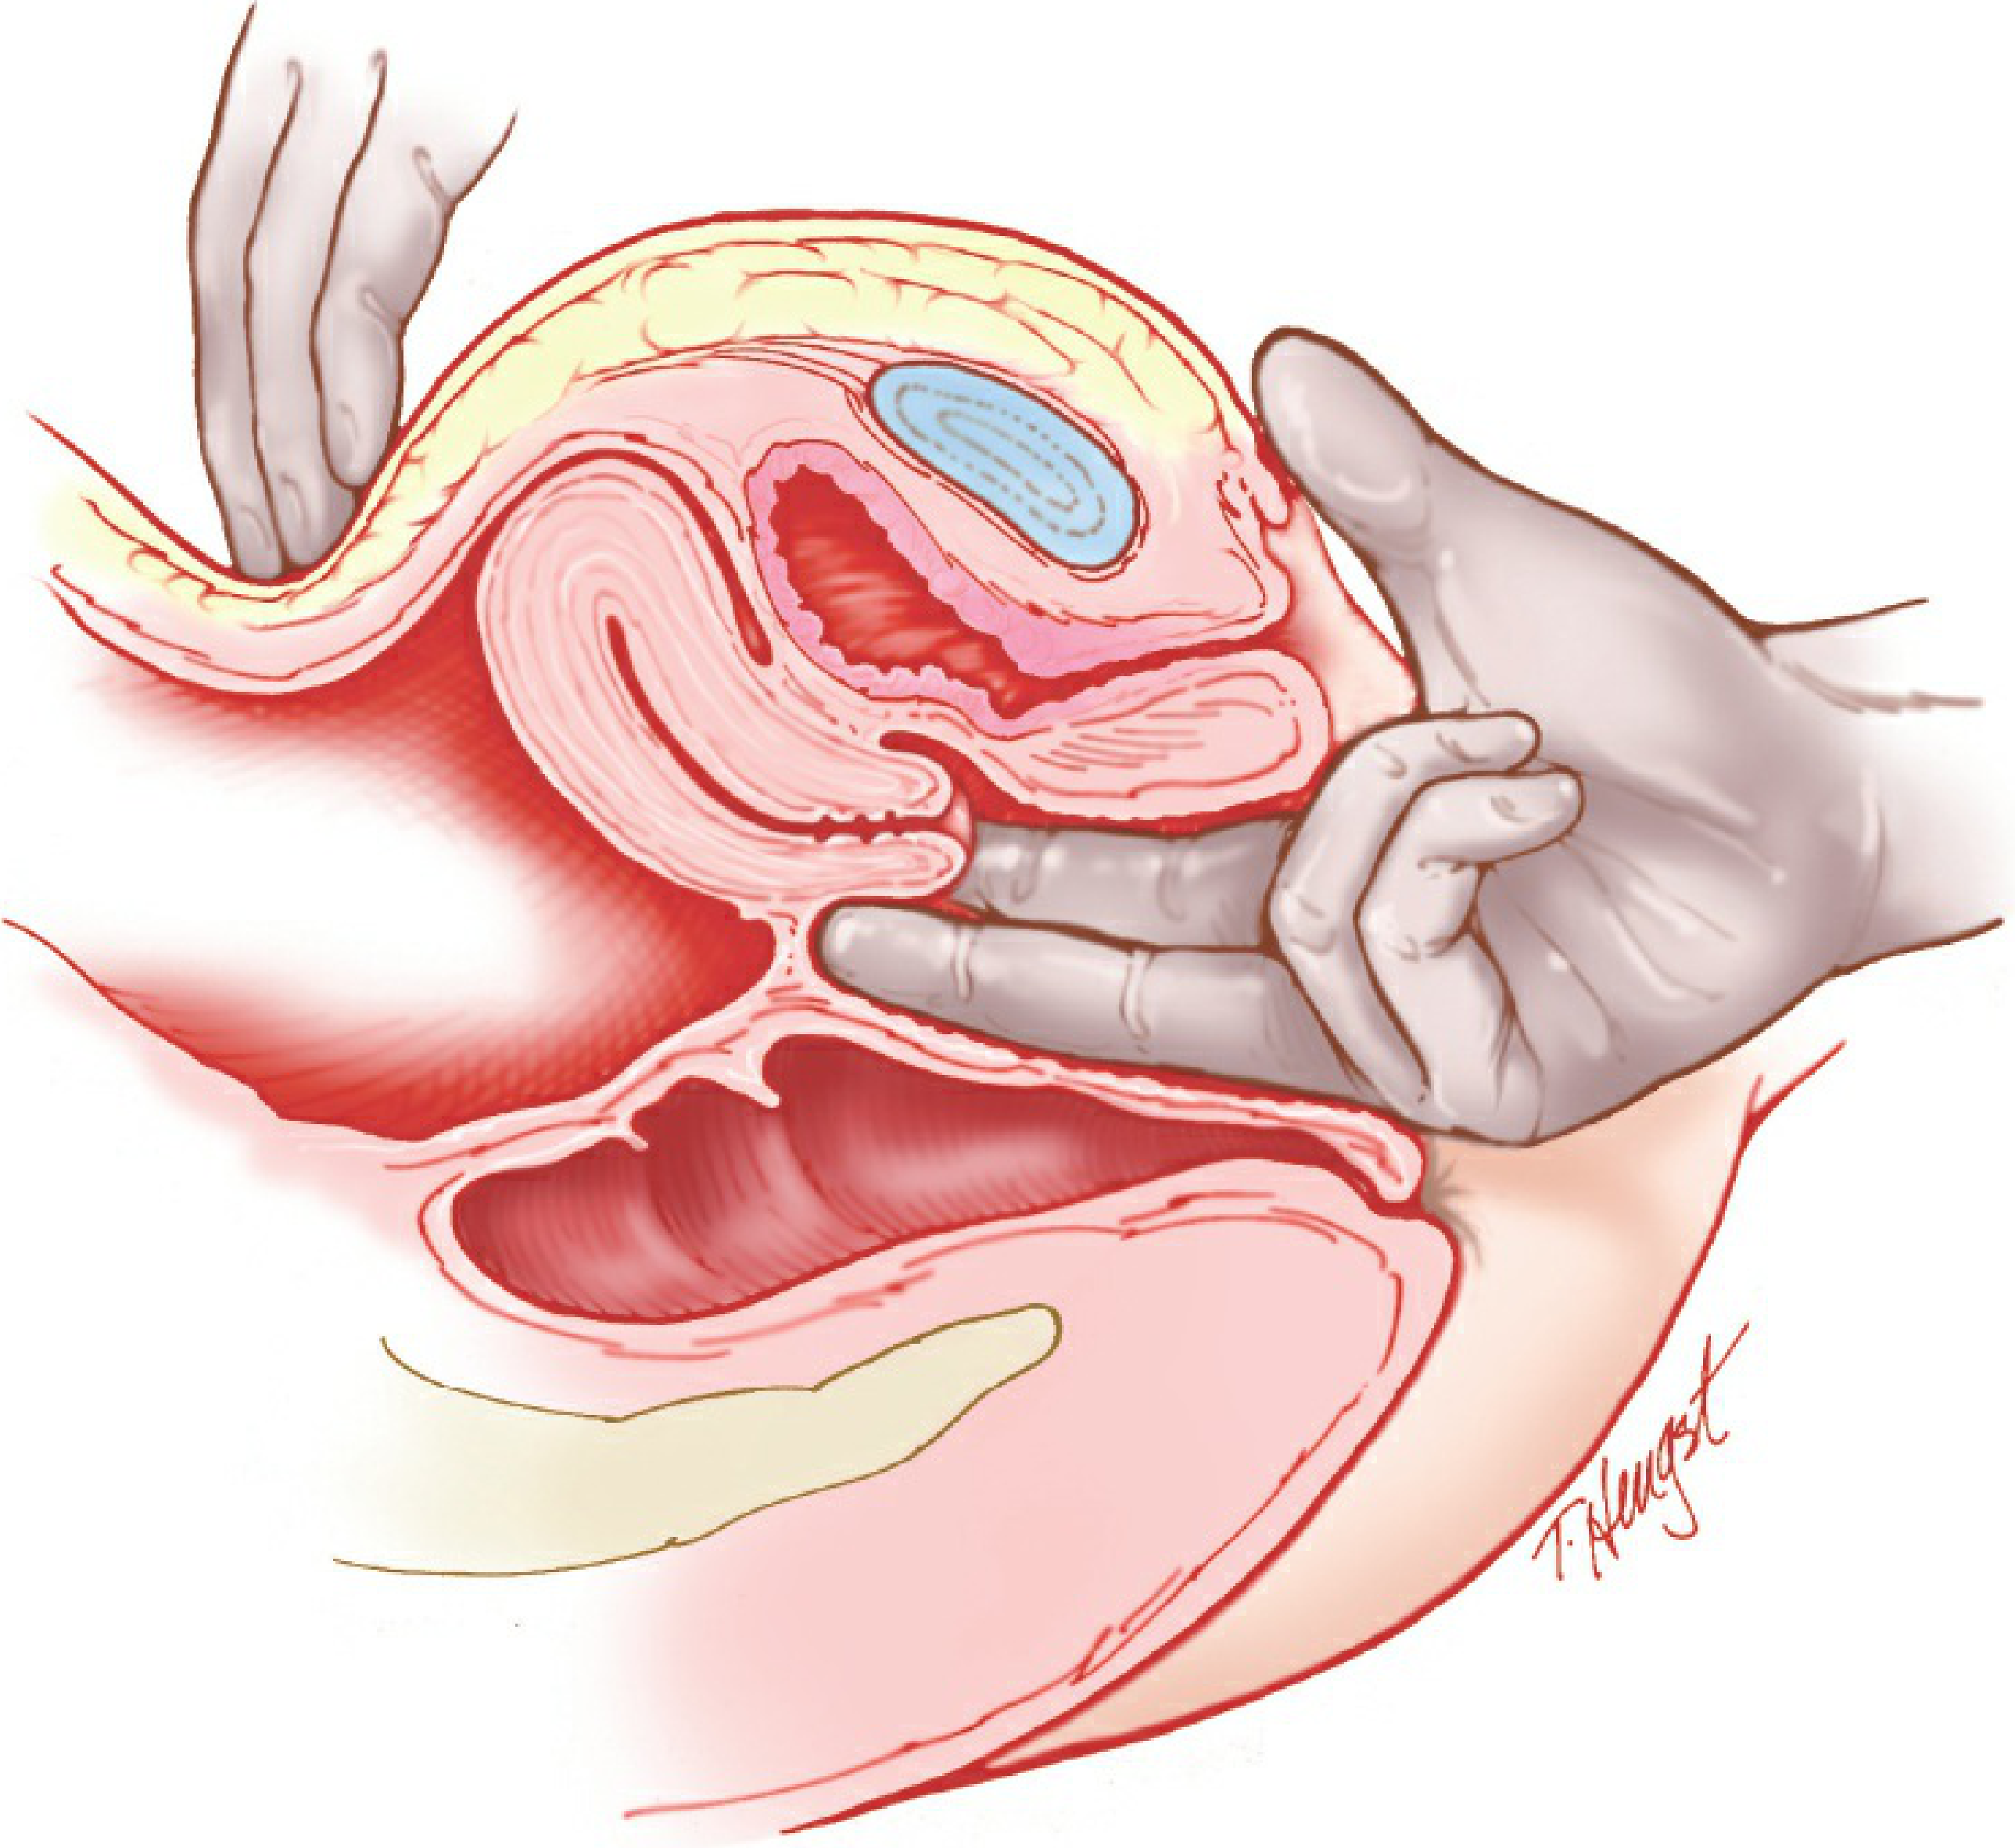
Palpation Sequence
| Structure | What to Assess |
|---|---|
| Vaginal introitus | Tenderness, muscle spasm |
| Pelvic floor muscles | Spasm (common with pelvic pain) |
| Bladder | Tenderness |
| Vagina and fornices | Masses, irregularity |
| Cervix | Tenderness, consistency, position, os patency |
| Cervical excitation | Pain on lateral movement = PID |
| Uterus | Size, shape, position, mobility, consistency, contour |
| Adnexa (each side) | Enlargement, masses (size, shape, firmness, fixation, tenderness) |
Uterine assessment: Place two fingers in the posterior fornix; elevate the uterus while the abdominal hand palpates just above the pubis.
Adnexal palpation: Move both fingers to one side of the cervix; trap adnexal structures between intravaginal fingers and abdominal hand.
Adnexal masses that may be felt: pedunculated fibroids, paraovarian cysts, tubo-ovarian abscess (TOA), ectopic pregnancy.
Asymmetric uterus may indicate fibroid tumour.
Step 4: Rectovaginal Examination (when indicated)
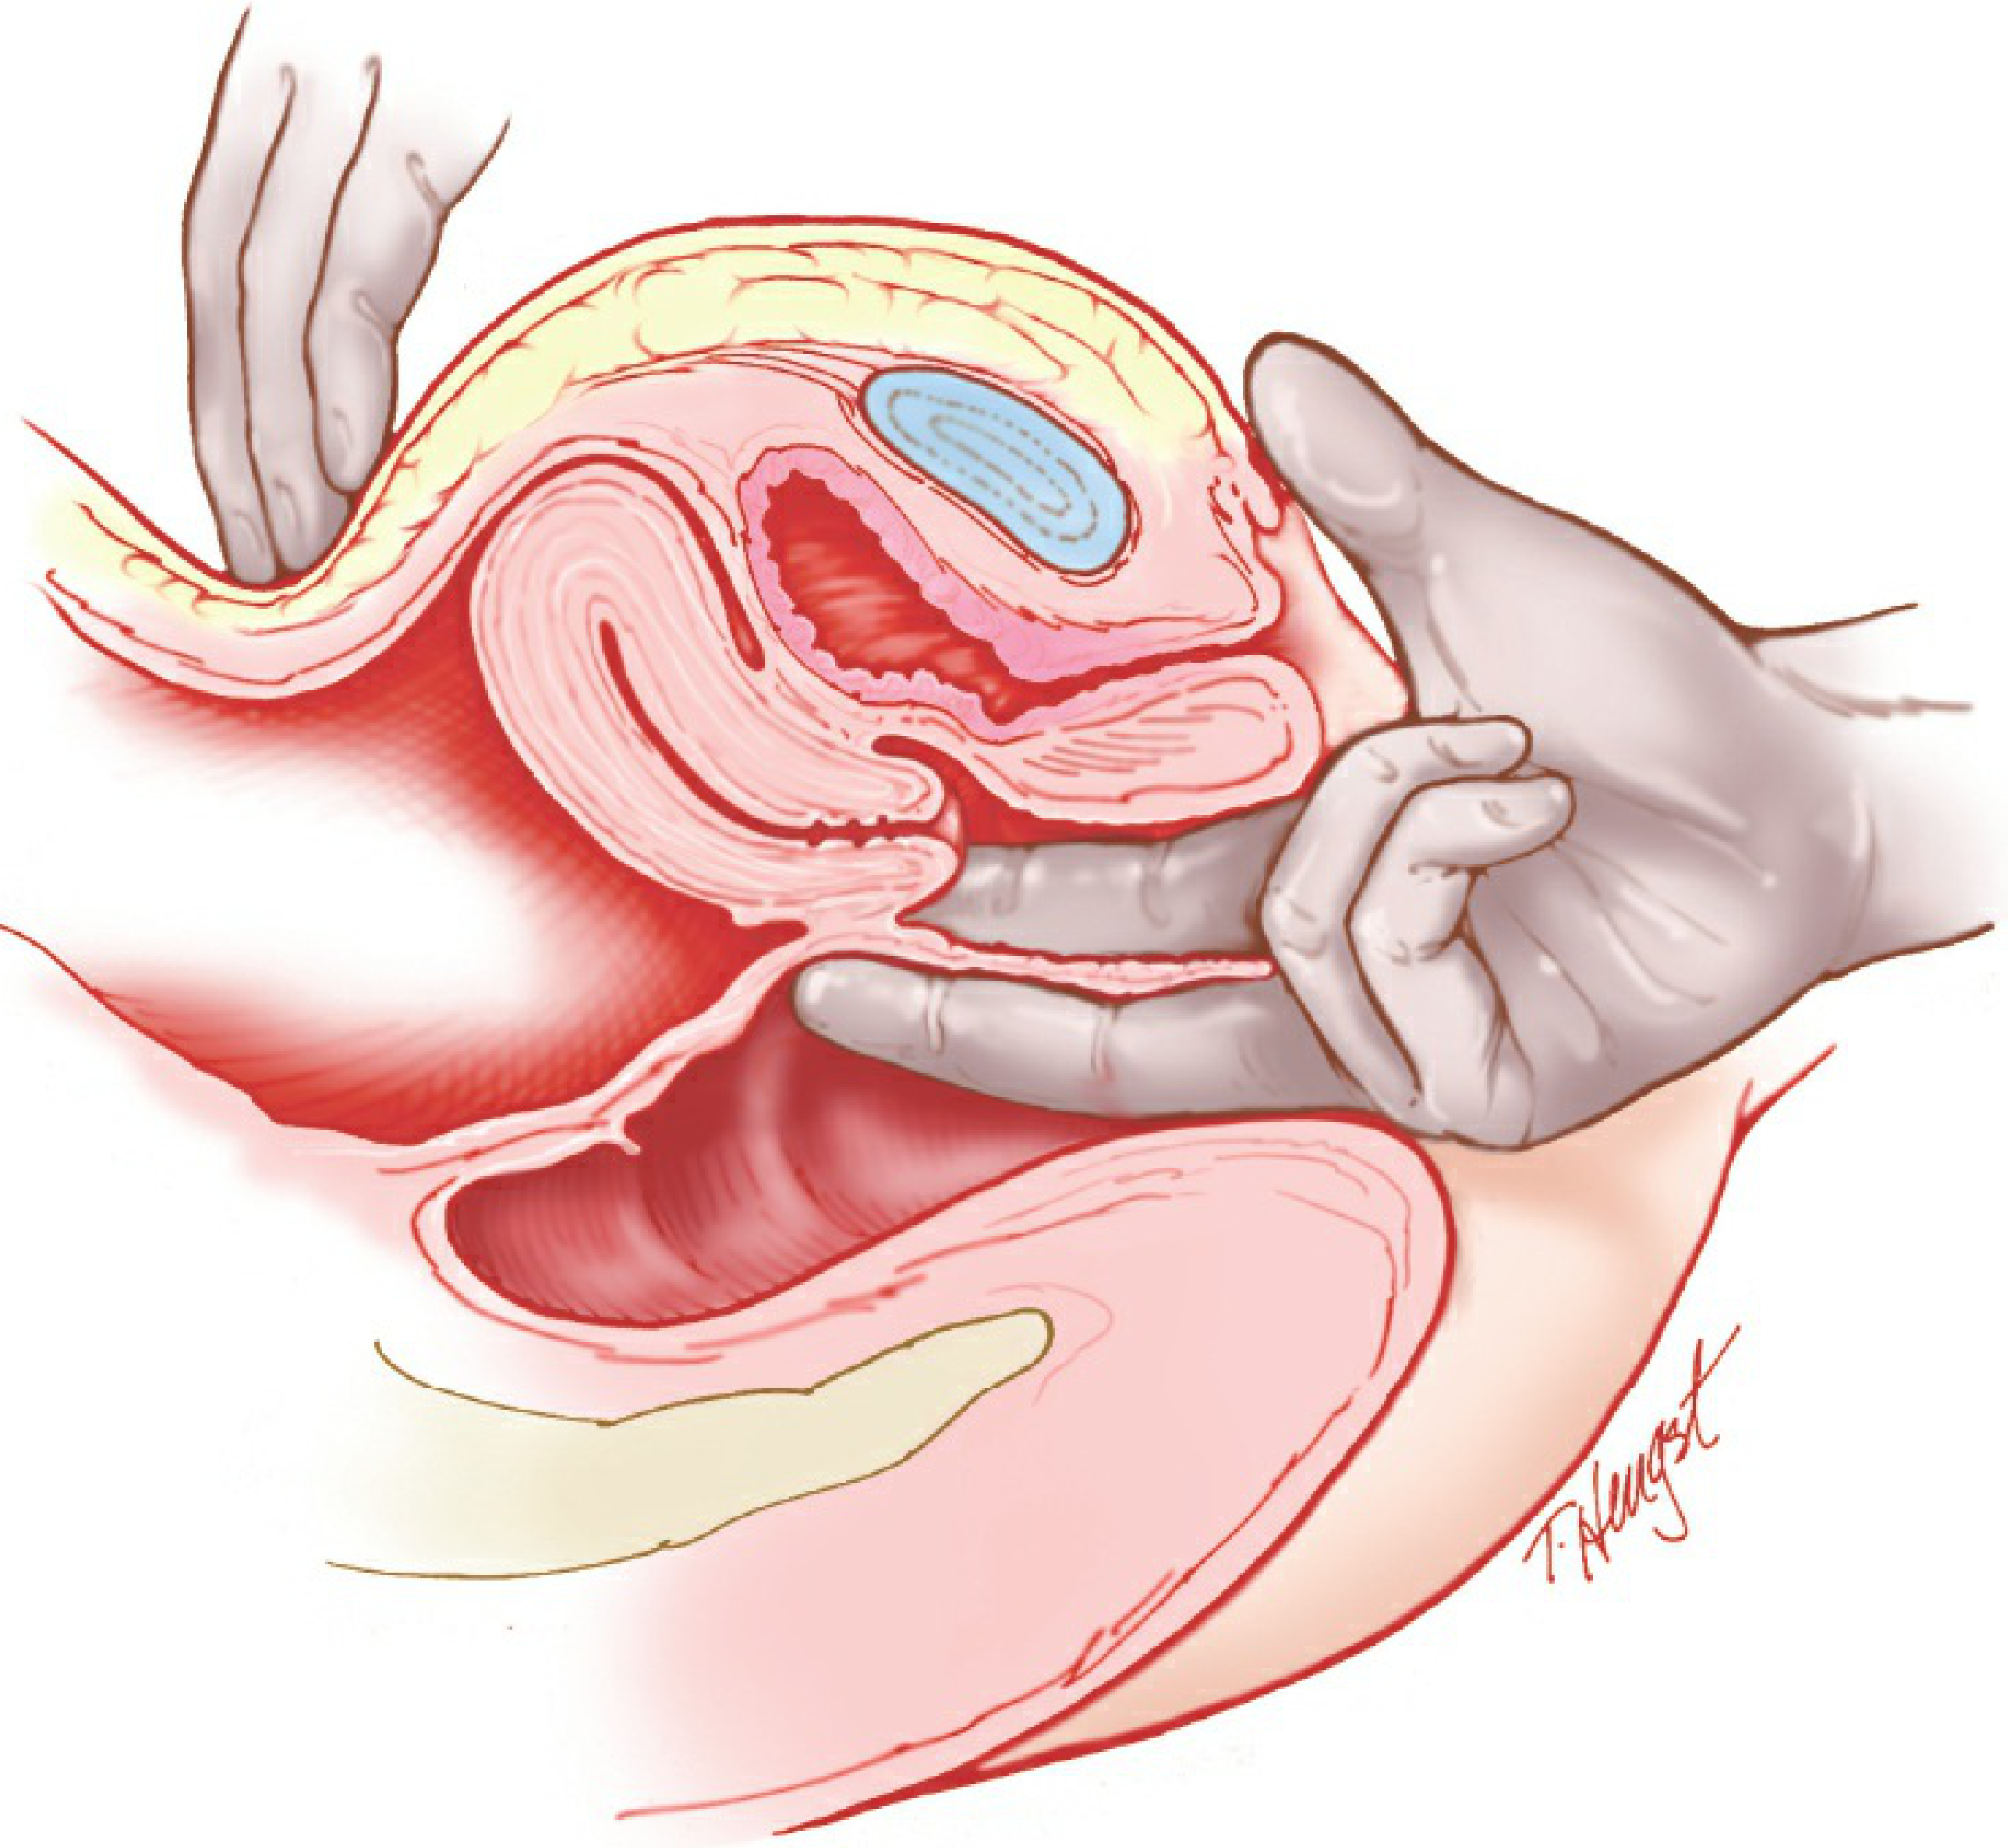
Indications: suspected endometriosis, pelvic malignancy, ovarian cancer staging, posterior pelvic pathology.
Assess:
- Rectovaginal septum
- Posterior uterine surface
- Uterosacral ligaments (nodularity suggests endometriosis or pelvic malignancy)
- Posterior cul-de-sac
- Rectal mucosa: hemorrhoids, fissures, polyps, sphincter tone
Note: A single stool sample for fecal occult blood obtained during PV examination is not adequate for colorectal cancer screening.
Key Clinical Findings and Significance
| Finding | Significance |
|---|---|
| Cervical excitation (cervical motion tenderness) | PID |
| Uterine tenderness | Endometritis, PID |
| Adnexal mass + tenderness | TOA, ectopic pregnancy, ovarian cyst |
| Nodular uterosacral ligaments | Endometriosis, pelvic malignancy |
| Irregular, fixed uterus | Malignancy, fibroids with adhesions |
| Cyanotic vagina | Pregnancy (Chadwick's sign) |
| White cervical lesion that does not wipe off | Dysplasia, CIN, condyloma |
| Tender spherical mass at posterior fourchette | Bartholin abscess |
After the Examination
- Inform the patient of findings immediately - ideally with the patient clothed.
- If normal, reassure her.
- If abnormal, explain the finding clearly in plain language and outline the next steps.
- Document speculum size used (especially if non-standard) and note it for future visits.
Sources: Berek & Novak's Gynecology, pp. 63-66 | Roberts and Hedges' Clinical Procedures in Emergency Medicine, pp. 4282-4372
Step
The user is asking for the steps of per vaginal examination in detail. Let me pull the most relevant textbook content to give a thorough step-by-step breakdown.
Searching sources...
Finding Sources
Finding Sources
Reading File
Finding Sources
Reading File
That block was from a surgical text. I already have comprehensive content from the previous search. Here is the complete step-by-step procedure of PV examination:
Steps of Per Vaginal (PV) Examination
Before You Begin
Assemble equipment:
- Examination table with stirrups
- Vaginal specula (multiple sizes)
- Sterile gloves + surgical lubricant
- Adequate light source
- Swabs, transport medium (chlamydia/gonorrhoea)
- pH paper, slides, coverslips, KOH 10%, normal saline (for discharge evaluation)
- Ring forceps / Kelly clamp (if foreign body suspected)
Consent and communication:
- Explain the procedure and obtain verbal consent
- Offer a chaperone (mandatory in most settings)
- Ask the patient to empty her bladder beforehand
Step 1 - Patient Positioning
- Place the patient in the dorsal lithotomy position
- Feet resting comfortably in stirrups
- Buttocks at the very edge of the table - this is essential for unobstructed access
- Raise the head of the table slightly to promote relaxation
- Drape the legs; depress the drape over the abdomen so you can maintain eye contact
If stirrups are unavailable: place a padded bedpan under the buttocks, feet together, knees apart. If lithotomy is impossible: knee-chest position.
Step 2 - External Inspection (Vulva & Perineum)
Warn the patient: "You'll feel me touch your inner thighs, then around the outside."
Systematically inspect:
| Structure | What to Note |
|---|---|
| Mons pubis | Lesions, hair distribution |
| Labia majora | Swelling, erythema, masses |
| Labia minora | Lesions, ulcers, discharge |
| Clitoris | Size, lesions |
| Urethral meatus | Discharge, prolapse, caruncle |
| Vaginal introitus | Hymen status, discharge, scars |
| Bartholin glands (posterior fourchette) | Cyst or abscess - tender, spherical swelling at lower labia minora |
| Perineum and perianal area | Fissures, haemorrhoids, warts, scars |
Palpate any visible lesion - note mobility, consistency, tenderness. Offer a mirror if the patient is unaware of a visible lesion.
Step 3 - Speculum Insertion and Cervical Inspection
3a. Select and prepare the speculum
| Patient | Speculum |
|---|---|
| Standard sexually active adult | Pederson regular |
| Lax walls / pregnant / needs biopsy | Graves (larger) |
| Nulliparous / virginal | Huffman / Smith-Pederson |
| Elderly / narrow introitus / adolescent | Pediatric |
| Obese / multiparous | Graves |
- Warm metal speculum to body temperature before use
- If Pap smear planned: lubricate with water only
- Otherwise: apply surgical lubricant to the blades
3b. Insert the speculum
- With your non-dominant hand, separate the labia majora to expose the introitus
- Hold the closed speculum in your dominant hand, blades pointing downward (oblique angle)
- Insert gently, directing posteriorly and downward following the vaginal axis
- Rotate to horizontal as it advances
- Advance to full length then open the blades to bring the cervix into view
- If the cervix is not visible: withdraw, digitally locate the cervix, redirect, reinsert
3c. Inspect the cervix
- Color: normally pink; red/inflamed in cervicitis
- Size: 2-3 cm diameter, 2-4 cm length (non-parous)
- Os: smooth and circular (nulliparous); fissured and oval (parous)
- Orientation: usually faces posteriorly (80%) or anteriorly (20%)
- Squamocolumnar junction: where red columnar endocervical epithelium meets pink squamous vaginal epithelium
- White lesion that does not wipe off = dysplasia / CIN / condyloma
- Discharge: clear/white = normal; purulent = PID / cervicitis; blood = erosion / malignancy
3d. Collect samples (before withdrawing speculum)
- Endocervical swabs for STI (chlamydia, gonorrhoea PCR)
- Cervical smear (Pap) if due
- High vaginal swab for pH, wet mount (KOH and normal saline)
- Biopsy of any suspicious lesion
3e. Inspect vaginal walls on withdrawal
- Slowly withdraw the speculum, rotating to view all vaginal walls
- Note: lesions, polyps, prolapse, discharge, rugae
- Close the blades just before exiting the introitus to avoid pinching
Step 4 - Bimanual Examination
Apply lubricant generously to gloved fingers.
- Right-handed: insert index + middle finger of the right hand into the vagina; place left hand on the lower abdomen
- Use one finger only if the introitus is narrow
Palpation order:
A. Vaginal walls and fornices
- Feel for masses, tenderness, induration
B. Cervix
- Consistency (firm/soft), mobility, tenderness
- Cervical motion tenderness (cervical excitation): pain on moving the cervix side to side = strong sign of PID
C. Uterus
- Place fingers in the posterior fornix, elevate the uterus toward the abdominal hand
- Palpate just above the pubic symphysis with the abdominal hand
- Assess: size, shape, position, consistency, contour, mobility
- Anteverted (normal) vs. retroverted
- Asymmetric uterus = probable fibroid
- Tender = endometritis / PID
D. Adnexa (both sides)
- Move intravaginal fingers to each side of the cervix in turn
- Trap adnexal structures between internal and abdominal hand
- Assess: size, shape, consistency, fixation, tenderness
- Normal ovaries are often non-palpable or feel like a small almond
- Palpable masses: ovarian cyst, tubo-ovarian abscess (TOA), ectopic pregnancy, pedunculated fibroid, paraovarian cyst
Palpate gently - firm palpation of normal ovaries causes pain and can be misleading.
Step 5 - Rectovaginal Examination (when indicated)
Indications: suspected endometriosis, pelvic malignancy (ovarian / cervical / rectal), posterior pelvic pathology.
Technique: Index finger in vagina, middle finger in rectum simultaneously.
Assess:
- Rectovaginal septum - nodularity or thickening
- Posterior uterine surface - tenderness
- Uterosacral ligaments - nodularity (endometriosis / metastatic deposits)
- Posterior cul-de-sac (pouch of Douglas) - masses, tenderness
- Rectal mucosa - haemorrhoids, fissures, polyps, sphincter tone
Step 6 - After the Examination
- Withdraw fingers, remove gloves
- Offer the patient tissues/wipes and privacy to dress
- With the patient clothed and seated, explain findings in plain language
- If normal: reassure
- If abnormal: explain the finding calmly, outline the investigation / management plan
- Document: speculum size used, findings at each step, any samples taken, patient tolerance
Summary Table
| Step | Action | Key Findings |
|---|---|---|
| 1 | Positioning (lithotomy) | Setup |
| 2 | External inspection | Lesions, Bartholin abscess, discharge |
| 3 | Speculum exam | Cervical appearance, vaginal walls, samples |
| 4 | Bimanual exam | Uterus, adnexa, cervical excitation |
| 5 | Rectovaginal exam (if needed) | Uterosacral nodularity, posterior lesions |
| 6 | Post-exam communication | Explain findings, plan, document |
Sources: Berek & Novak's Gynecology, pp. 63-66 | Roberts and Hedges' Clinical Procedures in Emergency Medicine, pp. 4282-4372
This is a shared conversation. Sign in to Orris to start your own chat.