

1000111751.jpg
Explain this model
Reading File
analyse_media
Now let me search the medical library for detailed content on gut rotation embryology.
Finding Sources
Finding Sources
Searching Images
rotation of gut midgut embryology stages 270 degrees
Reading File
Reading File
I now have all the information needed for a thorough explanation. Let me also fetch the textbook figure for display.
Loading Image
Here is a full explanation of the Rotation of Gut model:
Rotation of Gut - Embryological Model
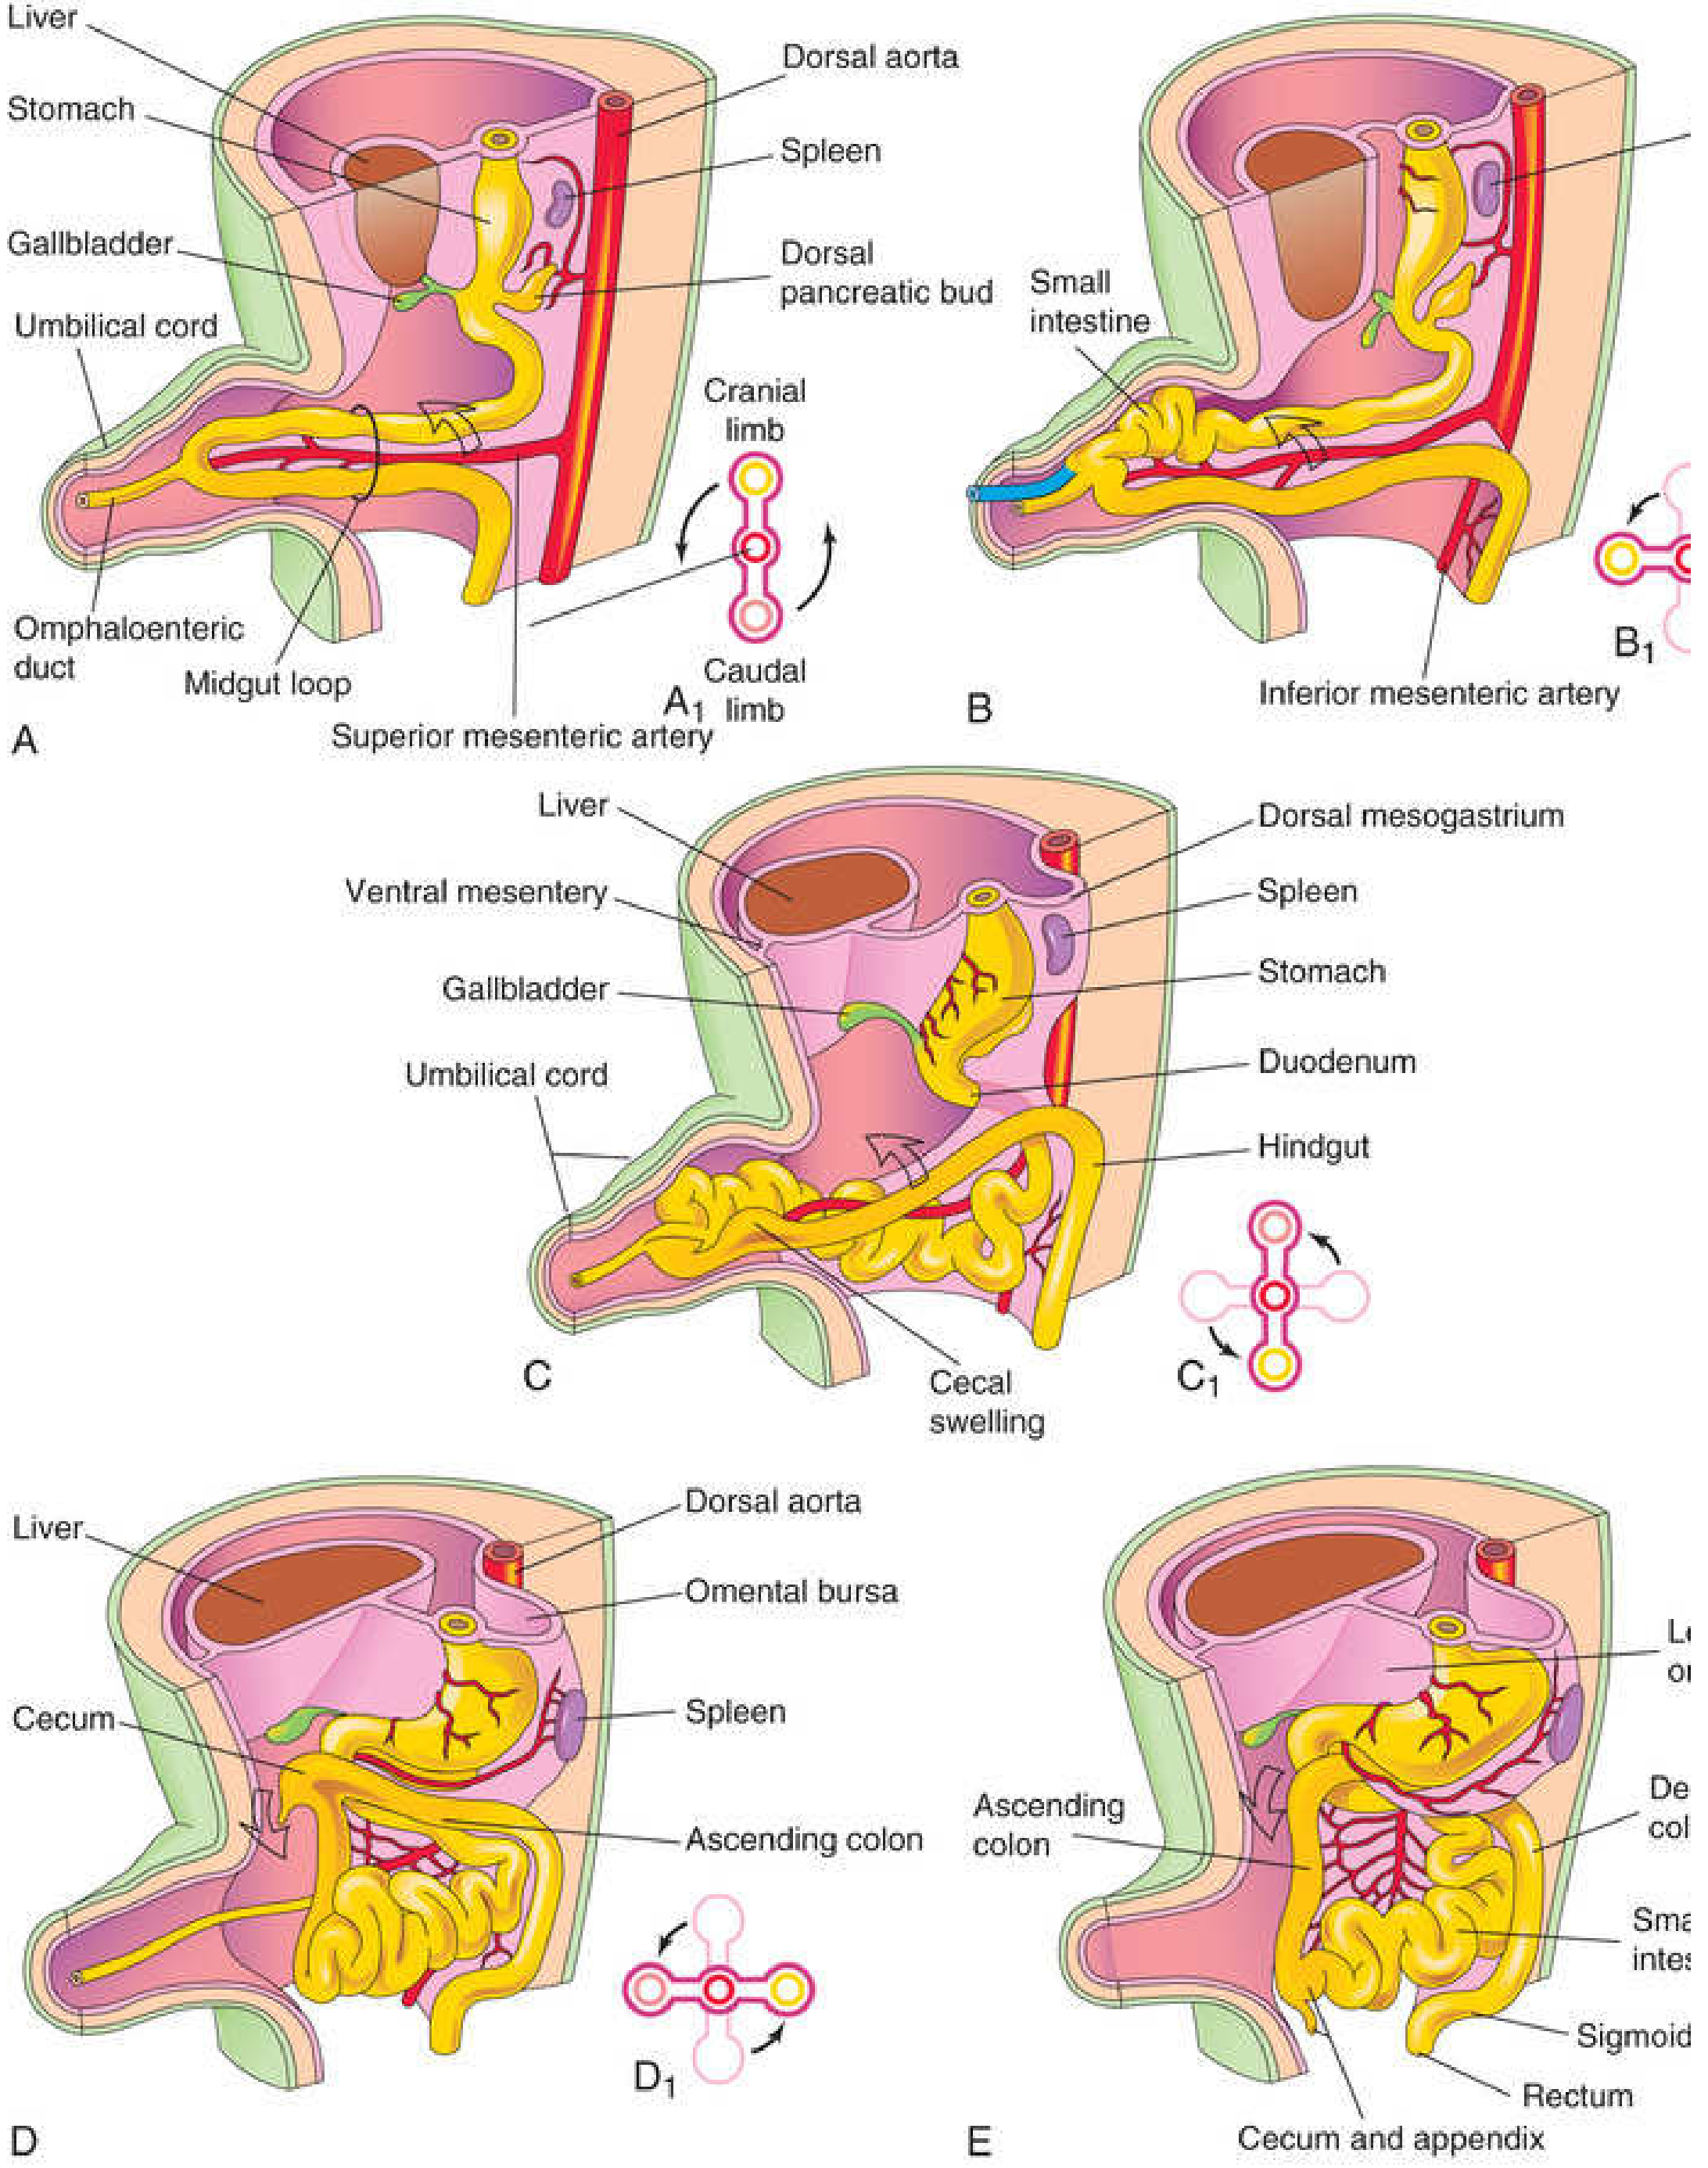
The model shows the 5 sequential stages of midgut rotation that occur between weeks 6-11 of embryonic development. The midgut undergoes a total 270° counterclockwise rotation around the axis of the Superior Mesenteric Artery (SMA), which is depicted as the branching red/brown vessel running through the yellow mesentery.
Here is the standard textbook diagram for reference:
Key Structures Shown in Each Model Piece
| Structure | Appearance |
|---|---|
| Midgut loop (cranial + caudal limbs) | Pink/beige tubular structure |
| Mesentery | Yellow fan-shaped sheet |
| Superior Mesenteric Artery (SMA) | Red/brown branching vessels - the axis of rotation |
| Cecal bud (later stages) | Small rounded swelling on the caudal limb |
Stage-by-Stage Explanation
Stage 1 (Top-left) - Week 6: Physiological Umbilical Herniation
- The rapidly elongating midgut forms a ventral U-shaped loop that herniates into the proximal umbilical cord.
- The loop has a cranial limb (upper - will become jejunum/ileum) and a caudal limb (lower - will become cecum, ascending colon, and proximal transverse colon).
- The SMA runs straight down the midpoint as the axis.
- The loop lies in the midsagittal plane - no rotation yet.
Stage 2 (Top-middle) - First 90° Counterclockwise Rotation
- Still within the umbilical cord, the midgut loop rotates 90° counterclockwise (viewed from the front).
- The cranial limb moves to the right side of the abdomen.
- The caudal limb moves to the left.
- The cranial limb (pre-arterial) begins elongating rapidly to form the intestinal loops (jejunum and ileum).
Stage 3 (Bottom-left) - Week 10: Return to Abdomen + Second 90° Rotation
- The intestines return to the abdominal cavity (reduction of physiological hernia). Triggers include the relatively decreasing size of the liver/kidneys and enlargement of the abdominal cavity.
- Small intestine returns first, passing posterior to the SMA, and occupies the central abdomen.
- A cecal swelling (primordium of the cecum and appendix) becomes visible on the caudal limb.
- A further 90° counterclockwise rotation occurs - total so far: 180°.
Stage 4 (Bottom-right) - Further 90° Rotation = Total 270°
- As the large intestine returns, it undergoes another 90° counterclockwise rotation (total: 270°).
- The cecum, which started on the left, swings across to the right side of the abdomen.
- The ascending colon becomes identifiable along the right posterior abdominal wall.
- The transverse colon crosses anterior to the duodenum and SMA.
Stage 5 (Top-right) - Week 11+: Final Fixation
- The cecum descends to the right iliac fossa (its permanent position).
- The duodenum and pancreas are pushed retroperitoneally due to pressure from the rotating colon.
- The ascending colon mesentery fuses with the parietal peritoneum - ascending colon becomes retroperitoneal.
- The small intestine mesentery gets a broad oblique attachment from the left upper to right lower abdomen.
Summary of Rotation
| Phase | Degrees | Timing | Limb affected |
|---|---|---|---|
| 1st rotation | 90° CCW | Week 6, in umbilical cord | Both limbs; cranial moves right |
| 2nd rotation | 90° CCW | Week 10, returning to abdomen | Large intestine |
| 3rd rotation | 90° CCW | Week 11 | Cecum descends right |
| Total | 270° CCW | Weeks 6-11 | Around SMA axis |
Clinical Relevance
Failure or incomplete gut rotation leads to malrotation, the most common clinical consequence being midgut volvulus - where the bowel twists around the SMA, causing acute intestinal obstruction and vascular compromise. The SMA-SMV relationship on cross-sectional imaging is used to detect malrotation (normal: SMA left of SMV; reversed in malrotation). Malrotation can also result in Ladd's bands (peritoneal bands that cross and obstruct the duodenum). - The Developing Human: Clinically Oriented Embryology, p. 632-636; Schwartz's Principles of Surgery, 11th ed.
Can you explain this in simple language point to point
Here is the Rotation of Gut explained in simple, point-by-point language:
🟢 What is this model about?
This model shows how the intestines form and rotate inside a baby during pregnancy (weeks 6 to 11).
🔵 Why does the gut need to rotate?
- The baby's abdomen is too small at first to hold all the intestines.
- So the intestines temporarily come out into the umbilical cord, grow there, rotate, then go back inside.
- This whole process takes about 5 weeks.
🟡 The 5 Stages (One model piece = one stage)
Stage 1 - "The Loop Goes Out"
- The intestine forms a U-shape loop and pops out into the umbilical cord.
- Think of it like a loop of rope hanging out of a bag.
- At this point, the loop has two arms:
- Top arm (cranial limb) - will become the small intestine
- Bottom arm (caudal limb) - will become the large intestine
- No rotation yet. Everything is straight.
Stage 2 - "First Turn: 90 degrees"
- The loop starts to spin counterclockwise (like turning a steering wheel to the left).
- It turns 90 degrees (a quarter turn).
- The top arm (small intestine) moves to the right side.
- The bottom arm (large intestine) moves to the left side.
- This happens while the gut is still outside the belly, in the cord.
Stage 3 - "Coming Back In + Another 90 degrees"
- Around week 10, the intestines start to return back into the belly.
- The small intestine goes in first.
- As it enters, it turns another 90 degrees counterclockwise.
- Total rotation so far: 180 degrees (half a full circle).
- A small bump called the cecal bud appears - this will become the appendix and cecum.
Stage 4 - "Final 90 degrees = 270 total"
- The large intestine now enters the belly and turns another 90 degrees.
- Total rotation = 270 degrees (three-quarter circle).
- The cecum (right side of large intestine) swings from the left all the way to the right side of the belly.
- The large intestine now forms an arch (called the "frame") around the small intestine.
Stage 5 - "Everything Settles in Place"
- The gut reaches its final position - the same positions we see in adults.
- The cecum and appendix sit in the lower right of the belly.
- The small intestine fills the center.
- Parts of the intestine stick to the back wall of the belly and become fixed permanently (retroperitoneal).
🔴 The Central Pole (Yellow + Red branching structure)
- That yellow fan with red branching lines = the mesentery and its main blood vessel, called the Superior Mesenteric Artery (SMA).
- The entire gut rotates around this artery like a wheel spinning around its axle.
- This is why it is the most important landmark in gut rotation.
⚠️ What if rotation goes wrong?
- If the gut fails to rotate properly, it is called malrotation.
- The biggest danger is midgut volvulus - the intestines twist around themselves, cutting off the blood supply.
- This is a surgical emergency in newborns.
- Symptoms: green (bilious) vomiting in a newborn = warning sign.
🧠 One-line Summary
The baby's intestines grow outside the belly, rotate 270 degrees counterclockwise around the main gut artery, and return inside to their final positions over weeks 6 to 11 of pregnancy.
Can you do simmilar for cleft palate model also
I'd love to help! Could you please share a photo of the cleft palate model you have? That way I can analyze exactly what your specific model shows and explain it point by point, just like I did for the gut rotation model.
Asking for Preferences
Please upload a photo of your cleft palate model so I can explain it accurately!
Go ahead and upload the photo whenever you're ready! Once I can see your model, I'll analyze it and give you a clear, simple point-by-point explanation just like the gut rotation one. 📸The image is a bit unclear - let me analyze it closely and search the textbook simultaneously.
analyse_media
Finding Sources
Finding Sources
Finding Sources
Reading File
Finding Sources
Reading File
Searching Images
cleft lip palate types embryology unilateral bilateral complete incomplete
Loading Image
Reading File
I now have everything needed. Here is the full, simple explanation:
🟢 What is this model about?
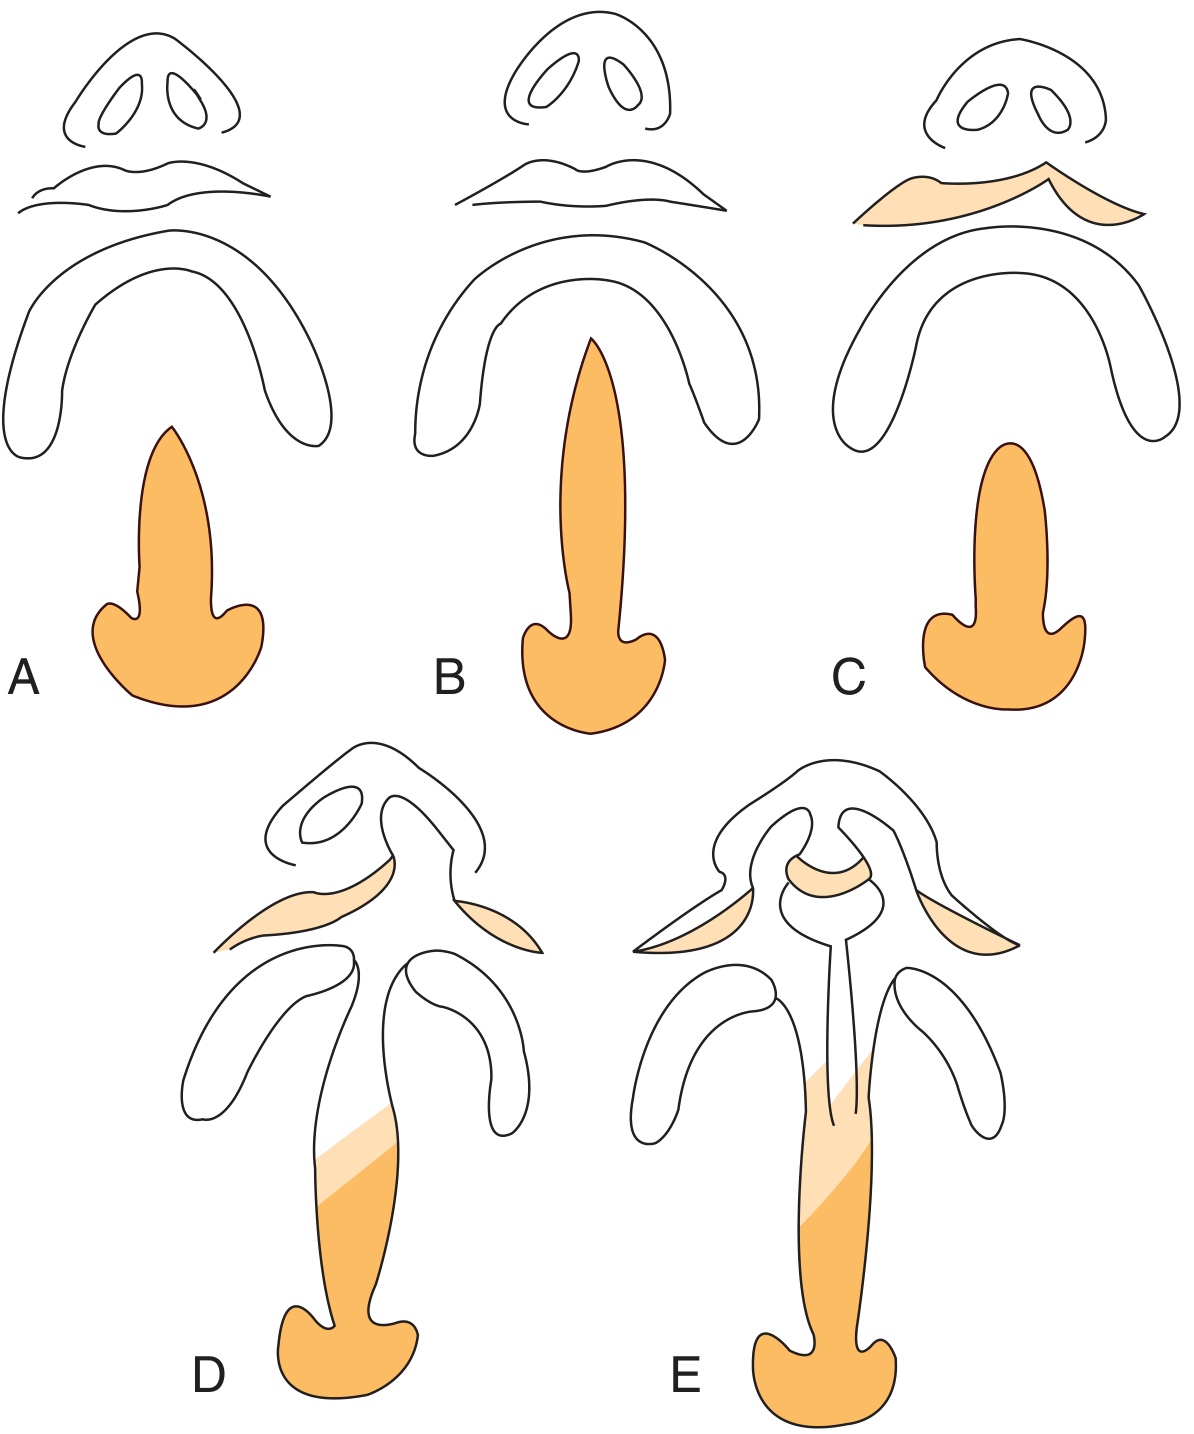
This model (Spot 8) shows the 6 types of Cleft Lip and Cleft Palate - a birth defect where parts of the upper lip and/or the roof of the mouth (palate) fail to join together properly during the baby's development in the womb.
Here is the standard classification diagram from the textbook for reference:
🔵 How does the palate normally form? (Simple)
- Around week 5-6 of pregnancy, the baby's face is forming from several tissue "pads" growing toward each other.
- Two side pads (called palatine shelves) start by pointing downward beside the tongue.
- By week 7, they flip up to a horizontal position and grow toward each other.
- By week 12, they fuse (join) in the middle - forming the roof of the mouth.
- If this fusion fails or is incomplete - a cleft results.
The dividing line between front and back of the palate is a small hole called the incisive foramen - this is the key reference point for all cleft types.
🟡 The 6 Models - One by One
The 6 pieces in your model represent the 6 standard types of cleft, viewed from below the mouth looking up (like a dentist's view). The orange/yellow areas = the cleft/gap. The dark center = nose or nasal septum.
Model 1 (Top-left) - Normal / Mild Cleft of the Soft Palate Only
- The lip is normal and intact.
- There is a small gap only in the soft palate (the fleshy back part of the roof of the mouth).
- The hard palate (bony front part) is fine.
- This is the mildest type - often missed at birth because it is hidden.
Model 2 (Top-middle) - Incomplete Cleft of Secondary Palate
- The lip is normal.
- There is a gap in the back palate only, but it does not reach all the way to the front (does not reach the incisive foramen).
- Think of it as a partial split in the roof of the mouth, going only partway.
Model 3 (Top-right) - Complete Cleft of Secondary Palate
- The lip is normal.
- The gap extends from the back of the palate all the way to the incisive foramen (the front dividing point).
- The entire secondary (back) palate has failed to fuse.
Model 4 (Bottom-left) - Incomplete Unilateral Cleft of Lip + Palate
- There is a cleft on one side of the lip (unilateral) - but it does not go all the way through.
- The palate gap is also present but incomplete.
- A small tissue bridge (called a Simonart's band) may still connect the two sides of the lip.
Model 5 (Bottom-middle) - Complete Unilateral Cleft of Lip + Palate
- The most common type of cleft.
- The cleft goes all the way through the lip, gum ridge (alveolus), and entire palate on one side.
- There is a wide, open gap on one side from the lip all the way to the back of the mouth.
- The nasal septum is visible and leans toward the non-cleft side.
Model 6 (Bottom-right) - Complete Bilateral Cleft of Lip + Palate
- The most severe type.
- Both sides of the lip and palate are completely cleft.
- The central premaxilla (front piece of the upper jaw carrying the front teeth) is floating forward, attached only to the nasal septum.
- The nasal septum hangs freely in the middle - not connected to either palatal shelf.
🔴 Color Guide for Your Model
| Color | Represents |
|---|---|
| Yellow/Gold arch | Maxillary arch (upper jaw and palate shelves) |
| Orange/Red area | The primary palate / premaxilla / cleft region |
| Dark center blob | Nasal septum or prolabium (central lip tissue) |
| Gap visible | The cleft itself - where fusion failed |
⚠️ Why does this happen?
- Genetics (family history is the biggest factor)
- Folate deficiency during early pregnancy
- Smoking, alcohol during pregnancy
- Certain medications (anti-epileptic drugs like phenytoin)
- Timing: Fusion must happen between weeks 5-12. Any disruption in this window can cause a cleft.
🩺 Clinical Impact (Simple)
| Problem | Why |
|---|---|
| Feeding difficulty | Baby can't create suction properly |
| Speech problems | Air escapes through nose during talking |
| Ear infections | Muscle around ear tube (Eustachian tube) is affected |
| Dental problems | Teeth erupt in wrong positions due to alveolar gap |
🧠 One-Line Summary
Cleft lip and palate happen when the tissue pads forming the baby's upper lip and roof of the mouth fail to fully fuse between weeks 5-12 of pregnancy, creating gaps that range from a small notch in the soft palate to a complete split through both sides of the lip and entire palate.
- Cummings Otolaryngology Head and Neck Surgery, p. 3599; Creasy & Resnik's Maternal-Fetal Medicine, p. 349
How is cleft palate surgically corrected?
Cleft palate repair (palatoplasty) is typically done around 9-18 months of age, before speech develops. The main goal is to close the gap and reconstruct the muscles of the soft palate to allow normal speech and feeding.
Searching sources...
Finding Sources
Finding Sources
Finding Sources
Reading File
Reading File
Reading File
Loading Image
Here is a complete, simple, point-by-point explanation of how cleft palate is surgically corrected:
🟢 What is the Surgery Called?
The operation to repair a cleft palate is called Palatoplasty (palato = palate, plasty = surgical repair).
For cleft lip (repaired separately), the operation is called Cheiloplasty.
🕐 When is it Done?
| What | When | Why |
|---|---|---|
| Cleft lip repair | 3-6 months of age | Before the baby develops facial growth habits |
| Cleft palate repair | 9-18 months of age | Before the child starts speaking (speech starts ~12-18 months) |
| Bone graft (if needed) | 8-10 years | Before permanent teeth erupt |
| Final corrections | Teenage years / adulthood | Nose reshaping, jaw surgery |
The most important window is getting the palate closed before speech begins - otherwise the child develops abnormal speech patterns that are very hard to correct later.
🎯 Goals of Surgery - What the Surgeon Tries to Do
- Close the gap - seal the roof of the mouth so the oral cavity and nasal cavity are separated
- Reconstruct the muscle sling - the levator veli palatini muscle runs abnormally front-to-back in a cleft; surgery reorients it into a normal side-to-side hammock shape
- Enable normal speech - the repaired palate must be able to close off the nose during talking (called velopharyngeal closure)
- Enable normal feeding/swallowing - no food going up into the nose
🔬 What Does the Surgeon Actually Do? (Step by Step)
Before we get into techniques - here is the actual surgery (before and after):
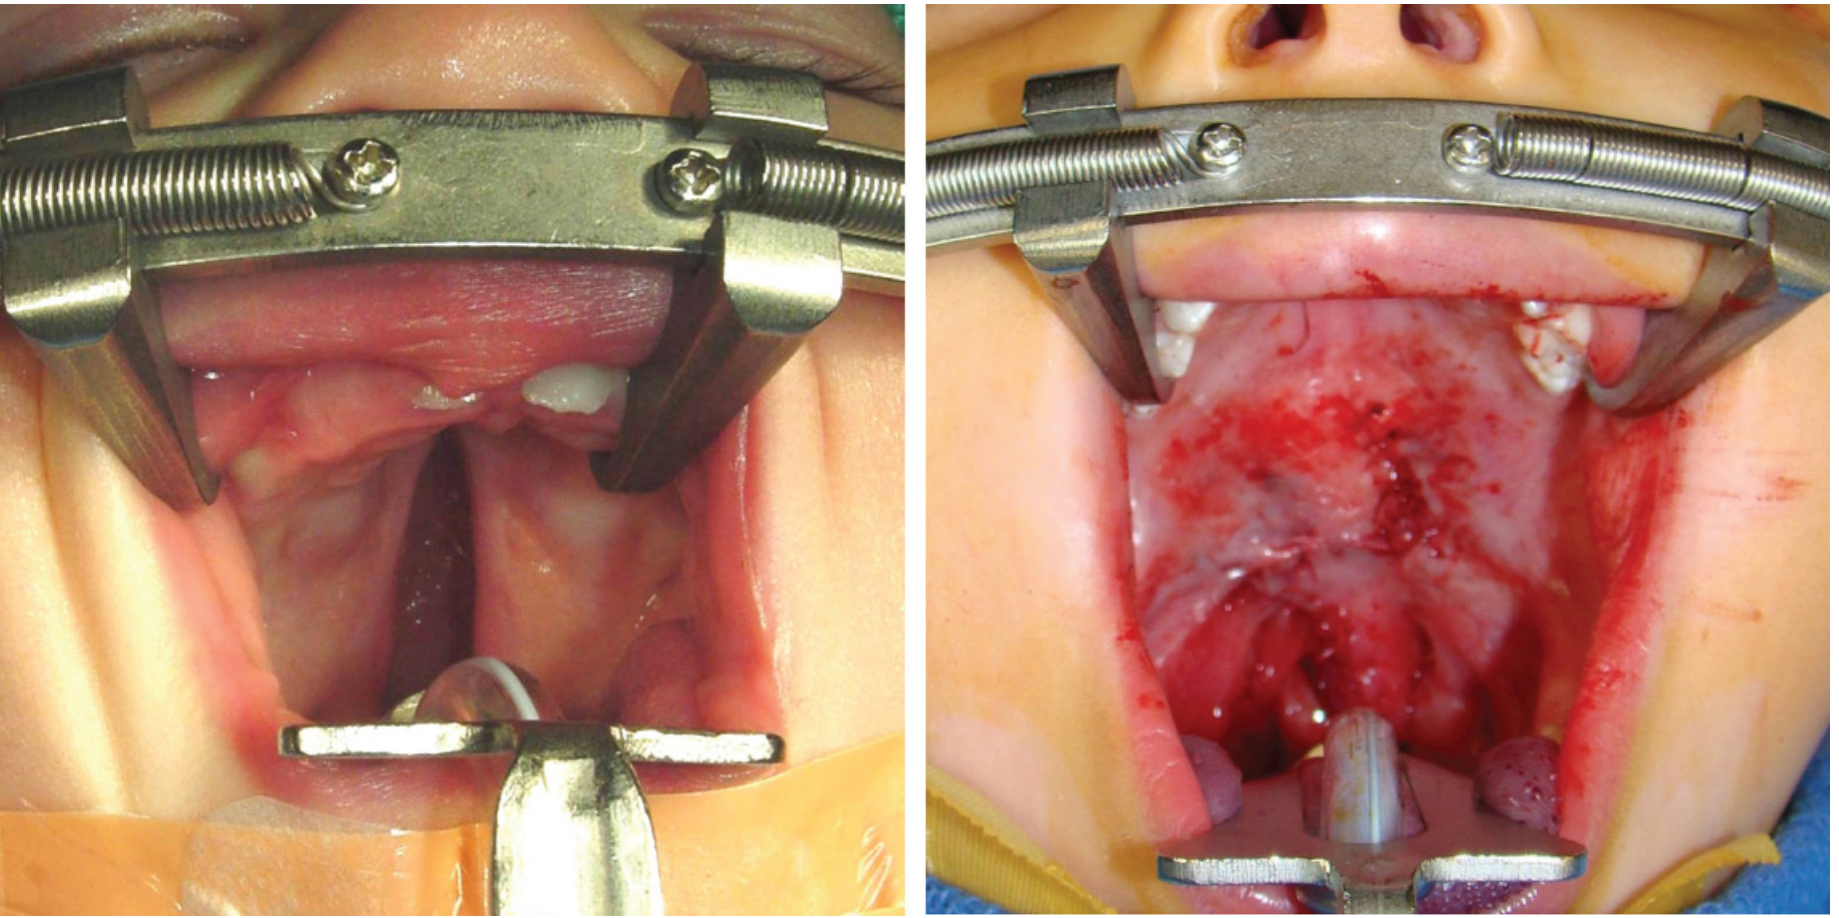
The palate has 3 layers that must all be closed:
- Top (nasal) layer - facing the nose
- Middle layer - the muscle
- Bottom (oral) layer - facing the mouth
🔧 The Main Surgical Techniques (Simple)
Technique 1 - Two-Flap Palatoplasty (Bardach Technique)
Most widely used - works for all types of cleft palate
- Two large flaps of tissue are cut from the left and right sides of the palate, keeping the blood supply intact (from the greater palatine artery).
- These flaps are rotated and brought together in the middle to close the gap.
- The muscle (levator sling) is detached from the back of the hard palate and re-stitched in the correct horizontal direction (this is called intravelar veloplasty).
- Three separate layers (nasal, muscle, oral) are stitched closed one by one.
Think of it like closing two doors - one from each side - and then reattaching the hinges properly.
Technique 2 - Furlow Double-Opposing Z-Plasty
Best for soft palate clefts and submucous clefts
- This uses the Z-plasty principle - making Z-shaped cuts that, when rearranged, lengthen the tissue.
- Two Z-cuts are made - one on the oral (lower) side and one on the nasal (upper) side.
- The flaps are transposed in opposite directions (like two interlocking Z's).
- This automatically lengthens the soft palate AND repositions the muscle into the correct hammock orientation in one step.
- A longer soft palate = better speech outcomes.
Think of it like pulling a tablecloth that is too short - by cutting it in a Z and rearranging the pieces, you make it longer without adding extra cloth.
Technique 3 - Von Langenbeck Technique (Older, Still Used)
- Two parallel cuts are made along the sides of the palate.
- The palate tissue is freed and slid toward the middle to close the gap.
- Simpler, but does not address the muscle properly.
💉 What Happens After Surgery?
| Care | Details |
|---|---|
| Pain relief | Paracetamol/ibuprofen - avoid aspirin in children |
| Feeding | Soft diet / cup feeding for 2-4 weeks; no bottle nipples that press on palate |
| Arm restraints | Sometimes used briefly so child does not put fingers in mouth |
| Infection prevention | Antibiotics may be given |
| Follow-up | Speech therapy begins as soon as the child starts talking |
⚠️ Complications to Watch For
| Complication | What It Means |
|---|---|
| Fistula | A small hole reopens in the repaired palate - most common complication |
| Velopharyngeal insufficiency (VPI) | The palate can't fully close off the nose - causes nasal/hypernasal speech |
| Ear infections | The tensor veli palatini muscle (which opens the Eustachian tube) is abnormal - ear tubes (grommets) are often placed at the same surgery |
| Scarring/growth restriction | Scar tissue from surgery can slow growth of the upper jaw |
| Speech delay | Needs speech therapy regardless of surgical success |
👥 Who Is Involved? (The Cleft Team)
Cleft palate is never treated by one doctor alone. The full team includes:
- Plastic Surgeon / ENT Surgeon (operates)
- Orthodontist (teeth alignment)
- Speech & Language Therapist
- Audiologist (hearing tests)
- Geneticist (checks for syndromes)
- Pediatrician
- Psychologist/Social Worker
🧠 One-Line Summary
Cleft palate is surgically repaired at around 9-18 months by raising flaps of palatal tissue, closing the gap in three layers, and most importantly reorienting the levator muscle into a normal hammock shape - using either the two-flap (Bardach) or Furlow Z-plasty technique - so the child can speak and swallow normally. - K.J. Lee's Essential Otolaryngology, p. 980-982; Mulholland & Greenfield's Surgery, p. 6016
This is a shared conversation. Sign in to Orris to start your own chat.