
Can you get me the location of Psoas Major in the human body?
- It originates from the lumbar vertebrae (T12-L5 vertebral bodies and transverse processes)
- It runs downward through the pelvis, passing under the inguinal ligament
- It inserts on the lesser trochanter of the femur, usually joining the iliacus muscle (together called the "iliopsoas")
- Its main function is hip flexion and lumbar spine stabilization
psoas major muscle anatomy location
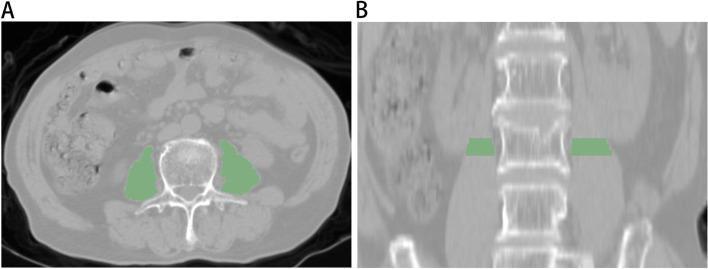
This diagnostic image demonstrates the segmentation of the psoas major muscle using unenhanced abdominal computed tomography (CT) at the level of the third lumbar vertebra (L3). Image A presents a transverse (axial) view showing the cross-sectional area of the bilateral psoas muscles highlighted in green. The muscles are situated posterolaterally to the centrally located vertebral body and anterior to the transverse processes. Visible surrounding anatomy includes the spinal canal, abdominal wall, and intra-abdominal viscera. Image B shows a coronal reconstruction of the same region, with the green-shaded regions indicating the vertical orientation of the psoas muscle segments adjacent to the L3 vertebral body. The lumbar spine is centrally aligned, with the kidneys visible laterally in the retroperitoneal space. This visualization is characteristic of sarcopenia or osteoporosis research, where psoas muscle mass and radiomic features are analyzed as biomarkers for musculoskeletal health and systemic frailty.
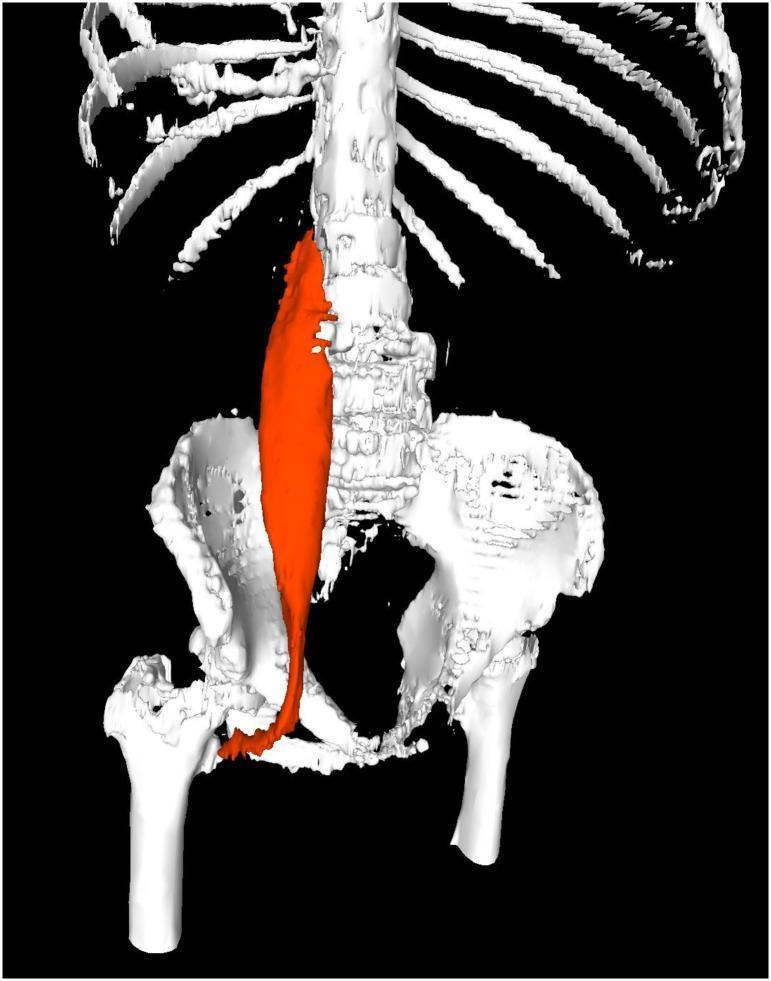
This diagnostic image is a 3D volume-rendered reconstruction derived from a CT scan, illustrating the musculoskeletal anatomy of the posterior abdominal wall and pelvis. The primary educational focus is the psoas major muscle, which is digitally segmented and highlighted in orange on the right side of the anatomical model (patient's left). The skeletal framework displays the lower rib cage, the lumbar vertebral column (L1-L5), the complete bony pelvis (including ilium, ischium, and pubis), and the proximal femurs. The psoas major is shown originating from the lateral aspects of the T12 and lumbar vertebrae, coursing inferiorly and laterally over the pelvic brim and anterior to the sacroiliac joint. It terminates at its insertion point on the lesser trochanter of the proximal femur. This visual is used in clinical research to demonstrate the measurement of Psoas Muscle Volume (PMV) and Psoas Muscle Index (PMI), which serve as radiological markers for sarcopenia and are prognostic indicators in oncological outcomes. The rendering clearly depicts the spatial relationship between the axial skeleton and the major hip flexor musculature.
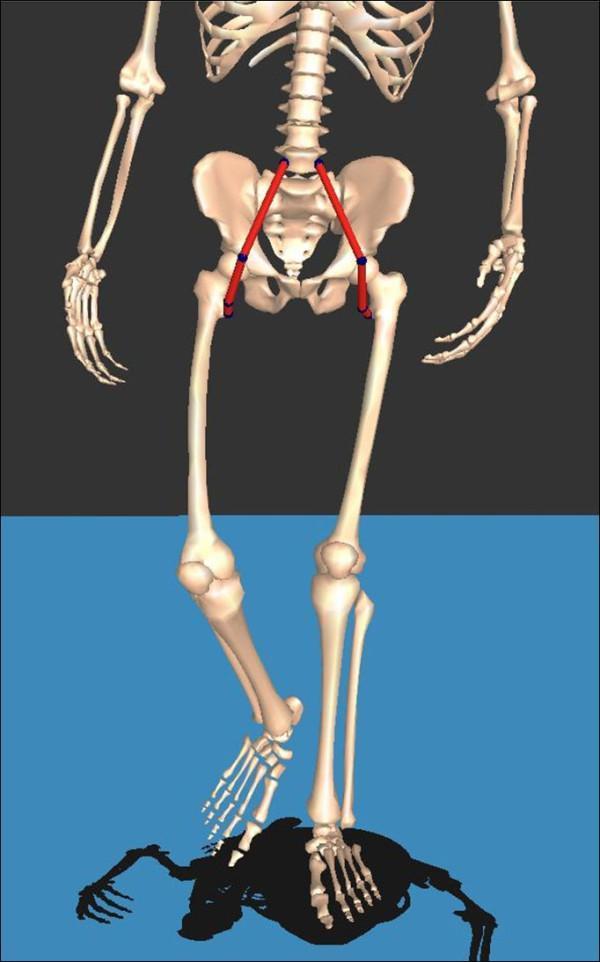
This musculoskeletal diagram features a 3D anatomical model of the human skeleton from an anterior view, illustrating the biomechanics of the psoas muscles during gait. The model is shown in mid-stride: the left leg is in the stance phase (straight and planted), while the right leg is in the swing phase (flexed at the hip and knee with dorsiflexion of the foot). The psoas major muscles are represented by bilateral red vector lines. Each muscle path is defined by three blue markers: the origin at the transverse processes of the lumbar spine (L5 region), a mid-path 'via point' at the pelvic brim (iliopectineal eminence), and the insertion at the lesser trochanter of the femur. This visualization highlights the dynamic changes in muscle length and the relationship between the lumbar spine, pelvis, and femur during locomotion. The image is designed for orthopedic and physical therapy education, specifically focusing on kinesiology, muscle modeling, and the functional anatomy of the hip flexors.
Psoas Major - Location & Anatomy
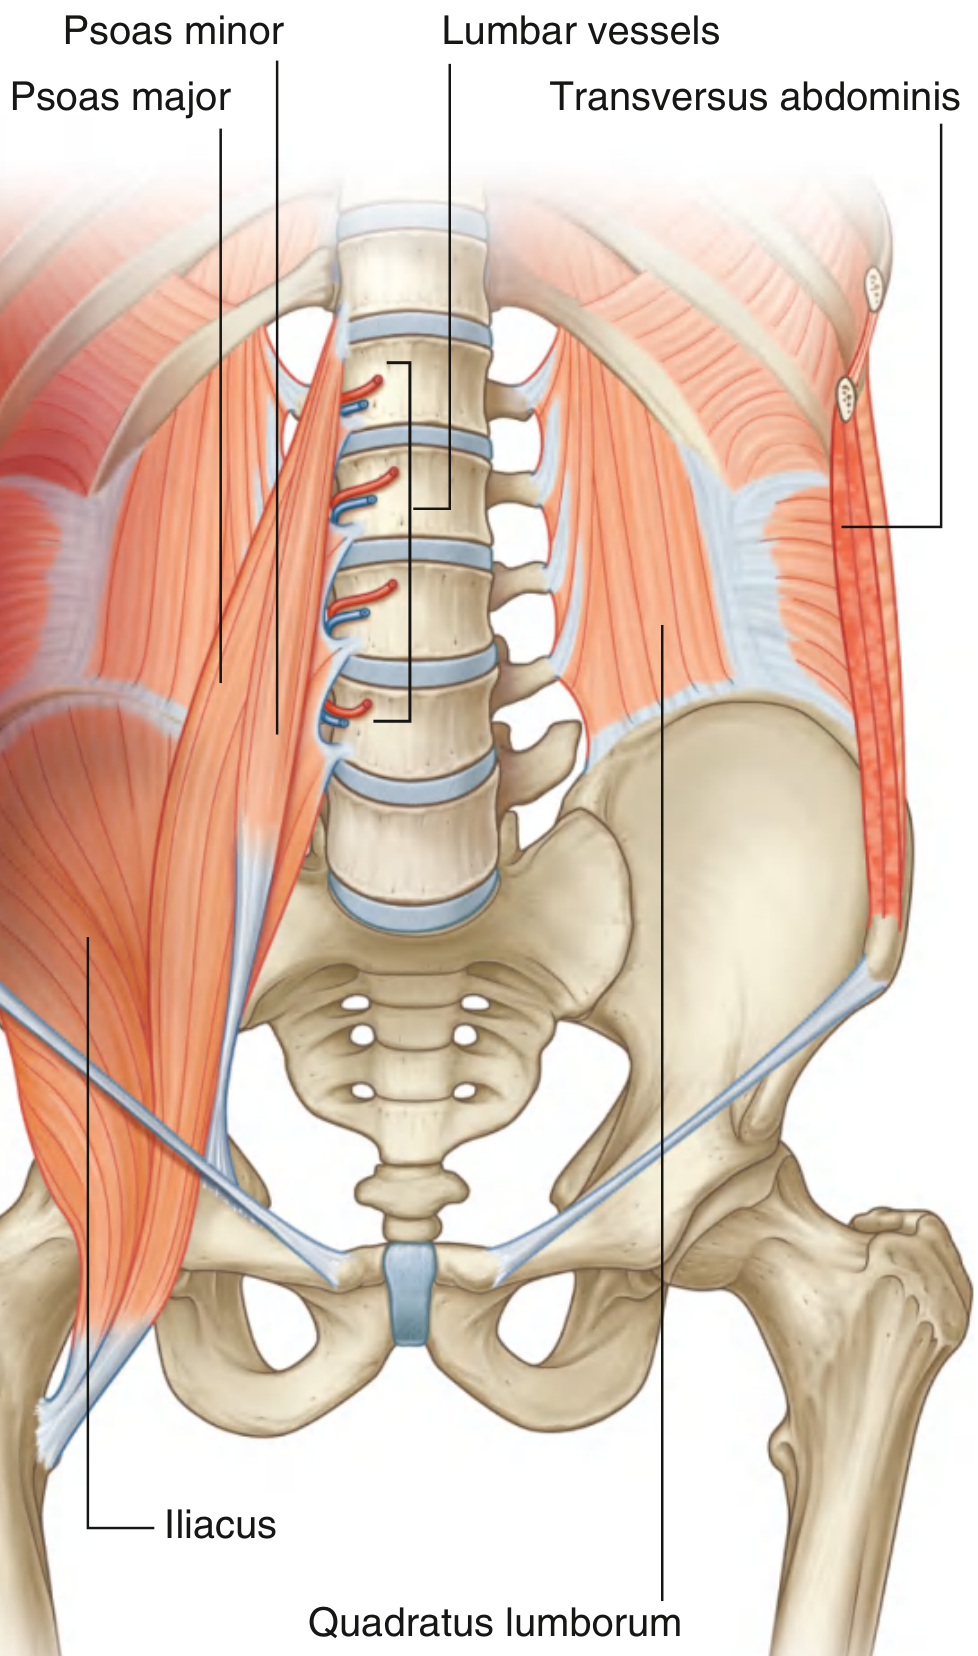
Where It Sits
Origin - Where It Starts
| Structure | Details |
|---|---|
| Vertebral bodies | T12 and L1-L5 (lateral surfaces) |
| Transverse processes | All lumbar vertebrae (L1-L5) |
| Intervertebral discs | Discs between T12/L1 down to L4/L5 |
Course - How It Travels
Insertion - Where It Ends
Innervation
Function
- Primary: Flexion of the thigh at the hip joint (when trunk is fixed)
- Secondary: Flexes the trunk against gravity when the body is supine (e.g., doing a sit-up)
- Also helps stabilize the lumbar spine
In Context: Neighboring Structures
- Medially: Lumbar vertebral column and lumbar vessels
- Laterally: Quadratus lumborum
- Inferiorly: Iliacus muscle
- Anteriorly: Psoas minor (when present) and the posterior abdominal viscera
Diagram depicting the different parts of gallbladder.
gallbladder anatomy parts fundus body neck cystic duct diagram
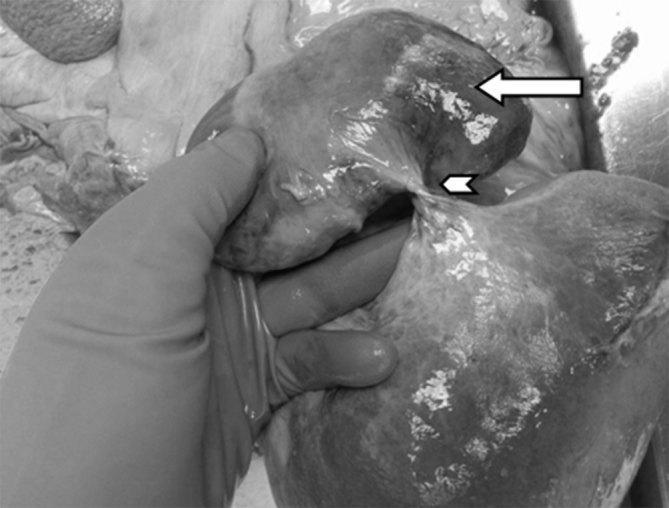
This grayscale clinical photograph captures a post-mortem specimen of a gallbladder volvulus. The image shows a grossly distended and necrotic gallbladder (indicated by the white arrow) that has undergone torsion. A clear fulcrum point or twist (marked by the white arrowhead) is visible at the neck of the organ, involving the vascular pedicle and cystic duct. The distal gallbladder body and fundus exhibit significant darkening and discoloration consistent with gangrenous changes and tissue necrosis resulting from vascular compromise. A gloved hand is positioned to retract the organ, highlighting its abnormal mobility and the specific site of the twist. This image serves as a pathological example of gallbladder torsion, a rare but life-threatening surgical emergency, typically associated with a long, mobile mesentery or 'floating gallbladder' anatomy. The visual evidence of hemorrhagic necrosis and severe distension illustrates the end-stage result of prolonged ischemia following mechanical torsion.
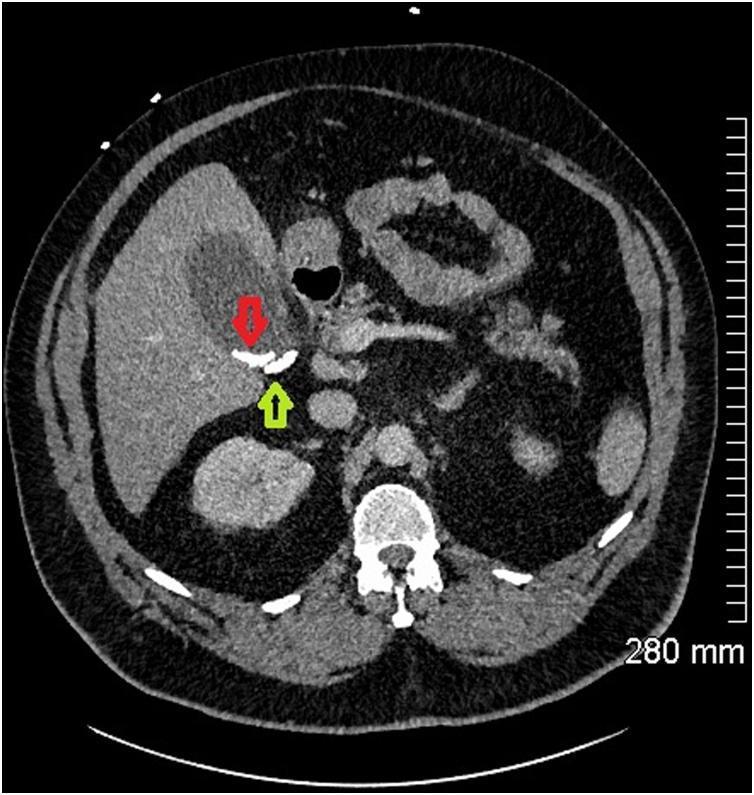
This diagnostic image is an axial CT scan of the abdomen at the level of the biliary system. The visual focus is on the gallbladder and cystic duct, which exhibit multiple hyperdense, calcified gallstones (cholelithiasis). Specifically, a red arrow indicates a cluster of bright white, high-attenuation stones located within the gallbladder fundus/body. Adjacent to this, a green arrow points to another calcified stone lodged within the cystic duct. The surrounding anatomy includes the liver, appearing as a homogenous gray parenchymal structure to the left of the gallbladder, and the right kidney located posteriorly. The vertebral body is visible at the bottom center of the frame as a high-density cortical structure. The image demonstrates key diagnostic features of calculous biliary disease and potential obstructive cholecystitis, characterized by the localization of radio-opaque calculi in the biliary drainage tract.
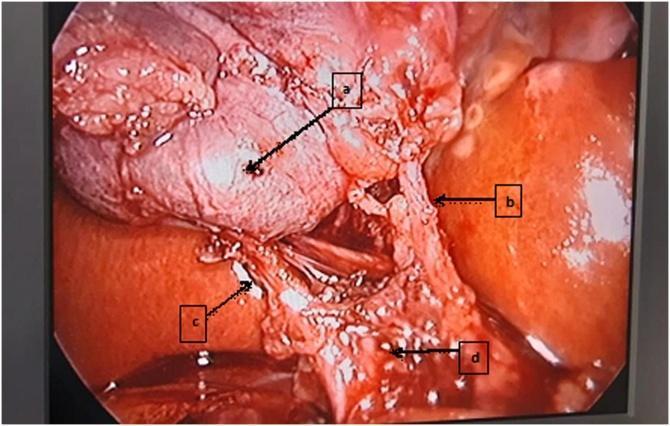
This laparoscopic clinical photograph illustrates the intraoperative identification of the 'Critical View of Safety' (CVS) during a cholecystectomy. The image shows the hepatobiliary anatomy after meticulous dissection and the release of an incarcerated Hartmann pouch from Calot's triangle. Four key structures are labeled: (a) the fundus and body of the gallbladder, demonstrating cephalad retraction; (b) the cystic artery, clearly isolated and originating from the right hepatic artery; (c) the cystic duct, seen entering the gallbladder neck; and (d) the common hepatic duct, which forms the medial boundary of the triangle. The image demonstrates the clinical application of surgical techniques to prevent bile duct injury by ensuring only two structures (the cystic duct and cystic artery) enter the gallbladder and that the lower third of the gallbladder is separated from the liver bed (cystic plate). This photograph serves as an educational resource for general surgery residents studying biliary anatomy and laparoscopic safe-entry protocols.
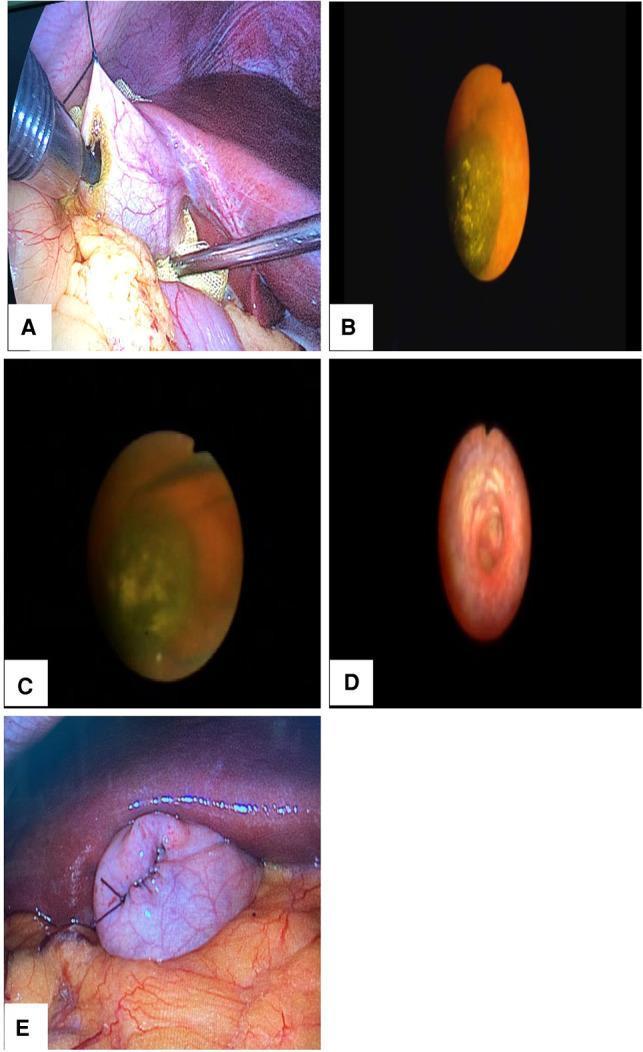
This composite intraoperative clinical photograph and endoscopic series documents the steps of minimally invasive gallbladder-preserving surgery (GPS) for cholecystolithiasis. Panel A (Laparoscopic view) shows the fundus of the gallbladder suspended from the abdominal wall with a 12-mm trocar inserted into the lumen. Panels B and C (Choledochoscopic views) visualize incarcerated yellowish-brown gallstones within the gallbladder neck, with a stone extraction basket engaged in Panel C. Panel D demonstrates the internal anatomy of the cystic duct, highlighting the spiral valves (valves of Heister) to confirm patency and complete stone clearance. Panel E (Laparoscopic view) illustrates the final procedural stage where the gallbladder incision is closed using a continuous suture technique with 4/0 absorbable material. The series highlights surgical techniques for organ preservation in symptomatic gallstone disease, focusing on direct endoscopic visualization for stone retrieval and anatomical verification of the biliary tract.
Parts of the Gallbladder
Primary Anatomical Diagram
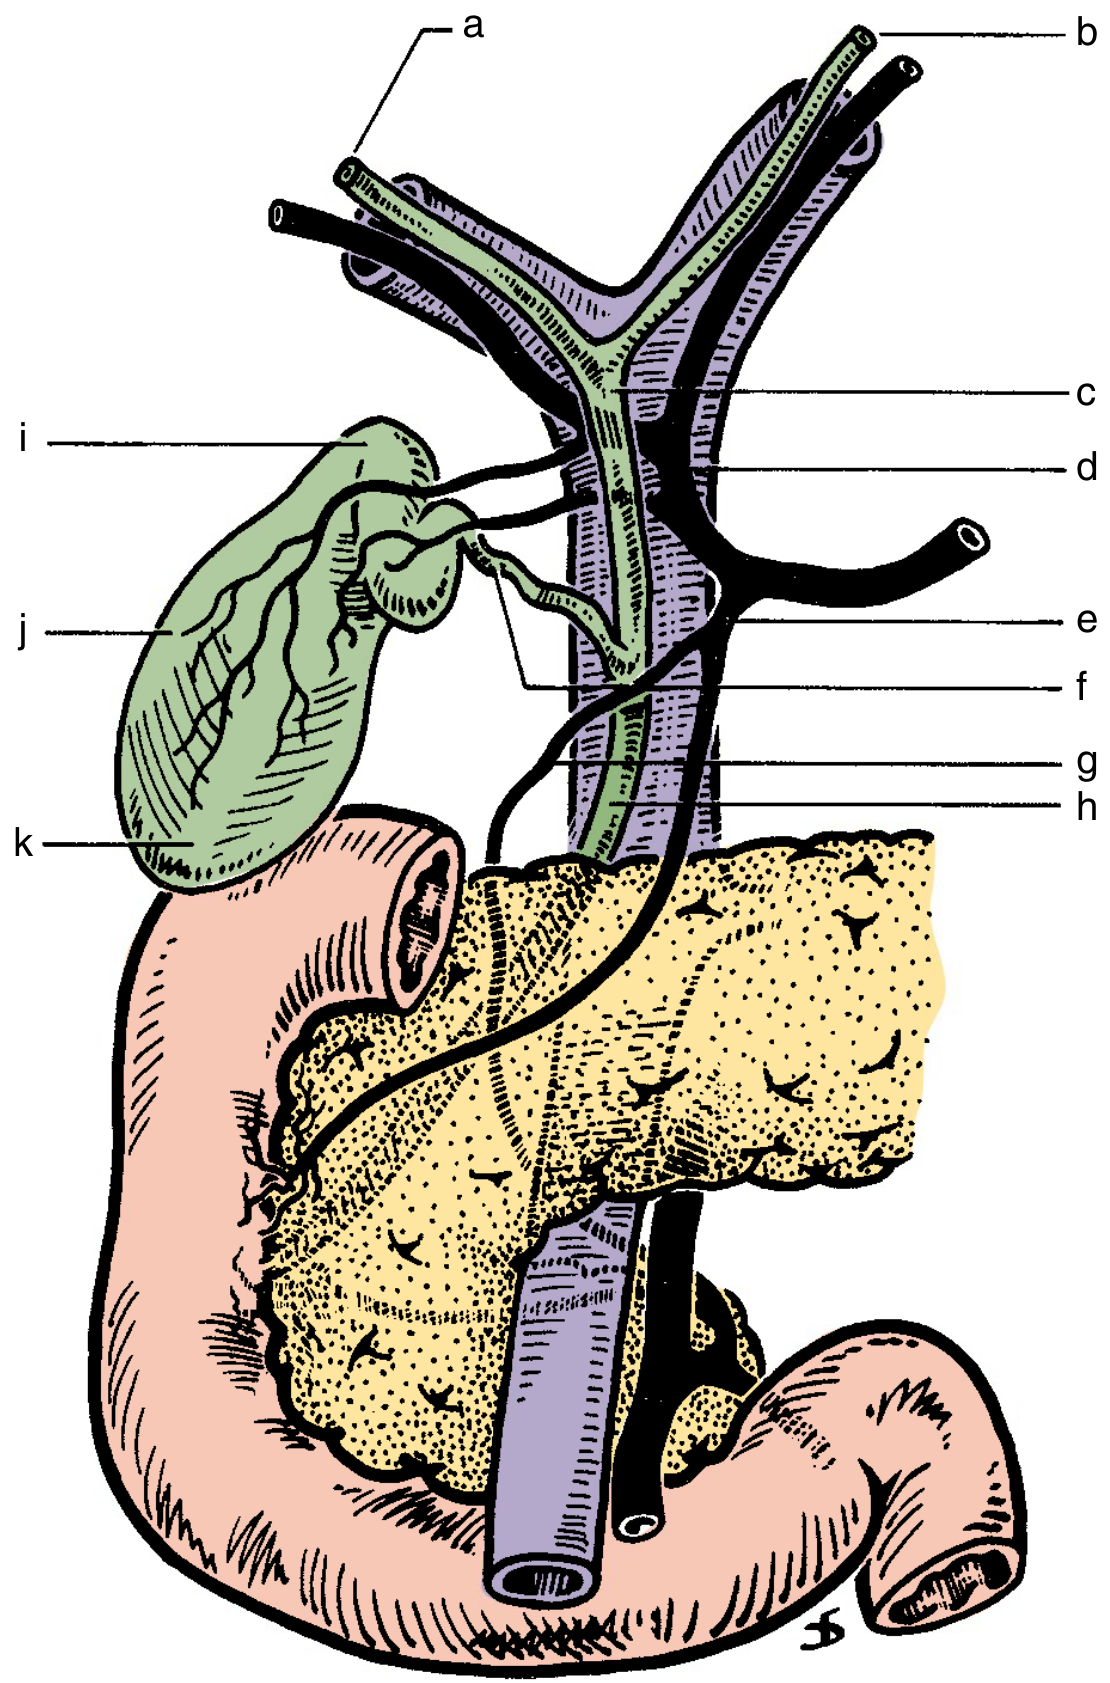
- a = Right hepatic duct
- b = Left hepatic duct
- c = Common hepatic duct
- d = Hepatic artery
- e = Gastroduodenal artery
- f = Cystic duct
- g = Retroduodenal artery
- h = Common bile duct
- i = Neck of the gallbladder
- j = Body of the gallbladder
- k = Fundus of the gallbladder
The Four Parts of the Gallbladder
| Part | Location | Key Features |
|---|---|---|
| Fundus | Rounded tip - projects just beyond the liver edge anteriorly | Most distal part; if folded on itself it is called a "Phrygian cap" |
| Body | Main middle section | Lies close to the second part of the duodenum and the transverse colon |
| Infundibulum (Hartmann's Pouch) | Junction between body and neck | A mucosal outpouching; hangs forward along the free edge of the lesser omentum; can fold in front of the cystic duct |
| Neck | Narrow tapered end | Contains mucosal spiral folds; leads directly into the cystic duct |
Cystic Duct
- Contains the folds (valves) of Heister - spiral mucosal duplications that regulate filling and emptying of the gallbladder
- Joins the common hepatic duct to form the common bile duct (CBD)
Arterial Supply
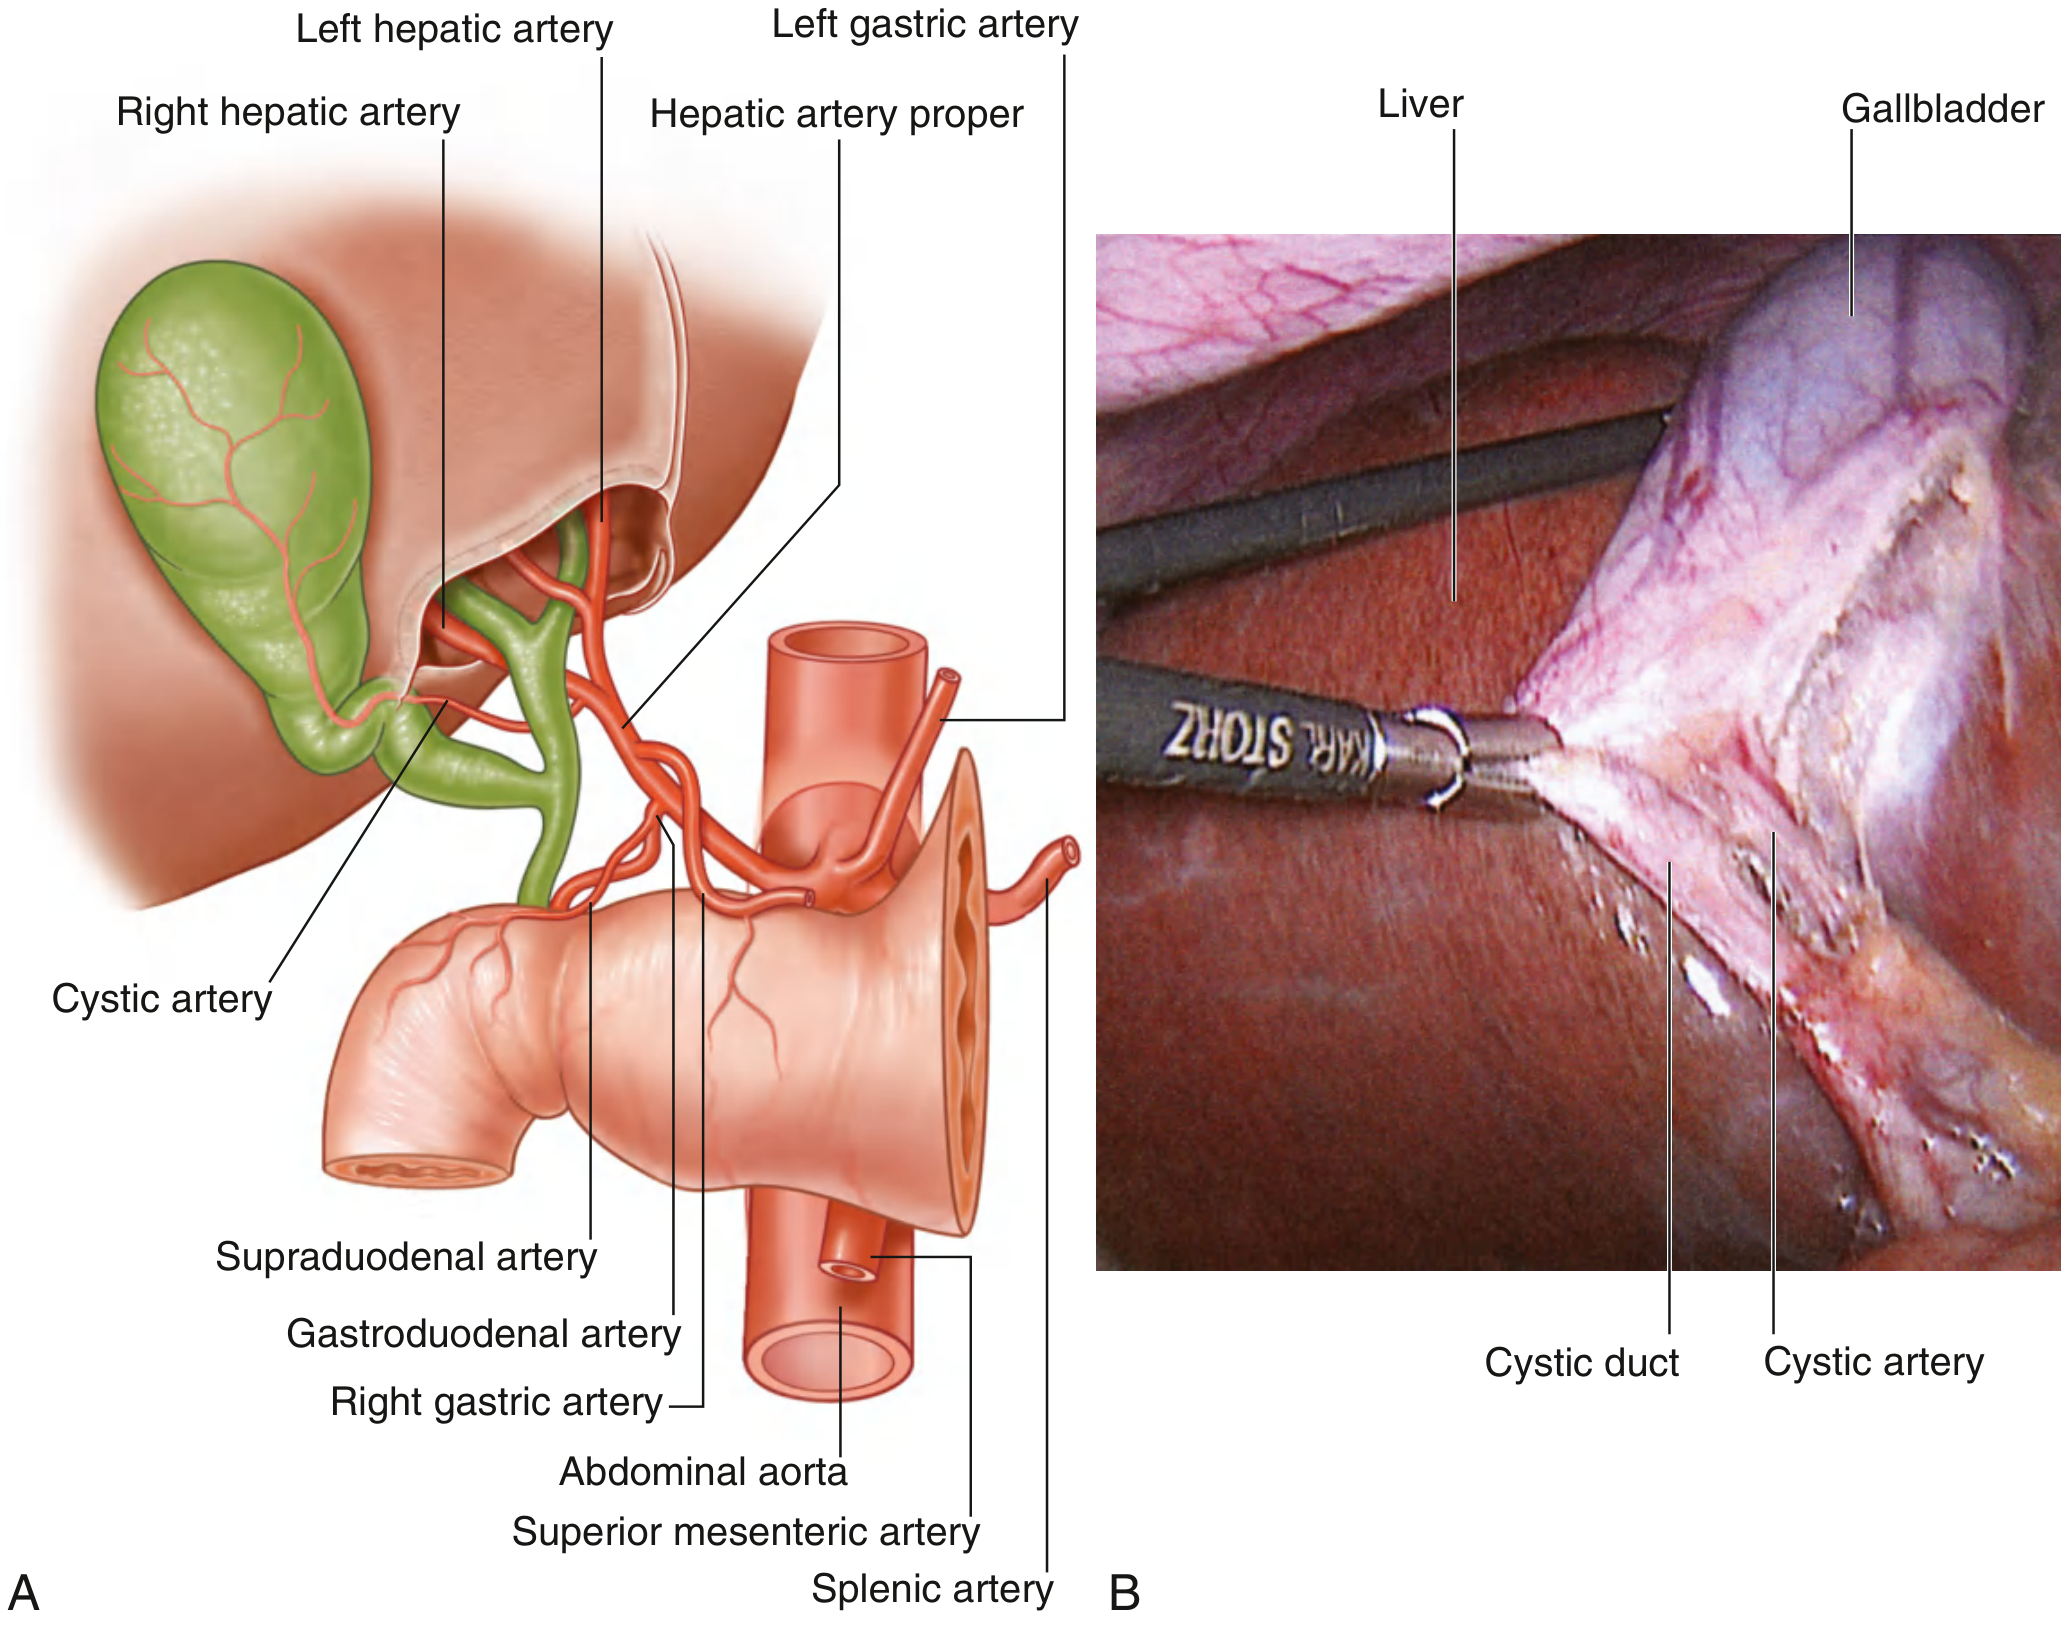
Function
Sources: - Gray's Anatomy for Students, p. 393 | - Sabiston Textbook of Surgery, Functional Anatomy, Ch. 89