
Ear drum parts
"tympanic membrane" anatomy
tympanic membrane anatomy parts pars tensa pars flaccida official
1. Main parts
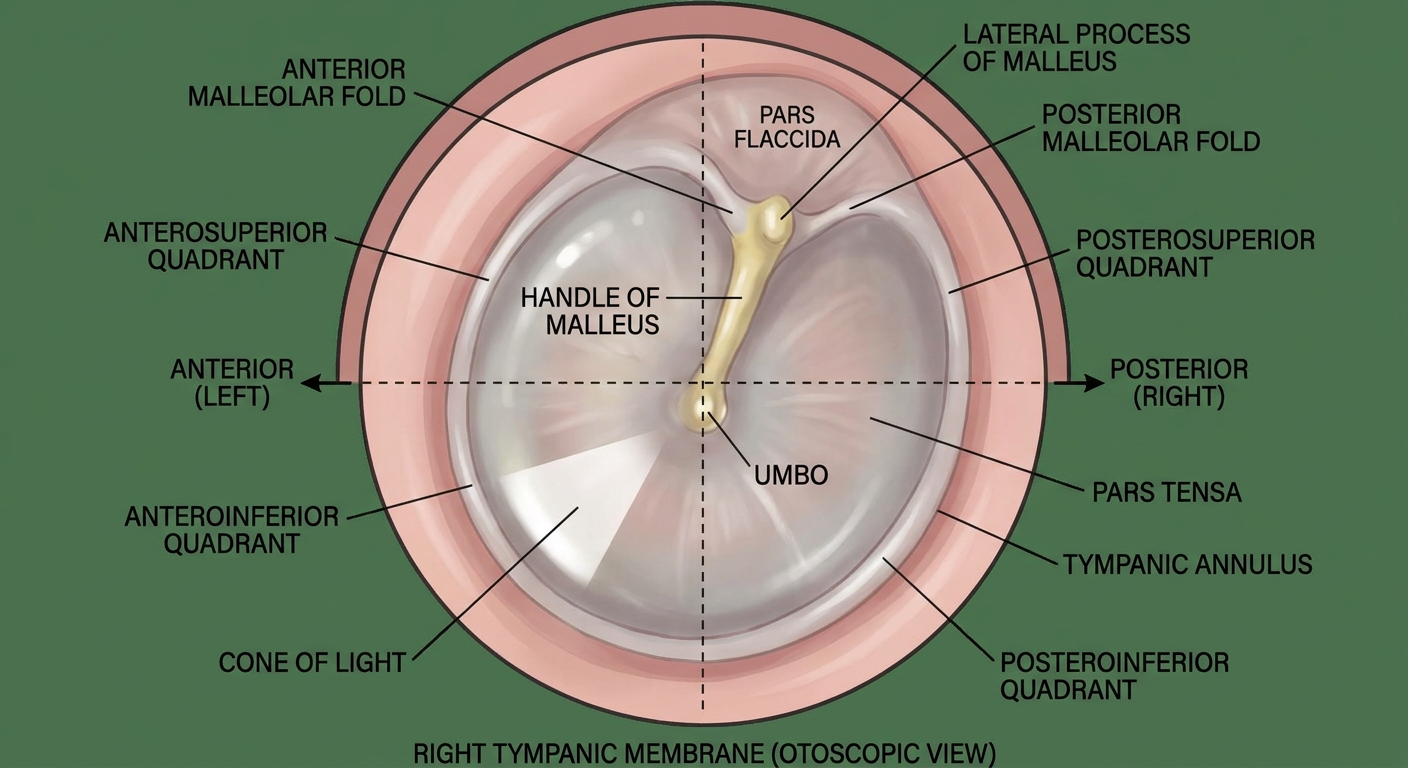
- Pars tensa: the large, tight lower portion. It makes up most of the eardrum.
- Pars flaccida: the small, loose upper portion, above the lateral process of the malleus.
2. Layers
- Outer layer: skin, continuous with the external auditory canal.
- Middle fibrous layer: provides strength, especially in pars tensa.
- Inner layer: mucous membrane, continuous with the middle-ear lining.
3. Visible landmarks on otoscopy
- Handle (manubrium) of malleus
- Lateral process of malleus
- Umbo: central depressed point where the malleus handle ends.
- Cone of light: light reflex seen anteroinferiorly, usually at 5 o’clock in the right ear and 7 o’clock in the left ear.
- Anterior and posterior malleolar folds: outline the pars flaccida.
- Annulus: thickened rim attaching the membrane to the bony groove.
Show a labeled diagram of the eardrum
labeled otoscopic view of tympanic membrane eardrum showing pars flaccida pars tensa malleus handle umbo cone of light quadrants
labeled tympanic membrane diagram pars flaccida pars tensa malleus umbo
"tympanic membrane" anatomy
A clear educational labeled anatomical diagram of the right tympanic membrane (eardrum) as viewed through an otoscope. Include labels with leader lines for pars flaccida, pars tensa, anterior malleolar fold, posterior malleolar fold, lateral process of malleus, handle of malleus, umbo, cone of light in the anteroinferior quadrant, tympanic annulus, and the four quadrants: anterosuperior, anteroinferior, posterosuperior, posteroinferior. Ensure accurate orientation: anterior to the left and posterior to the right.
Create a labeled middle-ear anatomy diagram
middle ear anatomy ossicles eustachian tube cochlea oval round window diagram anatomy
"middle ear" anatomy
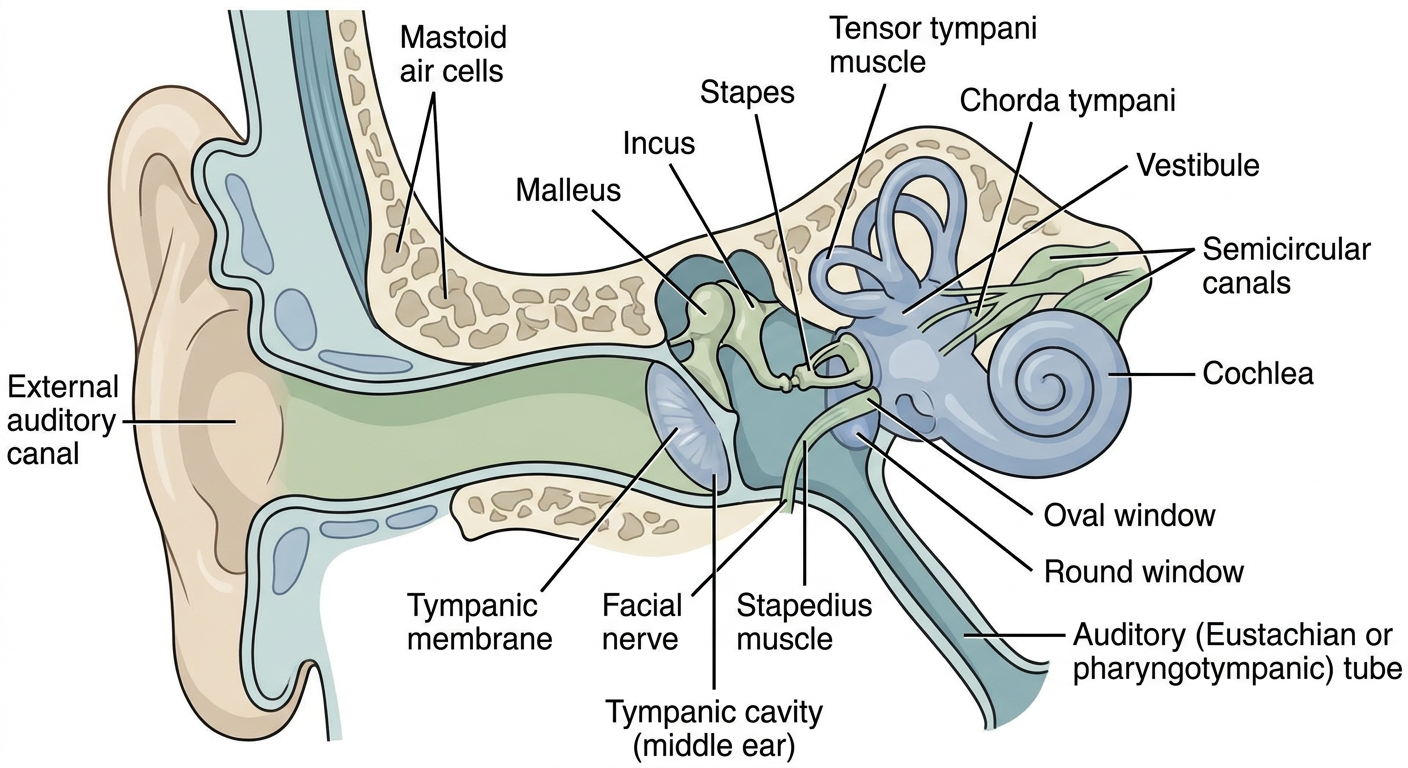
A medically accurate, clean labeled cross-sectional anatomy diagram of the human middle ear, with outer ear on the left and inner ear on the right. Clearly label: external auditory canal, tympanic membrane, tympanic cavity (middle ear), malleus, incus, stapes, oval window, round window, cochlea, vestibule, semicircular canals, auditory (Eustachian or pharyngotympanic) tube leading downward and forward to the nasopharynx, mastoid air cells posteriorly, tensor tympani muscle, stapedius muscle, facial nerve, and chorda tympani. Use clear leader lines and make all label text legible. Include a small arrow sequence showing sound transmission: tympanic membrane to malleus to incus to stapes to oval window to cochlea.
Explain the process of direct nasal endoscopy and also give a proper diagram along with all the parts
diagnostic nasal endoscopy procedure examination steps anatomy nasal cavity official guideline
"nasal endoscopy" diagnostic
labeled nasal endoscopy anatomy diagram nasal cavity turbinates meatuses choana nasopharynx
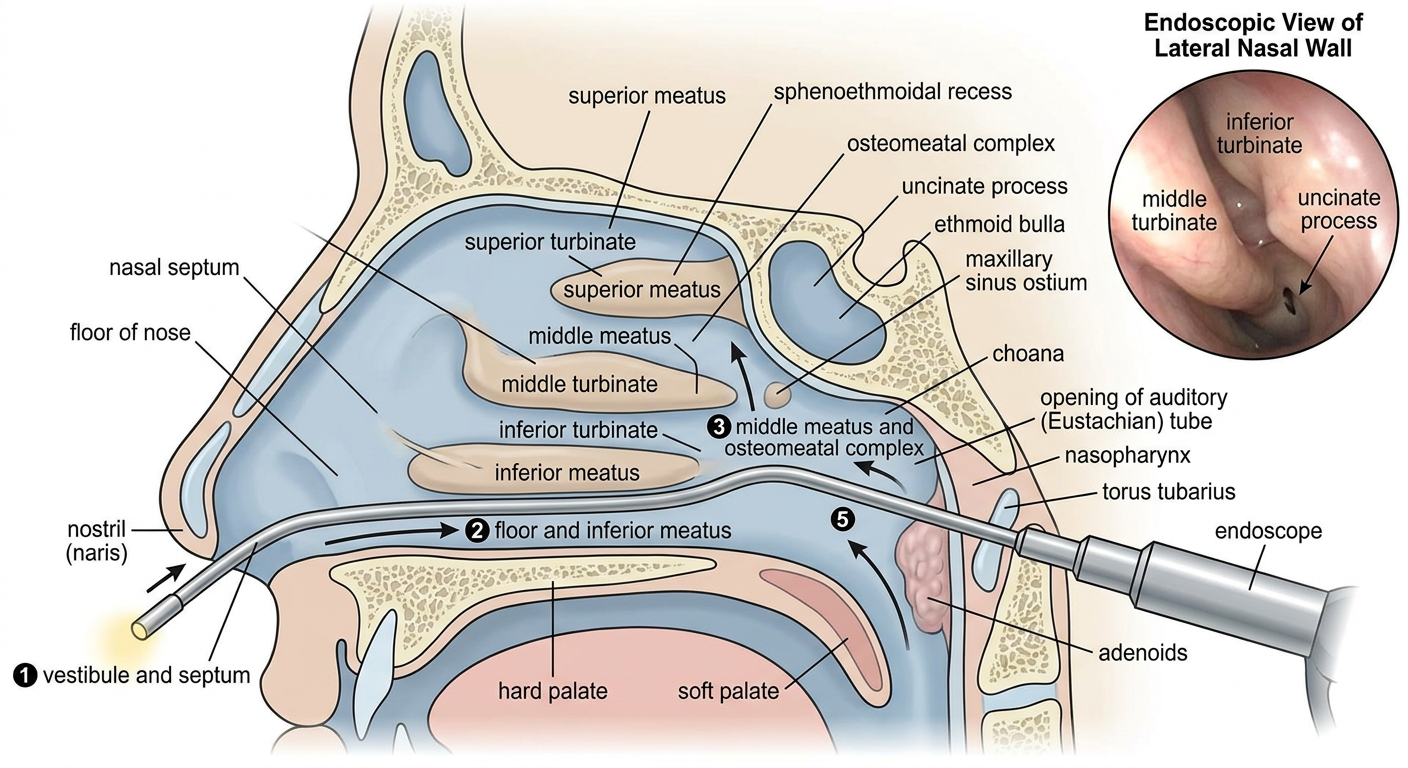
A medically accurate educational diagram for diagnostic direct nasal endoscopy, shown as a sagittal cutaway of the right nasal cavity, with a 0-degree rigid nasal endoscope entering through the nostril along the floor of the nose toward the choana and nasopharynx. Include a second small inset showing the endoscopic view of the lateral nasal wall. Clearly label with leader lines: nostril (nar naris), nasal vestibule, nasal septum, floor of nose, inferior turbinate, inferior meatus, middle turbinate, middle meatus, superior turbinate, superior meatus, sphenoethmoidal recess, osteomeatal complex, uncinate process, ethmoid bulla, maxillary sinus ostium, choana, nasopharynx, opening of auditory (Eustachian) tube, torus tubarius, adenoids, hard palate, soft palate, and the endoscope. Add numbered arrows for the systematic examination route: 1 vestibule and septum, 2 floor and inferior meatus, 3 middle meatus and osteomeatal complex, 4 sphenoethmoidal recess, 5 choana and nasopharynx. Use clear large legible labels and non-graphic clinical textbook style.
Direct nasal endoscopy
Instruments
- 0-degree rigid endoscope: gives a straight-ahead view and is commonly used.
- 30-degree or 70-degree endoscope: helps look around the turbinates and into sinus drainage areas.
- Flexible nasendoscope: useful when assessing the nasopharynx, soft palate, or larynx, and is often better tolerated.
Procedure: systematic examination
This is an examination for trained clinicians. Do not attempt it yourself, as trauma and nosebleed can occur.
1. Preparation
- Explain the procedure and obtain consent.
- Seat the patient upright with the head slightly extended.
- Inspect the nose externally, then perform anterior rhinoscopy.
- Apply a topical decongestant to reduce mucosal swelling and a topical local anesthetic if needed.
- Ask the patient to breathe gently through the mouth. The scope is held steadily and advanced under direct vision, never forced.
2. Examine the nasal vestibule and septum
- Crusting, vestibulitis, hairs, foreign body
- Nasal septal deviation
- Septal spur or perforation
- Bleeding point, especially in recurrent epistaxis
- Mass or ulceration
3. Pass along the floor of the nose
- Inferior turbinate
- Inferior meatus
- Nasal floor
- Septum
- Mucopus, edema, polyp, mass, or bleeding
4. Inspect the middle meatus and osteomeatal complex
- Middle turbinate
- Middle meatus
- Uncinate process
- Ethmoid bulla
- Hiatus semilunaris
- Osteomeatal complex
- Region of the maxillary sinus ostium
- Frontal recess area, when visible
5. Examine superiorly
- Superior turbinate
- Superior meatus
- Sphenoethmoidal recess
6. Inspect the posterior nasal cavity and nasopharynx
- Choana
- Nasopharynx
- Torus tubarius, the raised area around the Eustachian tube opening
- Pharyngeal opening of the Eustachian tube
- Adenoid tissue, especially in children
- Posterior nasal septum and posterior ends of turbinates
7. Repeat on the other side and document
- Septal deviation or spur
- Turbinate hypertrophy
- Mucosal color and edema
- Discharge: clear, purulent, blood-stained, or fungal
- Polyps, crusting, adhesions, mass, or foreign body
- Status of middle meatus, sphenoethmoidal recess, choana, and nasopharynx
- Any bleeding or pain after the procedure
Parts shown in the diagram
| Region | Key structures |
|---|---|
| Entrance | Nostril (naris), nasal vestibule |
| Medial wall | Nasal septum |
| Floor | Floor of nose, hard palate, soft palate |
| Lateral wall | Inferior, middle, and superior turbinates |
| Spaces beneath turbinates | Inferior, middle, and superior meatuses |
| Sinus drainage region | Uncinate process, ethmoid bulla, osteomeatal complex, maxillary ostium, sphenoethmoidal recess |
| Posterior nose | Choana |
| Nasopharynx | Adenoids, torus tubarius, Eustachian-tube opening |
Aftercare and complications
Tell me how can I make my face look thin in one week
facial puffiness sodium diet
NHS healthy weight loss reduce salt alcohol facial puffiness advice
For the next 7 days
- Cut back on high-salt foods: packaged snacks, instant noodles, chips, pickles, processed meats, takeaways, salty sauces. High salt can increase water retention. The NHS salt advice suggests limiting salty processed foods and sauces.
- Avoid or minimize alcohol: it can disrupt sleep, increase calories, and make some people look puffy the next day.
- Drink water regularly: aim for pale-yellow urine rather than forcing excessive water. Do not dehydrate yourself.
- Sleep 7 to 9 hours, ideally with your head slightly elevated if you wake up with facial puffiness.
- Eat simple meals: protein plus vegetables/fruit plus a high-fiber carbohydrate. Limit sugary drinks and very large late-night meals. The NHS healthy-eating guidance recommends water, vegetables, lower-sugar choices, and smaller portions.
- Move daily: a brisk 30 to 45-minute walk, cycling, or workout can support overall energy balance and reduce bloating.
- Use a cool compress in the morning for 5 to 10 minutes if you have temporary under-eye or facial puffiness.
For a slimmer appearance in photos
- Keep the camera slightly above eye level, not below the chin.
- Turn your face about 30 to 45 degrees rather than facing fully forward.
- Bring the chin slightly forward and down, while keeping the neck tall.
- Avoid wide-angle close-up selfies, which can distort facial proportions.
- Hairstyle, beard shaping, or contour makeup can change visual definition immediately.
Avoid
- Crash diets, fasting for days, “detox” teas, laxatives, diuretics, or deliberate dehydration. They do not safely reduce face fat and can make you ill.
- “Face exercises” as a promise of targeted facial fat loss. They do not reliably spot-reduce fat.
What hairstyles or grooming choices make a face look slimmer?
face shape hairstyles grooming tips create slimmer face appearance professional styling
Haircuts and styling
- Add height at the crown: Soft volume on top elongates the face. Avoid making the widest volume sit at cheek level.
- Try an off-center or deep side part: It breaks up facial symmetry and can create a narrower visual line.
- Choose face-framing layers below the cheekbones: Long layers that begin around the jaw or below tend to lengthen rather than widen the face.
- Long bob or “lob”: A cut ending below the chin, particularly slightly longer in front, can be flattering. Avoid a blunt bob ending exactly at the widest part of the jaw or cheeks.
- Soft waves below the chin: Keep roots smoother and place movement from jaw level downward.
- For long hair: A half-up style or a high, loose ponytail/bun adds vertical height.
- Bangs: Side-swept, curtain, or longer wispy bangs can frame the face. Very thick, straight-across short bangs may make a round face appear shorter.
If you have short hair
- Keep the sides neater/less bulky and leave a little length or texture on top.
- A textured crop, side-swept fringe, quiff, or asymmetric cut often adds height and definition.
- Avoid a very round shape with equal volume at the sides.
Beard and facial hair
- Keep the beard slightly fuller at the chin than at the cheeks to create an oval, longer outline.
- Use clean cheek lines, but avoid cutting them too low.
- Keep the sideburns and cheek area tidy rather than very wide.
- A short boxed beard, goatee with a connected moustache, or light stubble with a defined neckline may work well.
- Avoid a beard that is widest at the jawline if your goal is a narrower look.
Eyebrows and grooming
- Keep brows tidy but natural. A gentle, soft arch can visually lift the face.
- Avoid making brows very thin or overly rounded.
- If you wear makeup, light contour beneath the cheekbones and along the jaw, plus blush placed slightly upward toward the temples, can create definition.
Quick photo tips
- Use a camera slightly above eye level.
- Turn your face 30 to 45 degrees rather than facing straight on.
- Keep your chin slightly forward and down.
- Avoid close-up wide-angle shots from below.
Give me photos of the hairstyles I can use to make it look slimmer
hairstyles that create slimmer face illusion long face framing layers side part textured lob high ponytail images
1. Long face-framing layers

2. Textured high ponytail with loose front pieces

3. Deep side part with long layers

4. Long textured waves
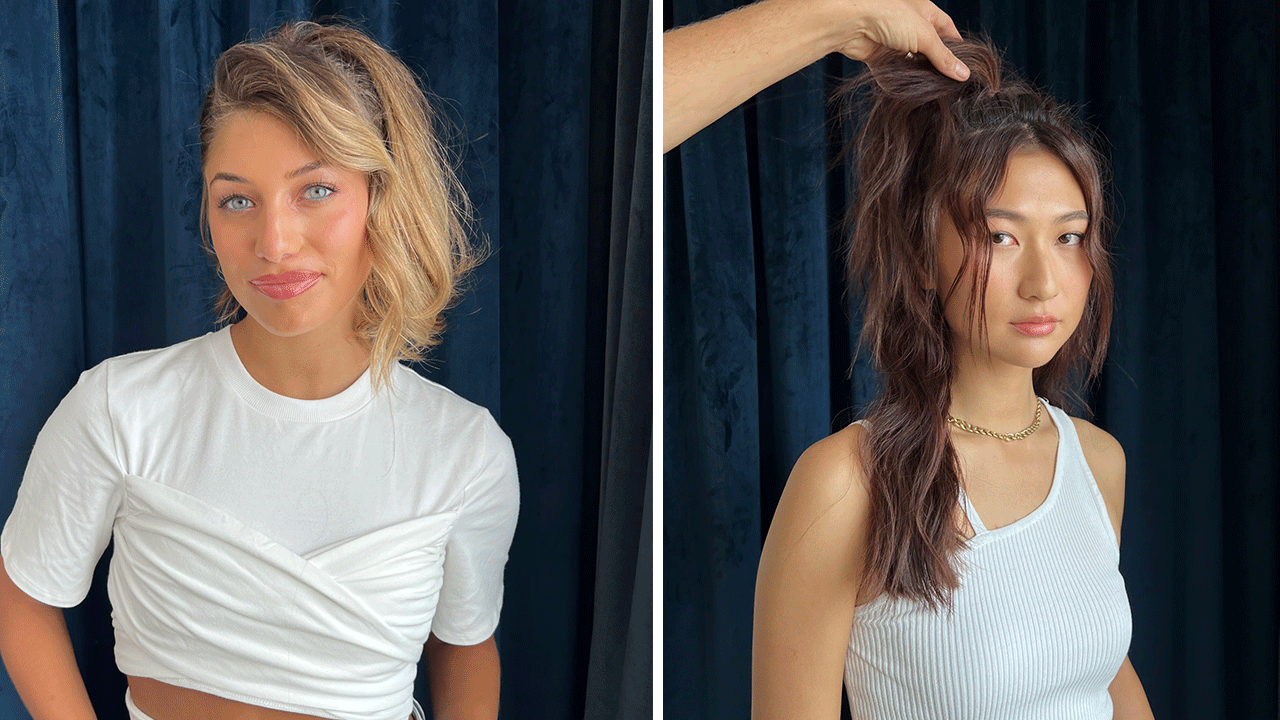
“I want soft, long face-framing layers starting below my cheekbones, some height at the crown, and avoid extra width around my cheeks.”