
Tell all about needle stick injury
needlestick injury management guidelines 2024 2025
needlestick injury healthcare workers bloodborne pathogens
"needlestick injury" AND "post-exposure prophylaxis"
needlestick injury management flowchart post-exposure prophylaxis
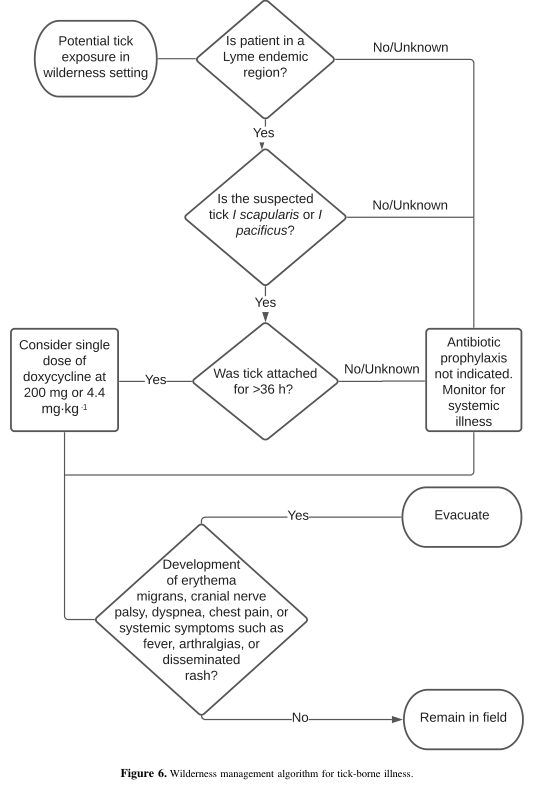
Summary : This flowchart presents a wilderness management algorithm for tick-borne illness, specifically guiding decisions about Lyme disease prophylaxis and evacuation based on tick exposure, region, tick species, attachment duration, and symptom development. flowchart: # Nodes : • Start (rounded rectangle): "Potential tick exposure in wilderness setting" • Decision (diamond): "Is patient in a Lyme endemic region?" • Decision (diamond): "Is the suspected tick I scapularis or I pacificus?" • Decision (diamond): "Was tick attached for >36 h?" • Process (rectangle): "Consider single dose of doxycycline at 200 mg or 4.4 mg·kg⁻¹" • Process (rectangle): "Antibiotic prophylaxis not indicated. Monitor for systemic illness" • Decision (diamond): "Development of erythema migrans, cranial nerve palsy, dyspnea, chest pain, or systemic symptoms such as fever, arthralgias, or disseminated rash?" • Process (rectangle): "Evacuate" • Process (rectangle): "Remain in field" # Connectors : • Start → "Is patient in a Lyme endemic region?" • "Is patient in a Lyme endemic region?" – Yes → "Is the suspected tick I scapularis or I pacificus?" – No/Unknown → "Antibiotic prophylaxis not indicated. Monitor for systemic illness" • "Is the suspected tick I scapularis or I pacificus?" – Yes → "Was tick attached for >36 h?" – No/Unknown → "Antibiotic prophylaxis not indicated. Monitor for systemic illness" • "Was tick attached for >36 h?" – Yes → "Consider single dose of doxycycline at 200 mg or 4.4 mg·kg⁻¹" – No/Unknown → "Antibiotic prophylaxis not indicated. Monitor for systemic illness" • "Consider single dose of doxycycline at 200 mg or 4.4 mg·kg⁻¹" → "Development of erythema migrans, cranial nerve palsy, dyspnea, chest pain, or systemic symptoms such as fever, arthralgias, or disseminated rash?" • "Development of erythema migrans, cranial nerve palsy, dyspnea, chest pain, or systemic symptoms such as fever, arthralgias, or disseminated rash?" – Yes → "Evacuate" – No → "Remain in field" # Layout : • Top-down vertical flow, with decision diamonds branching to the right for "No/Unknown" responses. • Merges back to main flow after "Antibiotic prophylaxis not indicated" node. • Final decision splits to "Evacuate" or "Remain in field" at the bottom. # Analysis : • The algorithm prioritizes Lyme disease risk assessment based on region, tick species, and attachment duration. • Antibiotic prophylaxis (doxycycline) is only considered if all risk criteria are met. • Symptom development triggers evacuation, while absence of symptoms allows continued field activity. • The flowchart provides clear, stepwise guidance for wilderness providers managing tick exposures.
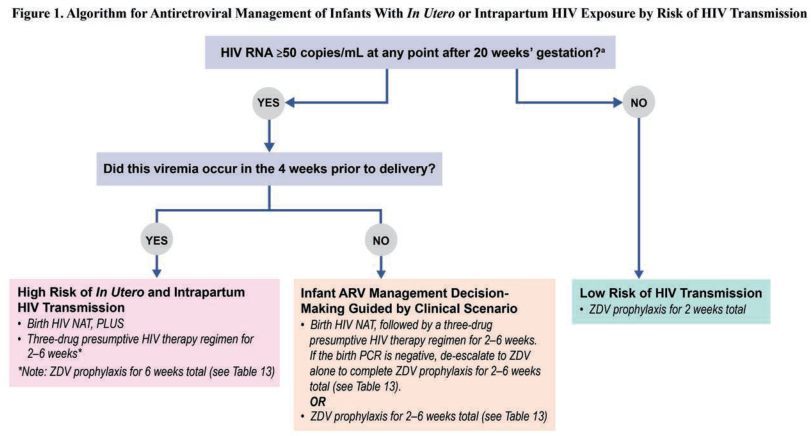
Summary : This flowchart presents an algorithm for antiretroviral management of infants with in utero or intrapartum HIV exposure, stratified by risk of HIV transmission based on maternal HIV RNA levels and timing of viremia. flowchart: # Nodes : • Start (rectangle): "HIV RNA ≥50 copies/mL at any point after 20 weeks’ gestation?" • Decision (diamond): "YES" / "NO" branches. • Decision (rectangle): "Did this viremia occur in the 4 weeks prior to delivery?" • Decision (diamond): "YES" / "NO" branches. • High Risk (rectangle, pink): "High Risk of In Utero and Intrapartum HIV Transmission" – "Birth HIV NAT, PLUS" – "Three-drug presumptive HIV therapy regimen for 2–6 weeks*" – "*Note: ZDV prophylaxis for 6 weeks total (see Table 13)" • Intermediate Risk (rectangle, peach): "Infant ARV Management Decision-Making Guided by Clinical Scenario" – "Birth HIV NAT, followed by a three-drug presumptive HIV therapy regimen for 2–6 weeks." – "If the birth PCR is negative, de-escalate to ZDV alone to complete ZDV prophylaxis for 2–6 weeks total (see Table 13)." – "OR" – "ZDV prophylaxis for 2–6 weeks total (see Table 13)" • Low Risk (rectangle, green): "Low Risk of HIV Transmission" – "ZDV prophylaxis for 2 weeks total" # Connectors : • Arrow from Start node splits to YES and NO. • YES branch leads to "Did this viremia occur in the 4 weeks prior to delivery?" node. • NO branch leads directly to "Low Risk of HIV Transmission" node. • From "Did this viremia occur..." node, YES leads to "High Risk..." node, NO leads to "Infant ARV Management..." node. # Layout : • Top-down hierarchical flow. • Initial decision splits into two main branches (YES/NO). • YES branch has a secondary decision, further splitting into two risk categories. • NO branch leads directly to low risk management. # Analysis : • The algorithm stratifies infants into high, intermediate, or low risk for HIV transmission based on maternal HIV RNA levels and timing of viremia. • High risk infants receive more intensive ARV therapy (three-drug regimen and longer ZDV prophylaxis). • Intermediate risk infants have management tailored by clinical scenario, with possible de-escalation based on birth PCR results. • Low risk infants receive only short-course ZDV prophylaxis. • The flowchart ensures that infants at greatest risk receive the most aggressive prophylaxis, while minimizing unnecessary treatment for low-risk cases.
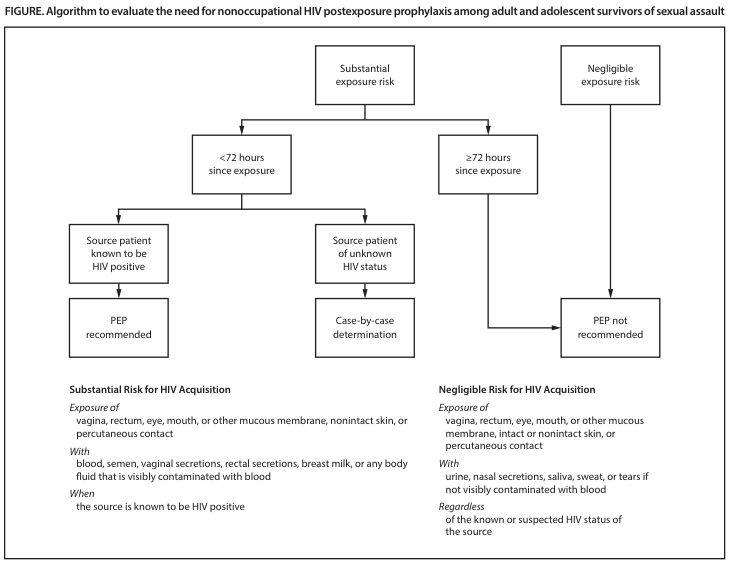
Summary : This flowchart provides an algorithm to evaluate the need for nonoccupational HIV postexposure prophylaxis (PEP) among adult and adolescent survivors of sexual assault, based on exposure risk, time since exposure, and the HIV status of the source patient. flowchart: # Nodes : • Substantial exposure risk (rectangle) • Negligible exposure risk (rectangle) • <72 hours since exposure (rectangle) • ≥72 hours since exposure (rectangle) • Source patient known to be HIV positive (rectangle) • Source patient of unknown HIV status (rectangle) • PEP recommended (rectangle) • Case-by-case determination (rectangle) • PEP not recommended (rectangle) • Substantial Risk for HIV Acquisition (text box) • Negligible Risk for HIV Acquisition (text box) # Connectors : • Substantial exposure risk splits into two branches: one to "<72 hours since exposure", one to "≥72 hours since exposure". • "<72 hours since exposure" splits into two: one to "Source patient known to be HIV positive" (leading to "PEP recommended"), one to "Source patient of unknown HIV status" (leading to "Case-by-case determination"). • "≥72 hours since exposure" leads directly to "PEP not recommended". • Negligible exposure risk leads directly to "PEP not recommended". # Layout : • The flowchart is organized in a top-down manner, starting with exposure risk assessment, followed by time since exposure, and then source patient HIV status. • Decision points branch horizontally and vertically, with final recommendations at the bottom. # Substantial Risk for HIV Acquisition (text box) : • Exposure of vagina, rectum, eye, mouth, or other mucous membrane, nonintact skin, or percutaneous contact • With blood, semen, vaginal secretions, rectal secretions, breast milk, or any body fluid that is visibly contaminated with blood • When the source is known to be HIV positive # Negligible Risk for HIV Acquisition (text box) : • Exposure of vagina, rectum, eye, mouth, or other mucous membrane, intact or nonintact skin, or percutaneous contact • With urine, nasal secretions, saliva, sweat, or tears if not visibly contaminated with blood • Regardless of the known or suspected HIV status of the source # Analysis : • The algorithm prioritizes PEP for substantial exposure risk within 72 hours, especially if the source is known to be HIV positive. • For exposures ≥72 hours or negligible risk exposures, PEP is not recommended. • If the source's HIV status is unknown, decisions are made on a case-by-case basis. • The flowchart clearly distinguishes between substantial and negligible risk exposures, providing criteria for each.
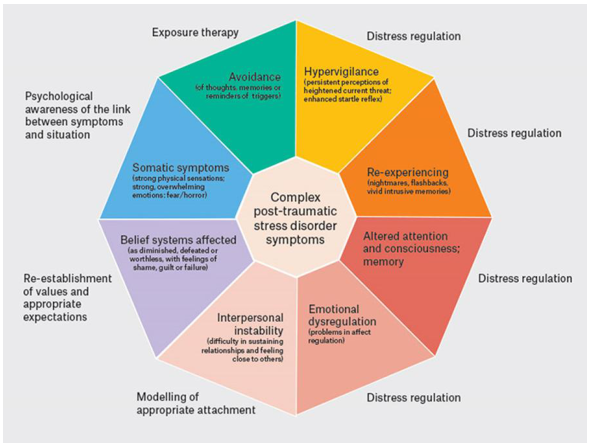
Summary : This diagram presents the core symptoms of complex post-traumatic stress disorder (C-PTSD) and links each symptom to recommended therapeutic approaches or psychological processes for management. flowchart: Nodes : • Center node: "Complex post-traumatic stress disorder symptoms" • Surrounding nodes (clockwise from top): – "Avoidance (of thoughts, memories or reminders of triggers)" – "Hypervigilance (persistent perceptions of heightened current threat; enhanced startle reflex)" – "Re-experiencing (nightmares, flashbacks, vivid intrusive memories)" – "Altered attention and consciousness; memory" – "Emotional dysregulation (problems in affect regulation)" – "Interpersonal instability (difficulty in sustaining relationships and feeling close to others)" – "Belief systems affected (as diminished, defeated or worthless, with feelings of shame, guilt or failure)" – "Somatic symptoms (strong physical sensations; strong, overwhelming emotions: fear/horror)" Connectors : • Each symptom node is linked to the central node. • Each symptom node is also associated with a specific therapeutic or psychological process, indicated by text outside the node: – Avoidance → "Exposure therapy" – Hypervigilance, Re-experiencing, Altered attention and consciousness; memory, Emotional dysregulation → "Distress regulation" – Somatic symptoms → "Psychological awareness of the link between symptoms and situation" – Belief systems affected → "Re-establishment of values and appropriate expectations" – Interpersonal instability → "Modelling of appropriate attachment" Layout : • Radial layout: central node surrounded by eight symptom nodes, each with an associated intervention or process label on the outer edge. • Colour-coded segments for each symptom node. Analysis : • The diagram visually organizes C-PTSD symptoms into eight categories, each mapped to a therapeutic focus. • Distress regulation is emphasized for half of the symptoms, highlighting its centrality in treatment. • Other interventions (exposure therapy, psychological awareness, value re-establishment, attachment modeling) are linked to specific symptom clusters, suggesting a multifaceted approach to C-PTSD management. • The radial structure underscores the interconnectedness of symptoms and the need for tailored interventions.
Needlestick Injury (NSI) - A Comprehensive Guide
Definition
Epidemiology
- NSIs are most common in nurses and physicians who perform invasive procedures, followed by laboratory staff, phlebotomists, and surgeons - Tintinalli's Emergency Medicine, p. 2419
- Globally, an estimated 385,000+ percutaneous injuries occur annually among HCWs in hospitals
- Most injuries occur in the non-dominant index finger during operative surgery
- Recapping of needles is the single most common activity resulting in NSIs - Goldman-Cecil Medicine, p. 3392
- Injection pens account for ~39% of NSIs connected to subcutaneous injections
- Nurses are disproportionately represented due to their frequency of invasive procedures
Risk Factors for Injury
- Recapping used needles
- Passing sharps hand-to-hand (instead of in a kidney dish)
- Working in a hurried or cluttered environment
- Inadequate sharps disposal containers (overfull)
- Inexperience or insufficient training
- Handling during resuscitation or emergency procedures
- Hollow-bore needles (greatest viral load transfer risk) - Bailey & Love's Surgery, p. 4606
Pathogens of Concern
1. Hepatitis B Virus (HBV)
- Highest transmission risk of the three
- Risk after NSI from HBeAg-positive source: 37-62% - Tintinalli's EM, p. 2419
- Risk after NSI from HBsAg-positive/HBeAg-negative source: ~1-6%
- Risk per NSI (general estimate): 4 in 1,000 - Comprehensive Clinical Nephrology, p. 4230
- HBV is stable on surfaces for up to 7 days
2. Hepatitis C Virus (HCV)
- Risk per NSI: approximately 2% (Tintinalli's EM) or 6 in 1,000 (Comprehensive Clinical Nephrology)
- No licensed post-exposure prophylaxis available
- Spontaneous clearance possible in some cases; early treatment with DAAs is highly effective
3. HIV
- Risk per NSI from known HIV+ source: 0.3% (3 in 1,000) - Robbins & Cotran Pathologic Basis of Disease, p. 236; Goldman-Cecil Medicine, p. 3381
- Mucous membrane exposure: ~0.09% per exposure
- Risk is negligible for Hepatitis A - Tintinalli's EM
- ART given within 24-48 hours of needlestick can reduce risk of infection eight-fold - Robbins & Cotran, p. 892
Factors That Increase HIV Transmission Risk
- Device visibly contaminated with blood
- Device used for insertion into a vein or artery
- Deep injury
- Source patient dies within two months of exposure (indicating high viral load)
Immediate Management After NSI
Step 1 - Wound Care (First Priority)
- Do NOT squeeze or suck the wound - this may force infectious material deeper
- Wash immediately under running water with soap for at least 1-2 minutes
- Allow free bleeding if possible
- Apply antiseptic (e.g., povidone-iodine) after washing
- Cover with a waterproof dressing
Step 2 - Reporting
- Report immediately to supervisor/occupational health department
- Complete an incident/exposure report form
- Document: time, date, type of needle, body site, depth of injury, amount of blood visible
Step 3 - Assess the Exposure
- Type of fluid (blood or blood-tinged fluid = high risk; urine/saliva alone = low risk)
- Type of needle (hollow bore > solid needle)
- Amount of blood on the needle
- Depth of puncture
Step 4 - Evaluate the Source Patient
- Test source for HIV, HBV (HBsAg, HBeAg), and HCV with rapid testing if available
- If source is unavailable, estimate risk based on the population served
- Rapid HIV testing of the source can prevent unnecessary PEP in the exposed individual - Tintinalli's EM
Post-Exposure Prophylaxis (PEP)
HIV PEP
- Must be initiated as soon as possible - within 72 hours for maximal effectiveness (Red Book 2021)
- Duration: 28 days
- Regimen: A combination of two reverse transcriptase inhibitors + one protease inhibitor (e.g., tenofovir/emtricitabine + raltegravir or dolutegravir) - Comprehensive Clinical Nephrology, p. 4230
- Re-evaluate the exposed worker within 72 hours for new information about the source
- If source tests HIV-negative, PEP can be discontinued
- Expert consultation: National PEP Hotline - 1-888-448-4911 (available 24/7, also at http://nccc.ucsf.edu)
HBV PEP
| HCW Vaccination Status | Source HBsAg+ | Source Unknown |
|---|---|---|
| Unvaccinated | HBIG + start HBV vaccine series | Start HBV vaccine series |
| Vaccinated, adequate anti-HBs (>10 mIU/mL) | No treatment | No treatment |
| Vaccinated, inadequate anti-HBs | HBIG + booster dose | Consider HBIG + booster if high risk |
| Vaccination status unknown | Test HCW for anti-HBs; treat based on result | - |
- HBIG (Hepatitis B Immune Globulin) should be given as soon as possible, ideally within 24 hours
- Even unvaccinated workers should start the vaccination series after exposure
HCV
- No established PEP for HCV
- Monitor with serial HCV RNA/antibody testing
- If seroconversion occurs, refer for early treatment with direct-acting antivirals (DAAs) - highly effective (>95% SVR)
Follow-Up Testing Protocol
| Timepoint | Tests |
|---|---|
| Baseline (Day 0) | HIV Ab, HBsAg, anti-HCV, LFTs, pregnancy test if applicable |
| 6 weeks | HIV antibody |
| 12 weeks | HIV antibody, HCV Ab/RNA |
| 6 months | HIV antibody, HCV Ab, LFTs |
| 12 months (if HCV exposure) | Final HCV antibody |
- If source is known HIV-negative: PEP not needed; no HIV follow-up required
- All workers should have HIV testing at 6 weeks, 12 weeks, and 6 months post-exposure
Prevention Strategies
Engineering Controls
- Safety-engineered needles (self-sheathing, retractable, needleless IV systems) - most effective single intervention
- Adequate sharps disposal containers - placed at the point of use, never overfilled
- Never recap, bend, break, or manipulate used needles - Goldman-Cecil, p. 3392
Administrative Controls
- Written exposure control plans
- Universal Precautions (treat all patients as potentially infectious)
- Limit personnel in theater; no unnecessary movement around sharps
- Pass sharps in a kidney dish, not hand-to-hand - Bailey & Love's Surgery
- Slow, meticulous operative technique with minimized bleeding
- Monitoring programs and random audits
Personal Protective Equipment (PPE)
- Double gloving during high-risk procedures
- Eye protection and face shields when splattering is likely
- Gowns for contamination risk
Training
- Regular education on safe injection practices
- Device-specific training (injection pens, surgical instruments)
- Incident reporting culture without blame
Legal and Occupational Health Obligations
- Federal law (in the USA - Needlestick Safety and Prevention Act 2000) requires employers to provide complete medical coverage including PEP and vaccines at no cost to the employee
- Occupational Health Services handle HCW exposures; non-occupational injuries (e.g., community needles) are managed differently
- For source patients who lack capacity to consent to testing, institutional protocols and ethics guidance apply (BMA guidelines, updated March 2025)
- Workers with active dermatitis or open skin lesions should avoid direct patient contact with sharps
Special Situations
Hollow Needle vs. Solid Needle
- Hollow needles carry the greatest risk - they deposit a bolus of blood; solid suture needles carry much lower risk - Bailey & Love's Surgery
Community Needlestick (Non-Occupational)
- Risk of HIV transmission from a discarded community needle is lower than 0.3%
- No confirmed HIV transmissions from accidental community needlestick in children (Red Book 2021)
- PEP is generally not recommended for trivial community needlestick injuries from unknown source
High-Risk Source Patients
Summary Table: Transmission Risk Per NSI
| Pathogen | Risk Per NSI | PEP Available? |
|---|---|---|
| Hepatitis A | Negligible | No (not relevant) |
| Hepatitis B (HBeAg+) | 37-62% | Yes (HBIG + vaccine) |
| Hepatitis C | ~2% (6/1000) | No (treat if infected) |
| HIV | 0.3% (3/1000) | Yes (ART x 28 days) |
Key Sources
- Tintinalli's Emergency Medicine: A Comprehensive Study Guide, Chapter on Needlestick Injuries
- Goldman-Cecil Medicine, Transmission to Health Care Workers / Prevention Strategies
- Robbins & Cotran Pathologic Basis of Disease, HIV Epidemiology section
- Bailey & Love's Short Practice of Surgery (28th ed.), Surgical Infections chapter
- Comprehensive Clinical Nephrology (7th ed.), Hemodialysis chapter
- Red Book 2021 - AAP Report of the Committee on Infectious Diseases, PEP guidelines
- BMA Needlestick Injury Guidance (updated March 2025)
- StatPearls - Needlestick
Clinical Pearl: The most important intervention after NSI is time - wash immediately, report within the hour, and initiate HIV PEP within 2 hours if indicated (absolute maximum 72 hours). HBV HBIG is most effective within 24 hours. HCV has no PEP, so early detection and DAA treatment is the strategy.
Spill management
spill management blood body fluid healthcare infection control guidelines 2024
https://www.england.nhs.uk/wp-content/uploads/2022/09/nipc-m…
https://royalwolverhampton.nhs.uk/wp-content/uploads/2024/10…
Spill Management in Healthcare Settings
Definition
Why Spill Management Matters
- Creates infection risks for patients, staff, and visitors
- Creates slip and fall hazards
- May breach COSHH (Control of Substances Hazardous to Health) regulations
- Can result in legal and regulatory consequences for healthcare institutions
Types of Spills in Healthcare
| Type | Examples |
|---|---|
| Blood and high-risk body fluids | Blood, CSF, pleural fluid, peritoneal fluid, synovial fluid, amniotic fluid, semen, vaginal secretions, breast milk, any fluid visibly contaminated with blood |
| Low-risk body fluids | Urine (without visible blood), faeces, vomit, sputum, saliva |
| Chemical spills | Disinfectants, solvents, reagents, acids/alkalis |
| Cytotoxic/chemotherapy spills | Antineoplastic drugs (require specialist spill kits) |
| Radioactive spills | In nuclear medicine/radiology departments |
Principles: The COSHH Framework
Step-by-Step Spill Management Protocol
Step 1 - Warn and Contain
- Immediately inform all staff, patients, and visitors in the vicinity
- Place hazard/wet floor warning signs around the spill
- Remove unaffected mobile equipment from the area to prevent further contamination
- Do not allow anyone to walk through the spill
Step 2 - Don Personal Protective Equipment (PPE)
- Disposable nitrile gloves (non-latex preferred)
- Disposable plastic apron
- Eye protection (goggles or face shield) - required if splashing is possible
- Double gloves (chemotherapy-grade)
- Full gown
- Respirator mask (N95 or above)
- Eye protection
- Full gown, mask, and eye protection as standard
Step 3 - Absorb / Remove Gross Contamination
- Apply chlorine-releasing granules (NaDCC granules) directly onto the spill - this solidifies and decontaminates simultaneously
- Leave for the manufacturer-recommended contact time (typically 3 minutes)
- Scoop up the solidified material using disposable paper towels or a disposable scoop
- Discard into a clinical/healthcare waste bag (yellow bag)
- First absorb bulk spillage using spill pads or disposable paper towels
- Then apply granules or 10,000 ppm (1%) sodium hypochlorite solution to the remaining contamination
- Allow contact time of 3 minutes minimum
- Wipe up and discard into clinical waste bag
- Place disposable paper towels over the spill to absorb and contain it
- Apply 10,000 ppm av Cl (1% sodium hypochlorite) solution over the towels
- Allow 3 minutes contact time, then remove and discard - NHS England NIPC Manual, Appendix 9
Step 4 - Decontaminate the Area
- Clean the area with 1,000 ppm available chlorine (0.1% sodium hypochlorite) solution OR a combined detergent/chlorine-releasing solution at 1,000 ppm av Cl
- Allow to dry
- A second clean with general-purpose detergent and warm water may follow
- Do NOT use chlorine-releasing agents directly on urine spills - uric acid reacts with hypochlorite, releasing toxic chlorine gas - NHS Royal Wolverhampton IP19
- Soak up the spillage with disposable paper towels
- A gelling agent can be used for urine spills
- Clean with general-purpose detergent and warm water
- Allow area to dry
Step 5 - Dispose of Waste
- All contaminated materials (towels, PPE, granules, scoop) go into a yellow clinical waste bag for incineration
- Bag must be sealed and labeled
- Heavy-duty waste containers for sharps if involved
- Excreta must be discarded directly into a commode pan washer or toilet, or placed in a yellow sack and incinerated
Step 6 - Clean PPE and Equipment
- Remove PPE using the correct doffing sequence (gloves first, then apron, then eyewear)
- All disposable PPE discarded into clinical waste
- Reusable equipment disinfected or discarded per protocol
- Buckets soaked in bleach solution or rinsed in hot water
- Disinfect all cleaning equipment before using in other areas
Step 7 - Hand Hygiene
- Wash hands with soap and water immediately after each item of PPE is removed and after completing cleanup
- Perform full WHO 6-step hand hygiene technique - Park's Textbook of Preventive and Social Medicine
Step 8 - Report and Document
- Complete an incident report form
- Record: location, time, type and volume of spill, personnel involved, actions taken
- Report to supervisor / infection prevention and control team (IPCT)
- Review for root cause and prevention measures
Disinfectants Used in Spill Management
1. Chlorine-Releasing Agents (Drug of Choice for Blood/Body Fluid Spills)
| Agent | Form | Concentration | Use |
|---|---|---|---|
| Sodium hypochlorite (liquid bleach) | Liquid | 10,000 ppm (1%) for gross spills; 1,000 ppm (0.1%) for surface decontamination | Standard blood spill |
| NaDCC (sodium dichloroisocyanurate) | Granules or tablets | 10,000 ppm when dissolved | Applied directly to spills |
| Chloramine-T | Powder | Per manufacturer | Alternative chlorine releaser |
Preparation of 1% Sodium Hypochlorite (10,000 ppm) Solution
| Product | Available Chlorine | Dilution for 1% Solution |
|---|---|---|
| Sodium hypochlorite liquid (3.5%) | 3.5% | 1 part bleach to 2.5 parts water |
| Sodium hypochlorite liquid (5%) | 5% | 1 part bleach to 4 parts water |
| NaDCC powder (60%) | 60% | 17 g to 1 litre water |
| NaDCC tablets (1.5 g each, 60%) | 60% | 11 tablets to 1 litre water |
| Chloramine powder (25%) | 25% | 80 g to 1 litre water |
| Bleaching powder (70%) | 70% | 7 g to 1 litre water |
Important caution: NaDCC granules must NOT be mixed with acids (e.g., urine). Store in a dry area, cap replaced after use, and use in well-ventilated areas. Avoid contact with skin, eyes, and mouth.
2. Other Disinfectants
- Hydrogen peroxide (H₂O₂): Broad-spectrum activity against viruses, bacteria, yeasts, and spores. Sporicidal at 10-30% concentration - Jawetz Medical Microbiology
- Quaternary Ammonium Compounds (QACs): Suitable for hard surfaces; NOT sporicidal; ineffective against non-enveloped viruses - use with caution for blood spills
- Phenolics: Not sporicidal; generally not first-line for blood spills
- Iodophors (e.g., povidone-iodine): Bactericidal and sporicidal; used more for wound care than environmental spills
Spill Kit - Contents
- Disposable nitrile gloves (multiple pairs)
- Disposable plastic apron
- Eye protection / face shield
- NaDCC granules or chlorine-releasing powder/tablets
- Absorbent pads / disposable paper towels
- Disposable scoop and scraper
- Yellow clinical waste bag
- Hazard/warning sign
- Instruction card
- Chemical-resistant gloves
- Neutralizing agents (for acid/alkali spills)
- First aid kit components
- Henry's Clinical Diagnosis and Management by Laboratory Methods
Special Situations
Spills on Carpets and Soft Furnishings
- If heavily contaminated - consider discarding the furnishing
- If the furnishing can withstand chlorine solution - follow standard procedure
- If only safe to clean with detergent - use detergent only and assess infection risk
- If not safe to clean at all - discard the item - NHS England NIPC Manual
Spills in Vehicles
- All specimen transport vehicles must carry a spillage kit
- Follow the spill kit's provided instructions
Cytotoxic/Chemotherapy Spills
- Use a dedicated cytotoxic spill kit (never use standard spill kits)
- Double gloves (chemotherapy-grade nitrile), full gown, respirator, eye protection
- Absorb liquid with absorbent pads
- Do NOT use dry sweep (risk of aerosolizing particles)
- All waste in purple cytotoxic waste bags for specialist incineration
- Report to pharmacy and occupational health immediately
- Skin contact: wash with soap and water 15 minutes; eye contact: irrigate with water 15 minutes
Large-Volume/Extensive Spills
- If the spill is greater than 30 mL (approximately ¼ cup), remove the bulk by physical means first before applying disinfectant - IP19, Royal Wolverhampton NHS Trust
Chlorine Concentration Summary (Blood Spills)
| Stage | Concentration Required |
|---|---|
| Gross contamination (active spill) | 10,000 ppm (1%) av Cl |
| Surface decontamination (after removal) | 1,000 ppm (0.1%) av Cl |
| General environmental cleaning | 1,000 ppm combined detergent/chlorine |
Key Precautions and Reminders
- Never use bare hands - always don PPE first
- Never use chlorine directly on urine - toxic chlorine gas released
- Freshly prepare chlorine solutions from tablets - never store pre-made solutions
- Never pour one chemical spill onto another without verifying compatibility (COSHH)
- Never eat, drink, or touch your face near a spill
- Solutions must be used in accordance with manufacturer instructions for correct concentration and contact time
- Ensure adequate ventilation when using chlorine-based products
Summary Quick-Reference Table
| Spill Type | Absorbent | Disinfectant | Waste Bag |
|---|---|---|---|
| Blood (small, ≤30 mL) | NaDCC granules directly | NaDCC granules + 1,000 ppm hypochlorite for surface | Yellow (clinical) |
| Blood (large, >30 mL) | Spill pads first, then granules | 10,000 ppm then 1,000 ppm hypochlorite | Yellow (clinical) |
| Urine/faeces/vomit (no blood) | Disposable towels / gelling agent | General purpose detergent + warm water (NO chlorine on urine) | Yellow (clinical) |
| Cytotoxic drug | Absorbent cytotoxic pads | Cytotoxic kit procedure | Purple (cytotoxic) |
| Chemical | Chemical-specific neutralizer | Per COSHH/data sheet | Per COSHH guidance |
Key Sources
- NHS England NIPC Manual, Appendix 9 - Blood and Body Fluid Spills
- IP19 Blood and Body Fluid Spillage Management, Royal Wolverhampton NHS Trust (September 2024)
- Park's Textbook of Preventive and Social Medicine - Sodium hypochlorite preparation table
- Jawetz, Melnick & Adelberg's Medical Microbiology (28th ed.) - Chlorine-releasing agents
- Henry's Clinical Diagnosis and Management by Laboratory Methods - Laboratory spill kit contents
Key takeaway: The disinfectant of choice for blood/body fluid spills is a chlorine-releasing agent (NaDCC granules or sodium hypochlorite). Use 10,000 ppm for gross contamination, 1,000 ppm for surface decontamination. Never use chlorine on urine. Always don PPE first, report and document every spill.