
im sending u some questions So what u have to do is Kiii Meee question bhjungaa tohh Unke answer naa viva readyyy krna haiii Lekin do form me ready krna haiii Ek to hinglish explanation deni haiii jo meri understanding ke lie hoo and Secondly u have to take care ki joo mujhe crisp answer doo Woo do books ke naam bhj raha huu us source se batana haii Sturdavent and manapalli
- Hinglish explanation - apni understanding ke liye, easy language mein
- Crisp viva answer - Sturdevant aur Manipal ke sources se, jo directly bol sako viva mein
Co we give bevel in amalgam restorations
❌ Bevel in Amalgam - NO, nahi dete!
🗣️ Hinglish Explanation (Apni understanding ke liye)
✅ Crisp Viva Answer
- Amalgam is a brittle material - a beveled (thin) margin of amalgam will fracture under occlusal loads
- Amalgam derives strength from bulk - it requires a minimum thickness (~1.5 mm) at the margins; bevel reduces this thickness
- Amalgam does not bond to tooth structure - unlike composite, there is no adhesive mechanism that benefits from increased surface area via bevel
- Correct margin design for amalgam = Butt joint at 90° - this gives maximum bulk and prevents marginal fracture
- 90° cavosurface margin (butt joint)
- No unsupported enamel rods left at margins
Source: Sturdevant's Art & Science of Operative Dentistry; Manipal Manual of Operative Dentistry
Bevel and its significance
BEVEL AND ITS SIGNIFICANCE
🗣️ Hinglish Explanation
✅ Crisp Viva Answer
| Type | Angle/Extension | Where Used |
|---|---|---|
| Short bevel | 0.5 mm, ~45° | Anterior composites |
| Long bevel | 1-2 mm, varies | Class III/IV composites |
| Full bevel | Covers entire enamel wall | Class III/IV labial |
| Hollow-ground (Scooped) bevel | Concave | Class V |
| Counter bevel | On opposing surface (lingual) | Class III |
- Increases surface area - more enamel exposed for acid etching → better bonding of composite
- Exposes enamel rod ends - cut ends of rods etch better than sides; creates stronger micromechanical retention
- Improves aesthetics - gradual transition of composite to tooth; margin becomes invisible (feathered blend)
- Removes unsupported enamel rods - prevents marginal fracture of enamel
- Better marginal seal - reduces microleakage at the enamel-composite interface
- Increases retention - additional surface area contributes to mechanical lock
| Cavity Class | Bevel? |
|---|---|
| Class I (composite) | Usually NO (occlusal stress area) |
| Class II (composite) | Proximal box - YES; occlusal - NO |
| Class III | YES (labial + lingual) |
| Class IV | YES (long bevel labially) |
| Class V | YES (hollow-ground) |
| Amalgam (any class) | NEVER |
| Metal crowns (full metal) | NO |
| PFM / All-ceramic | Shoulder margin, no bevel |
- Amalgam is brittle - thin margins fracture
- Amalgam needs bulk for strength (min. 1.5 mm at margins)
- No adhesive bonding in amalgam - increased surface area gives no benefit
- 90° butt joint is the correct margin for amalgam
Source: Sturdevant's Art & Science of Operative Dentistry; Manipal Manual of Operative Dentistry
Weekest phase of amalgam
WEAKEST PHASE OF AMALGAM
🗣️ Hinglish Explanation
- Weakest - mechanically sabse kamzor
- Most corrosive - mooh ke environment mein sabse pehle ghisti hai
- Creep - load ke neeche dheere dheere deform hoti hai
✅ Crisp Viva Answer
| Phase | Composition | Property |
|---|---|---|
| γ (Gamma) | Ag₃Sn (unreacted alloy) | Strong |
| γ1 (Gamma-1) | Ag₂Hg₃ | Strong, major matrix phase |
| γ2 (Gamma-2) | Sn₈Hg | WEAKEST |
- Mechanically weakest - lowest compressive and tensile strength
- Most susceptible to corrosion - corrodes first in oral environment → causes marginal breakdown and ditching
- High creep - deforms slowly under sustained load → marginal fracture over time
- Causes clinical failure - marginal deterioration, secondary caries, restoration failure
- Copper (>6%) reacts preferentially with Sn to form Cu₆Sn₅ (eta phase)
- This consumes the tin before it can form Sn-Hg (γ2)
- Result: No γ2 phase in high-copper amalgam
- High-copper amalgam = stronger + less corrosion + less creep = better clinical performance
Source: Sturdevant's Art & Science of Operative Dentistry; Manipal Manual of Operative Dentistry
Classify amalgam according to gv black
GV BLACK'S CLASSIFICATION - Cavity Preparation (Amalgam ke context mein)
🗣️ Hinglish Explanation
- Class I - Pit aur fissures mein - socho back teeth ki chewing surface
- Class II - Back teeth ke beech - proximal surfaces of posteriors
- Class III - Front teeth ke beech - proximal of anteriors (incisal angle involved nahi)
- Class IV - Front teeth ke beech + corner bhi gaya - incisal angle involved
- Class V - Har tooth ki gum ke paas wali surface - cervical 1/3rd
- Class VI - Cusp tips aur incisal edges (later addition)
✅ Crisp Viva Answer
| Class | Location | Teeth Involved |
|---|---|---|
| Class I | Pits and fissures - occlusal surface, buccal/lingual pits | Premolars, Molars; lingual pit of upper anteriors |
| Class II | Proximal surfaces (mesial/distal) | Posterior teeth (premolars & molars) |
| Class III | Proximal surfaces - incisal angle NOT involved | Anterior teeth (incisors & canines) |
| Class IV | Proximal surfaces - incisal angle INVOLVED | Anterior teeth (incisors & canines) |
| Class V | Gingival 1/3rd of facial or lingual surface | All teeth |
| Class VI (Simon, not GV Black) | Cusp tips (posteriors) / incisal edges (anteriors) | All teeth |
| Class | Amalgam Used? |
|---|---|
| Class I | ✅ YES - most common |
| Class II | ✅ YES |
| Class III | ❌ Rarely - composite preferred (aesthetics) |
| Class IV | ❌ NO - composite only (incisal edge, aesthetic zone) |
| Class V | ✅ YES (but GIC/composite also used) |
| Class VI | ✅ Sometimes |
"1-2 Posterior, 3-4 Anterior, 5 Cervical, 6 Cusp tip"
- 1 = Pit/fissure
- 2 = Proximal posterior
- 3 = Proximal anterior (no angle)
- 4 = Proximal anterior (angle gone!)
- 5 = Cervical (gum line)
- 6 = Tip top (cusp/incisal)
Source: Sturdevant's Art & Science of Operative Dentistry; Manipal Manual of Operative Dentistry
Classify amalgam alloy according to gv black not cavity prep
⚠️ Important Correction First!
🗣️ Hinglish Explanation
- Particle shape ke basis pe - lathe-cut ya spherical
- Copper content ke basis pe - low copper ya high copper
- Number of alloys ke basis pe - single composition ya mixed
✅ Crisp Viva Answer
CLASSIFICATION OF AMALGAM ALLOY
1. Based on PARTICLE SHAPE
| Type | Shape | Properties |
|---|---|---|
| Lathe-cut (Irregular) | Shavings/fillings - irregular | More condensation force needed, higher strength |
| Spherical | Round balls | Less condensation force, faster set, smoother mix |
| Admixed (Blended) | Mix of both | Combines properties of both |
2. Based on COPPER CONTENT
| Type | Cu Content | γ2 Phase | Example |
|---|---|---|---|
| Low-copper (Conventional) | < 6% | Present (γ2 exists) | Original GV Black formula |
| High-copper | 6-30% | Eliminated (no γ2) | Modern alloys |
- High-copper further divided into:
- Single composition (Dispersalloy type) - spherical high-Cu particles
- Admixed - mix of lathe-cut low-Cu + spherical high-Cu
3. Based on NUMBER OF ALLOY COMPOSITIONS
| Type | Description |
|---|---|
| Single composition | All particles same alloy |
| Admixed/Blended | Two different alloy particles mixed |
4. Based on ZINC CONTENT
| Type | Zinc Content |
|---|---|
| Zinc-containing | >0.01% Zn (acts as scavenger) |
| Zinc-free | <0.01% Zn |
| Component | % |
|---|---|
| Silver (Ag) | 65% |
| Tin (Sn) | 27% |
| Copper (Cu) | 6% |
| Zinc (Zn) | 2% |
Source: Sturdevant's Art & Science of Operative Dentistry; Manipal Manual of Operative Dentistry
Different types of burnishing
TYPES OF BURNISHING
🗣️ Hinglish Explanation
- Pre-carve burnishing - condensation ke baad, carving se pehle - mercury rich layer hatate hain upar se
- Post-carve burnishing - carving ke baad - surface smooth karte hain
- Final/Finishing burnishing - set hone ke baad (24 hrs later) polishing se pehle
✅ Crisp Viva Answer
TYPES OF BURNISHING
A. Based on TIMING (Most Important)
- Done: After condensation, BEFORE carving
- Instrument: Large ball burnisher / Beavertail burnisher
- Purpose:
- Removes the mercury-rich surface layer (weakest layer - excess Hg floats up during condensation)
- Adapts amalgam to cavity margins
- Improves marginal seal
- Reduces voids
- Technique: Vigorous rubbing over entire surface
- Done: After carving, BEFORE final set
- Instrument: Ball burnisher / Acorn burnisher
- Purpose:
- Smoothens carved surface
- Further adapts margins to tooth
- Removes fine carving marks
- Gives smooth surface - less plaque accumulation
- Technique: Gentle circular strokes
- Done: 24 hours after placement (at recall appointment), before polishing
- Instrument: Burnisher
- Purpose:
- Smoothens surface before polishing
- Increases surface hardness
- Improves corrosion resistance
B. Based on LOCATION/PURPOSE
| Type | Description |
|---|---|
| Pre-carve | After condensation, before carving |
| Post-carve | After carving, before set |
| Enamel burnishing | Burnishing cavity margins on enamel - improves adaptation |
| Foil burnishing | Used with gold foil restorations |
C. Based on INSTRUMENT SHAPE used
| Burnisher Type | Use |
|---|---|
| Ball burnisher | General burnishing, occlusal surface |
| Beavertail burnisher | Pre-carve burnishing - broad surfaces |
| Acorn burnisher | Post-carve, interproximal areas |
| T-ball burnisher | Occlusal anatomy adaptation |
- Removes mercury-rich weak surface layer
- Better marginal adaptation - reduces microleakage
- Smoother surface - less tarnish and corrosion
- Reduces surface voids
- Improves strength of restoration
Source: Sturdevant's Art & Science of Operative Dentistry; Manipal Manual of Operative Dentistry
Where do we discard amalgam, and what reaction occurs during discarding
AMALGAM DISCARDING - WHERE & WHAT REACTION
🗣️ Hinglish Explanation
✅ Crisp Viva Answer
AMALGAM DISPOSAL / DISCARDING
WHERE TO DISCARD:
- Thrown in regular trash
- Poured down the drain
- Left open in air (mercury vapour hazard)
TWO ACCEPTED METHODS:
- Scrap amalgam stored in wide-mouth, tightly-sealed container filled with water (radiographic fixer solution)
- Water acts as a physical barrier - prevents mercury vaporization into room air
- Simple, no chemical reaction
- Used for: temporary storage before proper disposal
- Scrap amalgam mixed with powdered sulfur
- Chemical reaction occurs:
Hg + S → HgS (Mercuric Sulfide) Mercury + Sulfur → Mercuric Sulfide
- HgS (Mercuric Sulfide) is:
- Stable
- Non-volatile (no mercury vapour)
- Insoluble in water
- Non-toxic compared to free mercury
- This permanently neutralizes the mercury hazard
SUMMARY TABLE:
| Method | Medium | Reaction | Purpose |
|---|---|---|---|
| Water storage | Radiographic fixer/water | No chemical reaction - physical barrier | Prevents Hg vapour release |
| Sulfurization | Sulfur powder | Hg + S → HgS | Converts Hg to stable non-toxic compound |
ADDITIONAL POINTS:
- Amalgam separator - fitted in dental unit waterlines to trap amalgam particles before they enter sewage
- Certified recycling - best method; scrap sent to licensed mercury recyclers
- Never use bleach/chlorine near amalgam - accelerates corrosion and Hg release
Source: Sturdevant's Art & Science of Operative Dentistry; Manipal Manual of Operative Dentistry
Mercury toxicity, and symptoms
MERCURY TOXICITY AND SYMPTOMS
🗣️ Hinglish Explanation
- Acute - respiratory + GI symptoms (breathlessness, vomiting, metallic taste)
- Chronic - yaad karo "3 T's + E" = Tremor, renal Tubular damage, Teeth loose + Erethism (behavioural changes)
✅ Crisp Viva Answer
MERCURY TOXICITY
FORMS OF MERCURY & ROUTES OF EXPOSURE:
| Form | Source | Main Route |
|---|---|---|
| Elemental (Hg⁰) | Amalgam, thermometers | Inhalation of vapour |
| Inorganic (Hg²⁺ salts) | Antiseptics, cosmetics | Ingestion, dermal |
| Organic (Methyl-Hg) | Contaminated fish, seafood | Ingestion |
SYMPTOMS:
1. ELEMENTAL MERCURY TOXICITY
- Shortness of breath, cough
- Fever and chills
- Nausea, vomiting, diarrhea
- Metallic taste
- Headache, weakness, blurry vision
- Severe cases: Acute Respiratory Distress Syndrome (ARDS)
- Tremor (hands first, then face)
- Erethism - shyness, emotional lability, irritability, insomnia, delirium
- Neurasthenia - fatigue, depression, difficulty concentrating
- Loose teeth, excessive salivation
- Renal dysfunction (proteinuria → nephrotic syndrome)
2. INORGANIC MERCURY TOXICITY
- Hemorrhagic gastroenteritis - severe abdominal pain
- Graying of oral mucosa
- Metallic taste
- Shock, cardiovascular collapse
- Acute kidney injury (tubular necrosis)
- Tremor, sensorimotor neuropathy
- Erethism
- Renal dysfunction
- Acrodynia (Pink Disease) - in children:
- Pink/red palms, soles, face
- Excessive sweating, fever
- Irritability, rash, hypotonia
3. ORGANIC MERCURY TOXICITY (Minamata Disease)
- Symptoms delayed weeks to months after exposure
- Orofacial paresthesias - first symptom
- Headache, tremor, fatigue
- Ataxia
- Muscle rigidity and spasticity
- Tunnel vision (constriction of visual fields)
- Hearing deficits, blindness
- Dementia in severe cases
- Congenital Minamata disease (in babies born to exposed mothers):
- Mental retardation
- Limb deformities
- Chorea, seizures, microcephaly
CLASSIC TRIAD OF CHRONIC MERCURY TOXICITY:
"Tremor + Erethism + Gingivitis/Stomatitis"
DIAGNOSIS:
- Urine mercury (24-hr) - for elemental/inorganic: normal <20 μg/L
- Whole blood mercury - for organic (methyl) mercury: normal <10 μg/L
- Organic mercury concentrates in RBCs (RBC:plasma ratio elevated)
TREATMENT:
- Remove from source of exposure
- Supportive care
- Chelation therapy: Dimercaprol (BAL), Succimer (DMSA) - FDA approved
- Renal replacement if oliguric renal failure
Source: Tintinalli's Emergency Medicine; Goldman-Cecil Medicine
How many amalgam restorations are permitted in oral cavity
HOW MANY AMALGAM RESTORATIONS ARE PERMITTED?
🗣️ Hinglish Explanation
✅ Crisp Viva Answer
NUMBER OF AMALGAM RESTORATIONS PERMITTED
BASIS / RATIONALE:
- Set amalgam continuously releases small amounts of mercury vapour
- Release increases during: chewing, tooth brushing, hot food/drinks, bruxism
- Each restoration releases approx. 1-3 μg Hg/day
| Body | Safe Daily Mercury Limit |
|---|---|
| WHO | 40 μg/day |
| ADA | 50 μg/day |
| OSHA (occupational) | 50 μg/m³ (air) |
- 8 restorations × ~3-5 μg/day = ~24-40 μg/day → within safe limits
- Beyond 8 restorations → mercury exposure may approach or exceed safe threshold
IMPORTANT ADDITIONAL POINTS:
| Group | Reason |
|---|---|
| Pregnant women | Mercury crosses placenta - fetal neurotoxicity |
| Nursing mothers | Mercury in breast milk |
| Children under 6 | Developing nervous system more vulnerable |
| Patients with renal disease | Impaired mercury excretion |
| Mercury allergy | Contact hypersensitivity |
| Patients with >8 existing amalgam restorations | Cumulative mercury exposure |
FACTORS AFFECTING MERCURY RELEASE FROM AMALGAM:
- Chewing - increases vapour release significantly
- Hot foods/beverages - increases volatilization
- Bruxism/clenching - accelerates wear
- Acidic foods - increased corrosion
- Restoration age - older restorations may release more due to corrosion
- Polishing - temporarily increases release then reduces it
CURRENT STATUS:
- Many countries (EU, UK) have phased out/restricted amalgam use (Minamata Convention 2013)
- India and many developing countries still use it due to cost-effectiveness
- ADA still considers amalgam safe for non-contraindicated patients
- Modern trend = amalgam-free dentistry using composite, GIC, ceramics
Source: Sturdevant's Art & Science of Operative Dentistry; Manipal Manual of Operative Dentistry
Different wedging techniques
DIFFERENT WEDGING TECHNIQUES
🗣️ Hinglish Explanation
- Matrix band ko gingival margin pe adapt karna (tight fit)
- Gingival flash rokna (amalgam neeche leak na ho)
- Slight tooth separation karna - toh restoration set hone ke baad contact point banega
- Ek wedge lingual se dalo = Single wedge (lingual)
- Ek wedge buccal se dalo = Single wedge (buccal)
- Dono taraf se dalo = Double/Bi-directional wedge
- Complex situations mein = Compound wedge
✅ Crisp Viva Answer
WEDGING TECHNIQUES
PURPOSE OF WEDGING:
- Adapts matrix band firmly at gingival margin - prevents gingival flash/overhang
- Separates teeth slightly - compensates for matrix band thickness → ensures tight proximal contact post-restoration
- Protects interdental papilla during condensation
- Stabilizes matrix band - prevents it from dislodging
CLASSIFICATION OF WEDGING TECHNIQUES:
A. Based on DIRECTION OF PLACEMENT
- Wedge inserted from lingual embrasure
- Used when: lingual embrasure is wider/more accessible
- Advantage: easier access, better visibility
- Most commonly used technique
- Wedge inserted from buccal embrasure
- Used when: buccal embrasure is wider
- Less common than lingual
- Wedges placed from BOTH buccal AND lingual simultaneously
- Used when: single wedge doesn't adapt band adequately
- Especially useful in: wide embrasures, Class II MOD cavities
- Gives better gingival seal on both sides
B. Based on NUMBER OF WEDGES
| Type | No. of Wedges | Indication |
|---|---|---|
| Single wedge | 1 (lingual or buccal) | Routine Class II cavities |
| Double wedge | 2 (buccal + lingual) | Wide embrasures, MOD cavities |
| Compound wedging | Multiple wedges/modified | Very wide/irregular embrasures |
C. Based on WEDGE MATERIAL
| Type | Material | Properties |
|---|---|---|
| Wooden wedge | Soft wood (basswood) | Absorbs moisture → swells → better adaptation over time |
| Plastic wedge | Polyurethane/nylon | Flexible, doesn't swell, transparent (light-curable composite use) |
| Custom wedge | Modified/shaped | For non-standard embrasure forms |
D. Special Techniques
- Two wedges placed at different angles to seal irregular/wide gingival floor
- One wedge from each direction at slightly different levels
- Used when gingival floor is at or below CEJ
- Wedge placed in a stepped manner to adapt to subgingival margins
WEDGE PLACEMENT TECHNIQUE:
- Place with cotton pliers or hemostat
- Insert with widest part gingival - apex pointing occlusally
- Should create slight tooth separation (blanching of papilla acceptable)
- Remove wedge before removing matrix band retainer
COMPLICATIONS IF WEDGE NOT USED / IMPROPER:
- Gingival overhang - amalgam excess at gingival margin
- Open proximal contact - no contact point with adjacent tooth
- Papilla trauma during condensation
Source: Sturdevant's Art & Science of Operative Dentistry; Manipal Manual of Operative Dentistry
Setting reactiom of amalgam
SETTING REACTION OF AMALGAM
🗣️ Hinglish Explanation
- Main component = Ag₃Sn = Silver-Tin alloy = ye hai Gamma (γ) phase
- Iske saath Mercury mix karte hain
- Gamma-1 (γ1) = Ag₂Hg₃ - silver-mercury - STRONG
- Gamma-2 (γ2) = Sn₈Hg - tin-mercury - WEAK (villain!)
- Kuch γ (gamma) unreacted reh jaati hai as core particles
✅ Crisp Viva Answer
SETTING REACTION OF AMALGAM
CONVENTIONAL (LOW-COPPER) AMALGAM:
- Alloy = γ (Gamma) phase = Ag₃Sn (silver-tin)
- Mixed with Mercury (Hg)
Ag₃Sn + Hg → Ag₂Hg₃ + Sn₈Hg + Ag₃Sn (unreacted)γ + Hg → γ1 + γ2 + γ (residual)
PHASES OF SET AMALGAM (Low Copper):
| Phase | Composition | Amount | Strength | Role |
|---|---|---|---|---|
| γ (Gamma) | Ag₃Sn | ~30% | Strong | Unreacted alloy core particles - gives strength |
| γ1 (Gamma-1) | Ag₂Hg₃ | ~50% | Strong | Main matrix - surrounds γ particles |
| γ2 (Gamma-2) | Sn₈Hg | ~15% | WEAKEST | Weak links - causes failure |
HIGH-COPPER AMALGAM SETTING REACTION:
Cu + Sn → Cu₆Sn₅ (Eta phase)Copper reacts with Tin PREFERENTIALLY before Sn can react with Hg
- No γ2 phase formed (tin is consumed by copper)
- Set amalgam contains: γ + γ1 + Cu₆Sn₅ (η)
- Eta phase (Cu₆Sn₅) replaces γ2 → stronger, less corrosion, less creep
COMPARISON TABLE:
| Property | Low-Copper Amalgam | High-Copper Amalgam |
|---|---|---|
| Phases present | γ + γ1 + γ2 | γ + γ1 + η (Cu₆Sn₅) |
| γ2 phase | ✅ Present | ❌ Absent |
| Strength | Lower | Higher |
| Corrosion | More | Less |
| Creep | More | Less |
| Clinical life | Shorter | Longer |
SEQUENCE OF EVENTS DURING SETTING:
Trituration (mixing)
       ↓
Mercury wets alloy particle surface
       ↓
Ag₃Sn dissolves partially into mercury
       ↓
Supersaturation → γ1 and γ2 nuclei form
       ↓
Crystals grow → interlock → hardening begins
       ↓
Setting complete (initial set ~8 min, final set ~24 hrs)
       ↓
Final structure: γ cores in γ1 matrix (+ γ2 in low Cu)
KEY POINTS FOR VIVA:
- Mercury:Alloy ratio = 1:1 by weight (50:50) ideally
- Excess mercury → more γ2 → weaker restoration
- Trituration time controls crystal size → affects strength
- 24 hours for complete set - do NOT polish before this
Source: Sturdevant's Art & Science of Operative Dentistry; Manipal Manual of Operative Dentistry
What is the degree of convergence of walls in amalgam cavity preparations
DEGREE OF CONVERGENCE OF WALLS IN AMALGAM CAVITY PREPARATION
🗣️ Hinglish Explanation
- Walls slightly inward jhuki hain occlusal direction mein
- Cavity ka floor wider hai, opening thoda narrow
- Ye dovetail/lock jaisa kaam karta hai - amalgam andar lock ho jaata hai
✅ Crisp Viva Answer
DEGREE OF CONVERGENCE IN AMALGAM CAVITY PREPARATION
CONCEPT:
  Occlusal surface
    /________\      ← Opening (narrower)
   /          \     ← Walls converging 2-5° each
  /____________\    ← Pulpal floor (wider)
DEGREE VALUES TO REMEMBER:
| Parameter | Degree |
|---|---|
| Per wall convergence | 2-5° from vertical (from parallel) |
| Total convergence (both walls) | 4-10° |
| Ideal/optimal per wall | ~2-3° |
WHY THIS SPECIFIC DEGREE?
- Difficult to place restoration
- Hard to pack amalgam to base
- Technically difficult cavity prep
- Restoration can dislodge occlusally - loss of retention
- Undercut eliminated completely
- Weak amalgam bulk at margins
- Zero retention - amalgam will simply fall out
- Absolutely unacceptable
- Provides retention - slightly locked in base
- Allows placement and condensation of amalgam
- Maintains bulk of material throughout
- Mimics natural tooth anatomy
IN CONTEXT OF DIFFERENT WALLS:
| Wall | Direction | Degree |
|---|---|---|
| Buccal wall | Converges toward occlusal | 2-5° |
| Lingual wall | Converges toward occlusal | 2-5° |
| Mesial wall | Converges toward occlusal | 2-5° |
| Distal wall | Converges toward occlusal | 2-5° |
| Axial wall (Class II) | Slight convergence | 2-5° |
ADDITIONAL RETENTION FEATURES IN AMALGAM (alongside convergence):
- Dovetail - mechanical lock in Class II
- Retention grooves/locks - in corners
- Pins - in large restorations with insufficient tooth structure
- Slots - auxiliary retention
- Flat pulpal floor - resists vertical displacement
Source: Sturdevant's Art & Science of Operative Dentistry; Manipal Manual of Operative Dentistry
Shape of axial wall in class 2 amalgam cavity prep
SHAPE OF AXIAL WALL IN CLASS II AMALGAM CAVITY PREPARATION
🗣️ Hinglish Explanation
✅ Crisp Viva Answer
AXIAL WALL - CLASS II AMALGAM CAVITY PREPARATION
LOCATION:
SHAPE: CONVEX (slightly rounded/curved outward toward the proximal surface)
WHY CONVEX?
| Reason | Explanation |
|---|---|
| Follows pulp contour | Pulp chamber is convex in this region - wall must mimic this to avoid pulp exposure |
| Protects pulp | Convex shape keeps wall equidistant from pulp at all points |
| Follows DEJ contour | DEJ itself is convex proximally - wall follows this natural anatomy |
| Prevents unnecessary tooth removal | Flat wall would require removing more tooth structure in center where pulp is closest |
DEPTH OF AXIAL WALL:
- Should be placed 0.2-0.5 mm inside (pulpal to) the DEJ
- i.e., just into dentin - not extending deep toward pulp
- Depth from proximal surface = approximately 1.5 mm
COMPLETE PROXIMAL BOX WALLS - QUICK REVIEW:
        Occlusal
           ↑
    ________|________
   |    Gingival     |   ← Gingival floor/wall (FLAT, perpendicular to long axis)
   |                 |
   |   Axial wall    |   ← CONVEX (faces pulp)
   |   (Convex)      |
   |_________________|
    Buccal        Lingual
    wall          wall
  (converge slightly toward axial)
ALL WALLS OF PROXIMAL BOX & THEIR SHAPES:
| Wall | Shape | Why |
|---|---|---|
| Axial wall | Convex | Follows pulp contour |
| Gingival floor/wall | Flat (perpendicular to long axis) | Resistance form, prevents apical displacement |
| Buccal wall | Slightly flared outward | Self-cleansing, access |
| Lingual wall | Slightly flared outward | Self-cleansing, access |
IMPORTANT: Axial wall vs Pulpal wall (Don't confuse!)
| Wall | Location | Shape | In which part |
|---|---|---|---|
| Pulpal wall | Floor of occlusal box | FLAT | Occlusal portion |
| Axial wall | Vertical wall of proximal box facing pulp | CONVEX | Proximal box |
Source: Sturdevant's Art & Science of Operative Dentistry; Manipal Manual of Operative Dentistry
How does amalgam bond to tooth surface
HOW DOES AMALGAM BOND TO TOOTH SURFACE?
🗣️ Hinglish Explanation
- Mechanical retention - cavity ki shape se - convergent walls, dovetail, retention grooves - yahi main method hai
- Corrosion products - overtime amalgam thoda corrode hota hai, corrosion products (tin oxides etc.) cavity walls aur amalgam ke beech ki gap fill kar dete hain - ek natural seal ban jaata hai! Isliye purani amalgam restorations kabhi kabhi zyada leakage nahi dikhati
- Bonded amalgam - aajkal adhesive resin (4th/5th gen bonding agent) laga ke phir amalgam daalte hain - is technique se chemical + mechanical dono bond milta hai
✅ Crisp Viva Answer
BONDING OF AMALGAM TO TOOTH SURFACE
DIRECT ANSWER:
MECHANISMS OF RETENTION:
1. MECHANICAL RETENTION (PRIMARY - Most Important)
| Feature | How it helps |
|---|---|
| Convergent walls (2-5°) | Locks amalgam - can't dislodge occlusally |
| Flat pulpal floor | Resists vertical displacement |
| Dovetail | Resists proximal displacement (Class II) |
| Retention grooves/locks | Additional mechanical lock in angles |
| Pins | In large cavities with inadequate tooth structure |
| Slots | Auxiliary mechanical retention |
2. CORROSION SEAL (Secondary - Over Time)
- Fresh amalgam has marginal gap with tooth (~5-10 μm)
- Over months/years, amalgam corrodes at margins
- Corrosion products (tin oxides, chlorides) accumulate in the gap
- This physically seals the margins - reduces microleakage over time
- Paradox: Older amalgam restorations often leak LESS than new ones (due to corrosion seal)
- This is why high-copper amalgam (less corrosion) may actually have MORE early microleakage
3. BONDED AMALGAM TECHNIQUE (Modern/Optional)
- A dentine bonding agent (adhesive resin) is applied to cavity walls BEFORE amalgam placement
- Creates micromechanical + chemical bond between adhesive resin and tooth + amalgam
- Advantages:
- Better marginal seal immediately
- Reduced microleakage
- Increased retention - allows more conservative cavity prep
- Reduced postoperative sensitivity
- Reinforces remaining tooth structure
- Used in: large restorations, cuspal coverage cases, teeth with inadequate mechanical retention
COMPARISON TABLE:
| Restorative Material | Bond Type |
|---|---|
| Amalgam | NO chemical bond - mechanical only (+ corrosion seal over time) |
| Composite resin | Chemical + micromechanical (via acid etch + bonding agent) |
| GIC | Chemical bond (ionic bond with Ca²⁺ of hydroxyapatite) |
| Zinc phosphate cement | Mechanical only (micromechanical interlocking) |
| Resin cement | Chemical + micromechanical |
WHY NO CHEMICAL BOND IN AMALGAM?
- Amalgam is a metal alloy - has no functional groups to react with hydroxyapatite
- No acid etching done before amalgam placement
- No bonding agent used in conventional technique
- Setting reaction produces metallic phases (γ, γ1, γ2) - none have affinity for tooth structure
Source: Sturdevant's Art & Science of Operative Dentistry; Manipal Manual of Operative Dentistry
What are various techniques for tooth separation?
TECHNIQUES FOR TOOTH SEPARATION
🗣️ Hinglish Explanation
- Immediate separation - same appointment mein, turant space milti hai (mechanical devices use karte hain)
- Slow/Gradual separation - kuch ghante ya days mein space milti hai (biologicals like rubber/cotton use karte hain)
- Separating wire (Brass wire) - wire ko interproximally place karke tighten karte hain - immediate
- Mechanical separators - Elliot's / Ferrier's - spring action se - immediate
- Rubber/Elastic separators - rubber band squeeze karke daalte hain - slow (orthodontics mein bhi)
- Wooden/Ivory wedge - gingival embrasure mein - slow
✅ Crisp Viva Answer
TOOTH SEPARATION TECHNIQUES
CLASSIFICATION:
A. Based on TIME TAKEN
I. IMMEDIATE SEPARATION
- Thin brass wire twisted in the interproximal contact area
- Wire looped around contact point and tightened with a twisting instrument
- Gives immediate 0.5-1 mm separation
- Simplest and most commonly used
- Disadvantage: can damage papilla, may slip
| Separator | Mechanism | Feature |
|---|---|---|
| Elliot's separator | Spring-loaded, opens on squeezing | Used for posterior teeth |
| Ferrier's separator | Double-bow design, screw mechanism | More stable, better for Class II |
| True's separator | Single bow | Anterior teeth |
| Jack screw separator | Screw tightened to push teeth apart | Gradual but used chairside |
- Wooden/plastic wedge in gingival embrasure
- Gives slight immediate separation
- Compensates for matrix band thickness
II. SLOW/GRADUAL SEPARATION
- Small rubber rings placed interproximally
- Absorb moisture → swell → gradually push teeth apart
- Takes 24-48 hours
- Used before matrix band placement at next appointment
- Preformed springs placed interproximally
- Gradual separation over time
- Dry wood wedge placed interproximally
- Wood absorbs saliva/moisture → swells → separates teeth
- Takes several hours
- Softened material packed interproximally
- Hardens and maintains separation
- Rarely used
SUMMARY TABLE:
| Method | Type | Time | Device |
|---|---|---|---|
| Brass separating wire | Immediate | Minutes | Wire + pliers |
| Elliot's separator | Immediate | Instant | Spring device |
| Ferrier's separator | Immediate | Instant | Double-bow screw |
| Rubber elastic | Slow | 24-48 hrs | Rubber ring |
| Moistened wedge | Slow | Hours | Basswood wedge |
INDICATIONS FOR TOOTH SEPARATION:
- Class II cavity preparation - access to proximal box
- Matrix band placement in tight contact areas
- Detecting proximal caries (diagnostically)
- Before proximal stripping in orthodontics
IDEAL REQUIREMENTS OF A SEPARATOR:
- Easy to place and remove
- Should not injure gingiva or tooth
- Should provide adequate separation
- Should not interfere with cavity preparation
- Should be stable during procedure
Source: Sturdevant's Art & Science of Operative Dentistry; Manipal Manual of Operative Dentistry
Amalgam war
amalgam war dental controversy history pro anti amalgam arguments
AMALGAM WAR
🗣️ Hinglish Explanation
- 1st War (1840s) - jab amalgam pehli baar USA aaya - ASDS (first dental association) ne ban kar diya!
- 2nd War (1920s) - ek chemist ne claim kiya amalgam se usse mercury poisoning hui - controversy phir bhadki
- 3rd War (1990s-present) - media + anti-amalgam groups ne fir se issue uthaya - environmental concerns add hue - Minamata Convention aaya
✅ Crisp Viva Answer
THE AMALGAM WAR
THREE PHASES / WAVES OF THE AMALGAM WAR:
FIRST AMALGAM WAR (1840s)
- Amalgam introduced in USA around 1833 by Crawcour brothers (from France)
- American Society of Dental Surgeons (ASDS) - the only dental body at the time - declared amalgam unsafe
- Members were made to sign pledges NOT to use amalgam (1844)
- Those who used amalgam were expelled from ASDS
- Reason: fear of mercury toxicity + professional rivalry
- Result: ASDS eventually dissolved (1856) - could not sustain the anti-amalgam stand
- American Dental Association (ADA) formed in 1859 - supported amalgam use
- Anti-amalgam lost the first war
SECOND AMALGAM WAR (1920s)
- Sparked by Alfred Stock - a German chemist
- He suffered from chronic mercury poisoning - attributed it to his amalgam fillings
- Published papers claiming dental amalgam caused systemic mercury toxicity
- Created widespread fear in Germany and Europe
- Counter-arguments from dental community: mercury in set amalgam is bound/stable - not freely released
- Anti-amalgam lost the second war too - scientific consensus remained pro-amalgam
THIRD AMALGAM WAR (1990s - Present)
- Media + anti-amalgam activist groups revived the controversy
- TV documentaries (e.g., 60 Minutes, CBS) showed "smoking teeth" - mercury vapour from fillings
- Key arguments AGAINST amalgam:
| Argument | Details |
|---|---|
| Mercury vapour release | Released during chewing, brushing, hot drinks |
| Bioaccumulation | Mercury accumulates in kidneys, brain over time |
| Neurological effects | Claimed links to Alzheimer's, MS, autism |
| Environmental hazard | Mercury in dental waste → water/soil contamination |
| Vulnerable groups | Pregnant women, children, renal patients |
| Minamata Convention (2013) | International treaty to phase down mercury use globally |
- Key arguments FOR amalgam (Pro-amalgam):
| Argument | Details |
|---|---|
| ADA position | Amalgam is safe for non-contraindicated patients |
| Mercury levels | Released mercury is below WHO safety threshold |
| Longevity | Amalgam restorations last 10-15+ years |
| Cost | Cheapest restorative material - important in developing countries |
| Strength | Best for high stress-bearing posterior areas |
| No proven link | No conclusive evidence linking amalgam to systemic disease |
| Set amalgam = stable | Mercury is chemically bound - not free ionic mercury |
CURRENT STATUS:
| Organization | Stand |
|---|---|
| ADA | Safe - supports continued use |
| FDI World Dental Federation | Safe and effective |
| WHO | Recommends phase-down (not immediate ban) |
| EU | Banned in children <15, pregnant/nursing women (2018); complete phase-out planned 2030 |
| USA (FDA) | Restricted in high-risk groups (2020) |
| Minamata Convention | Phase-down globally |
| India | Still widely used - cost-effective |
ANTI-AMALGAM vs PRO-AMALGAM - QUICK SUMMARY:
| Anti-Amalgam | Pro-Amalgam | |
|---|---|---|
| Main concern | Mercury toxicity | No proven systemic harm |
| Key claim | Mercury vapour = toxic | Set amalgam = stable compound |
| Alternatives | Composite, GIC, ceramics | Too expensive for mass use |
| Who supports | Environmental groups, holistic dentists | ADA, FDI, most dental schools |
Source: Sturdevant's Art & Science of Operative Dentistry; Manipal Manual of Operative Dentistry
Define composite
DEFINITION OF COMPOSITE RESIN
🗣️ Hinglish Explanation
- Organic matrix (Resin) - ye base hai - BisGMA ya UDMA - plastic jaisa material jo set hota hai
- Inorganic filler particles - glass/quartz ke particles - ye strength aur aesthetics deta hai
- Silane coupling agent - ye dono ko jodne wala agent hai - matrix aur filler ke beech bridge ka kaam karta hai
- Matrix = cement (base material)
- Filler = sand/aggregate (strength deta hai)
- Coupling agent = bonding chemical (dono ko saath rakhta hai)
✅ Crisp Viva Answer
DEFINITION OF COMPOSITE RESIN
DEFINITION:
THREE ESSENTIAL COMPONENTS:
1. ORGANIC RESIN MATRIX (~30-50% by volume)
| Component | Full Name | Role |
|---|---|---|
| Bis-GMA | Bisphenol-A Glycidyl Methacrylate (Bowen's resin) | Base monomer - introduced by Bowen 1962 |
| UDMA | Urethane Dimethacrylate | Alternative base monomer - more flexible |
| TEGDMA | Triethylene Glycol Dimethacrylate | Diluent - reduces viscosity |
| Initiator | Camphorquinone (light cure) / Benzoyl peroxide (chemical cure) | Initiates polymerization |
| Inhibitor | BHT (Butylated Hydroxytoluene) | Prevents premature polymerization |
| Accelerator | Tertiary amine | Works with initiator |
2. INORGANIC FILLER PARTICLES (~50-70% by volume)
| Filler Type | Size | Examples |
|---|---|---|
| Macrofiller | 1-100 μm | Quartz, borosilicate glass |
| Microfiller | 0.01-0.1 μm | Colloidal silica (Aerosil) |
| Minifiller/Hybrid | 0.1-10 μm | Modern composites |
| Nanofiller | 0.005-0.01 μm | Latest generation |
- Increases strength and hardness
- Reduces polymerization shrinkage
- Reduces thermal expansion
- Improves wear resistance
- Increases radiopacity (if barium/strontium glass used)
3. SILANE COUPLING AGENT
- Organosilane compound (gamma-methacryloxypropyltrimethoxysilane)
- Acts as a bridge/adhesive between organic matrix and inorganic filler
- One end bonds to filler (silanol groups)
- Other end bonds to resin matrix (methacrylate groups)
- Without it: filler and matrix would separate → restoration fails
- Critical for: stress transfer, durability, hydrolytic stability
OPTIONAL 4TH COMPONENT: PIGMENTS/DYES
- Iron oxides, organic dyes
- Match tooth shade (A1, A2, B2 etc.)
POLYMERIZATION OF COMPOSITE:
| Type | Initiator | How set |
|---|---|---|
| Light-cured | Camphorquinone (460-480 nm) | Blue light from curing unit |
| Self-cured (chemical) | Benzoyl peroxide + amine | Two-paste system mixed together |
| Dual-cured | Both | Light + chemical combined |
WHO INTRODUCED COMPOSITE?
- Dr. R.L. Bowen (1962) - introduced Bis-GMA resin + silane-treated fillers = foundation of modern composite
- Before Bowen: unfilled resins (acrylic) - poor wear resistance, high shrinkage
Source: Sturdevant's Art & Science of Operative Dentistry; Manipal Manual of Operative Dentistry
Steps un composite restoration
STEPS IN COMPOSITE RESTORATION
🗣️ Hinglish Explanation
- Incremental layering - composite ek baar mein pura nahi daalte - 2mm ke layers mein daalte hain aur har layer cure karte hain - ye polymerization shrinkage reduce karta hai
- Acid etching - 37% phosphoric acid 15-30 sec - enamel ko rough banata hai bonding ke liye - frosted glass jaisa dikh ta hai etched enamel
✅ Crisp Viva Answer
STEPS IN COMPOSITE RESTORATION
STEP 1: SHADE SELECTION
- Done FIRST - before rubber dam, before any drying
- Tooth should be moist/hydrated - dry tooth appears lighter
- Use shade guide (Vita shade guide) in natural daylight
- Select shade matching adjacent teeth
STEP 2: LOCAL ANAESTHESIA
- Administer appropriate LA if needed
- Wait for adequate anaesthesia
STEP 3: ISOLATION
- Rubber dam - GOLD STANDARD for composite (essential)
- Keeps field dry, prevents moisture contamination
- Moisture contamination = bond failure
- Alternative: Cotton rolls + saliva ejector (less ideal)
STEP 4: CAVITY PREPARATION
- Remove caries completely
- Conservative preparation - no need for extension for prevention (unlike amalgam)
- Composite is adhesive - no undercuts needed for retention
- Bevel given on enamel margins (except occlusal in Class I, II)
- Smooth enamel walls - no need for 90° butt joint
- Internal line angles may be rounded (reduces stress concentration)
STEP 5: LINER/BASE PLACEMENT (if needed)
- Deep cavity (within 0.5 mm of pulp): Calcium hydroxide (Ca(OH)₂) liner
- Moderate depth: RMGIC base
- Shallow/routine: No liner needed
- Cover only deepest area - do NOT cover enamel margins with liner
STEP 6: MATRIX BAND PLACEMENT (Class II only)
- Transparent (Mylar/celluloid) matrix strip for anterior
- Sectional matrix system (Palodent, Composi-Tight) for posterior Class II
- Wedge placed gingivally
- Creates proximal wall for shaping contact area
STEP 7: ACID ETCHING (Total Etch technique)
- Apply 37% Phosphoric acid gel
- Enamel: 15-30 seconds
- Dentin: 15 seconds (over-etching dentin = collagen collapse = bond failure)
- Rinse thoroughly with water: 2x the etching time
- Result: Enamel = frosted/chalky white appearance (etched)
STEP 8: DRYING
- Enamel: air dry completely
- Dentin: moist/damp - do NOT over-dry dentin (collagen collapse)
- "Wet bonding" concept for dentin
STEP 9: BONDING AGENT APPLICATION
- Apply primer (if using 3-step or 2-step system)
- Apply adhesive/bond
- Gently air thin - remove solvent, create uniform thin layer
- Light cure for 10-20 seconds (if using light-cure bond)
STEP 10: COMPOSITE PLACEMENT - INCREMENTAL LAYERING
| Rule | Detail |
|---|---|
| Increment size | Max 2 mm per layer |
| Why incremental? | Reduces polymerization shrinkage stress, ensures complete cure |
| Cure each layer | 20-40 seconds per increment |
| Class I/II | Oblique/diagonal increments preferred |
| Class III/IV | Layer from lingual to labial |
| Last increment | Slightly overfill - will be finished |
STEP 11: LIGHT CURING
- Standard: 20-40 sec per increment (halogen/LED curing light)
- Light tip within 1 mm of surface
- Depth of cure = 2 mm for standard composites
- Final surface cure after all increments placed
STEP 12: REMOVAL OF MATRIX BAND
- Carefully remove matrix/wedge after final cure
- Check proximal contact
STEP 13: FINISHING
- Remove excess/flash with:
- 12-fluted finishing burs
- Finishing discs (Sof-Lex, Super-Snap) - coarse to fine
- Finishing strips (proximal areas)
- Check and adjust occlusion - articulating paper
- Remove any premature contacts
- Shape anatomy with finishing burs
STEP 14: POLISHING
- Polishing discs/cups - fine to superfine
- Polishing pastes - aluminum oxide/diamond paste
- Sequence: Coarse → Medium → Fine → Superfine
- Creates smooth, glossy surface
- Reduces plaque accumulation and staining
STEP 15: FINAL CHECK
- Check occlusion
- Check contacts (floss)
- Apply surface sealant (optional) - seals micro-porosities
- Patient instructions
SUMMARY FLOWCHART:
Shade selection
      ↓
LA + Rubber dam isolation
      ↓
Cavity preparation (conservative + bevel)
      ↓
Liner/base if needed
      ↓
Matrix placement (Class II)
      ↓
Acid etch (37% H₃PO₄) → Rinse → Dry
      ↓
Bonding agent → Air thin → Cure
      ↓
Incremental composite placement (2mm layers) + Cure each layer
      ↓
Remove matrix
      ↓
Finishing (burs + discs)
      ↓
Occlusal adjustment
      ↓
Polishing (discs + paste)
      ↓
Surface sealant (optional)
Source: Sturdevant's Art & Science of Operative Dentistry; Manipal Manual of Operative Dentistry
What is c factor
C FACTOR (CONFIGURATION FACTOR)
🗣️ Hinglish Explanation
C factor = Bonded surfaces ÷ Unbonded (Free) surfaces
- Class I cavity (box shape) - 5 walls bonded, 1 free (occlusal) = C factor 5/1 = 5 → HIGHEST stress → WORST
- Flat surface restoration - 1 wall bonded, 1 free = C factor 1/1 = 1 → LOW stress → BEST
✅ Crisp Viva Answer
C FACTOR (CONFIGURATION FACTOR)
DEFINITION:
C Factor = Bonded surfaces / Unbonded (Free) surfaces
- Introduced by Feilzer, De Gee and Davidson (1987)
SIGNIFICANCE:
- C factor determines the magnitude of polymerization shrinkage stress transmitted to cavity walls
- Higher C factor = more stress on bonds = higher risk of:
- Bond failure
- Marginal gap formation
- Microleakage
- Postoperative sensitivity
- Restoration failure
C FACTOR VALUES FOR DIFFERENT CAVITY CLASSES:
| Cavity | Bonded Surfaces | Free Surfaces | C Factor | Stress |
|---|---|---|---|---|
| Class I (box) | 5 | 1 | 5 | Maximum |
| Class II (proximal box) | 4 | 1 | 4 | Very high |
| Class III | 3 | 1-2 | 3 | High |
| Class IV | 2 | 2 | 1 | Moderate |
| Class V | 4 | 1 | 4 | Very high |
| Flat surface (veneer) | 1 | 1 | 1 | Minimum |
WHY C FACTOR MATTERS CLINICALLY:
- If free surface available → composite can flow/shrink toward free surface → stress relieved ✅
- If all surfaces bonded (high C factor) → nowhere to flow → stress concentrated on bonded walls → bond breaks or tooth deforms ❌
HOW TO REDUCE C FACTOR PROBLEMS:
| Method | How it helps |
|---|---|
| Incremental layering (2mm) | Each increment has lower C factor than full bulk fill |
| Oblique increments | Never bond all walls simultaneously with one increment |
| Flowable composite liner | Low modulus material at base - acts as stress buffer (elastic layer) |
| Soft-start polymerization | Slow initial cure rate → allows stress relaxation before gelation |
| Ramp/step curing | Gradual light intensity increase |
| Bulk-fill composites | Specially formulated to reduce shrinkage stress despite bulk placement |
MEMORY AID:
"More Bonded = More Stressed = More Problems" Class I = 5 walls bonded = C factor 5 = Most problematic cavity for composite!
Source: Sturdevant's Art & Science of Operative Dentistry; Manipal Manual of Operative Dentistry
When and how polishing is done in amalgam
POLISHING OF AMALGAM - WHEN AND HOW
🗣️ Hinglish Explanation
- Heat generate hogi → mercury release badhega
- Surface weak hai → scratch ho jaayegi
- Microstructure disturb hogi
✅ Crisp Viva Answer
POLISHING OF AMALGAM
WHEN TO POLISH:
Minimum 24 hours after placement (at recall appointment)
| Reason | Explanation |
|---|---|
| Incomplete setting | Amalgam takes 24 hrs for full crystallization - early polishing disturbs microstructure |
| Heat generation | Polishing friction generates heat → accelerates mercury release |
| Weak surface | Freshly placed amalgam is soft - abrasion causes surface damage |
| γ2 phase present | Early on, γ2 phase is more abundant at surface - polishing at this stage worsens it |
Ideal time: 24 hours to 1 week post-placement
HOW TO POLISH - SEQUENCE:
STEP 1: EVALUATE THE RESTORATION
- Check occlusion with articulating paper
- Identify any high spots, overhangs, rough margins
- Adjust occlusion if needed with finishing burs first
STEP 2: PRE-POLISHING / FINISHING
| Instrument | Use |
|---|---|
| 12-fluted carbide finishing burs | Remove excess, shape occlusal anatomy |
| Abrasive stones (Carborundum/Arkansas) | Smooth rough areas |
| Sandpaper discs | Smooth accessible surfaces |
| Finishing strips | Proximal surfaces |
STEP 3: POLISHING SEQUENCE
| Step | Abrasive | Instrument |
|---|---|---|
| 1st | Coarse pumice slurry | Rubber cup / brush |
| 2nd | Fine pumice / Silex | Rubber cup |
| 3rd | Tin oxide (Whiting) | Rubber cup / felt cone |
| 4th | Final paste (Amalgloss) | Rubber cup |
IMPORTANT RULES DURING POLISHING:
| Rule | Reason |
|---|---|
| Wet polishing (use water/slurry) | Prevents heat generation → prevents mercury vapour release |
| Intermittent strokes | Reduces friction heat |
| Light pressure | Avoids surface scratching and heat |
| Never polish dry | Heat can reach 60°C+ → mercury vaporization → toxic |
| Short bursts | Rest between strokes |
WHY POLISH AMALGAM AT ALL?
| Benefit | Explanation |
|---|---|
| Reduces tarnish & corrosion | Smooth surface = less surface area for corrosion |
| Reduces plaque accumulation | Rough surface = more plaque = more caries/gingivitis |
| Better marginal adaptation | Smooth margins = less microleakage |
| Aesthetic improvement | Shiny surface looks better |
| Increases surface hardness | Burnishing effect during polishing |
| Reduces mercury vapour release | Corrosion products sealed after polishing |
SEQUENCE SUMMARY:
24 hrs wait (minimum)
        ↓
Occlusal check + adjust (finishing burs)
        ↓
Gross finishing (carbide burs + stones)
        ↓
Coarse pumice (wet) - rubber cup
        ↓
Fine pumice / Silex - rubber cup
        ↓
Tin oxide - rubber cup/felt
        ↓
Final polish paste
        ↓
Mirror-smooth surface ✓
Source: Sturdevant's Art & Science of Operative Dentistry; Manipal Manual of Operative Dentistry
Gic setting reaction
GIC SETTING REACTION
🗣️ Hinglish Explanation
- Powder = Fluoroaluminosilicate glass (basic/alkaline nature)
- Liquid = Polyacrylic acid (acidic)
- D = Dissolution - acid glass ko attack karta hai → ions release
- G = Gelation - ions polyacid ke saath react karte hain → gel banta hai (initial set)
- M = Maturation - aur zyada crosslinks bante hain → hard ho jaata hai (final set)
✅ Crisp Viva Answer
GIC SETTING REACTION
COMPONENTS:
| Component | Composition | Nature |
|---|---|---|
| Powder | Calcium fluoroaluminosilicate glass | Basic (alkaline) |
| Liquid | Polyacrylic acid (+ itaconic/maleic acid) in water | Acidic |
SETTING REACTION - 3 PHASES:
PHASE 1: DISSOLUTION (Attack Phase)
- Polyacrylic acid attacks the glass powder surface
- H⁺ ions from acid dissolve the glass network
- Ions released from glass:
- Ca²⁺ (Calcium ions)
- Al³⁺ (Aluminium ions)
- F⁻ (Fluoride ions)
- Na⁺ (Sodium ions)
- Si(OH)₄ (Silica gel forms around undissolved glass)
- Silica gel = siliceous hydrogel forms as protective layer around remaining glass core
PHASE 2: GELATION (Initial Set / Gel Phase)
- Released Ca²⁺ ions react first with carboxylate (-COO⁻) groups of polyacid
- Calcium polyacrylate salt bridges form → rapid ionic crosslinking
- Material transitions from paste → gel consistency
- This is the initial set (~2-5 minutes clinically)
- Material is still sensitive to moisture at this stage - can be washed out
Ca²⁺ + 2(-COO⁻) → Calcium polyacrylate crosslinks
PHASE 3: MATURATION (Hardening / Final Set)
- Al³⁺ ions (slower to release) now react with polyacid
- Aluminium polyacrylate crosslinks form
- Al³⁺ forms 3 crosslinks (trivalent) vs Ca²⁺ which forms 2 (divalent)
- Al crosslinks = stronger, more rigid network
- Continues for 24 hours → months
- Material becomes hard, rigid, strong
Al³⁺ + 3(-COO⁻) → Aluminium polyacrylate crosslinks (stronger)
FINAL STRUCTURE OF SET GIC:
Unreacted glass cores (surrounded by silica gel)
              ↓
   Embedded in polyacrylate salt matrix
              ↓
   (Ca²⁺ and Al³⁺ crosslinked polyacid chains)
              ↓
   F⁻ ions freely present in matrix
   (→ slow fluoride release = anticariogenic)
SUMMARY TABLE:
| Phase | What happens | Ions involved | Time |
|---|---|---|---|
| Dissolution | Acid attacks glass → ions released | H⁺ attacks Si-O-Al/Si-O-Ca bonds | Immediate on mixing |
| Gelation | Ca²⁺ crosslinks polyacid → gel | Ca²⁺ | 2-5 min (initial set) |
| Maturation | Al³⁺ crosslinks polyacid → hard | Al³⁺ | 24 hrs - months |
MOISTURE SENSITIVITY DURING SETTING:
| Stage | Effect of moisture |
|---|---|
| Early setting (0-5 min) | Water washes out unreacted ions → DISSOLVES - catastrophic |
| After initial set | Water causes erosion of surface |
| Late maturation | Desiccation/drying causes crazing/cracking |
- Apply cocoa butter / petroleum jelly / varnish immediately after initial set
- Do NOT expose to moisture early
- Do NOT let it dry out later
BONDING TO TOOTH - CHEMICAL BOND:
- Unique property of GIC - forms true chemical bond with tooth
- Carboxylate groups (-COO⁻) of polyacid bond with Ca²⁺ of hydroxyapatite in tooth
- Ionic + covalent bond = adhesion without separate bonding agent
- No acid etching required
Source: Sturdevant's Art & Science of Operative Dentistry; Manipal Manual of Operative Dentistry
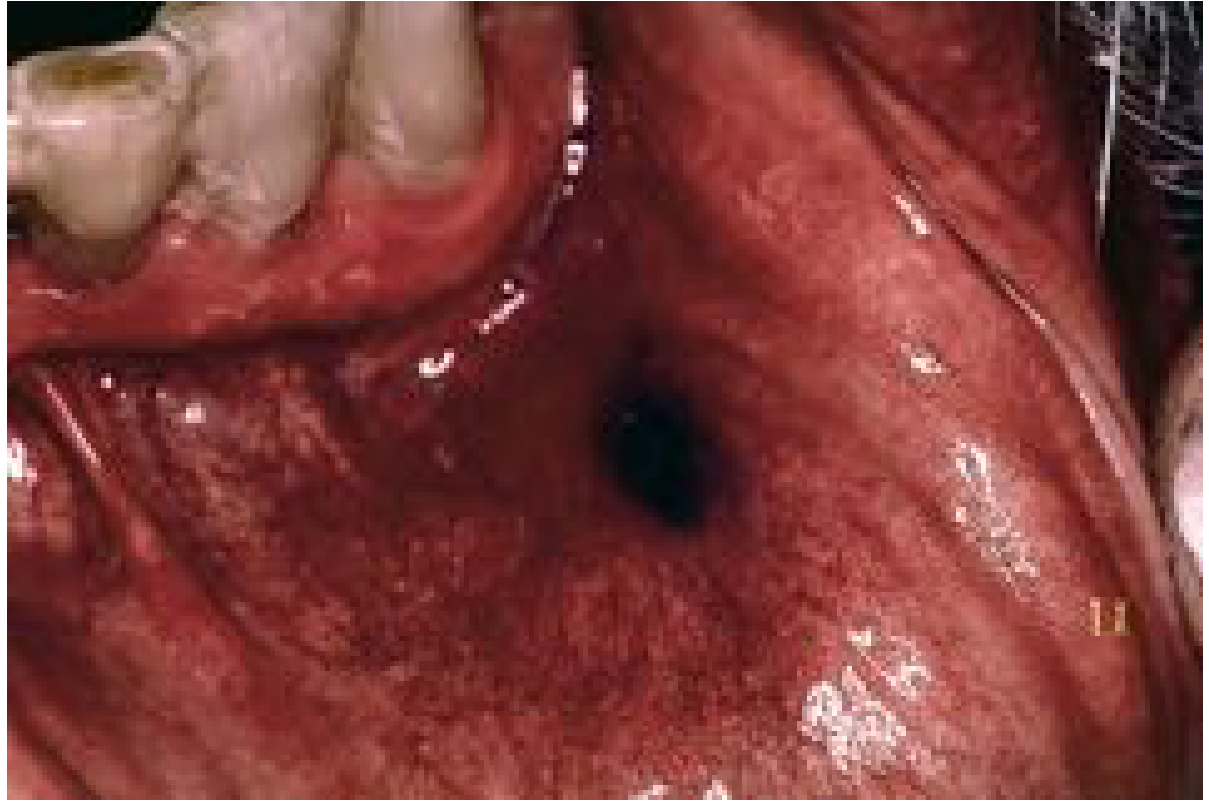
Amalgam tattoo
AMALGAM TATTOO
🗣️ Hinglish Explanation
✅ Crisp Viva Answer
AMALGAM TATTOO
DEFINITION:
OTHER NAMES:
- Focal argyrosis
- Iatrogenic amalgam pigmentation
ETIOLOGY / HOW IT OCCURS:
| Cause | Mechanism |
|---|---|
| Cavity preparation | Rotating bur throws amalgam particles into adjacent mucosa |
| Amalgam polishing | Abraded particles implanted in gingiva |
| Tooth extraction | Amalgam fragments fall into extraction socket |
| Endodontic treatment | Retrograde amalgam (apicoectomy) seeps into surrounding tissue |
| Fracture of restoration | Sharp fragments pierce mucosa |
| Chronic friction | Low-grade frictional transfer from old restoration |
PATHOGENESIS:
Amalgam particles enter lamina propria/submucosa
              ↓
Minimal chronic inflammatory infiltrate established
              ↓
Macrophages + Multinucleated giant cells ingest particles
              ↓
Particles distributed along collagen bundles,
basement membranes of vessels, nerves, epithelium
              ↓
May migrate to regional lymph nodes
(can mimic metastatic melanoma!)
              ↓
Permanent grey-black discoloration
CLINICAL FEATURES:
| Feature | Description |
|---|---|
| Color | Grey-black / bluish-black |
| Surface | Macular (flat), non-raised |
| Border | Well-defined, may be slightly diffuse |
| Size | 1 mm to 1.5 cm (most <0.4 cm) |
| Symptoms | Asymptomatic - no pain, no ulceration |
| Common sites | Mandibular attached gingiva, mucobuccal fold, alveolar gingiva, buccal mucosa |
| Radiograph | May show radiopaque particles if large deposit |
HISTOPATHOLOGY:
- Black (reduced) foreign metallic material in lamina propria and submucosa
- Fine granular silver deposits along:
- Collagen bundles
- Basement membranes of vasculature
- Nerves and epithelium
- Macrophages containing ingested particles
- Multinucleated giant cells (not always present)
- Energy-dispersive X-ray analysis confirms silver and copper in tissue
DIFFERENTIAL DIAGNOSIS (Important for viva!):
| Condition | Differentiating feature |
|---|---|
| Melanoma | Irregular, raised, growing, symptomatic |
| Blue nevus | Dome-shaped, deeper blue |
| Intramucosal nevus | Slightly raised |
| Vascular malformation | Blanches on pressure |
| Graphite tattoo | History of pencil injury |
| Kaposi sarcoma | Violaceous, multiple, in HIV patients |
| Peutz-Jeghers syndrome | Multiple perioral + intraoral macules |
| Addison's disease | Diffuse brown pigmentation + systemic signs |
DIAGNOSIS:
- Usually clinical diagnosis (history of dental treatment + characteristic appearance)
- Radiograph - may show radiopaque flecks
- Biopsy - if diagnosis uncertain (to rule out melanoma)
- Energy-dispersive X-ray analysis confirms silver/copper
TREATMENT:
- Usually NO TREATMENT required - benign condition
- Observation only if classic presentation and confirmed clinically
- Biopsy - if diagnosis in doubt
- Surgical excision - if cosmetically bothersome (elective)
- Q-switched ruby laser - reported for removal
Source: Cummings Otolaryngology Head & Neck Surgery; Sturdevant's Art & Science of Operative Dentistry; Manipal Manual of Operative Dentistry
Amalgam blues
AMALGAM BLUES
🗣️ Hinglish Explanation
- Amalgam tattoo = mucosa pe discoloration (soft tissue)
- Amalgam blues = tooth structure pe discoloration (hard tissue - enamel/dentin)
✅ Crisp Viva Answer
AMALGAM BLUES
DEFINITION:
MECHANISM / PATHOGENESIS:
Amalgam restoration corrodes slowly in oral environment
              ↓
Metallic ions released (Sn²⁺, Ag⁺, Hg²⁺)
              ↓
Ions penetrate dentinal tubules by diffusion
              ↓
React with organic components of dentin
              ↓
Metallic sulfides/oxides deposit in tubules:
- Tin sulfide (SnS) - grey/black
- Silver sulfide (Ag₂S) - black
- Tin oxide - grey
              ↓
Dentin stained grey/black
              ↓
Translucent enamel transmits colour → BLUISH APPEARANCE externally
CLINICAL FEATURES:
| Feature | Description |
|---|---|
| Appearance | Bluish-grey/dark hue visible through tooth |
| Location | At/around margins of amalgam restoration, especially visible in anterior teeth and premolars |
| Surface | No surface change - discoloration is deep/internal |
| Symptoms | Asymptomatic - purely aesthetic problem |
| When noticed | More common with old, corroded restorations |
| Reversibility | Irreversible - stain is within dentinal tubules |
IONS RESPONSIBLE:
| Ion | Source | Deposit formed | Colour |
|---|---|---|---|
| Sn²⁺ (Tin) | γ2 phase corrosion | Tin sulfide (SnS) | Grey/black |
| Ag⁺ (Silver) | γ1 phase corrosion | Silver sulfide (Ag₂S) | Black |
| Hg²⁺ (Mercury) | Hg phase | Mercury sulfide (HgS) | Black/red |
WHY MORE WITH LOW-COPPER AMALGAM:
- Low-copper amalgam has more γ2 phase → more tin → more corrosion → more staining
- High-copper amalgam - less γ2, less corrosion → less amalgam blues
AMALGAM BLUES vs AMALGAM TATTOO:
| Feature | Amalgam Blues | Amalgam Tattoo |
|---|---|---|
| Location | Tooth structure (enamel/dentin) | Oral mucosa (soft tissue) |
| Cause | Metallic ion diffusion into tubules | Physical implantation of amalgam particles |
| Colour | Bluish-grey through enamel | Grey-black macular spot |
| Reversible? | No | No |
| Treatment | Replace restoration + veneer/crown | Observation / excision |
| Malignant potential | None | None (but rule out melanoma) |
PREVENTION:
- Use high-copper amalgam - less corrosion
- Proper polishing - reduces corrosion rate
- Cavity varnish/liner - acts as barrier between amalgam and dentin
- Dentin bonding agent (bonded amalgam) - seals dentinal tubules
- Avoid amalgam in aesthetic zones (anterior teeth)
TREATMENT:
- Remove the amalgam restoration
- Replace with composite/ceramic (tooth-coloured material)
- Bleaching - usually ineffective (stain is intrinsic/within dentin)
- If severe - veneer or crown to mask discoloration
- Note: Even after removal, stain in dentin may persist (irreversible in advanced cases)
Source: Sturdevant's Art & Science of Operative Dentistry; Manipal Manual of Operative Dentistry
Minamata convection
Minamata Convention 2013 mercury dental amalgam phase down key points
MINAMATA CONVENTION
🗣️ Hinglish Explanation
- Amalgam ko phase DOWN karo (phase OUT nahi - important difference!)
- 2013 mein adopt hua, 2017 mein enforce hua
- 2034 tak complete phase out target kar liya gaya hai (latest amendment)
✅ Crisp Viva Answer
MINAMATA CONVENTION ON MERCURY
BACKGROUND - MINAMATA DISEASE:
| Feature | Detail |
|---|---|
| Location | Minamata Bay, Kumamoto, Japan |
| Period | 1950s-1960s |
| Cause | Chisso Corporation dumped methylmercury industrial waste into Minamata Bay |
| Route | Mercury → Bay → Fish → People (bioaccumulation) |
| Disease | Minamata Disease = severe organic mercury poisoning |
- Orofacial paresthesias (first symptom)
- Ataxia, tremor
- Dysarthria (slurred speech)
- Constriction of visual fields (tunnel vision)
- Hearing loss, blindness
- Dementia, death in severe cases
- Congenital Minamata Disease (in babies born to exposed mothers):
- Mental retardation
- Microcephaly
- Limb deformities
- Chorea, seizures
THE MINAMATA CONVENTION:
| Parameter | Detail |
|---|---|
| Full name | Minamata Convention on Mercury |
| Adopted | October 2013 (Kumamoto, Japan) |
| Entered into force | August 2017 |
| Administered by | UNEP (United Nations Environment Programme) |
| Parties | 140+ countries (including USA, EU, India) |
| Goal | Protect human health and environment from anthropogenic mercury emissions |
KEY PROVISIONS REGARDING DENTAL AMALGAM:
| Provision | Detail |
|---|---|
| Phase-down (NOT phase-out) | Reduce use of dental amalgam - not immediate ban |
| Phase-out target | Complete phase-out by 2034 (latest COP decision) |
| Dental amalgam = only mercury-added product subject to phase-DOWN (all others phase-out) | |
| Measures required | Promote alternatives, increase prevention, reduce use in vulnerable groups |
- Children under 15
- Pregnant women
- Breastfeeding women
- Patients with renal impairment
MEASURES CALLED FOR:
- Promote use of alternatives - composite, GIC, ceramics
- Amalgam separators - mandatory in dental offices (prevent mercury entering sewage)
- Promote dental caries prevention (less need for restorations)
- Proper disposal of amalgam waste
- Phase out manufacture, import, export of mercury-added products
- Education of dental professionals and public
- Research into mercury-free alternatives
COUNTRY-WISE STATUS:
| Region/Country | Status |
|---|---|
| European Union | Banned in children <15, pregnant/nursing women (2018); full ban planned 2025-2030 |
| USA (FDA) | Restricted use in high-risk groups (2020) |
| UK | Phase-down ongoing |
| India | Signatory - phase-down in progress; still widely used |
| Norway, Sweden, Denmark | Already banned amalgam |
DENTAL AMALGAM - ONLY PHASE-DOWN (Not Phase-Out):
- Developing countries depend on it - cheapest material
- No equally durable, low-cost alternative for posterior teeth yet
- Mass ban would create healthcare access issues
- ADA/FDI maintain it is still safe for non-vulnerable patients
MINAMATA CONVENTION vs MINAMATA DISEASE:
| Minamata Disease | Minamata Convention | |
|---|---|---|
| What | Neurological disease | International treaty |
| When | 1950s-60s | 2013 |
| Cause | Industrial methylmercury | Inspired by the disease |
| Mercury type | Organic (methyl mercury) | All forms including dental |
| Purpose | Historical tragedy | Prevent future mercury harm |
Source: Sturdevant's Art & Science of Operative Dentistry; Manipal Manual of Operative Dentistry; UNEP Minamata Convention
Affected and infected dentin
AFFECTED AND INFECTED DENTIN
🗣️ Hinglish Explanation
- Infected dentin = frontline pe jahan bacteria actually hain - ye contaminated zone hai
- Affected dentin = infected zone ke peeche - bacteria abhi nahi pahunche, lekin demineralization ho chuki hai - ye "affected" hai bacteria se nahi, acid se
- Infected dentin = REMOVE karo - bacteria hain, collagen damaged hai, remineralize nahi ho sakta
- Affected dentin = PRESERVE karo - bacteria nahi hain, collagen intact hai, remineralize ho sakta hai!
- Infected = soft, mushy, wet, easy to scoop - darker
- Affected = hard/leathery, firm - lighter colour
- Caries detector dye use karte hain - only infected dentin stains (red/pink)
✅ Crisp Viva Answer
AFFECTED AND INFECTED DENTIN
ZONES OF CARIOUS DENTIN (Deep to Superficial):
PULP
  ↑
Zone 1: Normal Dentin
  ↑
Zone 2: Subtransparent Dentin (early demineralization)
  ↑
Zone 3: Transparent Dentin (sclerotic - defense reaction)
  ↑
Zone 4: AFFECTED DENTIN ← Preserve
  ↑
Zone 5: INFECTED DENTIN ← Remove
  ↑
Cavity / Oral environment
COMPARISON TABLE - MOST IMPORTANT:
| Feature | INFECTED Dentin | AFFECTED Dentin |
|---|---|---|
| Location | Outer/superficial layer | Inner/deeper layer |
| Bacteria | ✅ PRESENT (heavily colonized) | ❌ ABSENT |
| Demineralization | Severe | Moderate |
| Collagen fibers | DESTROYED / denatured | INTACT |
| Remineralization potential | ❌ NONE | ✅ YES - can remineralize |
| Consistency | Soft, wet, mushy | Firm, leathery, hard |
| Colour | Dark brown/black | Light brown/yellow |
| Caries detector dye | STAINS (red/pink) | Does NOT stain |
| Sensitivity | Insensitive | May be sensitive |
| Action | MUST BE REMOVED | SHOULD BE PRESERVED |
DETAILED FEATURES:
INFECTED DENTIN:
- Outermost carious layer
- Heavily infected with Streptococcus mutans, Lactobacillus etc.
- Collagen matrix irreversibly denatured - cannot support remineralization
- Soft, discolored, easily scooped out with excavator
- Must be completely removed - if left → secondary caries → restoration failure
AFFECTED DENTIN:
- Deeper layer beneath infected dentin
- Acid has diffused here and caused demineralization
- BUT bacteria have NOT penetrated yet
- Collagen matrix still intact - vital and functional
- CAN BE REMINERALIZED by:
- Calcium hydroxide liner
- Fluoride
- GIC (fluoride release)
- Natural remineralization after sealing
- Should be preserved - removing it unnecessarily risks pulp exposure
CLINICAL RELEVANCE - WHEN TO STOP EXCAVATION:
| Situation | When to stop |
|---|---|
| Near pulp (deep caries) | Stop at affected dentin - use stepwise excavation or indirect pulp cap |
| Routine caries | Remove all infected, preserve affected |
| Stepwise excavation | Remove infected → place Ca(OH)₂ → re-enter after 6-8 weeks → remove remaining infected |
HOW TO CLINICALLY DISTINGUISH:
1. TACTILE METHOD:
- Infected = soft/mushy - excavator sinks in easily
- Affected = firm/leathery - resists excavation
2. COLOUR:
- Infected = dark brown/black (deeply stained)
- Affected = light/pale yellow-brown
3. CARIES DETECTOR DYE (Most reliable):
- 1% acid red in propylene glycol (Caries Detector - Kuraray)
- Apply for 10 seconds → rinse → observe
- Infected dentin = STAINS RED/PINK (denatured collagen takes up dye)
- Affected dentin = Does NOT stain (intact collagen resists dye)
- Normal dentin = Does NOT stain
SIGNIFICANCE IN CAVITY PREPARATION:
| Principle | Application |
|---|---|
| Remove infected only | Minimally invasive approach |
| Preserve affected | Avoids unnecessary pulp exposure |
| Biological basis of indirect pulp cap | Affected dentin left + Ca(OH)₂ → remineralization |
| Caries detector dye | Guides selective removal |
Source: Sturdevant's Art & Science of Operative Dentistry; Manipal Manual of Operative Dentistry
Cusp capping
CUSP CAPPING
🗣️ Hinglish Explanation
- Badi cavity prepare ki - cusp ke neeche ki support chali gayi
- Cusp ke neeche caries hai
- Remaining cusp wall bahut patli hai (< 1.5-2 mm)
✅ Crisp Viva Answer
CUSP CAPPING
DEFINITION:
RATIONALE / WHY IT IS DONE:
| Situation | How cusp is weakened |
|---|---|
| Large cavity preparation | Removes dentin support under cusp |
| Extensive caries | Undermines cusp from within |
| Remaining cusp wall < 1.5-2 mm thick | Insufficient bulk to withstand occlusal load |
| Isthmus width > 1/2 intercuspal distance | Structural weakness |
| Cracked cusp syndrome | Pre-existing fracture line |
| Previously restored tooth with large restoration | Repeated weakening |
- Occlusal forces → cusp fracture during function
- Fracture may be catastrophic (subgingival) → tooth loss
- Restoration failure
INDICATIONS FOR CUSP CAPPING:
- Remaining cusp wall thickness < 1.5-2 mm after preparation
- Cusp is undermined by caries
- Cavity isthmus width > half the intercuspal distance
- Cracked/fractured cusp
- Cusp with no dentin support beneath enamel
- Large MOD (mesio-occluso-distal) cavity involving multiple cusps
- Endodontically treated teeth - all cusps typically capped (brittleness)
HOW CUSP CAPPING IS DONE:
- Check remaining wall thickness
- Rule: if wall < 1.5 mm → cap it
- Transillumination / radiograph helps
- Reduce the cusp by 1.5-2 mm (minimum) using a flat-end tapered bur
- Reduction done parallel to the original cusp incline
- Creates flat platform for restoration to sit on
- Gives adequate bulk of material over the cusp
Before capping:          After cusp reduction:
    /\                       ___
   /  \    →              ___|  |___
  / [] \                  |  restoration |
 /______\                 |_____________|
- Place restorative material (amalgam/composite/GIC) over reduced cusp
- Material now bears the occlusal load instead of weakened cusp
- For very large restorations → consider onlay or crown
AMOUNT OF CUSP REDUCTION:
| Material used to cap | Minimum cusp reduction required |
|---|---|
| Amalgam | 1.5-2 mm (needs bulk for strength) |
| Composite | 1.5-2 mm |
| Cast metal onlay | 1.5-2 mm (functional cusp 2 mm) |
| Ceramic onlay | 2 mm minimum |
CUSP CAPPING vs CUSP COVERAGE vs ONLAY:
| Term | Meaning |
|---|---|
| Cusp capping | Including the cusp in a direct restoration (amalgam/composite) |
| Cusp coverage | Same concept - broader term |
| Onlay | Indirect restoration (cast metal/ceramic) that covers one or more cusps |
| Crown | Full coverage - when most/all cusps need protection |
WHEN TO DO ONLAY/CROWN INSTEAD:
| Situation | Preferred restoration |
|---|---|
| 1-2 cusps involved, adequate tooth structure | Cusp capping (direct) |
| Multiple cusps weakened | Onlay |
| Most cusps involved / endodontically treated | Crown |
KEY NUMBERS TO REMEMBER:
| Parameter | Value |
|---|---|
| Minimum cusp wall thickness to NOT cap | ≥ 1.5-2 mm |
| Cusp reduction for amalgam capping | 1.5-2 mm |
| Isthmus width indicating capping | > 1/2 intercuspal distance |
Source: Sturdevant's Art & Science of Operative Dentistry; Manipal Manual of Operative Dentistry
Remaining dentin thickness & its significance
REMAINING DENTIN THICKNESS (RDT) AND ITS SIGNIFICANCE
🗣️ Hinglish Explanation
- ≥ 2 mm RDT = Safe - koi liner nahi chahiye
- 0.5-2 mm RDT = Liner lagao (RMGIC/ZOE)
- < 0.5 mm RDT = Danger zone - Calcium hydroxide lining + pulp may need direct cap
✅ Crisp Viva Answer
REMAINING DENTIN THICKNESS (RDT)
DEFINITION:
SIGNIFICANCE OF RDT:
1. BARRIER AGAINST IRRITANTS
- Chemical irritants - acidic monomers (Bis-GMA), eugenol, acids
- Thermal stimuli - heat from cutting, exothermic setting reactions
- Bacterial toxins/microleakage - bacteria and their byproducts
- Electrical stimuli - galvanism
2. DENTINAL TUBULE PERMEABILITY RELATIONSHIP
| Factor | Effect on Permeability |
|---|---|
| Deeper cavity (less RDT) | More tubules per unit area, larger tubule diameter → MORE permeable |
| Shallower cavity (more RDT) | Fewer, narrower tubules → LESS permeable |
| Tubule diameter near pulp | 3-4 μm (very wide) |
| Tubule diameter near DEJ | 0.5-1 μm (narrow) |
| Tubule density near pulp | 45,000/mm² |
| Tubule density near DEJ | 20,000/mm² |
3. CLINICAL GUIDELINES BASED ON RDT:
| RDT | Clinical Situation | Action Required |
|---|---|---|
| ≥ 2 mm | Safe zone | No liner needed - dentin itself is adequate protection |
| 1-2 mm | Moderate depth | RMGIC or ZOE base recommended |
| 0.5-1 mm | Deep cavity | Calcium hydroxide liner + base |
| < 0.5 mm | Near pulp / pulp exposure risk | Calcium hydroxide (indirect pulp cap) + close monitoring |
| 0 mm (exposure) | Pulp exposed | Direct pulp cap or pulpotomy/RCT |
4. DETERMINES CHOICE OF LINER/BASE:
| RDT | Liner/Base of Choice | Why |
|---|---|---|
| < 0.5 mm | Calcium hydroxide (Ca(OH)₂) | Stimulates reparative dentin formation, bactericidal, high pH |
| 0.5-2 mm | RMGIC (Resin-modified GIC) | Seals tubules, fluoride release, bonds to tooth |
| > 2 mm | No liner / ZOP base | Not needed |
5. REPARATIVE/TERTIARY DENTIN FORMATION:
- When RDT is low → pulp responds by forming tertiary/reparative dentin
- This increases RDT over time = natural protective response
- Calcium hydroxide stimulates this response (high pH activates TGF-β)
FACTORS THAT AFFECT RDT:
| Factor | Effect |
|---|---|
| Depth of cavity | Deeper = less RDT |
| Tooth age | Older teeth = more secondary dentin = better RDT |
| Sclerotic dentin | Increases with age - tubules blocked = better seal |
| Previous restorations | May have reduced RDT already |
| Caries depth | Deeper caries = less RDT |
HOW TO MEASURE/ESTIMATE RDT:
- Radiographically - periapical X-ray showing pulp chamber size vs cavity depth
- Clinically - tactile sensation during excavation (softness near pulp)
- EPT/Pulp vitality tests - assess pulp status
- Transillumination - assess remaining tooth structure
KEY VALUES TO MEMORIZE:
| RDT Value | Significance |
|---|---|
| 2 mm | Minimum safe thickness - no liner needed |
| 0.5 mm | Critical threshold - Ca(OH)₂ mandatory |
| < 0.5 mm | Indirect pulp cap territory |
| 0 mm | Pulp exposure - direct pulp cap/RCT |
Source: Sturdevant's Art & Science of Operative Dentistry; Manipal Manual of Operative Dentistry
Mulling
MULLING
🗣️ Hinglish Explanation
- Triturated amalgam thoda sticky/rough hota tha - mulling use smooth karta tha
- Excess mercury absorb ho jaata tha chamois mein
- Mix uniform ho jaata tha
- Better consistency milti thi condensation ke liye
- Modern mechanical amalgamators (triturators) ke aane se mulling ki zaroorat khatam ho gayi
- Machine se trituration itni controlled hoti hai ki mulling ki zaroorat nahi
- Practically obsolete ab - lekin exam mein poochha jaata hai!
✅ Crisp Viva Answer
MULLING
DEFINITION:
WHEN DONE:
- After trituration (mixing of amalgam alloy + mercury)
- Before condensation into the cavity
- Was primarily used with hand trituration methods
HOW IT IS DONE:
Trituration complete
        ↓
Remove amalgam mass from mortar
        ↓
Place on chamois leather / rubber cloth
        ↓
Fold and knead (roll/press) with fingers
        ↓
Smooth, homogeneous, glossy mass obtained
        ↓
Ready for condensation
- The amalgam mass is folded over itself repeatedly
- Gentle pressure applied
- Takes about 10-15 seconds
PURPOSE / SIGNIFICANCE OF MULLING:
| Purpose | Explanation |
|---|---|
| Removes excess mercury | Chamois absorbs surplus Hg squeezed out during kneading |
| Improves consistency | Makes mix smoother and more homogeneous |
| Removes surface irregularities | Eliminates rough texture from trituration |
| Better plasticity | More workable for condensation |
| Uniform mix | Ensures even distribution of alloy and mercury |
| Removes trapped air | Reduces voids in final restoration |
MATERIAL USED:
| Material | Property |
|---|---|
| Chamois leather | Traditional - absorbs excess mercury, smooth texture |
| Rubber dam piece | Modern substitute |
| Rubber cloth | Similar to rubber dam |
Note: Never use cloth/cotton for mulling - fibres can contaminate the amalgam mix!
MULLING IN CONTEXT OF TRITURATION METHODS:
| Trituration Method | Mulling needed? |
|---|---|
| Hand trituration (mortar-pestle) | YES - essential step |
| Mechanical amalgamator (capsule) | NO - not needed; machine produces ideal mix directly |
CURRENT STATUS:
- With modern pre-capsulated amalgam + mechanical amalgamators, mulling is essentially obsolete
- Modern capsule systems produce a perfectly mixed, ready-to-use amalgam
- However, mulling concept is still tested in examinations
DIFFERENCE - TRITURATION vs MULLING:
| Step | Trituration | Mulling |
|---|---|---|
| What | Mixing of alloy + mercury | Kneading of triturated mass |
| Purpose | Initiate amalgamation reaction | Improve consistency, remove excess Hg |
| Instrument | Mortar-pestle / amalgamator | Chamois leather / rubber |
| When | First | Immediately after trituration |
| Duration | 30-60 seconds | 10-15 seconds |
Source: Sturdevant's Art & Science of Operative Dentistry; Manipal Manual of Operative Dentistry
Different types of wedges
DIFFERENT TYPES OF WEDGES
🗣️ Hinglish Explanation
- Material ke basis pe - wood ya plastic
- Cross-sectional shape ke basis pe - triangular, round, anatomical
- Special designs - contoured, V-shaped, winged
- Wooden wedge - chamois ki tarah moisture absorb karke swell hota hai - better seal deta hai time ke saath
- Plastic/Transparent wedge - swell nahi hota - lekin light cure composite mein use karte hain kyunki light pass hoti hai
✅ Crisp Viva Answer
TYPES OF WEDGES
A. Based on MATERIAL:
1. WOODEN WEDGES (Traditional)
- Material: Basswood (soft wood), balsa wood
- Property: Absorbs moisture from saliva/oral fluids → swells → better gingival adaptation over time
- Advantage: Better progressive seal, cheap
- Disadvantage: Can splinter, may over-separate teeth
- Most commonly used in routine practice
2. PLASTIC WEDGES
- Material: Polyurethane, nylon, polycarbonate
- Property: Does NOT swell - maintains consistent pressure
- Types: Opaque or transparent
- Key advantage of transparent: Allows light curing through the wedge - ideal for composite restorations
- Advantage: Flexible, atraumatic to papilla, color-coded by size
- Disadvantage: No swelling benefit
3. METAL WEDGES
- Material: Stainless steel
- Use: Rarely used - special situations
- Advantage: Very rigid, stable
B. Based on CROSS-SECTIONAL SHAPE:
1. TRIANGULAR WEDGE (Most common)
   /\
  /  \
 /____\
- Standard shape
- Fits most embrasures
- Apex fits into gingival embrasure
2. ROUND WEDGE (Cylindrical)
( )
- Round cross-section
- For wide/rounded embrasures
- Gentler on papilla
3. OVAL WEDGE
- Oval cross-section
- Modification of round wedge
C. Based on DESIGN/SPECIAL FEATURES:
1. SIMPLE/PLAIN WEDGE
- Basic triangular/round
- No special features
- Standard use
2. ANATOMICAL/CONTOURED WEDGE
- Shaped to follow the natural contour of the embrasure
- Better papilla protection
- Better gingival adaptation
- e.g., Composi-Tight wedge (Garrison)
3. V-SHAPED / NOTCHED WEDGE
- V-notch at the tip
- Allows matrix band to be seated deeper gingivally
- Better gingival seal
4. WINGED WEDGE
- Has small lateral extensions/wings
- Helps in stabilizing matrix band
- Prevents band from buckling
5. DOUBLE WEDGE (Bi-directional)
- Two wedges used simultaneously from buccal and lingual
- For wide embrasures, MOD cavities
D. Based on SIZE (Color-coded plastic wedges):
| Color | Size | Use |
|---|---|---|
| Yellow/White | Extra small | Narrow embrasures, anteriors |
| Blue | Small | Small posterior embrasures |
| Green | Medium | Standard posterior |
| Red/Orange | Large | Wide embrasures |
SUMMARY TABLE:
| Classification | Types |
|---|---|
| By material | Wooden (basswood), Plastic (transparent/opaque), Metal |
| By shape | Triangular, Round, Oval |
| By design | Plain, Anatomical/Contoured, V-notched, Winged, Double |
| By size | XS, S, M, L (color-coded) |
IDEAL REQUIREMENTS OF A WEDGE:
- Sufficient rigidity to separate teeth
- Adapt well to gingival embrasure contour
- Should not injure interdental papilla
- Should stabilize matrix band at gingival floor
- Easy to place and remove
- Should not splinter or fracture
Source: Sturdevant's Art & Science of Operative Dentistry; Manipal Manual of Operative Dentistry
Different types of class 2 cavity preparation
Different designs of class 2 cavity preparation
DIFFERENT DESIGNS OF CLASS II CAVITY PREPARATION
🗣️ Hinglish Explanation
- Conventional G.V. Black - complete occlusal + proximal box - purana approach
- Box only - sirf proximal box, occlusal nahi - modern, conservative
- Slot preparation - proximal surface se seedha, occlusal involvement nahi
- Tunnel preparation - marginal ridge bachao - sabse conservative
- MO / DO / MOD - involvement ke basis pe
✅ Crisp Viva Answer
DESIGNS OF CLASS II CAVITY PREPARATION
1. CONVENTIONAL (G.V. BLACK) CLASS II PREPARATION
a) MO (Mesio-Occlusal)
- Occlusal portion (dovetail) + mesial proximal box
- Used when: mesial caries + occlusal caries/need for retention
b) DO (Disto-Occlusal)
- Occlusal portion (dovetail) + distal proximal box
- Used when: distal caries involved
c) MOD (Mesio-Occluso-Distal)
- Occlusal portion + BOTH mesial and distal proximal boxes
- Used when: both proximal surfaces carious
- Most extensive conventional design
      Occlusal dovetail
      ___________
     |           |
     |  Dovetail |
     |___________|
    /             \
   /  Proximal box \
  /                 \
 |___________________| ← Gingival floor
- Dovetail provides retention against proximal displacement
- Step between occlusal and proximal box
- Butt joint margins (90°)
- No bevel on any margin
2. BOX-ONLY PREPARATION (Conservative)
- No occlusal extension
- Only proximal box prepared
- Used when: caries confined to proximal surface only, occlusal surface intact
- More conservative - preserves occlusal tooth structure
- Used mainly with composite resin
- Better for small-medium proximal lesions
     ______
    | BOX  |  ← only proximal box
    | ONLY |
    |______|
    (No occlusal dovetail)
3. SLOT PREPARATION
- Prepared from the proximal surface directly
- Access from buccal or lingual surface
- No occlusal involvement at all
- Very conservative
- Used for: small proximal lesions just below contact area
- Filled with: GIC, composite
    →→ [SLOT] ←←
    (horizontal slot in proximal surface)
- Limited retention - needs bonding agent
- Good for: early proximal caries, older patients
4. TUNNEL PREPARATION (Most Conservative)
- Marginal ridge is PRESERVED
- Access from occlusal fossa → tunnel burrowed under marginal ridge → proximal caries removed
- Proximal surface NOT opened from outside
- Most conservative design - maintains tooth structure integrity
    ___________
   |  occlusal |
   |  ↓ tunnel |
   |_____↓_____|
         ↓
    [proximal caries removed from inside]
    [marginal ridge intact externally]
- Preserves marginal ridge
- Better tooth strength
- More aesthetic (no visible proximal opening)
- Difficult to ensure complete caries removal
- Higher secondary caries risk
- Limited access visibility
- Mainly used with GIC (fluoride-releasing)
5. OPEN SANDWICH TECHNIQUE (Modified Class II)
- Gingival portion filled with GIC
- Occlusal portion filled with composite
- GIC at gingival margin: better marginal seal, fluoride release, bonds to dentin
- Composite occlusally: strength, aesthetics
- Best of both materials combined
COMPARISON OF ALL DESIGNS:
| Design | Conservativeness | Caries Access | Retention | Material |
|---|---|---|---|---|
| Conventional MO/DO/MOD | Least conservative | Excellent | High (dovetail) | Amalgam/Composite |
| Box-only | Moderate | Good | Moderate (bonding) | Composite |
| Slot | Conservative | Limited | Low (bonding needed) | GIC/Composite |
| Tunnel | Most conservative | Difficult | Low | GIC |
| Open sandwich | Moderate | Good | Moderate | GIC + Composite |
INDICATIONS SUMMARY:
| Design | Best Indication |
|---|---|
| Conventional MOD | Large caries, multiple surfaces, amalgam use |
| MO/DO | Single proximal + occlusal caries |
| Box only | Proximal caries only, occlusal surface intact, composite |
| Slot | Small proximal caries, no occlusal extension needed |
| Tunnel | Early proximal caries with intact marginal ridge, elderly patients |
| Open sandwich | Deep gingival margin + aesthetic requirement |
Source: Sturdevant's Art & Science of Operative Dentistry; Manipal Manual of Operative Dentistry
Syndes test
- Snyder's test - caries susceptibility test (most likely!)
- Sonde test - explorer se cavity detection
SNYDER'S TEST
🗣️ Hinglish Explanation
- Patient saliva deta hai
- Snyder's agar medium mein milate hain (glucose + bromocresol green dye hota hai isme - green colour)
- 37°C pe incubate karte hain
- 24, 48, 72 hours pe result dekhte hain
- Green → Yellow ho jaaye = acid production = bacteria active hain = caries susceptible!
✅ Crisp Viva Answer
SNYDER'S TEST (Colorimetric Caries Activity Test)
DEFINITION:
- Introduced by: Snyder (1951)
PRINCIPLE:
Green = Alkaline/Neutral = Negative (Low caries activity) Yellow = Acidic = Positive (High caries activity)
COMPOSITION OF SNYDER'S AGAR MEDIUM:
| Component | Purpose |
|---|---|
| Glucose (2%) | Substrate for bacterial fermentation |
| Tryptose/Peptone | Nutrient for bacterial growth |
| NaCl | Osmotic balance |
| Agar | Solidifying agent |
| Bromocresol green | pH indicator dye (Green at pH 4.8, Yellow below) |
| pH adjusted to 4.8 | Selective - only acidogenic bacteria survive |
PROCEDURE:
READING / INTERPRETATION:
| Time of colour change | Caries Activity | Interpretation |
|---|---|---|
| Yellow at 24 hours | Marked/High | Highly caries active |
| Yellow at 48 hours | Definite/Moderate | Moderately caries active |
| Yellow at 72 hours | Slight/Low | Slightly caries active |
| Green at 72 hours | Negative/Inactive | Low/no caries activity |
ADVANTAGES:
- Simple, inexpensive
- No special equipment needed
- Results easy to interpret (color change)
- Can be done chairside
- Motivates patient to improve oral hygiene
DISADVANTAGES / LIMITATIONS:
- Not specific - measures all acidogenic bacteria, not just S. mutans
- Quantitative assessment not possible
- Results affected by: recent antibiotic use, mouthwash use, diet changes
- Does not identify specific bacteria responsible
- Time-consuming (72 hours for complete result)
- Measures Lactobacillus mainly - but S. mutans is primary caries pathogen
COMPARISON WITH OTHER CARIES ACTIVITY TESTS:
| Test | Bacteria Measured | Medium | Result Time |
|---|---|---|---|
| Snyder's test | Lactobacillus (acidogenic) | Snyder's agar (bromocresol green) | 24-72 hrs |
| Lactobacillus count (Hadley) | Lactobacillus | Tomato peptone agar | 3-4 days |
| Streptococcus mutans count | S. mutans | Mitis-salivarius bacitracin agar | 48 hrs |
| Alban's test | Acidogenic bacteria | Similar to Snyder's | 24-72 hrs |
| Cariostat test | Acidogenic bacteria | Colorimetric | 48 hrs |
| Buffer capacity test | Saliva buffering | pH measurement | Immediate |
MODIFIED SNYDER'S TEST (Alban's test):
- Uses 0.04 mL saliva (less volume)
- Inoculated without melting agar (agar not remelted)
- Easier and quicker
- Otherwise similar principle
Source: Sturdevant's Art & Science of Operative Dentistry; Manipal Manual of Operative Dentistry
Hybrid layer
HYBRID LAYER
🗣️ Hinglish Explanation
✅ Crisp Viva Answer
HYBRID LAYER
DEFINITION:
- Introduced/described by: Nakabayashi et al. (1982)
- Also called: Resin-infiltrated layer, Interdiffusion zone
HOW IT FORMS - STEP BY STEP:
STEP 1: Acid etching (37% H₃PO₄, 15 sec on dentin)
              ↓
Hydroxyapatite mineral dissolved from dentin surface
Collagen fibrils EXPOSED (demineralized zone 3-8 μm deep)
Dentinal tubule openings widened
              ↓
STEP 2: Primer application (hydrophilic monomers in solvent)
              ↓
Primer penetrates into wet demineralized collagen mesh
Solvent carries monomers deep into interfibrillar spaces
Collagen supported (prevents collapse if moist technique used)
              ↓
STEP 3: Bonding agent application + curing
              ↓
Monomers polymerize WITHIN collagen fibril network
Resin + Collagen + Residual mineral = HYBRID LAYER
Resin tags extend into dentinal tubules below
              ↓
HYBRID LAYER FORMED ✓
STRUCTURE OF HYBRID LAYER:
COMPOSITE RESIN
      |
   [Adhesive layer]
      |
====HYBRID LAYER==== (3-10 μm)
  - Collagen fibrils (from dentin)
  - Resin monomers (infiltrated)
  - Residual hydroxyapatite crystals
  - Resin tags extending into tubules
      |
   Normal dentin (mineralized)
      |
     PULP
COMPONENTS OF HYBRID LAYER:
| Component | Source |
|---|---|
| Collagen fibrils | Demineralized dentin |
| Polymerized resin monomers | Bonding agent/primer |
| Residual hydroxyapatite | Incompletely demineralized dentin |
| Resin tags | Resin extending into tubules |
| Lateral branches | Resin in dentinal tubule side branches |
THICKNESS:
- 3-10 μm typically
- Depends on: type of adhesive, etching time, dentin depth, moisture
SIGNIFICANCE / IMPORTANCE:
| Significance | Explanation |
|---|---|
| Basis of dentin bonding | Micromechanical retention between resin and dentin |
| Prevents microleakage | Seals dentinal tubules - reduces fluid movement |
| Reduces postoperative sensitivity | Tubules sealed by hybrid layer + resin tags |
| Stress distribution | Hybrid layer acts as elastic buffer - distributes polymerization shrinkage stress |
| Longevity of restoration | Quality of hybrid layer determines bond strength and durability |
| Foundation of adhesive dentistry | All modern dentin bonding systems work by forming this layer |
BOND STRENGTH - WHERE DOES IT COME FROM?
- Micromechanical interlocking - resin tags in tubules
- Encapsulation of collagen - resin surrounds and locks collagen fibrils
- Lateral branches - resin fills side channels of tubules
- Chemical interaction - some adhesives have chemical affinity for collagen/Ca²⁺
FACTORS AFFECTING HYBRID LAYER QUALITY:
| Factor | Effect |
|---|---|
| Over-drying dentin | Collagen collapse → resin can't infiltrate → poor hybrid layer |
| Over-etching dentin | Deeper demineralization than resin can penetrate → gaps at base |
| Wet bonding technique | Keeps collagen expanded → better infiltration |
| Solvent in primer | Acetone/ethanol carries resin into wet collagen mesh |
| Generation of bonding agent | Higher generations = better hybrid layer formation |
WET BONDING CONCEPT (Related):
- Dentin should be moist but not wet after etching
- Completely dry dentin = collagen fibers collapse = resin can't penetrate = NO hybrid layer
- Moist dentin = collagen stays expanded = resin infiltrates = GOOD hybrid layer
- This is called "wet bonding technique"
NANO-LEAKAGE:
- Area below hybrid layer (base) where resin didn't completely infiltrate
- Demineralized dentin with NO resin = water-permeable zone
- Leads to: hydrolytic degradation over time, bond failure
- Major cause of long-term failure of composite restorations
Source: Sturdevant's Art & Science of Operative Dentistry; Manipal Manual of Operative Dentistry
Sandwich technique.
SANDWICH TECHNIQUE
🗣️ Hinglish Explanation
| GIC | Composite | |
|---|---|---|
| Chemical bond to tooth | ✅ YES | ❌ NO (needs etch+bond) |
| Fluoride release | ✅ YES | ❌ NO |
| Aesthetics | ❌ Poor | ✅ Excellent |
| Strength/Wear resistance | ❌ Low | ✅ High |
| Moisture tolerance | ✅ Better | ❌ Needs isolation |
- GIC base (neeche) = bonds to dentin, releases fluoride, tolerates moisture at gingival margin
- Composite top (upar) = strength, aesthetics, wear resistance
✅ Crisp Viva Answer
SANDWICH TECHNIQUE
DEFINITION:
- Introduced by: McLean, Powis, Prosser & Wilson (1985)
- Also called: Laminate technique / GIC-composite laminate
TWO TYPES:
1. CLOSED SANDWICH TECHNIQUE
    _____________________
   |   COMPOSITE RESIN   |  ← Outer layer (aesthetic, strong)
   |_____________________|
   |       GIC           |  ← Inner layer (bonds to dentin, F⁻)
   |_____________________|
   |      DENTIN         |
   |_____________________|
- GIC completely covered by composite (GIC not exposed to oral cavity)
- Used in: posterior restorations (Class I, II) where gingival margin is supragingivally located
- GIC acts as base - not visible clinically
2. OPEN SANDWICH TECHNIQUE
    _____________________
   |   COMPOSITE RESIN   |  ← Occlusal/Body portion
   |_____________________|
   | GIC |               |  ← Gingival margin (EXPOSED to oral cavity)
   |_____|               |
   |      DENTIN         |
- GIC exposed at gingival margin (in contact with oral environment)
- Used in: Class II cavities with deep gingival margins (at or below CEJ)
- GIC at gingival margin: better marginal seal, fluoride release directly at high-risk area
- Composite above: aesthetics, strength occlusally
RATIONALE - WHY SANDWICH TECHNIQUE?
| Problem solved | How |
|---|---|
| Deep gingival margin below CEJ | GIC bonds chemically to dentin/cementum even in moisture - composite cannot bond here reliably |
| Poor composite-dentin marginal seal | GIC bonds ionically to tooth - better seal at gingival margin |
| Caries risk at margin | GIC releases fluoride continuously → anticariogenic effect at gingival margin |
| Composite shrinkage stress | GIC base acts as elastic stress buffer (low modulus) → reduces C-factor stress |
| Moisture contamination | GIC more tolerant of moisture than composite at gingival floor |
PROCEDURE:
- Conventional GIC: allow to set fully
- RMGIC (Resin-Modified GIC): light cure → proceed immediately
MATERIALS USED:
| Layer | Material Options |
|---|---|
| Inner (base) | Conventional GIC, RMGIC (preferred - stronger bond to composite), Compomer |
| Outer (body) | Composite resin (anterior or posterior) |
RMGIC preferred over conventional GIC as inner layer because:
- Better bond to composite
- Light-curable → can proceed immediately
- Higher strength than conventional GIC
ADVANTAGES OF SANDWICH TECHNIQUE:
- Chemical bonding of GIC to dentin - true adhesion
- Fluoride release from GIC → caries prevention at margins
- Reduces C-factor - GIC as stress-absorbing base reduces polymerization shrinkage stress
- Better gingival margin seal - especially for subgingival margins
- Moisture tolerance at gingival floor
- Aesthetics of composite maintained occlusally
- Biocompatible - GIC near pulp is well tolerated
- Reduced microleakage at gingival margin
DISADVANTAGES:
- Technique sensitive - requires good understanding of both materials
- Time consuming - two materials, multiple steps
- Bond between GIC and composite can fail (weak link)
- In open sandwich - GIC wear may occur over time where exposed
INDICATIONS:
| Indication | Type |
|---|---|
| Class II with deep gingival margin | Open sandwich |
| Class V restorations | Open/Closed sandwich |
| Large posterior composites | Closed sandwich (reduce C-factor) |
| Deep cavities near pulp | Closed sandwich (RMGIC base) |
| High caries risk patients | Sandwich (fluoride benefit) |
| Subgingival margins | Open sandwich |
OPEN vs CLOSED SANDWICH:
| Feature | Open Sandwich | Closed Sandwich |
|---|---|---|
| GIC exposed? | YES - at gingival margin | NO - completely covered |
| Used in | Class II, deep gingival margin | Class I, II, V |
| Fluoride release | Directly at margin | Internally |
| GIC wear concern | YES | NO |
Source: Sturdevant's Art & Science of Operative Dentistry; Manipal Manual of Operative Dentistry
Tensile strength of dentin
TENSILE STRENGTH OF DENTIN
🗣️ Hinglish Explanation
- Dentin mein collagen fibers hote hain (organic matrix ~20%) - ye flexibility aur tensile resistance dete hain
- Enamel mein collagen nahi - sirf mineral crystals - isliye enamel brittle hai aur tension mein easily toot jaata hai
- Enamel ko support chahiye dentin ka - unsupported enamel tension mein toot jaata hai
- Cavity prep mein unsupported enamel hataate hain (fracture prevention)
- Dentin ki tensile strength jaanna bonding requirements samjhne ke liye important hai
✅ Crisp Viva Answer
TENSILE STRENGTH OF DENTIN
VALUE:
MECHANICAL PROPERTIES OF DENTIN (Complete):
| Property | Value |
|---|---|
| Tensile strength | 40-60 MPa (~52 MPa) |
| Compressive strength | 230-370 MPa (~297 MPa) |
| Flexural/Transverse strength | ~133 MPa |
| Modulus of elasticity (Young's modulus) | 11-19 GPa (~18.6 GPa) |
| Hardness (KHN - Knoop) | 60-65 KHN |
| Proportional limit | ~138 MPa |
COMPARISON - DENTIN vs ENAMEL:
| Property | Dentin | Enamel |
|---|---|---|
| Tensile strength | 40-60 MPa | ~10 MPa (brittle!) |
| Compressive strength | 230-370 MPa | 250-350 MPa |
| Hardness | 60-65 KHN | 340-430 KHN |
| Elastic modulus | 11-19 GPa | 80-84 GPa |
| Composition (mineral) | ~45-50% | ~96% |
| Composition (organic) | ~30% (collagen) | ~1% |
| Nature | Flexible, tough | Rigid, brittle |
WHY DENTIN HAS HIGHER TENSILE STRENGTH THAN ENAMEL:
| Factor | Dentin | Enamel |
|---|---|---|
| Organic matrix | 30% collagen = tensile resistance | Only 1% - no tensile support |
| Mineral content | 45-50% | 96% |
| Nature | Viscoelastic - can deform slightly | Brittle - no deformation before fracture |
| Analogy | Like reinforced concrete (steel + cement) | Like pure ceramic |
CLINICAL SIGNIFICANCE OF DENTIN'S TENSILE PROPERTIES:
-
Unsupported enamel must be removed during cavity prep
- Enamel (low tensile strength) supported by dentin = strong
- Unsupported enamel = no dentin below = tensile forces → fracture
- Classic rule: "No unsupported enamel" in cavity preparation
-
Basis of resistance form
- Cavity floor on dentin = strong base to resist fracture forces
- Dentin absorbs shock before it reaches pulp
-
Dentin bonding strength must EXCEED dentin tensile strength
- If bonding agent bond strength < dentin tensile strength → adhesive fails
- Modern bonding agents: 17-25 MPa bond strength to dentin
- Comparison: dentin tensile strength 40-60 MPa
-
Tooth fracture patterns
- Fractures propagate through enamel (brittle fracture - sudden)
- Dentin resists fracture propagation due to collagen (more energy needed)
-
Importance in endodontically treated teeth
- RCT removes moisture from dentin → collagen crosslinks broken → dentin becomes MORE BRITTLE
- Tensile strength DECREASES → cusp capping/crown mandatory
FACTORS AFFECTING DENTIN TENSILE STRENGTH:
| Factor | Effect |
|---|---|
| Dehydration | ↓ Tensile strength (collagen loses plasticity) |
| Age | ↓ Slightly with age (sclerotic dentin = more brittle) |
| Caries | ↓ Significantly - demineralization weakens |
| Endodontic treatment | ↓ (desiccation of dentin) |
| Location | Varies - coronal vs radicular dentin |
Source: Sturdevant's Art & Science of Operative Dentistry; Manipal Manual of Operative Dentistry
Eame's technique
EAMES TECHNIQUE
🗣️ Hinglish Explanation
- Kam mercury = kam γ2 phase
- Stronger restoration
- Less mercury toxicity/exposure
- Equal parts mercury + alloy lo (1:1 ratio)
- Triturate karo
- Squeeze/express out excess mercury using chamois cloth (mulling)
- Jo bache usme zyada alloy hai - better quality mix
✅ Crisp Viva Answer
EAMES TECHNIQUE
DEFINITION:
- Also called: Minimal mercury technique / Reduced mercury technique / No-squeeze cloth technique
BACKGROUND - TRADITIONAL vs EAMES:
| Parameter | Traditional Method | Eames Technique |
|---|---|---|
| Mercury:Alloy ratio | 8:5 (excess mercury) | 1:1 (equal parts) |
| Mercury content | High | Reduced |
| γ2 phase | More | Less |
| Strength | Lower | Higher |
| Mercury toxicity risk | Higher | Lower |
STEPS OF EAMES TECHNIQUE:
- Take equal parts (1:1 by weight) of:
- Mercury
- Amalgam alloy powder
- Mix in amalgamator/mortar for appropriate time
- Mix appears crumbly/granular initially (less mercury = drier mix)
- Place triturated mass in chamois cloth/rubber dam
- Squeeze/wring firmly to express out excess mercury
- Alternate method: use squeeze cloth technique - double layer cloth, twist to remove excess Hg
- Remaining mass mulled on fresh chamois
- Smooth, homogeneous, plastic mass obtained
- Use small condensers with maximum pressure (important in Eames)
- Heavy condensation pressure forces out any residual excess mercury to surface
- Amalgam condensed in small increments
WHY REDUCE MERCURY?
| Excess Mercury Problem | Result |
|---|---|
| More Hg → more γ2 phase (Sn₈Hg) | Weakest phase - lower strength |
| Higher mercury content | More corrosion, more creep |
| Mercury at surface | More tarnish, more clinical failure |
| Mercury vapour exposure | Toxicity to dentist/patient |
- Less γ2 → stronger restoration
- Less corrosion → longer lasting
- Less mercury vapour → safer
FINAL MERCURY CONTENT IN SET AMALGAM:
| Method | Mercury % in set amalgam |
|---|---|
| Traditional (8:5) | ~55-60% Hg by weight |
| Eames (1:1 + squeeze) | ~42-48% Hg by weight |
| Ideal | < 50% Hg by weight |
SIGNIFICANCE / ADVANTAGES:
- Reduced γ2 phase → stronger restoration
- Less corrosion → better marginal integrity
- Less creep → less marginal deterioration
- Less mercury exposure to dentist and patient
- Better strength of final restoration
- Less dimensional change during setting
DISADVANTAGES:
- Technique sensitive - requires consistent mercury expression
- Drier mix initially - harder to handle
- With modern pre-capsulated amalgam → technique largely obsolete
- Chamois/squeeze cloth = mercury contamination of operator's hands
CURRENT RELEVANCE:
- With pre-capsulated amalgam systems - mercury:alloy ratio is pre-set by manufacturer
- Modern capsules already use optimized ratios
- Eames technique is largely historical now - but tested in exams
- Concept of "less mercury = better" is still valid
RELATED CONCEPT - ZINC-CONTAINING AMALGAM:
- If excess mercury is squeezed with wet/contaminated hands → moisture contamination
- Moisture + zinc-containing amalgam → delayed expansion (H₂ gas released from Zn + H₂O reaction)
- This is why zinc-free amalgam or dry technique is important
Source: Sturdevant's Art & Science of Operative Dentistry; Manipal Manual of Operative Dentistry
Delayed expansion
DELAYED EXPANSION OF AMALGAM
🗣️ Hinglish Explanation
Zn + H₂O → ZnO + H₂↑ (hydrogen gas)
- Restoration toothache se upar aa jaata hai
- Cavity se bahar aa jaata hai (overhang)
- Tooth mein pressure aur pain hoti hai
- Severe cases mein tooth fracture bhi ho sakta hai
✅ Crisp Viva Answer
DELAYED EXPANSION OF AMALGAM
DEFINITION:
CAUSE - SINGLE CAUSE:
| Source | How it contaminates |
|---|---|
| Operator's wet/perspiring hands | During trituration/condensation |
| Patient's saliva | Inadequate isolation |
| Breath/moisture | During condensation |
| Wet instruments | Contaminated condensers |
| No rubber dam | Saliva contamination |
MECHANISM / CHEMICAL REACTION:
Zn + H₂O → ZnO + H₂↑Zinc + Water → Zinc Oxide + Hydrogen gas ↑
TIME OF OCCURRENCE:
| Type of Expansion | When |
|---|---|
| Normal setting expansion | Within first few hours of setting |
| Delayed expansion | 3 days to 3 weeks after placement (some sources: up to months) |
CLINICAL FEATURES / CONSEQUENCES:
| Feature | Description |
|---|---|
| Restoration rises above occlusal plane | High bite - premature contact |
| Overhang at margins | Restoration protrudes beyond cavity margin |
| Pain/sensitivity | Pulp pressure from expansion |
| Postoperative pain | Patient complains days after placement |
| Tooth fracture | In severe expansion - cusp fracture possible |
| Restoration failure | Eventual dislodgement |
| Amount of expansion | Can be as much as 4-15% (massive compared to normal 0.1-0.5%) |
NORMAL DIMENSIONAL CHANGE OF AMALGAM:
| Amalgam Type | Dimensional Change |
|---|---|
| Normal amalgam (no contamination) | Slight contraction or expansion ±0.1-0.5% |
| Zinc amalgam + moisture | Expansion up to 4-15% (DELAYED) |
PREVENTION:
| Preventive Measure | How it helps |
|---|---|
| Rubber dam isolation | Prevents saliva contamination |
| Dry hands during trituration | No moisture from operator |
| Dry instruments | No water contamination from condensers |
| Use zinc-free amalgam | No zinc = no reaction with water = no delayed expansion |
| Pre-capsulated amalgam | No open handling = no moisture risk |
| Avoid hand trituration | Less contamination risk vs mechanical trituration |
WHY ZINC IS IN AMALGAM?
- Prevents oxidation of silver and tin during alloy manufacture
- Reduces porosity
- Improves plasticity of mix
ZINC-CONTAINING vs ZINC-FREE AMALGAM:
| Property | Zinc-containing | Zinc-free |
|---|---|---|
| Delayed expansion risk | YES - if moisture | NO |
| Oxidation of alloy | Less (Zn scavenges) | More susceptible |
| Workability | Better | Slightly less |
| Handling | Requires dry technique | More forgiving |
MANAGEMENT IF DELAYED EXPANSION OCCURS:
- Remove restoration completely
- Re-prepare cavity if needed
- Re-restore with:
- Zinc-free amalgam, OR
- Composite/GIC
- Ensure proper isolation this time
Source: Sturdevant's Art & Science of Operative Dentistry; Manipal Manual of Operative Dentistry
Polymerization shrinkage