


So what exactly she is diagnosed with?
Summary of Diagnoses - Right Knee
1. MRI Findings (SMS Multi-Speciality Hospital)
- The root of the medial meniscus (the anchor point) is torn. This is a significant finding - it causes the meniscus to lose its ability to distribute load properly across the knee, similar to having no meniscus at all.
- Signal changes (STIR/T2 hyperintensity) at the femoral attachment and postero-lateral fibers of the ACL - meaning the ACL has been stretched/partially damaged, but is not completely torn.
- Medial tibio-femoral joint space narrowing with bone spurs (osteophytes)
- Chondromalacia Patella Grade III - significant cartilage wearing on the back of the kneecap (full thickness loss at medial patellar facet)
- Partial cartilage loss at medial femoral condyle and tibial plateau
- Bone bruising/stress reaction in the medial femoral and tibial condyles - indicates the bones are under abnormal stress
2. Ultrasound (KD City Centre - June 17, 2026)
- Minimal fluid around the semimembranosus tendon and medial gastrocnemius head
- Periarticular osteophytes (bone spurs around the joint)
- Mild medial meniscus extrusion (the meniscus is bulging outward - consistent with the root tear)
3. Orthopaedic Clinic Diagnosis (KD City Centre - June 27, 2026)
- The orthopaedic surgeon (Dr. Kalpan J. Desai, MS Ortho) noted the diagnosis as "IDK Rt knee" - this stands for "Internal Derangement of the Knee", which is a clinical umbrella term used when multiple internal structures of the knee are involved.
In Plain Language
What She Has Been Prescribed
| Treatment | Details |
|---|---|
| Tab Flexon (Ibuprofen + Paracetamol) | 1 tablet twice daily x 7 days, after food |
| Warm packs | Apply to right knee |
| SWD (Short Wave Diathermy) | Daily physiotherapy |
| Elastic knee support | To continue wearing |
| Exercises | Walking, cycling, isometric quads & hamstrings, SLR, range-of-motion, hyperextension stretches |
Important note: This is an explanation of her existing medical reports - not independent medical advice. Please follow up with her orthopaedic surgeon (Dr. Kalpan J. Desai) for treatment decisions, as the meniscus root tear in particular may require further evaluation for possible surgical options depending on her symptoms and functional needs.
So what would be the physio rehab for this?
"medial meniscus root tear" AND "rehabilitation" AND "physiotherapy"
"knee osteoarthritis" AND "exercise therapy" AND "rehabilitation"
"medial meniscus root" AND "conservative treatment" AND "rehabilitation"
"chondromalacia patella" AND "physiotherapy" AND "exercise"
Physiotherapy Rehabilitation Plan - Right Knee
Key Principles Before Starting
- Meniscus root tear - protect from compressive/rotational loads, avoid deep squatting
- ACL sprain (partial) - avoid excessive anterior tibial shear, no pivoting/twisting
- Chondromalacia patella Gr. III + OA - reduce patellofemoral compressive forces, load management
Phase 1 - Acute/Inflammatory Phase (Weeks 1-2)
Electrophysical Agents
| Modality | Details |
|---|---|
| SWD (Short Wave Diathermy) | As already prescribed - daily, 15-20 min. Reduces deep tissue inflammation and pain |
| TENS / IFT | 20-30 min sessions, helps with pain modulation |
| Ice / Warm packs | Warm packs as prescribed before exercise; ice after exercise (15 min) |
| Ultrasound therapy | Pulsed mode over medial joint line - reduces local inflammation |
Exercises (Gentle, Non-Weight Bearing)
| Exercise | Sets x Reps | Notes |
|---|---|---|
| Ankle pumps | 3 x 20 | Reduces stasis, aids venous return |
| Isometric quads (quad sets) | 3 x 10 hold 10 sec | Knee fully extended, tighten quad without moving knee |
| Straight Leg Raise (SLR) | 3 x 10 | Slow and controlled; as prescribed by doctor |
| Inner range quads | 3 x 10 | Small rolled towel under knee, lift heel to fully straighten |
| Heel slides | 2 x 15 | Gentle ROM restoration - slide heel toward buttock |
| Isometric hamstrings | 2 x 10 hold 5 sec | Pressing heel down against bed/floor |
What to AVOID in Phase 1
- Deep squatting (>60° knee flexion with load)
- Stairs with heavy loading
- Pivoting or twisting on the right knee
- High-impact activities
Phase 2 - Subacute/Strengthening Phase (Weeks 3-6)
Strengthening Exercises
| Exercise | Sets x Reps | Rationale |
|---|---|---|
| Mini squats (0-45°) | 3 x 15 | Safe range for meniscus + patellofemoral joint |
| Terminal knee extension (TKE) | 3 x 15 | Targets VMO (vastus medialis oblique) - critical for patellar tracking in chondromalacia |
| Step-ups (low step, 10 cm) | 3 x 10 each | Functional movement, controlled load |
| Hip abductor strengthening (side-lying) | 3 x 15 | Reduces knee valgus stress that worsens medial compartment |
| Clamshells | 3 x 15 | Gluteus medius activation - offloads medial knee |
| Wall slides (0-45°) | 3 x 10 | Closed chain, controlled |
| Cycling (stationary) | 20-30 min, low resistance | As prescribed - excellent for cartilage nutrition, low joint compression |
Manual Therapy (Physiotherapist-performed)
- Patellar mobilizations (medial glides) - directly addresses chondromalacia by improving patellar tracking
- Tibiofemoral joint mobilization (Grade I-II) - reduces stiffness, pain
- Soft tissue massage - medial quad, gastrocnemius, iliotibial band
Taping
- McConnell patellar taping - medially directed taping reduces patellofemoral pain significantly in Grade III chondromalacia. The 2025 BMJ network meta-analysis confirms exercise + adjuncts improve outcomes in knee OA.
Phase 3 - Functional Rehabilitation (Weeks 7-12)
Progressive Exercises
| Exercise | Details |
|---|---|
| Walking program | Start 10-15 min flat surface, increase by 5 min/week |
| Stationary cycling | Increase to 30-45 min, gradually increase resistance |
| Leg press (limited range 0-60°) | Avoids excessive compressive load at deeper angles |
| Single leg balance | Proprioception training - important for ACL sprain recovery |
| Hyperextension stretches | As prescribed - gently restore full extension |
| Hamstring stretches | Tight hamstrings increase patellofemoral compression |
| Calf stretches | Improves gait mechanics |
Proprioception / Neuromuscular Training
- Tandem stance (one foot in front of other)
- Single leg stance on flat surface progressing to foam pad
- Balance board training (Phase 3 only, under supervision)
Supports and Aids
| Item | Purpose |
|---|---|
| Elastic knee support (as prescribed) | Proprioceptive feedback, warmth, mild compression |
| Lateral wedge insole | Offloads the medial compartment (OA/meniscus) - worth discussing with orthopaedic surgeon |
| Walking stick (optional, left hand) | If pain is significant during walking - reduces medial knee load by ~30% |
Lifestyle Modifications
- Weight management - Every 1 kg reduction in body weight reduces knee joint load by ~4 kg during walking. This is one of the most impactful interventions for knee OA and meniscus preservation.
- Avoid sitting cross-legged or on floor level (increases medial compartment compression)
- Avoid low chairs / low toilets - use raised toilet seat if needed
- Swimming / aqua therapy - excellent low-impact option if available
Red Flags - Stop Exercise and See Doctor If:
- Sudden significant increase in swelling
- Locking or giving way of the knee
- Sharp catching pain during any exercise
- Pain >4/10 during exercise (some discomfort is acceptable, sharp pain is not)
Important Note on Meniscus Root Tear
But pt is having swelling around the knee so can tens be given?
"TENS" AND "knee effusion" AND "swelling"
TENS with Knee Swelling - Can It Be Given?
Why Swelling Is NOT a Contraindication to TENS
- Pacemaker / implanted cardiac device
- Over the carotid sinus or anterior neck
- Over broken/damaged skin, open wounds, or active infection
- Over malignant tissue
- Epilepsy (certain electrode placements)
- First trimester of pregnancy
- Over eyes or internally
- Thrombosis / DVT (direct over the site)
However - Important Clinical Distinction
| Type of Swelling | TENS Decision |
|---|---|
| Mild joint effusion (as in Geeta's case - confirmed on MRI/USG) | ✅ TENS is safe and appropriate |
| Post-arthroplasty / post-surgical acute swelling | ✅ TENS is safe |
| Swelling due to deep vein thrombosis (DVT) | ❌ Avoid TENS directly over the site |
| Swelling with skin breakdown, open blisters, or weeping infection | ❌ Avoid - cannot apply electrodes |
| Acute septic arthritis (hot, red, systemically unwell) | ❌ Avoid - treat infection first |
What to Actually Do
- Electrode placement: Place electrodes around the knee - not directly over the most swollen area if skin is taut. You can use a criss-cross pattern (one pair medial-lateral, one pair superior-inferior) or flank the swelling.
- Parameters for pain relief: 80-100 Hz, low intensity (sensory level - tingling, no muscle contraction), 20-30 min sessions - this is conventional TENS for acute/subacute pain.
- Alternatively: If you're concerned about electrode adhesion over a swollen area, IFT (Interferential Therapy) is an excellent alternative - it penetrates deeper, has a well-established anti-edema effect through its rhythmic muscle pumping action, and is very well tolerated over swollen joints. IFT at 1-10 Hz (for muscle pumping/anti-edema) or 80-150 Hz (for pain relief) would be very appropriate here.
Bottom Line for Geeta
So roughly how much days it takes to cure it through physio And will it be surely cured by physio?
"medial meniscus root tear" AND "conservative" AND "outcomes"
"knee osteoarthritis" AND "physiotherapy outcomes" AND "prognosis"
PMID: 39669056
"knee osteoarthritis" AND "exercise" AND "long term outcomes"
Realistic Prognosis with Physiotherapy
1. Mild Joint Effusion + Swelling
2. ACL Sprain (partial, Grade 1-2)
3. Chondromalacia Patella Grade III
- Pain can reduce substantially (60-80%) with physio - VMO strengthening, patellar taping, avoiding provocative postures
- The goal is pain-free function, not cartilage repair
- If well managed now, it may not progress to Grade IV for many years
4. Knee Osteoarthritis (medial compartment)
5. Medial Meniscus Root Tear - This Is the Most Important One
| Parameter | Conservative (Physio only) | Surgical Repair |
|---|---|---|
| Functional improvement | Yes, but less | Significantly better |
| OA progression (X-ray) | 80% showed significant progression | Only 5% |
| Severe joint space loss | 25% developed it | Only 10% |
Overall Timeline Summary
| Symptom | Expected Relief with Physio | Curable? |
|---|---|---|
| Pain & swelling | 3-6 weeks | ✅ Yes |
| ACL sprain | 8-12 weeks | ✅ Yes |
| Functional walking, stairs | 6-10 weeks | ✅ Yes |
| Chondromalacia patella pain | 8-16 weeks | ⚠️ Manageable, not curable |
| OA pain | 3-6 months, ongoing | ⚠️ Manageable, not curable |
| Meniscus root tear (structural) | Pain may ease, but tear remains | ❌ Not healed by physio |
My Honest Recommendation
- Continue physio aggressively for 6-8 weeks - it will genuinely help her pain and function
- Follow up with the orthopaedic surgeon at 6-8 weeks with a functional assessment
- Discuss the meniscus root tear specifically - at 59, arthroscopic meniscal repair is still a viable option and evidence shows it significantly slows OA progression compared to conservative treatment alone
- Maintain exercises long-term regardless of surgery - exercise is non-negotiable for knee OA
How OA will be progressing through medial meniscus root tear
"medial meniscus root tear" AND "osteoarthritis progression" AND "biomechanics"
"medial meniscus root" AND "hoop stress" AND "cartilage"
"meniscal extrusion" AND "joint space narrowing" AND "osteoarthritis"
PMID: 42465117
PMID: 40886077
medial meniscus root tear extrusion osteoarthritis progression biomechanics diagram
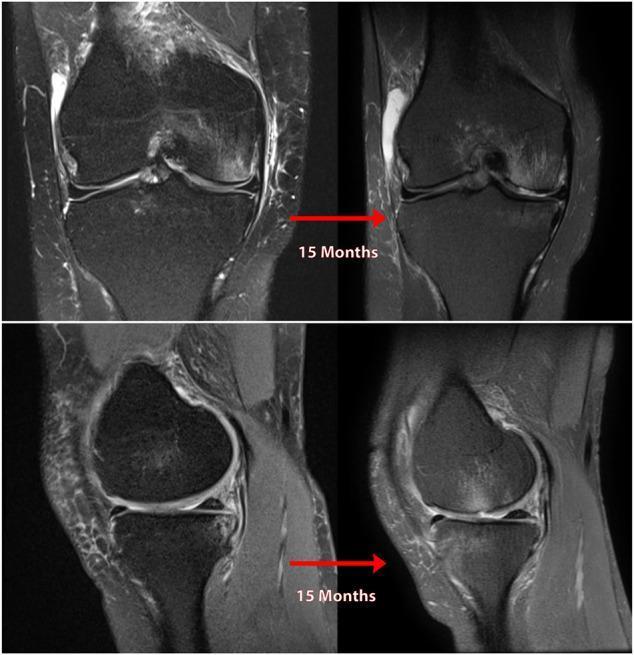
This diagnostic imaging set consists of T2-weighted fat-saturated MR images of the knee in coronal and sagittal planes, illustrating the 15-month progression of post-traumatic osteoarthritis following a neglected posterior medial meniscus root tear (PMMRT). The coronal series shows progressive medial compartment joint space narrowing and increasing medial meniscal extrusion. The sagittal series demonstrates progressive degradation of the meniscal body, thinning of the articular cartilage, and development of subchondral bone marrow edema. Significant joint effusion is visible as hyperintense signal within the suprapatellar bursa and joint space. These images serve as an educational clinical example of how loss of meniscal root integrity leads to altered biomechanical loading, rapid chondromalacia, and secondary degenerative joint disease in an otherwise stable knee.
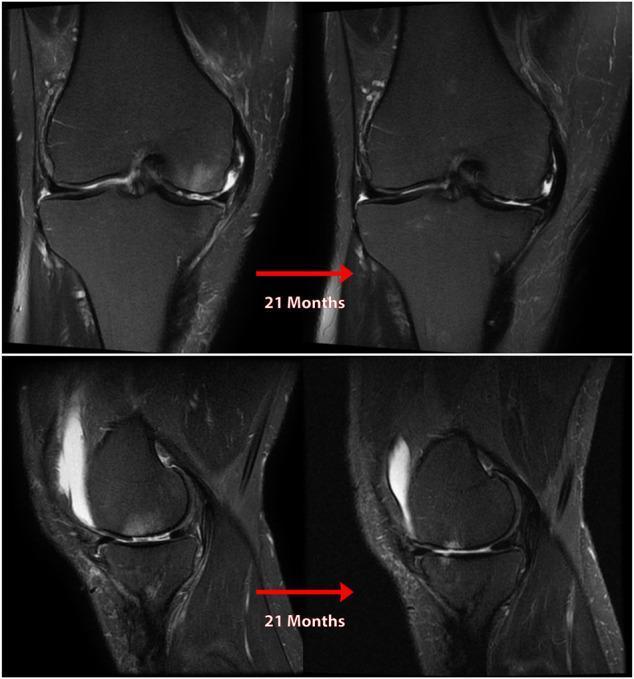
This diagnostic comparison image consists of T2-weighted magnetic resonance (MR) images of the right knee in coronal (top row) and sagittal (bottom row) planes, illustrating the 21-month progression of post-traumatic osteoarthritis. The series demonstrates the clinical consequences of a nonanatomic posterior medial meniscus root repair (PMMRT). In the coronal view, there is progressive medial joint space narrowing and notable meniscal extrusion beyond the tibial margin. The sagittal view reveals advancing chondromalacia and cartilage thinning between the femoral condyle and tibial plateau. Associated findings include subchondral bone marrow edema and changes in subchondral bone density, particularly in the medial compartment. These images emphasize the importance of anatomic meniscal root restoration to maintain joint biomechanics and prevent rapid degenerative changes. The visual highlights a transition from early-stage pathology to more advanced secondary osteoarthritis characterized by loss of articular cartilage and joint space collapse.
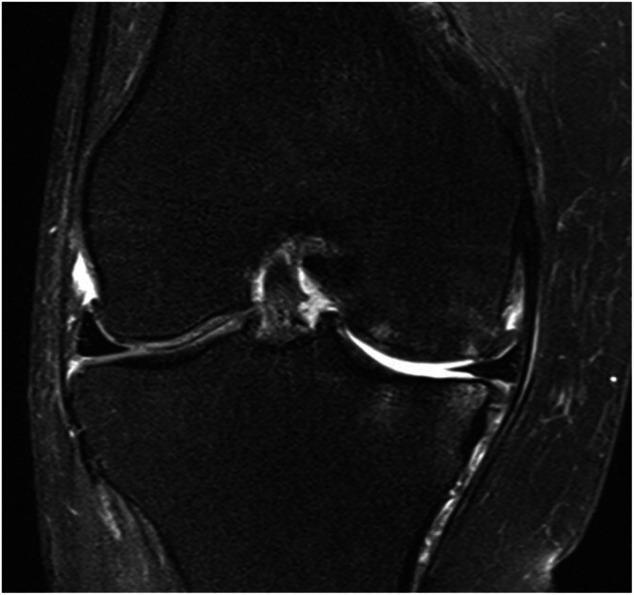
This diagnostic image is a coronal T2-weighted fluid-sensitive MRI of the knee joint, demonstrating significant degenerative changes characteristic of secondary osteoarthritis. The key pathological finding is the extrusion of the medial meniscus beyond the margin of the tibial plateau, likely following a posterior medial meniscus root tear (PMMRT). In contrast to the relatively well-preserved lateral compartment, the medial compartment shows marked joint space narrowing. There is a visible loss of articular cartilage thickness along the weight-bearing surfaces of the medial femoral condyle (MFC) and the medial tibial plateau (MTP), appearing as thinning and signal heterogeneity of the chondral surface. Subchondral bone marrow edema is present in the medial tibial plateau, indicated by hyperintense (bright) signal changes, which signifies increased mechanical stress. This image serves as an educational example of the rapid progression of post-traumatic osteoarthritis resulting from the loss of meniscal hoop stress and load-distribution functions.
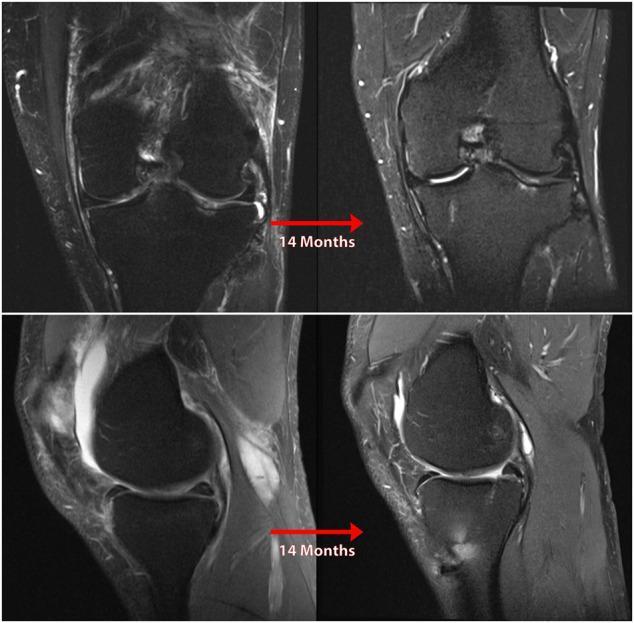
Diagnostic Magnetic Resonance Imaging (MRI) comparison demonstrating the 14-month progression of medial compartment osteoarthritis in the left knee. The image set includes T2-weighted fluid-sensitive sequences in both coronal (top) and sagittal (bottom) planes. Key visual features include significant joint space narrowing in the medial compartment and the development of high-signal subchondral bone marrow lesions (edema) in the medial femoral condyle and medial tibial plateau. The sagittal views highlight progressive meniscal extrusion and morphological changes following a nonanatomic posterior medial meniscus root repair. There is evidence of increasing subchondral sclerosis, osteophyte formation, and joint effusion over the 14-month interval. This comparison serves as a clinical illustration of rapid degenerative joint disease secondary to altered knee biomechanics and meniscus root insufficiency. The material is intended for orthopedic and radiological education focusing on meniscal pathology and its role in joint preservation.
How Medial Meniscus Root Tear Drives OA Progression
Step-by-Step Biomechanical Cascade
Step 1 - Loss of Hoop Stress Transmission
NORMAL:
Compressive load → Meniscus compressed → Hoop stress generated → Load spread over wide area
                                           (roots hold the ring)

ROOT TEAR:
Compressive load → Meniscus compressed → NO hoop stress (ring is open) → Load concentrated on small area
Step 2 - Meniscal Extrusion
Step 3 - Massive Increase in Contact Pressure
Step 4 - Subchondral Bone Marrow Edema
Step 5 - Cartilage Breakdown (Chondromalacia → Full Thickness Loss)
| Stage | What Happens |
|---|---|
| Early | Cartilage softening, surface fibrillation (Grade I-II) |
| Intermediate | Partial thickness cartilage loss (Grade III - already present in Geeta) |
| Advanced | Full thickness cartilage loss - bone-on-bone contact (Grade IV) |
Step 6 - Bone Remodelling and Osteophytes
Step 7 - Joint Space Collapse and End-Stage OA
- Medial joint space narrows progressively
- Varus deformity (bow-legged alignment) develops as the medial side collapses
- The varus deformity further shifts load to the medial compartment, creating a vicious cycle
- End result: bone-on-bone medial compartment requiring total knee replacement
The Full Cascade in One Diagram
Medial Meniscus Root Tear
         ↓
Loss of Hoop Stress Mechanism
         ↓
Meniscal Extrusion (already present in Geeta)
         ↓
Functional Total Meniscectomy Effect
         ↓
↑ Contact pressure ×25 in medial compartment
         ↓
Subchondral Bone Marrow Edema (already present in Geeta)
         ↓
Accelerated Cartilage Breakdown (Grade III already present)
         ↓
Osteophyte Formation (already present in Geeta)
         ↓
Joint Space Narrowing (already present in Geeta)
         ↓
Varus Deformity → More Medial Loading
         ↓
End-Stage OA → Total Knee Replacement
Real MRI Images Showing This Progression
What the Latest Research Says About Timing
- The more extrusion present now → the faster OA will progress
- Since Geeta already has extrusion → she is in the higher-risk group for progression
- Early referral for surgical evaluation is important - not because timing of surgery independently changes outcome, but because delayed presentation means more extrusion accumulates before surgery can help
Bottom Line for Geeta
So why after walking 7 8 round sudden point like pin pricking pain felt and pt stops while walking at ant knee?
chondromalacia patella grade 3 cartilage subchondral bone exposed anterior knee pain mechanism
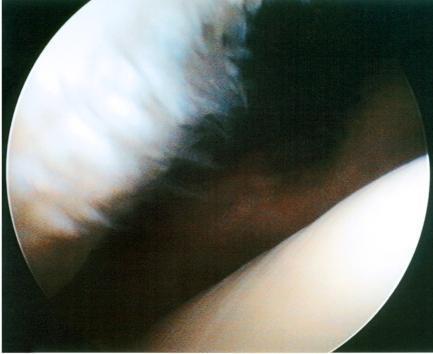
This diagnostic image is an intraoperative arthroscopic photograph of the patellofemoral joint within the human knee. The visual demonstrates the articular surfaces of the patella and the femur. On the left side of the frame, the patellar articular cartilage exhibits a Grade II chondral lesion characterized by visible surface irregularities, a frayed or 'shaggy' texture, and non-uniform coloration, consistent with chondromalacia. Despite these superficial changes, the lesion does not penetrate to the depth of the subchondral bone. In contrast, the femoral trochlear surface on the right appears smooth, white, and intact with a healthy glistening quality. This image is a classic educational example used in orthopedics to distinguish between pathological cartilage softening or fibrillation and normal hyaline cartilage. It serves as a clinical reference for the arthroscopic classification of chondral damage in the context of anterior knee pain or patellofemoral osteoarthritis.
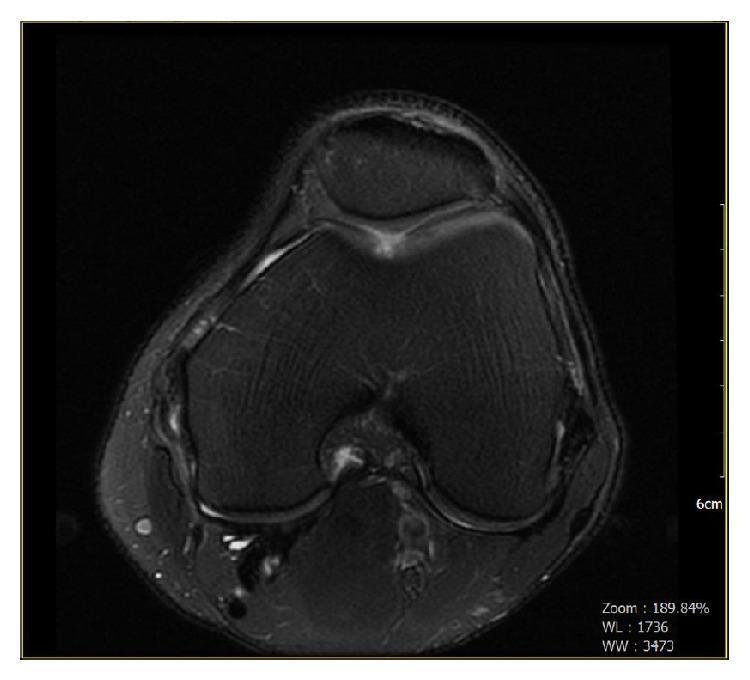
This diagnostic image is an axial cross-sectional MRI of the left knee joint, showcasing the patellofemoral compartment. The image reveals the patella positioned anterior to the femoral trochlea. Key pathological findings include mild patellofemoral joint osteoarthritis characterized by subtle subchondral bone signal changes and focal thinning of the articular cartilage. Specifically, a high-grade (Grade III-IV) chondromalacia defect is visible overlying the central femoral trochlear groove, where the cartilage surface appears irregular and diminished in thickness. The marrow signal within the patella and distal femur is largely preserved, though minor marginal osteophyte formation is noted. Surrounding soft tissues and ligamentous structures are visualized, with focal areas of increased signal intensity in the anterior soft tissues suggestive of localized edema or joint effusion. This imaging study is educationally significant for demonstrating traumatic and degenerative cartilage defects and the radiologic presentation of patellofemoral chondromalacia.
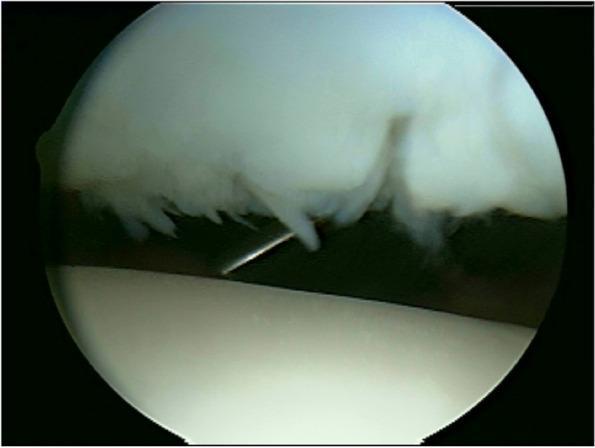
This arthroscopic diagnostic image displays a high-grade chondral lesion on the lateral facet of the patella within the knee joint. The visual focus is on a severe, Grade 4 International Cartilage Repair Society (ICRS) injury, characterized by full-thickness cartilage loss and significant structural degradation. The remaining cartilage edges exhibit marked fraying, fibrillation, and irregular, shaggy textures, indicating advanced chondromalacia. A metallic surgical probe is visible, partially inserted beneath a frayed flap of cartilage to assess the depth, stability, and extent of the delamination. The underlying subchondral bone appears exposed or minimally covered by necrotic debris in the depth of the defect. This image serves as a clinical example of severe patellofemoral degenerative disease, often requiring advanced regenerative procedures such as autologous chondrocyte implantation (ACI) or osteochondral allografts.
Why Pin-Prick Pain at the Anterior Knee After 7-8 Rounds of Walking?
The Core Mechanism - "Fatigue Threshold of Damaged Cartilage"
- Chondromalacia Patella Grade III - significant cartilage thinning on the back of the kneecap
- Patellofemoral joint mechanics during walking - the patella is compressed against the femoral trochlea with every step
What Happens Step by Step
During the First Few Rounds (No Pain)
- Adequate synovial fluid lubrication (freshly distributed)
- Quad muscles that are warm, fresh, and functioning well
- Strong VMO (vastus medialis oblique) keeping the patella tracking centrally
After 7-8 Rounds - Why the Threshold Is Hit
- Patella starts to drift laterally
- It now presses against the lateral facet of the trochlea at an abnormal angle
- All the compressive force shifts to the medial patellar facet - which already has full thickness cartilage loss (Grade III, as confirmed in her MRI)
- Sudden - the transition from "muscle barely coping" to "bone getting impacted" is abrupt
- Sharp/pin-prick - bone nociceptors fire in a sharp, focal pattern unlike the dull ache of inflamed soft tissue
- Forces her to stop - it's a protective reflex - the nociceptor signal is intense enough to override voluntary walking
Why Specifically ANTERIOR Knee?
- Pre-patellar/peri-patellar - consistent with what her orthopaedic notes say ("Pain at Rt knee - more in walking at anterior pre-patellar region")
- Not medial (meniscus pain is typically medial joint line)
- Not posterior (posterior capsule pain is deep and achy, not pin-prick)
Why She Can Walk Again After Resting?
- VMO partially recovers from fatigue
- Patellar tracking is restored
- Synovial fluid redistributes
- Inflammatory mediators dilute/clear
- Subchondral bone is no longer being impacted
Visual Reference

Summary Table
| Factor | What Happens After 7-8 Rounds |
|---|---|
| VMO fatigue | Patella drifts lateral → abnormal loading on medial facet |
| Cartilage Grade III | Thin/absent buffer → subchondral bone exposed to impact |
| Subchondral bone nociceptors | Fire sharply when impacted → pin-prick sensation |
| Inflammatory mediators | Accumulate with repetitive load → lower pain threshold |
| Synovial fluid | Displaced from contact zone → increased friction |
| Net result | Sudden, sharp, anterior knee pain forcing her to stop |
Clinical Implication for Physio
- VMO strengthening is the priority - terminal knee extensions, inner range quads, step-ups
- Patellar taping (McConnell) - medially directed tape reduces lateral drift even when VMO is fatigued, allowing her to walk more rounds pain-free
- Activity modification - keep walking rounds below her pain threshold (5-6 rounds for now), gradually build up as VMO strengthens
- Ice after walking - reduces post-activity inflammatory mediator accumulation
So for how much time she will face this pain as already is been 3 week 1st it comes in 2 round now its 8 round
This Is a Positive Sign - She Is Already Improving
What Is Actually Happening Physiologically
Why She Could Only Do 2 Rounds Initially
- VMO was very weak and deconditioned
- Inflammatory mediators were at peak levels in the joint
- Synovial fluid was thick/sluggish from disuse
- Patella was malaligning very early in activity
Why She Can Now Do 8 Rounds at Week 3
- VMO is getting stronger - it is now taking 4x longer to fatigue
- Inflammatory load in the joint has reduced (medications + SWD + rest working)
- Cartilage is getting better lubrication as she moves more regularly
- Her pain threshold has risen as acute inflammation settles
Expected Progression Timeline
| Timeframe | Expected Walking Tolerance | What's Happening |
|---|---|---|
| Now (Week 3) | 8 rounds before pain | VMO partially strengthened, inflammation reduced |
| Week 6 | 15-20 rounds | VMO significantly stronger, patellar tracking improved |
| Week 10-12 | 30+ min continuous walking | Near-normal VMO endurance, good patellar tracking |
| Month 4-6 | Walking without significant limitation | Maintained with regular home exercises |
Will the Pain Disappear Completely?
✅ The "fatigue threshold" pain will largely resolve
⚠️ She will likely always have a "ceiling"
❌ The underlying cartilage does not regenerate
- Strengthen the muscles that compensate for the cartilage loss
- Improve patellar tracking so the remaining cartilage is loaded more evenly
- Reduce inflammation that amplifies pain signals
Key Predictor - Her Current Rate of Progress Is Excellent
If the patient's walking tolerance doubles in 3 weeks, they are on a good trajectory.
- She is compliant with treatment
- The joint is responding well
- Muscle recruitment is improving
What Will Slow Progress or Cause Setbacks
- Overwalking - if she pushes past pain thinking "more is better," it flares inflammation and sets back by 1-2 weeks
- Skipping exercises on non-physio days - VMO strengthening requires consistent daily exercise, not just clinic visits
- Sitting in low chairs / squatting - increases patellofemoral compression and undoes daily gains
- Weight - even 2-3 kg weight loss meaningfully reduces patellofemoral load
Simple Message for the Patient
Best knee exercise for her after 3 week and best vmo exercise for her
"VMO" AND "patellofemoral" AND "exercise" AND "strengthening"
"vastus medialis" AND "patellofemoral pain" AND "exercise" AND "hip abduction"
"patellofemoral pain" AND "hip strengthening" AND "quadriceps"
VMO vastus medialis oblique exercise terminal knee extension inner range quad strengthening
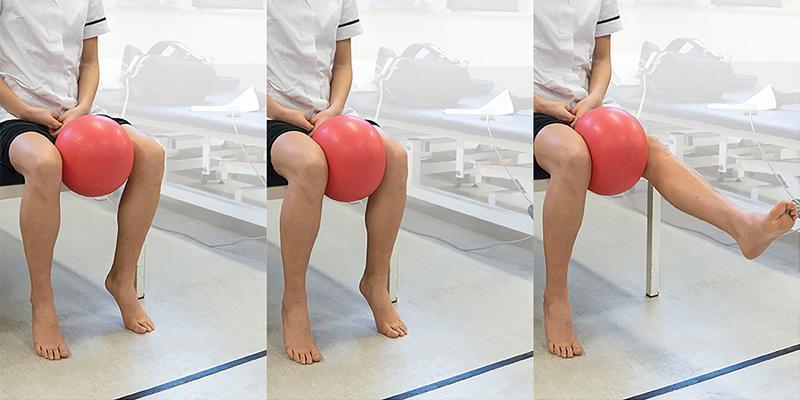
This sequence of clinical photographs demonstrates a rehabilitative exercise for strengthening the vastus medialis oblique (VMO) muscle, often prescribed for synovial plica syndrome or patellofemoral pain. The patient is shown in a seated position on the edge of a clinical plinth with hips and knees at approximately 90 degrees of flexion. A soft medicine ball is placed between the knees. The exercise progression involves three phases: (1) Initial seated posture with feet flat on the floor; (2) Active adduction of the hips to compress the ball, stabilizing the knee joint; and (3) Unilateral knee extension while maintaining adductor tension on the ball. This combination of hip adduction and terminal knee extension specifically targets the VMO to improve patellar tracking and medial quadriceps strength. The visual sequence serves as an educational guide for physical therapy protocols, emphasizing controlled movement and specific muscle recruitment in the management of anterior knee compartment pathologies.
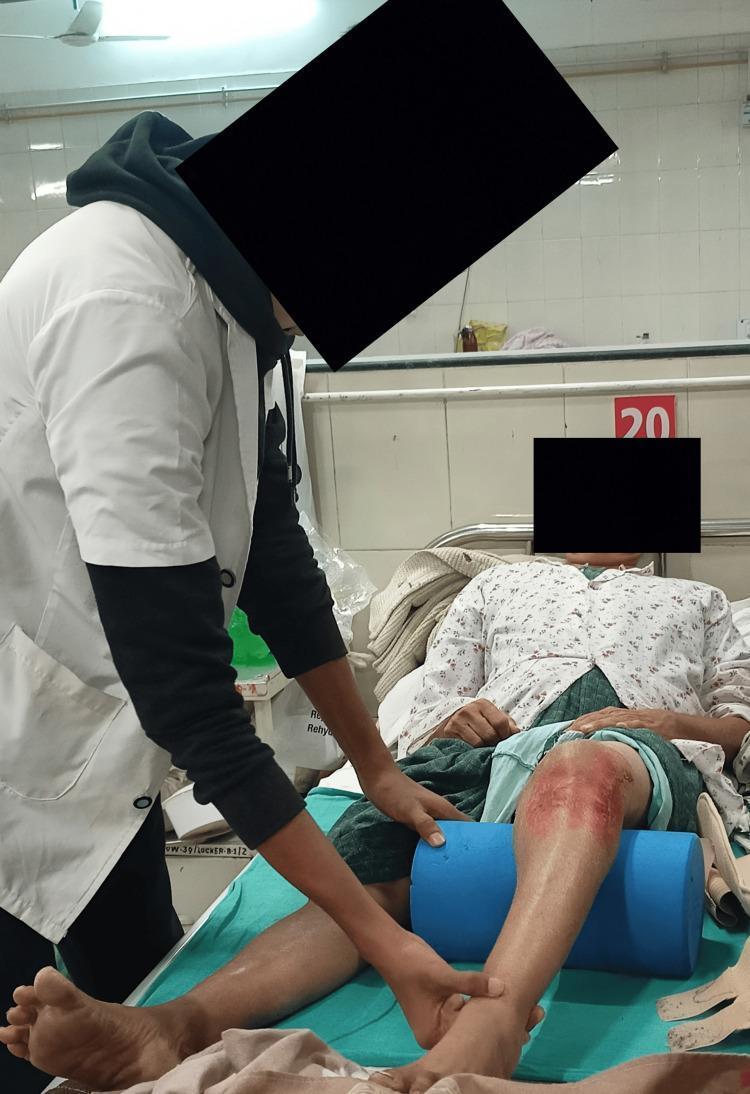
This clinical photograph illustrates a procedural rehabilitation technique for strengthening the vastus medialis oblique (VMO) muscle. A patient is depicted in a supine position on a hospital bed with a cylindrical blue foam bolster placed underneath the popliteal fossa of the right knee. The patient's right lower extremity shows visible signs of trauma, specifically a large, erythematous area of skin abrasion or friction burn across the anterior knee and proximal tibia. A clinician, dressed in a white medical coat, is shown providing manual assistance and tactile feedback, with one hand stabilizing the knee over the bolster and the other supporting the distal leg/ankle to facilitate terminal knee extension or isometric quadriceps contraction. This visual serves as a demonstration of post-injury physical therapy and musculoskeletal rehabilitation following soft tissue trauma or ligamentous injury, such as a posterolateral corner (PLC) injury. The clinical focus is on the correct positioning of props and clinician-led guidance for therapeutic exercise in an acute or subacute inpatient setting.
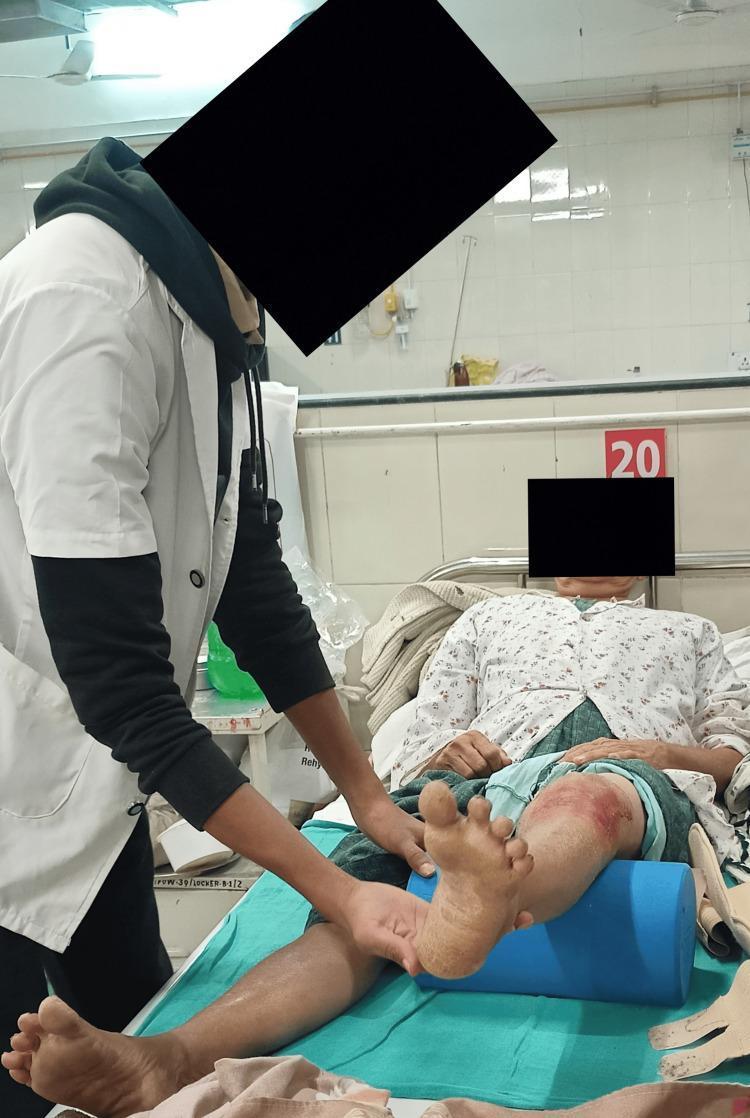
This clinical photograph depicts a post-traumatic physical therapy or rehabilitation session in a hospital setting. A patient is positioned supine on a medical bed, demonstrating a vastus medialis oblique (VMO) strengthening exercise. The right lower extremity is active, with the knee supported by a blue cylindrical foam bolster, facilitating terminal knee extension or isometric contraction. The right knee exhibits a large, erythematous, and abraded area consistent with recent skin trauma or friction injury. A clinician, wearing a white coat and stethoscope, provides tactile guidance and stabilization at the patient's ankle and foot. The anatomical focus is on the quadriceps mechanism and knee joint rehabilitation. This procedural image illustrates phase-wise rehabilitation following knee injuries, such as posterolateral corner (PLC) injuries or tibial plateau contusions, where restoring VMO strength is critical for patellofemoral stability and joint mechanics.
Best Exercises for Geeta at Week 3+
Ground Rules for This Phase
- Pain during exercise should stay ≤ 3/10 - if it crosses that, stop
- No deep knee flexion beyond 60° (protects meniscus + patellofemoral joint)
- Avoid full open-chain knee extension machine (high patellofemoral stress)
- Focus: VMO endurance, not just strength - she needs the muscle to last through walking
PART 1 - Best VMO Exercises (Most Important for Her)
🥇 #1 - Terminal Knee Extension (TKE) with Theraband
- Stand with Theraband looped behind the right knee, anchored to a wall/door in front
- Start with knee slightly bent (20-30°)
- Slowly straighten the knee fully, squeezing the quad hard at the end
- Hold 2 seconds fully straight, slowly return
- 3 sets × 15 reps, twice daily
🥇 #2 - Inner Range Quad (IRQ) / Short Arc Quad
- Lie on back (or sit)
- Place a rolled towel/bolster under the right knee (creating ~30° bend)
- Lift the heel off the bed by straightening the knee fully
- Squeeze the quad hard, hold 5 seconds at the top
- Slowly lower
- Feel the VMO (inner lower quad) contract - place her hand on it to feel it fire
- 3 sets × 12 reps
🥇 #3 - VMO Ball Squeeze + Knee Extension
- Sit at edge of chair/bed, knees at 90°
- Place a soft ball or rolled pillow between the knees
- Squeeze knees together (activating adductors + VMO) and hold that squeeze
- While squeezing, slowly straighten one knee fully
- Hold 3 seconds, slowly return
- 3 sets × 12 reps each leg
#4 - Straight Leg Raise with External Rotation
- Lie on back, left knee bent (foot flat)
- Turn right foot outward 30-45° (external rotation)
- Tighten quad completely (lock the knee), then raise leg to 45°
- Hold 3 seconds at top, slowly lower
- The external rotation preferentially fires VMO over VL (vastus lateralis)
- 3 sets × 15 reps
PART 2 - Best Overall Knee Exercises at Week 3
#5 - Mini Wall Squat (0-40°)
- Stand with back against wall, feet 30 cm from wall, shoulder-width apart
- Feet turned out slightly (15-20°) - this increases VMO activation
- Slowly slide down to only 30-40° knee bend - do NOT go deeper
- Hold 10 seconds, slide back up
- 3 sets × 10 holds
#6 - Step-Up (Low Step - 10 cm)
- Use a low step (a thick book, doorstep, or 10 cm platform)
- Step up with right foot leading, bring left foot up, step down slowly
- The slow eccentric lowering (3-4 seconds coming down) is the most therapeutic part
- 3 sets × 10 reps each side
#7 - Hip Abductor Strengthening (Side-Lying Leg Raise)
- Lie on left side, body in straight line
- Raise right leg to 45°, hold 2 seconds, slowly lower
- Keep toes pointing slightly downward (not toward ceiling) - this targets gluteus medius
- 3 sets × 15 reps
#8 - Clamshell
- Lie on side, hips bent to 45°, knees bent to 90°
- Keep feet stacked together
- Rotate top knee upward (like a clamshell opening) without rolling pelvis
- Hold 2 seconds at top, slowly return
- Can add Theraband around thighs to progress
- 3 sets × 15 reps
#9 - Standing Calf Raises
- Stand at kitchen counter for support
- Rise up on both toes slowly, hold 2 seconds, slowly lower
- Progress to single leg as tolerated
- 3 sets × 15 reps
#10 - Hamstring Curl (Prone)
- Lie face down
- Bend right knee slowly, bringing heel toward buttock to about 90° only
- Hold 2 seconds, slowly lower
- Can progress with Theraband around ankle
- 3 sets × 12 reps
Full Weekly Programme at Week 3
| Exercise | Sets × Reps | When | Priority |
|---|---|---|---|
| TKE with Theraband | 3 × 15 | Morning + Evening | ⭐⭐⭐ |
| Inner Range Quad | 3 × 12 | Morning | ⭐⭐⭐ |
| VMO Ball Squeeze + Extension | 3 × 12 | Evening | ⭐⭐⭐ |
| SLR with external rotation | 3 × 15 | Morning | ⭐⭐ |
| Mini Wall Squat (0-40°) | 3 × 10 holds | Morning | ⭐⭐ |
| Step-Up 10 cm | 3 × 10 | Evening | ⭐⭐ |
| Side-lying hip abduction | 3 × 15 | Evening | ⭐⭐⭐ |
| Clamshell | 3 × 15 | Morning | ⭐⭐ |
| Calf raises | 3 × 15 | Evening | ⭐ |
| Prone hamstring curl | 3 × 12 | Evening | ⭐⭐ |
| Walking | Within 8-round limit | Daily | ⭐⭐⭐ |
Progression Rule for Next 3 Weeks
When she can do all 3 sets comfortably with no pain for 3 consecutive days, increase either reps by 5 OR add light resistance (Theraband). Never increase both at the same time.