tibialis posterior tendon transfer for foot drop
"tibialis posterior" AND "tendon transfer" AND "foot drop"
tibialis posterior tendon transfer foot drop technique outcomes 2024
tibialis posterior tendon transfer foot drop surgical technique
tibialis posterior tendon transfer foot drop technique outcomes complications
Tibialis Posterior Tendon Transfer for Foot Drop
Overview
Anatomy Relevant to the Transfer
- Origin: posterior tibia and interosseous membrane
- Insertion: navicular tuberosity, cuneiforms, cuboid, metatarsal bases 2–4
- Innervation: tibial nerve (L4–S1) — preserved in peroneal nerve palsy
- Function: plantarflexion + inversion; primary driver of hindfoot varus when antagonists are paralysed
- In foot drop, the unopposed TP pulls the foot into equinovarus; removing it from its insertion also eliminates this deforming force
Prerequisites / Patient Selection
| Criterion | Requirement |
|---|---|
| Donor muscle strength | TP must be MRC grade ≥4 (grade 5 preferred) |
| Passive range of motion | Full passive dorsiflexion required — rigid equinovarus must be corrected first |
| Flexible deformity | No fixed bony deformity (may need tendon releases/osteotomy first) |
| Nerve recovery unlikely | Consider after failed nerve repair, or when nerve gap is too long (e.g., >6 cm grafts → only 38% recovery) or duration of paralysis exceeds expected reinnervation window |
| Cerebral palsy | EMG must confirm TP fires in swing phase — if it fires only in stance phase, the transfer will not produce active dorsiflexion |
| Skin/soft tissue | Adequate coverage over proposed routes |
From Rockwood and Green's Fractures in Adults, 10th ed.: "In view of the poorer results for those found to have longer nerve defects, early transfer of the tibialis posterior tendon at the ankle may be recommended rather than nerve repair."
Surgical Technique
Step 1 — Tendon Harvest
- Medial incision at the ankle/foot to detach TP at its navicular insertion; take maximum tendon length (a periosteal tongue can be harvested to facilitate fixation)
- Second medial incision proximal to the medial malleolus to retrieve the tendon from its sheath and deliver it proximally
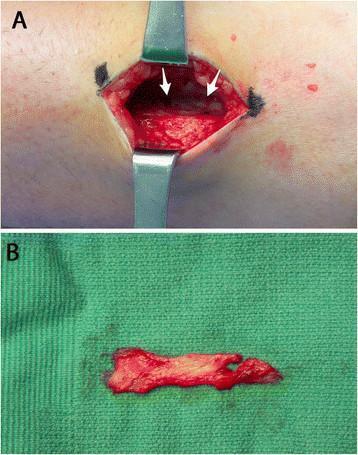
Step 2 — Routing (the most debated step)
| Route | Description | Characteristics |
|---|---|---|
| Interosseous membrane (IOM) route | Tendon passed directly through a window in the interosseous membrane from posterior to anterior compartment | More physiological line of pull; shorter path; currently preferred; considered gold standard |
| Circumtibial route | Tendon taken subcutaneously around the medial tibial border to the dorsum | Longer moment arm; avoids membrane dissection; more superficial; can limit ankle motion |
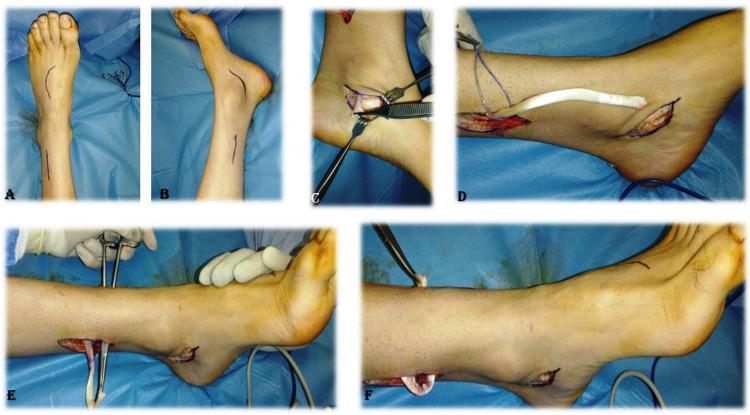
Step 3 — Fixation at the Dorsum of the Foot
- Insertion site: Most commonly the lateral cuneiform or second/third cuneiform complex (dorsal surface); some surgeons use the extensor retinaculum or split the tendon to multiple insertions
- Lateral cuneiform insertion → provides balanced dorsiflexion with slight eversion (corrects equinovarus)
- Medial cuneiform insertion → more eversion-neutral but risks varus undercorrection
- Fixation methods:
- Tendon-to-bone: interference screw or bone tunnel — increasingly popular; provides reliable fixation
- Tendon-to-tendon: weave into tibialis anterior or extensor tendons — traditional technique
- Tension: Ankle held at 10° dorsiflexion under appropriate tension at time of fixation; tension too loose → residual drop; too tight → equinus
Step 4 — Concomitant Procedures
- Achilles tendon lengthening (TAL): Required if passive dorsiflexion < 20° due to triceps surae contracture from long-standing equinus
- Peroneus longus to brevis transfer (stirrup-plasty): Added when superficial peroneal nerve is also involved (e.g., sciatic or high common peroneal palsy) to correct eversion deficit — Archives of Orthopaedic and Trauma Surgery 2025
- Correction of any fixed deformity before tendon transfer
Postoperative Protocol
- Short leg cast with ankle in slight dorsiflexion for 6 weeks
- Gradual weight bearing from 6–8 weeks
- Physiotherapy: gait retraining and re-education of TP muscle firing in swing phase (neuromotor reprogramming)
- AFO may be used during rehabilitation until active dorsiflexion is adequate
Outcomes
- Most frequently reported technique: TP transfer through interosseous membrane
- Significant increases in Stanmore scores and AOFAS scores postoperatively
- Reduction in AFO use postoperatively
- Patient satisfaction significantly improved
- Strength typically reaches MRC grade M4 (~82%) — approximately one-third of contralateral side by dynamometry, but functionally sufficient to lift foot against gravity
- The tenodesis effect provides additional functional benefit even when active dorsiflexion is incomplete
- Choice of surgical technique (IOM vs. circumtibial, tendon-to-bone vs. tendon-to-tendon) did not significantly affect overall outcome in pooled analysis
- IOM route with lateral cuneiform fixation: satisfactory restoration of active ankle dorsiflexion, reduced need for orthotic support, no significant effect on foot arch integrity
- Modified Barr's: 93% achieved normal dorsiflexion range; no varus deformity, no hypercorrection
- Classic technique: 46% achieved normal range; 26.7% varus, 33% hypercorrection
- Modified Barr's was superior
Complications
| Complication | Notes |
|---|---|
| Residual foot drop / insufficient dorsiflexion | Incorrect tensioning, inadequate muscle grade |
| Varus deformity | More common with medial insertion; classic Barr's technique |
| Hypercorrection / valgus | Over-tensioning or lateral insertion |
| Equinovarus recurrence | Missed Achilles contracture |
| Wound complications | Multiple incisions required |
| Loss of push-off power | TP no longer available as plantarflexor (usually clinically tolerated) |
| Neurovascular injury | IOM window dissection; risk to anterior tibial artery |
Special Situations
Cerebral Palsy
Duchenne Muscular Dystrophy
Long peroneal nerve gaps (post-knee dislocation/trauma)
Combined nerve + tendon transfer
Key Evidence
- Systematic review of tendon transfer in foot drop — Stevoska et al., Arch Orthop Trauma Surg 2023 [PMID: 34524486] — 37 studies confirming TP transfer through IOM is the most common and effective technique
- TP transfer in cerebral palsy — review — McKeithan & Whitaker, Orthop Clin North Am 2022 [PMID: 35725039]
Textbook sources: Gray's Anatomy for Students; Rockwood and Green's Fractures in Adults, 10th ed.; Miller's Review of Orthopaedics, 9th ed.
physiotherapy protocol for the same
"tibialis posterior" AND "tendon transfer" AND rehabilitation
physiotherapy rehabilitation protocol tibialis posterior tendon transfer foot drop phases exercises
physiotherapy rehabilitation protocol tibialis posterior tendon transfer foot drop phases exercises neuromuscular retraining
"foot drop" AND rehabilitation AND gait AND "peroneal nerve"
tibialis posterior tendon transfer foot drop physiotherapy neuromuscular retraining biofeedback gait proprioception phases
Physiotherapy Protocol: Tibialis Posterior Tendon Transfer for Foot Drop
Core Principles
- Protect the healing tendon-bone interface (most vulnerable in the first 6–12 weeks)
- Re-program the transferred muscle to fire at the correct phase of gait
- Restore ROM, strength, and proprioception progressively
- Normalize gait pattern — eliminate compensatory strategies developed during foot drop
- Full recovery takes 9–12 months
Phase 1 — Immobilisation & Wound Healing (Weeks 0–6)
Goals
- Wound healing and oedema control
- Protection of tendon fixation site
- Prevent DVT, maintain proximal strength
- Patient education
Immobilisation
- Weeks 0–2: Below-knee plaster cast (or backslab), ankle in slight plantarflexion/neutral — strictly non-weight-bearing (NWB)
- Weeks 2–6: Serial cast changes (if needed) progressing toward neutral dorsiflexion OR transition to a VACOcast/pneumatic walker boot at week 2 after suture removal
- Boot worn at all times including in bed (except for exercises and showering seated)
Physiotherapy Interventions
- Positioning: Limb elevation "55 minutes in the hour" to control oedema
- Toe and digit exercises: Active toe flexion/extension to encourage circulation and prevent stiffness
- Proximal exercises (all non-weight-bearing):
- Hip: clam exercises, side-lying hip abduction, straight leg raises, gluteus maximus, bridging
- Knee: SLR, theraband press, hamstring curls
- Core: abdominal recruitment, bridging, ball reach, arm pulley PNF patterns
- Cryotherapy/elevation for swelling management
- No ankle active or passive ROM until week 3 (to protect fixation)
- From week 3 onward (in boot): gentle active ROM — ankle plantar/dorsiflexion, toe flexion/extension — 2× daily × 30 reps
- Scar massage from 3 weeks post-op (once wounds healed)
- Gentle stationary cycling in the boot from week 3–4 (no resistance)
- DVT prophylaxis as per surgical team (e.g., aspirin, LMWH)
Important Precautions (Phase 1)
- No resistive activation of the tendon transfer
- No stretching of the transfer
- Avoid prolonged standing or walking
- NWB strictly for first 6 weeks in most protocols
Phase 2 — Early Mobilisation & Tendon Activation (Weeks 6–12)
Goals
- Progress to full weight-bearing in boot → shoes
- Initiate biofeedback-guided tendon activation (the most critical step)
- Normalise gait pattern
- Oedema/pain control
Weight-Bearing Progression
- Week 6: Begin partial weight-bearing in boot; progress to full weight-bearing by week 8
- Transition out of boot into supportive shoes with possible insole around weeks 8–10
- Use ankle brace during daytime after boot removal
Neuromotor Activation — Key Priority
| Technique | Method |
|---|---|
| EMG biofeedback | Surface electrodes over TP muscle belly; patient learns to "think dorsiflexion" while watching real-time EMG trace |
| Mental imagery | Visualise lifting the foot up before attempting movement |
| Mirror therapy | Watching contralateral foot dorsiflex can prime motor cortex |
| Facilitation in isolation | Initially practice in non-weight-bearing, relaxed sitting — avoid substitution by tibialis anterior |
| Verbal/tactile cueing | Therapist facilitates dorsiflexion by stroking dorsum of foot, guiding motion |
- Seated, foot off ground → attempt dorsiflexion while thinking "pull foot up" (original TP firing cue: think inversion to initiate)
- Standing, partial weight-bearing → activate in swing
- Slow walking with deliberate dorsiflexion cue
- Automatic integration into gait
Key tip: In the early phase, cueing the patient to "invert the foot" rather than "dorsiflex" can facilitate the transfer, as the motor cortex still associates this muscle with inversion. Over time, new motor engrams replace the original pattern.
ROM Exercises
- Gentle active ankle ROM: plantarflexion/dorsiflexion, eversion, toe flexion/extension
- Gastroc/soleus stretching (do not overstretch the tendon transfer itself)
- Joint mobilisation: subtalar, midtarsal glides
Strengthening (weeks 6–12)
- No resistance against the tendon transfer until week 12
- Gentle gastroc/soleus strengthening
- Tibialis anterior activation (separate from transfer)
- Intrinsic foot exercises: towel scrunches, marble pick-up
- Continue hip, knee, and core work
- Muscle electrical stimulation (NMES) to invertors/evertors as needed
Gait Retraining
- Normalise heel–toe gait pattern
- Correct compensatory strategies: hip hiking, circumduction, knee hyperextension
- Use parallel bars initially, progressing to open surfaces
- Treadmill at slow speed with visual feedback
Phase 3 — Strengthening & Functional Integration (3–6 Months)
Goals
- Full ROM in all planes
- MRC grade 4–5 in all muscles
- Normal walking in standard footwear, no aids
- Begin sport/work-specific demands
Strengthening Progression
| Exercise | Notes |
|---|---|
| Resisted active ROM — all planes | Theraband: dorsiflexion, plantarflexion, inversion, eversion |
| Double heel raises (bilateral) | Begin at ~4–5 months |
| Seated BAPS board | Proprioceptive + ROM |
| Leg press in boot/shoes | Closed chain |
| Knee extension, hamstring curl machines | Address overall limb strength |
| Intrinsic strengthening | Toe flexion with theraband, towel scrunches |
- Start closed chain (weight-bearing) for functional carry-over
- Add open chain (non-weight-bearing resisted) from 3 months onward
Proprioception & Balance
- Double leg stance on foam/wobble board
- Single leg stance on even surface (begin ~4 months)
- Single leg stance with perturbation (arm/leg resistance)
- BAPS board, Sissel disc
- Progress from stable → unstable surfaces
Gait Retraining (Advanced)
- Treadmill with speed/incline progression
- Stair climbing and descent
- Uneven surfaces, ramps
- Elliptical trainer, exercise bicycle
- Observe and correct any residual deviations: pelvic drop, circumduction, excessive hip flexion
Modalities
- Cryotherapy post-exercise for residual swelling
- Ultrasound/deep tissue massage for oedema
- TENS for pain if needed
Phase 4 — Return to Full Activity (6–12 Months)
Goals
- Grade 5/5 strength in all muscle groups (including inversion — note: TP is now the dorsiflexor, so plantarflexion strength will be slightly reduced — typically well tolerated)
- Single leg heel raise on operated side
- Jogging, running, sport-specific activities
- Return to work
Criteria to Progress to Running
- Full painless ROM
- Single leg stance ≥ 30 seconds without compensations
- Single leg heel raise × 10
- No oedema after activity
- MRC ≥ 4+ in dorsiflexion
Exercise Progression
- Jogging → running (from ~14 weeks if transfer healed)
- Stair climbing with reciprocal gait
- Lunges, squats with resistance
- Plyometrics: hopping, bench jumps (from ~14–16 weeks)
- Sport cord drills, agility ladders
- PNF diagonal patterns for lower limb
- Work-specific or sport-specific training from 16 weeks onward
Proprioception (Advanced)
- Single leg stance on wobble board/Fitter
- Dynamic surface challenges with dual tasks
- Perturbation training
Summary Timeline
| Phase | Time | Immobilisation | Weight-Bearing | Key Focus |
|---|---|---|---|---|
| 1 | 0–6 weeks | Cast → Boot | NWB → partial | Wound healing, proximal strengthening |
| 2 | 6–12 weeks | Boot → Shoes | Partial → Full | Tendon re-education, biofeedback, gait initiation |
| 3 | 3–6 months | Shoes | Full | Strengthening, proprioception, normal gait |
| 4 | 6–12 months | None | Full | Return to sport/work, plyometrics |
Red Flags / Precautions Throughout
| Concern | Action |
|---|---|
| Increasing pain + swelling | Reduce activity; rule out infection, DVT, hardware failure |
| No tendon activation by 10 weeks | Reassess with EMG; consider NMES or biofeedback intensification |
| Varus/valgus deformity developing | Alert surgeon; check tension/fixation |
| Wound dehiscence | Suspend PT; surgical review |
| Achilles tightness recurring | Resume gastrocnemius stretching (not of transfer) |