
Minimally invasive surgery and port placement in depth
laparoscopy AND port placement
SAGES guidelines laparoscopic access port placement safe entry
laparoscopic abdominal port placement diagram safe entry anatomy
https://www.sages.org/publications/guidelines/guidelines-for…
- Fundamentals of minimally invasive surgery (MIS): laparoscopy, thoracoscopy, robotic surgery, and procedural workflow
- Equipment: laparoscope, light source, insufflator, trocars, energy devices, instruments, and specimen retrieval
- Operating-room setup and patient positioning
- Creating pneumoperitoneum and primary abdominal entry: Veress, open Hasson, optical/direct entry
- Port-placement geometry: camera position, triangulation, instrument angles, spacing, ergonomics, assistant ports
- Procedure-specific layouts: cholecystectomy, appendectomy, hernia repair, colorectal, upper GI, pelvic, urologic, bariatric, thoracoscopic, and robotic
- Adjustments for obesity, prior operations/adhesions, pregnancy, large masses, pediatrics, and altered anatomy
- Access-related complications, prevention, recognition, and closure of port sites
Choose the primary focus for the detailed note. · What level should it target?
- Fundamentals of minimally invasive surgery (MIS): laparoscopy, thoracoscopy, robotic surgery, and procedural workflow
- Equipment: laparoscope, light source, insufflator, trocars, energy devices, instruments, and specimen retrieval
- Operating-room setup and patient positioning
- Creating pneumoperitoneum and primary abdominal entry: Veress, open Hasson, optical/direct entry
- Port-placement geometry: camera position, triangulation, instrument angles, spacing, ergonomics, assistant ports
- Procedure-specific layouts: cholecystectomy, appendectomy, hernia repair, colorectal, upper GI, pelvic, urologic, bariatric, thoracoscopic, and robotic
- Adjustments for obesity, prior operations/adhesions, pregnancy, large masses, pediatrics, and altered anatomy
- Access-related complications, prevention, recognition, and closure of port sites
One by one give all content without my permission generate all
- MIS fundamentals and advantages/limitations
- Equipment and operating-room setup
- Patient positioning and ergonomic principles
- Pneumoperitoneum and safe primary entry
- Core principles of abdominal port placement and triangulation
- Standard laparoscopic port layouts by procedure
- Robotic port placement principles
- Modifications for obesity, prior surgery, pregnancy, pediatrics, and altered anatomy
- Access and port-related complications
- Port-site closure and postoperative care
Start Part 1: MIS fundamentals in depth
laparoscopy AND perioperative outcomes
SAGES fundamentals laparoscopic surgery pneumoperitoneum insufflation patient safety
https://www.sages.org/publications/guidelines/guidelines-for…
Part 1: Minimally Invasive Surgery Fundamentals
Scope: This is an educational overview for medical and surgical trainees. It explains the principles underlying minimally invasive surgery, not a substitute for supervised operating-room training, simulation, credentialing, or local protocols.
1. What is minimally invasive surgery?
Small access wounds, full operation.
Main forms of MIS
| Approach | Access route | Typical examples |
|---|---|---|
| Laparoscopy | Abdominal or pelvic cavity | Cholecystectomy, appendectomy, colectomy, hernia repair |
| Thoracoscopy / VATS | Pleural cavity through intercostal spaces | Lung resection, pleural biopsy, sympathectomy |
| Robotic surgery | Usually laparoscopic or thoracoscopic ports | Pelvic, colorectal, urologic, upper GI procedures |
| Endoluminal / endoscopic procedures | Natural lumen, such as mouth, anus, urethra | Endoscopic mucosal resection, ERCP, transanal procedures |
| Natural-orifice surgery | Natural orifice with internal transluminal access | Selected transvaginal or transgastric techniques |
| Single-incision laparoscopy | Several instruments through one umbilical incision | Selected cholecystectomy, appendectomy, gynecologic cases |
| Hand-assisted laparoscopy | Ports plus a sealed hand-access incision | Selected colectomy, splenectomy, complex abdominal work |
2. The central difference between open and laparoscopic surgery
- Making an incision
- Retracting the abdominal wall and viscera
- Looking directly at the field
- Using hands and conventional instruments
- Entering the cavity with ports
- Insufflating carbon dioxide to create working space
- Viewing the operative field through a laparoscope and monitor
- Manipulating tissue with long instruments through fixed points in the abdominal wall
The laparoscopic environment
- External hand movement is reversed internally around the port fulcrum.
- Small changes in port position can substantially alter the internal angle of approach.
- Poor port placement cannot always be corrected by better instrument technique.
- A safe operation requires a planned camera view, instrument path, retraction strategy, and exit plan.
3. Essential objectives of MIS
- Correct indication and patient selection
- Adequate exposure
- Accurate identification of anatomy
- Safe tissue dissection
- Hemostasis
- Control of contamination
- Completion of reconstruction or resection
- Specimen extraction when required
- Safe closure
- Appropriate conversion to open surgery when needed
Conversion is not failure
- Uncontrolled bleeding
- Inability to identify critical anatomy
- Dense adhesions or distorted anatomy
- Injury requiring repair
- Inadequate exposure
- Technical inability to safely complete the planned operation
- Physiologic intolerance of pneumoperitoneum or positioning
4. Why MIS can benefit patients
- Smaller access incisions
- Less postoperative wound pain
- Reduced wound morbidity in many operations
- Earlier mobilization
- Faster return of functional recovery
- Shorter length of stay for many procedures
- Faster return to normal activity or work
- Improved cosmetic outcome
- Less blood loss in selected operations
5. Limits and disadvantages of MIS
A. Technical limitations
- Long, rigid instruments
- A limited tactile sense compared with direct manual surgery
- A two-dimensional view with many standard systems
- Reduced depth perception
- The fulcrum effect
- Restricted range of movement
- Limited ability to change the line of approach after ports are placed
- Potential external or internal instrument collision
B. Physiologic limitations
- Ventilation
- Venous return and cardiac output
- Carbon dioxide elimination
- Renal and splanchnic perfusion
- Intracranial and intraocular pressure in relevant contexts
C. System limitations
- Loss of pneumoperitoneum
- Camera fogging or contamination
- Failure of the light source, camera, monitor, insufflator, energy device, or suction-irrigation system
- Wrong instrument length
- Poor trocar position
- Failure to anticipate specimen extraction
- Inadequate communication between surgeon, anesthesia, and nursing staff
6. Basic components of a laparoscopic system
- Laparoscope
- Light source
- Camera
- Monitor
A. Laparoscope
- Diameter: commonly 5 mm or 10 mm
- Viewing angle: 0-degree or 30-degree, with other angles available
- Connection to a light cable
- Connection to a camera head or an integrated distal camera
0-degree laparoscope
- A direct, forward-looking view is adequate
- Orientation is straightforward
- The operator wants simple visual geometry
30-degree laparoscope
- Looks around structures
- Gives more flexible visualization in recesses
- Can improve the view over or under organs
- Helps when placing secondary ports because rotating the lens away from the working field can provide a panoramic view of the abdominal wall
B. Camera and monitor
- Neck rotation
- Shoulder elevation
- Fatigue
- Slower and less precise movement
- Loss of visual orientation
C. Light source and light cable
- Adequate light output
- A clean lens
- Intact light cable
- Correct white balance and focus
- Avoidance of excessive heat at the cable tip
D. Insufflator and carbon dioxide tubing
- An adequate CO₂ supply and backup supply
- Proper tubing connection
- Functional alarms
- Correct large-cavity/laparoscopy setting
- Function of valves and stopcocks
- Ability to troubleshoot leaks
E. Trocars and cannulas
| Port size | Typical uses |
|---|---|
| 5 mm | Graspers, dissectors, scissors, small energy devices |
| 10-12 mm | Camera, clip applier, stapler, larger energy device, specimen retrieval |
| 15 mm or larger | Selected stapling, bariatric, or specimen-related needs |
F. Working instruments
- Atraumatic graspers
- Traumatic graspers where appropriate
- Maryland dissector
- Right-angle dissector
- Laparoscopic scissors
- Needle holder
- Suction-irrigation device
- Clip applier
- Energy device
- Retractor
- Specimen retrieval bag
G. Energy devices
- Monopolar electrosurgery
- Bipolar electrosurgery
- Advanced bipolar vessel-sealing devices
- Ultrasonic devices
- Other hybrid energy devices
7. Pneumoperitoneum: creating the operative workspace
Definition
Why carbon dioxide is used
- Nonflammable
- Highly soluble in blood
- Rapidly eliminated by the lungs
- Compatible with electrosurgery
- Widely available and practical
Typical pressures
8. Physiologic consequences of pneumoperitoneum
A. Respiratory effects
- Reduced lung compliance
- Increased airway pressures
- Reduced functional residual capacity
- Atelectasis risk
- Ventilation-perfusion mismatch
- Increased absorption of CO₂, causing rising end-tidal CO₂ and possible respiratory acidosis if ventilation is not adjusted
B. Cardiovascular effects
- Reduced venous return
- Altered cardiac output
- Increased systemic vascular resistance
- Changes in blood pressure
- Increased cardiac workload in susceptible patients
C. Renal and splanchnic effects
- Renal blood flow and urine output
- Splanchnic blood flow
- Hepatic venous flow
D. Carbon dioxide-related effects
- Hypercapnia
- Respiratory acidosis if ventilation does not compensate
- Sympathetic stimulation
- Tachycardia or hypertension in some patients
- Increased cerebral blood flow, relevant in patients where elevated intracranial pressure is a concern
E. Subcutaneous emphysema and gas tracking
- Long operations
- Multiple ports
- Loose port fit
- Higher insufflation pressure
- Extraperitoneal dissection
- Port displacement
9. Patient position is part of exposure
| Position | Typical purpose | Important concern |
|---|---|---|
| Trendelenburg | Moves bowel cephalad for pelvic exposure | Increased diaphragmatic pressure, facial/airway edema during prolonged steep positioning |
| Reverse Trendelenburg | Moves bowel caudad for upper abdominal exposure | Reduced venous return, sliding risk |
| Right tilt | Often improves left upper quadrant exposure | Pressure-point and securement issues |
| Left tilt | Often improves right upper quadrant exposure | Pressure-point and securement issues |
| Lateral decubitus | Retroperitoneal, renal, adrenal, thoracic procedures | Padding, nerve protection, table flexion, securement |
- Securely positioned for intended table movement
- Padded at pressure points
- Protected from sliding
- Positioned with arms and legs safely
- Checked for access to the airway and IV lines after draping
- Considered in the context of possible conversion to open surgery
10. The fulcrum effect and loss of haptic feedback
Fulcrum effect
Haptic feedback
- Visual tissue deformation
- Color changes
- Instrument response
- Traction-countertraction
- Awareness of instrument tip position
- Controlled movement
- Avoidance of blind force
11. Visual-spatial orientation
- Where the camera is located
- Direction of the camera view
- The horizon
- The relationship between screen direction and patient anatomy
- Which instrument is in which hand
- Whether the camera has rotated
- Whether an organ is being viewed from an expected or reversed perspective
Orientation principles
- Keep the horizon level when possible.
- Identify fixed landmarks early.
- Avoid operating with an uncertain camera orientation.
- Clean the lens before attempting difficult dissection.
- Maintain a view of the active instrument tip.
- Keep non-active instruments visible when they can cause injury.
- Re-establish orientation after changing camera ports or table position.
12. Laparoscopy versus robotic surgery
Conventional laparoscopy
- Surgeon stands at the operating table
- Long rigid instruments
- Usually 2D image, though 3D systems exist
- Fulcrum effect
- Limited instrument articulation
- Direct control of instruments
Robotic surgery
- Surgeon sits at a console
- Usually stereoscopic, magnified 3D visualization
- Wristed instruments with extra degrees of freedom
- Motion scaling and tremor filtering
- Camera controlled from console
- Requires docking, arm spacing, and a plan for emergency undocking
13. Why team coordination matters in MIS
Surgeon
- Indication and operative plan
- Safe access strategy
- Port layout
- Anatomy and dissection
- Decision to add ports, change approach, or convert
Assistant
- Camera control
- Retraction
- Suction-irrigation
- Exposure
- Awareness of instrument collision and port conflict
Scrub professional
- Instrument readiness
- Device compatibility
- Energy-device setup
- Anticipating the operative sequence
Circulating nurse
- Equipment coordination
- Positioning assistance
- Availability of additional equipment and conversion supplies
Anesthesia team
- Monitoring the patient’s physiologic response to pneumoperitoneum and positioning
- Ventilation and CO₂ management
- Hemodynamic support
- Communication regarding intolerance of positioning or insufflation
- Preparing for the possibility of conversion
14. A practical mental framework before an MIS operation
- What is the target anatomy?
- What exposure is required to see it safely?
- What patient position uses gravity to help?
- Where should the camera be placed for the best overview?
- Where must each working instrument enter to obtain the right angle?
- How will retraction be achieved?
- What prior scars, adhesions, hernias, enlarged organs, or altered anatomy may change access?
- What is the extraction site, if a specimen is being removed?
- What is the backup plan if exposure, anatomy, or bleeding becomes unsafe?
Key takeaways
- MIS is an approach that reduces access trauma while preserving the goals of the operation.
- Laparoscopy requires ports, a camera system, long instruments, and a pneumoperitoneum-created workspace.
- CO₂ is the standard insufflation gas because it is nonflammable and highly soluble, but it can affect respiratory and cardiovascular physiology.
- Positioning, gravity, pneumoperitoneum, retraction, and port geometry together determine exposure.
- The fixed port creates a fulcrum effect and reduces tactile feedback.
- Conventional laparoscopy requires deliberate visual-spatial orientation and ergonomic planning.
- Robotic surgery improves some technical limitations but does not remove the need for safe access, sound anatomy, or correct port placement.
- Conversion to open surgery is a safety decision, not an operative failure.
Part 2
laparoscopy AND surgical safety checklist
SAGES laparoscopic preparation troubleshooting guide equipment setup energy safety
laparoscopic operating room equipment setup tower insufflator camera instruments
Part 2: Equipment and Operating-Room Setup for Laparoscopic Surgery
Educational note: Laparoscopic equipment must be used only by trained clinicians within local credentialing, device instructions for use, and operating-room safety systems.
1. Why setup matters
- The procedure and anticipated patient position
- Planned ports and likely need for extra ports
- The camera, scope angle, and port sizes required
- Required energy devices, staplers, clip appliers, sutures, and retrieval bag
- Whether imaging, fluoroscopy, endoscopy, ultrasound, or a robot is required
- The conversion-to-open plan
- The location and availability of blood, suction, and emergency equipment
2. Standard laparoscopic equipment
A. Laparoscopic tower
- Video monitor
- Camera-control unit
- Light source
- CO₂ insufflator
- Recording or image-capture system
- Smoke evacuation or insufflation-management system, where available
- Sometimes an integrated suction-irrigation system
B. Essential equipment checklist
| System | Essential components | Main purpose |
|---|---|---|
| Imaging | Scope, camera head, camera-control unit, light source, monitor | View the operative field |
| Insufflation | CO₂ cylinder, regulator, insufflator, tubing | Create and maintain working space |
| Access | Veress needle, trocar-obturator systems, cannulas, open-access set | Enter and maintain access to the cavity |
| Instruments | Graspers, dissectors, scissors, needle holders, retractors | Manipulate and dissect tissue |
| Hemostasis | Monopolar, bipolar, ultrasonic, or vessel-sealing device; clips; topical agents | Bleeding control and division |
| Suction-irrigation | Suction tubing, canister, irrigation saline, pressure system when required | Clear blood, bile, pus, smoke, and fluid |
| Specimen extraction | Retrieval bag, graspers, wound protector if needed | Contain and remove tissue/specimen |
| Emergency backup | Open laparotomy set, vascular instruments, extra suction, blood products as indicated | Manage conversion or major bleeding |
3. Imaging system
A. Laparoscope
Common diameter options
| Diameter | Typical role | Advantages | Limitations |
|---|---|---|---|
| 5 mm | Smaller camera port, pediatric and selected adult cases | Smaller incision, less wall trauma | Often less light transmission and image quality than larger scopes |
| 10 mm | Standard camera system in many procedures | Good image and light transmission | Requires a larger port |
| 12 mm | Camera and large-instrument access | Compatible with staplers and some advanced instrumentation | Larger fascial defect |
Common viewing angles
| Scope angle | View | Typical use |
|---|---|---|
| 0-degree | Straight ahead | Direct viewing, simple orientation |
| 30-degree | Angled view that rotates with the scope | Most versatile for abdominal work |
| 45-degree | More oblique viewing | Selected upper GI, bariatric, or difficult-angle procedures |
B. Camera head and camera-control unit
- White balancing
- Focusing
- Zoom, if available
- Image enhancement and gain
- Orientation
- High-definition or 4K output
- Recording or still-image capture
Before the case
- Powers on and produces a stable image
- Is white-balanced according to the manufacturer’s instructions
- Focuses correctly
- Has no loose cable connections
- Has a sterile drape, if required
- Produces an image on every monitor required by the surgeon and assistant
C. Light source and light cable
Key points
- Confirm light intensity and automatic/manual settings.
- Inspect the light cable for damage.
- Keep the cable tip controlled. It can become very hot and cause burns if placed on drapes or tissue.
- Clean blood, bile, condensation, and smoke from the lens promptly.
- If image brightness falls, consider light-source setting, cable connection, damaged fiberoptics, camera gain, scope diameter, and the presence of blood or smoke in the field.
D. Monitor position
Principles
- Keep the monitor at or slightly below eye level.
- Avoid persistent neck flexion, rotation, or extension.
- Align the screen with the operative target and camera orientation.
- Provide a separate monitor for the assistant if necessary.
- Ensure all team members can see the image during critical steps.
4. CO₂ insufflation system
A. Components
- Medical-grade CO₂ cylinder
- Cylinder valve and regulator
- Insufflator
- Sterile insufflation tubing
- Stopcock or port connection
- Pressure and flow controls
- Audible and visual alarms
B. Preoperative checks
- CO₂ cylinder contains adequate gas.
- A backup cylinder is available.
- Cylinder valve is opened correctly.
- Tubing is connected, patent, and not kinked.
- Insufflator is in the correct laparoscopy or large-cavity mode.
- Pressure and flow settings are appropriate for the case and patient.
- Alarms function.
- Stopcocks and port valves are understood by the operating team.
Common causes of poor insufflation
| Problem | Likely causes | Initial response |
|---|---|---|
| Inadequate pneumoperitoneum | Empty CO₂ cylinder, open stopcock, disconnected tubing, port leak | Check gas supply, valves, tubing, and port seals |
| Insufflation pressure unexpectedly high | Needle or trocar outside peritoneal space, kinked tubing, patient not adequately relaxed | Stop and reassess access and tubing; communicate with anesthesia |
| Persistent gas leak | Loose port, open valve, damaged seal, oversized skin incision | Secure or replace port, close valve, correct seal |
| Poor workspace | Inadequate pressure, large leak, obesity, adhesions, poor relaxation | Diagnose the cause, not simply increase pressure |
C. Low-pressure and standard-pressure strategies
- Body habitus
- Procedure
- Location of target anatomy
- Patient cardiopulmonary reserve
- Duration of surgery
- Need for hemostasis and exposure
- Team experience
5. Access devices
A. Veress needle
- Correct entry-site selection
- A controlled entry technique
- Confirmation that the needle is intraperitoneal
- Attention to pressure behavior and insufflation response
- A predefined alternative plan if entry is uncertain
B. Trocars and cannulas
- Obturator: the inner penetrating component
- Cannula: the hollow outer sleeve that remains after obturator removal
- Valve system: reduces CO₂ leak while allowing instruments to pass
- Retention system: threaded cannula, balloon, or other mechanism to reduce dislodgement
Trocar types
| Type | General concept | Considerations |
|---|---|---|
| Bladed trocar | Sharp cutting tip | Can enter readily but requires careful technique |
| Bladeless/dilating trocar | Separates or dilates tissue layers | May reduce cutting of the abdominal wall but does not eliminate visceral or vascular injury |
| Optical trocar | Allows visualization during passage | Requires correct use and does not eliminate injury risk |
| Balloon trocar | Retained by an intraperitoneal balloon | Useful in selected open-access sites and may reduce gas leak |
| Hasson cannula | Used with open access | Secured with fascial stay sutures or retention mechanism |
Port size must match the intended instrument
- Instrument diameter
- Need for clip applier or stapler
- Anticipated specimen extraction
- Camera system
- Need for a fascial closure plan
- Procedure-specific requirements
6. Basic laparoscopic instruments
A. Graspers
Atraumatic graspers
- Bowel handling
- Tissue retraction
- Gallbladder or organ traction
- Holding delicate structures
Traumatic graspers
- Firm tissue traction
- Fascia, peritoneum, or tough tissue
- Specimen control
B. Dissectors
- Maryland dissector
- Right-angle dissector
- Curved dissector
- Blunt dissector
- Create tissue planes
- Isolate vessels or ducts
- Pass sutures or clips
- Apply controlled traction-countertraction
- Facilitate blunt and sharp dissection
C. Scissors
- Straight
- Curved
- Monopolar-compatible
- Dedicated to sharp dissection
D. Needle holders
- Strong jaw grip
- Controlled rotation
- Appropriate needle compatibility
- A port position that permits correct needle angles
E. Retractors
- Fan retractors
- Liver retractors
- Flexible retractors
- Graspers used as retractors
- Suspension sutures in selected procedures
F. Clip appliers and staplers
- Bowel
- Vessels
- Mesentery
- Lung tissue in thoracoscopic procedures
- Other structures in procedure-specific settings
- Correct cartridge choice
- Adequate port size
- Correct articulation and tissue alignment
- No unintended tissue within jaws
- Adequate visualization of both sides of the target
- Ability to control bleeding if stapling fails or causes injury
7. Suction-irrigation system
Functions
- Remove blood and clot
- Remove bile, pus, enteric content, or irrigation fluid
- Identify a bleeding source
- Irrigate contaminated areas
- Perform blunt hydrodissection in selected circumstances
- Test for leakage in procedure-specific situations
- Clear lens-adjacent fluid or smoke
Practical principle
If the field is obscured by blood, smoke, or fluid, do not continue blind dissection. Restore visualization first.
Setup checks
- Suction tubing attached to working suction
- Canister functional and not full
- Irrigation saline available
- Connections tight
- Handpiece tested
- Backup suction ready for cases with a meaningful bleeding or contamination risk
8. Energy devices
A. Monopolar electrosurgery
- Active electrode at the surgical instrument
- Patient return electrode, often called a dispersive pad
- Electrosurgical generator
- Electrical current passing through the patient to the return electrode
Uses
- Cutting
- Coagulation
- Dissection
- Spot hemostasis
Risks
- Direct thermal injury
- Insulation failure
- Direct coupling
- Capacitive coupling
- Injury from an active instrument outside the camera view
- Inadequate dispersive-electrode contact
B. Bipolar electrosurgery
- More focused energy delivery
- Useful for controlled vessel coagulation
- Less unintended current pathway than monopolar energy
- Tissue sticking
- Slower division in some settings
- May not seal larger vessels reliably unless using an advanced vessel-sealing system
C. Advanced bipolar vessel-sealing devices
- Mesenteric division
- Omental division
- Vascular pedicles of appropriate diameter
- Tissue dissection with hemostasis
D. Ultrasonic devices
- Reduced electrical current through the patient
- Effective dissection and coagulation in selected tissues
- Less smoke than some monopolar settings
- Thermal spread
- Hot instrument tip after activation
- Injury to adjacent structures
- Activation outside the visual field
E. General energy safety rules
- Use the lowest effective setting.
- Activate only when the active tip is fully visible.
- Know what tissue lies behind the target.
- Avoid activating near bowel, ureter, major vessels, nerves, and thin-walled structures without a clear safety margin.
- Do not activate an instrument while withdrawing it through a trocar.
- Inspect reusable insulated instruments for defects.
- Avoid contact between an activated instrument and another metal instrument unless intended.
- Keep the active electrode clean.
- Confirm function of the dispersive pad for monopolar energy.
- Treat unexplained postoperative pain, fever, peritonitis, or sepsis with concern for a possible delayed thermal injury in the appropriate clinical setting.
9. Smoke evacuation
- Integrated insufflation and smoke-evacuation systems
- Filtered evacuation devices
- Suction through an appropriate filter system
- Controlled release of pneumoperitoneum
- Clearer view
- Fewer interruptions for camera cleaning
- Reduced operating-room contamination
- Better maintenance of pneumoperitoneum with modern systems
10. Specimen retrieval systems
- Gallbladder
- Appendix
- Lymph nodes
- Ovarian cysts or adnexal tissue
- Bowel specimen
- Solid organ tissue
- Tumor specimen
- Reduced contamination of the wound
- Reduced spillage of bile, pus, infected material, stones, or tumor tissue
- Controlled extraction
- Which port will be enlarged if needed?
- Does the specimen require a bag?
- Is wound protection needed?
- Is a mini-laparotomy more appropriate?
- How will the fascial defect be closed afterward?
11. Operating-room layout
A. Place the team around the target anatomy
- Right upper quadrant surgery: team and monitors are arranged to permit ergonomic approach to the hepatobiliary region.
- Pelvic surgery: monitors and team should align with pelvic access and Trendelenburg positioning.
- Flank renal surgery: positioning, table flexion, and equipment placement must accommodate a lateral operative approach.
- Thoracoscopic surgery: equipment must accommodate lateral decubitus positioning and intercostal access.
B. Position monitors for direct sight lines
C. Keep cables organized
- Long enough for table movement
- Clearly separated from foot pedals
- Protected from traction or entanglement
- Away from sterile-field hazards
- Checked again after patient repositioning
D. Ensure anesthesia access
- Airway
- IV lines
- Infusions
- Monitoring equipment
- The patient’s head and upper body, as feasible
12. Equipment check before incision
A. Imaging
- Camera image present
- Scope focused and white-balanced
- Lens clean
- Correct scope diameter and angle available
- Light cable functioning
- Backup scope or camera plan available
- Monitor correctly positioned
B. Insufflation
- Adequate CO₂ supply and backup
- Correct insufflator setting
- Alarm checked
- Tubing connected and unkinked
- Stopcocks understood and functional
- Planned access device ready
C. Instruments
- Required trocars and port sizes available
- Graspers, dissectors, scissors, needle holders ready
- Retraction device ready
- Suction-irrigation tested
- Specimen bag ready where appropriate
- Extra-long instruments available for high-BMI patients when required
D. Energy and hemostasis
- Electrosurgical generator tested
- Correct energy device and foot pedal identified
- Monopolar dispersive pad applied correctly, when used
- Clips, staplers, hemostatic agents, sutures available
- Smoke evacuation plan confirmed
E. Safety and contingency
- Open conversion instruments available
- Blood products and rapid infusion strategy considered when risk warrants
- Positioning secure before table tilt
- Pressure areas padded
- Antibiotic prophylaxis and VTE prevention completed as indicated
- Team shares expected difficult steps and rescue plan
13. Common setup errors and their prevention
| Error | Consequence | Prevention |
|---|---|---|
| Wrong scope angle or diameter | Poor visualization, repeated exchange | Confirm equipment before incision |
| Camera not white-balanced or focused | Poor image quality | Test before sterile draping |
| No backup CO₂ supply | Delayed procedure or loss of workspace | Check primary and backup cylinder |
| Inadequate port selection | Cannot pass stapler, clip applier, or specimen | Plan device sizes before entry |
| No retrieval bag prepared | Unplanned contamination or delay | Include in procedure-specific setup |
| Suction not tested | Delayed response to bleeding or spillage | Test suction and irrigation before incision |
| Energy device mismatch | Unsafe hemostasis or inefficiency | Confirm device, generator, and compatible instruments |
| Monitor poorly placed | Fatigue and impaired precision | Align monitor with surgeon and target |
| Cables under tension | Loss of image, gas, or energy delivery | Arrange with anticipated table movement |
| No conversion plan | Delayed response in an emergency | Ensure open tray and personnel readiness |
14. Key takeaways
- Laparoscopy requires an integrated system: imaging, insufflation, access ports, instruments, energy, suction-irrigation, and contingency equipment.
- Image quality is a safety issue. Ensure correct camera setup, light output, lens cleanliness, and monitor location before beginning.
- CO₂ insufflation requires a functional insufflator, correctly connected tubing, adequate gas supply, and a backup cylinder.
- Choose port size and instrument type based on the complete anticipated procedure, including stapling, clipping, suturing, and specimen extraction.
- Suction-irrigation must be ready and tested before incision.
- Energy devices require device-specific knowledge and continuous awareness of possible thermal injury.
- Equipment failures should be anticipated with a structured checklist rather than addressed only after a problem appears.
Part 3
laparoscopy AND ergonomics
SAGES laparoscopic patient positioning ergonomics Trendelenburg safety
laparoscopic surgery patient positioning Trendelenburg operating room diagram
Quick answer
Part 3: Patient Positioning, Table Movement, and Laparoscopic Ergonomics
1. Positioning objectives
- Expose the planned operative field
- Allow safe table tilt and movement
- Protect nerves, skin, eyes, and pressure points
- Preserve safe access for anesthesia
- Create an ergonomic working position for surgeon and assistant
2. General safety checklist before incision
- Correct procedure, laterality, and planned position
- Patient is securely fixed to the table before tilt
- Arms are positioned and padded appropriately
- All bony prominences are padded
- Neck is neutral and free from excessive rotation or flexion
- Eyes are protected and free of external pressure
- Lines, urinary catheter, monitoring leads, and endotracheal tube remain accessible and free of traction
- Legs are positioned symmetrically if stirrups are used
- The patient can tolerate the intended Trendelenburg, reverse Trendelenburg, or lateral tilt
- Table movement will not pull equipment cables, insufflation tubing, or the light cable
- The conversion-to-open plan remains feasible
3. Core patient positions
A. Supine position
Description
Typical uses
- Laparoscopic cholecystectomy
- Appendectomy
- Ventral hernia repair
- Many bowel procedures
- Diagnostic laparoscopy
- Bariatric surgery
- Some upper GI operations
Key precautions
- Pad the occiput, elbows, sacrum, heels, and any pressure points.
- If arms are abducted, avoid excessive abduction or external rotation.
- If arms are tucked, ensure hands, fingers, IV tubing, and monitoring lines are protected.
- Secure the patient well if reverse Trendelenburg or lateral tilt will be used.
Common modification
B. Trendelenburg position
Description
Purpose
- Pelvis
- Bladder
- Uterus and adnexa
- Rectum
- Distal sigmoid colon
- Prostate
Used in
- Gynecologic laparoscopy
- Laparoscopic and robotic hysterectomy
- Prostatectomy
- Rectal surgery
- Pelvic colorectal surgery
- Pelvic lymphadenectomy
Risks
- Reduced lung compliance and increased airway pressures
- Facial, conjunctival, and airway edema
- Reduced venous drainage from the head
- Increased intracranial and intraocular pressure
- Sliding toward the head of the table
- Brachial plexus injury if shoulder braces are used improperly
- Nerve injury, rhabdomyolysis, or compartment syndrome in prolonged cases
Safety principles
- Use the least degree of tilt that provides acceptable exposure.
- Avoid relying on shoulder braces that compress the shoulders or neck.
- Use approved nonslip positioning systems and securement methods.
- Reassess positioning after tilting.
- Communicate with anesthesia if airway pressures, facial edema, or hemodynamic changes become concerning.
- In prolonged robotic pelvic cases, periodically reassess the need for continued steep tilt where operative circumstances permit.
C. Reverse Trendelenburg position
Description
Purpose
Used in
- Laparoscopic cholecystectomy
- Hiatal hernia repair
- Fundoplication
- Bariatric surgery
- Liver surgery
- Splenic procedures
- Upper gastric surgery
Risks
- Patient sliding toward the foot of the table
- Decreased venous return and hypotension
- Excessive pressure on heels and sacrum
- Difficulty maintaining stable access if the patient is not adequately secured
Safety principles
- Use secure foot support and an approved anti-slide system.
- Ensure knees are not hyperextended.
- Protect heels and sacrum.
- Confirm that straps or supports do not compromise circulation or cause focal pressure injury.
D. Lateral tilt
Right-side-up tilt
Left-side-up tilt
Risks
- Sliding
- Asymmetric pressure injury
- Loss of secure position during table rotation
- Instrument and trocar torque if the abdominal wall shifts relative to the operating team
E. Lithotomy and modified lithotomy position
Description
Typical uses
- Pelvic laparoscopy
- Gynecologic procedures
- Robotic prostatectomy
- Low anterior resection
- Transanal procedures
- Procedures requiring perineal access
Key principles
- Both legs must be raised and lowered together.
- Avoid excessive hip flexion, abduction, or external rotation.
- Avoid pressure at the fibular head, where the common peroneal nerve is vulnerable.
- Ensure calves are supported without focal compression.
- Avoid extreme knee flexion and prolonged compression of the calf compartments.
- Confirm adequate clearance between legs, stirrups, surgeon, assistant, and equipment.
Risks
- Common peroneal neuropathy
- Femoral neuropathy
- Sciatic nerve stretch injury
- Pressure injury
- Compartment syndrome
- Rhabdomyolysis
- Lower-extremity ischemia, particularly in prolonged and steeply tilted cases
F. Lateral decubitus position
Description
Typical uses
- Laparoscopic nephrectomy
- Adrenalectomy
- Retroperitoneal procedures
- Splenectomy in selected approaches
- Thoracoscopic surgery
Positioning features
- Dependent arm supported on an arm board
- Upper arm supported without traction on the shoulder
- Axillary support used according to local practice and patient anatomy
- Padding between knees and ankles
- Beanbag, vacuum mattress, tape, or other securement system
- Table flexion where needed to widen the operative space
Risks
- Brachial plexus compression or stretch
- Dependent shoulder injury
- Pressure on dependent ear, eye, ribs, iliac crest, and peroneal nerve
- Ventilatory compromise
- Patient movement after table flexion or tilt
4. Positioning by operative target
| Operative region | Typical position | Gravity goal |
|---|---|---|
| Right upper quadrant | Supine, reverse Trendelenburg, right side up | Move bowel and omentum caudally and leftward |
| Left upper quadrant | Supine or right lateral/semi-lateral with tilt | Move bowel away from spleen and upper left abdomen |
| Epigastrium and hiatus | Supine, reverse Trendelenburg, often split-leg | Move bowel caudally and improve hiatal exposure |
| Pelvis | Supine lithotomy with Trendelenburg | Move bowel cephalad |
| Lower abdomen / appendix | Supine, Trendelenburg with left tilt | Move bowel cephalad and leftward |
| Right colon | Supine with left tilt, variable Trendelenburg | Shift small bowel leftward |
| Left colon / sigmoid | Supine with right tilt, variable Trendelenburg | Shift small bowel rightward |
| Kidney / adrenal | Lateral decubitus with table flexion | Open flank and allow viscera to fall medially |
| Thorax | Lateral decubitus, table flexion as needed | Open intercostal spaces and maintain lung access |
5. Surgeon ergonomics
A. Why ergonomics matter
- Neck pain
- Shoulder fatigue
- Back pain
- Wrist strain
- Hand fatigue
- Reduced precision
- Longer operative time
- Instrument collision
- Loss of control during fine dissection
B. Neutral surgeon posture
- Head and neck near neutral
- Shoulders relaxed, not elevated
- Elbows close to the body
- Forearms in a comfortable working range
- Wrists as neutral as possible
- Feet stable and apart at shoulder width
- Minimal trunk rotation or leaning
C. Operating table height
- Shoulders elevate
- Elbows abduct
- Neck and upper back fatigue increase
- The surgeon bends forward
- Trunk and neck strain increase
- Fine instrument control may worsen
D. Monitor placement
- Place the monitor in front of the primary surgeon.
- Keep it at or slightly below eye level.
- Avoid looking persistently upward, sideways, or over the shoulder.
- Ensure the assistant has a clear screen view.
- Reposition monitors if the team changes sides during the procedure.
6. Instrument ergonomics and port geometry
A. The target-centered approach
- Where is the target?
- What angle is needed for safe dissection?
- Where will traction come from?
- Where will countertraction come from?
- Will the surgeon need to suture, staple, clip, or divide tissue?
- What will the camera need to show at the critical step?
B. Avoid handle collision
- Too close together
- Misaligned with the target
- Positioned in a straight line rather than a useful triangular layout
- Inappropriately placed for a thick abdominal wall
- Too medial or too lateral for the planned maneuver
C. Avoid internal collision
- Instrument shafts
- Instrument tips
- Camera
- Bowel or abdominal wall
- Robotic arms in robotic surgery
D. Instrument length
E. Do not persist with a bad setup
- Change the table position
- Change camera port
- Add a port
- Reposition an accessory port
- Use a longer instrument
- Change the retraction strategy
- Convert to a different approach if safety requires
7. Positioning injuries: mechanisms and prevention
A. Peripheral nerve injury
- Compression
- Stretch
- Ischemia
- Prolonged pressure
- Improper arm or leg positioning
Common nerves at risk
| Nerve / structure | Typical mechanism |
|---|---|
| Brachial plexus | Shoulder compression, arm traction, steep Trendelenburg, shoulder braces |
| Ulnar nerve | Elbow compression or poor arm padding |
| Common peroneal nerve | Pressure at fibular head in lithotomy |
| Femoral nerve | Excessive hip flexion, extension, or retractor-related compression |
| Sciatic nerve | Excessive hip flexion or stretch in lithotomy |
| Radial nerve | Compression along humerus or arm-board injury |
Prevention
- Keep arms in a neutral, supported position.
- Avoid excessive shoulder abduction.
- Pad elbows and fibular heads.
- Ensure arm boards and stirrups are positioned symmetrically.
- Avoid focal pressure from straps, braces, or table edges.
- Reassess after repositioning and table tilt.
B. Pressure injury
- Occiput
- Ears
- Scapulae
- Sacrum
- Elbows
- Heels
- Lateral malleoli
- Knees
- Iliac crest
- Dependent shoulder in lateral position
C. Compartment syndrome and rhabdomyolysis
- Prolonged surgery
- Lithotomy
- Extreme Trendelenburg
- High BMI
- Hypoperfusion
- Excessive focal compression
- Inadequate padding
D. Eye and facial complications
- Facial and conjunctival edema
- Increased intraocular pressure
- Rare visual complications in susceptible circumstances
8. Positioning in robotic surgery
- Complete positioning and padding.
- Secure the patient for planned tilt.
- Confirm all lines and airway access.
- Ensure arms are properly tucked or placed.
- Confirm monitor access for bedside assistant.
- Ensure enough room for robotic-arm movement.
- Verify emergency undocking roles.
- Avoid moving the operating table unless the system and procedure permit it.
- Watch for robot arm pressure on the patient, legs, chest, or ports.
- Avoid excessive torque at ports.
- Maintain a clear path for emergency undocking and conversion.
9. Positioning time-out
- Patient position matches the procedure
- Table can safely tilt as planned
- Patient is secured against sliding
- Arms and legs are safe
- Pressure points are padded
- Airway and IV access are preserved
- Surgeon, assistant, anesthesiologist, and nursing team agree on intended table movements
- Equipment has enough cable slack
- The operative field remains adequately exposed after the final position
10. Key takeaways
- Patient positioning is a primary exposure tool, not a minor setup task.
- Use gravity deliberately with pneumoperitoneum and retraction.
- Trendelenburg improves pelvic exposure but increases respiratory, hemodynamic, nerve, facial-edema, and sliding risks.
- Reverse Trendelenburg improves upper-abdominal exposure but requires secure foot support and attention to hypotension and sliding.
- Lithotomy requires symmetric leg movement, nerve protection, and vigilance for compartment-related injury.
- Lateral decubitus requires careful pressure-point protection, arm support, securement, and table-flexion planning.
- Monitor height, table height, surgeon posture, instrument length, and port geometry must be planned together.
- Repositioning, adding a port, or changing the camera angle is often safer than continuing with an ergonomically poor setup.
Part 4
laparoscopy AND entry techniques
SAGES safe laparoscopic entry Veress Hasson optical trocar access guideline
laparoscopic abdominal entry Veress needle Hasson optical trocar diagram
Part 4: Pneumoperitoneum and Safe Primary Abdominal Entry
Educational scope: Primary abdominal access is one of the highest-risk phases of laparoscopy. This note is for supervised surgical education, simulation, and examination preparation. Technique selection and execution require formal training, institutional protocols, and readiness to recognize and manage complications.
1. Why primary entry matters
- Small or large bowel
- Stomach
- Solid organs
- Bladder
- Abdominal wall vessels
- Major retroperitoneal vessels, especially the aorta, inferior vena cava, and iliac vessels
- Patient anatomy and body habitus
- Previous abdominal operations and expected adhesions
- Presence of an umbilical or ventral hernia
- Pregnancy and uterine size
- Intra-abdominal distension or large mass
- Surgeon experience with the access method
- Availability of appropriate equipment and help
2. Objectives of safe entry
- Enter the peritoneal cavity at an appropriate site
- Confirm that the access device is actually intraperitoneal
- Create adequate working space before introducing further ports
- Recognize injury immediately if it occurs
- Inspect the entry site and accessible organs before proceeding
Do not progress from one stage of entry to the next until the preceding stage is credible and safe.
3. Relevant anatomy for primary access
A. Umbilical region
- The abdominal wall is usually thin
- The scar is anatomically adherent to fascia/peritoneum
- It is central, often giving a broad overview of the abdominal cavity
- It permits straightforward camera placement for many operations
- Previous midline laparotomy
- Prior umbilical hernia repair or mesh
- Known or suspected periumbilical adhesions
- Large umbilical hernia
- Infection at the site
- Masses or pregnancy altering local anatomy
B. Major vascular structures
C. Epigastric vessels
D. Left upper quadrant and Palmer's point
- Splenomegaly
- Significant gastric distension
- Prior upper abdominal surgery
- Left-upper-quadrant pathology
- Portal hypertension or altered anatomy
4. Main methods of primary access
| Method | Basic principle | Main advantage | Main limitation |
|---|---|---|---|
| Closed Veress needle entry | Needle creates pneumoperitoneum before trocar insertion | Small incision, familiar, rapid in suitable patients | Initial needle placement is not directly visualized |
| Open Hasson entry | Layered opening to peritoneum under direct vision, then blunt cannula | Direct access, useful with selected scars/adhesions | Can be slower; gas leak and wound issues may occur |
| Optical trocar entry | Camera inside transparent trocar visualizes wall layers during entry | Visualizes tissue passage | Does not eliminate visceral or vascular injury |
| Direct trocar entry | Trocar enters without prior Veress insufflation | Efficient in selected hands | Requires expert judgment and careful patient selection |
| Alternative-site entry | Entry away from expected adhesions or pathology | Avoids high-risk umbilical area | Site-specific risks and contraindications remain |
5. Closed entry with a Veress needle
A. Equipment
- Veress needle
- Insufflator and sterile tubing
- CO₂ source
- Skin scalpel
- Primary trocar and camera system
- Suction-irrigation system
- Open conversion equipment
B. Veress needle design
- The outer bevel is sharp and passes through tissue.
- The inner blunt stylet advances when resistance suddenly decreases after entering the peritoneal cavity.
C. General workflow
1. Pre-entry assessment
- Review scars, prior operative reports, imaging, hernias, and likely adhesions.
- Confirm patient position and securement.
- Ensure adequate muscle relaxation.
- Confirm functioning insufflator and CO₂ supply.
- Identify the intended site and backup entry plan.
- Ensure the stomach is not distended when upper-abdominal entry is planned.
2. Abdominal-wall elevation
3. Needle insertion
- Do not use uncontrolled force.
- Do not continue after uncertain or abnormal resistance.
- Do not assume a “double pop” proves correct placement.
- Avoid a trajectory toward major retroperitoneal vessels.
- Reassess rather than repeat multiple blind attempts at the same site.
4. Confirm intraperitoneal position
- Low initial opening pressure
- Unimpeded gas flow
- Appropriate abdominal distension
- No unexpected subcutaneous emphysema
- No marked resistance or rapid high-pressure alarm
5. Establish pneumoperitoneum
- Preperitoneal
- In the abdominal wall
- Obstructed
- Incorrectly positioned
- Associated with a tubing or stopcock problem
6. Insert the primary trocar
- Confirmation of intraperitoneal placement
- Inspection for access-related bleeding
- Inspection for bowel or visceral injury
- Assessment for adhesions before inserting any additional ports
6. Open Hasson entry
A. Principle
- Previous abdominal surgery raises concern for adhesions
- Umbilical anatomy is altered
- A controlled direct entry is preferred
- Closed access has failed or is uncertain
- A surgeon's own outcomes and experience favor open entry
B. Basic sequence
- Make a small incision, often at or near the umbilicus.
- Dissect carefully to expose the fascia.
- Secure fascia with stay sutures if appropriate.
- Open fascia and peritoneum under direct control.
- Confirm entry into the peritoneal cavity.
- Insert a blunt Hasson cannula.
- Secure the cannula to minimize gas leak or dislodgement.
- Insert the laparoscope and inspect before proceeding.
- Establish and maintain pneumoperitoneum.
C. Advantages
- Direct visualization of abdominal wall layers
- Avoids blind passage of a Veress needle
- Can be useful where adhesions are anticipated
- Allows use of a larger fascial opening when required
D. Limitations
- May take longer than closed entry
- Gas leakage can be more difficult to control
- Requires adequate fascial closure at the end
- Does not guarantee absence of underlying adhesions or bowel injury
- Still requires controlled opening and careful inspection
7. Optical trocar entry
A. Principle
B. Potential advantages
- Real-time view of the abdominal wall during entry
- May permit recognition of incorrect tissue planes
- Can be used after insufflation or as a primary entry technique in selected practice settings
C. Limitations
- Visualization does not make the technique automatically safe.
- The view may be obscured by blood, fat, or tissue.
- The surgeon must recognize layers and maintain an appropriate trajectory.
- Injury can occur if the device is advanced too far or into adhesions, bowel, mesentery, or vessels.
8. Direct trocar entry
- Appropriate patient selection
- Controlled insertion technique
- A clear backup plan
- Awareness of prior surgery, adhesions, hernias, and anatomy
- Readiness to recognize injury
9. Selecting the initial entry site
A. Standard umbilical entry
- No significant prior midline surgery
- No suspected periumbilical adhesions
- No umbilical hernia or infection
- No major distortion from a mass or pregnancy
- Central camera position is suitable for the planned operation
B. Alternative entry site
- Prior midline laparotomy scars
- Large ventral or umbilical hernia
- Mesh near the umbilicus
- Known adhesions near the planned entry point
- Abdominal distension
- A large pelvic or intra-abdominal mass
- Major anatomic distortion
- Failed or uncertain umbilical access
C. Prior surgery and adhesions
- Type and location of prior incision
- Number of prior operations
- Prior peritonitis, abscess, radiation, or mesh repair
- History of bowel obstruction
- Imaging evidence of adhesions or hernia
- Expected location of bowel relative to the abdominal wall
10. Entry in obesity
- Increased abdominal-wall thickness
- Less obvious surface landmarks
- Longer distance from skin to peritoneum
- Higher risk of poor trocar angle and inadequate reach
- Greater need for longer access devices and instruments in some cases
- Confirm that needle and trocar length are adequate.
- Maintain a planned trajectory toward the desired abdominal cavity.
- Avoid repeated uncertain attempts.
- Consider optical or open approaches based on anatomy and surgeon experience.
- Plan camera and working ports farther from the target when needed to preserve instrument mobility.
11. Entry during pregnancy
Principles
- Choose a site based on uterine fundal height and prior scars.
- Avoid the enlarged uterus.
- Use an entry technique familiar to the surgeon.
- Position beyond the first trimester with left lateral or partial left lateral tilt to reduce aortocaval compression.
- Tailor insufflation pressure to maternal physiology and operative requirements.
12. After successful primary entry: immediate inspection
Inspect for:
A. Entry-site injury
- Abdominal wall bleeding
- Omental injury
- Bowel perforation
- Mesenteric hematoma
- Solid-organ injury
- Retroperitoneal hematoma
- Free blood not explained by the procedure
B. Adhesions
- Bowel or omentum adherent to the anterior abdominal wall
- Adhesions at planned accessory-port sites
- Adhesions that prevent safe working-port placement
- Mesh or prior reconstruction material
C. Adequacy of working space
- Pneumoperitoneum is satisfactory
- Camera view is adequate
- Patient position permits access
- Additional ports can be safely inserted under direct vision
13. Secondary ports
Insert secondary trocars under direct laparoscopic vision.
- Identify the intended skin site externally.
- View the abdominal wall internally.
- Avoid visible vessels and adhesions.
- Advance the trocar under direct visualization.
- Aim toward the operative target.
- Avoid an excessive angle that causes resistance, poor reach, or later instrument torque.
14. Recognition of access complications
A. Suspect bowel injury when there is:
- Visible enteric content
- A puncture, laceration, or serosal defect
- Unexpected gas in bowel wall or mesentery
- Feculent odor or contamination
- A suspicious mark at the entry site
- Unexplained postoperative pain, fever, ileus, leukocytosis, peritonitis, or sepsis
B. Suspect vascular injury when there is:
- Sudden brisk bleeding
- Rapidly enlarging retroperitoneal hematoma
- Unexplained hypotension or tachycardia
- Poor visualization due to blood
- Hemodynamic deterioration immediately after entry
- Blood emerging from a trocar or port
C. Suspect preperitoneal insufflation when there is:
- High initial insufflation pressure
- Low or absent flow
- Poor abdominal distension
- Asymmetric abdominal-wall swelling
- Subcutaneous emphysema
- Failure to obtain an intraperitoneal view after trocar insertion
15. Immediate response to suspected entry injury
A. If access location is uncertain
- Stop insufflation and instrument advancement.
- Reassess pressure, flow, tubing, and the patient.
- Do not repeatedly force entry at the same site.
- Consider a different access site or open approach.
- Obtain direct visualization before continuing.
B. If bowel injury is seen or strongly suspected
- Stop further blind manipulation.
- Maintain or obtain visualization.
- Assess injury location, size, contamination, and viability.
- Seek senior surgical help early when needed.
- Repair laparoscopically only if the team has appropriate expertise, exposure, and confidence.
- Convert to open surgery when needed for safe assessment and repair.
C. If major vascular injury is suspected
- Announce the concern immediately.
- Stop blind maneuvers.
- Apply pressure if feasible and safe.
- Activate the institutional major-hemorrhage response.
- Obtain immediate senior help, including vascular expertise where available.
- Proceed to rapid open exposure when indicated.
16. Common entry errors
| Error | Why it is unsafe | Safer response |
|---|---|---|
| Repeated blind attempts at one site | Cumulative risk of injury and false confidence | Stop, reassess, choose alternate site or technique |
| Ignoring high opening pressure | May indicate preperitoneal or incorrect placement | Stop insufflation and verify access |
| Increasing pressure to overcome resistance | Can mask incorrect placement and worsen injury | Determine cause of resistance first |
| Failing to inspect after entry | Can miss bowel, vessel, or abdominal-wall injury | Perform a deliberate initial survey |
| Placing secondary ports blindly | Risks vascular or bowel injury | Insert under direct vision |
| Persisting with poor exposure | Increases risk during dissection | Reposition, add port, alter approach, or convert |
| Treating open entry as risk-free | Bowel can be adherent under the entry site | Use controlled dissection and inspection |
| Using a familiar technique despite altered anatomy | Prior scars, hernia, pregnancy, or masses change risk | Individualize site and method |
17. A practical pre-entry time-out
- Planned entry technique
- Planned entry site
- Backup site and backup technique
- Previous scars, mesh, hernias, or anticipated adhesions
- Pregnancy or mass-related anatomical changes
- Availability of long instruments if obesity is relevant
- Insufflator function and CO₂ reserve
- Availability of suction, energy, and open conversion instruments
- Team plan if bowel or vascular injury is suspected
18. Key takeaways
- Primary abdominal access is a major safety step, not a routine formality.
- Veress, open Hasson, optical-trocar, and direct-entry approaches can all be appropriate in experienced hands.
- Technique choice should reflect anatomy, prior surgery, adhesions, pregnancy, obesity, pathology, and surgeon experience.
- High initial pressure, poor flow, or inadequate abdominal distension should trigger reassessment.
- Obtain and inspect the first laparoscopic view before placing any additional port.
- Insert secondary ports under direct vision.
- Avoid repeated blind attempts and escalating force.
- Recognize suspected bowel or vascular injury early, involve help promptly, and convert to open surgery when necessary for safe control and repair.
Part 5
laparoscopy AND port placement
SAGES laparoscopic port placement triangulation secondary ports direct vision guidelines
Part 5: Core Principles of Laparoscopic Port Placement
Educational scope: Port placement is a procedure-specific operative skill. This chapter explains the transferable principles used to plan a safe, ergonomic multiport laparoscopic setup. Exact port maps belong to the individual operation and should be learned through supervised training.
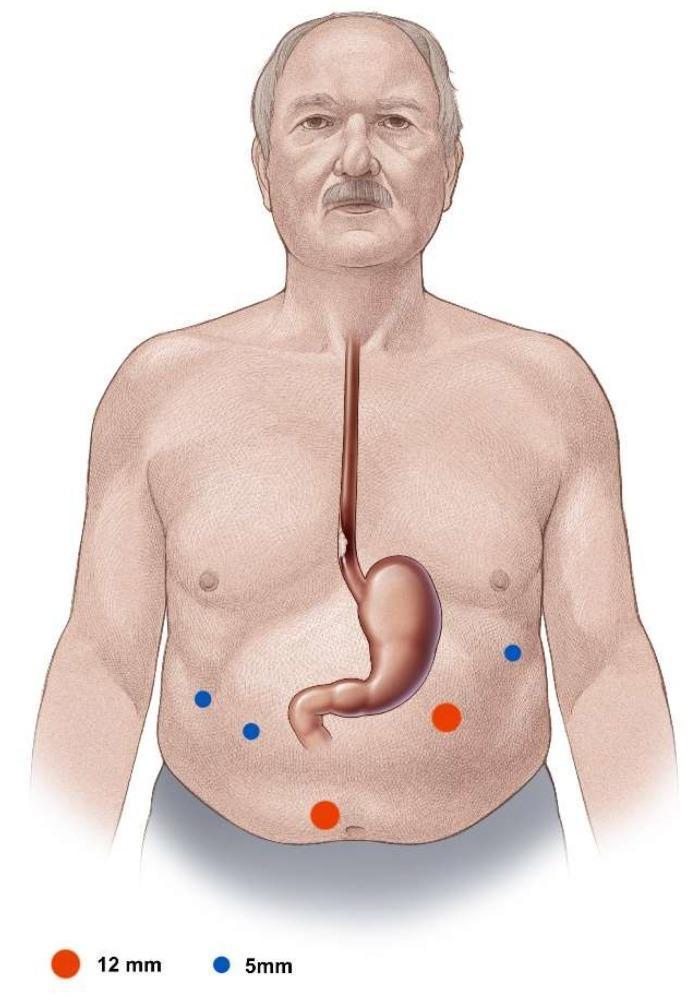
1. The central concept: plan from the target outward
- The target anatomy and critical dissection plane
- The direction from which the surgeon must approach it
- The best camera view
- The required traction and countertraction
- The need for clips, stapler, energy device, suturing, or specimen retrieval
- The safest skin sites based on scars, hernia, vessels, bony landmarks, and body habitus
- A panoramic camera view
- Controlled instrument reach
- Effective traction-countertraction
- Minimal external handle collision
- Minimal internal shaft collision
- Safe entry paths for each accessory port
- A workable angle for the most difficult step, not merely the first step
A port that works for exposure may not work for dissection. A port that works for dissection may not work for suturing or stapling.
2. Functions of ports
| Port type | Main function | Typical size |
|---|---|---|
| Camera port | Laparoscope and visualization | 5, 10, or 12 mm |
| Dominant-hand working port | Dissection, cutting, energy, suturing | 5 or 10-12 mm |
| Nondominant-hand working port | Grasping, traction, countertraction | Usually 5 mm |
| Assistant port | Retraction, suction-irrigation, clip application, exposure | Often 5 mm |
| Retraction port | Organ-specific retraction, such as liver elevation | Often 5 mm |
| Stapler or specimen port | Stapler passage, clip applier, specimen retrieval | Usually 10-12 mm or larger |
3. Camera-port planning
A. Role of the camera port
- A broad overview of the operative field
- A stable view of important anatomy
- A line of sight that permits the surgeon to see both working instruments
- Enough distance from the target to avoid an excessively magnified or cramped view
- A safe angle for viewing critical planes
B. Camera-to-target distance
- The view becomes overly magnified
- Orientation becomes difficult
- Instrument tips may be outside the field
- There is insufficient panoramic awareness
- The camera can collide internally with instruments
- Precision falls
- Depth cues become poorer
- Fine structures are difficult to identify
- Long instruments may become harder to control
- The operative target
- The active instrument tip
- The nearby “danger zone” containing adjacent bowel, vessels, ducts, or organs
C. Camera position relative to working ports
D. Scope angle matters
- Look over or beneath an organ
- View the anterior abdominal wall for accessory-port insertion
- Look into recesses
- Improve exposure around the target
- Move the visual axis away from a direct straight-ahead view
4. Triangulation
A. Definition
- Camera port
- Right-hand working port
- Left-hand working port
- Target tissue at the apex of the internal operative field
            Camera
               |
               |
      Left hand     Right hand
            \       /
             \     /
              TARGET
- Traction
- Countertraction
- Exposure
- Blunt dissection
- Sharp dissection
- Clip application
- Suturing
- Knot tying
B. Why triangulation works
- Separation of instruments
- Useful dissection angles
- A stable camera view
- Better bimanual control
- Reduced internal crowding
- Better ability to expose a tissue plane with traction-countertraction
C. Usual spacing principles
- Keep working ports sufficiently separated to prevent handle and shaft collision.
- In many adult conventional laparoscopic configurations, ports are often around 8-10 cm apart.
- The port-target relationship should permit useful approach angles and instrument movement.
- Avoid placing a port too near the target or excessively far away.
D. Triangulation is not a rigid geometric rule
- Very small patients
- Obesity
- Pregnancy
- Large masses
- Deep pelvic surgery
- Upper abdominal surgery
- Extraperitoneal work
- Retroperitoneal surgery
- Adhesions
- Single-incision surgery
- Robotic surgery
5. The fulcrum effect and optimal port distance
- The intraperitoneal instrument segment is short
- The trocar sheath interferes with instrument movement
- Instruments cannot open or articulate freely
- The surgeon may struggle to apply traction or sweep tissue
- The intraperitoneal instrument segment is excessively long
- Small external movements produce large internal tip excursions
- Fine dissection becomes harder
- Instrument stability falls
- Surgeon fatigue increases
6. Working-port selection
A. Dominant-hand port
- Maryland dissection
- Scissors
- Hook cautery
- Ultrasonic or advanced bipolar device
- Needle holder
- Clip applier
- Stapler in some procedures
B. Nondominant-hand port
- Retraction
- Countertraction
- Exposure
- Grasping
- Suction assistance
- Tissue stabilization
C. Assistant port
- Suction-irrigation
- Atraumatic grasper
- Retraction instrument
- Clip applier
- Endoscopic stapler, where required
7. Secondary-port insertion: safety principles
A. Before insertion
- Fully establish pneumoperitoneum.
- Inspect for adhesions at the intended site.
- Identify the planned external skin point.
- Visualize the corresponding internal abdominal wall.
- Consider a finder needle to confirm the trajectory and angle.
- Check for abdominal-wall vessels.
B. During insertion
- Make only an incision large enough for the selected cannula.
- Advance the trocar in a controlled manner.
- Keep the trocar tip under continuous laparoscopic observation.
- Direct it toward the operative target.
- Avoid excessive penetration after peritoneal entry.
- Confirm that the port is functional and appropriately positioned before proceeding.
C. Vessel avoidance
- Superficial vessels may sometimes be identified by transillumination.
- Deeper inferior epigastric vessels may not be reliably visible by transillumination.
- Direct internal visualization, awareness of abdominal-wall anatomy, and appropriate site selection are essential.
D. Avoid other structures
- Bladder, especially for suprapubic ports
- Enlarged uterus in pregnancy
- Liver and spleen for upper ports
- Pleura with very superior abdominal ports
- Bowel or omentum adherent to the abdominal wall
- Stomas
- Mesh
- Prior scars
- Hernias
- Bony landmarks, especially ribs and iliac crest
8. The principle of traction and countertraction
- One hand provides traction
- The other hand dissects
- The camera maintains a stable view
- An assistant retracts adjacent structures or uses suction-irrigation
Example
- The nondominant hand retracts tissue away from the dissection plane.
- The dominant hand uses a dissector or energy device along the exposed plane.
- The camera remains centered and close enough to show the active tip and surrounding risk structures.
9. Ergonomic alignment
Good ergonomic configuration
- Monitor in front of the primary surgeon
- Surgeon has relaxed shoulders and elbows close to the body
- Instruments reach the target without crossed hands
- Camera and working instruments are oriented predictably
- External handles do not collide
- Assistant can work without blocking the surgeon
Poor ergonomic configuration
- Surgeon repeatedly rotates trunk or neck
- Elbows are held high or far from the body
- Instrument handles collide
- Camera holder and surgeon interfere with each other
- Instrument tips cross unintentionally
- The operative target lies too close to a port
- The camera view is unstable or reversed
- The surgeon has to use awkward wrist angles to work
10. Common port-placement problems and remedies
| Problem | Likely cause | Practical remedy |
|---|---|---|
| External instrument collision | Ports too close or poorly aligned | Add or reposition a port; use a different camera location |
| Internal shaft collision | Parallel, crowded instrument paths | Restore triangulation; separate ports |
| Poor reach | Port too far from target; insufficient instrument length | Use longer instruments, change camera, add a closer but safe working port |
| Restricted tip movement | Port too close to target | Add a more distant port with a better working angle |
| Poor retraction vector | Port location does not permit desired pull | Add an assistant or retraction port |
| Camera constantly fogs or collides | Camera too close or poorly positioned | Change scope angle, move camera to another port |
| Port torque and pain at wall | Incorrect angle, thick wall, poor port site | Reassess trajectory, use longer port/instrument, relocate if needed |
| Inability to suture | Inadequate angle or narrow instrument separation | Add a port to widen triangulation |
| Inability to use stapler safely | Incorrect port size, angle, or trajectory | Plan a 12-mm or larger port with direct line to target |
| Bleeding from wall | Vessel injury | Maintain visualization, control bleeding, and reassess further port placement |
11. When to add an extra port
- Inadequate exposure
- Poor retraction
- Uncontrolled or difficult bleeding
- Need for suction-irrigation while maintaining two working instruments
- Inadequate triangulation for suturing
- Dense adhesions
- Obesity or deep target anatomy
- Need for a second assistant instrument
- Need to change camera position
- Need for a stapler or larger instrument
12. Port placement in obesity
- The distance from skin to peritoneum is increased.
- A port that appears correctly placed externally may have a poor internal angle.
- Instrument length may be inadequate.
- Thick abdominal wall increases friction and resistance.
- More lateral or more cranial placement may be needed depending on target anatomy.
- Accessory ports should be planned deliberately rather than placed by routine surface measurements.
13. Port placement with scars, adhesions, and hernias
- Inspect internally for adhesions.
- Avoid scars if they imply likely underlying adhesions.
- Avoid mesh when possible.
- Avoid entering directly through a ventral hernia unless it is part of the planned repair strategy.
- Maintain a low threshold to use a different site or add a safely placed port.
- Do not insert a trocar where bowel is adherent to the abdominal wall.
14. Conventional multiport versus single-incision laparoscopy
Multiport laparoscopy
- Better triangulation
- More natural bimanual technique
- Less instrument collision
- Better retraction options
- Usually easier for suturing and complex dissection
Single-incision laparoscopy
- External handle collision
- Internal shaft collision
- Parallel instruments
- Cross-handed technique
- Reduced range of motion
- Less intuitive camera orientation
- More difficult retraction and suturing
15. A port-planning checklist
Target
- What exact structure or plane is the main target?
- Where will the most demanding step occur?
Camera
- Does the camera provide a wide, correctly oriented view?
- Can I see both working tips and adjacent danger structures?
Working ports
- Can my dominant hand dissect safely?
- Can my nondominant hand provide useful countertraction?
- Are the ports separated enough to avoid collision?
Assistant and retraction
- Is a separate port needed for suction, retraction, or liver elevation?
- Does the assistant have a useful line of approach?
Device compatibility
- Is a large port needed for clip applier, stapler, specimen bag, or suturing?
- Is the intended extraction site planned?
Safety
- Is the path free of adhesions?
- Are bladder, epigastric vessels, bowel, ribs, and iliac crest considered?
- Are ports inserted under direct vision?
Rescue plan
- If bleeding occurs, do I have enough ports for suction, retraction, and hemostasis?
- If not, where will an extra port go?
16. Key takeaways
- Plan port placement from the target anatomy and intended operative maneuvers outward.
- Give every port a defined function: camera, dominant-hand working port, nondominant-hand working port, assistant, retraction, stapler, or extraction.
- Triangulation provides the instrument separation and approach angles needed for controlled traction-countertraction and dissection.
- Ports placed too close to the target restrict tip movement. Ports too far away reduce precision through an excessively long fulcrum.
- In many adult multiport configurations, working ports are often separated by about 8-10 cm, but this is adapted to the patient and procedure.
- Insert every secondary port under direct laparoscopic view.
- Consider epigastric vessels, adhesions, scars, hernias, bladder, pleura, ribs, and iliac crest before selecting each site.
- Improve poor exposure by changing position, camera location, instrument length, retraction, or by adding a port. Do not persist with unsafe ergonomics.
Continue with Part 6: procedure-specific port configurations
laparoscopy AND port placement
SAGES guidelines laparoscopic cholecystectomy appendectomy hernia port placement
standard laparoscopic cholecystectomy port placement diagram
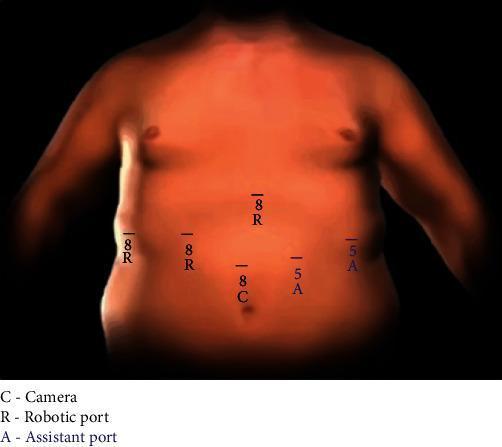
This medical illustration depicts the standard abdominal port placement for a robotic-assisted cholecystectomy on a human torso. The diagram highlights six specific surgical access points: three robotic arm ports (labeled '8 R'), one robotic camera port (labeled '8 C'), and two laparoscopic assistant ports (labeled '5 A'). The camera port 'C' is positioned supraumbilical in the midline. The robotic ports 'R' are distributed across the upper quadrants: one in the epigastrium and two in the right lateral and right mid-abdominal regions. The assistant ports 'A' are located in the left mid-abdominal and left lower quadrant regions. Numerical prefixes (8 and 5) indicate the port size in millimeters. This diagram serves as a clinical guide for surgeons to optimize robotic arm range of motion and assistant access during gallbladder removal, particularly in patients with complex surgical histories or significant inflammation as seen in acute cholecystitis.
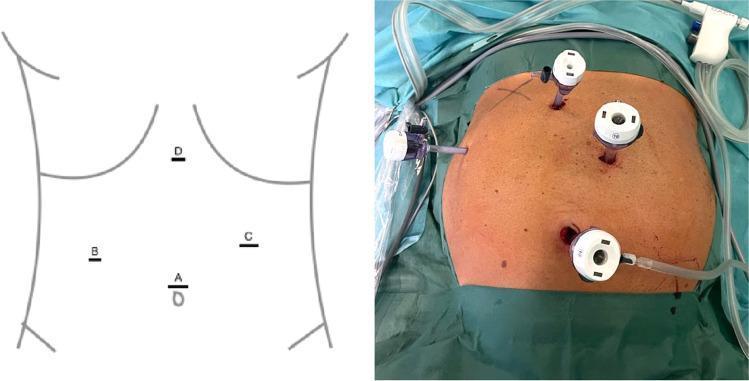
This composite educational resource consists of an anatomical line drawing and a clinical photograph demonstrating standard port placement for laparoscopic cholecystectomy. The anatomical diagram illustrates the surgical map with four labeled incisions: A (umbilical), B (right mid-abdomen), C (left mid-abdomen), and D (epigastric/xiphoid). The corresponding clinical photograph shows a patient's abdomen in the supine position, prepped and draped with green surgical cloths. Four trocars are in situ: a 10-mm camera trocar at the umbilicus (A), a 10-mm surgeon's right-hand trocar in the left mid-abdomen (C), a 5-mm surgeon's left-hand trocar in the right mid-abdomen (B), and a 5-mm assistant's trocar at the xiphoid process (D). The trocars are white, cylindrical laparoscopic ports, some with insufflation tubing attached. This material serves as a technical guide for surgeons to optimize visualization and instrument triangulation during minimally invasive gallbladder removal.
Quick answer
Part 6: Procedure-Specific Laparoscopic Port Configurations
Scope: These are common configuration patterns, not fixed prescriptions. Exact port locations vary with patient size, obesity, scars, organ size, pathology, camera system, surgeon position, need for stapling, and local practice. Every secondary port is inserted under direct vision after inspection for adhesions and abdominal-wall vessels.
General rule before every procedure
- Target anatomy
- Camera-to-target distance
- Dominant and nondominant working-hand angles
- Retraction requirement
- Need for a 10-12 mm port for clips, stapler, suturing, or specimen retrieval
- Likely extraction site
- Potential need for an additional rescue port
1. Laparoscopic cholecystectomy
Position
- Supine
- Reverse Trendelenburg
- Right side elevated
Usual four-port configuration
| Port | Common location | Typical function |
|---|---|---|
| Camera | Umbilical or supraumbilical midline, often 10 mm | Camera, may later be used for specimen extraction |
| Epigastric | Just inferior to xiphoid, often 10 mm | Dominant-hand dissection, clip application, scissors |
| Right midclavicular/subcostal | Right upper abdomen, often 5 mm | Grasping Hartmann pouch and lateral traction |
| Right lateral/anterior axillary | Right upper abdomen, often 5 mm | Fundus retraction cephalad toward diaphragm |
Functional geometry
- Fundus grasper: pulls the gallbladder cephalad toward the right shoulder.
- Infundibular/Hartmann pouch grasper: provides lateral and inferior traction.
- Epigastric instrument: dissects Calot triangle and applies clips.
- Camera: provides a stable overview of gallbladder, liver hilum, and critical structures.
Variations
- Additional port for severe inflammation, retraction, suction, or difficult exposure
- Larger camera or working port when cholangiography, stapling, or retrieval requirements demand it
- Split-leg/French position with surgeon between the legs for selected ergonomics
- Reduced-port and single-incision approaches in selected patients, but these reduce normal triangulation
2. Laparoscopic appendectomy
Position
- Supine
- Trendelenburg
- Left side down or left tilt
Common three-port pattern
| Port | Common location | Typical function |
|---|---|---|
| Camera | Umbilical, often 10 mm | Visualization and sometimes specimen extraction |
| Working port | Left lower quadrant, usually 5 mm | Dominant-hand dissection or energy device |
| Working/assistant port | Suprapubic midline or lower abdomen, usually 5 mm | Grasping appendix, traction, suction, stapler/loop assistance |
Important modifications
- Pelvic appendix: a lower suprapubic port may improve access.
- Retrocecal appendix: a higher or more lateral port may be useful.
- Obesity: ports may need to be placed farther from the target, and longer instruments may be required.
- Perforation or abscess: add a port early if suction, retraction, and safe dissection cannot be maintained simultaneously.
- Pregnancy: port position must move according to fundal height, rather than following a fixed lower-abdominal map.
3. Laparoscopic inguinal hernia repair
- TAPP: transabdominal preperitoneal repair
- TEP: totally extraperitoneal repair
A. TAPP repair
Typical configuration
| Port | Common location | Function |
|---|---|---|
| Camera | Midline supraumbilical or infraumbilical, usually 10 mm | View of bilateral myopectineal orifices |
| Right working port | Right lower abdomen, often 5 mm | Dissection and mesh handling |
| Left working port | Left lower abdomen, often 5 mm | Dissection and mesh handling |
Key principles
- Ports should permit dissection of the preperitoneal plane without crossing instruments excessively.
- A low enough angle is required to work parallel to the posterior inguinal floor.
- Prior pelvic surgery, prostatectomy, lower-midline incision, or mesh can alter the approach and increase technical complexity.
- Avoid blind lower-abdominal trocar placement because of inferior epigastric vessels and bladder risk.
B. TEP repair
- A camera port near the umbilicus
- Two working ports in the lower midline
4. Laparoscopic ventral or incisional hernia repair
Core strategy
Typical pattern
| Port | General location | Function |
|---|---|---|
| Primary camera port | Contralateral upper quadrant, away from defect/scars | Initial assessment and adhesiolysis view |
| Two working ports | Lateral abdominal wall, spaced from defect | Adhesiolysis, mesh introduction/fixation |
| Optional additional port | Opposite lateral abdomen | Retraction, suturing, mesh handling, rescue |
- Safe adhesiolysis near the anterior abdominal wall
- Full visualization of hernia margins
- Mesh deployment with adequate overlap
- Ergonomic fixation or suturing
Common problems
- Ports too close to the defect: poor mesh handling and inadequate view of margins
- Ports placed through scar or mesh: increased risk of adhesions and access difficulty
- Insufficient lateral separation: difficult adhesiolysis and instrument clashing
- No rescue port: inability to simultaneously retract, dissect, suction, and control bleeding
5. Laparoscopic colectomy and colorectal surgery
General configuration principles
- A central or off-midline camera port provides broad abdominal overview.
- Working ports are distributed to reach both upper abdomen and pelvis.
- An extraction site is planned early, often a Pfannenstiel incision, planned stoma site, mini-laparotomy, or enlarged port.
- A 12 mm port may be required for stapling.
- The map must permit mobilization, vascular control, mesenteric division, bowel division, and anastomotic work.
A. Right hemicolectomy
- Camera near umbilicus
- Working ports in left lower quadrant and suprapubic/left midabdomen
- Assistant port on the right or upper abdomen for retraction
- Extraction through a protected extension of an appropriate incision, depending on technique
B. Left hemicolectomy or sigmoid colectomy
- Camera near umbilicus
- Working ports commonly distributed in the right lower quadrant, suprapubic region, and one upper/lateral port as needed
- Low pelvic access must be preserved for rectal division and stapling
- Extraction often via a Pfannenstiel incision or planned specimen-extraction site
C. Low anterior resection
- Camera port with a broad abdominal and pelvic view
- Lower-quadrant working ports for pelvic dissection
- Suprapubic or lower-midline access for stapling or assistance
- Additional upper-abdominal port for splenic-flexure mobilization when required
D. Total colectomy
6. Laparoscopic hiatal hernia repair and fundoplication
Position
- Supine, commonly split-leg/French position
- Reverse Trendelenburg
Typical five-port configuration
| Port | Common role |
|---|---|
| Camera port | Upper midline or supraumbilical |
| Right working port | Right upper abdomen |
| Left working port | Left upper abdomen |
| Assistant/retraction port | Lateral upper abdomen |
| Liver retractor port | Subxiphoid or upper abdominal site |
Port geometry must permit
- Liver elevation without excessive focal pressure
- Dissection at right and left crura
- Access to the mediastinum
- Passage behind the esophagus
- Hiatal suturing
- Fundus mobilization and wrap creation
7. Laparoscopic sleeve gastrectomy and bariatric surgery
Position
- Supine
- Reverse Trendelenburg
- Often split-leg or French position
Typical components
- Central or supraumbilical camera port
- Right-sided working port, often 12 mm for stapler access
- Left-sided working port
- Additional lateral port for retraction
- Subxiphoid liver-retraction port
- Optional assistant port
Key planning priorities
- The stapler port must provide a safe trajectory along the gastric greater curvature.
- The liver retractor must expose the gastroesophageal junction.
- Port locations often need to be more widely spaced and sometimes more cranial in high-BMI patients.
- Long trocars and bariatric-length instruments may be necessary.
- The specimen-extraction plan should be anticipated.
8. Gynecologic laparoscopy and laparoscopic hysterectomy
Position
- Dorsal lithotomy
- Trendelenburg
- Uterine manipulator when relevant to the operation
Typical configuration
| Port | Common location | Function |
|---|---|---|
| Camera | Umbilical or supraumbilical | Panoramic pelvis view |
| Right lower quadrant | Lateral to rectus, avoiding epigastric vessels | Working port |
| Left lower quadrant | Lateral to rectus, avoiding epigastric vessels | Working port |
| Optional suprapubic, upper-quadrant, or extra lateral port | Procedure-dependent | Assistant, retraction, suturing, large uterus access |
Important modifications
- Large fibroid uterus: camera and working ports may need to move cephalad.
- Severe endometriosis: additional lateral ports can improve ureterolysis, deep pelvic dissection, and retraction.
- Obesity: longer instruments and more cranial sites may be necessary.
- Prior cesarean, pelvic, or bowel surgery: inspect for anterior-wall adhesions before placing lateral or suprapubic ports.
- Pelvic mass: choose camera and working sites that avoid direct passage through or near the mass.
9. Laparoscopic nephrectomy and upper retroperitoneal surgery
Position
- Usually modified flank or lateral decubitus
- Table flexion may increase distance between costal margin and iliac crest
General transperitoneal pattern
- Camera port near umbilicus or lateral to rectus
- Two working ports along a curved or L-shaped arrangement directed toward the renal hilum
- Optional assistant/retraction port
- Additional liver-retraction port on the right side when necessary
- Colon mobilization
- Medial visualization of kidney and hilum
- Upper-pole dissection
- Adrenal exposure where relevant
- Control of renal vessels
- Specimen retrieval
Nephrectomy-specific considerations
- Left and right renal surgery differ because of the liver on the right and spleen/pancreatic tail on the left.
- A separate right anterior axillary or subcostal port may be used for liver retraction in right-sided surgery.
- Hand-assisted approaches require a hand-port incision that does not obstruct working-port geometry.
- Prior abdominal surgery may favor an open, alternative-site, or retroperitoneal approach in selected cases.
10. Laparoscopic pyeloplasty
Position
- Often lateral decubitus with the operative side elevated
- Table partially flexed
Common conventional laparoscopic concept
- Camera port near or lateral to umbilicus
- Cranial working port below costal margin
- Caudal-lateral working port
- Optional assistant port
11. How procedure-specific maps change in difficult cases
Prior surgery or adhesions
- Enter away from scars and anticipated adhesions.
- Inspect internally before accessory-port placement.
- Add ports only under direct view.
- Use a camera position that can survey the entire anterior wall.
Obesity
- Shift ports to preserve a productive internal working distance.
- Consider more lateral or cranial placement based on the target.
- Use longer trocars and instruments where needed.
- Avoid relying solely on standard surface measurements.
Pregnancy
- Move primary and accessory ports according to fundal height.
- Avoid fixed lower-abdominal maps.
- Use an experienced surgeon's access technique and adapt position to maternal physiology.
Large organ or tumor
- Move camera and working ports farther from the target.
- Plan extraction early.
- Anticipate the need for extra retraction or hand assistance.
- Do not place ports where the mass distorts anatomy or restricts instrument movement.
Inflammation, perforation, or bleeding
- Add a port early for suction-irrigation and retraction.
- Preserve an unobstructed pathway for a larger suction instrument, clip applier, stapler, or specimen bag.
- Conversion remains appropriate if visualization or safe control cannot be achieved.
Key takeaways
- There is no universal “correct” port map. Each map is an application of camera visualization, triangulation, retraction, device access, and safe abdominal-wall entry.
- Cholecystectomy usually uses a four-port right-upper-quadrant arrangement with separate fundus and infundibular traction.
- Appendectomy commonly uses umbilical, left-lower-quadrant, and suprapubic ports.
- Inguinal hernia repair uses low pelvic geometry, but TAPP and TEP have different access planes and port strategies.
- Ventral hernia ports should generally be distant from the defect and prior scars.
- Colorectal procedures need flexible access to upper abdomen, pelvis, stapling, and extraction.
- Hiatal and bariatric surgery require a dedicated liver-retraction port and upper-abdominal triangulation.
- Gynecologic pelvic surgery typically uses an umbilical camera with bilateral lower-quadrant working ports, modified upward for a bulky uterus.
- Nephrectomy and pyeloplasty require flank-position planning and working angles appropriate for hilar dissection or reconstructive suturing.
Is it done
- MIS fundamentals
- Equipment and operating-room setup
- Positioning and ergonomics
- Pneumoperitoneum and safe entry
- Core port-placement principles
- Procedure-specific laparoscopic port configurations
- Robotic port placement principles
- Modifications for obesity, prior surgery, pregnancy, pediatrics, and altered anatomy
- Access and port-related complications
- Port-site closure and postoperative care
Create a complete PDF study guide for Parts 1–6
- MIS fundamentals and terminology
- Laparoscopic equipment and operating-room setup
- Patient positioning, table movement, and ergonomics
- Pneumoperitoneum and primary abdominal access
- Camera geometry, triangulation, and safe port placement
- Procedure-specific port configurations for common operations
- Quick-reference tables, safety checklists, and references
Which section should receive the greatest detail in the PDF?
- Fundamentals of minimally invasive surgery (MIS): laparoscopy, thoracoscopy, robotic surgery, and procedural workflow
- Equipment: laparoscope, light source, insufflator, trocars, energy devices, instruments, and specimen retrieval
- Operating-room setup and patient positioning
- Creating pneumoperitoneum and primary abdominal entry: Veress, open Hasson, optical/direct entry
- Port-placement geometry: camera position, triangulation, instrument angles, spacing, ergonomics, assistant ports
- Procedure-specific layouts: cholecystectomy, appendectomy, hernia repair, colorectal, upper GI, pelvic, urologic, bariatric, thoracoscopic, and robotic
- Adjustments for obesity, prior operations/adhesions, pregnancy, large masses, pediatrics, and altered anatomy
- Access-related complications, prevention, recognition, and closure of port sites
- MIS fundamentals and advantages/limitations
- Equipment and operating-room setup
- Patient positioning and ergonomic principles
- Pneumoperitoneum and safe primary entry
- Core principles of abdominal port placement and triangulation
- Standard laparoscopic port layouts by procedure
- Robotic port placement principles
- Modifications for obesity, prior surgery, pregnancy, pediatrics, and altered anatomy
- Access and port-related complications
- Port-site closure and postoperative care
Scope: This is an educational overview for medical and surgical trainees. It explains the principles underlying minimally invasive surgery, not a substitute for supervised operating-room training, simulation, credentialing, or local protocols.
1. What is minimally invasive surgery?
Small access wounds, full operation.
Main forms of MIS
| Approach | Access route | Typical examples |
|---|---|---|
| Laparoscopy | Abdominal or pelvic cavity | Cholecystectomy, appendectomy, colectomy, hernia repair |
| Thoracoscopy / VATS | Pleural cavity through intercostal spaces | Lung resection, pleural biopsy, sympathectomy |
| Robotic surgery | Usually laparoscopic or thoracoscopic ports | Pelvic, colorectal, urologic, upper GI procedures |
| Endoluminal / endoscopic procedures | Natural lumen, such as mouth, anus, urethra | Endoscopic mucosal resection, ERCP, transanal procedures |
| Natural-orifice surgery | Natural orifice with internal transluminal access | Selected transvaginal or transgastric techniques |
| Single-incision laparoscopy | Several instruments through one umbilical incision | Selected cholecystectomy, appendectomy, gynecologic cases |
| Hand-assisted laparoscopy | Ports plus a sealed hand-access incision | Selected colectomy, splenectomy, complex abdominal work |
2. The central difference between open and laparoscopic surgery
- Making an incision
- Retracting the abdominal wall and viscera
- Looking directly at the field
- Using hands and conventional instruments
- Entering the cavity with ports
- Insufflating carbon dioxide to create working space
- Viewing the operative field through a laparoscope and monitor
- Manipulating tissue with long instruments through fixed points in the abdominal wall
The laparoscopic environment
- External hand movement is reversed internally around the port fulcrum.
- Small changes in port position can substantially alter the internal angle of approach.
- Poor port placement cannot always be corrected by better instrument technique.
- A safe operation requires a planned camera view, instrument path, retraction strategy, and exit plan.
3. Essential objectives of MIS
- Correct indication and patient selection
- Adequate exposure
- Accurate identification of anatomy
- Safe tissue dissection
- Hemostasis
- Control of contamination
- Completion of reconstruction or resection
- Specimen extraction when required
- Safe closure
- Appropriate conversion to open surgery when needed
Conversion is not failure
- Uncontrolled bleeding
- Inability to identify critical anatomy
- Dense adhesions or distorted anatomy
- Injury requiring repair
- Inadequate exposure
- Technical inability to safely complete the planned operation
- Physiologic intolerance of pneumoperitoneum or positioning
4. Why MIS can benefit patients
- Smaller access incisions
- Less postoperative wound pain
- Reduced wound morbidity in many operations
- Earlier mobilization
- Faster return of functional recovery
- Shorter length of stay for many procedures
- Faster return to normal activity or work
- Improved cosmetic outcome
- Less blood loss in selected operations
5. Limits and disadvantages of MIS
A. Technical limitations
- Long, rigid instruments
- A limited tactile sense compared with direct manual surgery
- A two-dimensional view with many standard systems
- Reduced depth perception
- The fulcrum effect
- Restricted range of movement
- Limited ability to change the line of approach after ports are placed
- Potential external or internal instrument collision
B. Physiologic limitations
- Ventilation
- Venous return and cardiac output
- Carbon dioxide elimination
- Renal and splanchnic perfusion
- Intracranial and intraocular pressure in relevant contexts
C. System limitations
- Loss of pneumoperitoneum
- Camera fogging or contamination
- Failure of the light source, camera, monitor, insufflator, energy device, or suction-irrigation system
- Wrong instrument length
- Poor trocar position
- Failure to anticipate specimen extraction
- Inadequate communication between surgeon, anesthesia, and nursing staff
6. Basic components of a laparoscopic system
- Laparoscope
- Light source
- Camera
- Monitor
A. Laparoscope
- Diameter: commonly 5 mm or 10 mm
- Viewing angle: 0-degree or 30-degree, with other angles available
- Connection to a light cable
- Connection to a camera head or an integrated distal camera
0-degree laparoscope
- A direct, forward-looking view is adequate
- Orientation is straightforward
- The operator wants simple visual geometry
30-degree laparoscope
- Looks around structures
- Gives more flexible visualization in recesses
- Can improve the view over or under organs
- Helps when placing secondary ports because rotating the lens away from the working field can provide a panoramic view of the abdominal wall
B. Camera and monitor
- Neck rotation
- Shoulder elevation
- Fatigue
- Slower and less precise movement
- Loss of visual orientation
C. Light source and light cable
- Adequate light output
- A clean lens
- Intact light cable
- Correct white balance and focus
- Avoidance of excessive heat at the cable tip
D. Insufflator and carbon dioxide tubing
- An adequate CO₂ supply and backup supply
- Proper tubing connection
- Functional alarms
- Correct large-cavity/laparoscopy setting
- Function of valves and stopcocks
- Ability to troubleshoot leaks
E. Trocars and cannulas
| Port size | Typical uses |
|---|---|
| 5 mm | Graspers, dissectors, scissors, small energy devices |
| 10-12 mm | Camera, clip applier, stapler, larger energy device, specimen retrieval |
| 15 mm or larger | Selected stapling, bariatric, or specimen-related needs |
F. Working instruments
- Atraumatic graspers
- Traumatic graspers where appropriate
- Maryland dissector
- Right-angle dissector
- Laparoscopic scissors
- Needle holder
- Suction-irrigation device
- Clip applier
- Energy device
- Retractor
- Specimen retrieval bag
G. Energy devices
- Monopolar electrosurgery
- Bipolar electrosurgery
- Advanced bipolar vessel-sealing devices
- Ultrasonic devices
- Other hybrid energy devices
7. Pneumoperitoneum: creating the operative workspace
Definition
Why carbon dioxide is used
- Nonflammable
- Highly soluble in blood
- Rapidly eliminated by the lungs
- Compatible with electrosurgery
- Widely available and practical
Typical pressures
8. Physiologic consequences of pneumoperitoneum
A. Respiratory effects
- Reduced lung compliance
- Increased airway pressures
- Reduced functional residual capacity
- Atelectasis risk
- Ventilation-perfusion mismatch
- Increased absorption of CO₂, causing rising end-tidal CO₂ and possible respiratory acidosis if ventilation is not adjusted
B. Cardiovascular effects
- Reduced venous return
- Altered cardiac output
- Increased systemic vascular resistance
- Changes in blood pressure
- Increased cardiac workload in susceptible patients
C. Renal and splanchnic effects
- Renal blood flow and urine output
- Splanchnic blood flow
- Hepatic venous flow
D. Carbon dioxide-related effects
- Hypercapnia
- Respiratory acidosis if ventilation does not compensate
- Sympathetic stimulation
- Tachycardia or hypertension in some patients
- Increased cerebral blood flow, relevant in patients where elevated intracranial pressure is a concern
E. Subcutaneous emphysema and gas tracking
- Long operations
- Multiple ports
- Loose port fit
- Higher insufflation pressure
- Extraperitoneal dissection
- Port displacement
9. Patient position is part of exposure
| Position | Typical purpose | Important concern |
|---|---|---|
| Trendelenburg | Moves bowel cephalad for pelvic exposure | Increased diaphragmatic pressure, facial/airway edema during prolonged steep positioning |
| Reverse Trendelenburg | Moves bowel caudad for upper abdominal exposure | Reduced venous return, sliding risk |
| Right tilt | Often improves left upper quadrant exposure | Pressure-point and securement issues |
| Left tilt | Often improves right upper quadrant exposure | Pressure-point and securement issues |
| Lateral decubitus | Retroperitoneal, renal, adrenal, thoracic procedures | Padding, nerve protection, table flexion, securement |
- Securely positioned for intended table movement
- Padded at pressure points
- Protected from sliding
- Positioned with arms and legs safely
- Checked for access to the airway and IV lines after draping
- Considered in the context of possible conversion to open surgery
10. The fulcrum effect and loss of haptic feedback
Fulcrum effect
Haptic feedback
- Visual tissue deformation
- Color changes
- Instrument response
- Traction-countertraction
- Awareness of instrument tip position
- Controlled movement
- Avoidance of blind force
11. Visual-spatial orientation
- Where the camera is located
- Direction of the camera view
- The horizon
- The relationship between screen direction and patient anatomy
- Which instrument is in which hand
- Whether the camera has rotated
- Whether an organ is being viewed from an expected or reversed perspective
Orientation principles
- Keep the horizon level when possible.
- Identify fixed landmarks early.
- Avoid operating with an uncertain camera orientation.
- Clean the lens before attempting difficult dissection.
- Maintain a view of the active instrument tip.
- Keep non-active instruments visible when they can cause injury.
- Re-establish orientation after changing camera ports or table position.
12. Laparoscopy versus robotic surgery
Conventional laparoscopy
- Surgeon stands at the operating table
- Long rigid instruments
- Usually 2D image, though 3D systems exist
- Fulcrum effect
- Limited instrument articulation
- Direct control of instruments
Robotic surgery
- Surgeon sits at a console
- Usually stereoscopic, magnified 3D visualization
- Wristed instruments with extra degrees of freedom
- Motion scaling and tremor filtering
- Camera controlled from console
- Requires docking, arm spacing, and a plan for emergency undocking
13. Why team coordination matters in MIS
Surgeon
- Indication and operative plan
- Safe access strategy
- Port layout
- Anatomy and dissection
- Decision to add ports, change approach, or convert
Assistant
- Camera control
- Retraction
- Suction-irrigation
- Exposure
- Awareness of instrument collision and port conflict
Scrub professional
- Instrument readiness
- Device compatibility
- Energy-device setup
- Anticipating the operative sequence
Circulating nurse
- Equipment coordination
- Positioning assistance
- Availability of additional equipment and conversion supplies
Anesthesia team
- Monitoring the patient’s physiologic response to pneumoperitoneum and positioning
- Ventilation and CO₂ management
- Hemodynamic support
- Communication regarding intolerance of positioning or insufflation
- Preparing for the possibility of conversion
14. A practical mental framework before an MIS operation
- What is the target anatomy?
- What exposure is required to see it safely?
- What patient position uses gravity to help?
- Where should the camera be placed for the best overview?
- Where must each working instrument enter to obtain the right angle?
- How will retraction be achieved?
- What prior scars, adhesions, hernias, enlarged organs, or altered anatomy may change access?
- What is the extraction site, if a specimen is being removed?
- What is the backup plan if exposure, anatomy, or bleeding becomes unsafe?
Key takeaways
- MIS is an approach that reduces access trauma while preserving the goals of the operation.
- Laparoscopy requires ports, a camera system, long instruments, and a pneumoperitoneum-created workspace.
- CO₂ is the standard insufflation gas because it is nonflammable and highly soluble, but it can affect respiratory and cardiovascular physiology.
- Positioning, gravity, pneumoperitoneum, retraction, and port geometry together determine exposure.
- The fixed port creates a fulcrum effect and reduces tactile feedback.
- Conventional laparoscopy requires deliberate visual-spatial orientation and ergonomic planning.
- Robotic surgery improves some technical limitations but does not remove the need for safe access, sound anatomy, or correct port placement.
- Conversion to open surgery is a safety decision, not an operative failure.
Educational note: Laparoscopic equipment must be used only by trained clinicians within local credentialing, device instructions for use, and operating-room safety systems.
1. Why setup matters
- The procedure and anticipated patient position
- Planned ports and likely need for extra ports
- The camera, scope angle, and port sizes required
- Required energy devices, staplers, clip appliers, sutures, and retrieval bag
- Whether imaging, fluoroscopy, endoscopy, ultrasound, or a robot is required
- The conversion-to-open plan
- The location and availability of blood, suction, and emergency equipment
2. Standard laparoscopic equipment
A. Laparoscopic tower
- Video monitor
- Camera-control unit
- Light source
- CO₂ insufflator
- Recording or image-capture system
- Smoke evacuation or insufflation-management system, where available
- Sometimes an integrated suction-irrigation system
B. Essential equipment checklist
| System | Essential components | Main purpose |
|---|---|---|
| Imaging | Scope, camera head, camera-control unit, light source, monitor | View the operative field |
| Insufflation | CO₂ cylinder, regulator, insufflator, tubing | Create and maintain working space |
| Access | Veress needle, trocar-obturator systems, cannulas, open-access set | Enter and maintain access to the cavity |
| Instruments | Graspers, dissectors, scissors, needle holders, retractors | Manipulate and dissect tissue |
| Hemostasis | Monopolar, bipolar, ultrasonic, or vessel-sealing device; clips; topical agents | Bleeding control and division |
| Suction-irrigation | Suction tubing, canister, irrigation saline, pressure system when required | Clear blood, bile, pus, smoke, and fluid |
| Specimen extraction | Retrieval bag, graspers, wound protector if needed | Contain and remove tissue/specimen |
| Emergency backup | Open laparotomy set, vascular instruments, extra suction, blood products as indicated | Manage conversion or major bleeding |
3. Imaging system
A. Laparoscope
Common diameter options
| Diameter | Typical role | Advantages | Limitations |
|---|---|---|---|
| 5 mm | Smaller camera port, pediatric and selected adult cases | Smaller incision, less wall trauma | Often less light transmission and image quality than larger scopes |
| 10 mm | Standard camera system in many procedures | Good image and light transmission | Requires a larger port |
| 12 mm | Camera and large-instrument access | Compatible with staplers and some advanced instrumentation | Larger fascial defect |
Common viewing angles
| Scope angle | View | Typical use |
|---|---|---|
| 0-degree | Straight ahead | Direct viewing, simple orientation |
| 30-degree | Angled view that rotates with the scope | Most versatile for abdominal work |
| 45-degree | More oblique viewing | Selected upper GI, bariatric, or difficult-angle procedures |
B. Camera head and camera-control unit
- White balancing
- Focusing
- Zoom, if available
- Image enhancement and gain
- Orientation
- High-definition or 4K output
- Recording or still-image capture
Before the case
- Powers on and produces a stable image
- Is white-balanced according to the manufacturer’s instructions
- Focuses correctly
- Has no loose cable connections
- Has a sterile drape, if required
- Produces an image on every monitor required by the surgeon and assistant
C. Light source and light cable
Key points
- Confirm light intensity and automatic/manual settings.
- Inspect the light cable for damage.
- Keep the cable tip controlled. It can become very hot and cause burns if placed on drapes or tissue.
- Clean blood, bile, condensation, and smoke from the lens promptly.
- If image brightness falls, consider light-source setting, cable connection, damaged fiberoptics, camera gain, scope diameter, and the presence of blood or smoke in the field.
D. Monitor position
Principles
- Keep the monitor at or slightly below eye level.
- Avoid persistent neck flexion, rotation, or extension.
- Align the screen with the operative target and camera orientation.
- Provide a separate monitor for the assistant if necessary.
- Ensure all team members can see the image during critical steps.
4. CO₂ insufflation system
A. Components
- Medical-grade CO₂ cylinder
- Cylinder valve and regulator
- Insufflator
- Sterile insufflation tubing
- Stopcock or port connection
- Pressure and flow controls
- Audible and visual alarms
B. Preoperative checks
- CO₂ cylinder contains adequate gas.
- A backup cylinder is available.
- Cylinder valve is opened correctly.
- Tubing is connected, patent, and not kinked.
- Insufflator is in the correct laparoscopy or large-cavity mode.
- Pressure and flow settings are appropriate for the case and patient.
- Alarms function.
- Stopcocks and port valves are understood by the operating team.
Common causes of poor insufflation
| Problem | Likely causes | Initial response |
|---|---|---|
| Inadequate pneumoperitoneum | Empty CO₂ cylinder, open stopcock, disconnected tubing, port leak | Check gas supply, valves, tubing, and port seals |
| Insufflation pressure unexpectedly high | Needle or trocar outside peritoneal space, kinked tubing, patient not adequately relaxed | Stop and reassess access and tubing; communicate with anesthesia |
| Persistent gas leak | Loose port, open valve, damaged seal, oversized skin incision | Secure or replace port, close valve, correct seal |
| Poor workspace | Inadequate pressure, large leak, obesity, adhesions, poor relaxation | Diagnose the cause, not simply increase pressure |
C. Low-pressure and standard-pressure strategies
- Body habitus
- Procedure
- Location of target anatomy
- Patient cardiopulmonary reserve
- Duration of surgery
- Need for hemostasis and exposure
- Team experience
5. Access devices
A. Veress needle
- Correct entry-site selection
- A controlled entry technique
- Confirmation that the needle is intraperitoneal
- Attention to pressure behavior and insufflation response
- A predefined alternative plan if entry is uncertain
B. Trocars and cannulas
- Obturator: the inner penetrating component
- Cannula: the hollow outer sleeve that remains after obturator removal
- Valve system: reduces CO₂ leak while allowing instruments to pass
- Retention system: threaded cannula, balloon, or other mechanism to reduce dislodgement
Trocar types
| Type | General concept | Considerations |
|---|---|---|
| Bladed trocar | Sharp cutting tip | Can enter readily but requires careful technique |
| Bladeless/dilating trocar | Separates or dilates tissue layers | May reduce cutting of the abdominal wall but does not eliminate visceral or vascular injury |
| Optical trocar | Allows visualization during passage | Requires correct use and does not eliminate injury risk |
| Balloon trocar | Retained by an intraperitoneal balloon | Useful in selected open-access sites and may reduce gas leak |
| Hasson cannula | Used with open access | Secured with fascial stay sutures or retention mechanism |
Port size must match the intended instrument
- Instrument diameter
- Need for clip applier or stapler
- Anticipated specimen extraction
- Camera system
- Need for a fascial closure plan
- Procedure-specific requirements
6. Basic laparoscopic instruments
A. Graspers
Atraumatic graspers
- Bowel handling
- Tissue retraction
- Gallbladder or organ traction
- Holding delicate structures
Traumatic graspers
- Firm tissue traction
- Fascia, peritoneum, or tough tissue
- Specimen control
B. Dissectors
- Maryland dissector
- Right-angle dissector
- Curved dissector
- Blunt dissector
- Create tissue planes
- Isolate vessels or ducts
- Pass sutures or clips
- Apply controlled traction-countertraction
- Facilitate blunt and sharp dissection
C. Scissors
- Straight
- Curved
- Monopolar-compatible
- Dedicated to sharp dissection
D. Needle holders
- Strong jaw grip
- Controlled rotation
- Appropriate needle compatibility
- A port position that permits correct needle angles
E. Retractors
- Fan retractors
- Liver retractors
- Flexible retractors
- Graspers used as retractors
- Suspension sutures in selected procedures
F. Clip appliers and staplers
- Bowel
- Vessels
- Mesentery
- Lung tissue in thoracoscopic procedures
- Other structures in procedure-specific settings
- Correct cartridge choice
- Adequate port size
- Correct articulation and tissue alignment
- No unintended tissue within jaws
- Adequate visualization of both sides of the target
- Ability to control bleeding if stapling fails or causes injury
7. Suction-irrigation system
Functions
- Remove blood and clot
- Remove bile, pus, enteric content, or irrigation fluid
- Identify a bleeding source
- Irrigate contaminated areas
- Perform blunt hydrodissection in selected circumstances
- Test for leakage in procedure-specific situations
- Clear lens-adjacent fluid or smoke
Practical principle
If the field is obscured by blood, smoke, or fluid, do not continue blind dissection. Restore visualization first.
Setup checks
- Suction tubing attached to working suction
- Canister functional and not full
- Irrigation saline available
- Connections tight
- Handpiece tested
- Backup suction ready for cases with a meaningful bleeding or contamination risk
8. Energy devices
A. Monopolar electrosurgery
- Active electrode at the surgical instrument
- Patient return electrode, often called a dispersive pad
- Electrosurgical generator
- Electrical current passing through the patient to the return electrode
Uses
- Cutting
- Coagulation
- Dissection
- Spot hemostasis
Risks
- Direct thermal injury
- Insulation failure
- Direct coupling
- Capacitive coupling
- Injury from an active instrument outside the camera view
- Inadequate dispersive-electrode contact
B. Bipolar electrosurgery
- More focused energy delivery
- Useful for controlled vessel coagulation
- Less unintended current pathway than monopolar energy
- Tissue sticking
- Slower division in some settings
- May not seal larger vessels reliably unless using an advanced vessel-sealing system
C. Advanced bipolar vessel-sealing devices
- Mesenteric division
- Omental division
- Vascular pedicles of appropriate diameter
- Tissue dissection with hemostasis
D. Ultrasonic devices
- Reduced electrical current through the patient
- Effective dissection and coagulation in selected tissues
- Less smoke than some monopolar settings
- Thermal spread
- Hot instrument tip after activation
- Injury to adjacent structures
- Activation outside the visual field
E. General energy safety rules
- Use the lowest effective setting.
- Activate only when the active tip is fully visible.
- Know what tissue lies behind the target.
- Avoid activating near bowel, ureter, major vessels, nerves, and thin-walled structures without a clear safety margin.
- Do not activate an instrument while withdrawing it through a trocar.
- Inspect reusable insulated instruments for defects.
- Avoid contact between an activated instrument and another metal instrument unless intended.
- Keep the active electrode clean.
- Confirm function of the dispersive pad for monopolar energy.
- Treat unexplained postoperative pain, fever, peritonitis, or sepsis with concern for a possible delayed thermal injury in the appropriate clinical setting.
9. Smoke evacuation
- Integrated insufflation and smoke-evacuation systems
- Filtered evacuation devices
- Suction through an appropriate filter system
- Controlled release of pneumoperitoneum
- Clearer view
- Fewer interruptions for camera cleaning
- Reduced operating-room contamination
- Better maintenance of pneumoperitoneum with modern systems
10. Specimen retrieval systems
- Gallbladder
- Appendix
- Lymph nodes
- Ovarian cysts or adnexal tissue
- Bowel specimen
- Solid organ tissue
- Tumor specimen
- Reduced contamination of the wound
- Reduced spillage of bile, pus, infected material, stones, or tumor tissue
- Controlled extraction
- Which port will be enlarged if needed?
- Does the specimen require a bag?
- Is wound protection needed?
- Is a mini-laparotomy more appropriate?
- How will the fascial defect be closed afterward?
11. Operating-room layout
A. Place the team around the target anatomy
- Right upper quadrant surgery: team and monitors are arranged to permit ergonomic approach to the hepatobiliary region.
- Pelvic surgery: monitors and team should align with pelvic access and Trendelenburg positioning.
- Flank renal surgery: positioning, table flexion, and equipment placement must accommodate a lateral operative approach.
- Thoracoscopic surgery: equipment must accommodate lateral decubitus positioning and intercostal access.
B. Position monitors for direct sight lines
C. Keep cables organized
- Long enough for table movement
- Clearly separated from foot pedals
- Protected from traction or entanglement
- Away from sterile-field hazards
- Checked again after patient repositioning
D. Ensure anesthesia access
- Airway
- IV lines
- Infusions
- Monitoring equipment
- The patient’s head and upper body, as feasible
12. Equipment check before incision
A. Imaging
- Camera image present
- Scope focused and white-balanced
- Lens clean
- Correct scope diameter and angle available
- Light cable functioning
- Backup scope or camera plan available
- Monitor correctly positioned
B. Insufflation
- Adequate CO₂ supply and backup
- Correct insufflator setting
- Alarm checked
- Tubing connected and unkinked
- Stopcocks understood and functional
- Planned access device ready
C. Instruments
- Required trocars and port sizes available
- Graspers, dissectors, scissors, needle holders ready
- Retraction device ready
- Suction-irrigation tested
- Specimen bag ready where appropriate
- Extra-long instruments available for high-BMI patients when required
D. Energy and hemostasis
- Electrosurgical generator tested
- Correct energy device and foot pedal identified
- Monopolar dispersive pad applied correctly, when used
- Clips, staplers, hemostatic agents, sutures available
- Smoke evacuation plan confirmed
E. Safety and contingency
- Open conversion instruments available
- Blood products and rapid infusion strategy considered when risk warrants
- Positioning secure before table tilt
- Pressure areas padded
- Antibiotic prophylaxis and VTE prevention completed as indicated
- Team shares expected difficult steps and rescue plan
13. Common setup errors and their prevention
| Error | Consequence | Prevention |
|---|---|---|
| Wrong scope angle or diameter | Poor visualization, repeated exchange | Confirm equipment before incision |
| Camera not white-balanced or focused | Poor image quality | Test before sterile draping |
| No backup CO₂ supply | Delayed procedure or loss of workspace | Check primary and backup cylinder |
| Inadequate port selection | Cannot pass stapler, clip applier, or specimen | Plan device sizes before entry |
| No retrieval bag prepared | Unplanned contamination or delay | Include in procedure-specific setup |
| Suction not tested | Delayed response to bleeding or spillage | Test suction and irrigation before incision |
| Energy device mismatch | Unsafe hemostasis or inefficiency | Confirm device, generator, and compatible instruments |
| Monitor poorly placed | Fatigue and impaired precision | Align monitor with surgeon and target |
| Cables under tension | Loss of image, gas, or energy delivery | Arrange with anticipated table movement |
| No conversion plan | Delayed response in an emergency | Ensure open tray and personnel readiness |
14. Key takeaways
- Laparoscopy requires an integrated system: imaging, insufflation, access ports, instruments, energy, suction-irrigation, and contingency equipment.
- Image quality is a safety issue. Ensure correct camera setup, light output, lens cleanliness, and monitor location before beginning.
- CO₂ insufflation requires a functional insufflator, correctly connected tubing, adequate gas supply, and a backup cylinder.
- Choose port size and instrument type based on the complete anticipated procedure, including stapling, clipping, suturing, and specimen extraction.
- Suction-irrigation must be ready and tested before incision.
- Energy devices require device-specific knowledge and continuous awareness of possible thermal injury.
- Equipment failures should be anticipated with a structured checklist rather than addressed only after a problem appears.
1. Positioning objectives
- Expose the planned operative field
- Allow safe table tilt and movement
- Protect nerves, skin, eyes, and pressure points
- Preserve safe access for anesthesia
- Create an ergonomic working position for surgeon and assistant
2. General safety checklist before incision
- Correct procedure, laterality, and planned position
- Patient is securely fixed to the table before tilt
- Arms are positioned and padded appropriately
- All bony prominences are padded
- Neck is neutral and free from excessive rotation or flexion
- Eyes are protected and free of external pressure
- Lines, urinary catheter, monitoring leads, and endotracheal tube remain accessible and free of traction
- Legs are positioned symmetrically if stirrups are used
- The patient can tolerate the intended Trendelenburg, reverse Trendelenburg, or lateral tilt
- Table movement will not pull equipment cables, insufflation tubing, or the light cable
- The conversion-to-open plan remains feasible
3. Core patient positions
A. Supine position
Description
Typical uses
- Laparoscopic cholecystectomy
- Appendectomy
- Ventral hernia repair
- Many bowel procedures
- Diagnostic laparoscopy
- Bariatric surgery
- Some upper GI operations
Key precautions
- Pad the occiput, elbows, sacrum, heels, and any pressure points.
- If arms are abducted, avoid excessive abduction or external rotation.
- If arms are tucked, ensure hands, fingers, IV tubing, and monitoring lines are protected.
- Secure the patient well if reverse Trendelenburg or lateral tilt will be used.
Common modification
B. Trendelenburg position
Description
Purpose
- Pelvis
- Bladder
- Uterus and adnexa
- Rectum
- Distal sigmoid colon
- Prostate
Used in
- Gynecologic laparoscopy
- Laparoscopic and robotic hysterectomy
- Prostatectomy
- Rectal surgery
- Pelvic colorectal surgery
- Pelvic lymphadenectomy
Risks
- Reduced lung compliance and increased airway pressures
- Facial, conjunctival, and airway edema
- Reduced venous drainage from the head
- Increased intracranial and intraocular pressure
- Sliding toward the head of the table
- Brachial plexus injury if shoulder braces are used improperly
- Nerve injury, rhabdomyolysis, or compartment syndrome in prolonged cases
Safety principles
- Use the least degree of tilt that provides acceptable exposure.
- Avoid relying on shoulder braces that compress the shoulders or neck.
- Use approved nonslip positioning systems and securement methods.
- Reassess positioning after tilting.
- Communicate with anesthesia if airway pressures, facial edema, or hemodynamic changes become concerning.
- In prolonged robotic pelvic cases, periodically reassess the need for continued steep tilt where operative circumstances permit.
C. Reverse Trendelenburg position
Description
Purpose
Used in
- Laparoscopic cholecystectomy
- Hiatal hernia repair
- Fundoplication
- Bariatric surgery
- Liver surgery
- Splenic procedures
- Upper gastric surgery
Risks
- Patient sliding toward the foot of the table
- Decreased venous return and hypotension
- Excessive pressure on heels and sacrum
- Difficulty maintaining stable access if the patient is not adequately secured
Safety principles
- Use secure foot support and an approved anti-slide system.
- Ensure knees are not hyperextended.
- Protect heels and sacrum.
- Confirm that straps or supports do not compromise circulation or cause focal pressure injury.
D. Lateral tilt
Right-side-up tilt
Left-side-up tilt
Risks
- Sliding
- Asymmetric pressure injury
- Loss of secure position during table rotation
- Instrument and trocar torque if the abdominal wall shifts relative to the operating team
E. Lithotomy and modified lithotomy position
Description
Typical uses
- Pelvic laparoscopy
- Gynecologic procedures
- Robotic prostatectomy
- Low anterior resection
- Transanal procedures
- Procedures requiring perineal access
Key principles
- Both legs must be raised and lowered together.
- Avoid excessive hip flexion, abduction, or external rotation.
- Avoid pressure at the fibular head, where the common peroneal nerve is vulnerable.
- Ensure calves are supported without focal compression.
- Avoid extreme knee flexion and prolonged compression of the calf compartments.
- Confirm adequate clearance between legs, stirrups, surgeon, assistant, and equipment.
Risks
- Common peroneal neuropathy
- Femoral neuropathy
- Sciatic nerve stretch injury
- Pressure injury
- Compartment syndrome
- Rhabdomyolysis
- Lower-extremity ischemia, particularly in prolonged and steeply tilted cases
F. Lateral decubitus position
Description
Typical uses
- Laparoscopic nephrectomy
- Adrenalectomy
- Retroperitoneal procedures
- Splenectomy in selected approaches
- Thoracoscopic surgery
Positioning features
- Dependent arm supported on an arm board
- Upper arm supported without traction on the shoulder
- Axillary support used according to local practice and patient anatomy
- Padding between knees and ankles
- Beanbag, vacuum mattress, tape, or other securement system
- Table flexion where needed to widen the operative space
Risks
- Brachial plexus compression or stretch
- Dependent shoulder injury
- Pressure on dependent ear, eye, ribs, iliac crest, and peroneal nerve
- Ventilatory compromise
- Patient movement after table flexion or tilt
4. Positioning by operative target
| Operative region | Typical position | Gravity goal |
|---|---|---|
| Right upper quadrant | Supine, reverse Trendelenburg, right side up | Move bowel and omentum caudally and leftward |
| Left upper quadrant | Supine or right lateral/semi-lateral with tilt | Move bowel away from spleen and upper left abdomen |
| Epigastrium and hiatus | Supine, reverse Trendelenburg, often split-leg | Move bowel caudally and improve hiatal exposure |
| Pelvis | Supine lithotomy with Trendelenburg | Move bowel cephalad |
| Lower abdomen / appendix | Supine, Trendelenburg with left tilt | Move bowel cephalad and leftward |
| Right colon | Supine with left tilt, variable Trendelenburg | Shift small bowel leftward |
| Left colon / sigmoid | Supine with right tilt, variable Trendelenburg | Shift small bowel rightward |
| Kidney / adrenal | Lateral decubitus with table flexion | Open flank and allow viscera to fall medially |
| Thorax | Lateral decubitus, table flexion as needed | Open intercostal spaces and maintain lung access |
5. Surgeon ergonomics
A. Why ergonomics matter
- Neck pain
- Shoulder fatigue
- Back pain
- Wrist strain
- Hand fatigue
- Reduced precision
- Longer operative time
- Instrument collision
- Loss of control during fine dissection
B. Neutral surgeon posture
- Head and neck near neutral
- Shoulders relaxed, not elevated
- Elbows close to the body
- Forearms in a comfortable working range
- Wrists as neutral as possible
- Feet stable and apart at shoulder width
- Minimal trunk rotation or leaning
C. Operating table height
- Shoulders elevate
- Elbows abduct
- Neck and upper back fatigue increase
- The surgeon bends forward
- Trunk and neck strain increase
- Fine instrument control may worsen
D. Monitor placement
- Place the monitor in front of the primary surgeon.
- Keep it at or slightly below eye level.
- Avoid looking persistently upward, sideways, or over the shoulder.
- Ensure the assistant has a clear screen view.
- Reposition monitors if the team changes sides during the procedure.
6. Instrument ergonomics and port geometry
A. The target-centered approach
- Where is the target?
- What angle is needed for safe dissection?
- Where will traction come from?
- Where will countertraction come from?
- Will the surgeon need to suture, staple, clip, or divide tissue?
- What will the camera need to show at the critical step?
B. Avoid handle collision
- Too close together
- Misaligned with the target
- Positioned in a straight line rather than a useful triangular layout
- Inappropriately placed for a thick abdominal wall
- Too medial or too lateral for the planned maneuver
C. Avoid internal collision
- Instrument shafts
- Instrument tips
- Camera
- Bowel or abdominal wall
- Robotic arms in robotic surgery
D. Instrument length
E. Do not persist with a bad setup
- Change the table position
- Change camera port
- Add a port
- Reposition an accessory port
- Use a longer instrument
- Change the retraction strategy
- Convert to a different approach if safety requires
7. Positioning injuries: mechanisms and prevention
A. Peripheral nerve injury
- Compression
- Stretch
- Ischemia
- Prolonged pressure
- Improper arm or leg positioning
Common nerves at risk
| Nerve / structure | Typical mechanism |
|---|---|
| Brachial plexus | Shoulder compression, arm traction, steep Trendelenburg, shoulder braces |
| Ulnar nerve | Elbow compression or poor arm padding |
| Common peroneal nerve | Pressure at fibular head in lithotomy |
| Femoral nerve | Excessive hip flexion, extension, or retractor-related compression |
| Sciatic nerve | Excessive hip flexion or stretch in lithotomy |
| Radial nerve | Compression along humerus or arm-board injury |
Prevention
- Keep arms in a neutral, supported position.
- Avoid excessive shoulder abduction.
- Pad elbows and fibular heads.
- Ensure arm boards and stirrups are positioned symmetrically.
- Avoid focal pressure from straps, braces, or table edges.
- Reassess after repositioning and table tilt.
B. Pressure injury
- Occiput
- Ears
- Scapulae
- Sacrum
- Elbows
- Heels
- Lateral malleoli
- Knees
- Iliac crest
- Dependent shoulder in lateral position
C. Compartment syndrome and rhabdomyolysis
- Prolonged surgery
- Lithotomy
- Extreme Trendelenburg
- High BMI
- Hypoperfusion
- Excessive focal compression
- Inadequate padding
D. Eye and facial complications
- Facial and conjunctival edema
- Increased intraocular pressure
- Rare visual complications in susceptible circumstances
8. Positioning in robotic surgery
- Complete positioning and padding.
- Secure the patient for planned tilt.
- Confirm all lines and airway access.
- Ensure arms are properly tucked or placed.
- Confirm monitor access for bedside assistant.
- Ensure enough room for robotic-arm movement.
- Verify emergency undocking roles.
- Avoid moving the operating table unless the system and procedure permit it.
- Watch for robot arm pressure on the patient, legs, chest, or ports.
- Avoid excessive torque at ports.
- Maintain a clear path for emergency undocking and conversion.
9. Positioning time-out
- Patient position matches the procedure
- Table can safely tilt as planned
- Patient is secured against sliding
- Arms and legs are safe
- Pressure points are padded
- Airway and IV access are preserved
- Surgeon, assistant, anesthesiologist, and nursing team agree on intended table movements
- Equipment has enough cable slack
- The operative field remains adequately exposed after the final position
10. Key takeaways
- Patient positioning is a primary exposure tool, not a minor setup task.
- Use gravity deliberately with pneumoperitoneum and retraction.
- Trendelenburg improves pelvic exposure but increases respiratory, hemodynamic, nerve, facial-edema, and sliding risks.
- Reverse Trendelenburg improves upper-abdominal exposure but requires secure foot support and attention to hypotension and sliding.
- Lithotomy requires symmetric leg movement, nerve protection, and vigilance for compartment-related injury.
- Lateral decubitus requires careful pressure-point protection, arm support, securement, and table-flexion planning.
- Monitor height, table height, surgeon posture, instrument length, and port geometry must be planned together.
- Repositioning, adding a port, or changing the camera angle is often safer than continuing with an ergonomically poor setup.
Educational scope: Primary abdominal access is one of the highest-risk phases of laparoscopy. This note is for supervised surgical education, simulation, and examination preparation. Technique selection and execution require formal training, institutional protocols, and readiness to recognize and manage complications.
1. Why primary entry matters
- Small or large bowel
- Stomach
- Solid organs
- Bladder
- Abdominal wall vessels
- Major retroperitoneal vessels, especially the aorta, inferior vena cava, and iliac vessels
- Patient anatomy and body habitus
- Previous abdominal operations and expected adhesions
- Presence of an umbilical or ventral hernia
- Pregnancy and uterine size
- Intra-abdominal distension or large mass
- Surgeon experience with the access method
- Availability of appropriate equipment and help
2. Objectives of safe entry
- Enter the peritoneal cavity at an appropriate site
- Confirm that the access device is actually intraperitoneal
- Create adequate working space before introducing further ports
- Recognize injury immediately if it occurs
- Inspect the entry site and accessible organs before proceeding
Do not progress from one stage of entry to the next until the preceding stage is credible and safe.
3. Relevant anatomy for primary access
A. Umbilical region
- The abdominal wall is usually thin
- The scar is anatomically adherent to fascia/peritoneum
- It is central, often giving a broad overview of the abdominal cavity
- It permits straightforward camera placement for many operations
- Previous midline laparotomy
- Prior umbilical hernia repair or mesh
- Known or suspected periumbilical adhesions
- Large umbilical hernia
- Infection at the site
- Masses or pregnancy altering local anatomy
B. Major vascular structures
C. Epigastric vessels
D. Left upper quadrant and Palmer's point
- Splenomegaly
- Significant gastric distension
- Prior upper abdominal surgery
- Left-upper-quadrant pathology
- Portal hypertension or altered anatomy
4. Main methods of primary access
| Method | Basic principle | Main advantage | Main limitation |
|---|---|---|---|
| Closed Veress needle entry | Needle creates pneumoperitoneum before trocar insertion | Small incision, familiar, rapid in suitable patients | Initial needle placement is not directly visualized |
| Open Hasson entry | Layered opening to peritoneum under direct vision, then blunt cannula | Direct access, useful with selected scars/adhesions | Can be slower; gas leak and wound issues may occur |
| Optical trocar entry | Camera inside transparent trocar visualizes wall layers during entry | Visualizes tissue passage | Does not eliminate visceral or vascular injury |
| Direct trocar entry | Trocar enters without prior Veress insufflation | Efficient in selected hands | Requires expert judgment and careful patient selection |
| Alternative-site entry | Entry away from expected adhesions or pathology | Avoids high-risk umbilical area | Site-specific risks and contraindications remain |
5. Closed entry with a Veress needle
A. Equipment
- Veress needle
- Insufflator and sterile tubing
- CO₂ source
- Skin scalpel
- Primary trocar and camera system
- Suction-irrigation system
- Open conversion equipment
B. Veress needle design
- The outer bevel is sharp and passes through tissue.
- The inner blunt stylet advances when resistance suddenly decreases after entering the peritoneal cavity.
C. General workflow
1. Pre-entry assessment
- Review scars, prior operative reports, imaging, hernias, and likely adhesions.
- Confirm patient position and securement.
- Ensure adequate muscle relaxation.
- Confirm functioning insufflator and CO₂ supply.
- Identify the intended site and backup entry plan.
- Ensure the stomach is not distended when upper-abdominal entry is planned.
2. Abdominal-wall elevation
3. Needle insertion
- Do not use uncontrolled force.
- Do not continue after uncertain or abnormal resistance.
- Do not assume a “double pop” proves correct placement.
- Avoid a trajectory toward major retroperitoneal vessels.
- Reassess rather than repeat multiple blind attempts at the same site.
4. Confirm intraperitoneal position
- Low initial opening pressure
- Unimpeded gas flow
- Appropriate abdominal distension
- No unexpected subcutaneous emphysema
- No marked resistance or rapid high-pressure alarm
5. Establish pneumoperitoneum
- Preperitoneal
- In the abdominal wall
- Obstructed
- Incorrectly positioned
- Associated with a tubing or stopcock problem
6. Insert the primary trocar
- Confirmation of intraperitoneal placement
- Inspection for access-related bleeding
- Inspection for bowel or visceral injury
- Assessment for adhesions before inserting any additional ports
6. Open Hasson entry
A. Principle
- Previous abdominal surgery raises concern for adhesions
- Umbilical anatomy is altered
- A controlled direct entry is preferred
- Closed access has failed or is uncertain
- A surgeon's own outcomes and experience favor open entry
B. Basic sequence
- Make a small incision, often at or near the umbilicus.
- Dissect carefully to expose the fascia.
- Secure fascia with stay sutures if appropriate.
- Open fascia and peritoneum under direct control.
- Confirm entry into the peritoneal cavity.
- Insert a blunt Hasson cannula.
- Secure the cannula to minimize gas leak or dislodgement.
- Insert the laparoscope and inspect before proceeding.
- Establish and maintain pneumoperitoneum.
C. Advantages
- Direct visualization of abdominal wall layers
- Avoids blind passage of a Veress needle
- Can be useful where adhesions are anticipated
- Allows use of a larger fascial opening when required
D. Limitations
- May take longer than closed entry
- Gas leakage can be more difficult to control
- Requires adequate fascial closure at the end
- Does not guarantee absence of underlying adhesions or bowel injury
- Still requires controlled opening and careful inspection
7. Optical trocar entry
A. Principle
B. Potential advantages
- Real-time view of the abdominal wall during entry
- May permit recognition of incorrect tissue planes
- Can be used after insufflation or as a primary entry technique in selected practice settings
C. Limitations
- Visualization does not make the technique automatically safe.
- The view may be obscured by blood, fat, or tissue.
- The surgeon must recognize layers and maintain an appropriate trajectory.
- Injury can occur if the device is advanced too far or into adhesions, bowel, mesentery, or vessels.
8. Direct trocar entry
- Appropriate patient selection
- Controlled insertion technique
- A clear backup plan
- Awareness of prior surgery, adhesions, hernias, and anatomy
- Readiness to recognize injury
9. Selecting the initial entry site
A. Standard umbilical entry
- No significant prior midline surgery
- No suspected periumbilical adhesions
- No umbilical hernia or infection
- No major distortion from a mass or pregnancy
- Central camera position is suitable for the planned operation
B. Alternative entry site
- Prior midline laparotomy scars
- Large ventral or umbilical hernia
- Mesh near the umbilicus
- Known adhesions near the planned entry point
- Abdominal distension
- A large pelvic or intra-abdominal mass
- Major anatomic distortion
- Failed or uncertain umbilical access
C. Prior surgery and adhesions
- Type and location of prior incision
- Number of prior operations
- Prior peritonitis, abscess, radiation, or mesh repair
- History of bowel obstruction
- Imaging evidence of adhesions or hernia
- Expected location of bowel relative to the abdominal wall
10. Entry in obesity
- Increased abdominal-wall thickness
- Less obvious surface landmarks
- Longer distance from skin to peritoneum
- Higher risk of poor trocar angle and inadequate reach
- Greater need for longer access devices and instruments in some cases
- Confirm that needle and trocar length are adequate.
- Maintain a planned trajectory toward the desired abdominal cavity.
- Avoid repeated uncertain attempts.
- Consider optical or open approaches based on anatomy and surgeon experience.
- Plan camera and working ports farther from the target when needed to preserve instrument mobility.
11. Entry during pregnancy
Principles
- Choose a site based on uterine fundal height and prior scars.
- Avoid the enlarged uterus.
- Use an entry technique familiar to the surgeon.
- Position beyond the first trimester with left lateral or partial left lateral tilt to reduce aortocaval compression.
- Tailor insufflation pressure to maternal physiology and operative requirements.
12. After successful primary entry: immediate inspection
Inspect for:
A. Entry-site injury
- Abdominal wall bleeding
- Omental injury
- Bowel perforation
- Mesenteric hematoma
- Solid-organ injury
- Retroperitoneal hematoma
- Free blood not explained by the procedure
B. Adhesions
- Bowel or omentum adherent to the anterior abdominal wall
- Adhesions at planned accessory-port sites
- Adhesions that prevent safe working-port placement
- Mesh or prior reconstruction material
C. Adequacy of working space
- Pneumoperitoneum is satisfactory
- Camera view is adequate
- Patient position permits access
- Additional ports can be safely inserted under direct vision
13. Secondary ports
Insert secondary trocars under direct laparoscopic vision.
- Identify the intended skin site externally.
- View the abdominal wall internally.
- Avoid visible vessels and adhesions.
- Advance the trocar under direct visualization.
- Aim toward the operative target.
- Avoid an excessive angle that causes resistance, poor reach, or later instrument torque.
14. Recognition of access complications
A. Suspect bowel injury when there is:
- Visible enteric content
- A puncture, laceration, or serosal defect
- Unexpected gas in bowel wall or mesentery
- Feculent odor or contamination
- A suspicious mark at the entry site
- Unexplained postoperative pain, fever, ileus, leukocytosis, peritonitis, or sepsis
B. Suspect vascular injury when there is:
- Sudden brisk bleeding
- Rapidly enlarging retroperitoneal hematoma
- Unexplained hypotension or tachycardia
- Poor visualization due to blood
- Hemodynamic deterioration immediately after entry
- Blood emerging from a trocar or port
C. Suspect preperitoneal insufflation when there is:
- High initial insufflation pressure
- Low or absent flow
- Poor abdominal distension
- Asymmetric abdominal-wall swelling
- Subcutaneous emphysema
- Failure to obtain an intraperitoneal view after trocar insertion
15. Immediate response to suspected entry injury
A. If access location is uncertain
- Stop insufflation and instrument advancement.
- Reassess pressure, flow, tubing, and the patient.
- Do not repeatedly force entry at the same site.
- Consider a different access site or open approach.
- Obtain direct visualization before continuing.
B. If bowel injury is seen or strongly suspected
- Stop further blind manipulation.
- Maintain or obtain visualization.
- Assess injury location, size, contamination, and viability.
- Seek senior surgical help early when needed.
- Repair laparoscopically only if the team has appropriate expertise, exposure, and confidence.
- Convert to open surgery when needed for safe assessment and repair.
C. If major vascular injury is suspected
- Announce the concern immediately.
- Stop blind maneuvers.
- Apply pressure if feasible and safe.
- Activate the institutional major-hemorrhage response.
- Obtain immediate senior help, including vascular expertise where available.
- Proceed to rapid open exposure when indicated.
16. Common entry errors
| Error | Why it is unsafe | Safer response |
|---|---|---|
| Repeated blind attempts at one site | Cumulative risk of injury and false confidence | Stop, reassess, choose alternate site or technique |
| Ignoring high opening pressure | May indicate preperitoneal or incorrect placement | Stop insufflation and verify access |
| Increasing pressure to overcome resistance | Can mask incorrect placement and worsen injury | Determine cause of resistance first |
| Failing to inspect after entry | Can miss bowel, vessel, or abdominal-wall injury | Perform a deliberate initial survey |
| Placing secondary ports blindly | Risks vascular or bowel injury | Insert under direct vision |
| Persisting with poor exposure | Increases risk during dissection | Reposition, add port, alter approach, or convert |
| Treating open entry as risk-free | Bowel can be adherent under the entry site | Use controlled dissection and inspection |
| Using a familiar technique despite altered anatomy | Prior scars, hernia, pregnancy, or masses change risk | Individualize site and method |
17. A practical pre-entry time-out
- Planned entry technique
- Planned entry site
- Backup site and backup technique
- Previous scars, mesh, hernias, or anticipated adhesions
- Pregnancy or mass-related anatomical changes
- Availability of long instruments if obesity is relevant
- Insufflator function and CO₂ reserve
- Availability of suction, energy, and open conversion instruments
- Team plan if bowel or vascular injury is suspected
18. Key takeaways
- Primary abdominal access is a major safety step, not a routine formality.
- Veress, open Hasson, optical-trocar, and direct-entry approaches can all be appropriate in experienced hands.
- Technique choice should reflect anatomy, prior surgery, adhesions, pregnancy, obesity, pathology, and surgeon experience.
- High initial pressure, poor flow, or inadequate abdominal distension should trigger reassessment.
- Obtain and inspect the first laparoscopic view before placing any additional port.
- Insert secondary ports under direct vision.
- Avoid repeated blind attempts and escalating force.
- Recognize suspected bowel or vascular injury early, involve help promptly, and convert to open surgery when necessary for safe control and repair.
Educational scope: Port placement is a procedure-specific operative skill. This chapter explains the transferable principles used to plan a safe, ergonomic multiport laparoscopic setup. Exact port maps belong to the individual operation and should be learned through supervised training.
1. The central concept: plan from the target outward
- The target anatomy and critical dissection plane
- The direction from which the surgeon must approach it
- The best camera view
- The required traction and countertraction
- The need for clips, stapler, energy device, suturing, or specimen retrieval
- The safest skin sites based on scars, hernia, vessels, bony landmarks, and body habitus
- A panoramic camera view
- Controlled instrument reach
- Effective traction-countertraction
- Minimal external handle collision
- Minimal internal shaft collision
- Safe entry paths for each accessory port
- A workable angle for the most difficult step, not merely the first step
A port that works for exposure may not work for dissection. A port that works for dissection may not work for suturing or stapling.
2. Functions of ports
| Port type | Main function | Typical size |
|---|---|---|
| Camera port | Laparoscope and visualization | 5, 10, or 12 mm |
| Dominant-hand working port | Dissection, cutting, energy, suturing | 5 or 10-12 mm |
| Nondominant-hand working port | Grasping, traction, countertraction | Usually 5 mm |
| Assistant port | Retraction, suction-irrigation, clip application, exposure | Often 5 mm |
| Retraction port | Organ-specific retraction, such as liver elevation | Often 5 mm |
| Stapler or specimen port | Stapler passage, clip applier, specimen retrieval | Usually 10-12 mm or larger |
3. Camera-port planning
A. Role of the camera port
- A broad overview of the operative field
- A stable view of important anatomy
- A line of sight that permits the surgeon to see both working instruments
- Enough distance from the target to avoid an excessively magnified or cramped view
- A safe angle for viewing critical planes
B. Camera-to-target distance
- The view becomes overly magnified
- Orientation becomes difficult
- Instrument tips may be outside the field
- There is insufficient panoramic awareness
- The camera can collide internally with instruments
- Precision falls
- Depth cues become poorer
- Fine structures are difficult to identify
- Long instruments may become harder to control
- The operative target
- The active instrument tip
- The nearby “danger zone” containing adjacent bowel, vessels, ducts, or organs
C. Camera position relative to working ports
D. Scope angle matters
- Look over or beneath an organ
- View the anterior abdominal wall for accessory-port insertion
- Look into recesses
- Improve exposure around the target
- Move the visual axis away from a direct straight-ahead view
4. Triangulation
A. Definition
- Camera port
- Right-hand working port
- Left-hand working port
- Target tissue at the apex of the internal operative field
            Camera
               |
               |
      Left hand     Right hand
            \       /
             \     /
              TARGET
- Traction
- Countertraction
- Exposure
- Blunt dissection
- Sharp dissection
- Clip application
- Suturing
- Knot tying
B. Why triangulation works
- Separation of instruments
- Useful dissection angles
- A stable camera view
- Better bimanual control
- Reduced internal crowding
- Better ability to expose a tissue plane with traction-countertraction
C. Usual spacing principles
- Keep working ports sufficiently separated to prevent handle and shaft collision.
- In many adult conventional laparoscopic configurations, ports are often around 8-10 cm apart.
- The port-target relationship should permit useful approach angles and instrument movement.
- Avoid placing a port too near the target or excessively far away.
D. Triangulation is not a rigid geometric rule
- Very small patients
- Obesity
- Pregnancy
- Large masses
- Deep pelvic surgery
- Upper abdominal surgery
- Extraperitoneal work
- Retroperitoneal surgery
- Adhesions
- Single-incision surgery
- Robotic surgery
5. The fulcrum effect and optimal port distance
- The intraperitoneal instrument segment is short
- The trocar sheath interferes with instrument movement
- Instruments cannot open or articulate freely
- The surgeon may struggle to apply traction or sweep tissue
- The intraperitoneal instrument segment is excessively long
- Small external movements produce large internal tip excursions
- Fine dissection becomes harder
- Instrument stability falls
- Surgeon fatigue increases
6. Working-port selection
A. Dominant-hand port
- Maryland dissection
- Scissors
- Hook cautery
- Ultrasonic or advanced bipolar device
- Needle holder
- Clip applier
- Stapler in some procedures
B. Nondominant-hand port
- Retraction
- Countertraction
- Exposure
- Grasping
- Suction assistance
- Tissue stabilization
C. Assistant port
- Suction-irrigation
- Atraumatic grasper
- Retraction instrument
- Clip applier
- Endoscopic stapler, where required
7. Secondary-port insertion: safety principles
A. Before insertion
- Fully establish pneumoperitoneum.
- Inspect for adhesions at the intended site.
- Identify the planned external skin point.
- Visualize the corresponding internal abdominal wall.
- Consider a finder needle to confirm the trajectory and angle.
- Check for abdominal-wall vessels.
B. During insertion
- Make only an incision large enough for the selected cannula.
- Advance the trocar in a controlled manner.
- Keep the trocar tip under continuous laparoscopic observation.
- Direct it toward the operative target.
- Avoid excessive penetration after peritoneal entry.
- Confirm that the port is functional and appropriately positioned before proceeding.
C. Vessel avoidance
- Superficial vessels may sometimes be identified by transillumination.
- Deeper inferior epigastric vessels may not be reliably visible by transillumination.
- Direct internal visualization, awareness of abdominal-wall anatomy, and appropriate site selection are essential.
D. Avoid other structures
- Bladder, especially for suprapubic ports
- Enlarged uterus in pregnancy
- Liver and spleen for upper ports
- Pleura with very superior abdominal ports
- Bowel or omentum adherent to the abdominal wall
- Stomas
- Mesh
- Prior scars
- Hernias
- Bony landmarks, especially ribs and iliac crest
8. The principle of traction and countertraction
- One hand provides traction
- The other hand dissects
- The camera maintains a stable view
- An assistant retracts adjacent structures or uses suction-irrigation
Example
- The nondominant hand retracts tissue away from the dissection plane.
- The dominant hand uses a dissector or energy device along the exposed plane.
- The camera remains centered and close enough to show the active tip and surrounding risk structures.
9. Ergonomic alignment
Good ergonomic configuration
- Monitor in front of the primary surgeon
- Surgeon has relaxed shoulders and elbows close to the body
- Instruments reach the target without crossed hands
- Camera and working instruments are oriented predictably
- External handles do not collide
- Assistant can work without blocking the surgeon
Poor ergonomic configuration
- Surgeon repeatedly rotates trunk or neck
- Elbows are held high or far from the body
- Instrument handles collide
- Camera holder and surgeon interfere with each other
- Instrument tips cross unintentionally
- The operative target lies too close to a port
- The camera view is unstable or reversed
- The surgeon has to use awkward wrist angles to work
10. Common port-placement problems and remedies
| Problem | Likely cause | Practical remedy |
|---|---|---|
| External instrument collision | Ports too close or poorly aligned | Add or reposition a port; use a different camera location |
| Internal shaft collision | Parallel, crowded instrument paths | Restore triangulation; separate ports |
| Poor reach | Port too far from target; insufficient instrument length | Use longer instruments, change camera, add a closer but safe working port |
| Restricted tip movement | Port too close to target | Add a more distant port with a better working angle |
| Poor retraction vector | Port location does not permit desired pull | Add an assistant or retraction port |
| Camera constantly fogs or collides | Camera too close or poorly positioned | Change scope angle, move camera to another port |
| Port torque and pain at wall | Incorrect angle, thick wall, poor port site | Reassess trajectory, use longer port/instrument, relocate if needed |
| Inability to suture | Inadequate angle or narrow instrument separation | Add a port to widen triangulation |
| Inability to use stapler safely | Incorrect port size, angle, or trajectory | Plan a 12-mm or larger port with direct line to target |
| Bleeding from wall | Vessel injury | Maintain visualization, control bleeding, and reassess further port placement |
11. When to add an extra port
- Inadequate exposure
- Poor retraction
- Uncontrolled or difficult bleeding
- Need for suction-irrigation while maintaining two working instruments
- Inadequate triangulation for suturing
- Dense adhesions
- Obesity or deep target anatomy
- Need for a second assistant instrument
- Need to change camera position
- Need for a stapler or larger instrument
12. Port placement in obesity
- The distance from skin to peritoneum is increased.
- A port that appears correctly placed externally may have a poor internal angle.
- Instrument length may be inadequate.
- Thick abdominal wall increases friction and resistance.
- More lateral or more cranial placement may be needed depending on target anatomy.
- Accessory ports should be planned deliberately rather than placed by routine surface measurements.
13. Port placement with scars, adhesions, and hernias
- Inspect internally for adhesions.
- Avoid scars if they imply likely underlying adhesions.
- Avoid mesh when possible.
- Avoid entering directly through a ventral hernia unless it is part of the planned repair strategy.
- Maintain a low threshold to use a different site or add a safely placed port.
- Do not insert a trocar where bowel is adherent to the abdominal wall.
14. Conventional multiport versus single-incision laparoscopy
Multiport laparoscopy
- Better triangulation
- More natural bimanual technique
- Less instrument collision
- Better retraction options
- Usually easier for suturing and complex dissection
Single-incision laparoscopy
- External handle collision
- Internal shaft collision
- Parallel instruments
- Cross-handed technique
- Reduced range of motion
- Less intuitive camera orientation
- More difficult retraction and suturing
15. A port-planning checklist
Target
- What exact structure or plane is the main target?
- Where will the most demanding step occur?
Camera
- Does the camera provide a wide, correctly oriented view?
- Can I see both working tips and adjacent danger structures?
Working ports
- Can my dominant hand dissect safely?
- Can my nondominant hand provide useful countertraction?
- Are the ports separated enough to avoid collision?
Assistant and retraction
- Is a separate port needed for suction, retraction, or liver elevation?
- Does the assistant have a useful line of approach?
Device compatibility
- Is a large port needed for clip applier, stapler, specimen bag, or suturing?
- Is the intended extraction site planned?
Safety
- Is the path free of adhesions?
- Are bladder, epigastric vessels, bowel, ribs, and iliac crest considered?
- Are ports inserted under direct vision?
Rescue plan
- If bleeding occurs, do I have enough ports for suction, retraction, and hemostasis?
- If not, where will an extra port go?
16. Key takeaways
- Plan port placement from the target anatomy and intended operative maneuvers outward.
- Give every port a defined function: camera, dominant-hand working port, nondominant-hand working port, assistant, retraction, stapler, or extraction.
- Triangulation provides the instrument separation and approach angles needed for controlled traction-countertraction and dissection.
- Ports placed too close to the target restrict tip movement. Ports too far away reduce precision through an excessively long fulcrum.
- In many adult multiport configurations, working ports are often separated by about 8-10 cm, but this is adapted to the patient and procedure.
- Insert every secondary port under direct laparoscopic view.
- Consider epigastric vessels, adhesions, scars, hernias, bladder, pleura, ribs, and iliac crest before selecting each site.
- Improve poor exposure by changing position, camera location, instrument length, retraction, or by adding a port. Do not persist with unsafe ergonomics.
Scope: These are common configuration patterns, not fixed prescriptions. Exact port locations vary with patient size, obesity, scars, organ size, pathology, camera system, surgeon position, need for stapling, and local practice. Every secondary port is inserted under direct vision after inspection for adhesions and abdominal-wall vessels.
General rule before every procedure
- Target anatomy
- Camera-to-target distance
- Dominant and nondominant working-hand angles
- Retraction requirement
- Need for a 10-12 mm port for clips, stapler, suturing, or specimen retrieval
- Likely extraction site
- Potential need for an additional rescue port
1. Laparoscopic cholecystectomy
Position
- Supine
- Reverse Trendelenburg
- Right side elevated
Usual four-port configuration
| Port | Common location | Typical function |
|---|---|---|
| Camera | Umbilical or supraumbilical midline, often 10 mm | Camera, may later be used for specimen extraction |
| Epigastric | Just inferior to xiphoid, often 10 mm | Dominant-hand dissection, clip application, scissors |
| Right midclavicular/subcostal | Right upper abdomen, often 5 mm | Grasping Hartmann pouch and lateral traction |
| Right lateral/anterior axillary | Right upper abdomen, often 5 mm | Fundus retraction cephalad toward diaphragm |
Functional geometry
- Fundus grasper: pulls the gallbladder cephalad toward the right shoulder.
- Infundibular/Hartmann pouch grasper: provides lateral and inferior traction.
- Epigastric instrument: dissects Calot triangle and applies clips.
- Camera: provides a stable overview of gallbladder, liver hilum, and critical structures.
Variations
- Additional port for severe inflammation, retraction, suction, or difficult exposure
- Larger camera or working port when cholangiography, stapling, or retrieval requirements demand it
- Split-leg/French position with surgeon between the legs for selected ergonomics
- Reduced-port and single-incision approaches in selected patients, but these reduce normal triangulation
2. Laparoscopic appendectomy
Position
- Supine
- Trendelenburg
- Left side down or left tilt
Common three-port pattern
| Port | Common location | Typical function |
|---|---|---|
| Camera | Umbilical, often 10 mm | Visualization and sometimes specimen extraction |
| Working port | Left lower quadrant, usually 5 mm | Dominant-hand dissection or energy device |
| Working/assistant port | Suprapubic midline or lower abdomen, usually 5 mm | Grasping appendix, traction, suction, stapler/loop assistance |
Important modifications
- Pelvic appendix: a lower suprapubic port may improve access.
- Retrocecal appendix: a higher or more lateral port may be useful.
- Obesity: ports may need to be placed farther from the target, and longer instruments may be required.
- Perforation or abscess: add a port early if suction, retraction, and safe dissection cannot be maintained simultaneously.
- Pregnancy: port position must move according to fundal height, rather than following a fixed lower-abdominal map.
3. Laparoscopic inguinal hernia repair
- TAPP: transabdominal preperitoneal repair
- TEP: totally extraperitoneal repair
A. TAPP repair
Typical configuration
| Port | Common location | Function |
|---|---|---|
| Camera | Midline supraumbilical or infraumbilical, usually 10 mm | View of bilateral myopectineal orifices |
| Right working port | Right lower abdomen, often 5 mm | Dissection and mesh handling |
| Left working port | Left lower abdomen, often 5 mm | Dissection and mesh handling |
Key principles
- Ports should permit dissection of the preperitoneal plane without crossing instruments excessively.
- A low enough angle is required to work parallel to the posterior inguinal floor.
- Prior pelvic surgery, prostatectomy, lower-midline incision, or mesh can alter the approach and increase technical complexity.
- Avoid blind lower-abdominal trocar placement because of inferior epigastric vessels and bladder risk.
B. TEP repair
- A camera port near the umbilicus
- Two working ports in the lower midline
4. Laparoscopic ventral or incisional hernia repair
Core strategy
Typical pattern
| Port | General location | Function |
|---|---|---|
| Primary camera port | Contralateral upper quadrant, away from defect/scars | Initial assessment and adhesiolysis view |
| Two working ports | Lateral abdominal wall, spaced from defect | Adhesiolysis, mesh introduction/fixation |
| Optional additional port | Opposite lateral abdomen | Retraction, suturing, mesh handling, rescue |
- Safe adhesiolysis near the anterior abdominal wall
- Full visualization of hernia margins
- Mesh deployment with adequate overlap
- Ergonomic fixation or suturing
Common problems
- Ports too close to the defect: poor mesh handling and inadequate view of margins
- Ports placed through scar or mesh: increased risk of adhesions and access difficulty
- Insufficient lateral separation: difficult adhesiolysis and instrument clashing
- No rescue port: inability to simultaneously retract, dissect, suction, and control bleeding
5. Laparoscopic colectomy and colorectal surgery
General configuration principles
- A central or off-midline camera port provides broad abdominal overview.
- Working ports are distributed to reach both upper abdomen and pelvis.
- An extraction site is planned early, often a Pfannenstiel incision, planned stoma site, mini-laparotomy, or enlarged port.
- A 12 mm port may be required for stapling.
- The map must permit mobilization, vascular control, mesenteric division, bowel division, and anastomotic work.
A. Right hemicolectomy
- Camera near umbilicus
- Working ports in left lower quadrant and suprapubic/left midabdomen
- Assistant port on the right or upper abdomen for retraction
- Extraction through a protected extension of an appropriate incision, depending on technique
B. Left hemicolectomy or sigmoid colectomy
- Camera near umbilicus
- Working ports commonly distributed in the right lower quadrant, suprapubic region, and one upper/lateral port as needed
- Low pelvic access must be preserved for rectal division and stapling
- Extraction often via a Pfannenstiel incision or planned specimen-extraction site
C. Low anterior resection
- Camera port with a broad abdominal and pelvic view
- Lower-quadrant working ports for pelvic dissection
- Suprapubic or lower-midline access for stapling or assistance
- Additional upper-abdominal port for splenic-flexure mobilization when required
D. Total colectomy
6. Laparoscopic hiatal hernia repair and fundoplication
Position
- Supine, commonly split-leg/French position
- Reverse Trendelenburg
Typical five-port configuration
| Port | Common role |
|---|---|
| Camera port | Upper midline or supraumbilical |
| Right working port | Right upper abdomen |
| Left working port | Left upper abdomen |
| Assistant/retraction port | Lateral upper abdomen |
| Liver retractor port | Subxiphoid or upper abdominal site |
Port geometry must permit
- Liver elevation without excessive focal pressure
- Dissection at right and left crura
- Access to the mediastinum
- Passage behind the esophagus
- Hiatal suturing
- Fundus mobilization and wrap creation
7. Laparoscopic sleeve gastrectomy and bariatric surgery
Position
- Supine
- Reverse Trendelenburg
- Often split-leg or French position
Typical components
- Central or supraumbilical camera port
- Right-sided working port, often 12 mm for stapler access
- Left-sided working port
- Additional lateral port for retraction
- Subxiphoid liver-retraction port
- Optional assistant port
Key planning priorities
- The stapler port must provide a safe trajectory along the gastric greater curvature.
- The liver retractor must expose the gastroesophageal junction.
- Port locations often need to be more widely spaced and sometimes more cranial in high-BMI patients.
- Long trocars and bariatric-length instruments may be necessary.
- The specimen-extraction plan should be anticipated.
8. Gynecologic laparoscopy and laparoscopic hysterectomy
Position
- Dorsal lithotomy
- Trendelenburg
- Uterine manipulator when relevant to the operation
Typical configuration
| Port | Common location | Function |
|---|---|---|
| Camera | Umbilical or supraumbilical | Panoramic pelvis view |
| Right lower quadrant | Lateral to rectus, avoiding epigastric vessels | Working port |
| Left lower quadrant | Lateral to rectus, avoiding epigastric vessels | Working port |
| Optional suprapubic, upper-quadrant, or extra lateral port | Procedure-dependent | Assistant, retraction, suturing, large uterus access |
Important modifications
- Large fibroid uterus: camera and working ports may need to move cephalad.
- Severe endometriosis: additional lateral ports can improve ureterolysis, deep pelvic dissection, and retraction.
- Obesity: longer instruments and more cranial sites may be necessary.
- Prior cesarean, pelvic, or bowel surgery: inspect for anterior-wall adhesions before placing lateral or suprapubic ports.
- Pelvic mass: choose camera and working sites that avoid direct passage through or near the mass.
9. Laparoscopic nephrectomy and upper retroperitoneal surgery
Position
- Usually modified flank or lateral decubitus
- Table flexion may increase distance between costal margin and iliac crest
General transperitoneal pattern
- Camera port near umbilicus or lateral to rectus
- Two working ports along a curved or L-shaped arrangement directed toward the renal hilum
- Optional assistant/retraction port
- Additional liver-retraction port on the right side when necessary
- Colon mobilization
- Medial visualization of kidney and hilum
- Upper-pole dissection
- Adrenal exposure where relevant
- Control of renal vessels
- Specimen retrieval
Nephrectomy-specific considerations
- Left and right renal surgery differ because of the liver on the right and spleen/pancreatic tail on the left.
- A separate right anterior axillary or subcostal port may be used for liver retraction in right-sided surgery.
- Hand-assisted approaches require a hand-port incision that does not obstruct working-port geometry.
- Prior abdominal surgery may favor an open, alternative-site, or retroperitoneal approach in selected cases.
10. Laparoscopic pyeloplasty
Position
- Often lateral decubitus with the operative side elevated
- Table partially flexed
Common conventional laparoscopic concept
- Camera port near or lateral to umbilicus
- Cranial working port below costal margin
- Caudal-lateral working port
- Optional assistant port
11. How procedure-specific maps change in difficult cases
Prior surgery or adhesions
- Enter away from scars and anticipated adhesions.
- Inspect internally before accessory-port placement.
- Add ports only under direct view.
- Use a camera position that can survey the entire anterior wall.
Obesity
- Shift ports to preserve a productive internal working distance.
- Consider more lateral or cranial placement based on the target.
- Use longer trocars and instruments where needed.
- Avoid relying solely on standard surface measurements.
Pregnancy
- Move primary and accessory ports according to fundal height.
- Avoid fixed lower-abdominal maps.
- Use an experienced surgeon's access technique and adapt position to maternal physiology.
Large organ or tumor
- Move camera and working ports farther from the target.
- Plan extraction early.
- Anticipate the need for extra retraction or hand assistance.
- Do not place ports where the mass distorts anatomy or restricts instrument movement.
Inflammation, perforation, or bleeding
- Add a port early for suction-irrigation and retraction.
- Preserve an unobstructed pathway for a larger suction instrument, clip applier, stapler, or specimen bag.
- Conversion remains appropriate if visualization or safe control cannot be achieved.
Key takeaways
- There is no universal “correct” port map. Each map is an application of camera visualization, triangulation, retraction, device access, and safe abdominal-wall entry.
- Cholecystectomy usually uses a four-port right-upper-quadrant arrangement with separate fundus and infundibular traction.
- Appendectomy commonly uses umbilical, left-lower-quadrant, and suprapubic ports.
- Inguinal hernia repair uses low pelvic geometry, but TAPP and TEP have different access planes and port strategies.
- Ventral hernia ports should generally be distant from the defect and prior scars.
- Colorectal procedures need flexible access to upper abdomen, pelvis, stapling, and extraction.
- Hiatal and bariatric surgery require a dedicated liver-retraction port and upper-abdominal triangulation.
- Gynecologic pelvic surgery typically uses an umbilical camera with bilateral lower-quadrant working ports, modified upward for a bulky uterus.
- Nephrectomy and pyeloplasty require flank-position planning and working angles appropriate for hilar dissection or reconstructive suturing.
- MIS fundamentals
- Equipment and operating-room setup
- Positioning and ergonomics
- Pneumoperitoneum and safe entry
- Core port-placement principles
- Procedure-specific laparoscopic port configurations
-
Robotic port placement principles
-
Modifications for obesity, prior surgery, pregnancy, pediatrics, and altered anatomy
-
Access and port-related complications
-
Port-site closure and postoperative careA complete PDF study guide for Parts 1-6 would contain:
-
MIS fundamentals and terminology
-
Laparoscopic equipment and operating-room setup
-
Patient positioning, table movement, and ergonomics
-
Pneumoperitoneum and primary abdominal access
-
Camera geometry, triangulation, and safe port placement
-
Procedure-specific port configurations for common operations
-
Quick-reference tables, safety checklists, and references
~/
laparoscopy AND port placement
SAGES laparoscopic safety access port placement guidelines
mkdir -p "/tmp/workspace/mis-study-guide/src" "/tmp/workspace/mis-study-guide/output" && python - <<'PY' from pathlib import Path p=Path('/tmp/workspace/mis-study-guide/src/build_guide.py') p.write_text(r'''from reportlab.lib import colors from reportlab.lib.enums import TA_CENTER, TA_LEFT from reportlab.lib.pagesizes import A4 from reportlab.lib.styles import getSampleStyleSheet, ParagraphStyle from reportlab.lib.units import cm from reportlab.platypus import SimpleDocTemplate, Paragraph, Spacer, PageBreak, Table, TableStyle, KeepTogether, HRFlowable from reportlab.pdfbase.ttfonts import TTFont from reportlab.pdfbase import pdfmetrics from reportlab.lib.colors import HexColor from reportlab.pdfbase.pdfmetrics import stringWidth from reportlab.pdfgen import canvas from pathlib import Path OUT=Path('/tmp/workspace/mis-study-guide/output/MIS_and_Port_Placement_Parts_1_to_6.pdf') NAVY=HexColor('#123047'); TEAL=HexColor('#0F6B73'); LIGHT=HexColor('#EAF2F4'); PALE=HexColor('#F6F8FA'); GOLD=HexColor('#C58A1A'); RED=HexColor('#B43B35'); GREY=HexColor('#5B6670') styles=getSampleStyleSheet() styles.add(ParagraphStyle(name='TitleX', parent=styles['Title'], fontName='Helvetica-Bold', fontSize=27, leading=32, textColor=NAVY, alignment=TA_CENTER, spaceAfter=12)) styles.add(ParagraphStyle(name='SubTitleX', parent=styles['Normal'], fontName='Helvetica', fontSize=12, leading=17, textColor=GREY, alignment=TA_CENTER)) styles.add(ParagraphStyle(name='H1x', parent=styles['Heading1'], fontName='Helvetica-Bold', fontSize=18, leading=23, textColor=NAVY, spaceBefore=12, spaceAfter=8, keepWithNext=True)) styles.add(ParagraphStyle(name='H2x', parent=styles['Heading2'], fontName='Helvetica-Bold', fontSize=13, leading=17, textColor=TEAL, spaceBefore=9, spaceAfter=5, keepWithNext=True)) styles.add(ParagraphStyle(name='BodyX', parent=styles['BodyText'], fontName='Helvetica', fontSize=9.4, leading=13.2, spaceAfter=5)) styles.add(ParagraphStyle(name='SmallX', parent=styles['BodyText'], fontName='Helvetica', fontSize=8, leading=10.4, textColor=GREY)) styles.add(ParagraphStyle(name='BoxX', parent=styles['BodyText'], fontName='Helvetica', fontSize=9.2, leading=13, textColor=NAVY, leftIndent=6, rightIndent=6, spaceAfter=3)) styles.add(ParagraphStyle(name='TOCx', parent=styles['BodyText'], fontName='Helvetica', fontSize=10, leading=17, textColor=NAVY)) class NumberedCanvas(canvas.Canvas): def __init__(self,*args,**kwargs): canvas.Canvas.__init__(self,*args,**kwargs); self.pages=[] def showPage(self): self.pages.append(dict(self.__dict__)); self._startPage() def save(self): page_count=len(self.pages) for state in self.pages: self.__dict__.update(state) self.setStrokeColor(TEAL); self.setLineWidth(.35); self.line(1.65*cm,1.35*cm,19.35*cm,1.35*cm) self.setFont('Helvetica',8); self.setFillColor(GREY) self.drawString(1.65*cm,0.85*cm,'MIS and Port Placement Study Guide | Parts 1-6') self.drawRightString(19.35*cm,0.85*cm,f'Page {self._pageNumber} of {page_count}') canvas.Canvas.showPage(self) canvas.Canvas.save(self) def P(t, style='BodyX'): return Paragraph(t,styles[style]) def bullets(items): out=[] for x in items: out.append(Paragraph('• '+x,styles['BodyX'])) return out def box(title, text, color=LIGHT): tbl=Table([[P(f'<b>{title}</b><br/>{text}','BoxX')]], colWidths=[17.6*cm]) tbl.setStyle(TableStyle([('BACKGROUND',(0,0),(-1,-1),color),('BOX',(0,0),(-1,-1),.45,TEAL),('LEFTPADDING',(0,0),(-1,-1),8),('RIGHTPADDING',(0,0),(-1,-1),8),('TOPPADDING',(0,0),(-1,-1),7),('BOTTOMPADDING',(0,0),(-1,-1),7)])) return tbl def table(headers, rows, widths=None, fsize=8.1): data=[[P(f'<b>{h}</b>','SmallX') for h in headers]]+[[P(str(c),'SmallX') for c in r] for r in rows] t=Table(data,colWidths=widths,repeatRows=1,hAlign='LEFT') t.setStyle(TableStyle([('BACKGROUND',(0,0),(-1,0),NAVY),('TEXTCOLOR',(0,0),(-1,0),colors.white),('BACKGROUND',(0,1),(-1,-1),PALE),('GRID',(0,0),(-1,-1),.25,HexColor('#BCC8CF')),('VALIGN',(0,0),(-1,-1),'TOP'),('LEFTPADDING',(0,0),(-1,-1),5),('RIGHTPADDING',(0,0),(-1,-1),5),('TOPPADDING',(0,0),(-1,-1),4),('BOTTOMPADDING',(0,0),(-1,-1),4)])) return t def section(title, intro=None): S.append(P(title,'H1x')) if intro: S.append(P(intro)) def h(t): S.append(P(t,'H2x')) S=[] # cover S += [Spacer(1,3.3*cm),P('Minimally Invasive Surgery<br/>and Port Placement','TitleX'),P('Complete Study Guide: Parts 1-6','SubTitleX'),Spacer(1,.55*cm),HRFlowable(width='65%',thickness=2,color=GOLD,hAlign='CENTER'),Spacer(1,.65*cm),P('Fundamentals, equipment, positioning, abdominal access, triangulation, and procedure-specific port configurations','SubTitleX'),Spacer(1,2.4*cm),box('Educational use only','This guide supports supervised trainee learning and revision. It does not replace operative credentialing, local policy, manufacturer instructions for use, or the judgement of the operating surgeon. Exact port locations must be individualized to anatomy, pathology, prior surgery, body habitus, and intraoperative findings.',HexColor('#FFF6E4')),Spacer(1,.7*cm),P('Prepared August 2026','SubTitleX'),PageBreak()] # TOC section('Contents') for x in ['1. MIS fundamentals','2. Equipment and operating-room setup','3. Patient positioning and ergonomics','4. Pneumoperitoneum and safe primary entry','5. Core principles of port placement','6. Procedure-specific port configurations','7. Rapid revision checklists','8. References and evidence note']: S.append(P(x,'TOCx')) S.append(Spacer(1,.35*cm)); S.append(box('How to use this guide','Read Parts 1-5 as the transferable framework. Use Part 6 only after understanding the target-centered logic: safe access, a clear camera view, triangulated working angles, retraction, device access, and a rescue plan.')) S.append(PageBreak()) # part1 section('1. MIS Fundamentals','Minimally invasive surgery, or MIS, performs an operation through small access incisions using imaging and specialized instruments. The objective is not merely a smaller scar. It is to reduce access trauma while preserving safe exposure, anatomy recognition, hemostasis, and completion of the intended operation.') h('1.1 Forms and principles of MIS') S.append(table(['Approach','Access route','Typical use'],[['Laparoscopy','Peritoneal or extraperitoneal abdominal access','Abdominal, pelvic, hepatobiliary, colorectal surgery'],['Thoracoscopy / VATS','Intercostal pleural access','Pulmonary and pleural procedures'],['Robotic surgery','Usually laparoscopic or thoracoscopic ports','Complex pelvic, urologic, colorectal, and upper GI work'],['Endoluminal surgery','Natural lumen','Diagnostic and therapeutic endoscopy'],['Hand-assisted or single-site laparoscopy','Modified abdominal access','Selected complex or cosmetic applications']], [4.1*cm,5.0*cm,8.5*cm])) h('1.2 The laparoscopic workspace') S.extend(bullets(['Trocars create fixed abdominal-wall fulcrums; instrument movements outside the body are reversed at the pivot point inside the body.','Pneumoperitoneum creates separation between the abdominal wall and viscera, enabling visualization and instrument movement.','The camera, monitor, long rigid instruments, retraction, gravity, and ports form one integrated system.','A clear view of both the active tip and relevant danger structures is required before dissection or energy activation.'])) S.append(box('Safety standard','The correct endpoint is safe completion of the operation. Conversion to an open procedure is an appropriate safety decision when anatomy, exposure, bleeding control, or patient physiology is unsatisfactory.')) h('1.3 Benefits and limits') S.append(table(['Potential benefits','Important limitations'],[['Less access trauma, less wound pain, faster mobilization and recovery in many operations','Reduced tactile feedback; long rigid instruments; fulcrum effect'],['Smaller incisions and often shorter hospital stay','Camera-dependent visual-spatial orientation'],['Less blood loss in selected procedures','Pneumoperitoneum and positioning can produce cardiopulmonary effects'],['Improved cosmesis','Technology dependence, learning curve, and potential access injury']], [8.8*cm,8.8*cm])) h('1.4 Essential physiologic concepts') S.extend(bullets(['Carbon dioxide is the usual insufflation gas because it is nonflammable, highly blood soluble, and rapidly excreted by the lungs.','Raised intra-abdominal pressure elevates the diaphragm, can reduce pulmonary compliance, increase airway pressure, and increase CO₂ absorption.','Venous return, cardiac output, renal perfusion, and splanchnic flow may be affected, especially during prolonged cases, high pressure, or extreme table position.','The lowest insufflation pressure that provides safe exposure should be used, with monitoring and adjustment by the anesthesia team.'])) h('1.5 Core operative objectives') S.append(table(['Before and during surgery','The operative standard'],[['Indication and planning','Correct procedure for the patient and pathology'],['Exposure','Clear view with deliberate use of position, insufflation, retraction, and ports'],['Dissection','Anatomic identification before division; controlled traction-countertraction'],['Hemostasis and contamination control','Maintain vision; have suction and a rescue plan'],['Completion','Safe resection/reconstruction, extraction, closure, and postoperative plan']], [5.2*cm,12.4*cm])) S.append(PageBreak()) # part2 section('2. Equipment and Operating-Room Setup','Laparoscopic safety begins before incision. The tower, access devices, energy system, suction-irrigation, patient positioning, instruments, and conversion resources must function as a coordinated system.') h('2.1 Core system') S.append(table(['System','Key components','Purpose'],[['Imaging','Laparoscope, camera, light cable, light source, monitor','Visualize the operative field'],['Insufflation','CO₂ cylinder, tubing, insufflator, port valves','Create and maintain working space'],['Access','Veress needle, optical/direct trocar, Hasson set, cannulas','Enter and maintain port access'],['Instrumentation','Graspers, dissectors, scissors, needle holders, retractors','Manipulate and divide tissue'],['Hemostasis','Monopolar, bipolar, advanced bipolar, ultrasonic, clips','Control bleeding and dissect'],['Suction-irrigation','Suction tubing, canister, saline, handpiece','Restore vision, evacuate fluid, assist rescue'],['Extraction','Retrieval bag, wound protector when needed','Contain and remove specimen']], [3.0*cm,7.4*cm,7.2*cm])) h('2.2 Imaging') S.extend(bullets(['A 0-degree telescope looks straight ahead; a 30-degree telescope permits rotation of the view and often improves visualization around structures and of the anterior abdominal wall.','Before incision, confirm image, focus, white balance, cable integrity, light output, and ergonomically positioned monitors.','Poor visualization is a safety issue: clean the lens, remove smoke or fluid, correct light/camera settings, and restore a stable image before proceeding.'])) h('2.3 Insufflation troubleshooting') S.append(table(['Finding','Common causes','Immediate check'],[['Poor insufflation / loss of pneumoperitoneum','Empty CO₂ tank, disconnected or kinked tubing, open stopcock, seal leak','Gas supply, tubing, valves, port seal'],['High pressure / poor flow','Incorrect needle or trocar position, tubing obstruction, inadequate relaxation','Stop, reassess access and tubing; communicate with anesthesia'],['Inadequate workspace','Leak, low pressure, obesity, adhesions, inadequate relaxation','Identify cause before increasing pressure']], [4.1*cm,7.0*cm,6.5*cm])) h('2.4 Energy safety') S.extend(bullets(['Use the lowest effective energy setting and activate only when the active tip is fully visible.','Understand monopolar, bipolar, ultrasonic, and vessel-sealing device functions and device-specific vessel-size limits.','Prevent direct coupling, capacitive coupling, insulation-failure injury, and contact with tissue outside the field.','Confirm monopolar dispersive-pad placement and function where used. A delayed thermal injury may present after surgery.'])) h('2.5 Pre-incision equipment time-out') S.append(box('Practical checklist','Image and light working; CO₂ supply and backup available; insufflator alarm and setting correct; selected scope angle and port sizes ready; suction-irrigation tested; energy device and pedal identified; clips/staplers/sutures/retrieval bag available; open-conversion instruments and major-bleeding plan available.')) S.append(PageBreak()) # part3 section('3. Patient Positioning and Ergonomics','Positioning is an exposure tool. Pneumoperitoneum, gravity, retraction, and port geometry together determine the view and working space. Positioning also produces preventable risks if padding, securement, access, and time are not managed.') h('3.1 Positions and goals') S.append(table(['Position','Exposure goal','Key risks'],[['Supine','General abdominal access','Pressure areas, arm position'],['Trendelenburg','Moves bowel cephalad for pelvis','Airway/facial edema, sliding, nerve injury'],['Reverse Trendelenburg','Moves bowel caudad for upper abdomen','Hypotension, footward sliding'],['Lateral tilt','Moves bowel away from side of operation','Sliding, asymmetric pressure'],['Lithotomy','Pelvic/perineal access','Peroneal/femoral/sciatic injury, compartment syndrome'],['Lateral decubitus with flexion','Flank, renal, adrenal, thoracic access','Brachial plexus and dependent pressure injury']], [3.6*cm,7.0*cm,7.0*cm])) h('3.2 Position-specific principles') S.extend(bullets(['Trendelenburg: use the least tilt that provides exposure; secure the patient without creating focal shoulder or nerve pressure; reassess in long or robotic cases.','Reverse Trendelenburg: secure against footward sliding, protect heels and sacrum, and monitor venous-return effects.','Lithotomy: raise and lower both legs together; avoid pressure at the fibular head and excessive hip flexion, abduction, or external rotation.','Lateral decubitus: protect dependent ear, eye, shoulder, ribs, iliac crest, knees, and ankles; support arms and secure the patient before flexing or tilting the table.'])) h('3.3 Ergonomic alignment') S.append(P('Aim for a straight relationship between surgeon, hands and instruments, target, camera, and monitor. The monitor is best positioned in front of the surgeon at or slightly below eye level. Table height should permit relaxed shoulders, elbows near the torso, neutral wrists, and minimal neck or trunk rotation.')) S.append(box('Correct an ergonomically poor setup','Change position, table height, monitor position, camera port, working-port placement, instrument length, retraction strategy, or add a port. Do not compensate for a poor configuration by sustained awkward posture or excessive force.')) h('3.4 Positioning safety check') S.extend(bullets(['Patient secured for intended tilt; pressure points padded; neck neutral; eyes free of pressure.','Arms, fingers, IV lines, and monitoring cables protected; legs symmetric in stirrups.','Airway and anesthetic access preserved after draping and, when relevant, robotic docking.','Team agrees on table movement, anticipated duration, and emergency access/undocking plan.'])) S.append(PageBreak()) # part4 section('4. Pneumoperitoneum and Safe Primary Entry','Primary access is a high-risk step. Selection of entry method and site should account for scars, likely adhesions, hernia, pregnancy, obesity, mass effect, and the surgeon’s experience.') h('4.1 Entry methods') S.append(table(['Technique','Principle','Strengths and cautions'],[['Closed Veress entry','Spring-loaded needle establishes pneumoperitoneum before trocar','Efficient in suitable patients; initial passage is not directly seen'],['Open Hasson entry','Layered direct opening into peritoneum, then blunt cannula','Direct tissue-layer control; still not risk-free if bowel is adherent'],['Optical trocar','Camera in transparent trocar during abdominal-wall passage','Visualizes layers but does not eliminate visceral or vascular injury'],['Direct trocar','Trocar placement without prior Veress insufflation','Selected expert technique; avoid uncontrolled blind force'],['Alternative-site access','Entry away from high-risk umbilicus','Useful with scars/adhesions; site-specific risks remain']], [3.2*cm,5.1*cm,9.3*cm])) h('4.2 Veress-entry confirmation') S.extend(bullets(['Review scars, mesh, hernia, imaging, and backup plan. Ensure functioning insufflator and adequate relaxation.','Use controlled insertion and an appropriate trajectory. A tactile “pop” alone does not prove intraperitoneal position.','Assess the entire pattern: low opening pressure, acceptable flow, appropriate abdominal distension, and absence of subcutaneous emphysema.','If pressure is unexpectedly high or flow poor, stop and reassess. Do not increase pressure merely to overcome resistance.'])) h('4.3 Open Hasson concept') S.extend(bullets(['Expose fascia through a small incision, secure it as needed, open fascia and peritoneum in a controlled manner, insert a blunt cannula, secure the port, then confirm view and establish insufflation.','It may be useful in selected scarred abdomens or after failed/uncertain closed entry. Gas leak and fascial closure require attention.'])) h('4.4 Alternative entry and special settings') S.append(P('Palmer’s point, roughly 3 cm below the left costal margin in the midclavicular line, is a commonly described alternative when periumbilical adhesions are likely. Consider splenomegaly, gastric distension, prior left-upper-quadrant surgery, and local pathology. In pregnancy, access site must be adjusted to fundal height and previous incisions.')) h('4.5 First-look and suspected injury response') S.append(table(['Immediately after entry','If concern arises'],[['Inspect port site, bowel, omentum, accessible viscera, free blood, and retroperitoneum; identify adhesions before adding ports.','Stop unsafe progression; obtain visualization; reassess or change site/technique.'],['Insert every secondary trocar under direct vision.','For suspected bowel injury: assess, seek help early, repair only with adequate expertise/exposure, convert if needed.'],['Use a 30-degree scope to inspect anterior wall when appropriate.','For suspected major vascular injury: announce emergency, control if feasible, activate hemorrhage response, obtain immediate senior/vascular help, and convert when indicated.']], [8.8*cm,8.8*cm])) S.append(box('Do not normalize abnormal access','Repeated uncertain blind attempts, unexplained high pressure, poor gas flow, asymmetric swelling, sudden bleeding, or unexpected enteric content each require a deliberate pause and reassessment.')) S.append(PageBreak()) # part5 section('5. Core Principles of Port Placement','Port placement is target-centered planning. Start with the most difficult operative task, then establish camera view, working angles, retraction, device access, extraction, and rescue options.') h('5.1 Functions of ports') S.append(table(['Port','Role','Usual size'],[['Camera','Stable overview and visualization','5, 10, or 12 mm'],['Dominant working port','Dissection, energy, clip or suture work','5 or 10-12 mm'],['Nondominant working port','Traction and countertraction','Usually 5 mm'],['Assistant/retraction port','Suction, retraction, exposure','Usually 5 mm'],['Stapler/extraction port','Stapling, clips, specimen bag','Usually 10-12 mm or larger']], [4.0*cm,9.0*cm,4.6*cm])) h('5.2 Triangulation') S.append(P('Triangulation places the camera and two principal working ports so instruments approach the target from different directions. It supports traction-countertraction, bimanual dissection, suturing, and reduced collision. In many adult multiport procedures, working ports are often around 8-10 cm apart, but patient size and operative target determine the usable distance.')) S.append(box('Target-centered geometry','A port too close to the target restricts tip motion because the trocar interferes. A port too far away creates an excessively long fulcrum and exaggerated tip movement. The best location gives controlled reach, useful approach angle, and relaxed external ergonomics.')) h('5.3 Secondary-port safety') S.extend(bullets(['Establish adequate pneumoperitoneum and inspect for adhesions before each port.','Use direct laparoscopic vision. Consider a finder needle to verify site and trajectory.','Avoid visible vessels, prior scars, mesh, hernia, bladder, enlarged uterus, bowel adherent to wall, costal margin, and iliac crest.','Superficial vessels may transilluminate, but inferior epigastric vessels are deeper and not always reliably visible by transillumination.','Aim the port toward the surgical target. Avoid excessive penetration and confirm the port functions without torque.'])) h('5.4 Camera, assistant, and rescue') S.extend(bullets(['The camera must show target anatomy, active tip, and surrounding danger structures. A 30-degree scope can improve view without relocating a port.','The assistant port should permit useful suction, retraction, or clipping without crossing the surgeon’s instruments.','Add a port early when there is inadequate exposure, poor retraction, difficult bleeding, need for suction while maintaining two working hands, or insufficient geometry for suturing.'])) h('5.5 Common faults') S.append(table(['Problem','Likely cause','Correction'],[['External or internal clash','Ports too close or parallel','Widen separation, change camera, add/reposition port'],['Poor tip control','Port too near or far from target','Restore a balanced working distance'],['Bad traction vector','Port does not permit desired pull','Add a retraction/assistant port'],['Cannot suture or staple safely','Incorrect angle or inadequate port size','Plan a better trajectory and compatible larger port'],['Wall pain or torque','Poor angle, thick abdominal wall, short device','Reassess site, direction, and instrument length']], [4.0*cm,6.4*cm,7.2*cm])) S.append(PageBreak()) #part 6 section('6. Procedure-Specific Port Configurations','These are common patterns to understand the logic of port selection. They are not universal operative prescriptions. Ports should be altered when anatomy, scarring, obesity, organ size, device needs, or intraoperative findings make the standard map unsafe or unproductive.') h('6.1 Cholecystectomy') S.append(P('Usual position: supine, reverse Trendelenburg, right side elevated. Commonly four ports: umbilical or supraumbilical camera; epigastric dominant-hand dissection/clip port; right midclavicular grasper for Hartmann pouch traction; and right lateral port for fundus retraction. The geometry must permit cephalad fundus traction, lateral-inferior infundibular traction, and a direct line for safe critical-view dissection.')) h('6.2 Appendectomy') S.append(P('Usual position: supine, Trendelenburg, left tilt. A common three-port arrangement is umbilical camera, left-lower-quadrant working port, and suprapubic working/assistant port. The map may shift for pelvic, retrocecal, perforated, or difficult appendix. Add a port early if suction, retraction, and safe dissection cannot coexist.')) h('6.3 Inguinal hernia repair') S.append(P('<b>TAPP:</b> a midline camera port with two lower-abdominal working ports provides access to the preperitoneal plane. <b>TEP:</b> uses lower-midline ports in the extraperitoneal working space. Both require low pelvic geometry, careful avoidance of epigastric vessels and bladder, and adaptation after pelvic surgery.')) h('6.4 Ventral/incisional hernia repair') S.append(P('Primary access is generally distant from the defect and prior scars, often in an upper quadrant. Lateral working ports allow adhesiolysis, mesh handling, and fixation. Working ports must be sufficiently distant from the defect to permit safe anterior-wall dissection and adequate mesh overlap.')) h('6.5 Colorectal surgery') S.append(P('Use a distributed configuration capable of reaching both upper abdomen and pelvis. Plan the extraction site early, often Pfannenstiel, stoma site, mini-laparotomy, or enlarged port. A stapling port must provide a safe trajectory. Right-sided, left-sided, and rectal procedures have different requirements; change camera location or add ports when necessary.')) h('6.6 Hiatal surgery, fundoplication, and bariatric surgery') S.append(P('Usual position: reverse Trendelenburg, often split-leg/French. A typical foregut layout includes upper-midline camera, right and left working ports, assistant port, and a dedicated liver-retraction port. Sleeve gastrectomy also requires a correctly located larger stapler port with a productive line along the gastric greater curvature.')) h('6.7 Gynecologic laparoscopy and hysterectomy') S.append(P('Usual position: dorsal lithotomy with Trendelenburg. Typical arrangement: umbilical or supraumbilical camera with bilateral lower-quadrant working ports lateral to rectus, plus optional suprapubic, upper-quadrant, or extra lateral assistant port. Large uterus or pelvic mass generally requires more cranial and/or additional ports.')) h('6.8 Nephrectomy and pyeloplasty') S.append(P('Usually performed in modified flank or lateral decubitus, often with table flexion. Ports form a curved or L-shaped arrangement toward renal hilum or ureteropelvic junction. Right-sided cases may need a liver-retraction port. Pyeloplasty requires geometry suitable for intracorporeal suturing, not merely exposure.')) S.append(table(['Procedure','Core configuration logic','Frequent modification'],[['Cholecystectomy','Four-port right-upper-quadrant traction and dissection','Extra suction/retraction port in inflammation'],['Appendectomy','Umbilical + LLQ + suprapubic triangle','Higher/lateral port for retrocecal appendix'],['Ventral hernia','Ports far from defect and scars','Longer instruments in obesity'],['Fundoplication','Upper-abdominal triangle plus liver retraction','Additional port for difficult mediastinal/hiatal exposure'],['Hysterectomy','Umbilical camera + bilateral lateral pelvic ports','Move ports cranially for large uterus'],['Nephrectomy','Flank-oriented ports toward hilum','Liver retraction on right']], [3.2*cm,8.0*cm,6.4*cm])) S.append(PageBreak()) # checklists section('7. Rapid Revision Checklists') h('7.1 Ten rules for safe laparoscopy') S.extend(bullets(['Plan access around scars, hernia, prior operations, mass, pregnancy, and expected adhesions.','Use an entry technique you are trained to perform and can troubleshoot.','Treat abnormal pressure-flow behavior as a warning, not a nuisance.','Inspect immediately after primary access and place all secondary ports under direct vision.','Plan every port around its function at the hardest operative step.','Maintain camera view of active instruments and critical surrounding anatomy.','Use traction-countertraction rather than blind force.','Correct poor ergonomics, bad camera view, or inadequate retraction early.','Add a port when it improves safety; conversion is appropriate when safe progress cannot be maintained.','Close and inspect port sites appropriately, including fascial closure of clinically significant larger defects according to procedure and local policy.'])) h('7.2 Before incision') S.append(box('Team check','Correct procedure and patient position; scars/hernia reviewed; entry and backup plan stated; CO₂ and backup supply checked; camera, light, scope angle, and monitor tested; energy and suction tested; device port sizes planned; conversion resources and hemorrhage response available.')) h('7.3 Before every secondary port') S.append(box('Port check','Adequate pneumoperitoneum; inspect internal wall for adhesion; identify safe external site; consider vessel course and bladder; use finder needle if helpful; insert under direct view toward target; verify useful working angle before committing to the next port.')) h('7.4 When the operation becomes difficult') S.append(table(['Problem','First questions'],[['Poor view','Is the lens clean? Is smoke/blood/fluid obscuring view? Is camera too close or poorly positioned?'],['Poor exposure','Would table position, retraction, or another port improve the field?'],['Instrument clash','Are ports too close/parallel? Should the camera move or a port be added?'],['Bleeding','Can the bleeding point be seen? Is suction, pressure, retraction, or conversion required?'],['Uncertain anatomy','Stop dissection. Restore exposure and identify landmarks; seek senior input or convert if necessary.']], [4.0*cm,13.6*cm])) S.append(PageBreak()) # references section('8. References and Evidence Note') S.append(P('Core textbook and guideline sources used for the study content:')) refs=[ "Schwartz’s Principles of Surgery, 11th ed., Chapter 14: Minimally Invasive Surgery, Robotics, Natural Orifice Transluminal Endoscopic Surgery, and Single-Incision Laparoscopic Surgery, pp. 453-475; access principles pp. 486-487.", "Sabiston Textbook of Surgery: The Biological Basis of Modern Surgical Practice. Chapters on minimally invasive preoperative considerations, surgical ergonomics, and procedure-specific approaches.", "Bailey and Love’s Short Practice of Surgery, 28th ed. Open Hasson technique for laparoscopic primary trocar insertion, p. 123.", "Hinman’s Atlas of Urologic Surgery. Laparoscopic instrumentation, secondary-trocar insertion, positioning and access, and urologic port-placement examples.", "Campbell-Walsh-Wein Urology. Standard laparoscopic setup, secondary-trocar placement, and robotic considerations.", "SAGES. Guidelines for Laparoscopic Ventral Hernia Repair: primary access away from defect/scars; secondary ports under direct vision and in ergonomic lateral positions.", "SAGES. Guidelines for the Clinical Application of Laparoscopic Biliary Tract Surgery.", "SAGES. Guidelines for the Use of Laparoscopy during Pregnancy.", "SAGES. Laparoscopy Preparation and Troubleshooting Guide." ] for r in refs: S.append(P('• '+r)) h('Recent-evidence note') S.append(P('Recent systematic reviews of single-site, reduced-port, conventional laparoscopic, and robotic techniques are procedure-specific. They should not be used to claim a universal advantage of one port strategy across all operations. Examples include: Kong et al., 2024, colorectal single-incision-plus-one-port versus conventional multiport laparoscopy, PMID 38684561; Marchand et al., 2025, mini-laparoscopy versus single-port hysterectomy, PMID 40816228; Nava Silerio et al., 2025, single-site versus multiport hysterectomy, PMID 40669538.')) S.append(Spacer(1,.4*cm)); S.append(box('Final study point','Memorize principles before maps: safe entry, direct vision, target-centered camera geometry, triangulation, traction-countertraction, adequate device access, avoidance of abdominal-wall hazards, ergonomics, and a readiness to add ports or convert when safety requires.',HexColor('#FFF6E4'))) doc=SimpleDocTemplate(str(OUT),pagesize=A4,rightMargin=1.65*cm,leftMargin=1.65*cm,topMargin=1.5*cm,bottomMargin=1.7*cm,title='MIS and Port Placement Study Guide: Parts 1-6',author='Orris') doc.build(S,canvasmaker=NumberedCanvas) print(OUT) ''') print('written',p) PY python "/tmp/workspace/mis-study-guide/src/build_guide.py"
python - <<'PY' from pathlib import Path from pypdf import PdfReader p=Path('/tmp/workspace/mis-study-guide/output/MIS_and_Port_Placement_Parts_1_to_6.pdf') assert p.exists() and p.stat().st_size > 10000, (p.exists(),p.stat().st_size if p.exists() else 0) r=PdfReader(str(p)) text='\n'.join((page.extract_text() or '') for page in r.pages) checks=['Minimally Invasive Surgery','Equipment and Operating-Room Setup','Pneumoperitoneum and Safe Primary Entry','Core Principles of Port Placement','Procedure-Specific Port Configurations','Rapid Revision Checklists','References and Evidence Note'] missing=[x for x in checks if x not in text] print('pages=',len(r.pages),'bytes=',p.stat().st_size,'missing=',missing) print('first=',text[:300].replace('\n',' | ')) PY
MIS and Port Placement Parts 1 to 6
PDF Document · PDF
Make a one-page port-placement quick reference
~/
laparoscopy AND port placement
SAGES laparoscopic port placement triangulation secondary ports direct vision
python - <<'PY' from pathlib import Path p=Path('/tmp/workspace/mis-study-guide/src/build_quick_reference.py') p.write_text(r'''from reportlab.lib.pagesizes import A4 from reportlab.lib import colors from reportlab.lib.colors import HexColor from reportlab.lib.styles import getSampleStyleSheet, ParagraphStyle from reportlab.lib.enums import TA_CENTER from reportlab.lib.units import cm from reportlab.platypus import SimpleDocTemplate, Paragraph, Spacer, Table, TableStyle, KeepTogether from reportlab.pdfgen import canvas OUT='/tmp/workspace/mis-study-guide/output/Port_Placement_Quick_Reference.pdf' NAVY=HexColor('#123047'); TEAL=HexColor('#0F6B73'); PALE=HexColor('#F3F7F8'); GOLD=HexColor('#BD8417'); RED=HexColor('#A83232'); GREY=HexColor('#586772') ss=getSampleStyleSheet() ss.add(ParagraphStyle(name='TitleQ',parent=ss['Title'],fontName='Helvetica-Bold',fontSize=20,leading=23,textColor=NAVY,alignment=TA_CENTER,spaceAfter=3)) ss.add(ParagraphStyle(name='SubQ',parent=ss['Normal'],fontName='Helvetica',fontSize=8.2,leading=10,textColor=GREY,alignment=TA_CENTER,spaceAfter=7)) ss.add(ParagraphStyle(name='Hq',parent=ss['Heading2'],fontName='Helvetica-Bold',fontSize=9.2,leading=10.5,textColor=colors.white,spaceAfter=0)) ss.add(ParagraphStyle(name='Bq',parent=ss['BodyText'],fontName='Helvetica',fontSize=6.9,leading=8.25,textColor=NAVY,spaceAfter=0)) ss.add(ParagraphStyle(name='Sq',parent=ss['BodyText'],fontName='Helvetica-Bold',fontSize=6.9,leading=8.25,textColor=NAVY,spaceAfter=0)) def p(x,sty='Bq'): return Paragraph(x,ss[sty]) def head(x): t=Table([[p(x,'Hq')]],colWidths=[17.8*cm]) t.setStyle(TableStyle([('BACKGROUND',(0,0),(-1,-1),TEAL),('LEFTPADDING',(0,0),(-1,-1),6),('RIGHTPADDING',(0,0),(-1,-1),6),('TOPPADDING',(0,0),(-1,-1),3),('BOTTOMPADDING',(0,0),(-1,-1),3)])) return t def tbl(headers, rows, widths): data=[[p('<b>'+x+'</b>','Bq') for x in headers]]+[[p(x) for x in row] for row in rows] t=Table(data,colWidths=widths,repeatRows=1) t.setStyle(TableStyle([('BACKGROUND',(0,0),(-1,0),NAVY),('TEXTCOLOR',(0,0),(-1,0),colors.white),('BACKGROUND',(0,1),(-1,-1),PALE),('GRID',(0,0),(-1,-1),.25,HexColor('#BBC8CC')),('VALIGN',(0,0),(-1,-1),'TOP'),('LEFTPADDING',(0,0),(-1,-1),4),('RIGHTPADDING',(0,0),(-1,-1),4),('TOPPADDING',(0,0),(-1,-1),2.5),('BOTTOMPADDING',(0,0),(-1,-1),2.5)])) return t class C(canvas.Canvas): def save(self): self.setStrokeColor(TEAL); self.setLineWidth(.35); self.line(1.5*cm,1.05*cm,19.5*cm,1.05*cm) self.setFont('Helvetica',6.6); self.setFillColor(GREY) self.drawString(1.5*cm,.65*cm,'Educational aid only | Individualize to anatomy, scars, pathology, body habitus, device requirements, and local protocol.') self.drawRightString(19.5*cm,.65*cm,'MIS Study Guide') canvas.Canvas.save(self) story=[] story += [p('LAPAROSCOPIC PORT-PLACEMENT QUICK REFERENCE','TitleQ'),p('Target-centered planning for supervised surgical training. All secondary ports are placed under direct laparoscopic vision.','SubQ')] story += [head('1. UNIVERSAL RULES'), Spacer(1,2)] story.append(tbl(['Plan around','Fast check'],[ ['Target anatomy','What is the hardest dissection, suture, clip, or stapling step?'], ['Camera','Can it show target, active tips, and adjacent danger structures?'], ['Triangulation','Separate working ports and approach target from different directions.'], ['Distance','Too close: restricted tip motion. Too far: exaggerated fulcrum and poor precision.'], ['Safety','Inspect for adhesions; avoid scars, mesh, hernia, bladder, epigastric vessels, ribs, and iliac crest.'], ['Rescue','Add a port for suction, retraction, hemostasis, or suturing. Conversion is a safety decision.']], [4.1*cm,13.7*cm])) story += [Spacer(1,5),head('2. PORT FUNCTIONS AND GEOMETRY'),Spacer(1,2)] story.append(tbl(['Port','Usual purpose','Quick rule'],[ ['Camera','5, 10, or 12 mm scope','Stable panoramic view; 30-degree scope can look around structures and toward the anterior wall.'], ['Dominant working','Dissection, energy, clips, suturing','Needs a direct but not cramped line to the critical target.'], ['Nondominant working','Traction / countertraction','Place for the <i>direction of pull</i>, not mirror-image skin symmetry.'], ['Assistant / retraction','Suction, organ retraction, exposure','Do not crowd surgeon’s hands or cross working instruments.'], ['Stapler / extraction','Usually 10-12 mm or larger','Pre-plan port size, trajectory, specimen route, and fascial closure.']], [3.2*cm,6.6*cm,8.0*cm])) story += [Spacer(1,5),head('3. COMMON CONFIGURATION PATTERNS'),Spacer(1,2)] story.append(tbl(['Procedure','Typical position','Configuration logic'],[ ['Cholecystectomy','Supine; reverse Trendelenburg; right side up','Umbilical camera + epigastric dissection/clip port + right midclavicular infundibular traction + right lateral fundus retraction.'], ['Appendectomy','Supine; Trendelenburg; left tilt','Umbilical camera + left lower-quadrant working port + suprapubic working/assistant port. Adjust for pelvic or retrocecal appendix.'], ['TAPP inguinal hernia','Supine; slight Trendelenburg','Midline camera + two lower-abdominal working ports. Low pelvic approach; avoid bladder and epigastrics.'], ['Ventral/incisional hernia','Supine; variable tilt','Primary access away from defect and scars; lateral working ports for adhesiolysis, mesh deployment, and fixation.'], ['Fundoplication / hiatal','Split-leg or supine; reverse Trendelenburg','Upper-midline camera + bilateral upper-abdominal working ports + assistant + dedicated liver-retractor port.'], ['Sleeve gastrectomy','Supine; reverse Trendelenburg','Upper-abdominal ports + liver retraction; correctly placed larger stapler port with productive greater-curvature trajectory.'], ['Hysterectomy / pelvic','Lithotomy; Trendelenburg','Umbilical/supraumbilical camera + bilateral lateral lower-quadrant working ports; move cranially for bulky uterus.'], ['Nephrectomy / pyeloplasty','Modified flank / lateral; table flexion','Curved or L-shaped flank-oriented arrangement toward hilum or UPJ; right side may require liver retraction.']], [3.45*cm,4.3*cm,10.05*cm])) story += [Spacer(1,5),head('4. BEFORE EACH SECONDARY PORT'),Spacer(1,2)] story.append(tbl(['Sequence','Action'],[ ['1. Insufflate','Ensure adequate working space and stable camera view.'], ['2. Inspect','Confirm no bowel/omentum adhesion at the intended site.'], ['3. Mark','Choose site relative to target, scars, vascular anatomy, and bony landmarks.'], ['4. Verify','Use direct vision; a finder needle can confirm the path and desired angle.'], ['5. Insert','Advance in a controlled manner toward target; avoid excessive penetration.'], ['6. Test','Confirm instrument reach, traction vector, external handle clearance, and need for another port.']], [3.45*cm,14.35*cm])) story += [Spacer(1,5),head('5. TROUBLESHOOTING'),Spacer(1,2)] story.append(tbl(['Problem','Likely correction'],[ ['Instruments clash','Increase spacing, change camera port, or add/reposition an accessory port.'], ['Poor retraction','Change table position or add a dedicated retraction/assistant port.'], ['Target too close','Use a more distant, safer working port to restore instrument mobility.'], ['Target too far','Use longer instruments, change camera location, or add a closer safe port.'], ['Cannot suture / staple','Create wider triangulation; use correctly sized port with a direct trajectory.'], ['Bleeding or obscured view','Stop blind dissection. Suction, pressure, restore view, add port if needed, and convert if control is not secure.']], [4.3*cm,13.5*cm])) story += [Spacer(1,5)] warning=Table([[p('<b>STOP AND REASSESS:</b> Unclear anatomy, poor exposure, abnormal port torque, inaccessible instrument tip, uncontrolled bleeding, or loss of camera orientation. Improve the setup before proceeding.','Sq')]],colWidths=[17.8*cm]) warning.setStyle(TableStyle([('BACKGROUND',(0,0),(-1,-1),HexColor('#FFF1EE')),('BOX',(0,0),(-1,-1),.55,RED),('LEFTPADDING',(0,0),(-1,-1),6),('RIGHTPADDING',(0,0),(-1,-1),6),('TOPPADDING',(0,0),(-1,-1),4),('BOTTOMPADDING',(0,0),(-1,-1),4)])) story.append(warning) doc=SimpleDocTemplate(OUT,pagesize=A4,leftMargin=1.5*cm,rightMargin=1.5*cm,topMargin=.9*cm,bottomMargin=1.4*cm,title='Laparoscopic Port-Placement Quick Reference',author='Orris') doc.build(story,canvasmaker=C) print(OUT) ''') print(p) PY python "/tmp/workspace/mis-study-guide/src/build_quick_reference.py"
python - <<'PY' from pathlib import Path from pypdf import PdfReader p=Path('/tmp/workspace/mis-study-guide/output/Port_Placement_Quick_Reference.pdf') assert p.exists() and p.stat().st_size > 5000 r=PdfReader(str(p)) text='\n'.join((x.extract_text() or '') for x in r.pages) checks=['UNIVERSAL RULES','COMMON CONFIGURATION PATTERNS','BEFORE EACH SECONDARY PORT','TROUBLESHOOTING','Cholecystectomy','Nephrectomy'] print({'pages':len(r.pages),'bytes':p.stat().st_size,'missing':[x for x in checks if x not in text]}) PY
python - <<'PY' p='/tmp/workspace/mis-study-guide/src/build_quick_reference.py' s=open(p).read() s=s.replace("from reportlab.lib.pagesizes import A4", "from reportlab.lib.pagesizes import A4, landscape") s=s.replace("fontSize=20,leading=23", "fontSize=17,leading=19") s=s.replace("fontSize=8.2,leading=10", "fontSize=7.2,leading=8") s=s.replace("fontSize=9.2,leading=10.5", "fontSize=8.1,leading=9") s=s.replace("fontSize=6.9,leading=8.25", "fontSize=5.7,leading=6.5") s=s.replace("pagesize=A4", "pagesize=landscape(A4)") s=s.replace("colWidths=[17.8*cm]", "colWidths=[26.7*cm]") s=s.replace("[4.1*cm,13.7*cm]", "[5.5*cm,21.2*cm]") s=s.replace("[3.2*cm,6.6*cm,8.0*cm]", "[4.0*cm,9.4*cm,13.3*cm]") s=s.replace("[3.45*cm,4.3*cm,10.05*cm]", "[4.1*cm,5.0*cm,17.6*cm]") s=s.replace("[3.45*cm,14.35*cm]", "[4.2*cm,22.5*cm]") s=s.replace("[4.3*cm,13.5*cm]", "[5.0*cm,21.7*cm]") s=s.replace("1.5*cm,1.05*cm,19.5*cm,1.05*cm", "1.5*cm,1.05*cm,28.2*cm,1.05*cm") s=s.replace("19.5*cm,.65*cm", "28.2*cm,.65*cm") s=s.replace("topMargin=.9*cm,bottomMargin=1.4*cm", "topMargin=.55*cm,bottomMargin=1.3*cm") open(p,'w').write(s) PY python "/tmp/workspace/mis-study-guide/src/build_quick_reference.py" python - <<'PY' from pathlib import Path from pypdf import PdfReader p=Path('/tmp/workspace/mis-study-guide/output/Port_Placement_Quick_Reference.pdf') r=PdfReader(str(p)) t='\n'.join((x.extract_text() or '') for x in r.pages) assert len(r.pages)==1, f'Expected 1 page, got {len(r.pages)}' for x in ['UNIVERSAL RULES','COMMON CONFIGURATION PATTERNS','TROUBLESHOOTING','Cholecystectomy']: assert x in t, x print(f'validated pages={len(r.pages)}, bytes={p.stat().st_size}') PY
python - <<'PY' from pathlib import Path p=Path('/tmp/workspace/mis-study-guide/src/build_quick_reference.py') p.write_text(r'''from reportlab.lib.pagesizes import A4, landscape from reportlab.pdfgen import canvas from reportlab.lib.colors import HexColor, white from reportlab.lib.units import cm from reportlab.pdfbase.pdfmetrics import stringWidth from pathlib import Path OUT=Path('/tmp/workspace/mis-study-guide/output/Port_Placement_Quick_Reference.pdf') W,H=landscape(A4) NAVY=HexColor('#123047'); TEAL=HexColor('#0F6B73'); PALE=HexColor('#F2F7F8'); GOLD=HexColor('#BD8417'); RED=HexColor('#A83232'); GREY=HexColor('#586772'); LINE=HexColor('#B8C8CD') c=canvas.Canvas(str(OUT),pagesize=(W,H),pageCompression=1) def wrap(text,font,size,width): words=text.split(); lines=[]; line='' for word in words: test=(line+' '+word).strip() if stringWidth(test,font,size)<=width: line=test else: lines.append(line); line=word if line: lines.append(line) return lines def textblock(x,y,w,text,size=6.6,leading=8.1,font='Helvetica',color=NAVY,bullet=False): c.setFillColor(color); c.setFont(font,size) lines=wrap(text,font,size,w-(7 if bullet else 0)) for i,line in enumerate(lines): if bullet and i==0: c.drawString(x,y,'•'); c.drawString(x+6,y,line) else: c.drawString(x+(6 if bullet else 0),y,line) y-=leading return y def panel(x,y,w,title,items, fill=PALE): # calculate content height h=20 for label,body in items: h += max(1,len(wrap((label+' '+body).strip(),'Helvetica',6.45,w-12)))*7.55 + 2.2 c.setFillColor(fill); c.roundRect(x,y-h,w,h,4,fill=1,stroke=0) c.setFillColor(TEAL); c.roundRect(x,y-15,w,15,4,fill=1,stroke=0) c.setFillColor(white); c.setFont('Helvetica-Bold',7.4); c.drawString(x+5,y-10.2,title) yy=y-22 for label,body in items: c.setFont('Helvetica-Bold',6.45); c.setFillColor(NAVY) prefix=(label+': ') if label else '' full=prefix+body lines=wrap(full,'Helvetica',6.45,w-12) for i,line in enumerate(lines): # bold prefix only if entire line permits otherwise plain for clean compact layout c.setFont('Helvetica-Bold' if i==0 and label else 'Helvetica',6.45) c.drawString(x+6,yy,line); yy-=7.55 yy-=2.2 return y-h # Header c.setFillColor(NAVY); c.setFont('Helvetica-Bold',18); c.drawCentredString(W/2,H-25,'LAPAROSCOPIC PORT-PLACEMENT QUICK REFERENCE') c.setFillColor(GREY); c.setFont('Helvetica',7.3); c.drawCentredString(W/2,H-36,'Target-centered planning for supervised surgical training | All secondary ports under direct laparoscopic vision') c.setStrokeColor(GOLD); c.setLineWidth(1.4); c.line(17,H-42,W-17,H-42) margin=15; gap=7; col=(W-2*margin-2*gap)/3; top=H-51 # column 1 x=margin; y=top p1=[('Target','Plan from the hardest dissection, suturing, stapling, or extraction step.'),('Camera','Must show the target, active tips, and adjacent danger structures.'),('Triangulation','Working instruments approach the target from different directions; avoid parallel crowded shafts.'),('Distance','Too close restricts tip movement; too far exaggerates fulcrum motion and reduces precision.'),('Safety','Consider scars, mesh, hernia, adhesions, bladder, epigastric vessels, ribs, and iliac crest.'),('Rescue','Add a port for suction, traction, hemostasis, or suturing. Conversion is a safety decision.')] y=panel(x,y,col,'1. UNIVERSAL RULES',p1)-6 p2=[('Camera','5, 10, or 12 mm. A 30-degree scope can look around structures and toward the anterior wall.'),('Dominant hand','Dissection, energy, clips, suturing. Needs a direct but not cramped path.'),('Nondominant hand','Traction and countertraction. Place for the required direction of pull.'),('Assistant','Suction or retraction without crossing the surgeon’s instruments.'),('Stapler/extraction','Usually 10-12 mm or larger. Plan size, trajectory, specimen route, and fascial closure.')] y=panel(x,y,col,'2. PORT FUNCTIONS',p2)-6 p3=[('1. Insufflate','Adequate working space and stable view.'),('2. Inspect','No bowel or omental adhesion at intended site.'),('3. Mark','Safe site relative to target, scars, vessels, and bony landmarks.'),('4. Verify','Direct view; a finder needle can check trajectory.'),('5. Insert','Controlled advance toward the target.'),('6. Test','Check reach, traction vector, handle clearance, and need for another port.')] panel(x,y,col,'3. BEFORE EACH SECONDARY PORT',p3) # col 2 configurations A x=margin+col+gap; y=top cfgA=[('Cholecystectomy','Supine, reverse Trendelenburg, right side up. Umbilical/supraumbilical camera + epigastric dissection/clip port + right midclavicular infundibular traction + right lateral fundus retraction.'),('Appendectomy','Supine, Trendelenburg, left tilt. Umbilical camera + left-lower-quadrant working port + suprapubic working/assistant port. Modify for pelvic or retrocecal appendix.'),('TAPP hernia','Supine, slight Trendelenburg. Midline camera + two lower-abdominal ports. Low pelvic approach; avoid bladder and epigastrics.'),('Ventral hernia','Primary access away from defect and previous scars; lateral working ports for adhesiolysis, mesh deployment, and fixation.')] y=panel(x,y,col,'4. COMMON MAPS: ABDOMEN',cfgA)-6 cfgB=[('Fundoplication / hiatal','Reverse Trendelenburg, often split-leg. Upper-midline camera + bilateral upper-abdominal working ports + assistant + liver-retraction port.'),('Sleeve gastrectomy','Upper abdominal arrangement plus liver retraction; a larger working port needs a productive stapling trajectory along greater curvature.'),('Colorectal','Distributed ports must reach upper abdomen and pelvis. Plan extraction early. A stapling port needs a safe direct angle.'),('Hysterectomy / pelvis','Lithotomy with Trendelenburg. Umbilical/supraumbilical camera + bilateral lateral lower-quadrant working ports. Move cranially for bulky uterus/mass.'),('Nephrectomy / pyeloplasty','Modified flank/lateral with table flexion. Curved or L-shaped flank-oriented ports toward hilum or UPJ; right-sided cases may require liver retraction.')] panel(x,y,col,'5. COMMON MAPS: SPECIALTY',cfgB) # col 3 x=margin+2*(col+gap); y=top trouble=[('Instrument clash','Increase port separation, alter camera position, or add/reposition an accessory port.'),('Poor retraction','Change table position or add dedicated retraction/assistant port.'),('Target too close','Use a more distant, safely positioned working port.'),('Target too far','Use longer instruments, adjust camera, or add a closer safe port.'),('Cannot suture/staple','Create wider triangulation and a correctly sized port with direct trajectory.'),('Bleeding/obscured view','Stop blind dissection. Suction, pressure, restore vision, add a port if needed, and convert if control is not secure.')] y=panel(x,y,col,'6. TROUBLESHOOTING',trouble)-6 safety=[('Direct vision','Every accessory port enters under laparoscopic view after inspection for adhesion.'),('Vessels','Superficial vessels may transilluminate. Inferior epigastrics are deeper: use anatomy and direct view.'),('Ergonomics','Align surgeon, hands, target, camera, and monitor. Correct poor posture and torque early.'),('Obesity','May require more tailored spacing, longer ports, and longer instruments.'),('Hard case','Add ports early when suction, retraction, two working hands, or hemostasis cannot coexist.')] y=panel(x,y,col,'7. SAFETY REMINDERS',safety)-6 # warning box warn=[('STOP AND REASSESS','Unclear anatomy, poor exposure, abnormal port torque, inaccessible instrument tip, uncontrolled bleeding, or loss of camera orientation. Improve setup before proceeding.')] panel(x,y,col,'8. PAUSE POINT',warn,HexColor('#FFF1EE')) # Footer c.setStrokeColor(TEAL); c.setLineWidth(.35); c.line(15,13,W-15,13) c.setFillColor(GREY); c.setFont('Helvetica',6.3) c.drawString(15,6.5,'Educational aid only. Individualize to anatomy, scars, pathology, body habitus, device requirements, and local protocol.') c.drawRightString(W-15,6.5,'MIS Study Guide | Parts 1-6') c.save(); print(OUT) ''') PY python "/tmp/workspace/mis-study-guide/src/build_quick_reference.py" python - <<'PY' from pathlib import Path from pypdf import PdfReader p=Path('/tmp/workspace/mis-study-guide/output/Port_Placement_Quick_Reference.pdf') r=PdfReader(str(p)); text='\n'.join((pg.extract_text() or '') for pg in r.pages) assert len(r.pages)==1, len(r.pages) for s in ['UNIVERSAL RULES','COMMON MAPS: ABDOMEN','TROUBLESHOOTING','Cholecystectomy','STOP AND REASSESS']: assert s in text, s print('validated',len(r.pages),p.stat().st_size) PY
Port Placement Quick Reference
PDF Document · PDF
Create a PDF with procedure-specific port diagrams
~/
SAGES guidelines laparoscopic cholecystectomy appendectomy hernia port placement
laparoscopic port placement diagrams cholecystectomy appendectomy fundoplication hysterectomy nephrectomy
python - <<'PY' from pathlib import Path p=Path('/tmp/workspace/mis-study-guide/src/build_port_diagram_atlas.py') p.write_text(r'''from reportlab.lib.pagesizes import A4 from reportlab.lib import colors from reportlab.lib.colors import HexColor from reportlab.lib.units import cm from reportlab.pdfgen import canvas from reportlab.pdfbase.pdfmetrics import stringWidth from pathlib import Path OUT=Path('/tmp/workspace/mis-study-guide/output/Procedure_Specific_Port_Diagram_Atlas.pdf') W,H=A4 NAVY=HexColor('#123047'); TEAL=HexColor('#0F6B73'); BLUE=HexColor('#247AA5'); GREEN=HexColor('#2A8C69'); ORANGE=HexColor('#D57821'); PURPLE=HexColor('#7451A0'); RED=HexColor('#B63D35'); PALE=HexColor('#F4F8F8'); GREY=HexColor('#586772'); LINE=HexColor('#B8C8CD'); SKIN=HexColor('#F5E2D3') def wrap(text,font,size,width): ws=text.split(); out=[]; ln='' for w in ws: t=(ln+' '+w).strip() if stringWidth(t,font,size)<=width: ln=t else: out.append(ln); ln=w if ln: out.append(ln) return out def draw_footer(c,pg): c.setStrokeColor(TEAL); c.setLineWidth(.35); c.line(1.35*cm,1.05*cm,W-1.35*cm,1.05*cm) c.setFont('Helvetica',7); c.setFillColor(GREY) c.drawString(1.35*cm,.65*cm,'Educational schematic only | Individualize to patient anatomy, scars, pathology, device requirements, and institutional protocol.') c.drawRightString(W-1.35*cm,.65*cm,f'Procedure-Specific Port Diagram Atlas | {pg}') def paragraph(c,x,y,w,text,size=8.2,leading=10,font='Helvetica',color=NAVY): c.setFillColor(color); c.setFont(font,size) for line in wrap(text,font,size,w): c.drawString(x,y,line); y-=leading return y def port(c,x,y,kind,label): cols={'C':BLUE,'W':GREEN,'A':ORANGE,'R':PURPLE,'S':RED} r={'C':7,'W':6,'A':6,'R':5.5,'S':7}.get(kind,6) c.setFillColor(cols[kind]); c.setStrokeColor(colors.white); c.setLineWidth(1.3); c.circle(x,y,r,fill=1,stroke=1) c.setFillColor(colors.white); c.setFont('Helvetica-Bold',6.2); c.drawCentredString(x,y-2.2,label) def torso(c,cx,top,scale,ports, target=None, side=False): # stylized anterior torso, not anatomical scale c.saveState(); c.setFillColor(SKIN); c.setStrokeColor(NAVY); c.setLineWidth(1) if not side: path=c.beginPath(); path.moveTo(cx-23*scale,top); path.curveTo(cx-39*scale,top-10*scale,cx-38*scale,top-37*scale,cx-31*scale,top-53*scale); path.curveTo(cx-26*scale,top-71*scale,cx-30*scale,top-112*scale,cx-20*scale,top-136*scale); path.curveTo(cx-11*scale,top-149*scale,cx+11*scale,top-149*scale,cx+20*scale,top-136*scale); path.curveTo(cx+30*scale,top-112*scale,cx+26*scale,top-71*scale,cx+31*scale,top-53*scale); path.curveTo(cx+38*scale,top-37*scale,cx+39*scale,top-10*scale,cx+23*scale,top); path.close(); c.drawPath(path,fill=1,stroke=1) # midline and umbilicus c.setStrokeColor(HexColor('#D6B8A4')); c.setLineWidth(.55); c.line(cx,top-20*scale,cx,top-135*scale); c.setFillColor(HexColor('#C7967C')); c.circle(cx,top-83*scale,1.7,fill=1,stroke=0) # costal margin / pelvis markers c.setStrokeColor(HexColor('#D6B8A4')); c.arc(cx-27*scale,top-52*scale,cx+27*scale,top-24*scale,205,130); c.arc(cx-21*scale,top-141*scale,cx+21*scale,top-119*scale,15,150) else: path=c.beginPath(); path.moveTo(cx-12*scale,top); path.curveTo(cx-30*scale,top-18*scale,cx-25*scale,top-64*scale,cx-18*scale,top-86*scale); path.curveTo(cx-26*scale,top-115*scale,cx-18*scale,top-139*scale,cx,top-145*scale); path.curveTo(cx+18*scale,top-134*scale,cx+18*scale,top-89*scale,cx+12*scale,top-58*scale); path.curveTo(cx+23*scale,top-28*scale,cx+16*scale,top-8*scale,cx-12*scale,top); path.close(); c.drawPath(path,fill=1,stroke=1) c.setStrokeColor(HexColor('#D6B8A4')); c.line(cx-10*scale,top-80*scale,cx+9*scale,top-80*scale) # target if target: tx,ty,tt=target; c.setFillColor(HexColor('#FFF4D7')); c.setStrokeColor(GOLD if 'GOLD' in globals() else ORANGE); c.circle(cx+tx*scale,top-ty*scale,7*scale,fill=1,stroke=1); c.setFillColor(NAVY); c.setFont('Helvetica-Bold',5.5); c.drawCentredString(cx+tx*scale,top-ty*scale-2,tt) for px,py,k,l in ports: port(c,cx+px*scale,top-py*scale,k,l) c.restoreState() def legend(c,x,y): entries=[('C','Camera',BLUE),('W','Working',GREEN),('A','Assistant / suction',ORANGE),('R','Retractor',PURPLE),('S','Stapler / specimen',RED)] for i,(k,n,col) in enumerate(entries): xx=x+(i%3)*55; yy=y-(i//3)*15; port(c,xx,yy,k,k); c.setFont('Helvetica',6.7); c.setFillColor(NAVY); c.drawString(xx+9,yy-2,n) def title(c,main,sub,pg): c.setFillColor(NAVY); c.setFont('Helvetica-Bold',20); c.drawCentredString(W/2,H-31,main) c.setFillColor(GREY); c.setFont('Helvetica',8); c.drawCentredString(W/2,H-43,sub) c.setStrokeColor(TEAL); c.setLineWidth(1.1); c.line(1.35*cm,H-49,W-1.35*cm,H-49); draw_footer(c,pg) def card(c,x,y,w,h,name,pos,desc,ports,target=None,side=False): c.setFillColor(PALE); c.roundRect(x,y-h,w,h,6,fill=1,stroke=0); c.setStrokeColor(LINE); c.roundRect(x,y-h,w,h,6,fill=0,stroke=1) c.setFillColor(TEAL); c.roundRect(x,y-18,w,18,6,fill=1,stroke=0); c.setFillColor(colors.white); c.setFont('Helvetica-Bold',10); c.drawString(x+7,y-12.5,name) torso(c,x+w*.32,y-27,1.48 if not side else 1.28,ports,target,side) tx=x+w*.60; ty=y-30 c.setFillColor(NAVY); c.setFont('Helvetica-Bold',7.2); c.drawString(tx,ty,'Position'); ty-=10 ty=paragraph(c,tx,ty,w*.35,pos,6.8,8.3) ty-=3; c.setFont('Helvetica-Bold',7.2); c.drawString(tx,ty,'Port logic'); ty-=10 paragraph(c,tx,ty,w*.35,desc,6.8,8.3) c=canvas.Canvas(str(OUT),pagesize=A4,pageCompression=1) # COVER c.setFillColor(NAVY); c.rect(0,0,W,H,fill=1,stroke=0) c.setFillColor(colors.white); c.setFont('Helvetica-Bold',27); c.drawCentredString(W/2,H-205,'PROCEDURE-SPECIFIC') c.drawCentredString(W/2,H-239,'PORT DIAGRAM ATLAS') c.setFillColor(HexColor('#B8DADF')); c.setFont('Helvetica',12); c.drawCentredString(W/2,H-269,'Laparoscopic educational schematics for common operations') # decorative torso with ports c.setFillColor(HexColor('#174359')); c.roundRect(W/2-77,H-490,154,172,22,fill=1,stroke=0) torso(c,W/2,H-340,1.35,[(-23,65,'W','W'),(0,76,'C','C'),(23,65,'W','W'),(0,29,'R','R')],(0,43,'T')) c.setFillColor(HexColor('#B8DADF')); c.setFont('Helvetica',8); c.drawCentredString(W/2,H-531,'Camera • Working ports • Assistant access • Retraction • Stapler / specimen route') c.setFillColor(colors.white); c.setFont('Helvetica',9); c.drawCentredString(W/2,70,'Educational use only. Diagrams are simplified, not to scale, and never replace supervised procedural training.') c.showPage() # Page 2 pg=2; title(c,'Upper Abdominal Procedures','Standard patterns. Exact position and spacing vary with habitus, target anatomy, inflammation, and device selection.',pg); legend(c,35,H-66) card(c,25,H-106,260,250,'Laparoscopic cholecystectomy','Supine; reverse Trendelenburg; right side elevated.','C: umbilical or supraumbilical overview. W: epigastric dissection/clip access and right midclavicular infundibular traction. A: right lateral fundus retraction. Maintain the traction vectors needed for safe hilar dissection.',[(0,83,'C','C'),(-14,47,'W','W'),(22,57,'W','W'),(37,39,'A','A')],(18,42,'GB')) card(c,310,H-106,260,250,'Hiatal repair / fundoplication','Supine or split-leg; reverse Trendelenburg.','C: upper-midline view. W: bilateral upper-abdominal access for crural dissection and suturing. R: dedicated liver retractor. A: assistant/suction. The configuration must permit mediastinal work and needle angles at the hiatus.',[(0,70,'C','C'),(-25,55,'W','W'),(25,55,'W','W'),(0,31,'R','R'),(42,63,'A','A')],(0,43,'H')) card(c,25,H-376,260,250,'Sleeve gastrectomy','Supine or split-leg; reverse Trendelenburg.','Upper-abdominal arrangement with R for liver elevation. C gives overview. A larger S port requires a safe longitudinal stapler trajectory along the greater curvature. Wider spacing and longer instruments are often needed in high BMI.',[(0,74,'C','C'),(-28,58,'S','S'),(24,56,'W','W'),(0,30,'R','R'),(42,65,'A','A')],(-13,53,'ST')) card(c,310,H-376,260,250,'Ventral / incisional hernia repair','Supine; tilt as required by defect location.','Access C away from defect and scars. Place W ports laterally and far enough from the defect for adhesiolysis, mesh deployment, and fixation. Use A if retraction or suction is required. Do not use this generic map over known adhesions.',[(-30,45,'C','C'),(30,50,'W','W'),(38,84,'W','W'),(-37,80,'A','A')],(0,72,'D')) c.showPage() # page3 pg=3; title(c,'Lower Abdominal and Pelvic Procedures','The port map must preserve access to the target while avoiding the bladder, epigastric vessels, adhesions, and prior mesh.',pg); legend(c,35,H-66) card(c,25,H-106,260,250,'Laparoscopic appendectomy','Supine; Trendelenburg; left tilt.','C: umbilical overview. W: left-lower-quadrant working access. A/W: suprapubic port for traction, exposure, or additional instrumentation. Port location may change for a pelvic or retrocecal appendix and in pregnancy.',[(0,83,'C','C'),(-27,108,'W','W'),(0,122,'A','A')],(22,104,'Ap')) card(c,310,H-106,260,250,'TAPP inguinal hernia repair','Supine; slight Trendelenburg.','C: midline camera. W: paired lower abdominal ports to reach the preperitoneal plane. Maintain low pelvic ergonomics. Avoid bladder and epigastric vessels. TEP uses a different, extraperitoneal access geometry.',[(0,78,'C','C'),(-23,111,'W','W'),(23,111,'W','W')],(-18,118,'IH')) card(c,25,H-376,260,250,'Laparoscopic hysterectomy','Dorsal lithotomy; Trendelenburg.','C: umbilical or supraumbilical pelvic view. W: bilateral lower-quadrant ports lateral to rectus. A: optional suprapubic or additional lateral port. Move ports cranially for a bulky uterus or pelvic mass.',[(0,78,'C','C'),(-28,108,'W','W'),(28,108,'W','W'),(0,124,'A','A')],(0,108,'U')) card(c,310,H-376,260,250,'Left colectomy / low anterior resection','Supine/lithotomy; variable Trendelenburg and tilt.','Distributed C and W ports should reach both upper abdomen and pelvis. A lower S port permits pelvic stapling in a suitable trajectory. Plan extraction separately, commonly at a protected Pfannenstiel or other appropriate site.',[(0,76,'C','C'),(-30,107,'W','W'),(30,107,'W','W'),(0,126,'S','S'),(38,55,'A','A')],(-5,116,'R')) c.showPage() # page4 pg=4; title(c,'Flank and Urologic Procedures','Flank positioning, costal margin, iliac crest, and organ laterality materially affect trocar location. These schematics illustrate principles only.',pg); legend(c,35,H-66) card(c,25,H-106,260,250,'Left laparoscopic nephrectomy','Modified flank/lateral; table flexion as appropriate.','C and W ports form a curved or L-shaped approach to the renal hilum. Maintain clearance from costal margin and iliac crest. Add A for retraction. The actual map differs by transperitoneal versus retroperitoneal approach.',[(-12,73,'C','C'),(-23,52,'W','W'),(12,95,'W','W'),(22,65,'A','A')],(-7,65,'K'),True) card(c,310,H-106,260,250,'Right laparoscopic nephrectomy','Modified flank/lateral; table flexion as appropriate.','Flank-oriented camera and working ports target the renal hilum. An additional superior-lateral R port may be used for liver retraction. Exact direction depends on approach, liver size, prior surgery, and body habitus.',[(-10,73,'C','C'),(-23,52,'W','W'),(12,95,'W','W'),(20,42,'R','R')],(-7,65,'K'),True) card(c,25,H-376,260,250,'Laparoscopic pyeloplasty','Lateral decubitus; table partially flexed.','C plus cranial and caudolateral W ports should form a triangle at the ureteropelvic junction. A port may assist exposure. This is reconstructive surgery: choose ports for needle driving and intracorporeal suturing, not exposure alone.',[(-10,72,'C','C'),(-22,48,'W','W'),(15,96,'W','W'),(24,64,'A','A')],(0,78,'UPJ'),True) # safety box c.setFillColor(HexColor('#FFF1EE')); c.setStrokeColor(RED); c.roundRect(310,H-376-250,260,250,6,fill=1,stroke=1) c.setFillColor(RED); c.setFont('Helvetica-Bold',10); c.drawString(319,H-394,'How to read the diagrams safely') items=['Diagrams show a common <b>logic</b>, not a universal skin map.','C = camera, W = working, A = assistant/suction, R = retraction, S = stapler/specimen.','All secondary ports: inspect internally, identify a safe wall site, then insert under direct vision.','Change camera location, table position, port count, instrument length, or approach when the geometry is poor.','Add a port or convert when exposure, anatomy, or bleeding control is inadequate.'] y=H-411 for it in items: # plain draw bullets avoiding markup c.setFillColor(NAVY); c.setFont('Helvetica',7.3) for j,line in enumerate(wrap(it.replace('<b>','').replace('</b>',''),'Helvetica',7.3,240)): c.drawString(321 if j else 319,y,('• ' if j==0 else ' ')+line); y-=9 y-=4 c.showPage() # page5 reference pg=5; title(c,'Diagram Use Checklist','Apply the same safety framework to every procedure-specific configuration.',pg) items=[('Before access','Review scars, hernia, mesh, likely adhesions, body habitus, pregnancy, mass effect, and alternate entry plan.'),('After primary access','Perform a deliberate first look for access injury and adhesions before adding any secondary port.'),('For each accessory port','Confirm target-centered trajectory, device compatibility, vessel/bladder avoidance, direct vision, and expected traction vector.'),('For the difficult step','Check whether the configuration works for suturing, stapling, hilar work, deep pelvis, or specimen extraction, not merely initial exposure.'),('If difficulty develops','Reposition patient, change camera port, use a 30-degree scope, add a port, use longer instruments, seek assistance, or convert when safety requires.')] c.setFillColor(PALE); c.roundRect(28,H-95,539,285,8,fill=1,stroke=0); c.setStrokeColor(LINE); c.roundRect(28,H-95,539,285,8,fill=0,stroke=1) y=H-120 for hd,tx in items: c.setFillColor(TEAL); c.setFont('Helvetica-Bold',11); c.drawString(47,y,hd); y-=14 y=paragraph(c,47,y,495,tx,9.3,12)-11 c.setFillColor(HexColor('#FFF6E3')); c.setStrokeColor(ORANGE); c.roundRect(28,H-420,539,88,8,fill=1,stroke=1) c.setFillColor(NAVY); c.setFont('Helvetica-Bold',11); c.drawString(47,H-355,'Reference basis') paragraph(c,47,H-373,495,'Patterns were synthesized from standard surgical-textbook descriptions and SAGES guidance. Examples include common three-port appendectomy arrangements, five-port fundoplication with liver retraction, pelvic configurations using umbilical and bilateral lower-quadrant ports, and flank-oriented urologic port geometry. Recent evidence comparing reduced-port and conventional approaches is procedure-specific; no single configuration is universally best.',8.5,10.6) c.setFillColor(GREY); c.setFont('Helvetica-Oblique',7.5); c.drawCentredString(W/2,160,'Sources: Schwartz’s Principles of Surgery; Sabiston Textbook of Surgery; Bailey and Love; Hinman’s Atlas of Urologic Surgery; Campbell-Walsh-Wein Urology; SAGES guidance.') c.showPage(); c.save(); print(OUT) ''') print(p) PY python "/tmp/workspace/mis-study-guide/src/build_port_diagram_atlas.py"
python - <<'PY' from pathlib import Path from pypdf import PdfReader p=Path('/tmp/workspace/mis-study-guide/output/Procedure_Specific_Port_Diagram_Atlas.pdf') assert p.exists() and p.stat().st_size>10000 r=PdfReader(str(p)); txt='\n'.join((page.extract_text() or '') for page in r.pages) checks=['Upper Abdominal Procedures','Laparoscopic cholecystectomy','Laparoscopic appendectomy','TAPP inguinal hernia repair','Laparoscopic hysterectomy','Left laparoscopic nephrectomy','Laparoscopic pyeloplasty','Diagram Use Checklist'] missing=[x for x in checks if x not in txt] assert len(r.pages)==5, len(r.pages) assert not missing, missing print('Validated:',len(r.pages),'pages,',p.stat().st_size,'bytes') PY
Procedure Specific Port Diagram Atlas
PDF Document · PDF
Create a PPT teaching the procedure-specific port layouts
SAGES laparoscopic port placement guidelines trocar placement direct vision
~/
laparoscopic port placement
standard laparoscopic cholecystectomy port placement schematic diagram
mkdir -p "/tmp/workspace/mis-study-guide/src" "/tmp/workspace/mis-study-guide/output" && python - <<'PY' from pathlib import Path p=Path('/tmp/workspace/mis-study-guide/src/build_port_layout_teaching_deck.py') p.write_text(r'''from pptx import Presentation from pptx.util import Inches, Pt from pptx.enum.shapes import MSO_SHAPE from pptx.enum.text import PP_ALIGN, MSO_ANCHOR from pptx.dml.color import RGBColor from pptx.enum.dml import MSO_THEME_COLOR from pptx.enum.shapes import MSO_CONNECTOR from pathlib import Path OUT=Path('/tmp/workspace/mis-study-guide/output/Procedure_Specific_Port_Layouts_Teaching_Deck.pptx') prs=Presentation(); prs.slide_width=Inches(13.333); prs.slide_height=Inches(7.5) blank=prs.slide_layouts[6] # Colors NAVY='123047'; TEAL='0F6B73'; BLUE='247AA5'; GREEN='2A8C69'; ORANGE='D57821'; PURPLE='7451A0'; RED='B63D35'; BG='F6F9FA'; MUTED='536773'; PALE='EAF2F3'; SKIN='F4E1D2'; LINE='B9C9CD'; GOLD='D99A23' def C(x): return RGBColor.from_string(x) def shape(slide, typ, x,y,w,h, fill, line=None, radius=False): s=slide.shapes.add_shape(typ, Inches(x), Inches(y), Inches(w), Inches(h)) s.fill.solid(); s.fill.fore_color.rgb=C(fill) s.line.color.rgb=C(line or fill); return s def textbox(slide,x,y,w,h,text,size=18,color=NAVY,bold=False,align=None,font='Aptos',valign=None): s=slide.shapes.add_textbox(Inches(x), Inches(y), Inches(w), Inches(h)); tf=s.text_frame; tf.clear(); tf.word_wrap=True tf.margin_left=tf.margin_right=0; tf.margin_top=tf.margin_bottom=0 if valign: tf.vertical_anchor=valign for i,line in enumerate(text.split('\n')): p=tf.paragraphs[0] if i==0 else tf.add_paragraph(); p.text=line; p.font.name=font; p.font.size=Pt(size); p.font.bold=bold; p.font.color.rgb=C(color) if align: p.alignment=align p.space_after=Pt(0) return s def base(title,subtitle='',num=None): sl=prs.slides.add_slide(blank); shape(sl,MSO_SHAPE.RECTANGLE,0,0,13.333,7.5,BG) shape(sl,MSO_SHAPE.RECTANGLE,0,0,13.333,.17,TEAL) textbox(sl,.55,.35,12.1,.42,title,25,NAVY,True) if subtitle: textbox(sl,.56,.83,12.0,.28,subtitle,9.5,MUTED) shape(sl,MSO_SHAPE.RECTANGLE,.55,7.08,12.2,.012,LINE) textbox(sl,.55,7.16,8.4,.16,'Procedure-Specific Port Layouts | Educational schematics, not patient-specific maps',7,MUTED) if num: textbox(sl,12.1,7.14,.65,.18,str(num),8,TEAL,True,PP_ALIGN.RIGHT) return sl def port(slide,x,y,k,label): cols={'C':BLUE,'W':GREEN,'A':ORANGE,'R':PURPLE,'S':RED} s=shape(slide,MSO_SHAPE.OVAL,x-.115,y-.115,.23,.23,cols[k],'FFFFFF') s.line.width=Pt(1.2) textbox(slide,x-.10,y-.055,.20,.10,label,5.5,'FFFFFF',True,PP_ALIGN.CENTER) def torso(slide,cx,top,scale,ports,target=None,side=False): # Original abstract torso sketch if not side: body=shape(slide,MSO_SHAPE.ROUNDED_RECTANGLE,cx-.62*scale,top,.0+1.24*scale,2.85*scale,SKIN,NAVY) # contour elements shape(slide,MSO_SHAPE.ARC,cx-.58*scale,top+.37*scale,1.16*scale,.38*scale,SKIN,'D4B7A3') shape(slide,MSO_SHAPE.ARC,cx-.45*scale,top+2.16*scale,.9*scale,.35*scale,SKIN,'D4B7A3') sh=shape(slide,MSO_SHAPE.OVAL,cx-.026*scale,top+1.53*scale,.052*scale,.052*scale,'C89578','C89578') else: body=shape(slide,MSO_SHAPE.ROUNDED_RECTANGLE,cx-.48*scale,top,.96*scale,2.85*scale,SKIN,NAVY) shape(slide,MSO_SHAPE.ARC,cx-.38*scale,top+1.34*scale,.76*scale,.22*scale,SKIN,'D4B7A3') if target: tx,ty,t=target; shape(slide,MSO_SHAPE.OVAL,cx+tx*scale-.10,top+ty*scale-.10,.20,.20,'FFF2D8',GOLD); textbox(slide,cx+tx*scale-.08,top+ty*scale-.035,.16,.06,t,4.5,NAVY,True,PP_ALIGN.CENTER) for x,y,k,l in ports: port(slide,cx+x*scale,top+y*scale,k,l) def legend(slide,x,y): for i,(k,n) in enumerate([('C','Camera'),('W','Working'),('A','Assistant / suction'),('R','Retraction'),('S','Stapler / specimen')]): xx=x+(i%3)*1.45; yy=y+(i//3)*.28; port(slide,xx,yy,k,k); textbox(slide,xx+.15,yy-.05,1.22,.11,n,7,NAVY) def info(slide,x,y,w,h,head,body,accent=TEAL): shape(slide,MSO_SHAPE.ROUNDED_RECTANGLE,x,y,w,h,'FFFFFF',LINE) shape(slide,MSO_SHAPE.RECTANGLE,x,y,.08,h,accent,accent) textbox(slide,x+.22,y+.16,w-.34,.20,head,11,accent,True) textbox(slide,x+.22,y+.48,w-.38,h-.56,body,9.2,NAVY) def procedure_slide(num,title,position,logic,ports,target,side=False,alert=''): sl=base(title,position,num); legend(sl,.70,1.28) shape(sl,MSO_SHAPE.ROUNDED_RECTANGLE,.55,1.72,5.15,4.92,'FFFFFF',LINE) torso(sl,3.1,2.00,1.34,ports,target,side) textbox(sl,.85,5.95,4.5,.30,'Original conceptual schematic - not to scale',8,MUTED,False,PP_ALIGN.CENTER) info(sl,6.0,1.72,6.73,2.1,'Port logic',logic,TEAL) info(sl,6.0,4.02,6.73,1.25,'Safety / customization',alert,RED) info(sl,6.0,5.47,6.73,1.17,'Teaching point','Work backward from the difficult step: target, camera view, traction vectors, device trajectory, then rescue options.',PURPLE) return sl # Slide 1 cover sl=prs.slides.add_slide(blank); shape(sl,MSO_SHAPE.RECTANGLE,0,0,13.333,7.5,NAVY); shape(sl,MSO_SHAPE.RECTANGLE,0,0,13.333,.19,TEAL) textbox(sl,.7,1.12,8.6,.55,'Procedure-Specific\nLaparoscopic Port Layouts',31,'FFFFFF',True) textbox(sl,.73,2.57,7.5,.38,'A teaching deck using original conceptual schematics',14,'B9DADF') shape(sl,MSO_SHAPE.ROUNDED_RECTANGLE,9.25,1.15,2.85,4.65,'174359','174359'); torso(sl,10.68,1.72,1.75,[(-.35,1.42,'W','W'),(0,1.63,'C','C'),(.35,1.42,'W','W'),(0,.62,'R','R')],(0,1.0,'T')) textbox(sl,.75,5.72,7.75,.68,'For supervised trainee education. A port map supports exposure and safety; it never substitutes for patient-specific planning, trained assistance, or readiness to add ports or convert.',12,'FFFFFF') textbox(sl,.75,6.74,10,.20,'Common operations: upper GI, biliary, appendix, hernia, pelvic, colorectal and urologic procedures',9,'B9DADF') # slide2 principles sl=base('How to use a port map','Treat every configuration as a target-centered hypothesis that must be tested after entry.',2) info(sl,.7,1.35,3.9,1.45,'1. Define the target','Identify the critical anatomy and the step that demands the greatest precision, traction, or device access.') info(sl,4.75,1.35,3.9,1.45,'2. Build a visual triangle','Camera plus two working instruments need a view of the target, instrument tips, and nearby danger structures.',BLUE) info(sl,8.8,1.35,3.85,1.45,'3. Add function, not symmetry','Assistant, liver retractor, suction, stapler and extraction ports exist to solve a specific task.',PURPLE) info(sl,.7,3.15,5.85,2.55,'Direct-vision rule','After primary access and first look, place secondary ports under laparoscopic vision. Consider scars, adhesions, wall vessels, bladder, uterus, mesh, and the intended instrument trajectory.\n\nPoor exposure is a reason to reposition, change the camera, add a port, or change approach.',RED) shape(sl,MSO_SHAPE.ROUNDED_RECTANGLE,6.85,3.15,5.8,2.55,'FFFFFF',LINE); torso(sl,9.7,3.43,1.23,[(-.42,1.75,'W','W'),(0,1.95,'C','C'),(.42,1.75,'W','W')],(0,1.25,'T')); legend(sl,7.2,5.9) textbox(sl,.75,6.25,11.75,.38,'Practical message: add a port rather than accept unsafe traction, collision, inadequate visualization, or inability to control bleeding.',12,NAVY,True,PP_ALIGN.CENTER) # procedures procedure_slide(3,'Laparoscopic cholecystectomy','Supine; reverse Trendelenburg; right side elevated.','C: umbilical or supraumbilical overview. W: epigastric dissection/clip access and right midclavicular traction. A: lateral fundus retraction. The port geometry should create traction vectors for safe hilar dissection.',[(0,1.55,'C','C'),(-.26,.82,'W','W'),(.42,1.02,'W','W'),(.62,.63,'A','A')],(.32,.70,'GB'),False,'Use a configuration that preserves exposure of the hepatocystic triangle. Severe inflammation, bleeding, or poor retraction justify extra access or a change in strategy.') procedure_slide(4,'Hiatal repair and fundoplication','Supine or split-leg; reverse Trendelenburg.','C: upper-midline overview. W: bilateral upper-abdominal ports for crural dissection and suturing. R: dedicated liver elevation. A: assistant or suction. The layout must facilitate mediastinal work and needle angles at the hiatus.',[(0,1.35,'C','C'),(-.48,1.05,'W','W'),(.48,1.05,'W','W'),(0,.50,'R','R'),(.75,1.28,'A','A')],(0,.75,'H'),False,'A liver-retractor port is functional, not decorative. Confirm that suturing can be performed at the hiatus before committing to dissection.') procedure_slide(5,'Sleeve gastrectomy','Supine or split-leg; reverse Trendelenburg.','Upper-abdominal C and W ports support mobilization and gastric manipulation. R elevates the liver. A larger S port is planned for a safe longitudinal stapler trajectory along the greater curvature.',[(0,1.45,'C','C'),(-.54,1.10,'S','S'),(.47,1.05,'W','W'),(0,.48,'R','R'),(.80,1.27,'A','A')],(-.20,.95,'ST'),False,'High BMI can require wider or more cranial spacing and longer instruments. Do not use a fixed skin map when it compromises stapler trajectory or exposure.') procedure_slide(6,'Laparoscopic appendectomy','Supine; Trendelenburg; left tilt.','C: umbilical view. W: left lower quadrant for dissection. A/W: suprapubic port for traction, exposure, or additional instrumentation. This is a common three-port concept, not a universal configuration.',[(0,1.55,'C','C'),(-.52,2.05,'W','W'),(0,2.35,'A','A')],(.42,1.94,'Ap'),False,'Modify for a pelvic or retrocecal appendix, perforation/abscess, obesity, pregnancy, and adhesions. Recheck the operative field after entry.') procedure_slide(7,'TAPP inguinal hernia repair','Supine; slight Trendelenburg.','C: midline view. W: paired lower abdominal ports give access to the preperitoneal plane. Preserve low pelvic ergonomics and a workable angle for dissection and mesh handling.',[(0,1.46,'C','C'),(-.45,2.10,'W','W'),(.45,2.10,'W','W')],(-.33,2.24,'IH'),False,'Avoid bladder and inferior epigastric vessels. TEP uses a different extraperitoneal access geometry, so do not transfer this map without adaptation.') procedure_slide(8,'Ventral or incisional hernia repair','Supine; table tilt tailored to defect location.','C is selected away from the defect and prior scars. W ports are lateral and sufficiently distant to permit adhesiolysis, mesh deployment, and fixation. A may support retraction or suction.',[(-.55,.90,'C','C'),(.55,1.02,'W','W'),(.62,1.65,'W','W'),(-.62,1.55,'A','A')],(0,1.43,'D'),False,'SAGES guidance supports direct-vision secondary ports placed as lateral from the defect as practical for ergonomics. Anticipate adhesions and plan alternative entry.') procedure_slide(9,'Laparoscopic hysterectomy and pelvic surgery','Dorsal lithotomy; Trendelenburg.','C: umbilical or supraumbilical pelvic view. W: bilateral lower-quadrant ports lateral to rectus. A: optional suprapubic or additional lateral access. Large uteri or masses often require more cranial or additional ports.',[(0,1.45,'C','C'),(-.52,2.05,'W','W'),(.52,2.05,'W','W'),(0,2.38,'A','A')],(0,2.04,'U'),False,'Avoid inferior epigastric vessels, bladder, and prior scars. Confirm that ports permit uterine manipulation, vascular control, and safe extraction strategy.') procedure_slide(10,'Colorectal surgery: flexible, task-specific distribution','Supine or lithotomy; variable tilt and Trendelenburg.','C and W ports are distributed to reach both upper abdomen and pelvis. S is placed to permit a suitable pelvic stapling trajectory. Plan extraction site early, independently from the working layout.',[(0,1.38,'C','C'),(-.55,2.02,'W','W'),(.55,2.02,'W','W'),(0,2.42,'S','S'),(.75,.86,'A','A')],(-.08,2.22,'R'),False,'Right, left, and rectal resections do not share a fixed map. Verify reach for splenic flexure or hepatic flexure work, deep pelvic dissection, stapling, and specimen extraction.') procedure_slide(11,'Flank-oriented nephrectomy','Modified flank or lateral decubitus; table flexion as appropriate.','C and W ports form a curved or L-shaped approach toward the renal hilum. Additional A or R access is selected for retraction. Costal margin and iliac crest constrain the available working envelope.',[(-.16,1.35,'C','C'),(-.42,.78,'W','W'),(.24,1.95,'W','W'),(.43,1.18,'A','A')],(-.10,1.18,'K'),True,'Transperitoneal and retroperitoneal approaches differ. On the right, liver retraction can change the layout. Individualize to laterality, organ size, scars, and access route.') procedure_slide(12,'Laparoscopic pyeloplasty','Lateral decubitus; table partially flexed.','C plus cranial and caudolateral W ports form a triangle at the ureteropelvic junction. A can assist exposure. The defining requirement is reconstructive suturing geometry, not merely initial visualization.',[(-.14,1.34,'C','C'),(-.42,.75,'W','W'),(.28,1.98,'W','W'),(.45,1.18,'A','A')],(.02,1.52,'UPJ'),True,'Choose port sites that permit controlled needle driving and intracorporeal knotting. Change access rather than accept poor suturing angle or instrument collision.') # slide 13 special cases sl=base('When the standard pattern should change','Anatomy and physiology overrule any diagram.',13) for i,(h,b,col) in enumerate([('Prior surgery, mesh, or hernia','Review scars and access plan. Expect adhesions; choose a safe primary entry and place all accessory ports under direct view.',RED),('Obesity or deep target','Use wider spacing, possibly more cranial access and longer instruments. Preserve a safe stapler and retraction trajectory.',ORANGE),('Pregnancy or mass effect','Move access in relation to fundal height or displaced anatomy. Position and entry technique must be selected by experienced teams.',PURPLE),('Unexpected findings','Pause. Improve view with position, scope angle, retraction, suction, an added port, specialist help, or conversion as indicated.',TEAL)]): x=.75+(i%2)*6.1; y=1.45+(i//2)*2.35; info(sl,x,y,5.7,1.9,h,b,col) textbox(sl,.8,6.45,11.8,.24,'Safety principle: the preferred map is the one that gives adequate visualization, traction, hemostatic control, and an exit strategy.',12,NAVY,True,PP_ALIGN.CENTER) # slide 14 close sl=base('Take-home framework','A concise checklist for each case.',14) items=[('Target','What structure and difficult step must the instruments reach?'),('View','Can the camera see the target, instruments, and danger structures?'),('Vectors','Do working ports provide bimanual traction and countertraction?'),('Devices','Are port sizes and trajectories compatible with clips, staplers, suturing, retrieval, and suction?'),('Adapt','Do not persist with poor geometry: move the camera, reposition, add a port, seek help, or convert when indicated.')] y=1.35 for n,(h,b) in enumerate(items,1): shape(sl,MSO_SHAPE.OVAL,.9,y,.47,.47,TEAL,TEAL); textbox(sl,1.02,y+.12,.22,.10,str(n),10,'FFFFFF',True,PP_ALIGN.CENTER) textbox(sl,1.62,y+.02,2.0,.18,h,13,TEAL,True); textbox(sl,3.55,y+.02,8.3,.38,b,11,NAVY); y+=.92 shape(sl,MSO_SHAPE.ROUNDED_RECTANGLE,.9,6.12,11.55,.54,'EAF2F3',LINE); textbox(sl,1.15,6.29,11.05,.14,'Recent evidence is procedure-specific: reduced-port and multiport approaches should not be treated as interchangeable across operations.',9,NAVY,True,PP_ALIGN.CENTER) textbox(sl,.9,6.78,11.7,.14,'Selected sources: SAGES ventral hernia and biliary guidance; Schwartz’s Principles of Surgery; Sabiston; Hinman’s Atlas; Campbell-Walsh-Wein. Recent reviews: PMID 41413347; PMID 39903416.',7.2,MUTED,False,PP_ALIGN.CENTER) # add notes metadata prs.core_properties.title='Procedure-Specific Laparoscopic Port Layouts' prs.core_properties.subject='Educational procedure-specific laparoscopic port placement schematics' prs.core_properties.author='Orris' prs.save(str(OUT)); print(OUT) ''') print(p) PY python "/tmp/workspace/mis-study-guide/src/build_port_layout_teaching_deck.py"
python - <<'PY' from pathlib import Path from pptx import Presentation p=Path('/tmp/workspace/mis-study-guide/output/Procedure_Specific_Port_Layouts_Teaching_Deck.pptx') assert p.exists() and p.stat().st_size>20000 prs=Presentation(str(p)) assert len(prs.slides)==14, len(prs.slides) need=['Procedure-Specific','How to use a port map','Laparoscopic cholecystectomy','Laparoscopic appendectomy','TAPP inguinal hernia repair','Laparoscopic hysterectomy and pelvic surgery','Flank-oriented nephrectomy','Laparoscopic pyeloplasty','Take-home framework'] alltext=[] for sl in prs.slides: alltext.extend(sh.text for sh in sl.shapes if getattr(sh,'has_text_frame',False)) blob='\n'.join(alltext) missing=[x for x in need if x not in blob] assert not missing, missing # basic overflows: no text beyond slide coordinates from pptx.util import Inches for i,sl in enumerate(prs.slides,1): for sh in sl.shapes: assert sh.left >= 0 and sh.top >=0, (i,sh.left,sh.top) assert sh.left+sh.width <= prs.slide_width+1000, (i,sh.left+sh.width,prs.slide_width) assert sh.top+sh.height <= prs.slide_height+1000, (i,sh.top+sh.height,prs.slide_height) print(f'Validated: {len(prs.slides)} slides, {p.stat().st_size} bytes, {len(alltext)} text shapes') PY
Procedure Specific Port Layouts Teaching Deck
Presentation · PPTX
Add speaker notes and teaching objectives to the PPT
~/mis-study-guide/
SAGES laparoscopic ventral hernia repair secondary port placement direct vision lateral defect
python - <<'PY' from pathlib import Path p=Path('/tmp/workspace/mis-study-guide/src/enhance_port_layout_teaching_deck.py') p.write_text(r'''from pptx import Presentation from pptx.util import Inches, Pt from pptx.enum.shapes import MSO_SHAPE from pptx.enum.text import PP_ALIGN from pptx.dml.color import RGBColor from lxml import etree from pathlib import Path src=Path('/tmp/workspace/mis-study-guide/output/Procedure_Specific_Port_Layouts_Teaching_Deck.pptx') out=Path('/tmp/workspace/mis-study-guide/output/Procedure_Specific_Port_Layouts_Teaching_Deck_with_Notes.pptx') prs=Presentation(str(src)) NAVY='123047'; TEAL='0F6B73'; MUTED='536773'; BG='F6F9FA'; LINE='B9C9CD'; PALE='EAF2F3' def C(x): return RGBColor.from_string(x) def rect(sl,x,y,w,h,fill,line=None): s=sl.shapes.add_shape(MSO_SHAPE.RECTANGLE, Inches(x), Inches(y), Inches(w), Inches(h)); s.fill.solid(); s.fill.fore_color.rgb=C(fill); s.line.color.rgb=C(line or fill); return s def text(sl,x,y,w,h,t,size=14,color=NAVY,bold=False,align=None): sh=sl.shapes.add_textbox(Inches(x), Inches(y), Inches(w), Inches(h)); tf=sh.text_frame; tf.clear(); tf.word_wrap=True; tf.margin_left=tf.margin_right=tf.margin_top=tf.margin_bottom=0 for i,line in enumerate(t.split('\n')): p=tf.paragraphs[0] if i==0 else tf.add_paragraph(); p.text=line; p.font.name='Aptos'; p.font.size=Pt(size); p.font.bold=bold; p.font.color.rgb=C(color); p.space_after=Pt(0) if align: p.alignment=align return sh # Add objectives slide and position it after cover sl=prs.slides.add_slide(prs.slide_layouts[6]) rect(sl,0,0,13.333,7.5,BG); rect(sl,0,0,13.333,.17,TEAL) text(sl,.55,.35,12,.42,'Teaching objectives',25,NAVY,True) text(sl,.56,.83,12,.25,'By the end of this session, learners should be able to:',9.5,MUTED) objectives=[ ('1','Explain','Use a target-centered approach to plan camera, working, assistant, retraction, stapler, and extraction access.'), ('2','Interpret','Read the color-coded schematics as functional roles and trajectories, rather than as fixed skin maps.'), ('3','Compare','Describe common layout patterns for biliary, upper GI, appendix, hernia, pelvic, colorectal, and urologic procedures.'), ('4','Adapt','Identify when patient habitus, scars, pregnancy, altered anatomy, or the difficult operative step requires modification.'), ('5','Prioritize safety','State when to change camera position, add a port, seek assistance, or convert because safe exposure is inadequate.')] y=1.32 for n,verb,body in objectives: s=sl.shapes.add_shape(MSO_SHAPE.OVAL, Inches(.78), Inches(y), Inches(.43), Inches(.43)); s.fill.solid(); s.fill.fore_color.rgb=C(TEAL); s.line.color.rgb=C(TEAL) text(sl,.90,y+.12,.18,.1,n,9,'FFFFFF',True,PP_ALIGN.CENTER) text(sl,1.48,y+.02,1.35,.18,verb,13,TEAL,True) text(sl,2.76,y+.01,9.55,.4,body,11,NAVY) y+=.91 rect(sl,.55,6.47,12.2,.012,LINE); text(sl,.55,6.67,12.2,.23,'Scope: supervised educational review only. Diagrams are conceptual, not to scale, and must be individualized to the patient and procedure.',8,MUTED,False,PP_ALIGN.CENTER) # move new slide's id to slot 2 sldIdLst=prs.slides._sldIdLst new_id=sldIdLst[-1]; sldIdLst.remove(new_id); sldIdLst.insert(1,new_id) notes=[ '''Welcome learners and state that this session is about planning access geometry, not memorizing incisions. The diagrams are original conceptual schematics. Emphasize that patient-specific anatomy, exposure, and surgeon experience determine final placement. Preview the sequence: universal principles, procedure patterns, adaptation, and safety decisions.''', '''Read the objectives aloud. Frame assessment around a learner's ability to explain why a port is placed, not merely where it is shown. Reinforce that all layout choices must preserve visualization, traction, device access, and a contingency plan.''', '''Ask: “What makes a port useful?” Elicit that each has a role: view, bimanual work, retraction, suction, stapling, or extraction. Explain that secondary ports are inserted under direct laparoscopic vision after a first look. Poor geometry should prompt repositioning, a changed camera, or added access rather than persistence.''', '''Point out the four functional ports: camera, epigastric working/clip access, midclavicular infundibular traction, and lateral fundus retraction. Link port logic to the required traction vectors at the hepatocystic triangle. Do not teach this as a fixed map. Ask learners what they would change with severe inflammation or poor fundus retraction.''', '''Explain that the liver retractor is a functional port. Ask learners to trace the intended camera and instrument paths to the hiatus. The layout must support mediastinal work and crural suturing, not simply entry. If needle angles are poor, revise the configuration before proceeding.''', '''Highlight the stapler trajectory as the organizing feature. The layout has to give controlled access along the greater curvature while maintaining exposure with liver elevation and gastric retraction. In larger body habitus, spacing and instrument length often need to change. Ask learners why a universal skin map would fail here.''', '''This illustrates the conventional three-port concept. Ask learners to identify how Trendelenburg and left tilt work with the port arrangement. Explain why appendix position, perforation, obesity, pregnancy, and adhesions can change the map. The suprapubic port is task-specific, commonly providing traction or an additional working angle.''', '''Contrast this transabdominal preperitoneal pattern with TEP, which uses a different extraperitoneal geometry. The lower working ports need to support dissection and mesh handling in the preperitoneal plane. Reinforce avoidance of bladder and inferior epigastric vessels, and direct-vision secondary placement.''', '''For ventral hernia work, start away from the defect and prior scars. SAGES guidance supports secondary ports under direct vision and as lateral from the defect as practical for ergonomics. Ask learners to name the tasks that demand distance from the defect: adhesiolysis, mesh deployment, and fixation.''', '''Emphasize the lateral-to-rectus working concept and the optional nature of the suprapubic or extra lateral port. The camera and working positions may need to move cranially for a large uterus or mass. Ask what must be protected: inferior epigastric vessels, bladder, and sites affected by scars or mesh.''', '''Avoid presenting one colorectal template. The procedure determines the working envelope, including upper abdomen, pelvis, stapling, and extraction. Ask learners to identify why an appropriately placed pelvic stapler port may not be the best extraction site. Planning the extraction route early prevents later compromise.''', '''Use the lateral body orientation to discuss the constraints of costal margin, iliac crest, and laterality. Describe the curved or L-shaped pathway to the renal hilum. Emphasize that transperitoneal and retroperitoneal approaches differ, and that right-sided liver retraction may affect the configuration.''', '''For reconstructive surgery, exposure is not enough. Demonstrate how the camera and two working ports should form an effective suturing triangle at the ureteropelvic junction. Ask learners to describe what they would do if needle driving causes collision or an excessively oblique angle: change the setup, not force the maneuver.''', '''Use these scenarios as a rapid discussion. Ask each group to pick one factor and state how it changes entry, camera placement, spacing, or device selection. Reinforce that unexpected findings require a pause and a new plan, including help, an extra port, or conversion if indicated.''', '''Close by revisiting the five-part framework: target, view, vectors, devices, and adaptation. Ask learners for one example from any operation where an extra port is safer than struggling. Remind learners that current evidence about reduced-port techniques is procedure-specific, not a mandate to minimize access at the expense of safety.''' ] assert len(notes)==len(prs.slides), (len(notes),len(prs.slides)) for i,(slide,note) in enumerate(zip(prs.slides,notes),1): tf=slide.notes_slide.notes_text_frame tf.text='Speaker notes\n'+note+'\n\nTeaching cue: Pause for questions; adapt the discussion to local protocols, supervision, and learner level.' for p in tf.paragraphs: for r in p.runs: r.font.name='Aptos'; r.font.size=Pt(11) prs.core_properties.title='Procedure-Specific Laparoscopic Port Layouts with Teaching Objectives and Speaker Notes' prs.save(str(out)); print(out) ''') print(p) PY python "/tmp/workspace/mis-study-guide/src/enhance_port_layout_teaching_deck.py"
~/mis-study-guide/src/enhance_port_layout_teaching_deck.py
from pptx import Presentation
from pptx.util import Inches, Pt
from pptx.enum.shapes import MSO_SHAPE
from pptx.enum.text import PP_ALIGN
from pptx.dml.color import RGBColor
from pathlib import Path

SRC = Path('/tmp/workspace/mis-study-guide/output/Procedure_Specific_Port_Layouts_Teaching_Deck.pptx')
OUT = Path('/tmp/workspace/mis-study-guide/output/Procedure_Specific_Port_Layouts_Teaching_Deck_with_Notes.pptx')
prs = Presentation(str(SRC))

NAVY='123047'; TEAL='0F6B73'; MUTED='536773'; BG='F6F9FA'; LINE='B9C9CD'
def rgb(v): return RGBColor.from_string(v)
def rect(slide,x,y,w,h,fill,line=None):
    s=slide.shapes.add_shape(MSO_SHAPE.RECTANGLE, Inches(x), Inches(y), Inches(w), Inches(h))
    s.fill.solid(); s.fill.fore_color.rgb=rgb(fill); s.line.color.rgb=rgb(line or fill)
    return s
def tx(slide,x,y,w,h,content,size=12,color=NAVY,bold=False,align=None):
    s=slide.shapes.add_textbox(Inches(x), Inches(y), Inches(w), Inches(h))
    tf=s.text_frame; tf.clear(); tf.word_wrap=True
    tf.margin_left=tf.margin_right=tf.margin_top=tf.margin_bottom=0
    for idx,line in enumerate(content.split('\n')):
        p=tf.paragraphs[0] if idx==0 else tf.add_paragraph()
        p.text=line; p.font.name='Aptos'; p.font.size=Pt(size); p.font.bold=bold; p.font.color.rgb=rgb(color); p.space_after=Pt(0)
        if align: p.alignment=align
    return s

# Insert learning-objectives slide immediately after the title slide
sl=prs.slides.add_slide(prs.slide_layouts[6])
rect(sl,0,0,13.333,7.5,BG); rect(sl,0,0,13.333,.17,TEAL)
tx(sl,.55,.35,12,.42,'Teaching objectives',25,NAVY,True)
tx(sl,.56,.83,12,.25,'By the end of this session, learners should be able to:',9.5,MUTED)
objectives=[
('1','Explain','Use a target-centered approach to plan camera, working, assistant, retraction, stapler, and extraction access.'),
('2','Interpret','Read the color-coded schematics as functional roles and trajectories, rather than as fixed skin maps.'),
('3','Compare','Describe common layout patterns for biliary, upper GI, appendix, hernia, pelvic, colorectal, and urologic procedures.'),
('4','Adapt','Identify when body habitus, scars, pregnancy, altered anatomy, or the difficult step requires modification.'),
('5','Prioritize safety','State when to change camera position, add a port, seek assistance, or convert because safe exposure is inadequate.')]
y=1.32
for n,verb,body in objectives:
    s=sl.shapes.add_shape(MSO_SHAPE.OVAL, Inches(.78), Inches(y), Inches(.43), Inches(.43))
    s.fill.solid(); s.fill.fore_color.rgb=rgb(TEAL); s.line.color.rgb=rgb(TEAL)
    tx(sl,.90,y+.12,.18,.10,n,9,'FFFFFF',True,PP_ALIGN.CENTER)
    tx(sl,1.48,y+.02,1.35,.18,verb,13,TEAL,True)
    tx(sl,2.76,y+.01,9.55,.4,body,11,NAVY)
    y+=.91
rect(sl,.55,6.47,12.2,.012,LINE)
tx(sl,.55,6.67,12.2,.23,'Scope: supervised educational review only. Diagrams are conceptual, not to scale, and must be individualized to the patient and procedure.',8,MUTED,False,PP_ALIGN.CENTER)
# move new slide to position 2
sld_ids=prs.slides._sldIdLst
new_id=sld_ids[-1]; sld_ids.remove(new_id); sld_ids.insert(1,new_id)

notes=[
"Welcome learners and state that this session is about planning access geometry, not memorizing incisions. The diagrams are original conceptual schematics. Patient-specific anatomy, exposure, and surgeon experience determine final placement. Preview the sequence: universal principles, procedure patterns, adaptation, and safety decisions.",
"Read the objectives aloud. Frame assessment around the learner's ability to explain why a port is placed, not merely where it is shown. Reinforce that all layout choices must preserve visualization, traction, device access, and a contingency plan.",
"Ask: What makes a port useful? Elicit that each port has a role: view, bimanual work, retraction, suction, stapling, or extraction. Secondary ports are inserted under direct laparoscopic vision after a first look. Poor geometry should prompt repositioning, a changed camera, or added access rather than persistence.",
"Point out the camera, epigastric working or clip access, midclavicular traction, and lateral fundus-retraction roles. Link the layout to traction vectors for safe hilar dissection. Ask learners what they would change with severe inflammation or poor fundus retraction.",
"Explain that the liver retractor is a functional port. Ask learners to trace camera and instrument paths to the hiatus. The layout must support mediastinal work and crural suturing, not simply entry. If needle angles are poor, revise the configuration before dissection.",
"Highlight the stapler trajectory as the organizing feature. The layout must give controlled access along the greater curvature while maintaining liver elevation and gastric retraction. In larger body habitus, spacing and instrument length often change. Ask why a universal skin map would fail here.",
"This illustrates a conventional three-port concept. Ask how Trendelenburg and left tilt work with the layout. Appendix position, perforation, obesity, pregnancy, and adhesions can change the map. The suprapubic port commonly provides traction or an additional working angle.",
"Contrast this transabdominal preperitoneal pattern with TEP, which uses a different extraperitoneal geometry. Lower working ports support dissection and mesh handling. Reinforce avoidance of bladder and inferior epigastric vessels and direct-vision secondary placement.",
"For ventral hernia work, start away from the defect and prior scars. SAGES guidance supports secondary ports under direct vision and as lateral from the defect as practical for ergonomics. Ask learners to name why distance matters: adhesiolysis, mesh deployment, and fixation.",
"Emphasize the lateral-to-rectus working concept and optional suprapubic or extra lateral access. The camera and working positions may need to move cranially for a large uterus or mass. Ask what must be protected: inferior epigastric vessels, bladder, and sites affected by scars or mesh.",
"Avoid presenting one colorectal template. The procedure determines the working envelope, including upper abdomen, pelvis, stapling, and extraction. Ask why an appropriate pelvic stapler port may not be the best extraction site. Planning extraction early prevents later compromise.",
"Use the lateral body orientation to discuss costal-margin, iliac-crest, and laterality constraints. Describe the curved or L-shaped pathway to the renal hilum. Transperitoneal and retroperitoneal approaches differ, and right-sided liver retraction can change the layout.",
"For reconstructive surgery, exposure is not enough. Demonstrate how camera and two working ports should form an effective suturing triangle at the ureteropelvic junction. If needle driving causes collision or a very oblique angle, change the setup rather than force the maneuver.",
"Use these scenarios for rapid discussion. Ask groups to pick one factor and state how it changes entry, camera placement, spacing, or device selection. Unexpected findings require a pause and a new plan, including help, an extra port, or conversion if indicated.",
"Close with target, view, vectors, devices, and adaptation. Ask learners for one example where an extra port is safer than struggling. Recent evidence about reduced-port techniques is procedure-specific, not a mandate to minimize access at the expense of safety."
]
assert len(notes)==len(prs.slides), (len(notes),len(prs.slides))
for slide,note in zip(prs.slides,notes):
    tf=slide.notes_slide.notes_text_frame
    tf.text='Speaker notes\n'+note+'\n\nTeaching cue: Pause for questions and adapt discussion to local protocol, supervision, and learner level.'
    for p in tf.paragraphs:
        for r in p.runs:
            r.font.name='Aptos'; r.font.size=Pt(11)
prs.core_properties.title='Procedure-Specific Laparoscopic Port Layouts with Teaching Objectives and Speaker Notes'
prs.save(str(OUT))
print(OUT)
python "/tmp/workspace/mis-study-guide/src/enhance_port_layout_teaching_deck.py" && python - <<'PY' from pathlib import Path from pptx import Presentation p=Path('/tmp/workspace/mis-study-guide/output/Procedure_Specific_Port_Layouts_Teaching_Deck_with_Notes.pptx') assert p.exists() and p.stat().st_size>30000 prs=Presentation(str(p)) assert len(prs.slides)==15, len(prs.slides) texts=[]; note_texts=[] for sl in prs.slides: texts += [sh.text for sh in sl.shapes if getattr(sh,'has_text_frame',False)] note_texts.append(sl.notes_slide.notes_text_frame.text) assert 'Teaching objectives' in '\n'.join(texts) assert all('Speaker notes' in n and len(n)>150 for n in note_texts) assert 'Use a target-centered approach' in '\n'.join(texts) print(f'Validated: {len(prs.slides)} slides, speaker notes on {len(note_texts)} slides, {p.stat().st_size} bytes') PY
Procedure Specific Port Layouts Teaching Deck with Notes
Presentation · PPTX