
How to measure ajv and pjv
Asking for Preferences
Could you clarify what context you're asking about? AJV and PJV can refer to different things depending on the field.
Aortic jetvelocity
AJV = Aortic Jet Velocity and PJV = Peak Jet Velocity - both are measured using Continuous Wave (CW) Doppler echocardiography, typically in the context of aortic stenosis assessment. The probe is positioned to align with aortic outflow, and the highest velocity signal is captured.
Searching sources...
Reading File
Searching the Web
aortic jet velocity PJV measurement echocardiography technique
Finding Sources
Reading File
Reading File
Reading File
I now have comprehensive information. Here is the full answer:
Measuring Aortic Jet Velocity (AJV) and Peak Jet Velocity (PJV)
AJV and PJV are the same measurement - the maximum antegrade systolic velocity across the aortic valve, recorded using Continuous Wave (CW) Doppler echocardiography. It is the single strongest predictor of clinical outcome in aortic stenosis (AS).
Instrument and Transducer
- Use a dedicated non-imaging CW Doppler transducer (pencil probe) for optimal results. Its smaller "footprint" allows better positioning, angulation, and a higher signal-to-noise ratio compared to a combined imaging + Doppler transducer.
- CW Doppler is mandatory (not pulsed wave) because AS velocities are typically 2 to 6 m/s - too high for pulsed wave.
The Core Principle: Parallel Beam Alignment
Doppler velocity measurement assumes the ultrasound beam is parallel to the direction of jet flow (intercept angle = 0°, cos θ = 1).
- Angles within 15° of parallel → error ≤5% (acceptable)
- An angle of 30° → measured 3.6 m/s when true velocity is 4.2 m/s (significant underestimation)
- Because velocity is squared in the Bernoulli equation, errors in velocity cause even larger errors in calculated pressure gradients
The aortic jet direction is often eccentric and cannot be predicted visually - so you must interrogate multiple windows and record the highest velocity found.
Acoustic Windows to Interrogate (mandatory search)
| Window | Patient Position |
|---|---|
| Apical (5-chamber or 3-chamber view) | Steep left lateral decubitus on a bed with apical cutout |
| High right parasternal | Right lateral decubitus position |
| Suprasternal notch | Supine, neck extended |
| Subcostal | If above windows don't yield highest velocity |
| Left parasternal | Occasionally useful |
The highest velocity signal from any window is taken as the most parallel intercept angle and represents the true AJV/PJV. According to ASE/EACVI guidelines, the right parasternal window often yields the highest velocity when the LV-aortic root angle is acute.
Recording Technique
- Align the CW beam with the jet - a smooth velocity curve with a well-defined peak and spectral darkening along the outer edge confirms good alignment. Audibly: high-frequency, tonal signal.
- Set velocity scale ~1 m/s above the observed maximum jet velocity.
- Use high wall filter settings.
- Adjust gain to clearly define the peak signal without blurring artifacts.
- Maximum velocity is measured at the edge of the dark spectral envelope - avoid faint signals at the boundary (Doppler artifacts from excessive gain or transit time effect).
- The velocity-time integral (VTI) is measured by tracing the dark outer edge of the velocity curve over systole.
- In patients with arrhythmia, average at least 5 consecutive beats, excluding post-extrasystolic beats.
What AJV/PJV Tells You (Grading Aortic Stenosis Severity)
| AS Severity | Peak Jet Velocity (AJV) |
|---|---|
| Mild | 2.0 - 2.9 m/s |
| Moderate | 3.0 - 3.9 m/s |
| Severe | ≥ 4.0 m/s |
| Very Severe | ≥ 5.0 m/s |
From AJV, you derive:
- Maximum pressure gradient: ΔP_max = 4 × (V_max)² (simplified Bernoulli equation)
- Mean pressure gradient: by tracing the outer edge of the CW Doppler curve
- Continuity equation valve area: requires LVOT diameter + LVOT VTI + Aortic jet VTI
Common Pitfalls
- Underestimation from non-parallel beam - always report the highest velocity from all windows
- Mistaking other high-velocity jets (e.g., MR, TR, VSD) for the aortic jet - check timing, shape, and associated diastolic flow curves
- Low-flow states (EF <50% or SVi <35 mL/m²) may produce falsely low AJV despite severe anatomic stenosis - consider dobutamine stress echo
- If LVOT velocity >1 m/s, do not use the simplified Bernoulli equation (use the expanded form: ΔP = 4[V₂² - V₁²])
Sources: Textbook of Clinical Echocardiography (Otto), p. 335-340; ASE/EACVI 2017 Aortic Stenosis Guidelines
Step by steap how to measure ajv
Here is a clear step-by-step guide to measuring Aortic Jet Velocity (AJV) by CW Doppler echocardiography:
Step-by-Step: Measuring Aortic Jet Velocity (AJV)
STEP 1 — Patient Positioning
- Place the patient in a steep left lateral decubitus position for the apical window (use a bed with an apical cutout if available).
- For the right parasternal window, roll the patient into right lateral decubitus.
- For the suprasternal window, position the patient supine with neck extended.
STEP 2 — Select the Correct Transducer
- Use a dedicated non-imaging (pencil) CW Doppler transducer when available.
- It has a smaller footprint, allows better angulation, and gives a higher signal-to-noise ratio than a phased-array imaging probe.
- If a pencil probe is not available, use the CW mode on your imaging probe.
STEP 3 — Set Up Machine Settings
- Switch to CW Doppler mode.
- Set the velocity scale (Nyquist limit) to approximately 1 m/s above your expected maximum jet velocity (typically set to 5-6 m/s for severe AS).
- Set wall filters to HIGH to eliminate low-frequency noise.
- Adjust gain so the spectral envelope is clear but not overblown with artifact.
- Set sweep speed to 100 mm/s for accurate measurement.
STEP 4 — Interrogate the First Window (Apical)
- Place the transducer at the cardiac apex.
- Aim the CW beam toward the aortic valve (apical 5-chamber or 3-chamber orientation).
- Listen for a high-pitched, tonal signal - this indicates good beam-to-jet alignment.
- Watch the spectral display for a smooth, dark velocity envelope with a well-defined peak.
- Note the peak velocity value.
STEP 5 — Interrogate Additional Windows (mandatory)
Because the aortic jet direction is eccentric and unpredictable, you must check all windows:
| Window | How |
|---|---|
| High right parasternal | Patient in right lateral decubitus; probe at 2nd-3rd right intercostal space |
| Suprasternal notch | Patient supine, neck extended; aim beam down toward aortic valve |
| Left parasternal | Occasionally higher velocity here |
| Subcostal | Useful in patients with poor apical windows |
At each window, rock and tilt the transducer slowly to "hunt" for the highest velocity signal. The jet can be quite eccentric - do not assume the apical window gives the best result.
STEP 6 — Identify and Record the Highest Velocity
- The window that produces the highest velocity = the most parallel intercept angle = the true AJV.
- A good signal looks like:
- Smooth, dense outer spectral edge
- Dark spectral filling (not hollow)
- Well-defined peak
- High-pitched tonal audio signal
- A bad/suboptimal signal looks like:
- Hollow or faint spectral envelope
- Multiple noisy signals
- No clear peak
Freeze and record several beats from the best window.
STEP 7 — Take the Measurement
- Place the caliper at the outer edge of the dark spectral envelope at its highest point.
- This is your Peak Jet Velocity (Vmax / AJV) in m/s.
- Do NOT measure faint blur or artifact signals above the true envelope - these are transit-time or gain artifacts.
- Most echo machines will also automatically calculate:
- Max pressure gradient = 4 × Vmax²
- Mean pressure gradient = by tracing the full envelope
STEP 8 — Trace the Velocity-Time Integral (VTI)
- Trace the outer dark edge of the CW Doppler envelope from the beginning to the end of systole.
- This gives the Aortic VTI (VTI_Ao), needed for the continuity equation to calculate aortic valve area (AVA).
STEP 9 — Average Beats (if arrhythmia present)
- In sinus rhythm: measure 3 consecutive beats and average.
- In atrial fibrillation or arrhythmia: measure at least 5 beats, and exclude post-extrasystolic beats (they give falsely high velocities).
STEP 10 — Interpret the Result
| Peak AJV (Vmax) | AS Severity |
|---|---|
| < 2.0 m/s | Normal / no significant stenosis |
| 2.0 - 2.9 m/s | Mild AS |
| 3.0 - 3.9 m/s | Moderate AS |
| ≥ 4.0 m/s | Severe AS |
| ≥ 5.0 m/s | Very severe AS |
Quick Checklist Summary
- ✅ Position patient correctly for each window
- ✅ Use dedicated CW (pencil) transducer
- ✅ Set velocity scale, high wall filters, appropriate gain
- ✅ Interrogate apical window first
- ✅ Check right parasternal, suprasternal, subcostal windows
- ✅ Hunt for highest velocity by rocking/tilting probe
- ✅ Record the highest velocity signal found
- ✅ Measure at outer edge of dark spectral envelope
- ✅ Trace VTI for continuity equation
- ✅ Average multiple beats if arrhythmia
Key rule: Always report the highest velocity obtained from any window - underestimation due to a non-parallel beam is the most common error in AJV measurement.
In pictures
Let me pull the relevant diagrams from the echocardiography textbook and search for good visual references.
Finding Sources
Searching the Web
aortic jet velocity CW Doppler measurement technique echocardiography images acoustic windows
Now let me fetch the textbook images and the web images in parallel:
Loading Image
Loading Image
Loading Image
Loading Image
Reading File
Now let me fetch one more key image - correct jet identification figure:
Loading Image
Loading Image
Here is the full visual, step-by-step guide to measuring AJV:
Step-by-Step AJV Measurement - In Pictures
STEP 1 - Use CW Doppler (Not PW)
The aortic jet in stenosis reaches 2-6 m/s - only Continuous Wave (CW) Doppler can capture these high velocities. Use a dedicated non-imaging (pencil) CW probe when possible.
STEP 2 - Know What CW Doppler Looks Like for Each Valve
The shape and timing of the Doppler curve tells you which jet you are recording. The aortic jet is systolic with an early-to-mid systolic peak and no diastolic flow:
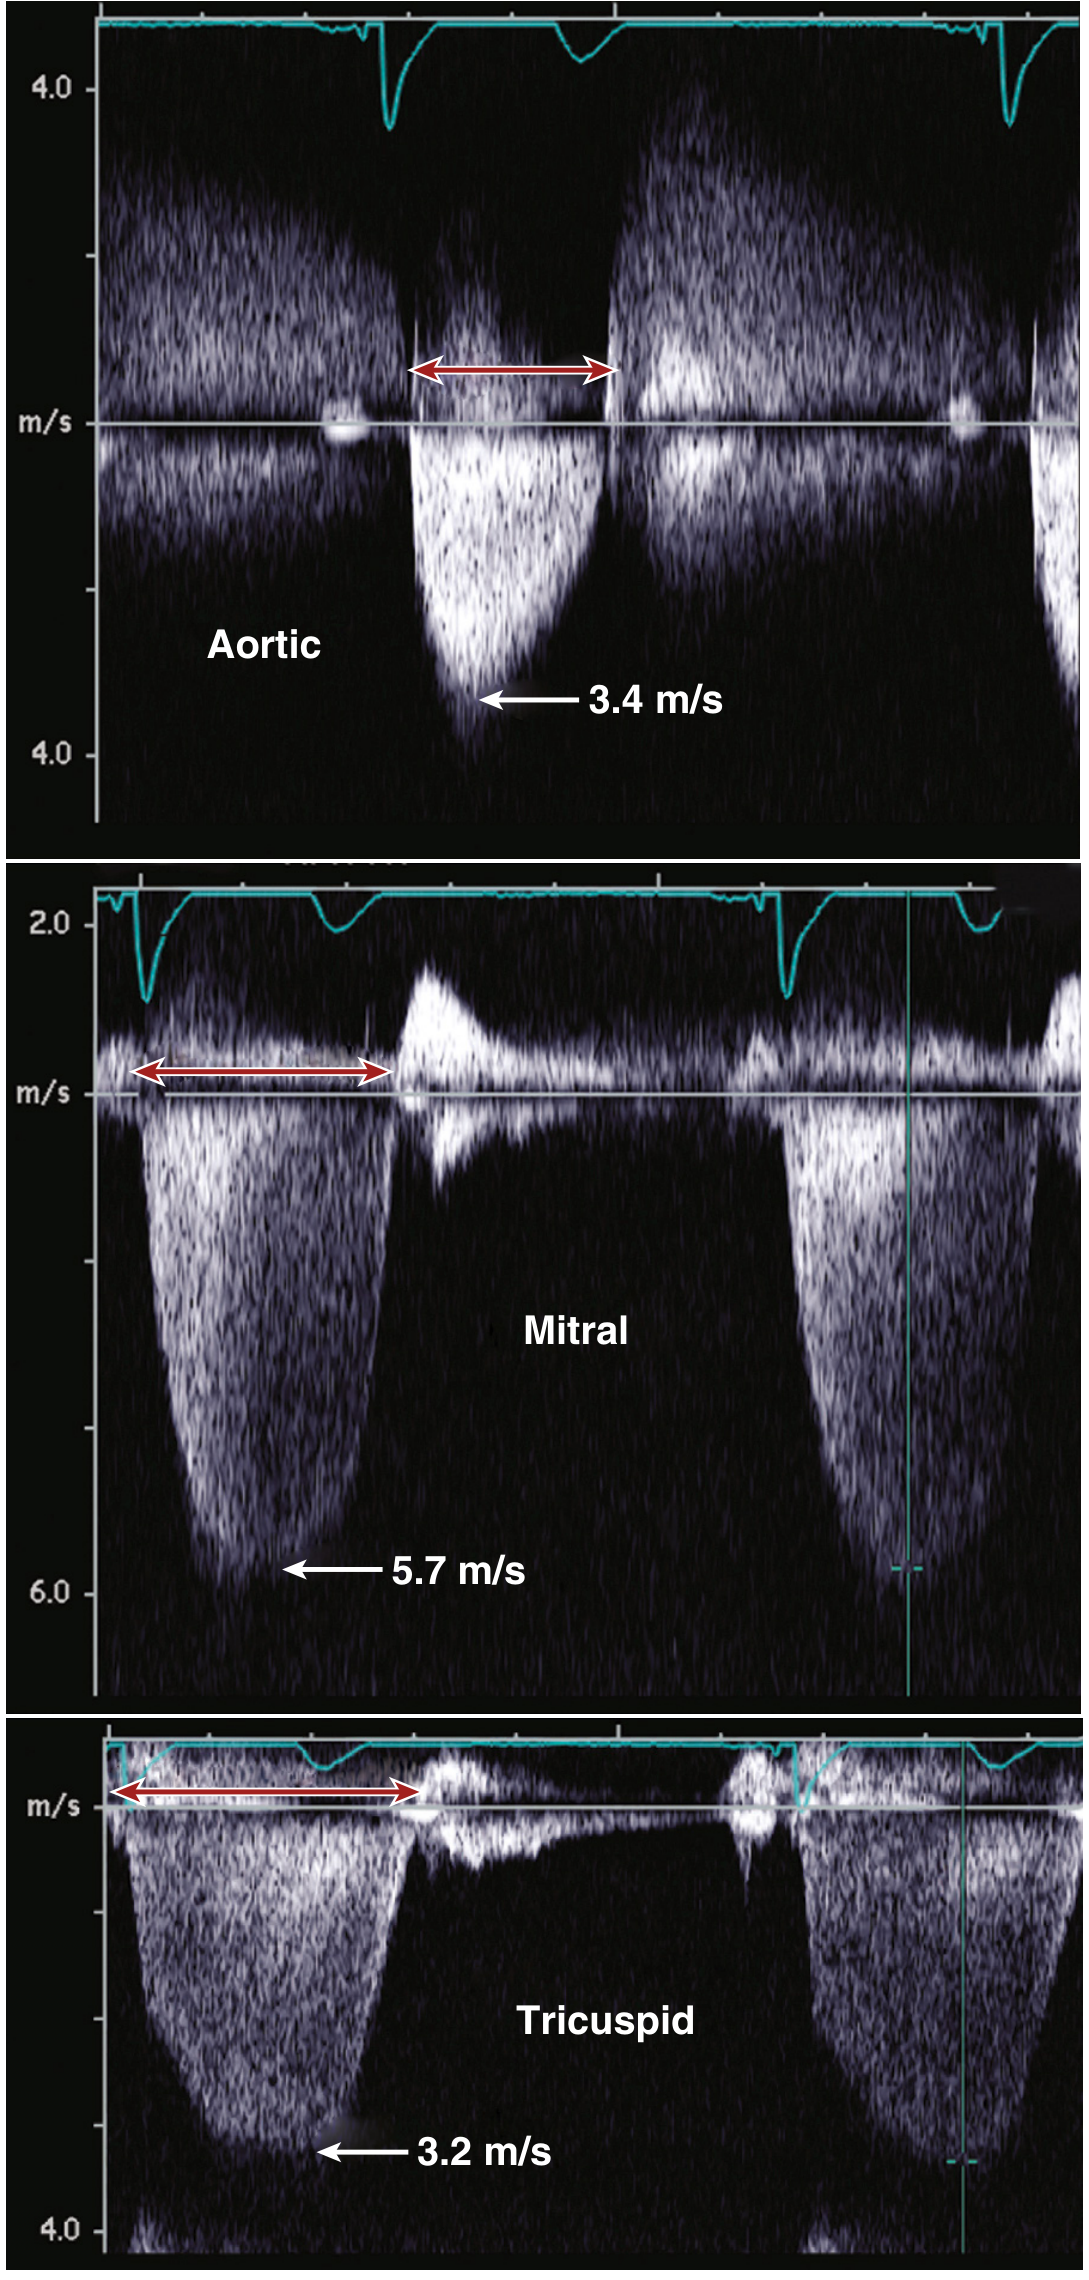
The aortic jet (top, 3.4 m/s) has a smooth systolic envelope with no diastolic component. Mitral regurgitation (middle, 5.7 m/s) and tricuspid regurgitation (bottom, 3.2 m/s) look similar but have diastolic filling signals - do not confuse these with the aortic jet.
STEP 3 - Interrogate Multiple Windows to Find the Highest Velocity
Because the aortic jet direction is unpredictable and eccentric, you must check all windows. The highest velocity = most parallel beam = true AJV.
| Window | Probe Position |
|---|---|
| Apical (most common) | Cardiac apex, patient in left lateral decubitus |
| Right parasternal | 2nd-3rd right intercostal space, patient rolled right |
| Suprasternal | Suprasternal notch, neck extended |
| Subcostal | Subxiphoid, if above windows suboptimal |
STEP 4 - Recognize a Good vs Bad Signal
Look at the velocity curve carefully:
GOOD signal:
- Dense, dark, smooth outer spectral edge
- Well-defined sharp peak
- High-pitched tonal audio
- Clear spectral filling
BAD signal:
- Hollow or faint envelope
- No clear peak
- Blurry/fuzzy outer edge (artifact)
- Multiple overlapping signals
The CW Doppler shapes below show how valvular AS, subaortic membrane, and HCM look different - important for making sure you are measuring the right thing:
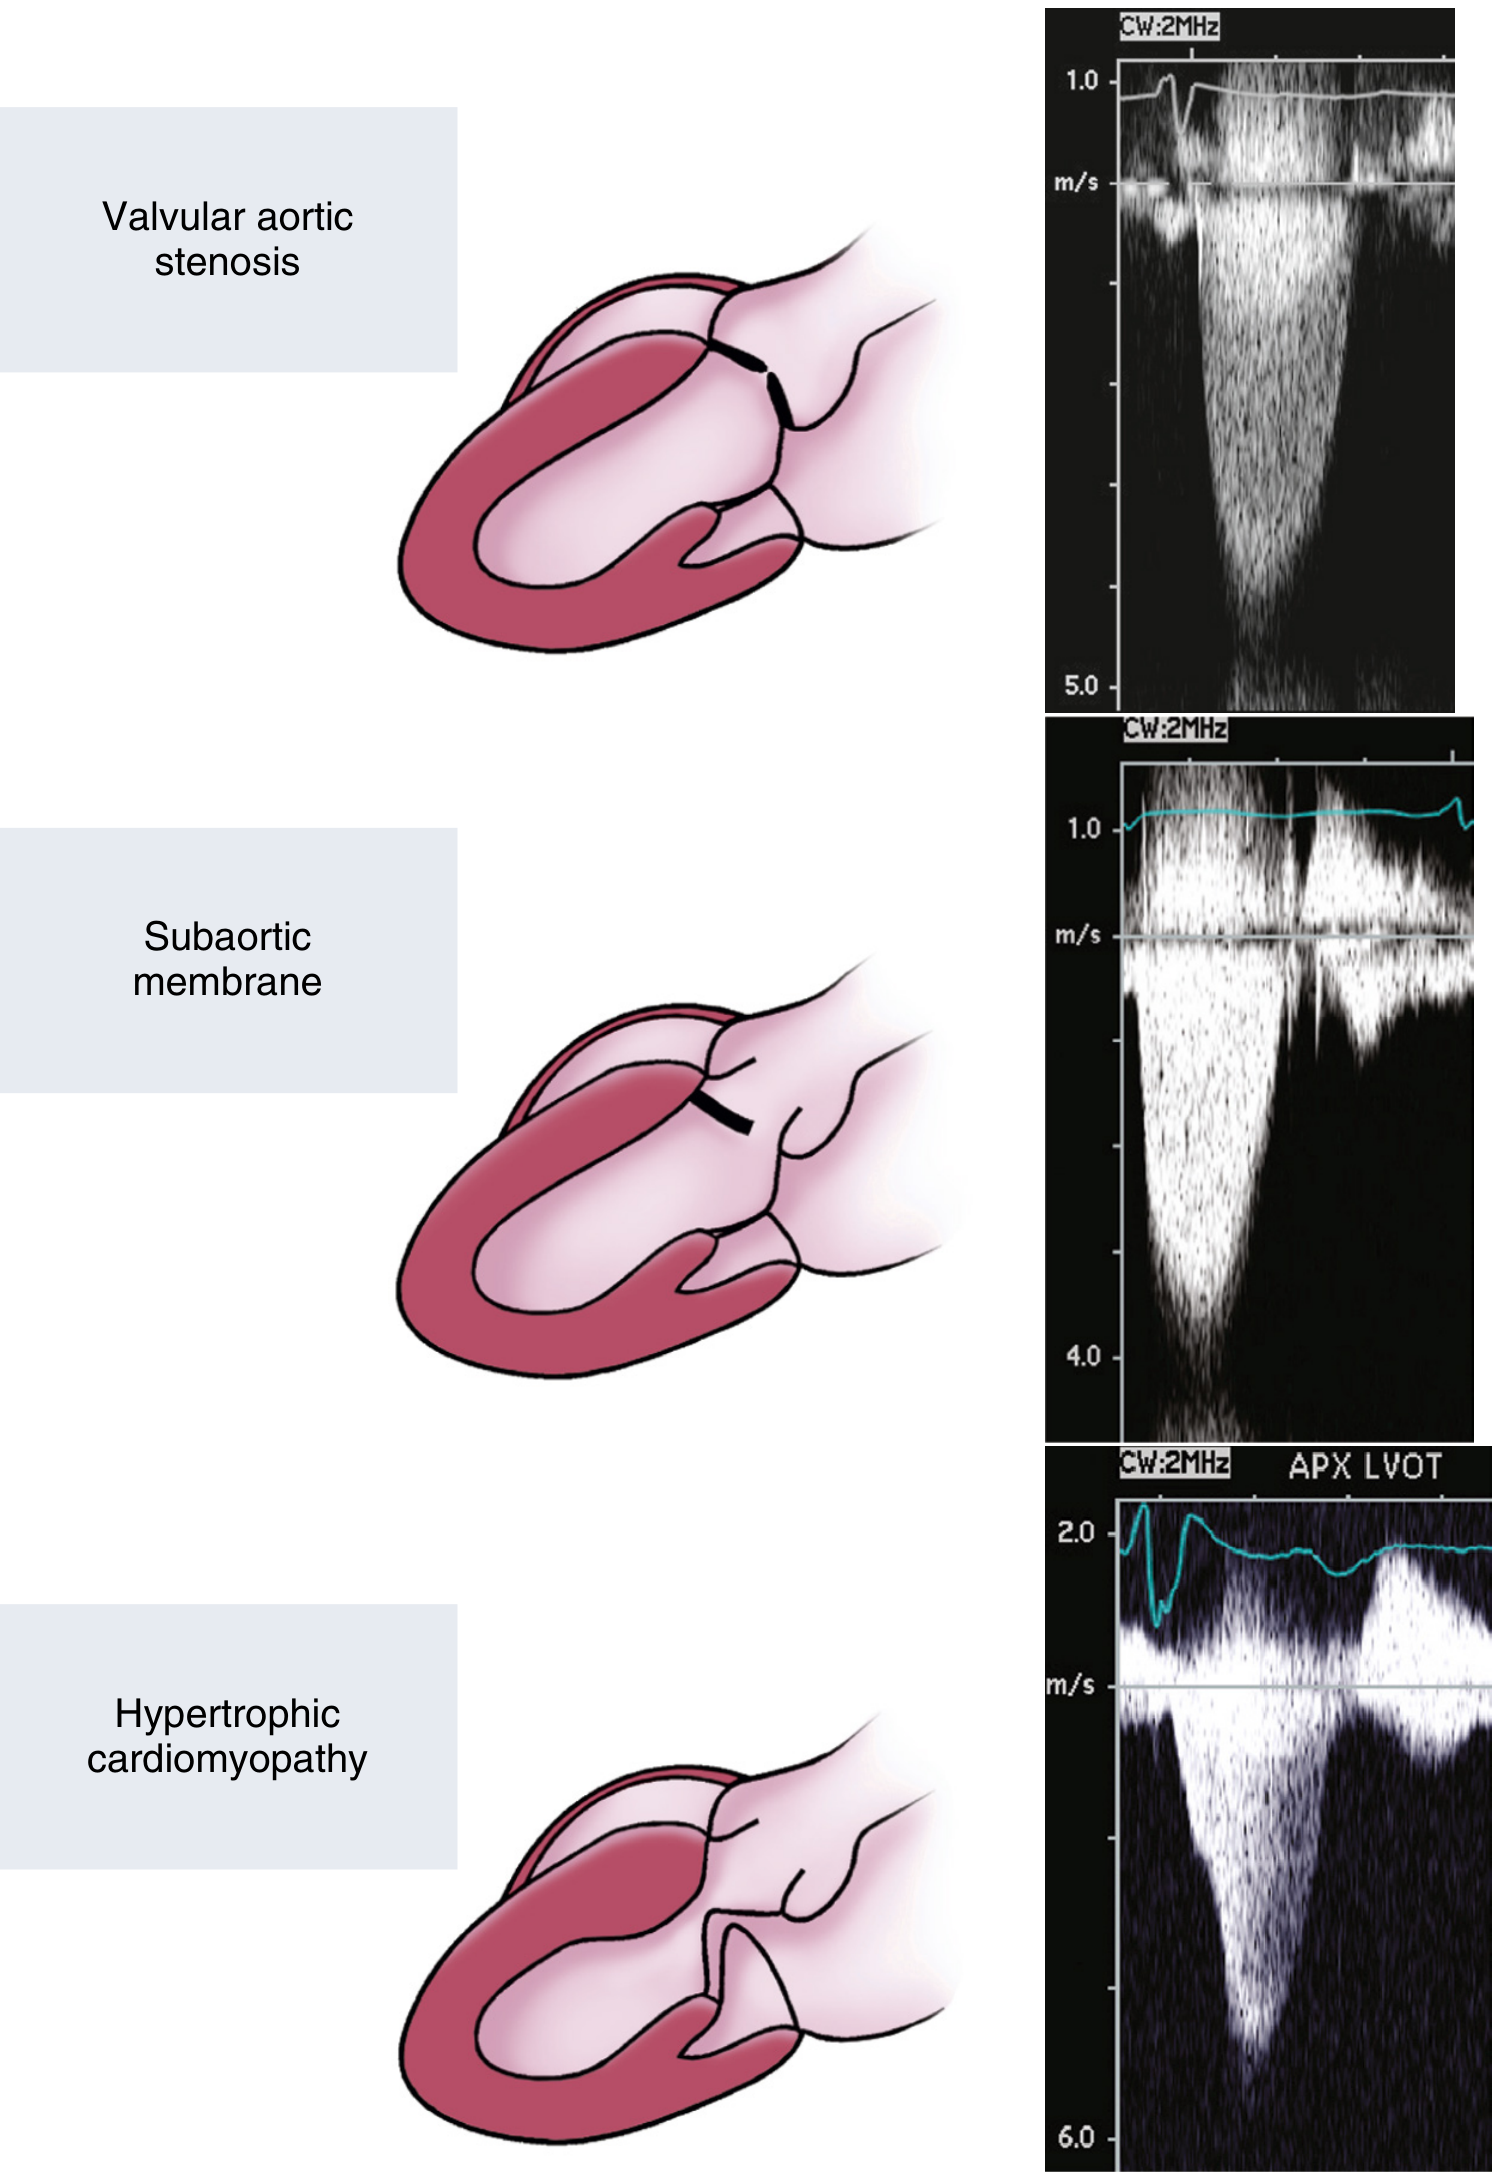
Top: Valvular AS - symmetric early-peak envelope. Middle: Subaortic membrane - similar shape but "rough" texture. Bottom: HCM - late-peaking "dagger" shape, distinctly different.
STEP 5 - Measure the Peak Velocity (AJV)
Place your caliper at the outer edge of the dark spectral envelope at its highest point. The machine auto-calculates max pressure gradient (4 × Vmax²).
Here is what a real measurement looks like on the echo machine screen:
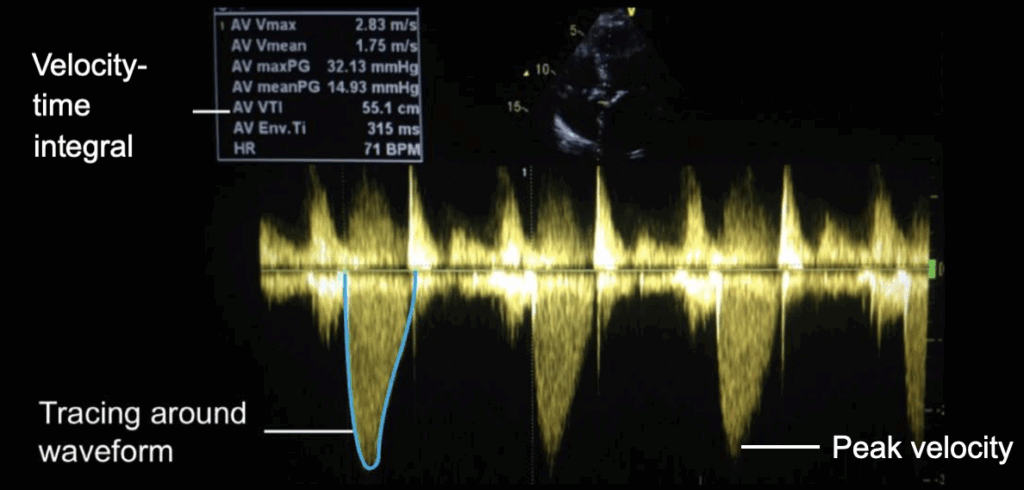
The machine automatically reports AV Vmax (peak AJV), AV maxPG (max pressure gradient), AV meanPG (mean gradient), and AV VTI when you trace the envelope.
STEP 6 - Trace the VTI (for Valve Area Calculation)
After marking peak velocity, trace the entire outer edge of the systolic envelope. This gives the Aortic VTI, needed for the continuity equation:
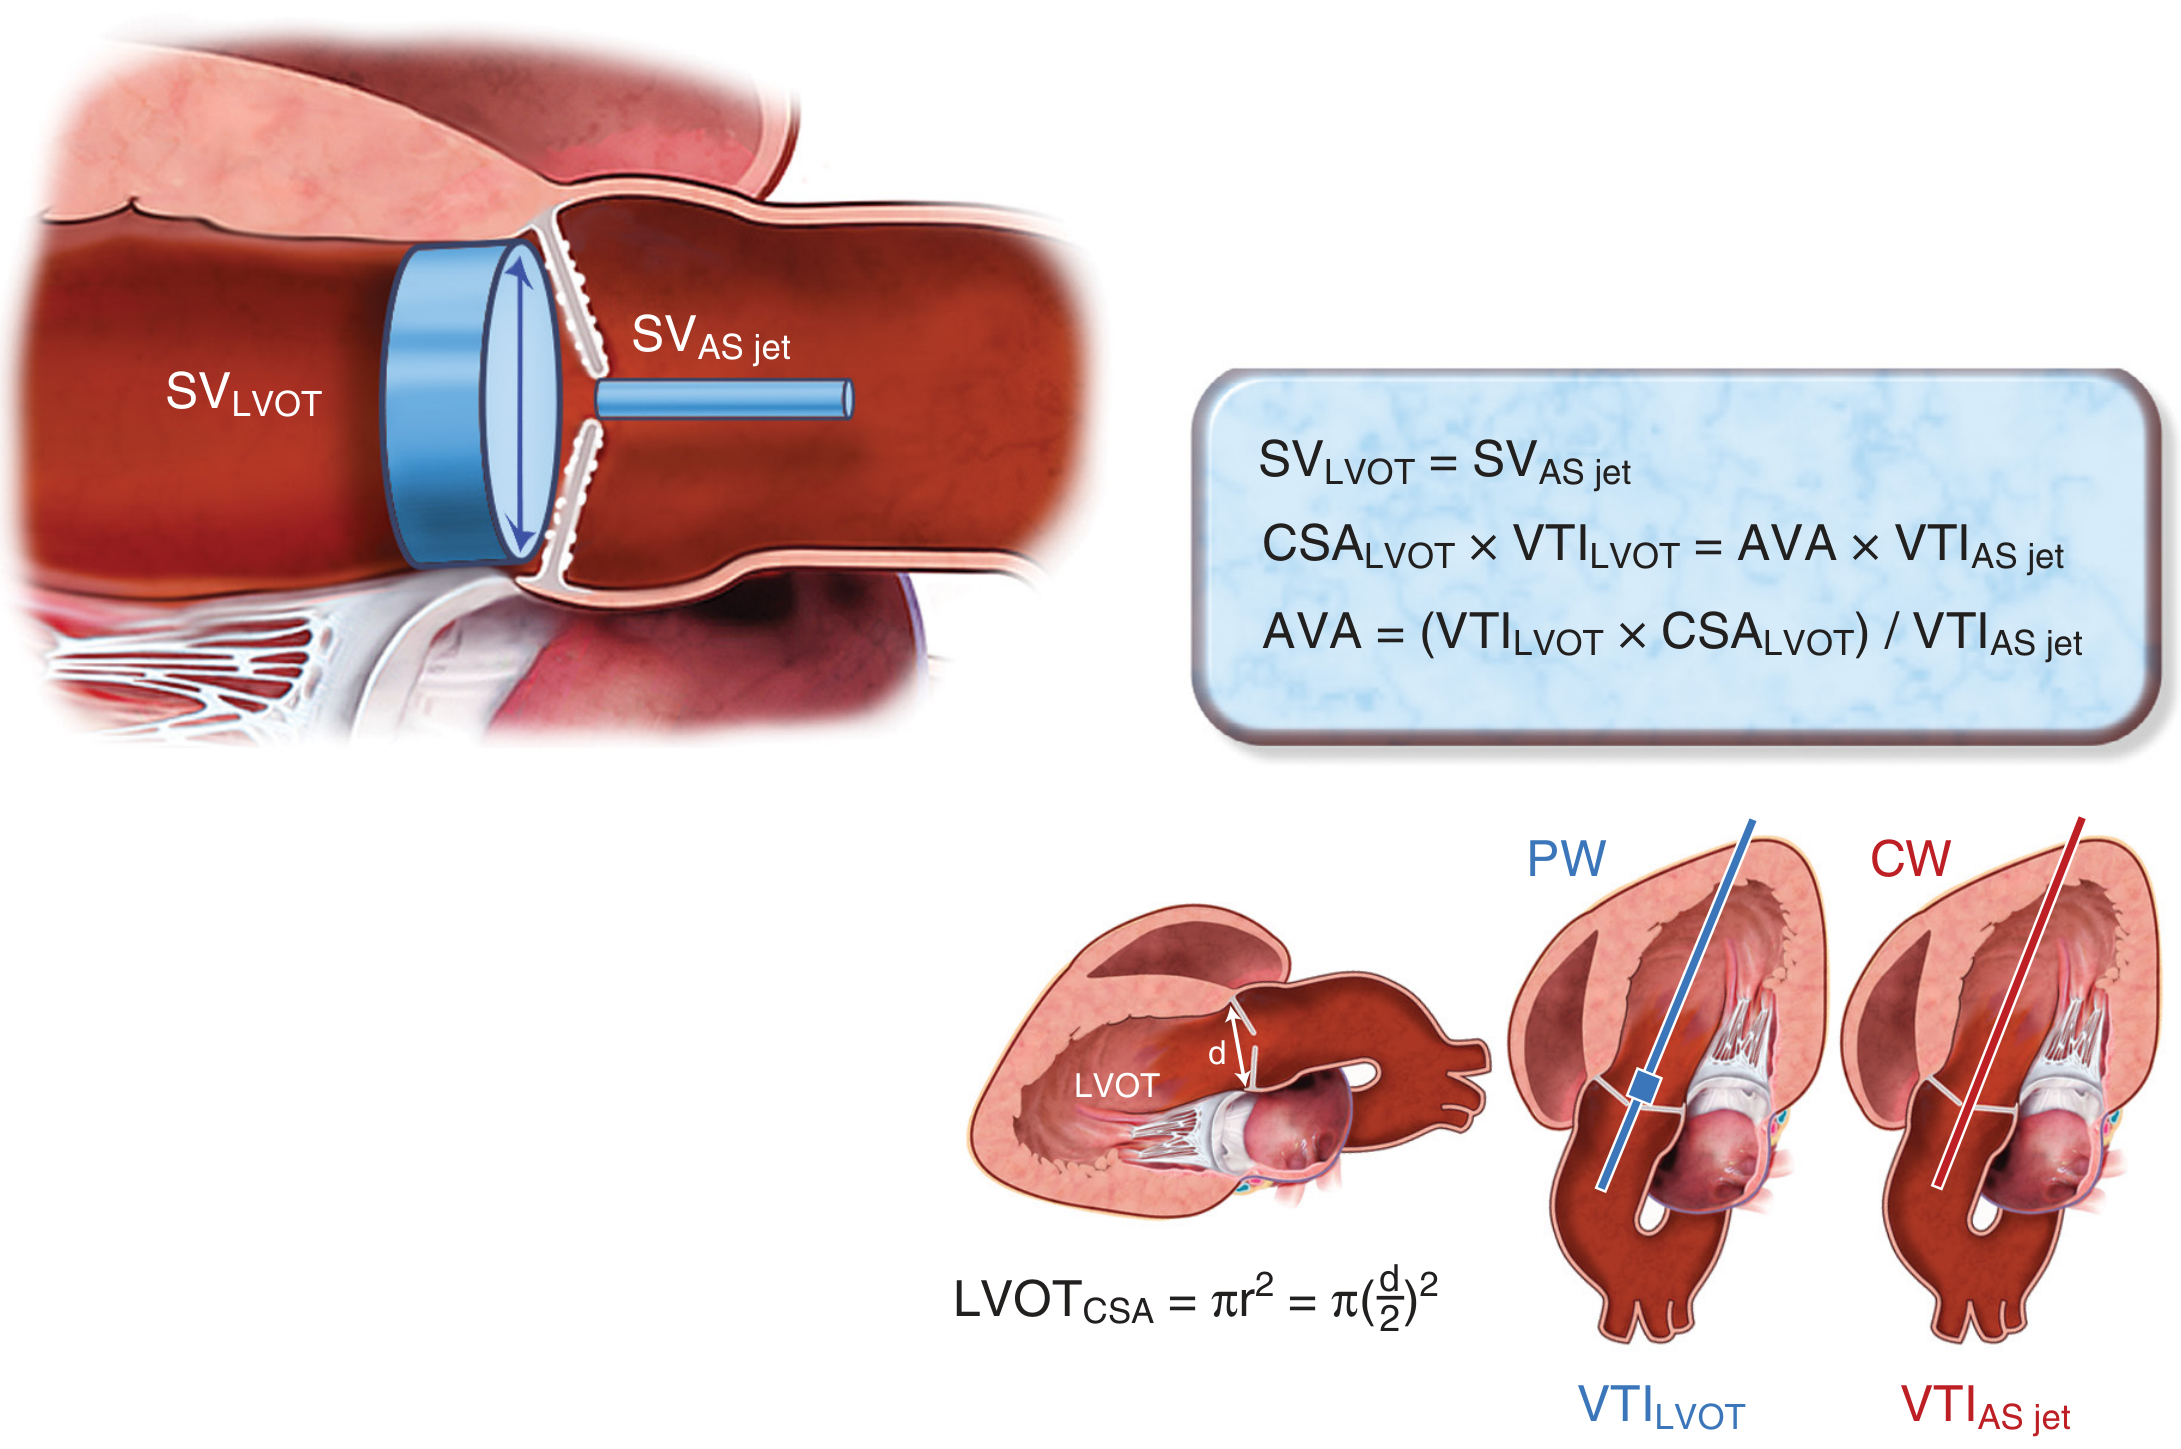
PW Doppler (blue) records LVOT VTI just below the valve. CW Doppler (red) records the aortic stenosis jet VTI. Together with the LVOT diameter, these give the aortic valve area (AVA) by continuity equation.
STEP 7 - Avoid These Common Errors
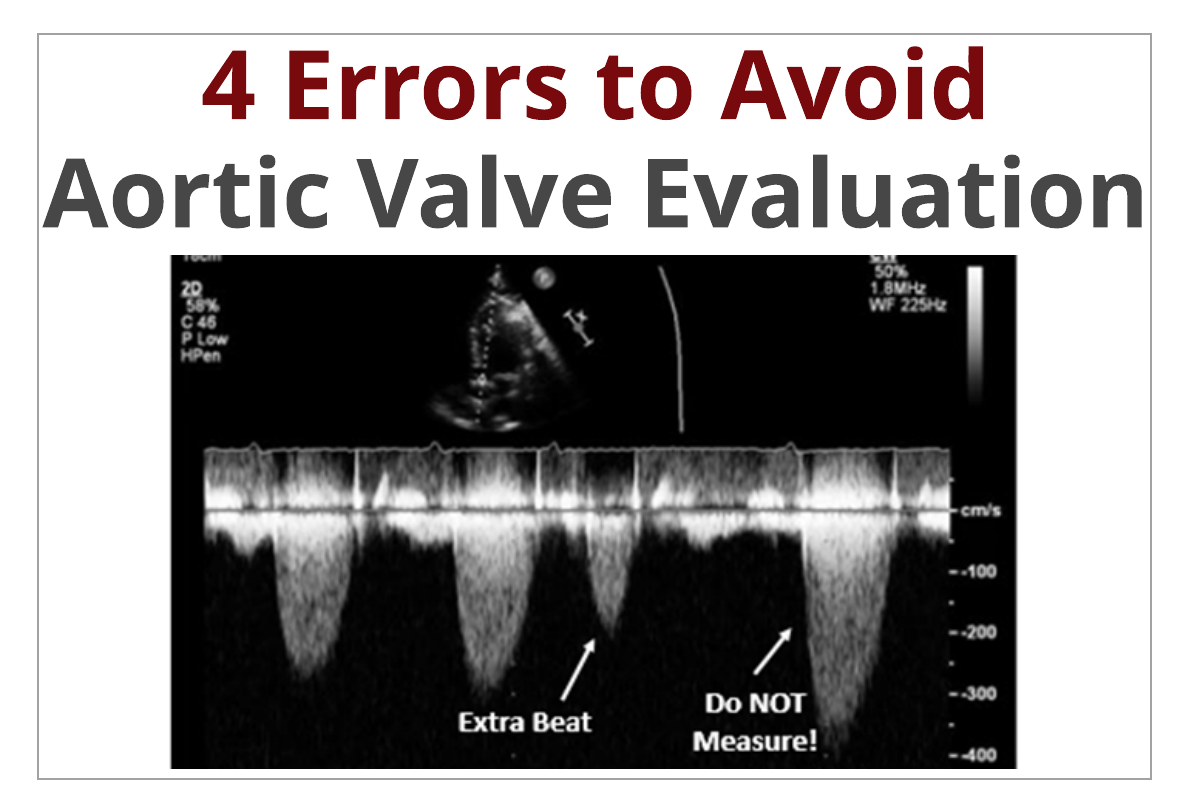
Key error: Never measure the beat immediately after an extra beat (post-extrasystolic beat) - it gives a falsely high velocity. In arrhythmia, average 5+ regular beats.
Final: Interpret Your AJV
| AJV (Vmax) | AS Severity |
|---|---|
| < 2.0 m/s | Normal |
| 2.0 - 2.9 m/s | Mild AS |
| 3.0 - 3.9 m/s | Moderate AS |
| ≥ 4.0 m/s | Severe AS |
| ≥ 5.0 m/s | Very severe AS |
Images sourced from: Textbook of Clinical Echocardiography (Otto), LITFL, Cardioserv, ASE/EACVI 2017 Guidelines
This is a shared conversation. Sign in to Orris to start your own chat.