
Lumbar puncture indications, contraindications,and steps
lumbar puncture procedure technique spinal needle
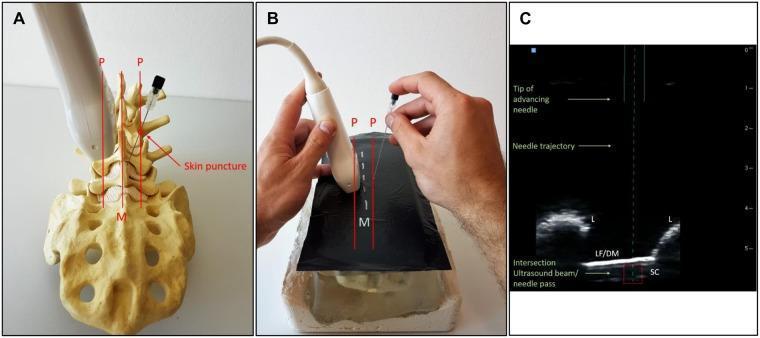
This composite educational graphic illustrates a real-time ultrasound-guided spinal puncture procedure using a paramedian sagittal oblique (PSO) approach.
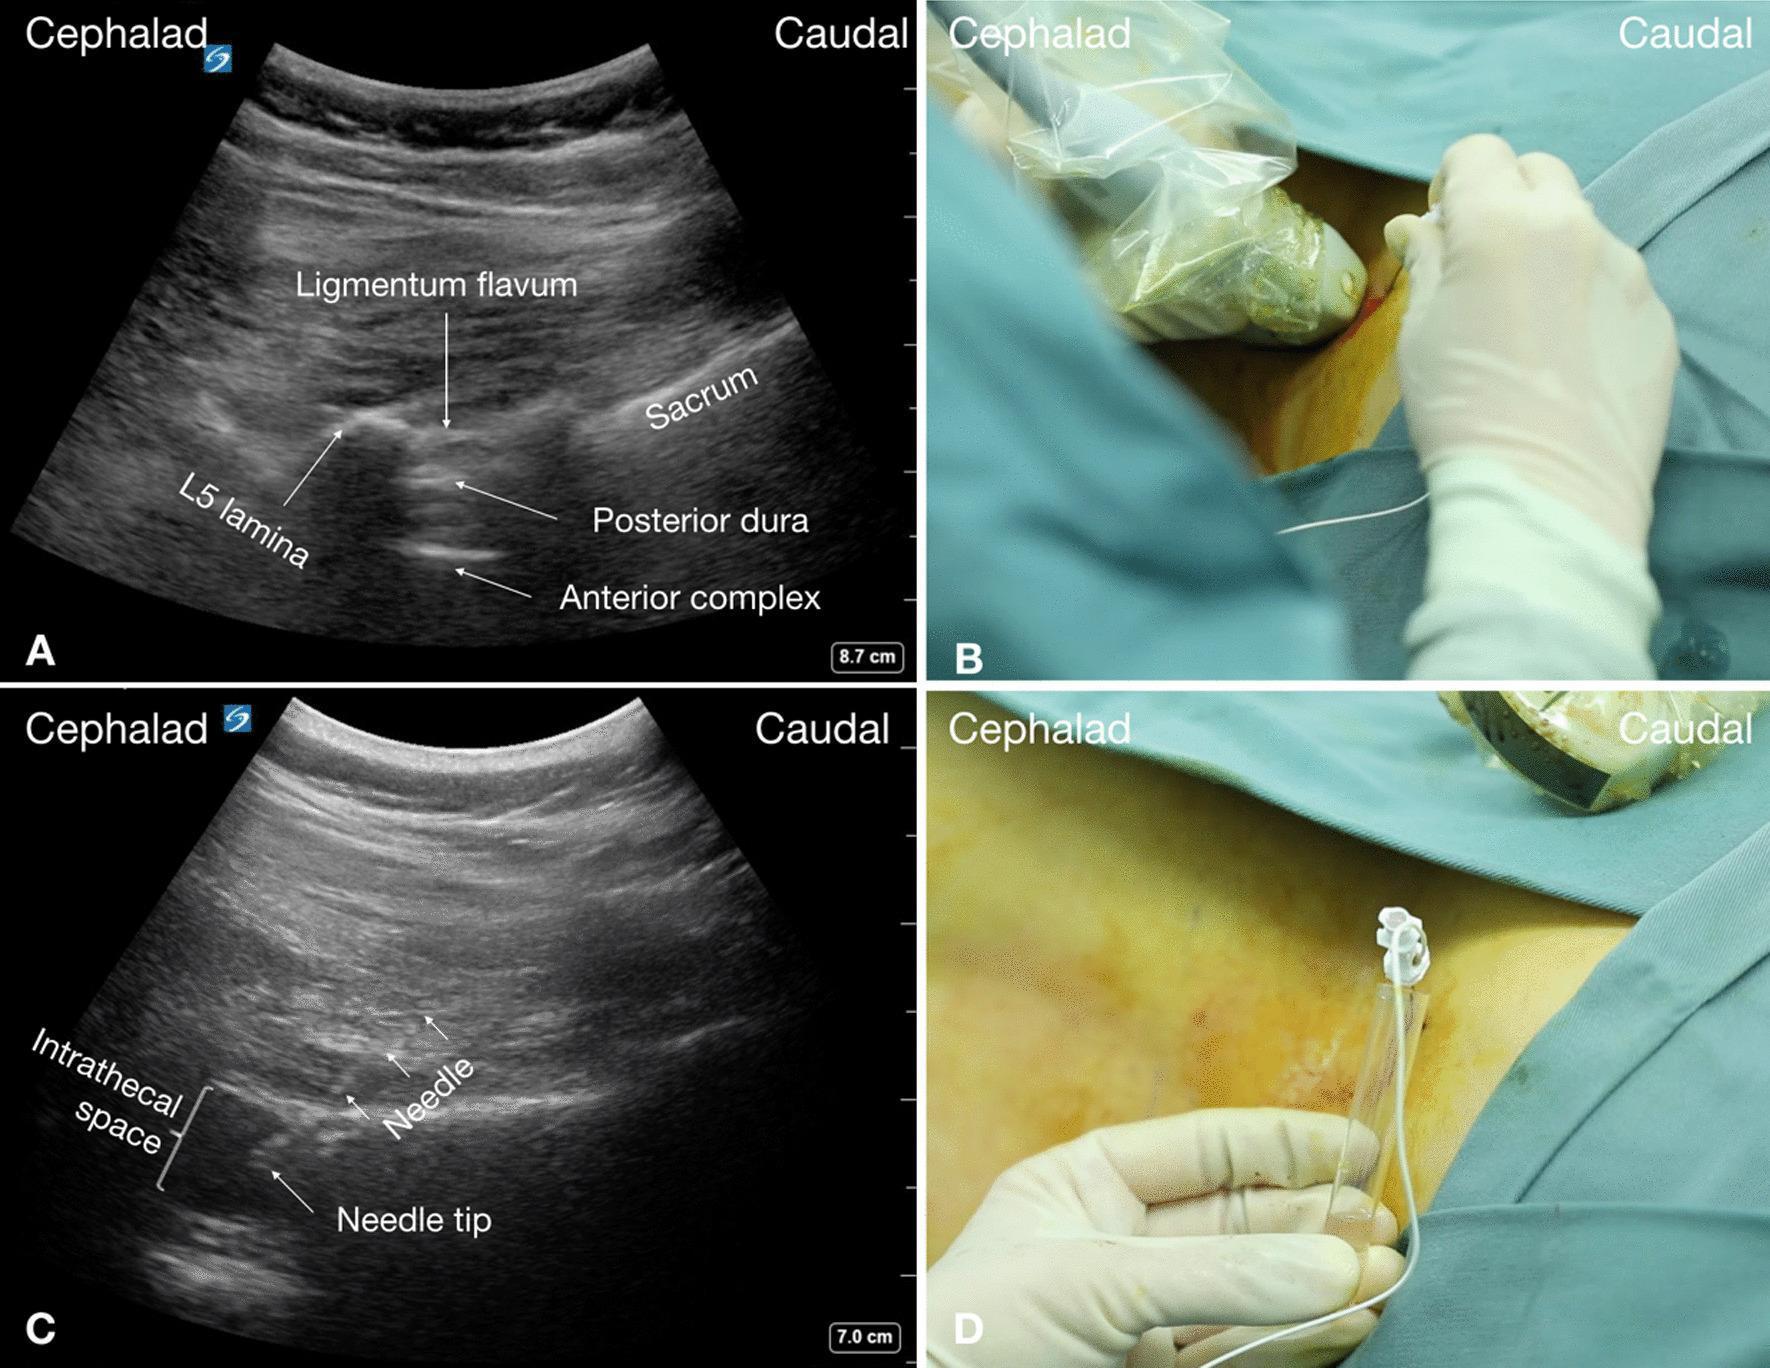
A four-panel medical illustration demonstrating a real-time ultrasound-guided lumbar puncture in a patient with Spinal Muscular Atrophy (SMA) and severe scoliosis. Panel A shows a paramedian sagittal oblique sonogram of the L5–S1 lumbar spine. Key sonoanatomical landmarks are identified: the hyperechoic L5 lamina and sacrum, the hyperechoic ligamentum flavum, the posterior dura, and the deep anterior complex (anterior dura, posterior longitudinal ligament, and vertebral body). The anechoic space between the posterior dura and anterior complex represents the intrathecal space. Panel B is a clinical photograph showing the placement of a curvilinear ultrasound transducer in a sterile sheath, with a needle advanced using an in-plane, caudal-to-cephalad approach. Panel C is a real-time sonogram showing the echogenic needle and its tip successfully positioned within the anechoic intrathecal space. Panel D confirms successful access with a clinical photograph showing the free flow of clear cerebrospinal fluid (CSF) from the hub of the puncture needle. This procedure illustrates an advanced neuraxial technique for patients with complex spinal anatomy requiring intrathecal medication administration.
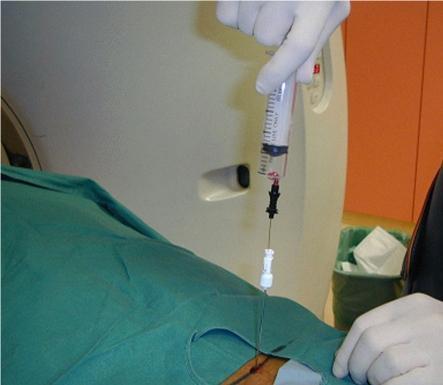
This clinical photograph illustrates the coaxial needle technique used during a CT-guided percutaneous biopsy of the lumbar spine. A patient is positioned on a CT table, covered with a green sterile surgical drape featuring a small central aperture for the procedure site. The primary visual focus is the needle assembly: a larger-bore Ostycut trephine needle, identified by its white hub, serves as an outer cannula. Inserted through this is a finer-gauge Chiba aspiration needle, distinguished by its black hub and an attached syringe held by a gloved operator. This coaxial arrangement allows for multiple tissue samples to be obtained through a single puncture tract, minimizing trauma. The procedure is performed in an interventional radiology suite, with the CT gantry visible in the background. The setup demonstrates standard sterile technique and the use of specialized interventional equipment for spinal pathology investigation.
Lumbar Puncture (LP)
Indications
- Suspected bacterial, viral, fungal, or tuberculous meningitis - the most common indication; do not delay antibiotics while awaiting CT when meningitis is strongly suspected
- Suspected subarachnoid hemorrhage (SAH) - when CT is negative but clinical suspicion remains high (xanthochromia on CSF is diagnostic)
- Suspected encephalitis (HSV, autoimmune)
- Unexplained neurologic disorders when CT is negative (altered consciousness, polyneuropathy, Guillain-Barre)
- Dementia workup when NPH, neurosyphilis, CNS vasculitis, or chronic infection is suspected
- Meningeal carcinomatosis (cytology)
- Multiple sclerosis - looking for oligoclonal bands
- Suspected neurosyphilis
- Idiopathic intracranial hypertension (pseudotumor cerebri) - drain CSF until closing pressure is ≤100 mm H₂O (usually 25-35 mL removed)
- Normal-pressure hydrocephalus - large-volume tap (35-50 mL) to assess gait/cognitive response
- Intrathecal delivery of antibiotics or chemotherapy
- Myelography and cisternography contrast administration
Contraindications
Absolute
| Contraindication | Notes |
|---|---|
| Local skin/soft tissue infection at puncture site | Risk of introducing infection into CSF |
| Signs of raised ICP with herniation risk | Papilledema, decorticate/decerebrate posturing, no response to pain |
| Supratentorial mass lesion on imaging | CT findings: midline shift, loss of suprachiasmatic/basilar cisterns, posterior fossa mass, obliteration of quadrigeminal plate cistern |
Relative
| Contraindication | Notes |
|---|---|
| Coagulopathy (INR >1.4, platelets rapidly falling or <20,000/mm³) | Use smallest-gauge needle; most experienced operator; transfuse if needed |
| Anticoagulation - heparin, LMWH, warfarin | Heparin increases SEH risk ~2%; clopidogrel should be stopped 7-10 days prior per ASRA guidelines |
| Spinal cord compression at or above LP site | Risk of worsening deficits |
| Unstable patient (hypotension, shock, status asthmaticus) | Delay until stabilized |
Important: Absence of papilledema does NOT rule out raised ICP - papilledema may be absent in up to 15% of adults and 50% of children in early elevated ICP. A CT must be obtained first in patients with: altered consciousness, focal neurologic signs, immunocompromise, history of CNS disease, seizure within 1 week, age ≥60, or papilledema.
Equipment
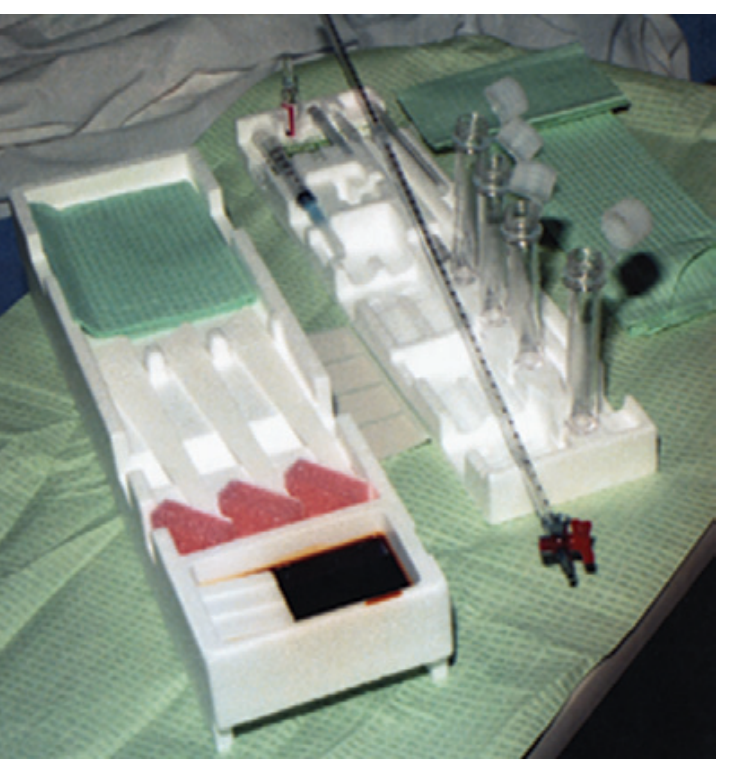
- Betadine or chlorhexidine antiseptic solution + gauze swabs
- Fenestrated sterile drape + sterile gloves
- 1% lidocaine for local anesthesia
- 3-mL syringe with 20-23G needle (for drawing up anaesthetic)
- 25-27G needle for skin anesthesia
- 20-22G spinal needle (Quincke - sharp beveled; or Whitacre/Sprotte - pencil-point, preferred to reduce post-LP headache)
- Manometer + three-way stopcock
- 4 numbered, capped sterile collection tubes
- Sterile dressing/Band-Aid
Steps (Midline Approach)
1. Pre-procedure
- Review indications and contraindications
- Obtain informed consent
- Consider CT head first if any features of raised ICP are present (Box above)
- If meningitis is suspected: do NOT delay antibiotics for CT or LP
2. Positioning
- Lateral decubitus (fetal position): Patient lies on side, knees drawn up to abdomen, chin tucked to chest. Shoulders, back, and hips perpendicular to the bed. This is preferred for measuring opening pressure accurately.
- Sitting position: Patient sits with feet hanging, hunched forward over a pillow. Easier to identify midline, especially in obese patients; however, opening pressure measurement is less accurate.
3. Identify the landmark
- Draw an imaginary line connecting the superior iliac crests - this intersects at the L4 vertebral body.
- The L3-L4 interspace is the standard entry point. L4-L5 is an acceptable alternative; L2-L3 can be used if needed.
- Mark the site with a pen or a small skin indentation using the needle hub.
4. Sterile preparation
- Wash hands; don sterile gloves.
- Cleanse the skin widely with betadine or chlorhexidine in concentric circles, then alcohol swab.
- Apply fenestrated sterile drape.
5. Local anesthesia
- Raise a skin wheal with 25-27G needle using 1% lidocaine at the selected interspace.
- Infiltrate deeper tissues along the intended needle track.
- Allow 2-3 minutes to take effect (EMLA cream can be applied 30-60 min before for better effect, though local injection is still needed).
6. Needle insertion
- Insert the spinal needle with stylet in place in the midline, bevel oriented parallel to the longitudinal dural fibers (bevel up/cephalad in lateral decubitus; this reduces dural fiber disruption and post-LP headache).
- Angle the needle slightly cephalad (toward the umbilicus), aiming for the interspace.
- Advance slowly, with a firm grip. You will feel distinct resistance as the needle passes through:
- Skin → subcutaneous fat → supraspinous ligament → interspinous ligament → ligamentum flavum (firm resistance) → epidural space → dura/arachnoid (a characteristic "pop") → subarachnoid space
- Depth to subarachnoid space is typically 4-5 cm in adults, more in obese patients.
7. Check position
- Remove the stylet and look for free flow of CSF.
- If no CSF flows: replace stylet, rotate needle 90°, or advance/withdraw slightly.
- If blood flows: replace stylet, wait a moment, then recheck - if persistent, withdraw and try another level.
8. Measure opening pressure
- Attach the manometer + three-way stopcock before collecting CSF.
- Patient must be in lateral decubitus and relaxed for accurate measurement.
- Normal opening pressure: 70-180 mm H₂O in adults (50-80 mm H₂O in infants and children).
- If pressure is very high (>400 mm H₂O), collect minimal CSF and withdraw immediately; consider urgent neurosurgical consultation.
9. Collect CSF
- Turn stopcock to allow CSF to flow into numbered tubes in order.
- Collect 2-3 mL per tube in at least 3-4 tubes.
- Label in the order collected - tube 3 is used for cell count (least likely to have traumatic blood contamination).
| Tube | Tests |
|---|---|
| 1 | Gram stain + culture, sensitivity |
| 2 | Glucose + protein |
| 3 | Cell count + differential |
| 4 | Spare (freeze) - oligoclonal bands, PCR, cytology, etc. |
10. Withdraw
- Replace the stylet before withdrawing the needle (reduces risk of post-LP headache by preventing CSF leakage along the needle track).
- Withdraw needle smoothly and apply sterile dressing.
11. Post-procedure
- Patient may lie flat or prone for 1-4 hours (though evidence for this preventing post-LP headache is mixed).
- Monitor for complications: headache, back pain, radicular pain, bladder/bowel dysfunction, bleeding signs.
Normal CSF Values
| Parameter | Infant | Child | Adult |
|---|---|---|---|
| Opening pressure (mm H₂O) | 50-80 | 50-80 | 70-180 |
| WBC (/mm³) | <22 | <7 | <5 |
| Neutrophils | Up to 61% | None | None |
| Glucose (mg/dL) | 34-119 | 40-80 | 50-80 |
| CSF:blood glucose ratio | 44-128% | ~50% | 60-70% |
| Protein (mg/dL) | 20-170 | 5-40 | 15-45 |
Complications
- Post-LP headache (most common) - positional, relieved by lying down; treat with caffeine, hydration; blood patch for refractory cases
- Spinal epidural hematoma (SEH) - rare but catastrophic in anticoagulated patients; presents with back pain + new neurologic deficit; treat with emergency laminectomy
- Herniation - in patients with unrecognized raised ICP
- Infection/meningitis - from breach of sterile technique
- Bloody tap - may be traumatic or true SAH (xanthochromia after centrifuge distinguishes the two)
- Radicular pain or transient paresthesias during insertion
Lateral (Paramedian) Approach
- Enter 1.5-2 cm lateral to midline, angled 15° cephalad and 20° toward midline.
- This bypasses the supraspinous and interspinous ligaments.