
Surgical video of Lateral approach for THR with detailed explanation
The lateral approach (also called the Hardinge or modified Hardinge approach) for Total Hip Replacement involves splitting the gluteus medius and minimus to access the hip joint from the side, preserving posterior structures and reducing dislocation risk.
Searching sources...
Reading File
Searching the Web
lateral approach total hip replacement surgical video Hardinge approach THR
Now let me search the medical library and find images to give you a comprehensive answer alongside the videos.
Reading File
Searching Images
lateral approach total hip replacement Hardinge transgluteal approach anatomy
Finding Sources
Searching Images
total hip arthroplasty surgical technique gluteus medius splitting
Reading File
Finding Sources
Reading File
Reading File
Loading Image
Reading File
Now I have everything I need to give a comprehensive, well-illustrated answer. Let me compile it.
Lateral Approach (Hardinge/Transgluteal Approach) for Total Hip Replacement
Surgical Videos
Here are the best available surgical videos for the lateral/Hardinge approach to THR:
1. Hardinge Approach (Lateral Approach to the Hip) - YouTube
2. Modified Hardinge Approach for Total Hip Arthroplasty - VuMedi (Surgical Demonstration, 12:30)
3. Anterolateral and Direct Lateral Approach for THA - VuMedi (Dr. David G. Lewallen, Mayo Clinic)
4. Minimally Invasive Direct Lateral THA - AAOS Video Library
Textbook Anatomy Diagram (Campbell's Operative Orthopaedics, 15th Ed. 2026)
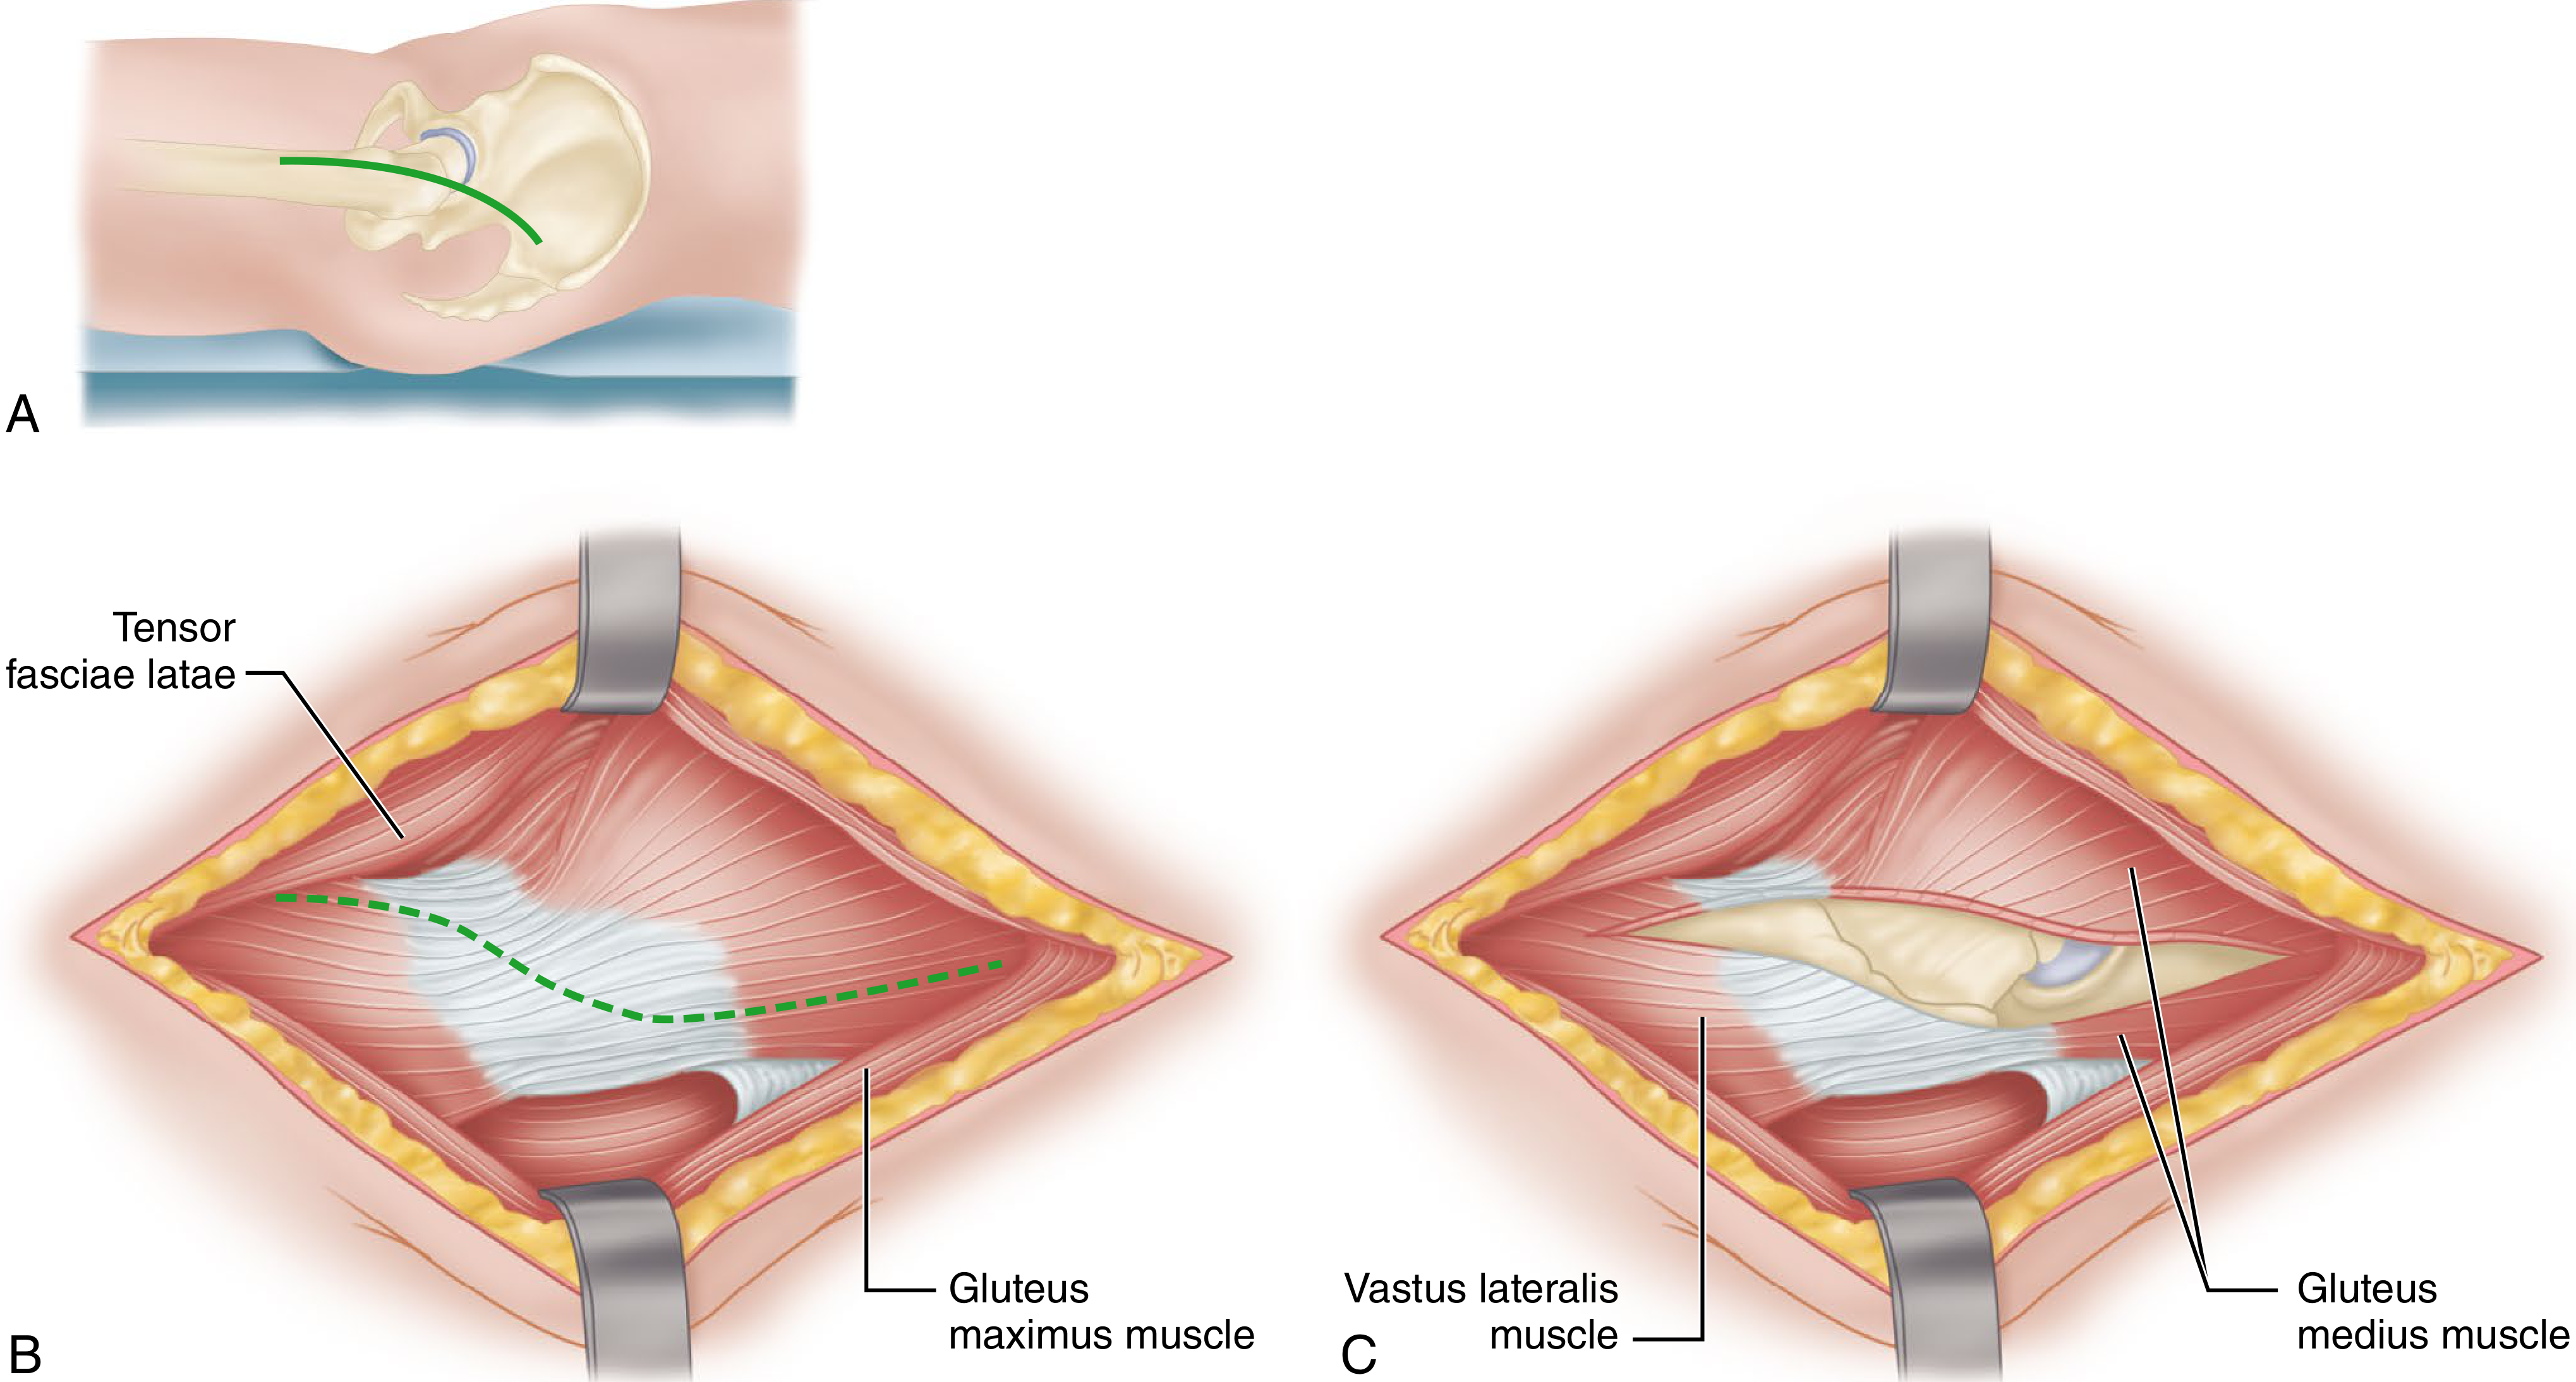
FIGURE 1.74 - Hardinge direct lateral transgluteal approach. A: Lazy-J skin incision. B: Tensor fasciae latae retracted anteriorly, gluteus maximus posteriorly - planned gluteus medius tendon incision outlined (dashed). Posterior half of gluteus medius tendon left attached to trochanter. C: Anterior joint capsule exposed after elevation of anterior flap.
Detailed Step-by-Step Surgical Technique
(Based on Campbell's Operative Orthopaedics, 15th Ed. 2026 - Technique 1.69, Hardinge)
Patient Positioning
- Patient placed supine with the greater trochanter at the edge of the table
- Muscles of the buttocks freed from the table edge
- (Alternative: lateral decubitus position is also used in many centers)
Step 1: Skin Incision
- Make a posteriorly directed lazy-J incision centered over the greater trochanter
- The curve of the J opens anteriorly, typically 15-20 cm in length
Step 2: Fascia Lata Division
- Divide the fascia lata in line with the skin incision, centered over the greater trochanter
Step 3: Superficial Muscle Retraction
- Retract the tensor fasciae latae anteriorly
- Retract the gluteus maximus posteriorly
- This exposes:
- The origin of the vastus lateralis distally
- The insertion of the gluteus medius on the greater trochanter
Step 4: The Critical Gluteus Medius Tendon Split (Key Step)
This is what defines the Hardinge approach:
- Incise the tendon of the gluteus medius obliquely across the greater trochanter
- Leave the posterior half attached to the trochanter (this is the "functional anchor")
- Carry the incision proximally in line with the gluteus medius fibers at the junction of middle and posterior thirds of the muscle
- Critical limit: The split must NOT extend more than 4-5 cm above the tip of the greater trochanter - beyond this risks injury to the superior gluteal nerve and artery
- Carry the incision distally and anteriorly in line with the vastus lateralis fibers down to bone along the anterolateral femur
Step 5: Exposure of Anterior Capsule
- Elevate the tendinous insertions of the anterior portions of gluteus minimus and vastus lateralis
- Abduct the thigh - this brings the anterior hip capsule into view
- Full anterior joint capsule is now exposed
Step 6: Capsulotomy
- Incise the capsule as desired (anterior capsulotomy, cruciate incision, or excision)
- The femoral head and neck are now fully accessible for femoral neck osteotomy and cup preparation
Step 7: THR Implantation
- Perform femoral neck osteotomy at the planned level
- Acetabular preparation: Reamers used to prepare the cup bed; press-fit cup inserted at ~40-45° inclination and 10-25° anteversion
- Femoral preparation: Canal broached, trial components sized, femoral stem impacted (cemented or cementless)
- Trial reduction performed to assess leg length, stability, and range of motion
Step 8: Closure (Critical - Restoring Abductor Function)
- The gluteus medius tendon is repaired with non-absorbable braided sutures back to the greater trochanter - this is the most important closure step
- Adequate repair prevents Trendelenburg gait (abductor lurch)
- Fascia lata closed, subcutaneous layer, skin
Advantages vs. Disadvantages
| Feature | Detail |
|---|---|
| Dislocation risk | Lower than posterior approach (intact posterior capsule and external rotators) |
| Nerve at risk | Superior gluteal nerve (if split > 5 cm proximal to trochanter) |
| Abductor damage | Risk of weakness if gluteus medius repair fails |
| Heterotopic ossification | Lower risk vs. transtrochanteric lateral approach |
| Osteotomy needed? | No (unlike transtrochanteric approach) |
| Visualization | Excellent anterior capsule and acetabular access |
Frndak Modification (Modified Hardinge)
Frndak et al. placed the abductor split more anteriorly, directly over the femoral head and neck. The split must not extend more than 2 cm above the lateral lip of the acetabulum to protect the gluteal neurovascular bundle. Because the split is more anterior, less retraction is needed to expose the femoral head and neck. - Campbell's Operative Orthopaedics, 15th Ed. 2026
Key Anatomical Dangers
- Superior gluteal nerve: Exits above the piriformis, runs anteriorly between gluteus medius and minimus - damaged if the split extends > 4-5 cm above the trochanter tip
- Superior gluteal artery: Accompanies the nerve - bleeding risk
- Femoral nerve: Protected by the anterior position of the approach (unlike the direct anterior approach)
- Sciatic nerve: Protected posteriorly (unlike posterior approach)
This is a shared conversation. Sign in to Orris to start your own chat.