
Steps of Vaginal Hysterectomy in detail
Reading File
Now let me search the medical library for vaginal hysterectomy content, in parallel with a web search.
Finding Sources
Searching the Web
vaginal hysterectomy surgical steps technique detailed
Good - I found excellent sources. Let me now read the key textbook sections in parallel with the best web sources.
Reading File
Reading File
Reading Web Page
https://www.ncbi.nlm.nih.gov/books/NBK554482
Let me read more of the Berek & Novak section on the actual surgical technique steps.
Reading File
Reading File
Let me get more of the Berek & Novak text on the surgical technique steps.
Reading File
I now have comprehensive information from Berek & Novak's Gynecology, Campbell-Walsh Urology, StatPearls, and the Atlas of Pelvic Surgery. Let me now fetch key figures from the textbook to include in the response.
Loading Image
Loading Image
Loading Image
I now have comprehensive, well-illustrated information from multiple authoritative sources. Let me compose the detailed response.
Vaginal Hysterectomy - Detailed Surgical Steps
Vaginal hysterectomy (VH) is the removal of the uterus through a vaginal incision, without abdominal incisions. It is the preferred route for most benign indications when technically feasible.
Pre-operative Preparation
- Patient assessment: Bimanual examination under anesthesia to confirm uterine mobility, descent, and size. The lower uterine segment width should be <9-10 cm for safe uterine artery clamping. Pubic arch angle should be ≥90° and bituberous diameter >10 cm.
- Positioning: Dorsal lithotomy position with buttocks slightly off the table edge, using candy-cane or Allen stirrups. Careful padding of pressure points to avoid neuropraxia (common peroneal, femoral nerves).
- Antiseptic prep: Vulva and vagina prepped with antiseptic solution. Sterile draping.
- Antibiotic prophylaxis: Cefazolin 1-2 g IV within 60 minutes of incision.
- VTE prophylaxis: Sequential compression devices applied before induction; anticoagulants as indicated.
- Bladder drainage: Foley catheter inserted (some surgeons prefer to defer until after anterior colpotomy to enable cystotomy identification).
- Retraction: A self-retaining ring retractor (e.g., Lone Star) is placed to expose the vaginal introitus. A Lahey or Jacobs tenaculum grasps anterior and posterior lips of the cervix - placed as distally as possible since the bladder can descend low on the anterior cervix.
- Vasoconstriction/hydrodissection: Dilute vasopressin (20 units in 100 mL normal saline) or 1:200,000 epinephrine in normal saline is injected circumferentially at the cervicovaginal junction. This reduces bleeding and assists dissection in the correct tissue plane.
Step 1: Circumferential Cervical Incision (Colpotomy)
A circumferential incision is made through the full thickness of the vaginal epithelium at the cervicovaginal junction - at the border between the rugated vaginal mucosa and the smooth epithelium overlying the cervix:
- Anterior incision: Made from 10 to 2 o'clock
- Posterior incision: Made from 8 to 4 o'clock
- If the cervix descends adequately with traction, the incision is extended all the way around circumferentially.
The correct plane is at the junction between vaginal epithelium and the underlying fibromuscular layer of the cervix - not too shallow (will tear) and not too deep (risks entry into the cervical stroma or bladder).
Step 2: Posterior Colpotomy - Entry into Pouch of Douglas
This is usually the easier of the two peritoneal entries and is performed first.
- The posterior vaginal wall is elevated with Allis clamps or tissue forceps on the outer edge of the posterior incision.
- The tissue is pulled downward to create tension on the exposed posterior peritoneum.
- The rectouterine pouch (pouch of Douglas / posterior cul-de-sac) is identified - it is typically readily visible as a glistening, translucent layer.
- The peritoneum is entered sharply with curved Mayo scissors.
- The posterior peritoneal edge is sutured centrally to the posterior vaginal wall with a single delayed absorbable suture to maintain access.
- The cul-de-sac is palpated to evaluate for adhesions, endometriosis, or other pathology, and the uterosacral ligaments are palpated.
- A long-bladed Steiner-Auvard weighted speculum is placed into the posterior peritoneal cavity - it sits in the cul-de-sac and provides posterior retraction and an excellent view of the operative field.
Step 3: Uterosacral Ligament Ligation
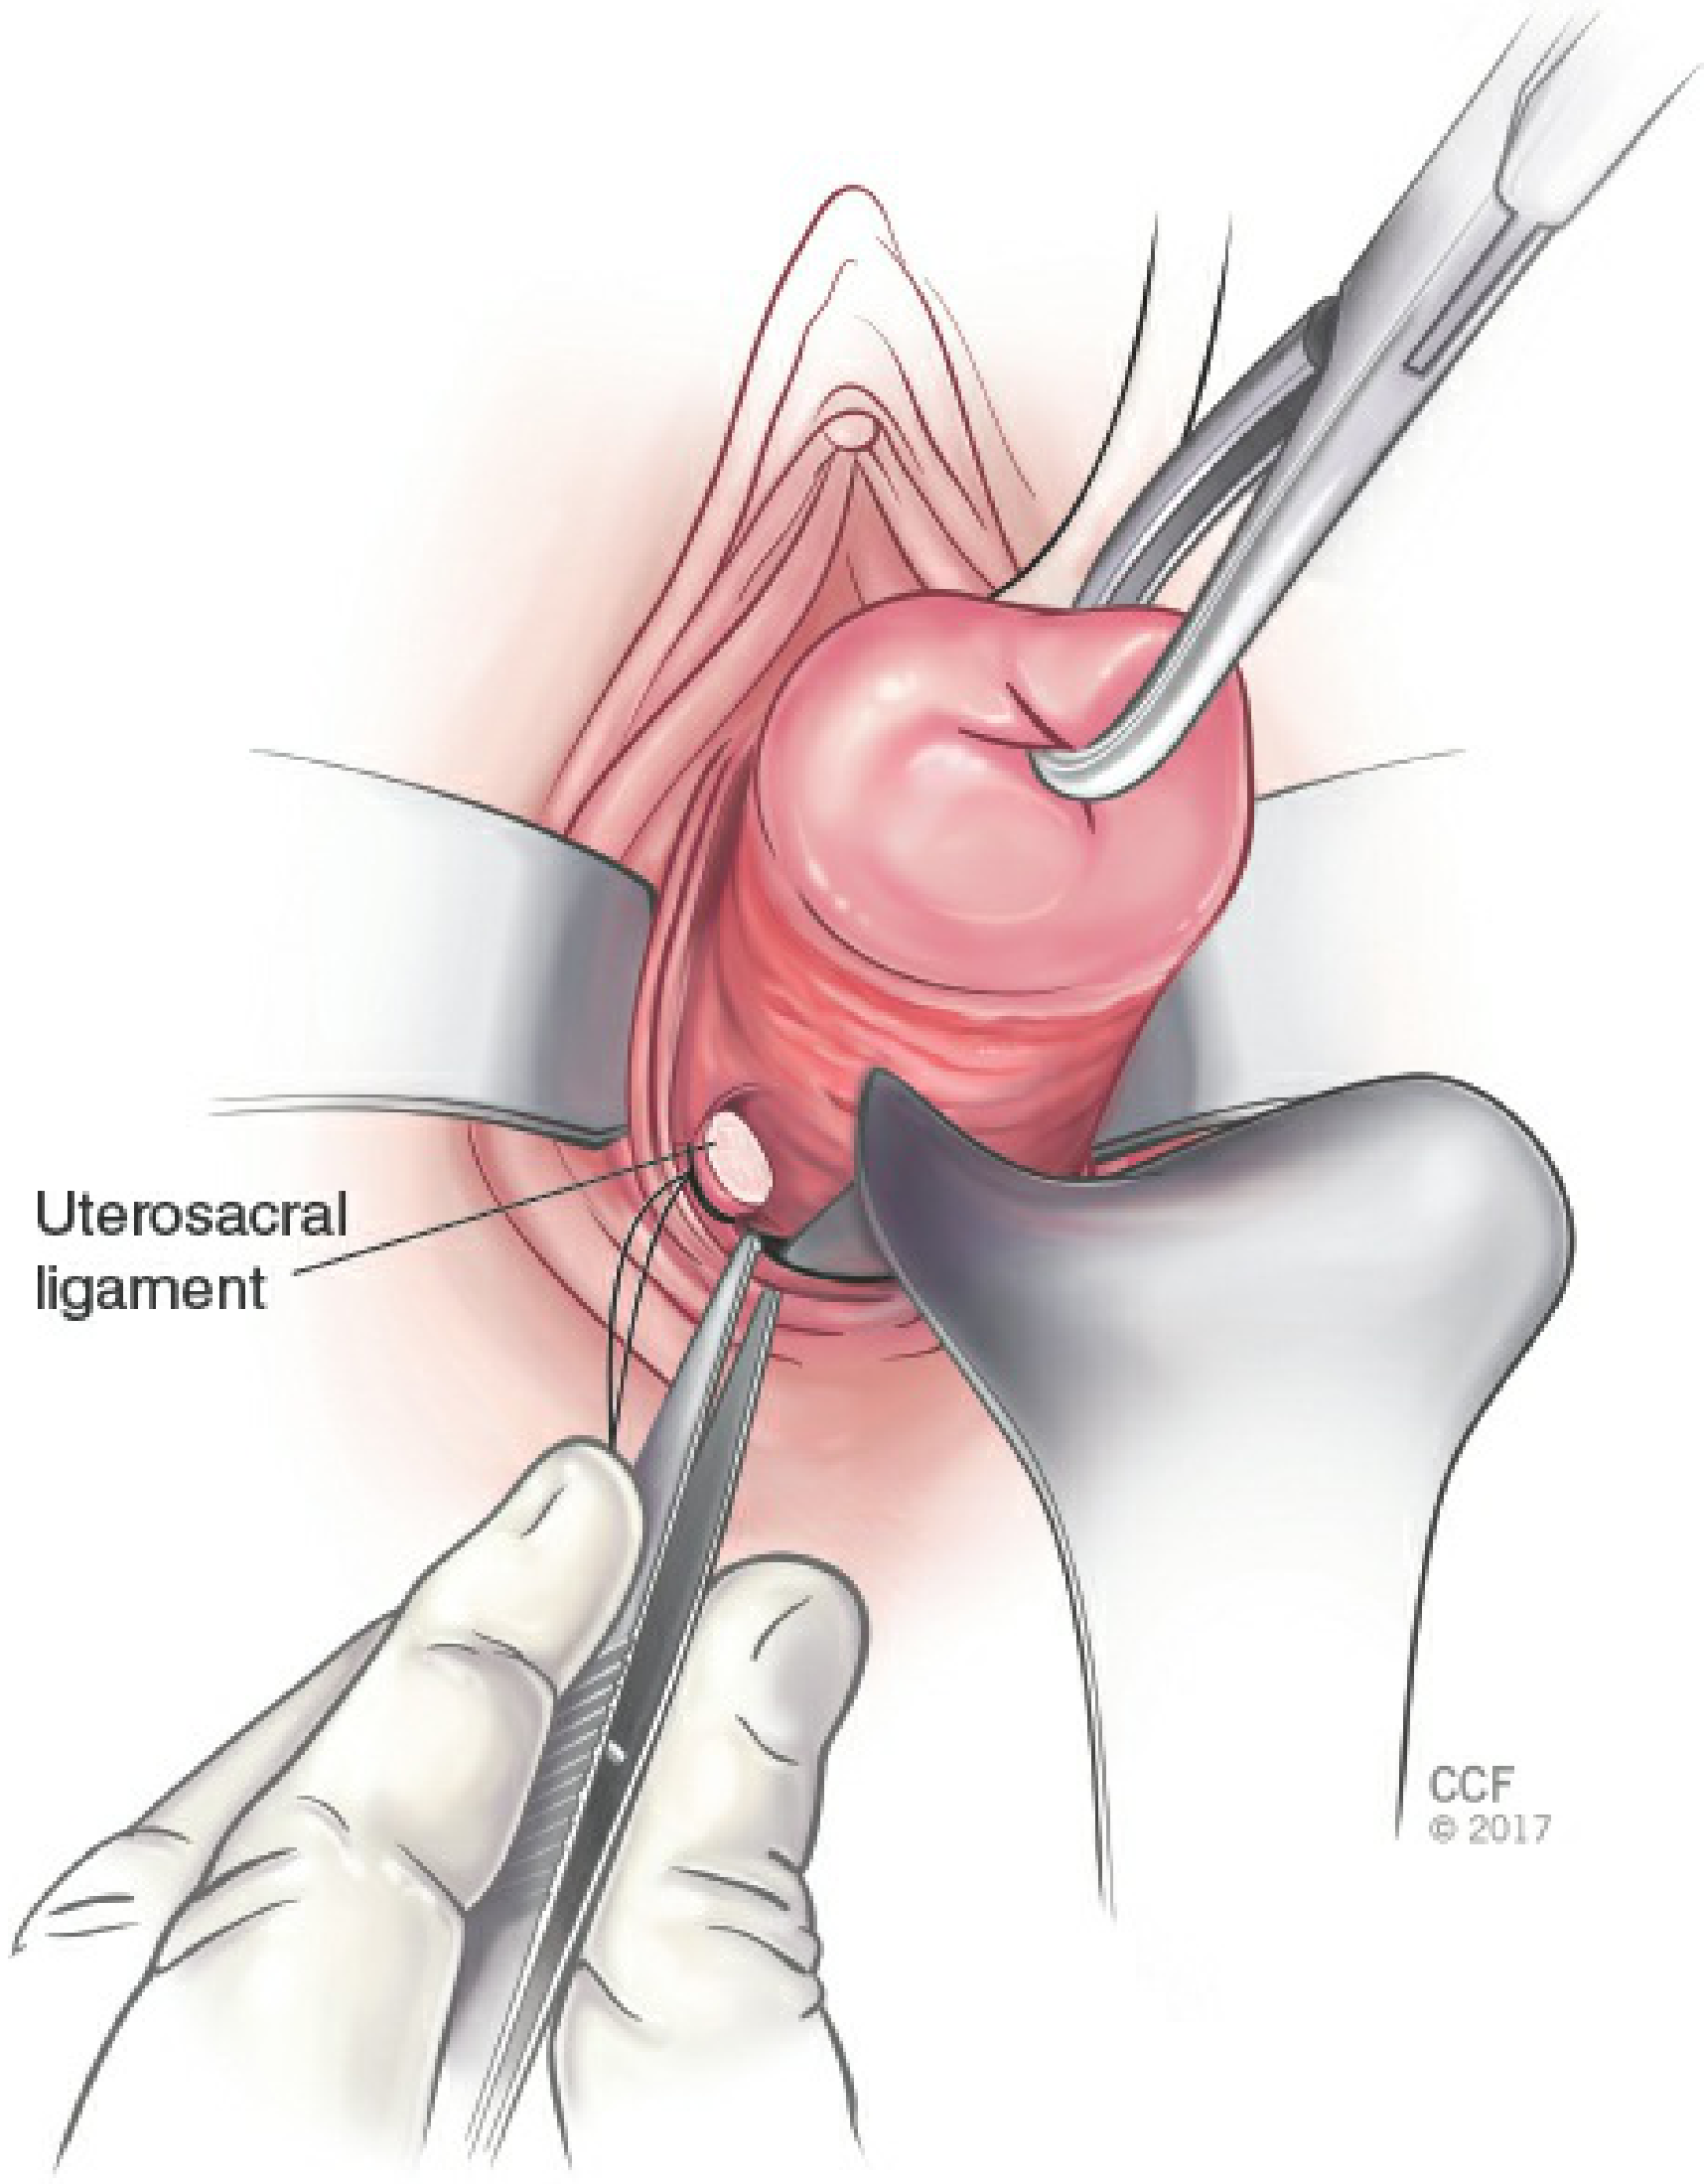
- The cervix is placed on outward and upward traction.
- The uterosacral ligaments are identified by palpation bilaterally at the 4 o'clock and 8 o'clock positions.
- Each ligament is:
- Clamped with a curved Heaney clamp
- Transected
- Suture-ligated with 0-gauge delayed absorbable suture (e.g., Vicryl) using a transfixion stitch
- The free suture ends are tagged with hemostats and not cut - they are used later to attach to the vaginal cuff for support (McCall culdoplasty, vault suspension).
- Both sides are ligated in turn before progressing.
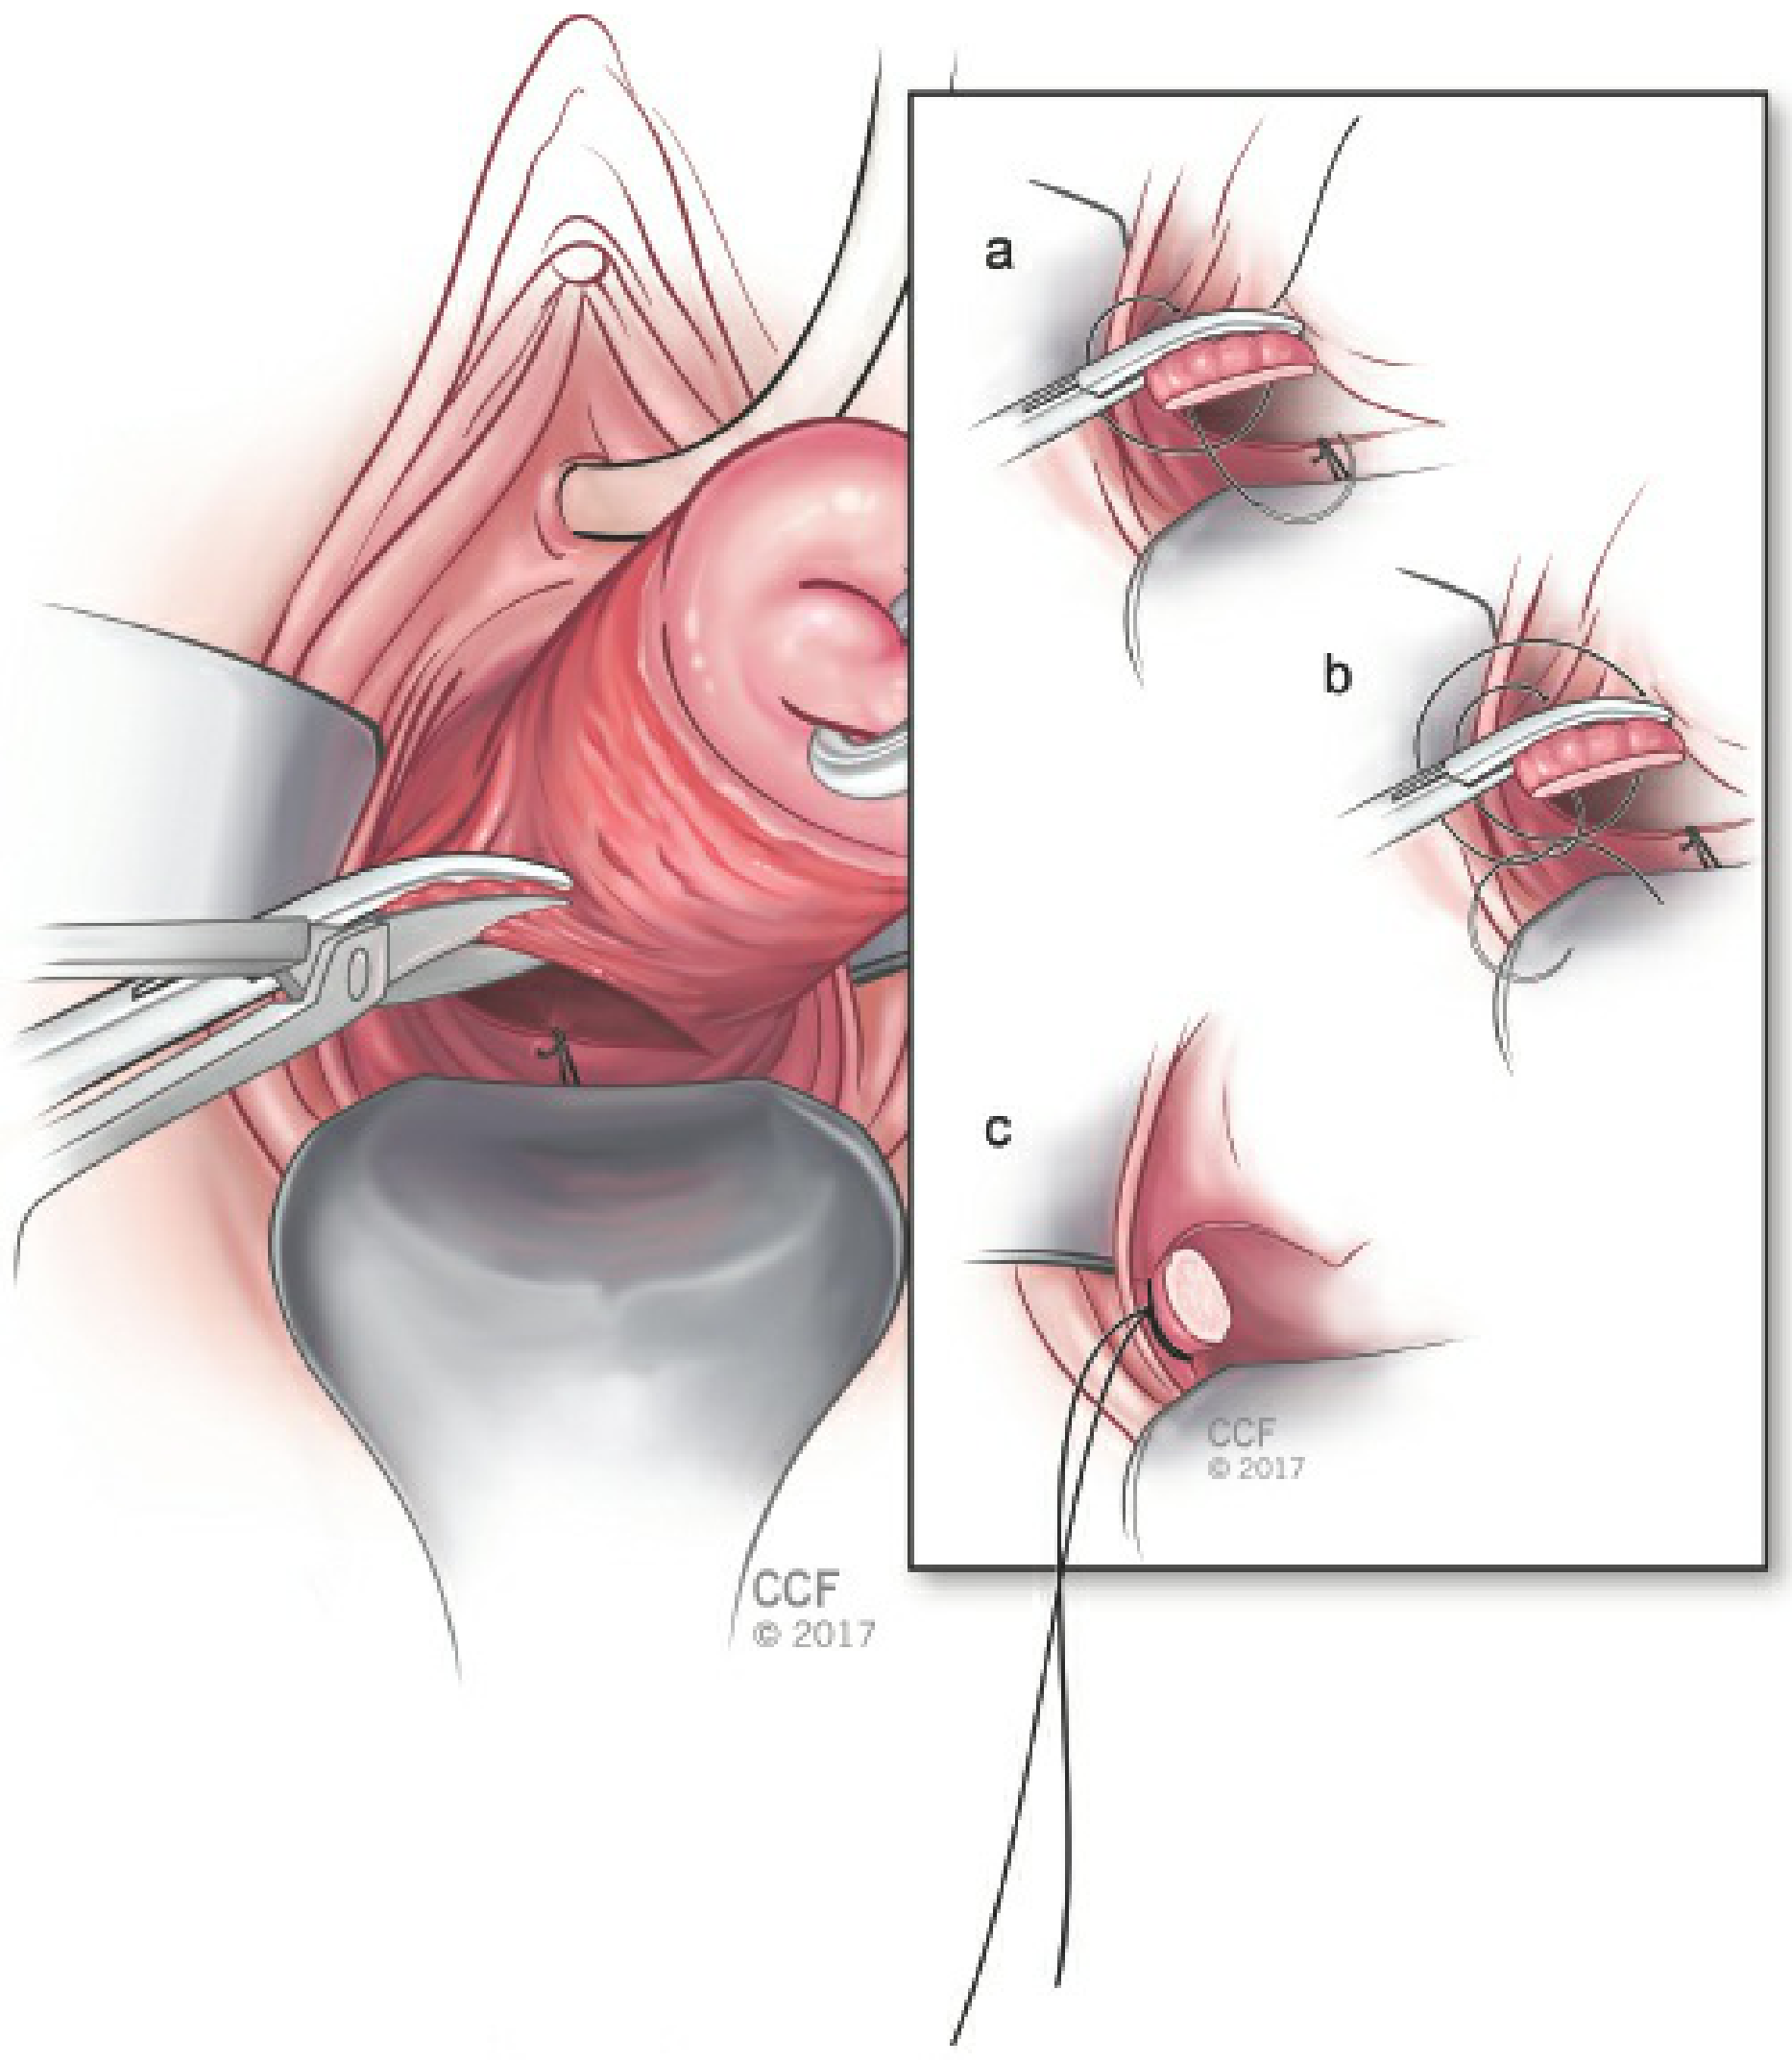
Step 4: Anterior Colpotomy - Entry into Vesicouterine Space
This step is typically deferred until after the uterosacral ligaments are tagged, reducing bladder injury risk.
- The cervix is pulled outward and downward with the tenaculum.
- The anterior vaginal tissue is elevated in the midline with forceps.
- Sharp dissection with Metzenbaum scissors is performed parallel to the cervix in the cervicovesical space - the correct plane is between the cervix and the base of the bladder. The key is to stay superficial on the cervical stroma, not to "dig in."
- A Deaver or Breisky retractor is placed under the anterior vaginal epithelium to expose the cervicovesical stroma.
- Dissection continues cephalad until the vesicouterine peritoneum is identified - a glistening, tented, translucent layer (the "silk sac sign" may be visible).
- The peritoneum is grasped, elevated, and entered sharply with Metzenbaum scissors (anterior colpotomy).
- Entry into the peritoneal cavity is confirmed by seeing intraperitoneal fat.
- A long right-angle retractor is placed into the anterior peritoneal cavity to elevate and protect the bladder for the remainder of the procedure - this retractor must remain in place throughout.
Step 5: Cardinal Ligament Ligation
- The cervix is placed on traction.
- The cardinal ligaments (which contain the main blood supply to the uterus) are identified, clamped, transected, and suture-ligated bilaterally.
- The anterior and posterior peritoneum are incorporated into the clamp when possible - this aids anatomic definition and hemostasis.
- If bowel is encountered in the operative space, a moistened tagged laparotomy sponge can pack it cephalad.
- Each pedicle is suture-ligated with 0 delayed absorbable suture. Suture ends are tagged and not cut.
Step 6: Uterine Artery Ligation
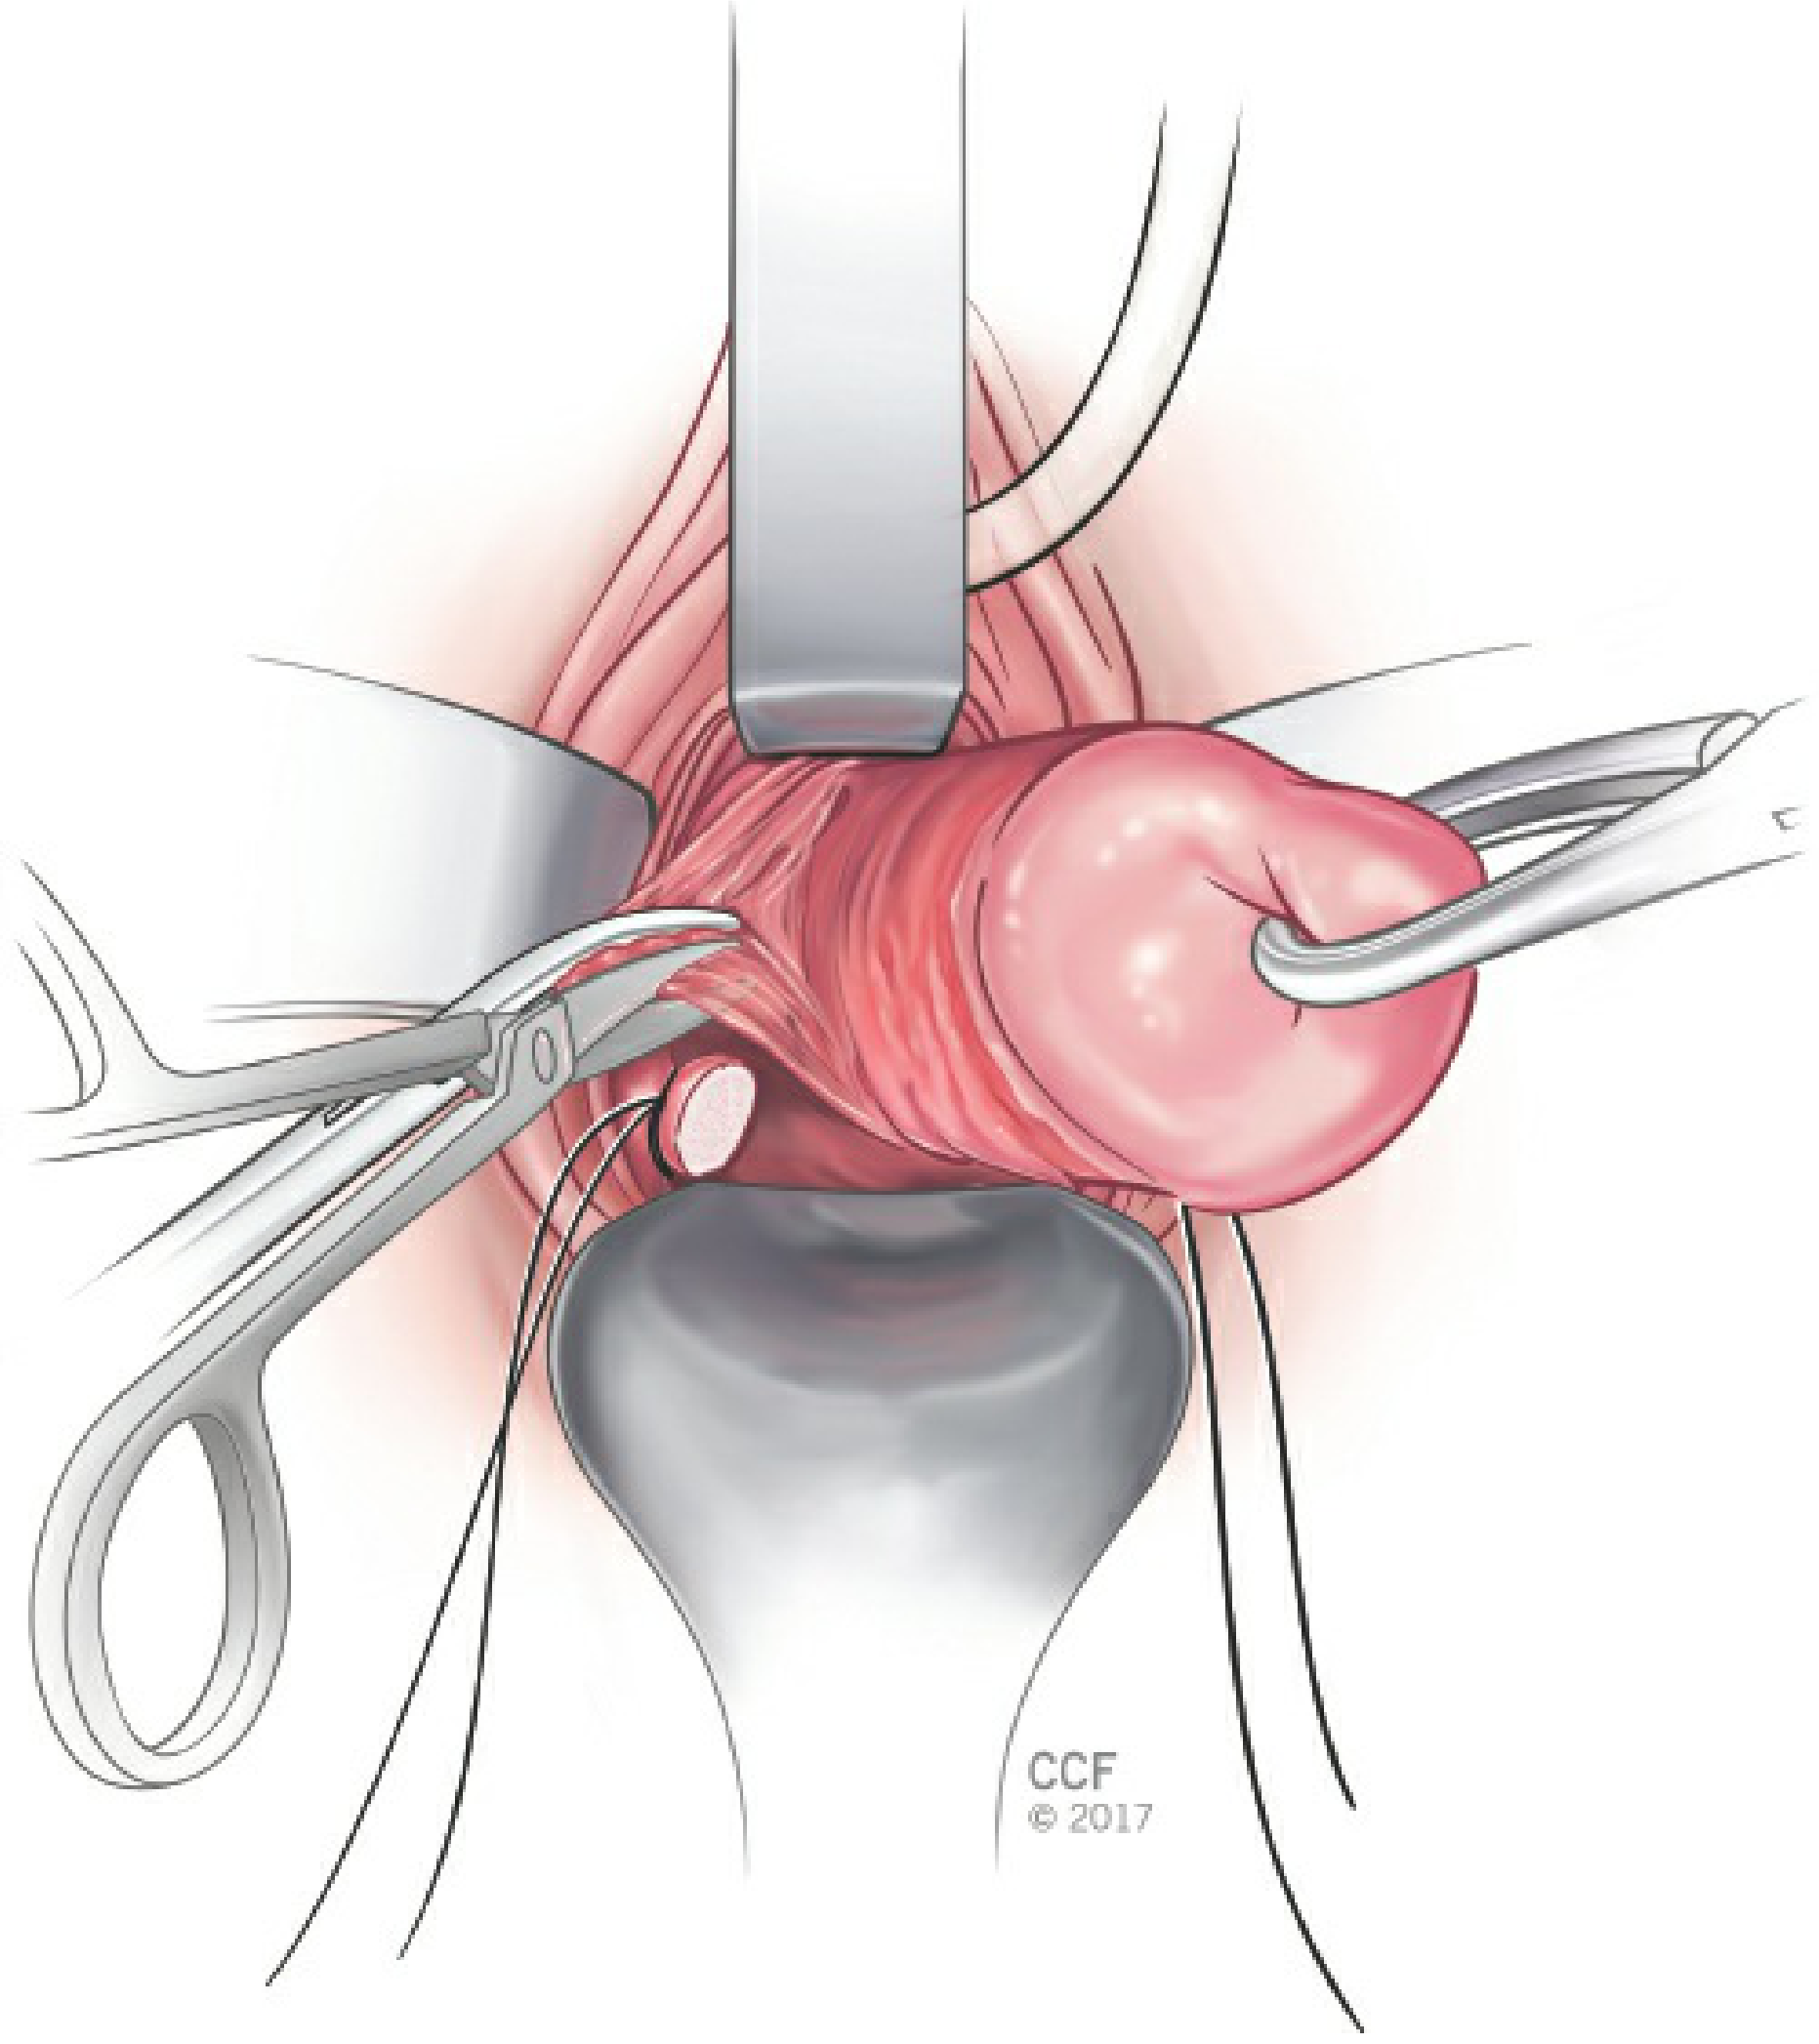
- Contralateral and downward traction is placed on the cervix to bring the uterine vessels into view.
- The clamp is placed medial to the previous cardinal ligament pedicle to avoid slippage and to reduce ureteral injury risk.
- With effort to incorporate both anterior and posterior leaves of the visceral peritoneum, the uterine vessels (uterine artery and veins) are:
- Clamped with a Heaney clamp
- Transected
- Suture-ligated (single suture and single clamp technique is preferred - reduces ureteral injury)
- If the uterus is large or a fibroid distorts anatomy, a second suture may be required to control remaining branches.
- This is the most critical step for hemorrhage prevention. The ureter runs within 1-2 cm of the uterine artery at this level.
Step 7: Delivery of the Uterus and Ligation of Upper Pedicles
Once the uterine vessels are controlled, the uterus is mobile enough to be delivered:
- A second tenaculum is placed onto the uterine fundus.
- The fundus is delivered posteriorly (flipped through the posterior colpotomy) by applying traction inferiorly.
- The operator's index finger is placed behind the utero-ovarian ligament to guide clamp placement safely.
Utero-ovarian and Round Ligament Ligation
- The utero-ovarian ligament + fallopian tube + round ligament complex on each side is:
- Clamped (clamp tips guided by the operator's index finger)
- Transected
- Double-ligated: a suture tie followed by a ligature medial to the first suture (since this is the highest pedicle and retracts cephalad into the abdomen if it slips)
- A hemostat is placed on the suture ends to identify this pedicle.
- The procedure is repeated on the contralateral side.
- The uterus is now completely free and is removed.
If larger pedicles are encountered, the assistant can briefly "flash" (partially release) the second clamp while the first tie is placed to ensure security.
Step 8: Adnexal Removal (Optional - Bilateral Salpingo-oophorectomy)
If BSO is planned:
- The utero-ovarian pedicle is not transected at Step 7; instead, the infundibulopelvic (IP) ligament containing the ovarian vessels is identified, clamped, cut, and doubly ligated.
- The ovary is delivered and removed along with the fallopian tube.
- This requires adequate uterine descent and access to the IP ligament.
Step 9: Hemostasis Check and Peritoneal Closure (Retroperitonealization)
- All pedicles are inspected for bleeding.
- A purse-string suture (Moschcowitz-type) or running suture closes the peritoneum to retroperitonealize all pedicle stumps - this constitutes the first layer of vault support.
- The cul-de-sac is obliterated by plication of the uterosacral ligament sutures in the midline (reduces risk of enterocele).
Step 10: McCall Culdoplasty / Vault Suspension
This is performed to provide apical vaginal support and prevent future vault prolapse:
- The previously tagged uterosacral ligament sutures (from Step 3) are tied together in the midline - this approximates the uterosacral ligaments and suspends the vaginal apex.
- Alternatively, a formal McCall culdoplasty is performed: one or more permanent or delayed absorbable sutures incorporate the posterior vaginal wall, the uterosacral ligaments bilaterally, and the anterior peritoneum to plicate the pouch of Douglas and elevate the vault.
Step 11: Vaginal Cuff Closure
- The tagged suture ends of the utero-ovarian, uterine artery, cardinal, and uterosacral pedicles are used to reinforce the cuff angles.
- The vaginal mucosa is reefed (not formally closed in many protocols, to allow drainage): a running locking 0 synthetic absorbable suture (e.g., 0-Vicryl) approximates the cut edges of the vaginal epithelium.
- Alternatively, the cuff is closed in a figure-of-8 or continuous locking fashion depending on surgeon preference.
- The angle sutures incorporate the nearest ligament pedicle to give the cuff corners additional strength.
Step 12: Final Inspection and Bladder Check
- The vaginal cuff is inspected for hemostasis.
- A Foley catheter is passed (if not already in situ) to confirm the bladder is intact and there is no haematuria.
- In some protocols, cystoscopy is performed routinely at the end to confirm bilateral ureteral efflux and exclude cystotomy.
- Vaginal packing may be placed at surgeon discretion.
Summary of the Four Core Phases
| Phase | Steps |
|---|---|
| Access | Circumferential incision → Posterior colpotomy → Anterior colpotomy |
| Devascularization | Uterosacral → Cardinal → Uterine artery ligation (bottom to top, bilateral) |
| Removal | Fundus delivery → Utero-ovarian / round ligament ligation → Uterus removed |
| Reconstruction | Peritoneal closure → McCall culdoplasty → Vaginal cuff reefing/closure |
Key Technical Points and Safety Principles
| Point | Detail |
|---|---|
| Clamp placement | Always clamp medial to the previous pedicle to avoid missing pedicle tissue and reduce ureteral risk |
| Ureteral safety | The ureter is 1-2 cm lateral to the uterine artery at the level of ligation - downward traction on the uterus moves the ureter laterally away from the operative field |
| Bladder injury | Most common complication; anterior peritoneum must not be entered blindly. If cystotomy occurs, complete the hysterectomy before bladder repair |
| Large uterus | May require morcellation (bivalving, wedge, or intramyometrial coring) to reduce volume and allow delivery - only after uterine vessels are controlled |
| Double ligation of upper pedicles | The utero-ovarian pedicle is at the highest risk of slipping back into the abdomen; always doubly ligate |
| Tagged sutures | All pedicle sutures are tagged with hemostats and not cut until cuff closure, both for identification and to enable vault suspension |
Sources: Berek & Novak's Gynecology, pp. 1430-1445 | Campbell-Walsh-Wein Urology, Vaginal Hysterectomy with McCall Culdoplasty | StatPearls - Vaginal Hysterectomy | Atlas of Pelvic Surgery
This is a shared conversation. Sign in to Orris to start your own chat.