I now have comprehensive anatomy and examination content from multiple authoritative textbooks. Let me compile the complete, detailed answer.
Anatomy and Clinical Examination of the Ankle Joint
PART 1: ANATOMY OF THE ANKLE JOINT
1. Bony Architecture - The Ankle Mortise
The ankle joint complex consists of two functional articulations:
- Talocrural joint (true ankle joint) - a synovial hinge joint between the tibia, fibula, and talus
- Subtalar (talocalcaneal) joint - articulation between talus and calcaneus, allowing inversion/eversion
The bony mortise ("ankle mortise") is formed by:
- Tibial plafond (tibial articular surface) - the roof
- Medial malleolus (distal tibia) - the medial wall
- Lateral malleolus (distal fibula) - the lateral wall, extending ~1 cm more distally than the medial malleolus
The talus sits within this mortise. It is widest anteriorly, meaning the mortise is more stable in dorsiflexion (when the wider part of the talus is engaged) and less stable in plantarflexion (when the narrower posterior talus is in the mortise - predisposing to lateral sprains).
Source: Miller's Review of Orthopaedics, 9th Ed., p. 193; ROSEN's Emergency Medicine, p. 828
2. The Distal Tibiofibular Joint (Syndesmosis)
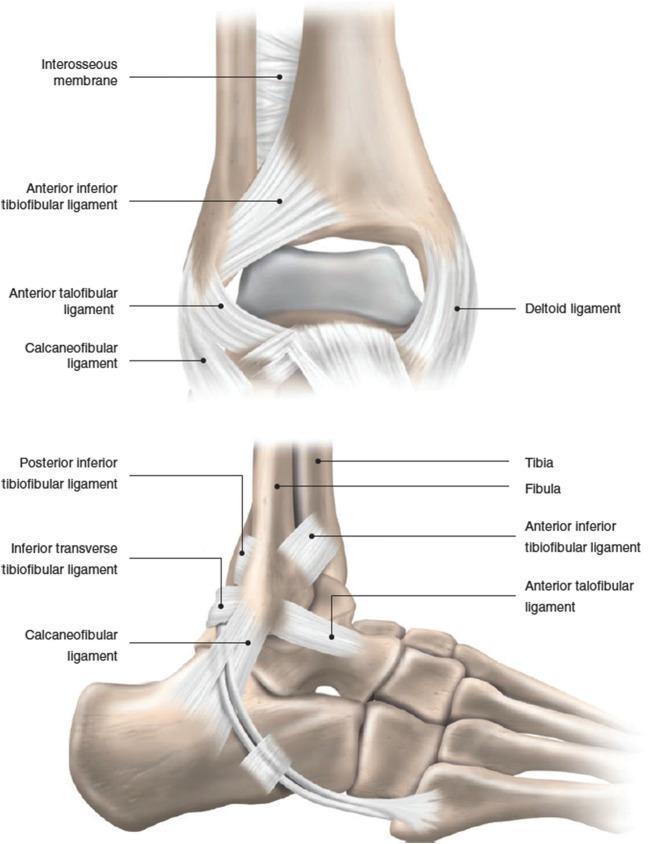
The tibia and fibula are held together at the ankle by the ankle syndesmosis, supported by four ligaments:
| Ligament | Notes |
|---|
| Anterior inferior tibiofibular ligament (AITFL) | Most commonly injured in syndesmotic sprains |
| Posterior inferior tibiofibular ligament (PITFL) | Deep + superficial bundle |
| Transverse tibiofibular ligament | Deep portion of PITFL |
| Interosseous ligament | Continuation of interosseous membrane |
Syndesmotic disruption is called a "high-ankle sprain" and is clinically important. The posterior tibiofibular overlap on a true lateral view is the most reliable marker for syndesmotic reduction.
Source: Miller's Review of Orthopaedics, 9th Ed., p. 193
3. Ligaments of the Ankle
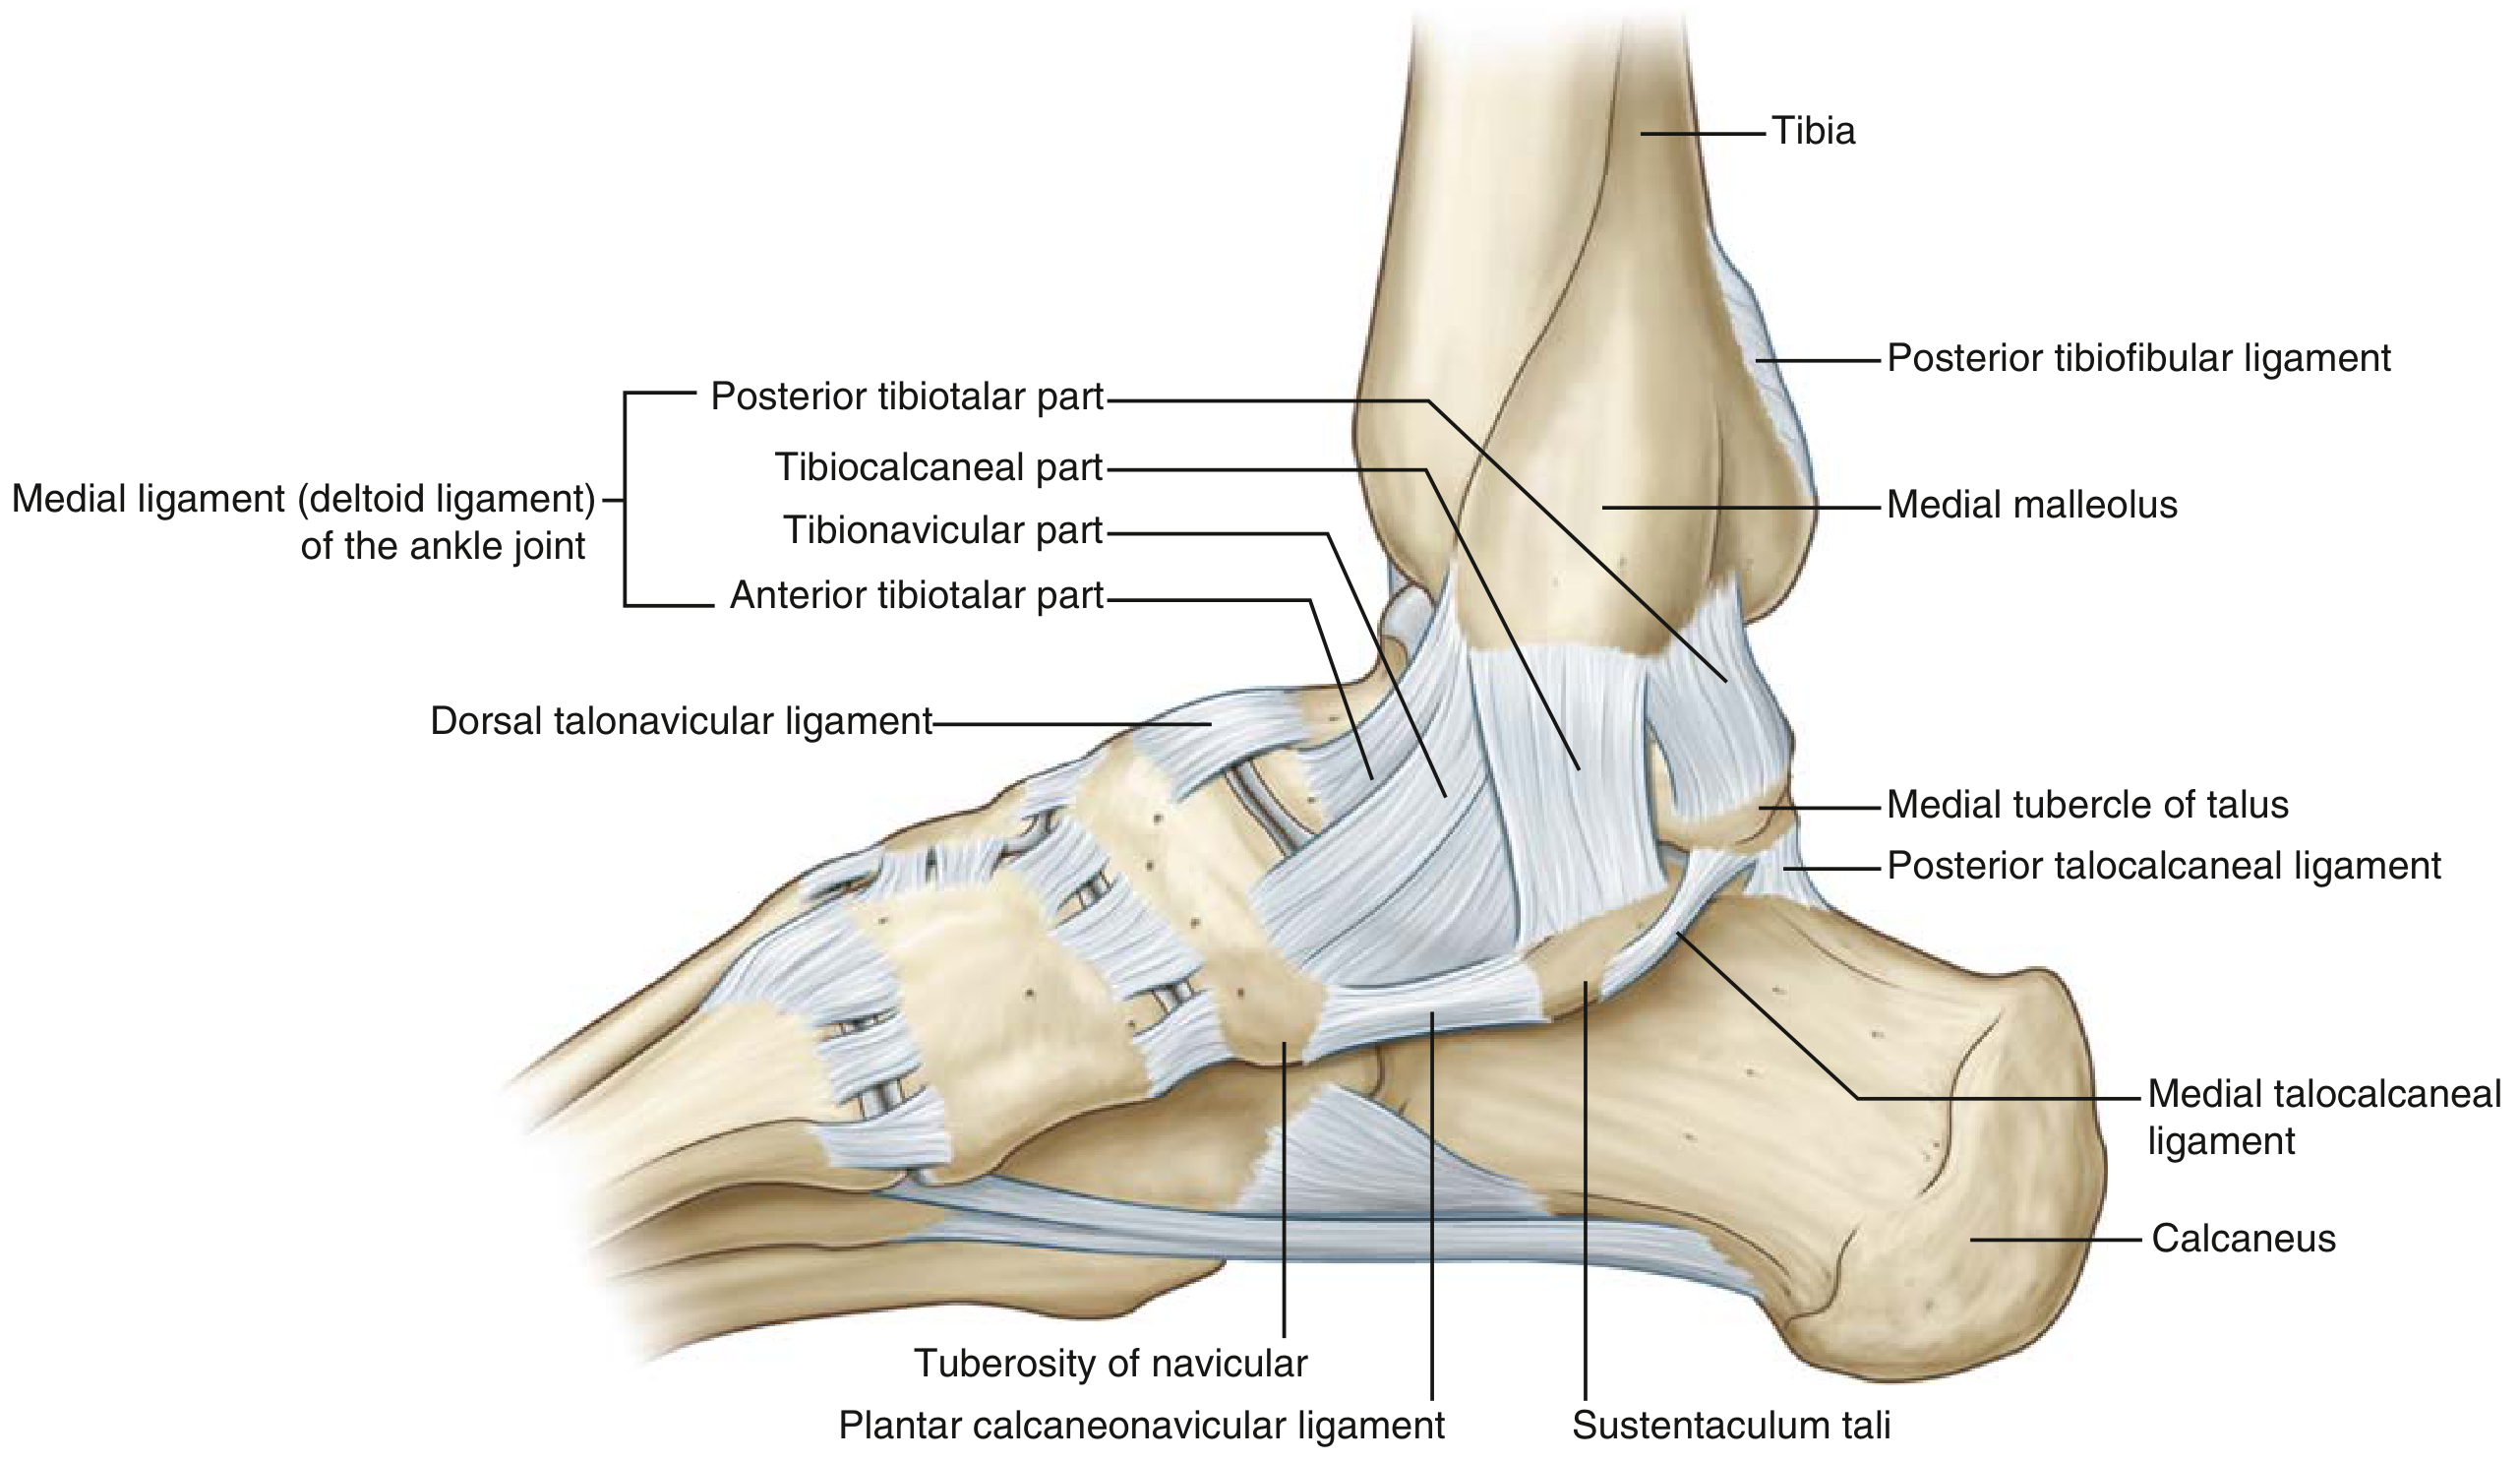
Medial (Deltoid) Ligament
A strong, fan-shaped ligament composed of two layers:
-
Superficial layer (crosses both ankle AND subtalar joint):
- Tibionavicular part
- Tibiocalcaneal part
-
Deep layer (crosses ankle joint only):
- Anterior tibiotalar part
- Posterior tibiotalar part
The deltoid ligament is extremely strong - medial ankle sprains are uncommon, and a severe force often avulses the medial malleolus rather than tearing the ligament.
Deltoid ligament (medial view) - from Miller's Review of Orthopaedics, Gray's Atlas
Lateral Ligament Complex
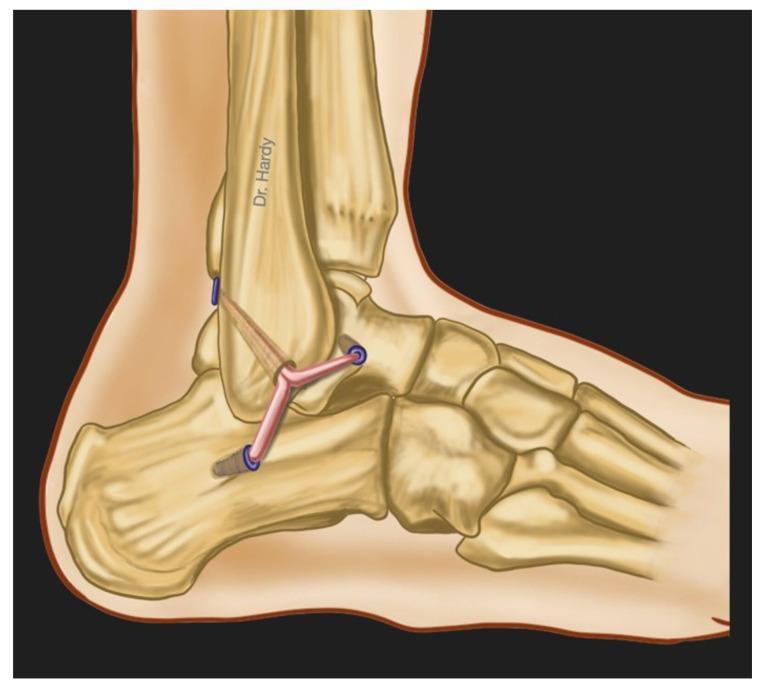
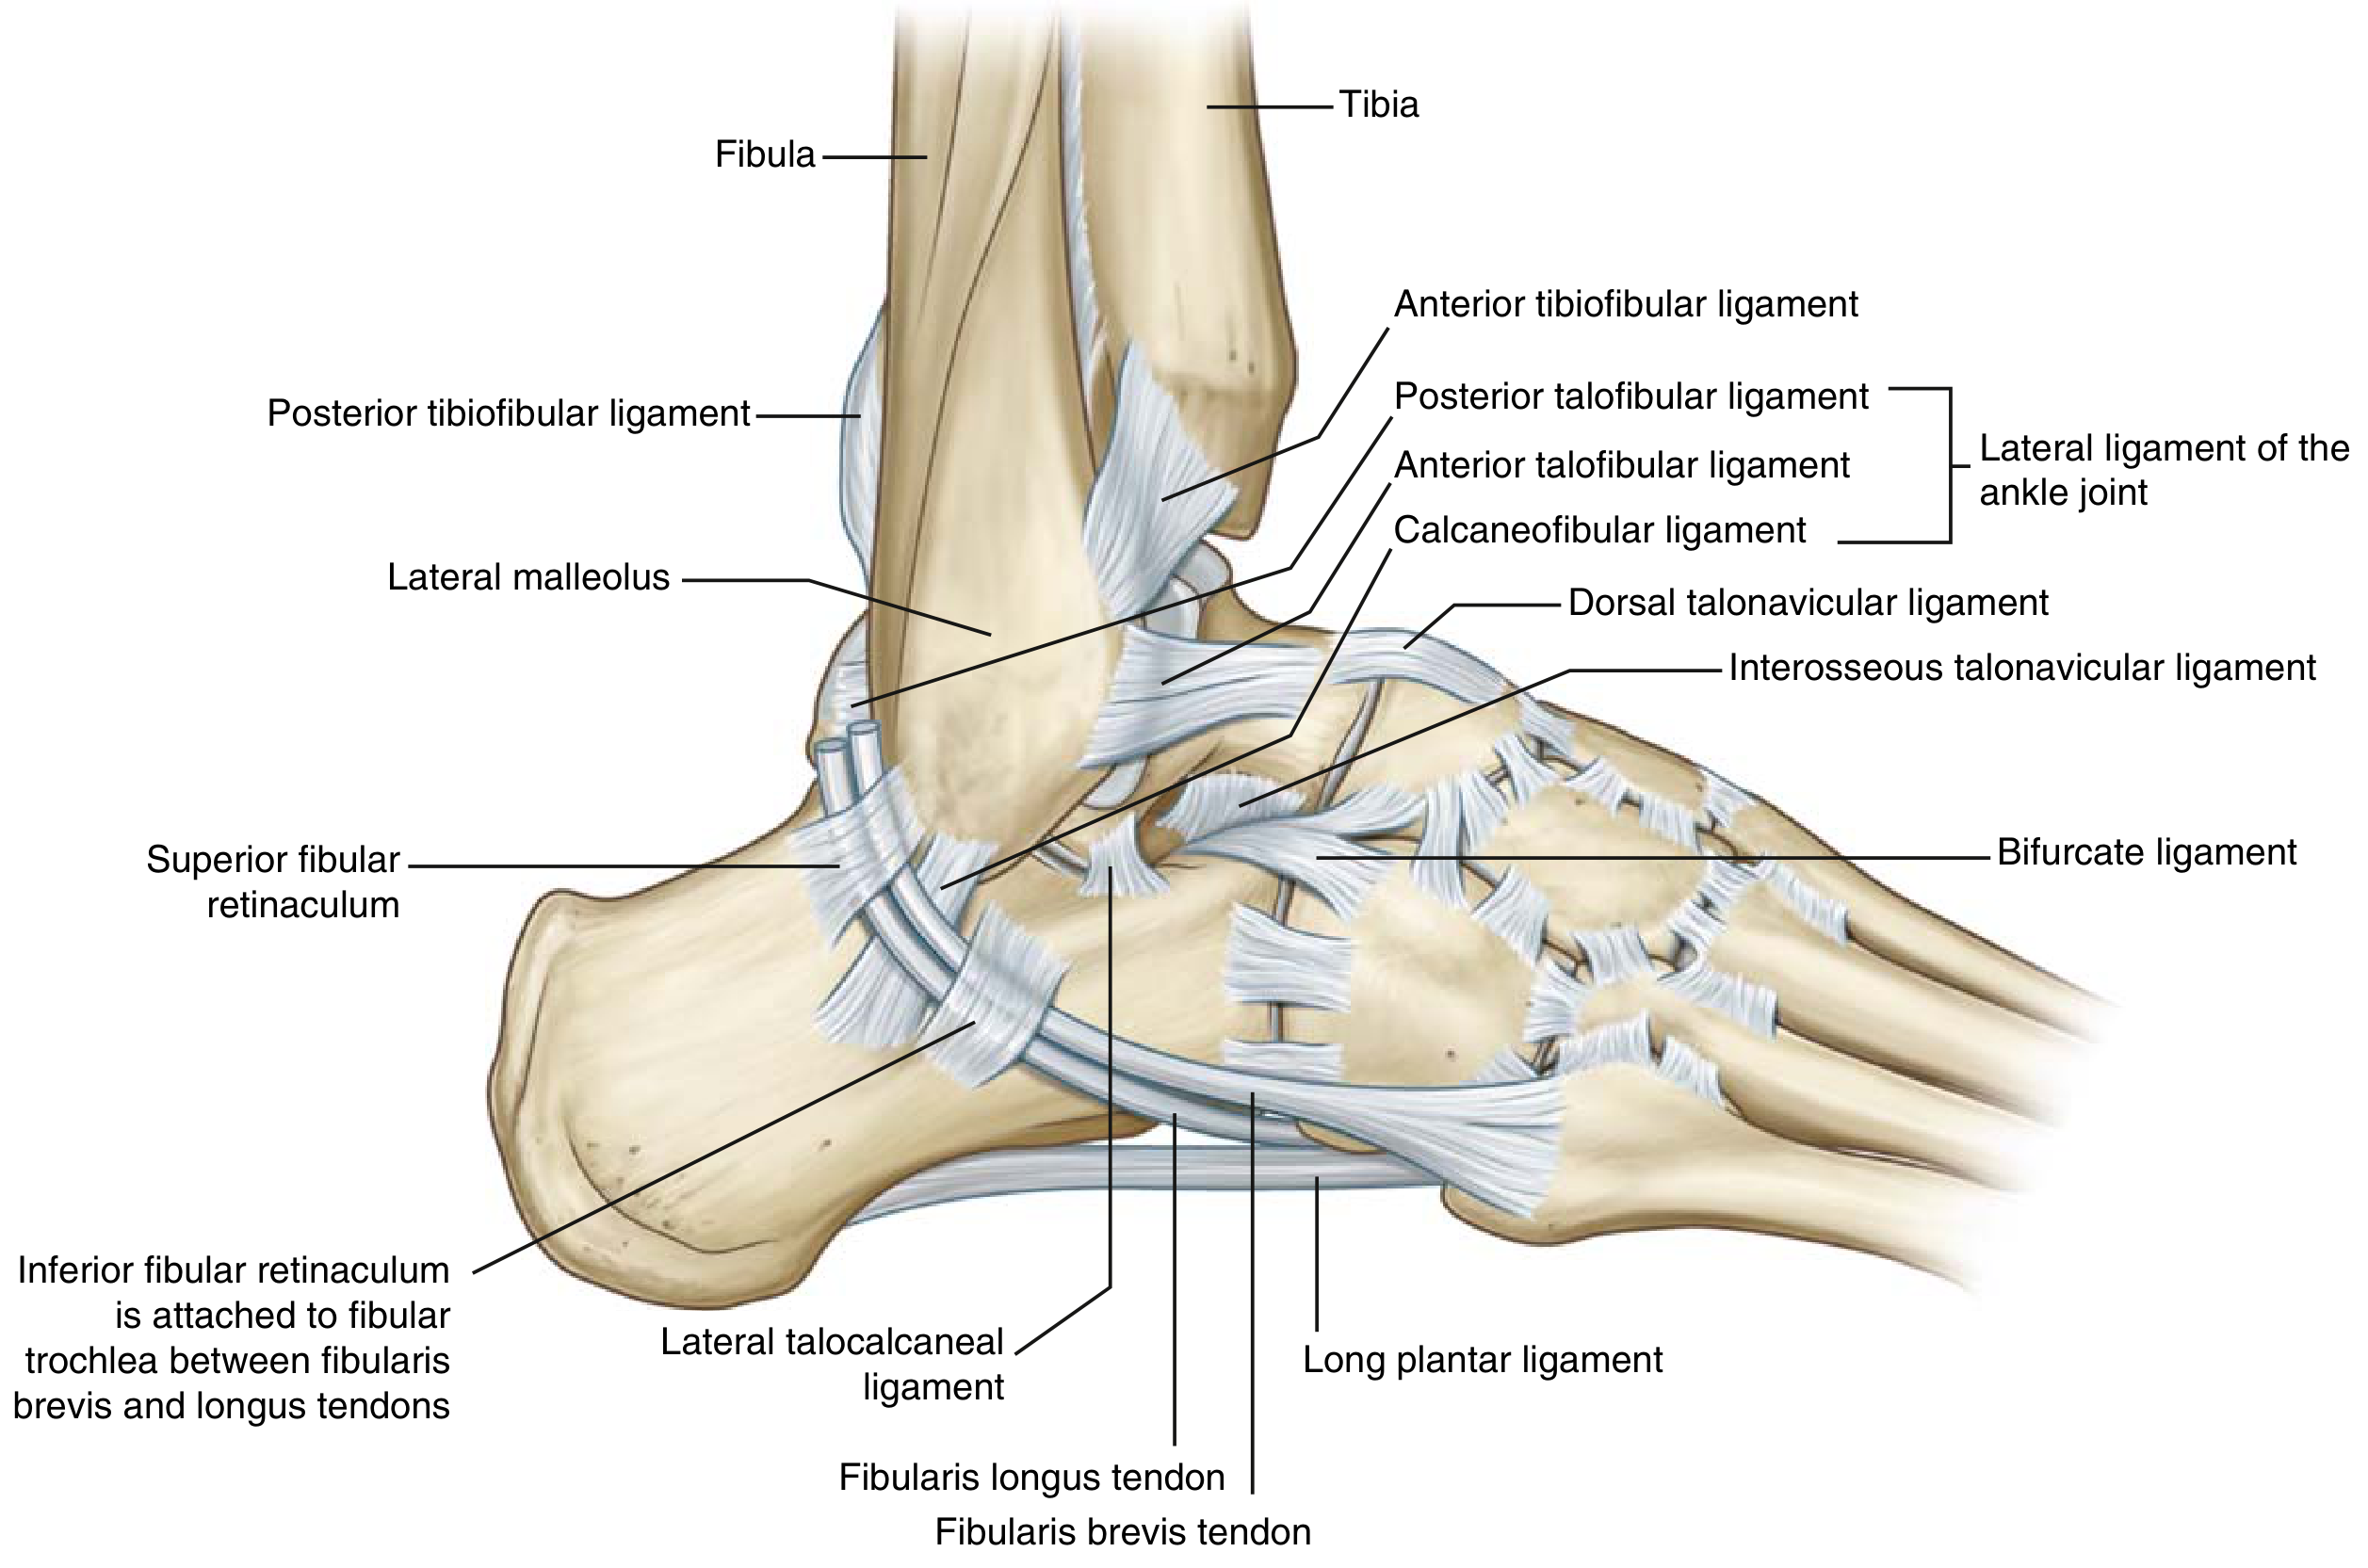
Three distinct ligaments - most commonly injured in ankle sprains:
| Ligament | Abbreviation | Course | Notes |
|---|
| Anterior talofibular ligament | ATFL | Fibular tip → talus | Weakest; intracapsular; most commonly torn; tightens in plantarflexion |
| Calcaneofibular ligament | CFL | Fibular tip → calcaneus | Crosses both ankle and subtalar joint; tightens with inversion in neutral |
| Posterior talofibular ligament | PTFL | Fibular tip → posterior talus | Strongest of the three; rarely torn |
Lateral ligaments of the ankle (lateral view) - from Miller's Review of Orthopaedics, Gray's Atlas
Clinical pearl: Position of the ankle determines which lateral ligament is stressed:
- Plantarflexion + inversion → stresses ATFL
- Neutral + inversion → stresses CFL
Source: Miller's Review of Orthopaedics, 9th Ed., p. 183-184
4. Subtalar Joint
The subtalar joint consists of talar plantar facets articulating with the calcaneus. Stability is derived from four ligaments:
- Medial ligament
- Lateral ligament
- Interosseous talocalcaneal ligament
- Cervical ligament
The sinus tarsi is the anatomical space bounded by the talus and calcaneus, recognizable as a soft-tissue depression anterior to the lateral malleolus. It contains fat, the extensor digitorum brevis muscle, and the interosseous ligament.
5. Key Intertarsal Ligaments
| Ligament | Common Name | Proximal Attachment | Distal Attachment |
|---|
| Interosseous talocalcaneal | Cervical | Talus | Calcaneus |
| Calcaneocuboid/calcaneonavicular | Bifurcate | Calcaneus | Cuboid + navicular |
| Plantar calcaneocuboid | Short plantar | Calcaneus | Cuboid |
| Calcaneocuboid-metatarsal | Long plantar | Calcaneus | Cuboid + 1st-5th metatarsals |
| Plantar calcaneonavicular | Spring ligament | Sustentaculum tali | Navicular |
| Tarsometatarsal | Lisfranc ligament | Medial cuneiform | 2nd metatarsal base |
The spring (plantar calcaneonavicular) ligament supports the head of the talus and the medial longitudinal arch. Its largest component is the superomedial calcaneonavicular ligament originating off the sustentaculum tali. It is attenuated in pes planus.
The Lisfranc ligament connects the medial cuneiform to the second metatarsal base; notably the first metatarsal has no direct ligamentous connection to the second metatarsal.
Source: Miller's Review of Orthopaedics, 9th Ed., p. 204-213
6. Muscles Acting on the Ankle
| Compartment | Muscle | Origin | Insertion | Action | Nerve |
|---|
| Anterior | Tibialis anterior | Lateral tibia | Medial cuneiform, 1st metatarsal | Dorsiflexion, inversion | Deep peroneal (L4) |
| Anterior | Extensor hallucis longus | Mid fibula | Great toe distal phalanx | Dorsiflexion, toe extension | Deep peroneal (L5) |
| Anterior | Extensor digitorum longus | Tibial condyle/fibula | Middle+distal phalanges | Dorsiflexion, toe extension | Deep peroneal (L5) |
| Anterior | Peroneus tertius | Fibula/EDL tendon | 5th metatarsal | Eversion, dorsiflexion | Deep peroneal (S1) |
| Lateral | Peroneus longus | Proximal fibula | Medial cuneiform, 1st metatarsal | Eversion, plantarflexion | Superficial peroneal (S1) |
| Lateral | Peroneus brevis | Distal fibula | Tuberosity 5th metatarsal | Eversion | Superficial peroneal (S1) |
| Posterior (superficial) | Gastrocnemius | Femoral condyles | Calcaneus (via Achilles) | Plantarflexion (knee extended) | Tibial (S1-S2) |
| Posterior (superficial) | Soleus | Proximal tibia/fibula | Calcaneus (via Achilles) | Plantarflexion | Tibial (S1-S2) |
| Posterior (deep) | Tibialis posterior | Tibia/fibula/IOM | Navicular + multiple | Plantarflexion, inversion | Tibial (L4-L5) |
| Posterior (deep) | Flexor hallucis longus | Posterior fibula | Great toe distal phalanx | Toe flexion, plantarflexion | Tibial (S2-S3) |
| Posterior (deep) | Flexor digitorum longus | Posterior tibia | Distal phalanges 2-5 | Toe flexion, plantarflexion | Tibial (L5-S1) |
Source: Miller's Review of Orthopaedics, 9th Ed., p. 194
7. Range of Motion
| Movement | Joint | Normal Range |
|---|
| Dorsiflexion | Talocrural | 10-20° |
| Plantarflexion | Talocrural | 40-50° |
| Inversion | Subtalar | ~5° |
| Eversion | Subtalar | ~5° |
| Adduction (midtarsal) | Midtarsal | ~20° |
| Abduction (midtarsal) | Midtarsal | ~10° |
Source: Bailey and Love's Short Practice of Surgery, 28th Ed., p. 518; S. Das Manual on Clinical Surgery
PART 2: CLINICAL EXAMINATION OF THE ANKLE JOINT
LOOK (Inspection)
With the patient standing:
-
Overall alignment - assess pelvic obliquity, leg-length discrepancy, valgus/varus at the knee, rotational alignment
-
Foot shape from all three planes:
- Front view: overall forefoot shape
- Lateral view: medial longitudinal arch (normal = visible arch), note pes planus (collapsed arch) or pes cavus (high arch)
- Posterior view: heel position; normal heel valgus is 5-7°; count toes visible from behind - the "too many toes" sign indicates forefoot abduction (pes planus)
-
Skin: look for bunions (medial MTP swelling/bursa), gouty tophi, thin fat pads (rheumatoid), corns, callositites, nail changes, ulcers, sinuses
-
Soft tissue swelling: indicates joint or soft tissue pathology
-
Muscle wasting: commonly on the dorsum of foot and between metatarsal heads (neurological cause)
-
Bony prominences/exostoses
Gait:
- High-stepping gait = foot drop (common peroneal nerve palsy)
- Antalgic gait = ankle/foot joint pain
- Short propulsive phase = forefoot pain
Footwear inspection:
- External: normal heel wear is posterolateral corner; circular wear under 1st MTP = toe-off
- Internal: insoles, arch supports, heel cups
Source: Bailey and Love's Short Practice of Surgery, 28th Ed., p. 516-517
FEEL (Palpation)
Soft tissues:
- Posterior tibial pulse (behind medial malleolus) and dorsalis pedis pulse (dorsum of foot, lateral to EHL tendon)
- Tibialis anterior tendon and long extensor tendons on the dorsum
- Achilles tendon from the back - feel for gaps (rupture), tenderness, swelling; identify Haglund's prominence posterolateral on calcaneus and retro-Achilles bursa
- Peroneal tendons from the lateral side
- Tibialis posterior tendon from the medial side
- Sinus tarsi - soft-tissue depression anterior to the lateral malleolus; tenderness here with subjective instability = sinus tarsi syndrome
Bones - systematic palpation:
- Ankle joint: medial and lateral malleoli, anterior and posterior joint line, lateral gutter and ligament complex, syndesmosis (front of ankle), medial gutter and deltoid ligament
- Subtalar joint: palpate each facet
- Midtarsal joints: talonavicular and calcaneocuboid joints
- Tarsometatarsal joints (TMTJ): note the 2nd TMTJ is several mm proximal to the others
- Calcaneus: most common cause of heel pain is plantar fasciitis - burning/electric shock pain worst in morning
- Sustentaculum tali: palpate one fingerbreadth below the medial malleolus (attachment of spring ligament)
- Head of talus: invert and evert the patient's foot while palpating
- Cuneiforms, MTPJs, web spaces
Source: Bailey and Love's Short Practice of Surgery, 28th Ed., p. 517; S. Das Manual on Clinical Surgery, p. 325
MOVE (Examination of Range of Motion)
Recall the two key acronyms:
- PAED = Pronation, Abduction, Eversion, Dorsiflexion
- SAPI = Supination, Adduction, Plantarflexion, Inversion
Ankle (Talocrural) Joint:
- Dorsiflexion (normal ~20°): test with knee both flexed and extended
- Restriction greater with knee extended = gastrocnemius contracture
- Equal restriction in all knee positions = soleus contracture
- Plantarflexion (normal ~15° touching floor): weakness suggests Achilles injury or S1 nerve root pathology
Subtalar Joint (normal 5° each direction):
- Hold the talar neck, ask the patient to move their heel side to side
- Apply varus/valgus stress while feeling for movement
- Holding the talus (not the tibia) isolates subtalar from ankle motion
- Inversion (foot towards body) and Eversion (foot away from body)
Midtarsal Joint:
- Hold heel with one hand, move forefoot medially (adduction = 20°) and laterally (abduction = 10°)
Tarsometatarsal Joint:
- Hold midfoot, manipulate each metatarsal up and down (passive range)
Metatarsophalangeal Joint:
- Extension: ask patient to lift toes to ceiling (normal 70-90°)
- Flexion: point toes to floor (normal 45°)
- Normal toe-off requires 35-40° of dorsiflexion
Source: Bailey and Love's Short Practice of Surgery, 28th Ed., p. 518; S. Das Manual on Clinical Surgery, p. 325
SPECIAL TESTS
1. Thompson / Simmonds Test (Achilles Tendon Integrity)
- Lie patient prone with calves resting over examiner's forearms
- Squeeze each calf in turn and watch for plantar flexion at ankle
- Lack of movement = Achilles tendon rupture
- Note: standing on tiptoes alone does NOT rule out rupture (long toe flexors can compensate)
Source: Bailey and Love's Short Practice of Surgery, 28th Ed., p. 519
2. Subtalar Joint Flexibility
Coleman Block Test:
- Patient stands on a 2-cm block with the great toe over the medial edge resting on the floor
- Observe hindfoot from behind
- Hindfoot varus persists → subtalar joint is fixed
- Hindfoot corrects to valgus → subtalar joint is mobile
Windlass Test (Flexible vs. Fixed Flat Foot):
- Ask patient to stand on their toes and observe medial arch
- Arch forms immediately on tiptoe = flexible flat foot
- Failure to form = fixed flat foot
Jack's Test:
- With patient standing, lift up the great toe
- Arch forms = flexible flat foot
Source: Bailey and Love's Short Practice of Surgery, 28th Ed., p. 519
3. Ankle Stability Tests
Anterior Drawer Test (ATFL integrity):
- Foot resting over the edge of the bed in slight plantarflexion
- One hand holds the heel; other hand holds the front of the tibia
- Draw the heel forwards on the fixed tibia
- Compare both sides - excessive anterior translation = ATFL insufficiency
Talar Tilt Test (CFL integrity):
- Hold the talus at the neck (not the heel) - this isolates the ankle from the subtalar joint
- Apply inversion stress
- Excessive tilt compared to opposite side = CFL +/- ATFL tear
Squeeze Test (Syndesmosis/Distal Tibiofibular Stability):
- Compress the proximal calf (at mid-leg level)
- Pain elicited at the ankle = disruption of the distal tibiofibular syndesmosis ("high-ankle sprain")
- Instability of the syndesmosis may also be palpable on the anterior drawer test
Source: Bailey and Love's Short Practice of Surgery, 28th Ed., p. 519-520
4. Tibialis Posterior Integrity Test
- Ask patient to perform a single-foot tiptoe test on both sides
- Inability to raise heel off the ground = tibialis posterior tendon injury/insufficiency
- To test strength: position foot in plantarflexed + inverted position; apply resistance
5. Tibialis Anterior Test
- Ask patient to walk on heels with feet inverted - tibialis anterior tendon becomes prominent
- Ask patient to dorsiflex and invert foot against resistance
- Foot drop (inability to dorsiflex) = stroke, spinal injury, spinal stenosis, L4-L5 disc prolapse, common/deep peroneal nerve injury, or peripheral neuropathy
6. Peroneal Tendons
- Peroneal tendon dislocation: attempt to dislocate tendons by dorsiflexing and everting the foot
- Peroneus longus: ask patient to plantar flex the first metatarsal; test with active/resisted eversion
7. Morton's Neuroma (Metatarsal Web Space)
- Palpate in the web space between 3rd and 4th toes for a mass
- Mulder's click: metatarsal compression may elicit an audible/palpable click between bones
SUMMARY BOX: Ankle and Foot Examination Checklist
| Step | Key Points |
|---|
| Look - standing | Alignment, foot shape (medial arch), heel valgus, too many toes sign |
| Look - posterior | Heel valgus/varus, Achilles tendon |
| Look - lateral | Medial longitudinal arch, pes planus/cavus |
| Gait | Foot drop, antalgic, short propulsive phase |
| Footwear | Wear pattern, supports |
| Feel - soft tissue | Pulses (DP + PT), tendons, sinus tarsi |
| Feel - bone | Malleoli, joint lines, syndesmosis, sustentaculum tali |
| Move - ankle | Dorsiflexion (knee flexed + extended), plantarflexion |
| Move - subtalar | Inversion 5°, eversion 5° |
| Move - midtarsal | Adduction 20°, abduction 10° |
| Special - Achilles | Thompson/Simmonds test |
| Special - stability | Anterior drawer (ATFL), talar tilt (CFL), squeeze test (syndesmosis) |
| Special - flat foot | Windlass test, Jack's test, Coleman block test |
| Special - tibialis posterior | Single heel raise test |
Sources: Bailey and Love's Short Practice of Surgery, 28th Ed., p. 516-521; Miller's Review of Orthopaedics, 9th Ed., p. 193-213; S. Das Manual on Clinical Surgery, 13th Ed., p. 325; General Anatomy and Musculoskeletal System (Thieme Atlas), p. 483