
Enumerate all approaches to proximal tibia with skin incision planes in detail
proximal tibia surgical approaches skin incision
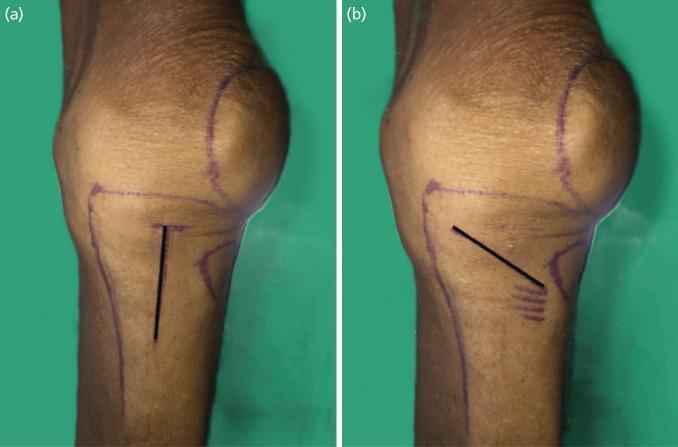
Two side-by-side clinical photographs (a and b) of a cadaveric knee and proximal lower leg, illustrating surgical incision landmarks for orthopedic procedures. The skin surface is marked with purple ink outlining the patella, joint line, and the proximal tibia. In image (a), a vertical black line represents a 5cm longitudinal incision located centrally between the medial tibial tuberosity and the medial aspect of the tibia, beginning approximately 1cm distal to the joint line. In image (b), an oblique black line represents a 5cm diagonal incision extending from a point superior to the pes anserinus insertion toward the most medial point of the knee joint. These images are used in surgical anatomy studies to compare different surgical approaches and their proximity to vulnerable structures such as the infrapatellar branch of the saphenous nerve (IPBSN). The comparison demonstrates vertical versus oblique incision orientations relative to palpable bony landmarks and the joint space.
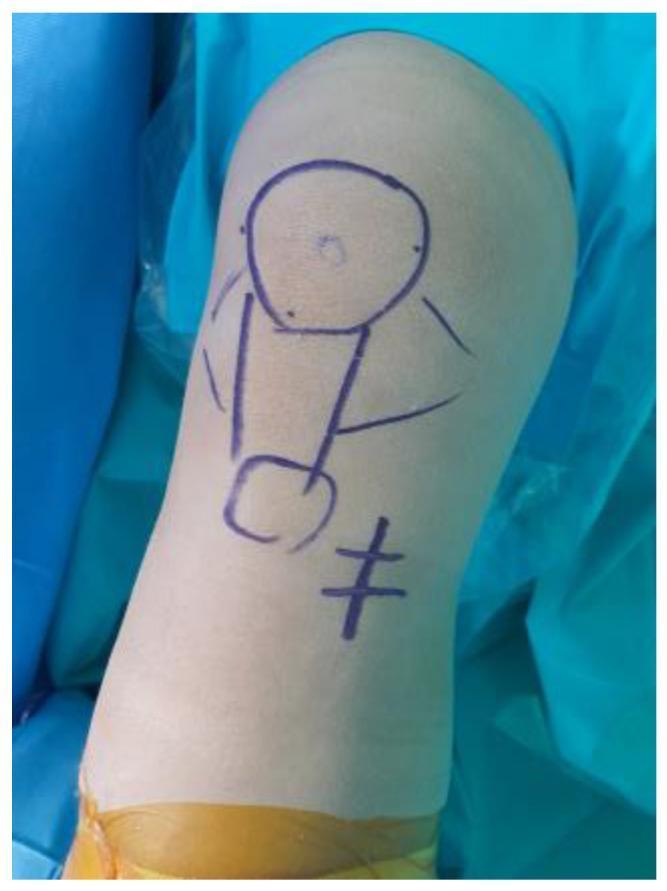
A clinical photograph displaying the anterior aspect of a human knee prepared for orthopedic surgery. The image shows surgical site markings in blue ink on the skin, outlining anatomical landmarks and intended incision sites. Key markings include a circle over the patella, vertical and oblique lines indicating surgical portals or approaches, and markings over the anteromedial aspect of the proximal tibia, consistent with preparation for a medial meniscus posterior root tear (MMPRT) repair or superficial medial collateral ligament (sMCL) release. The limb is draped with blue sterile surgical material, and a yellow elastic tourniquet or wrap is visible at the distal aspect near the ankle. The skin appears healthy with no visible pre-existing lesions. This visual serves as an educational example of pre-operative planning and landmark identification in orthopedic sports medicine, specifically for procedures involving the tibial plateau and medial meniscus.
tibial plateau surgical approaches anterolateral posteromedial posterolateral
Approaches to the Proximal Tibia - Complete Enumeration
1. Anterolateral Approach to the Lateral Tibial Plateau
- Begin 2-3 cm proximal to the joint line, in line with the lateral femoral epicondyle.
- Carry the incision obliquely distally, crossing the midpoint of Gerdy's tubercle.
- As the tibial crest is approached, keep the incision 1-2 cm lateral to stay over the anterior compartment musculature (not over the crest itself).
- Optional: S-shaped or hockey-stick modification proximally.
- Incise the iliotibial band in line with the skin incision; detach it anterior and posterior from Gerdy's tubercle.
- Develop the interval between the ITB and the joint capsule.
- Reflect the origin of the anterior compartment musculature (tibialis anterior) from the anterolateral tibia posteriorly.
- For articular exposure: perform a submeniscal arthrotomy - incise the meniscotibial (coronary) ligament immediately off its tibial insertion. Carry it posteriorly as far as the fibula (avoiding the LCL), and anteriorly as far as the lateral tibial tubercle, leaving the anterior horn origin intact.
- Place 3-4 retraction sutures in the lateral meniscal periphery.
- Campbell's Operative Orthopaedics 15th Ed, Technique 1.32
- Rockwood and Green's 10th Ed, p. 3137
2. Medial Approach to the Medial Tibial Plateau
- Begin 1-2 cm proximal to the joint line, in line with the medial femoral epicondyle.
- Extend distally over the pes anserinus insertion (bisecting the posteromedial border of the tibia and tibial crest - Line A in the figure below).
- Avoid the saphenous vein and saphenous nerve, which run posteriorly to the incision.
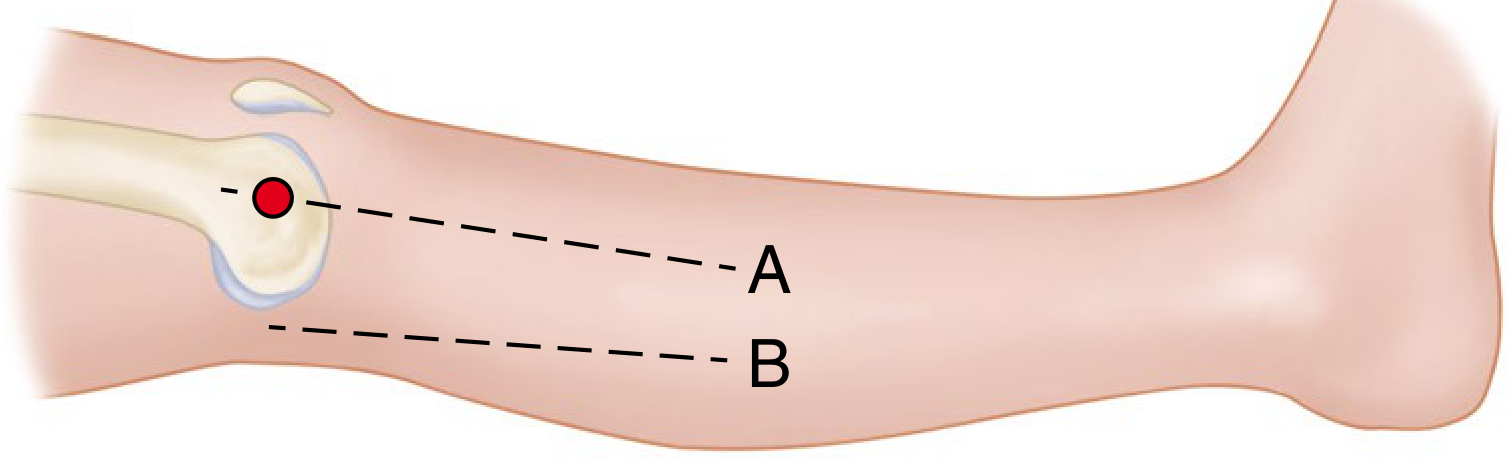
- Take down the pes anserinus tendons (sartorius, gracilis, semitendinosus) sharply from the tibia, or retract them.
- Expose the superficial medial collateral ligament.
- Apply plate directly over the medial collateral ligaments.
3. Posteromedial Approach to the Medial Tibial Plateau - Supine
- Longitudinal incision along the posteromedial border of the tibia (Line B in figure above).
- Begin 3 cm above the joint line; extend as far distally as needed.
- Avoid the saphenous vein and nerve, which lie anterior to this incision.
- Mobilize and retract or incise the pes anserinus tendons (proximally/anteriorly or distally/posteriorly).
- Retract the medial gastrocnemius and soleus posteriorly.
- Expose the junction of popliteal fascia, semimembranosus muscle, and posterior capsule.
- Incise the periosteum longitudinally and subperiosteally elevate the popliteus muscle insertion off the posterior tibia.
4. Posteromedial Approach - Prone (Banks and Laufman)
- Hockey-stick incision: Begin the transverse limb at the lateral end of the popliteal flexion crease, extend it transversely across the popliteal space, then turn the incision distally along the medial side of the calf for 7-10 cm.
- This creates an angular flap of skin and subcutaneous tissue.
- Incise deep fascia in line with the skin incision; identify and protect cutaneous nerves and superficial vessels.
- Define the interval between the semitendinosus tendon (medially) and the medial head of gastrocnemius (laterally).
- Retract semitendinosus proximally and medially; retract gastrocsoleus distally and laterally.
- Popliteus and flexor digitorum longus lie in the floor of this interval.
- Subperiosteally elevate FDL distally/laterally and popliteus proximally/medially.
- Exposes the posterior surface of the proximal fourth of the tibia.
- Further popliteus elevation exposes the posterior cruciate ligament fossa.
5. Lobenhoffer Posteromedial Approach (Galla and Lobenhoffer)
- Straight 6-8 cm longitudinal incision along the medial border of the medial head of the gastrocnemius muscle, beginning at the level of the joint line.
- Incise subcutaneous tissue and popliteal fascia sharply.
- Free the medial border of the medial gastrocnemius head (without detaching it); retract it laterally.
- Bluntly dissect and retract the semimembranosus complex medially.
- The interval is between semimembranosus (medial) and medial gastrocnemius (lateral) - neurovascular bundle lies deep in the midline and is not entered.
- Find the upper edge of the popliteus muscle and detach it subperiosteally.
- Exposes the posteromedial tibial plateau.
- If more exposure needed: incise the tibial insertion of semimembranosus subperiosteally.
6. Posterolateral Approach to the Tibial Plateau - With Fibular Osteotomy
- 6-cm longitudinal incision anterior to the biceps femoris tendon contour on the fibular head.
- Can be extended distally as needed.
- Incise subcutaneous fat and deep fascia over biceps tendon; incise fascia lata over biceps tendon and common peroneal nerve.
- Identify the common peroneal nerve in the adipose tissue of the popliteal fossa - this is the key protection step.
- Release CPN from the posterior intermuscular septum, posterior to peroneus longus, as it enters the lateral compartment.
- Expose the deep peroneal nerve by detaching peroneus longus and tibialis anterior from both aspects of the anterior intermuscular septum.
- Release the deep peroneal nerve as it enters the anterior compartment.
- Predrill the fibular head and neck just lateral to biceps femoris insertion; osteotomize the fibular neck with osteotome just above the peroneal nerve.
- Release capsule from proximal tibiofibular joint; reflect the fibular head proximally with attached biceps femoris tendon and LCL complex.
- Mobilize the lateral meniscus by detaching the coronary ligament from PCL to ITB.
- At closure: repair osteotomy with a longitudinal lag screw (or a one-third or full fibular head excision if needed, leaving biceps/LCL intact).
7. Posterolateral Approach - Without Fibular Osteotomy
- 15-cm posterolateral incision, starting 3 cm above the joint line, then following the fibula distally.
- Incise the posterior part of the iliotibial band from Gerdy's tubercle and perform a lateral arthrotomy.
- Bluntly dissect into the popliteal fossa between the lateral origin of the gastrocnemius and the soleus muscle, exposing the popliteus.
- Ligate the inferior geniculate vessels if necessary.
- Develop the interval between biceps femoris (anterolaterally) and popliteus (posteromedially) - this is the key internervous plane.
- Detach the soleus muscle from the posterior aspect of the fibula.
- Exposes the posterolateral plateau directly.
8. Tscherne-Johnson Extensile Approach to the Lateral Tibial Plateau
- Lateral parapatellar incision from the supracondylar area of the distal femur to below and lateral to the tibial tubercle.
- Develop a lateral full-thickness myocutaneous flap; reflect the ITB from Gerdy's tubercle.
- Flex the knee to 40 degrees; incise the middle part of the ITB distally from 4 cm above the joint line to the joint line, then continue anteriorly dividing the anterior half of the band to the patellar tendon.
- Incise the meniscal coronary ligament from posterior to anterior, ending at the patellar tendon; elevate the lateral meniscus with 3 absorbable sutures.
- Incise the origin of tibialis anterior along the lateral tibial metaphyseal flare, elevate it distally.
- Perform two osteotomies (anterior and distal to Gerdy's tubercle with a narrow osteotome at 90 degrees to each other).
- Rotate the Gerdy's tubercle fragment posteriorly on its posterior soft-tissue hinge to expose the undersurface of the lateral plateau.
- At closure: repair osteotomy with an overlying plate and screws.
9. Anterolateral Approach to the Tibial Shaft (Proximal Portion)
- Longitudinal incision 1-2 cm lateral to the anterior border of the tibia (tibial crest). This ensures adequate soft-tissue bridge over the bone.
- Sharply incise the fascia the entire length of the wound, approximately 1 cm lateral to the tibial crest.
- Elevate the anterior compartment musculature from the lateral face of the tibia.
- Incise and elevate periosteum over desired area (strip as little as possible - periosteal circulation is a nutritional source for bone).
10. Posteromedial Approach to the Tibial Shaft (Phemister Medial Approach)
- Longitudinal incision along the posteromedial border of the tibia.
- Protect the saphenous nerve and vein.
- This is a continuation distally of the posteromedial plateau approach.
11. Intramedullary Nailing Approaches (for Proximal Tibia IM Nailing)
a. Medial Parapatellar (Infrapatellar)
- Incision: Centered at the midpoint of the patella, running distally approximately the length of the patella, placed 1 cm medial to center.
- Plane: Through skin down to identify the medial border of the patella; longitudinal incision along its medial border into the fat pad (extra-articular). Stay out of the knee joint.
- Issue: Patella and patellar tendon tend to push the starting wire too medially - overly medial start causes valgus deformity in proximal fractures.
b. Lateral Parapatellar (Infrapatellar)
- Incision: Same as above but centered 1 cm lateral to midline.
- Plane: Same principle, lateral border of patella; used when anatomy makes ideal start point more accessible laterally, or for proximal fractures.
c. Patellar Tendon Split (Infrapatellar)
- Incision: Midline, at midpoint of patella, running distally.
- Plane: Longitudinal split directly in the patellar tendon. Allows more central and lateral starting point than medial parapatellar.
- Issue: The tendon cannot be translated away from the wire, so the wire may angle posteriorly.
d. Suprapatellar Approach
- Position: Knee in semiextended position (preferred for proximal tibia fractures as it reduces extension deformity of the proximal fragment).
- Incision: Superior to the patella, through the quadriceps tendon or just above the superior pole of the patella.
- Plane: Enters the suprapatellar pouch/patellofemoral joint; allows near-straight access to the tibial canal without flexing the knee.
- Advantage: Decreased malalignment rates compared to hyperflexed infrapatellar approaches; reduced fluoroscopic time.
- Concern: Potential patellofemoral cartilage damage (long-term data still emerging).
Summary Table
| Approach | Incision | Interval / Plane | Key Indication |
|---|---|---|---|
| Anterolateral (lateral plateau) | Oblique, proximal to Gerdy's tubercle distally to 1-2 cm lateral to tibial crest | ITB/joint capsule; anterior compartment off tibia; submeniscal arthrotomy | Lateral plateau fractures (most common) |
| Medial (medial plateau) | Longitudinal, medial epicondyle to pes anserinus | Pes anserinus tendons retracted; over sMCL | Medial plateau fractures |
| Posteromedial - supine | Longitudinal along posteromedial border, 3 cm above joint line | Pes anserinus retracted; popliteus subperiosteal elevation | Posteromedial shear fractures |
| Posteromedial - prone (Banks & Laufman) | Hockey-stick: transverse across popliteal fossa + distal along medial calf | Between semitendinosus and medial gastrocnemius | Superomedial tibial access |
| Lobenhoffer posteromedial | 6-8 cm longitudinal along medial gastrocnemius border, at joint line | Between semimembranosus (med) and medial gastrocnemius (lat) | Posteromedial split fragments; no NV dissection |
| Posterolateral with fibular osteotomy (Solomon) | 6 cm, anterior to biceps femoris on fibular head | ITB/biceps; CPN protection; fibular head osteotomy | Posterolateral plateau with fibular head osteotomy |
| Posterolateral without fibular osteotomy (Frosch) | 15 cm posterolateral, 3 cm above joint line, following fibula | Between lateral gastrocnemius/soleus and biceps/popliteus | Posterolateral plateau; avoids fibular osteotomy |
| Tscherne-Johnson extensile | Lateral parapatellar, supracondylar to below tibial tubercle | ITB/Gerdy's osteotomy; submeniscal; tibialis anterior elevated | Depressed lateral plateau (maximum exposure) |
| Anterolateral shaft | Longitudinal, 1-2 cm lateral to tibial crest | Anterior compartment off lateral tibial face | Tibial shaft plating |
| Posteromedial shaft (Phemister) | Longitudinal, posteromedial border | Saphenous NV protected; posterior tibial surface | Nonunion bone grafting |
| IM nail - infrapatellar (3 variants) | Midline or 1 cm medial/lateral at patella midpoint | Medial/lateral parapatellar or tendon split into fat pad | IM nailing of tibia |
| IM nail - suprapatellar | Above patella, through quadriceps tendon | Enters patellofemoral joint/suprapatellar pouch | Proximal tibia fractures; semiextended position |
- Campbell's Operative Orthopaedics 15th Ed 2026, Techniques 1.29, 1.30, 1.32-1.39 (pp. 43-50)
- Rockwood and Green's Fractures in Adults 10th Ed 2025, Chapter 62-63 (pp. 3137, 3191)
.
Continue
Continuing from the Previous Answer...
12. Anterolateral Approach to the Knee (Kocher Approach)
- Begin 7.5 cm proximal to the patella, at the insertion of the vastus lateralis into the quadriceps tendon.
- Continue distally along the lateral border of the quadriceps tendon, the lateral border of the patella, and the lateral border of the patellar tendon.
- End 2.5 cm distal to the tibial tuberosity.
- Deepen through the lateral joint capsule.
- Retract the patella medially (with tendons attached) to expose the articular surface.
- Avoid the anterior horn of the lateral meniscus.
13. Posteromedial Approach to the Knee (Henderson Approach)
- Curved incision, slightly convex anteriorly, approximately 7.5 cm long.
- Begins distally from the adductor tubercle.
- Follows the course of the tibial collateral ligament, anterior to the relaxed tendons of semimembranosus, semitendinosus, sartorius, and gracilis.
- Expose and incise the oblique part of the tibial collateral ligament.
- Incise the capsule longitudinally posterior to the tibial collateral ligament to enter the posteromedial compartment.
- Retract the hamstring tendons posteriorly.
14. Medial Approach to the Knee - Cave Approach
- Begin 1 cm posterior to and at the level of the medial femoral epicondyle, approximately 1 cm proximal to the joint line.
- Carry the incision distally and anteriorly in a curve to a point 0.5 cm distal to the joint line, ending anterior to the patellar tendon border.
- This is a single, curved skin incision.
- Anterior compartment: Incision begins anterior to the tibial collateral ligament, continues distally/anteriorly mirroring the skin incision curve, ending just distal to the joint line.
- Posterior compartment: Second deep incision posterior to the tibial collateral ligament, from the level of the femoral epicondyle, straight distally across the joint line.
15. Medial Approach to the Knee - Hoppenfeld and DeBoer
- Longitudinal incision along the medial aspect of the knee, from just above the joint line to just below it, centered over the medial tibial plateau region.
- Through subcutaneous tissue to the medial retinaculum and capsule.
- Opens the medial compartment through a longitudinal capsular incision.
16. Direct Posterior Approach to the Knee (Brackett-Osgood-Putti-Abbott)
- Curvilinear incision, 10-15 cm long, over the popliteal space.
- The proximal limb follows the tendon of the semitendinosus distally to the level of the joint.
- Curve laterally across the posterior aspect of the joint for about 5 cm.
- Continue distally over the lateral head of the gastrocnemius muscle.
- This creates a lazy-S or sigmoid shape across the popliteal fossa.
- Reflect skin and subcutaneous tissue; expose the popliteal fascia.
- Identify the posterior cutaneous nerve of the calf (medial sural cutaneous nerve) lying beneath the fascia between the two heads of the gastrocnemius - this is the key anatomical landmark for the dissection.
- Lateral to it, the short saphenous vein perforates the popliteal fascia.
- Trace the medial sural cutaneous nerve proximally to the tibial nerve; define the sciatic nerve and its division (tibial and common peroneal).
- Identify the medial head of the gastrocnemius; divide its tendon of origin to expose the joint capsule.
- If further exposure needed: the lateral head can also be divided.
17. Extensile Anterior Approach (Fernandez)
- Lateral parapatellar incision beginning 10 cm proximal to the lateral joint line.
- Continue distally along the lateral border of the patella, patellar tendon, and tibial tuberosity.
- End 15 cm distal to the lateral joint line.
- This is a long, straight lateral parapatellar incision.
- Develop full-thickness skin flaps in the subcutaneous plane: medially to the anterior edge of the tibial collateral ligament; laterally exposing the ITB and proximal origins of tibialis anterior and peroneal muscles.
- To expose the lateral tibial metaphysis: detach tibialis anterior and retract distally + elevate ITB by transverse division at the joint line OR flat osteotomy of Gerdy's tubercle.
- For posteromedial metaphysis: divide pes anserinus tibial insertion or elevate as an osteoperiosteal flap.
- Tibial tuberosity osteotomy (trapezoidal, 5 cm long, 2 cm wide proximally, 1.5 cm wide distally): elevate the tibial tuberosity + patellar tendon; incise joint capsule transversely medially and laterally at the joint line; carry each limb proximally to the level of vastus medialis and lateralis.
- If further articular exposure needed: detach menisci by transecting the anterior horn, cutting the transverse ligament, and dividing the anterior coronary ligament; elevate with stay sutures.
- Closure: repair menisci, coronary and transverse ligaments (2-0 non-absorbable); reattach Gerdy's tubercle with lag screw; fix tibial tuberosity osteotomy with lag screws engaging the posterior cortex.
18. Dual/Two-Incision Approach for Bicondylar Tibial Plateau Fractures
- First (posteromedial) incision - performed as described above (Lobenhoffer/posteromedial supine approach): reduce and fix the medial condylar segment, effectively converting the injury to a unicondylar pattern.
- Second (anterolateral) incision - anterolateral approach for lateral condyle fixation with a precontoured proximal tibial plate, whose proximal fixation also captures the medial condylar segment.
Important Soft-Tissue and Anatomical Considerations Across All Approaches
| Region | Structures at Risk | Protective Strategy |
|---|---|---|
| Medial | Saphenous nerve and vein (anteromedial to posteromedial incision) | Stay posterior to saphenous vein; protect before any retraction |
| Posteromedial | Tibial nerve, posterior tibial artery (beneath soleus) | Stay superficial to soleus; do not enter deep to it without direct visualization |
| Posterolateral | Common peroneal nerve (wraps around fibular neck) | Identify and loop it before any lateral/posterolateral deep dissection; release from intermuscular septum |
| Posterior (popliteal) | Popliteal artery and vein, tibial nerve, common peroneal nerve | Use medial sural cutaneous nerve as dissection guide; stay between gastrocnemius heads initially |
| Anterolateral | Lateral meniscus (submeniscal arthrotomy) | Place stay sutures in meniscal periphery; leave anterior horn intact |
| Skin bridge (dual approach) | Devascularization between two incisions | Plan incisions preoperatively; maintain minimum 6-7 cm bridge |
- Campbell's Operative Orthopaedics 15th Ed 2026, Techniques 1.44, 1.46, 1.47, 1.48, 1.53, 1.54, 59.14
- Rockwood and Green's Fractures in Adults 10th Ed 2025, Chapter 62