Ear examination..upto tympanic membrane and otoscopy examination
Ear examination..upto tympanic membrane and otoscopy examination with images
Reading File
Finding Sources
Finding Sources
Searching the Web
ear examination otoscopy tympanic membrane anatomy clinical technique
Reading File
Reading File
Reading File
Loading Image
Loading Image
Loading Image
Loading Image
Loading Image
Reading File
Loading Image
Reading File
Reading File
Loading Image
Loading Image
Reading File
Loading Image
Loading Image
I now have all the content and images needed. Here is the comprehensive response:
Ear Examination: Up to the Tympanic Membrane and Otoscopy
1. Instruments Required
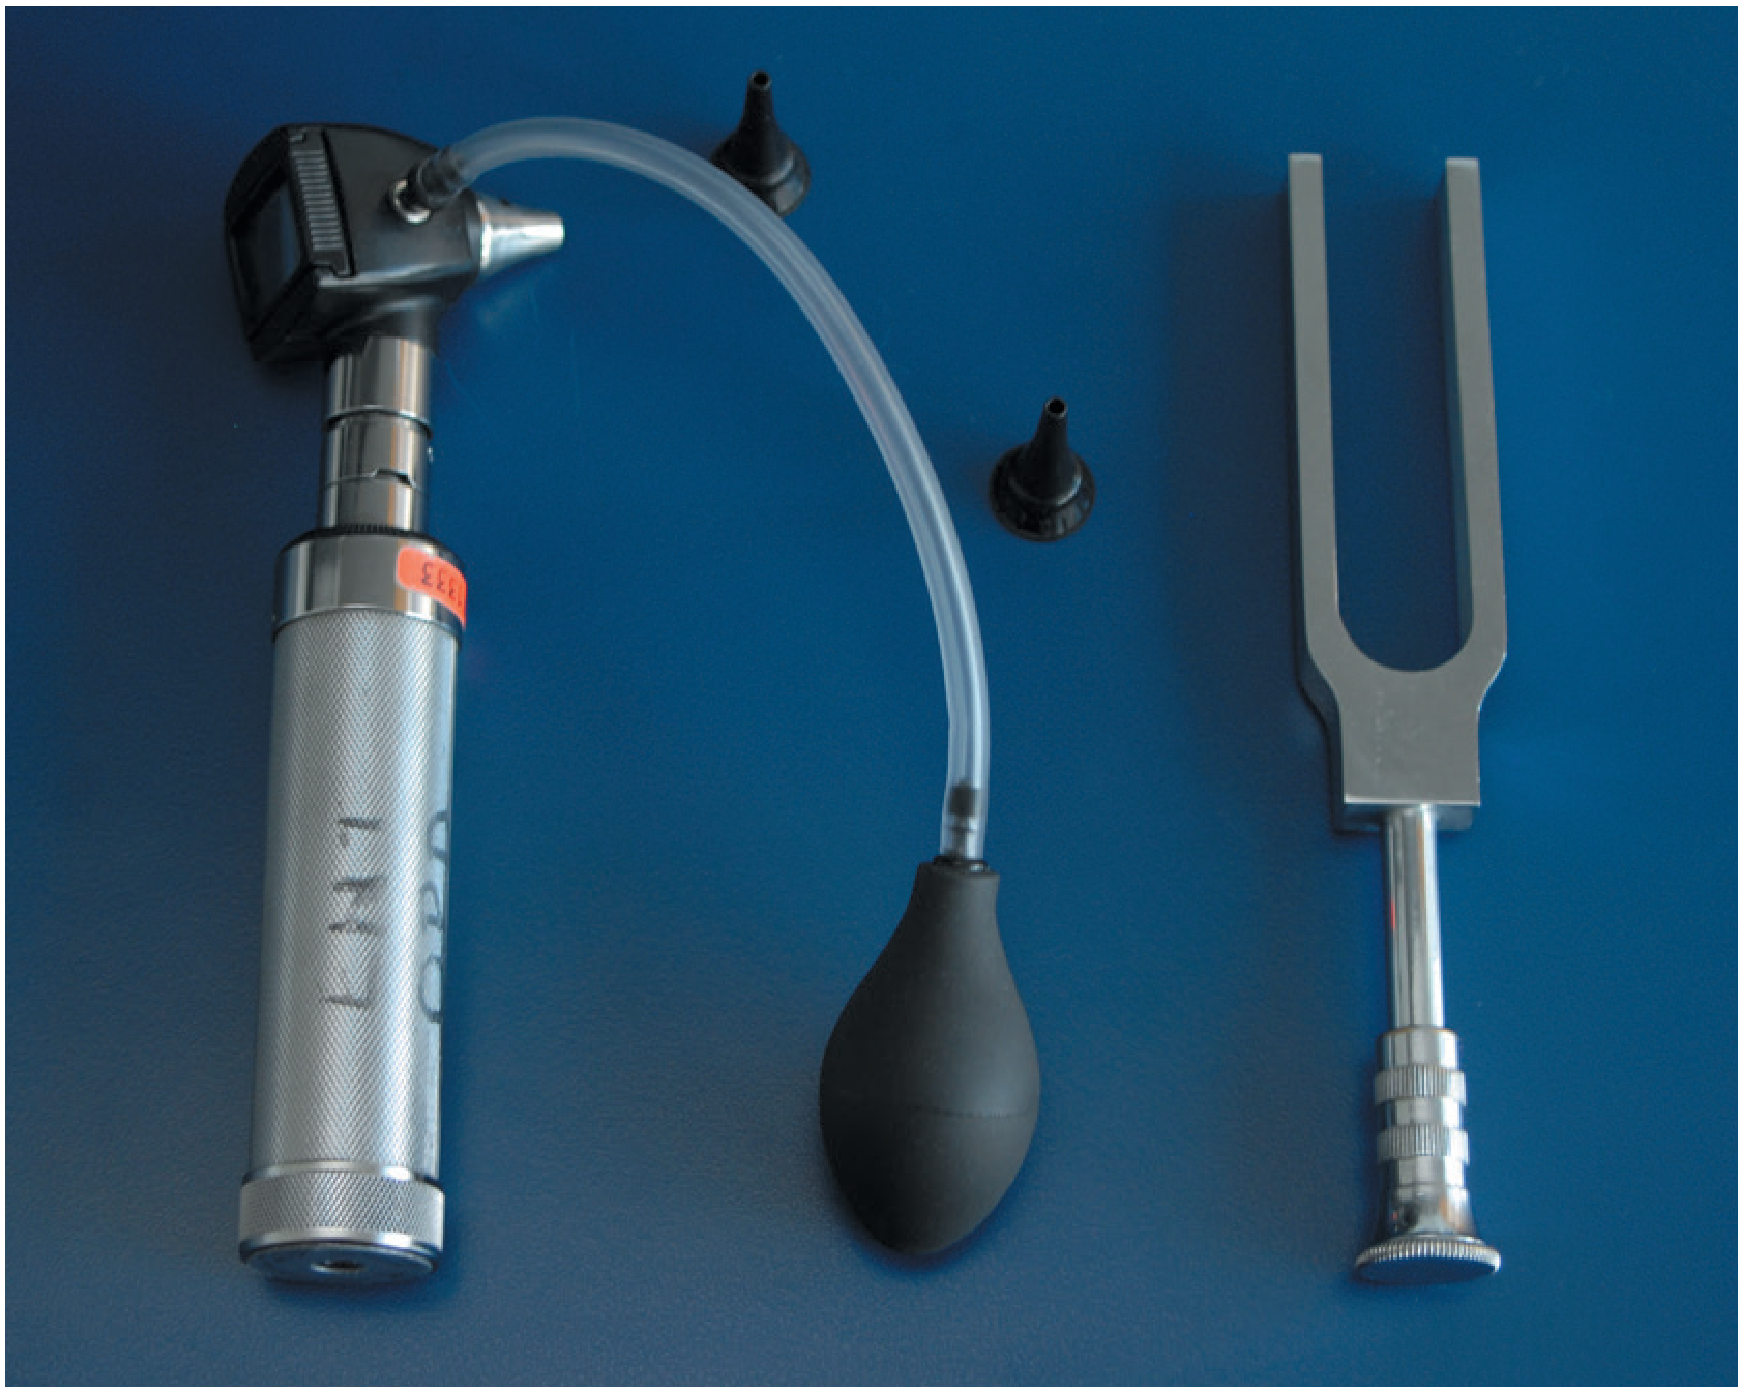
The standard instruments used for ear examination include:
- Hand-held otoscope (auriscope) - with a light source, magnifying lens, and specula of varying sizes
- Operating otoscope - lens can be moved to allow instrumentation of the canal
- Pneumatic otoscope - with insufflating bulb to assess TM mobility
- Binocular otomicroscope - for specialist examination (gives stereovision, depth perception)
- 512 Hz tuning fork - for Rinne and Weber tests
- 4 mm rigid endoscope - can substitute for speculum, allows angling into attic
2. Anatomy: The External Ear and Canal
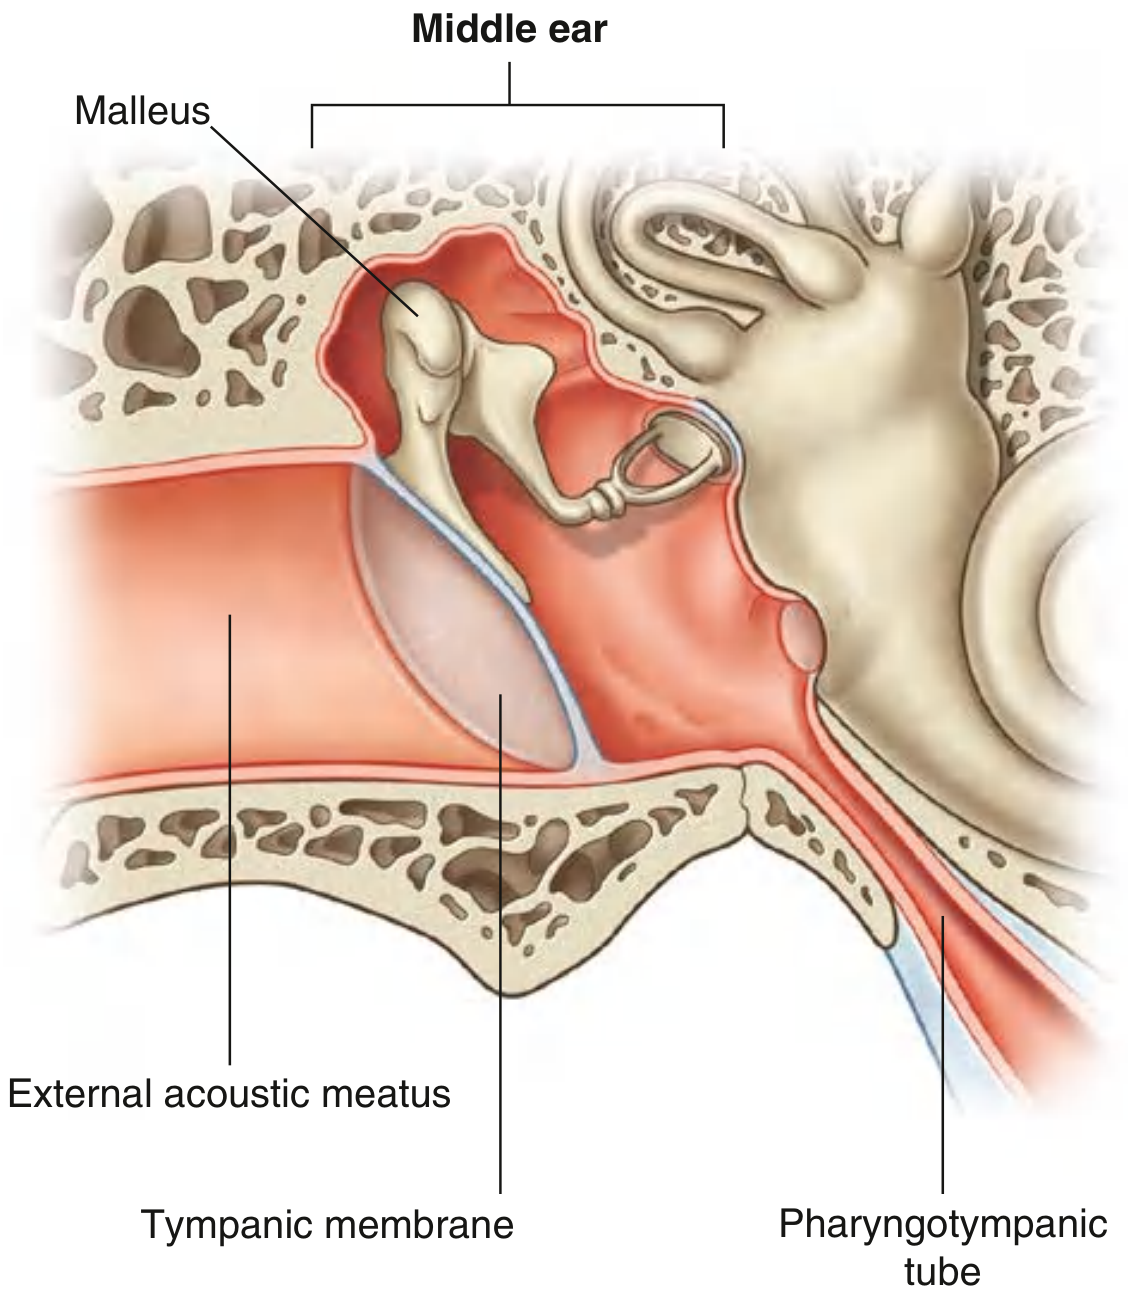
External Auditory Canal (EAC)
- Runs in a sigmoid (S-shaped) fashion - this is why pinna traction is needed to straighten it
- Outer 1/3: cartilaginous - contains hair follicles, cerumen glands (modified apocrine), sebaceous glands
- Inner 2/3: bony (tympanic and squamous parts of temporal bone)
- Length: approximately 2.5 cm in adults
- Innervation (sensory):
- Anterior/superior wall: auriculotemporal nerve (V3 branch)
- Posterior/inferior wall: auricular branch of vagus nerve (CN X) - explains referred otalgia from throat/larynx
- Minor contribution from facial nerve (CN VII)
3. Anatomy: The Tympanic Membrane
Structure
The tympanic membrane (TM) separates the EAC from the middle ear. It is:
- Oriented obliquely - slopes medially from top to bottom and posteriorly to anteriorly; the lateral surface faces inferiorly and anteriorly
- Layers (3): skin (lateral) + fibrous connective tissue core + mucous membrane (medial/middle ear side)
- Attached to the tympanic part of the temporal bone by a fibrocartilaginous annulus (fibrous annulus)
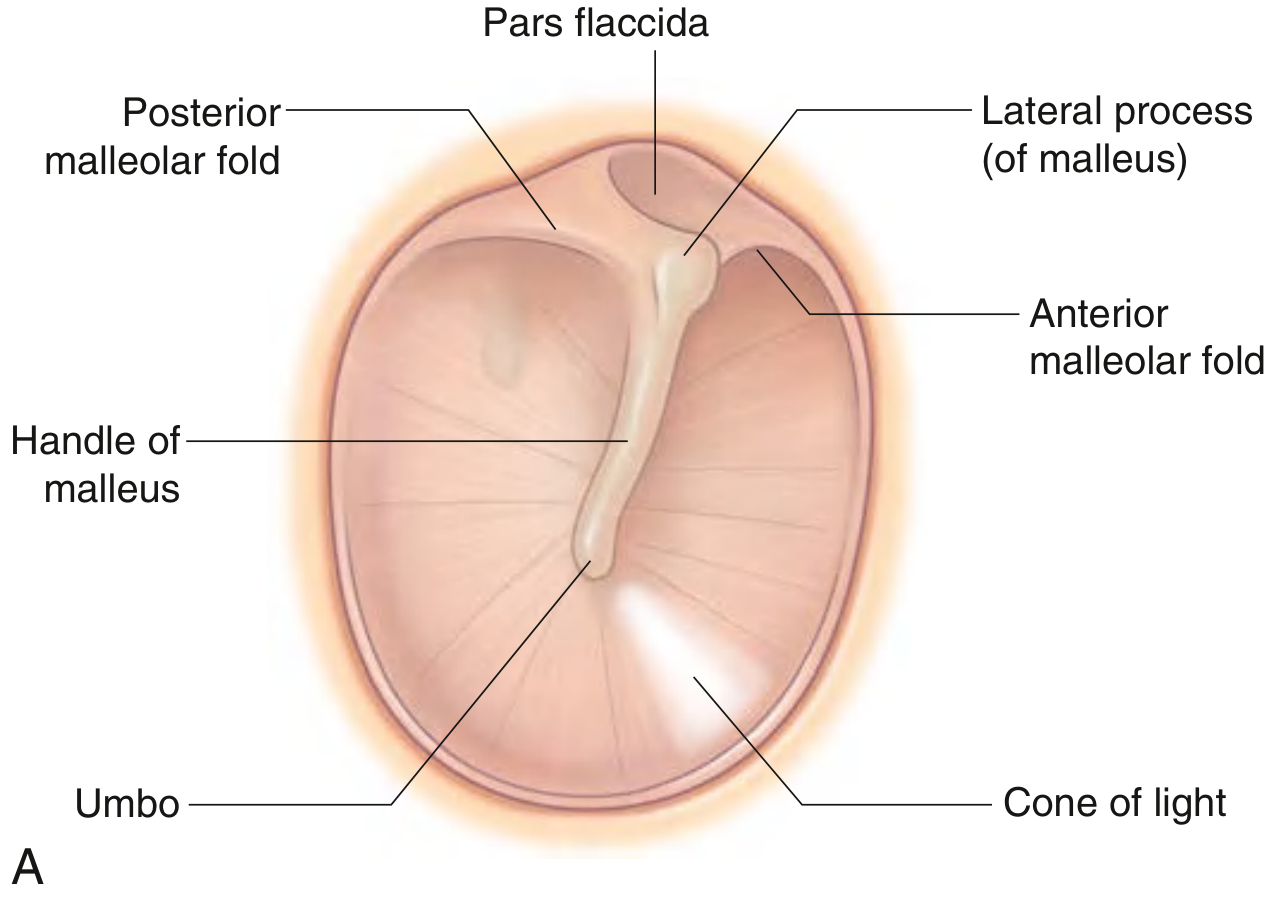
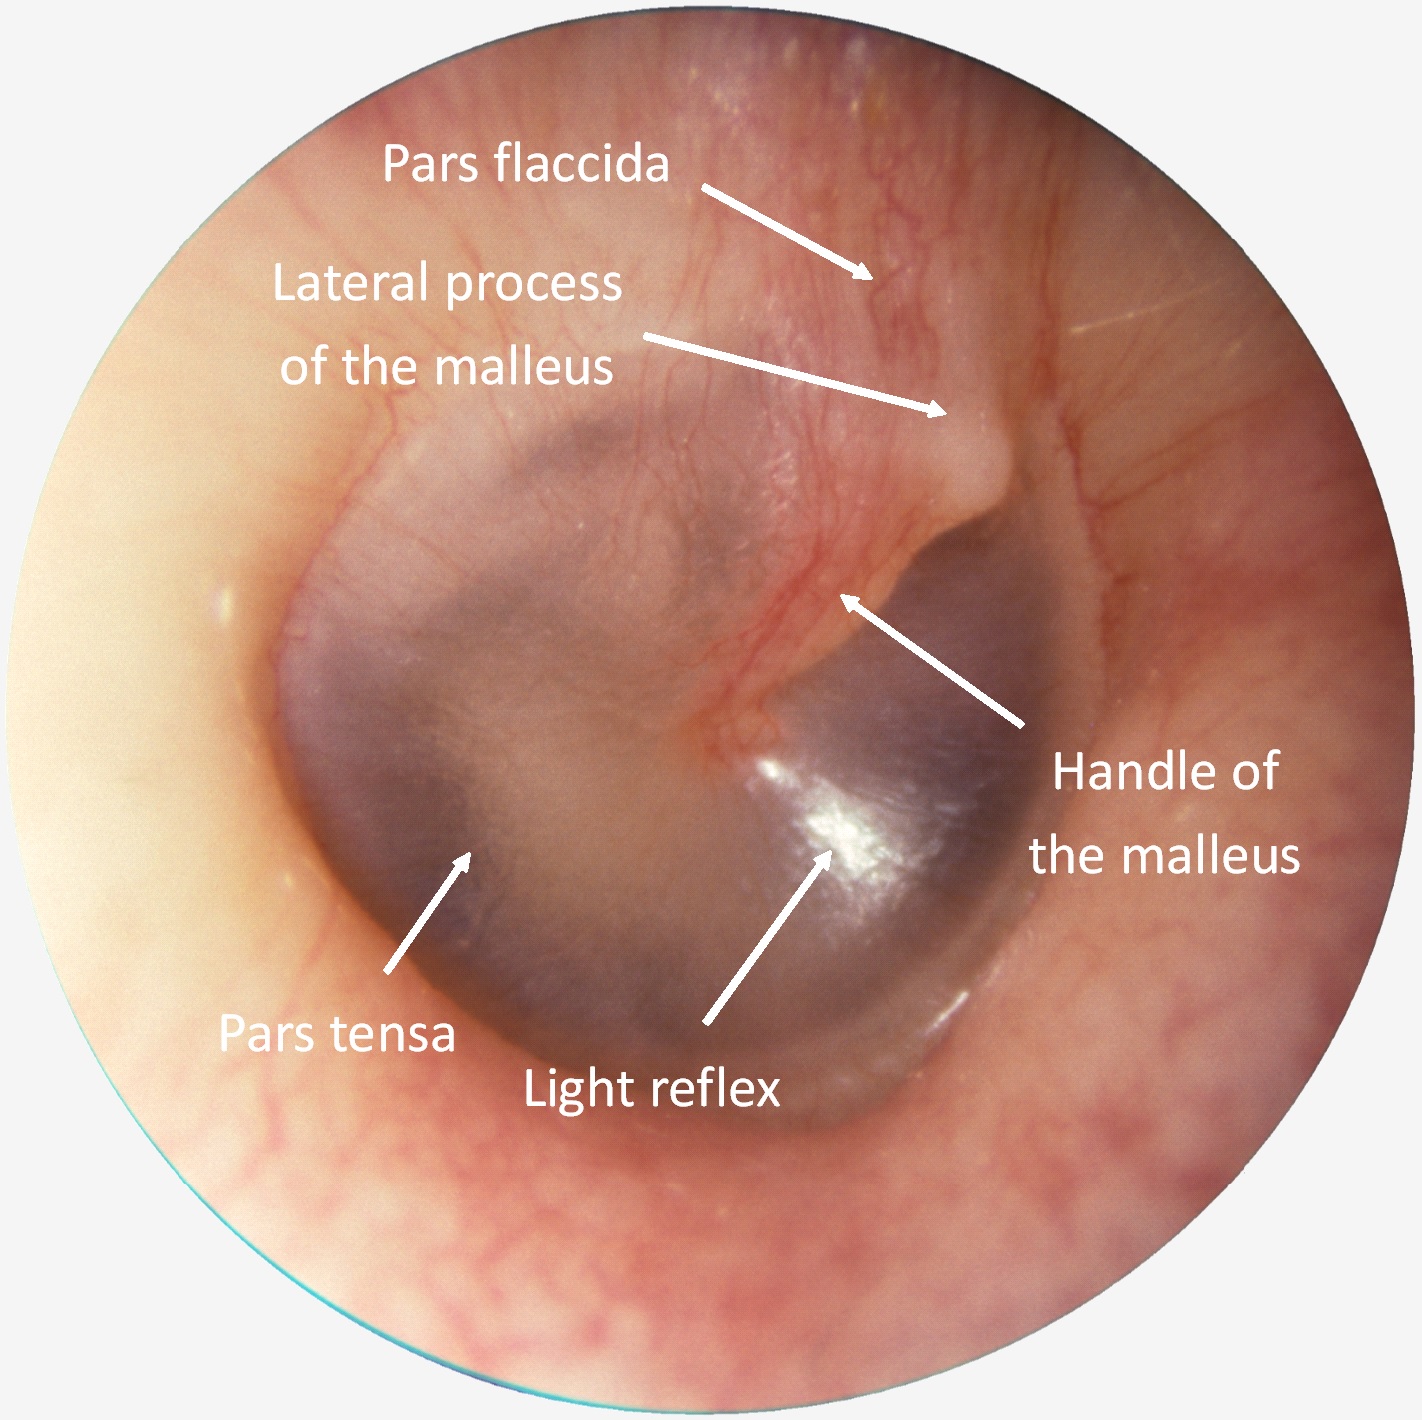
Key Landmarks on the Tympanic Membrane
| Landmark | Location | Description |
|---|---|---|
| Pars tensa | Inferior 4/5 | Thick, taut portion; 3-layered |
| Pars flaccida (Shrapnell's membrane) | Superior, above malleolar folds | Thin, slack, only 2 layers; most common site of cholesteatoma |
| Handle (manubrium) of malleus | Runs from lateral process to umbo | Seen as a whitish streak running inferiorly |
| Umbo | Inferior end of malleus handle | Deepest point of TM concavity |
| Lateral process (short process) of malleus | Superior knob-like projection | Marks junction of pars tensa and pars flaccida |
| Anterior & posterior malleolar folds | Extending from lateral process | Separate pars tensa from pars flaccida |
| Cone of light (light reflex) | Anteroinferior, at 5 o'clock (right) or 7 o'clock (left) | Triangular bright reflection; points toward umbo at its apex |
| Notch of Rivinus | Superior bony notch | Where pars flaccida attaches |
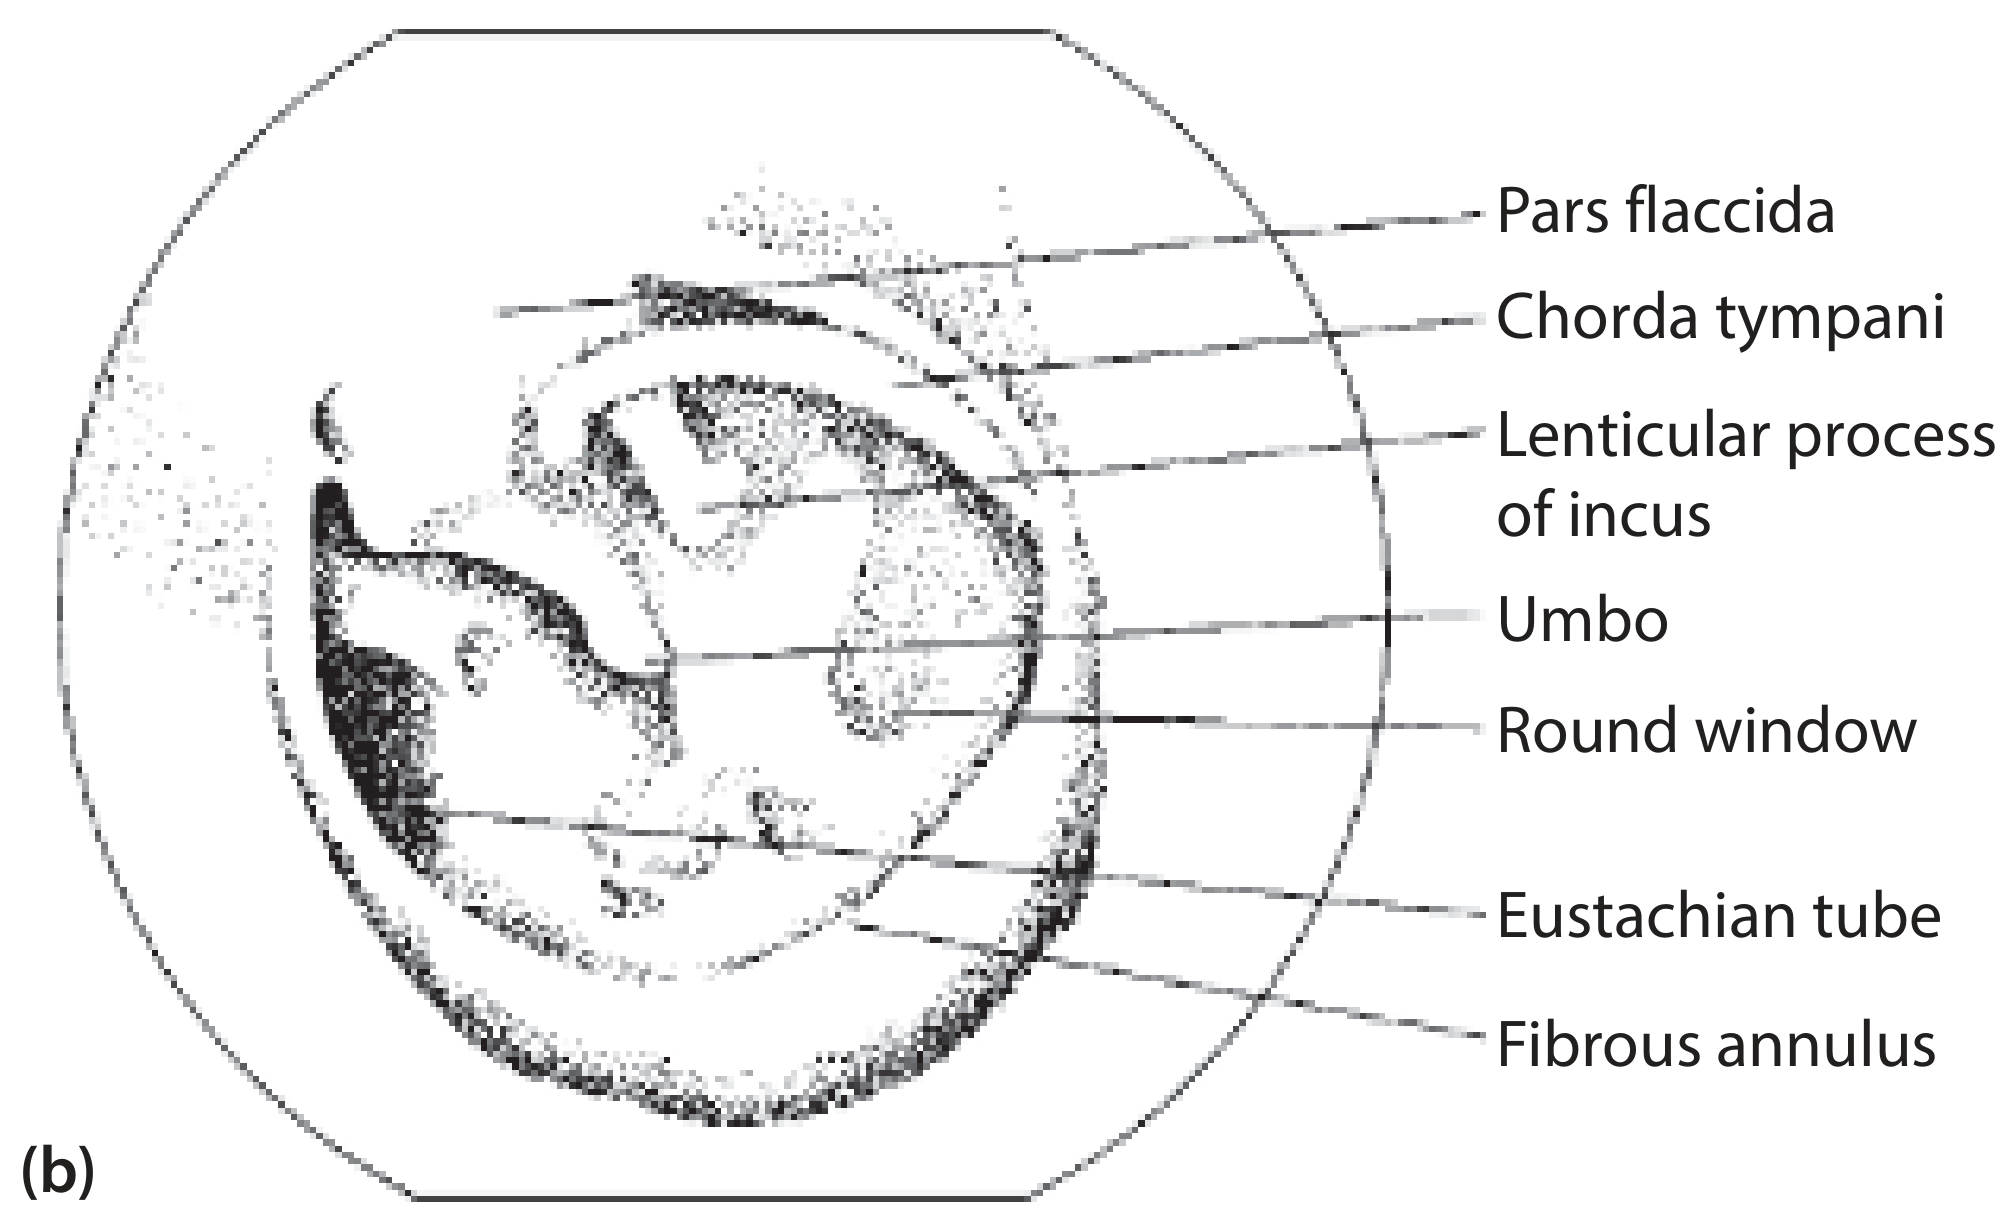
Structures Visible Through a Translucent TM
- Round window niche
- Incudostapedial complex
- Chorda tympani nerve
- Long process of incus
4. Normal TM Appearance
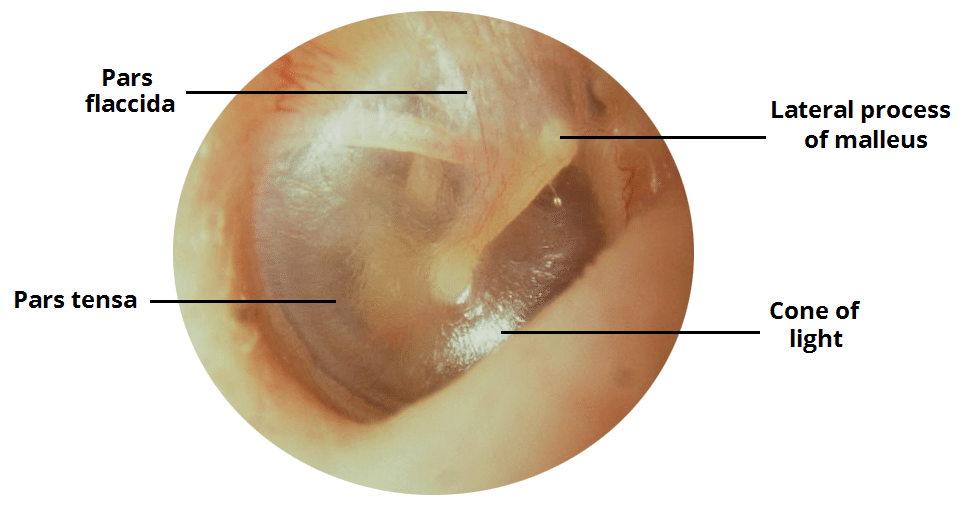
A normal TM is:
- Color: pearly grey, slightly translucent
- Position: neutral (not retracted or bulging)
- Light reflex: bright, cone-shaped, anteroinferior
- Landmarks: handle of malleus and umbo clearly visible
5. Otoscopy Technique
Patient Positioning
Step-by-Step Technique
1. Preparation
- Ensure the otoscope is fully charged (low battery causes a yellow tint that mimics middle ear effusion)
- Select the largest speculum that fits comfortably in the meatus
- Warn the patient - the procedure should be painless
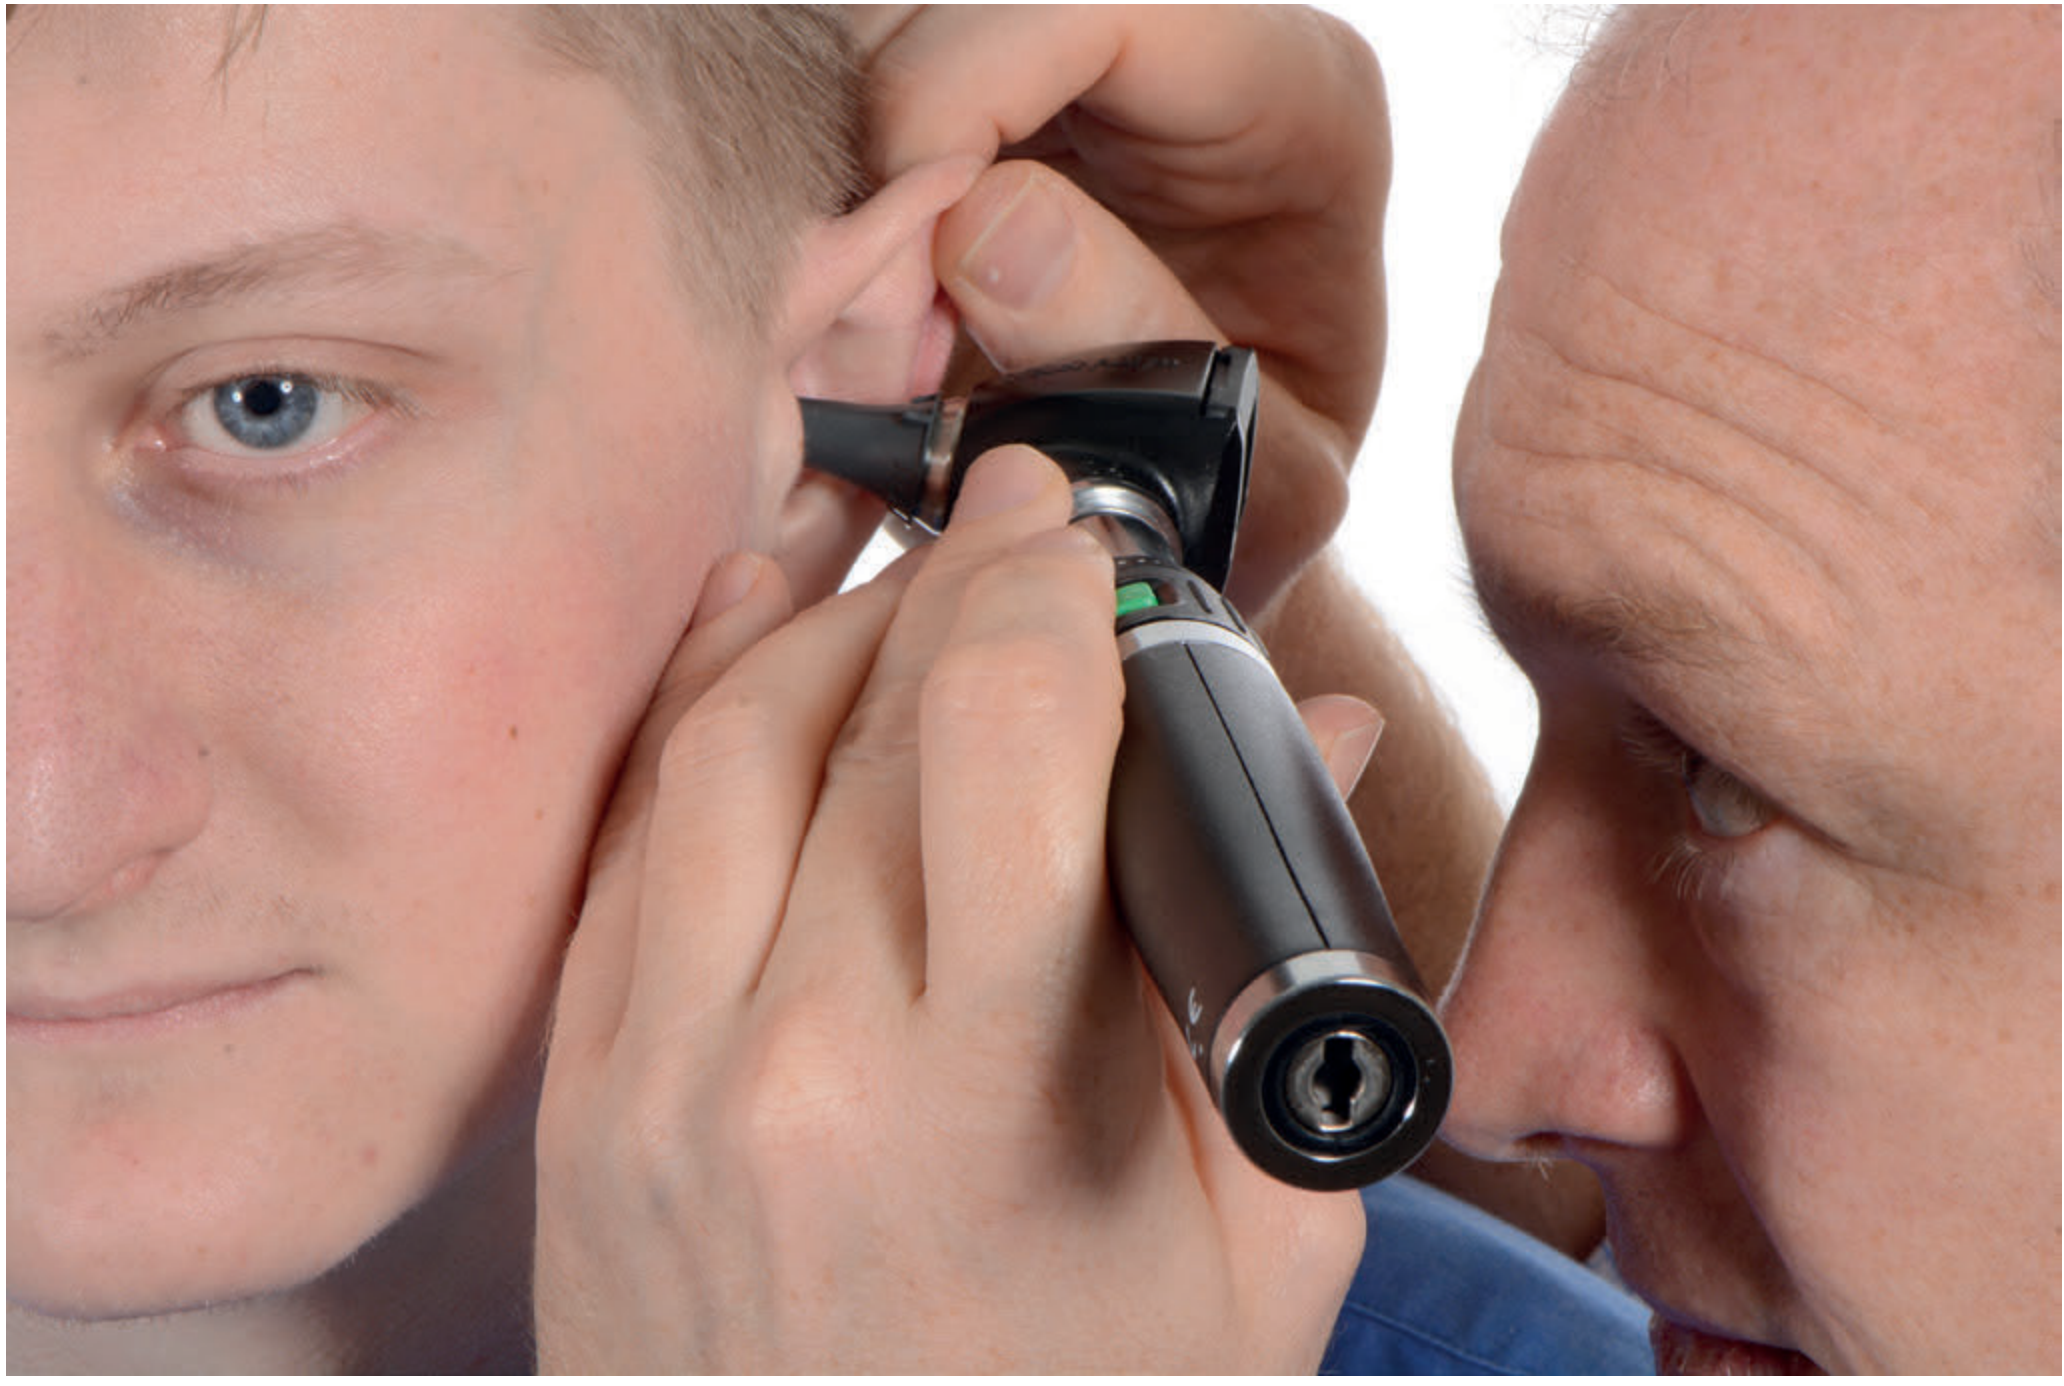
2. Pinna Traction
- Adults: pull the pinna superiorly and posteriorly (up and back) to straighten the sigmoid cartilaginous canal
- Children under 2: pull inferiorly and posteriorly (the canal takes a different curve)
- This is mandatory because the canal is tortuous and without traction the TM cannot be seen
3. Holding the Otoscope
- Hold the barrel like a pen, with the little finger braced against the patient's cheek or mastoid
- This ensures the instrument moves with the patient's head - preventing the speculum from impinging on the TM during sudden movement
4. Insertion
- Insert the speculum gently into the cartilaginous (outer) canal only - do not push into the bony canal
- Advance with a gentle downward/forward angling movement
5. Speculum Size Choice
- A narrow speculum limits the visible field - the examiner must mentally piece together multiple overlapping views
- A larger speculum gives a wider, more complete view with less repositioning needed
- A large speculum also allows pneumatic insufflation and passage of instruments
6. Systematic (Structured) Otoscopy
A structured approach is recommended to avoid missing pathology. Follow this sequence:
Step 1 - External canal first: Check for wax, discharge, foreign bodies, masses, skin changes, or signs of otitis externa
Step 2 - Identify the handle of malleus: This is the most consistently recognizable landmark - find it first
Step 3 - Identify the umbo and lateral process: Establish orientation
Step 4 - Examine the pars tensa: Is it intact? Is it in normal position?
- Foreshortening of the handle = TM retracted medially
- "Neoannulus" lipping around the annulus = retraction
- Check for perforations (central vs. marginal), thinning, or bulging
Step 5 - Examine the pars flaccida / attic: Look for retraction pockets (most common site for cholesteatoma)
Step 6 - Assess the cone of light: Loss of the light reflex can indicate retraction, inflammation, or scarring (less diagnostically important on its own)
Step 7 - Assess color and translucency:
- Normal: grey, slightly translucent
- Opaque white / thickened = tympanosclerosis (hyaline degeneration + calcium deposits from prior inflammation)
- Amber/yellow fluid level = middle ear effusion ("glue ear")
- Red, bulging = acute otitis media
7. Pneumatic Otoscopy
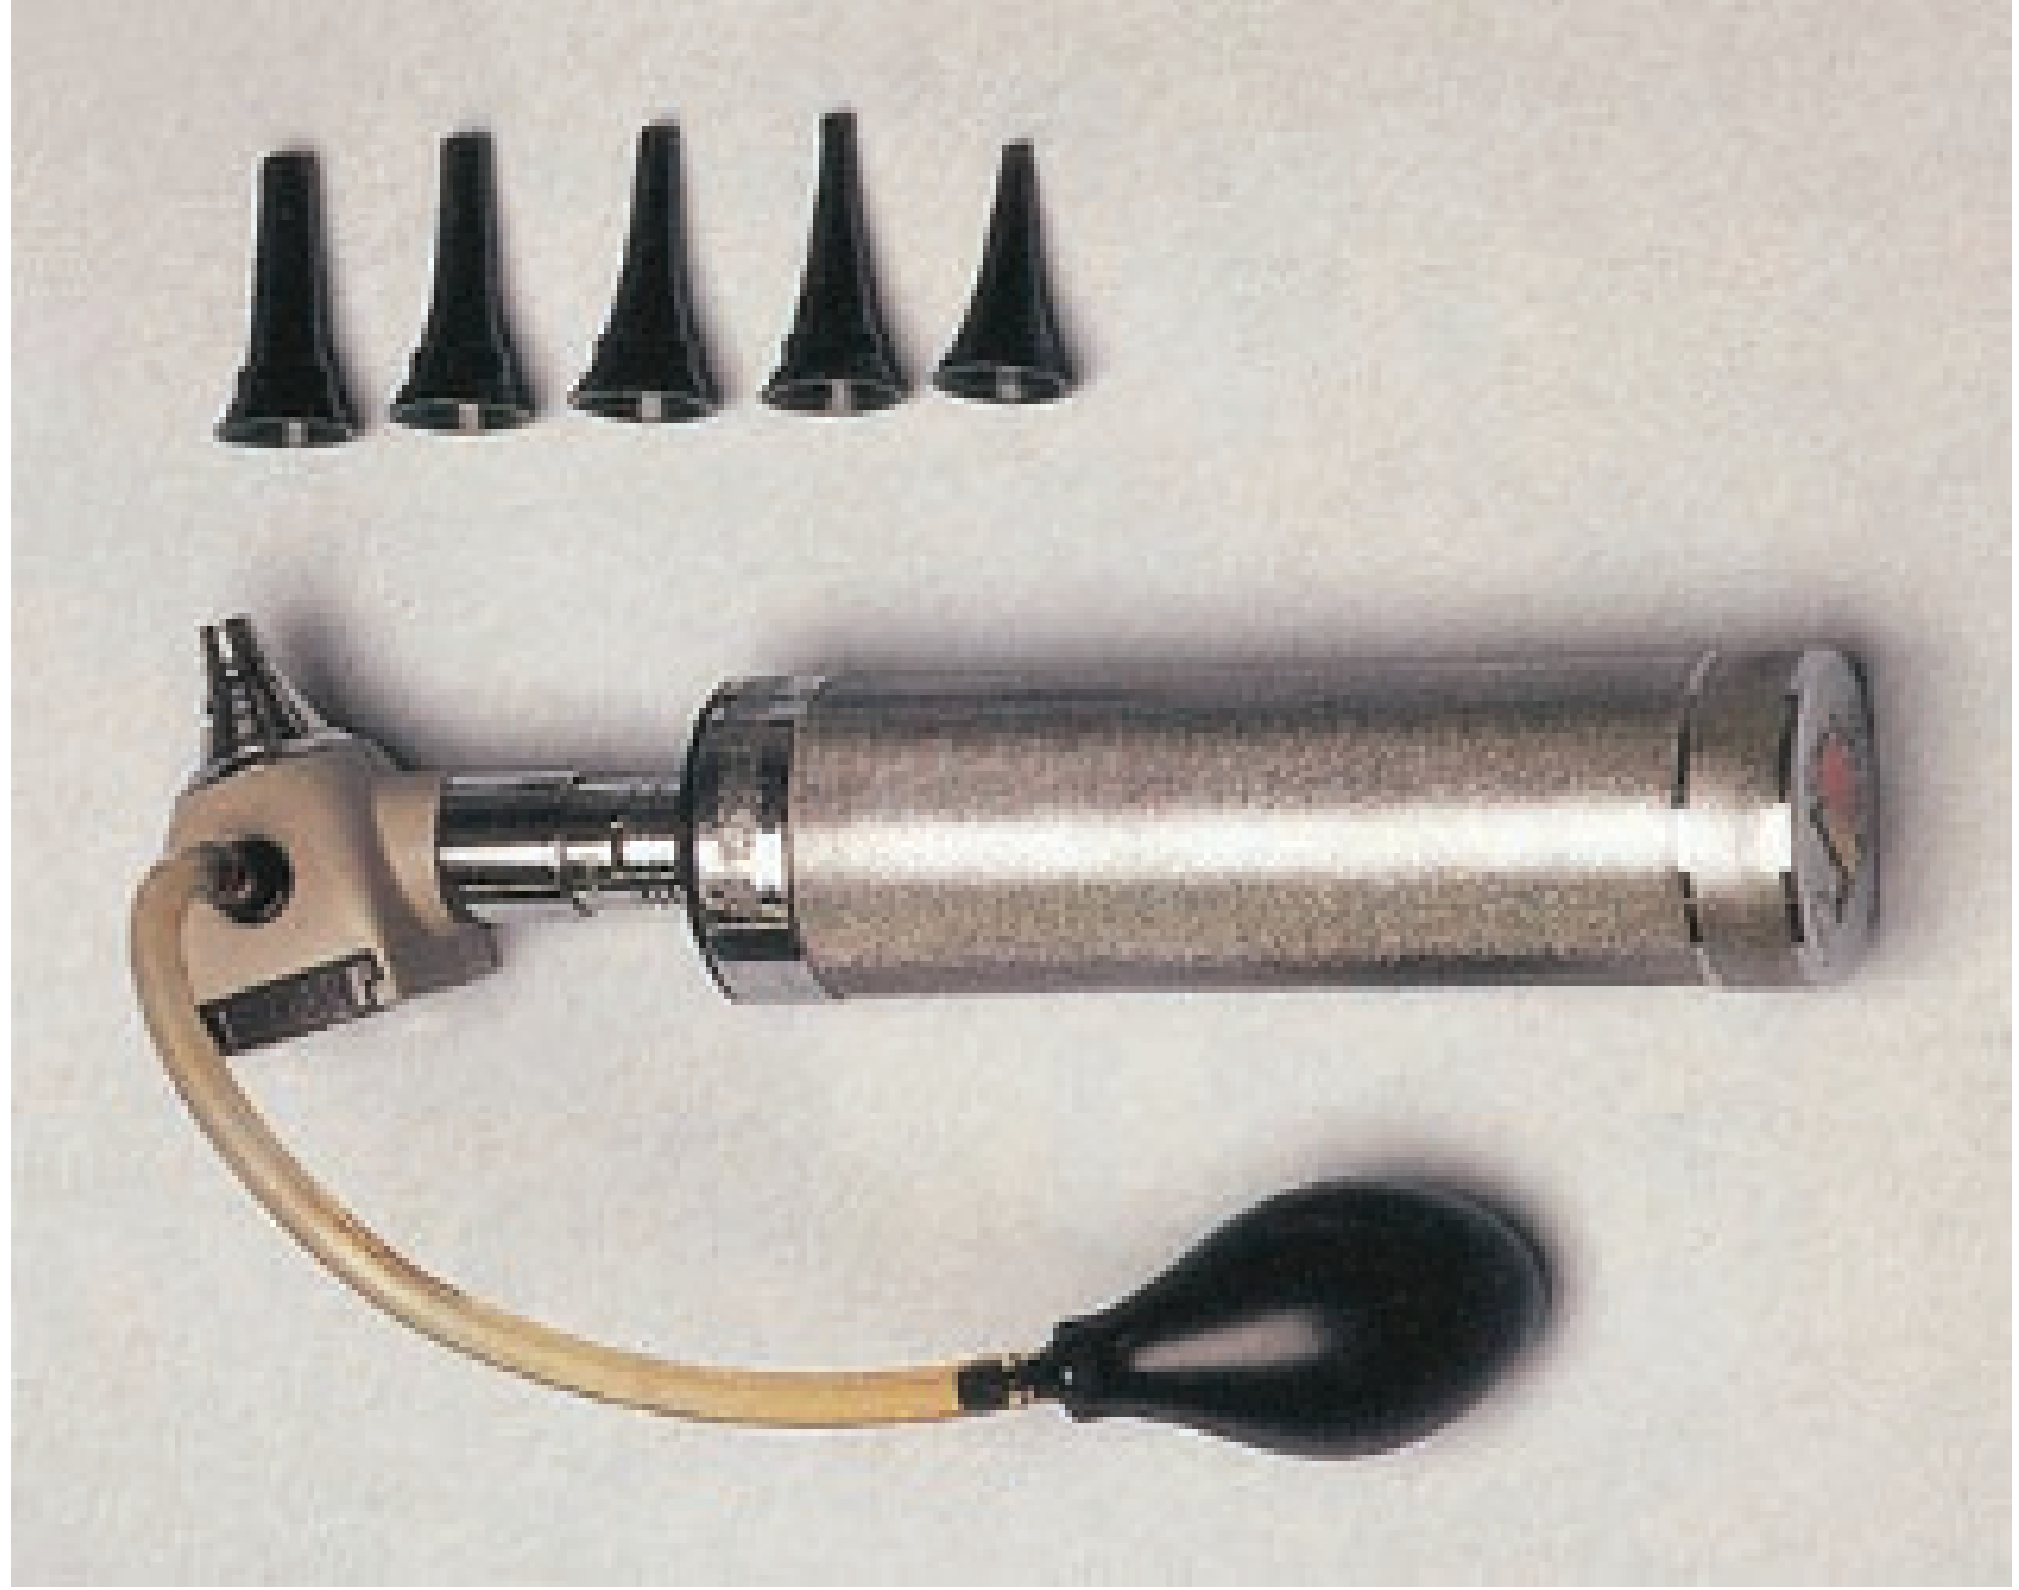
- The insufflating bulb is attached to the otoscope and an airtight seal is formed with a properly fitting speculum
- Gentle compression increases pressure, gentle release decreases pressure
- A normal TM moves briskly inward with compression and outward with release
- Reduced or absent mobility = middle ear effusion (most common cause) or tympanosclerosis
- Sensitivity: 85-93%, specificity: 71-89% (when performed by trained clinicians)
- Also used for the bedside Hennebert's (fistula) test - a perilymph fistula causes nystagmus or vertigo with pressure change
8. Describing TM Findings
When documenting findings, describe:
- Perforation location: use the clock face (e.g., central at 6 o'clock)
- Marginal vs. central: marginal (involving the annulus) carries higher risk of cholesteatoma
- Retraction pockets: describe quadrant, depth, and whether debris is present
- Attic/pars flaccida: check superiorly for keratin debris (hallmark of cholesteatoma)
9. Alternative Examination Tools
| Tool | Advantage | Limitation |
|---|---|---|
| Hand-held otoscope | Portable, widely available | Monocular, low magnification, difficult to instrument canal |
| Binocular otomicroscope | Stereovision, depth, high magnification, two-handed instrumentation | Expensive, not portable |
| Rigid endoscope (4 mm, 0°) | No speculum needed, angles into attic; photo/video documentation | Lens condensation; single-handed only |
| Pneumatic otoscope (Bruening) | Dynamic TM assessment, fistula test | Requires seal, training |
Sources
- Scott-Brown's Otorhinolaryngology Head & Neck Surgery, Vol. 2 - Chapter 73 (Structured Otoscopy)
- Cummings Otolaryngology Head and Neck Surgery - Chapter 137 (Direct Examination, Tympanic Membrane)
- Gray's Anatomy for Students - Chapter 8 (Tympanic Membrane Anatomy)
- Bailey and Love's Short Practice of Surgery, 28th Ed. - Chapter 51 (Examination of the Ear)
This is a shared conversation. Sign in to Orris to start your own chat.