
One 20 mark question of thoracotomy with steps..types..I want to write in neet pg university exam
thoracotomy types steps surgical procedure NEET PG surgery exam answer
https://www.ncbi.nlm.nih.gov/books/NBK557600
posterolateral thoracotomy incision steps diagram
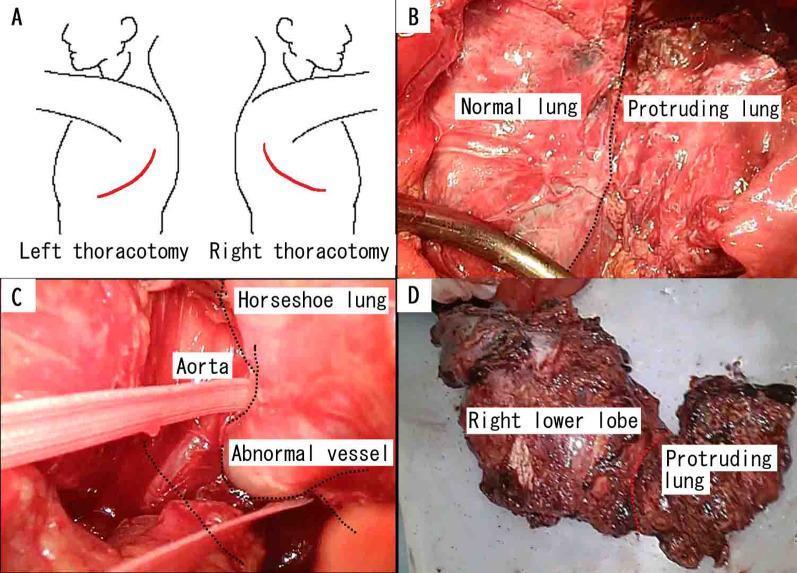
A composite medical figure illustrating surgical management of a horseshoe lung with extralobular sequestration. Panel A is an anatomical diagram showing bilateral posterolateral thoracotomy incision lines (red) on the left and right posterior thoracic wall. Panel B is an intraoperative clinical photograph during a left thoracotomy, distinguishing the native left lung from the abnormal 'protruding lung' tissue crossing the mediastinum. Panel C shows the surgical field identifying the descending aorta and a systemic abnormal blood vessel supplying the sequestered lung segment. Panel D displays the gross pathology specimen of the resected horseshoe lung, consisting of the right lower lobe and the continuous protruding lung tissue. The specimen appears dark and congested, consistent with chronic infection or aspergillosis. This content serves as an educational resource for thoracic surgery and congenital pulmonary malformations.
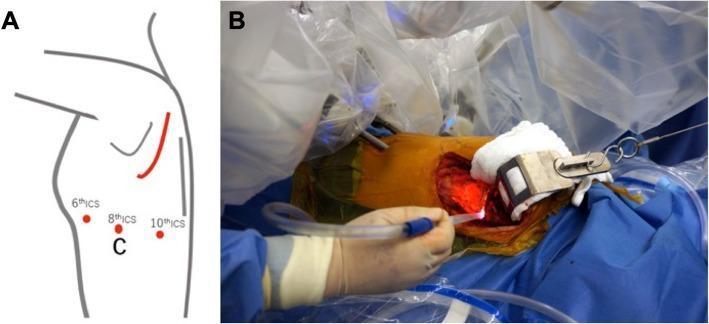
Educational composite figure demonstrating surgical planning and intraoperative execution for Robotic-Assisted Thoracic Surgery (RATS). Panel A is a schematic anatomical diagram of the left posterolateral chest wall. Red circles indicate specific port placements at the 6th, 8th, and 10th intercostal spaces (ICS), with the 8th ICS marked 'C' to denote the camera port. A curved red line indicates the site for a posterior skin incision required for chest wall resection. Panel B is a clinical photograph of the intraoperative field with the da Vinci surgical system docked. The surgical site is prepared with povidone-iodine and bordered by blue sterile drapes. Robotic arms encased in sterile plastic draping are positioned over the patient. A surgeon's hand is seen manipulating a clear suction/irrigation tube near the thoracotomy opening, which is illuminated by a red light source. A metal retractor is visible at the edge of the incision, which exposes the underlying muscle and rib tissue involved in the resection of a posterior mediastinal mass.
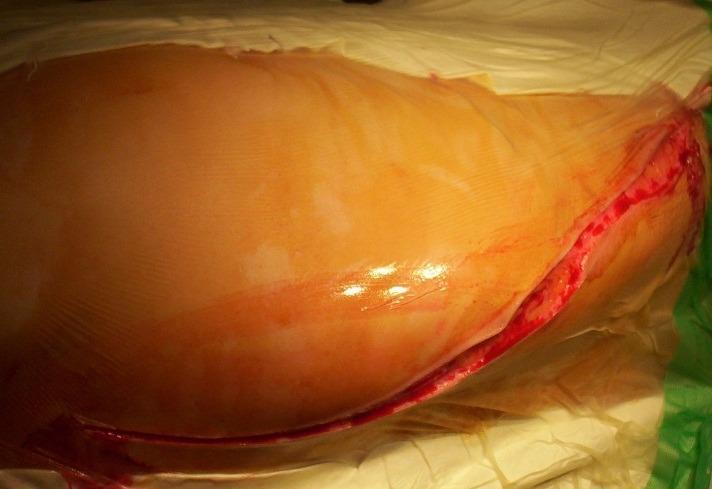
A clinical photograph of a fresh intraoperative surgical site on the posterolateral hemithorax. The image demonstrates a long, oblique incision approximately starting 2 cm lateral to the spinous process and extending inferiorly and laterally toward the midpoint of the XIIth rib. The incision edges are sharp and exhibit minor active bleeding from the dermal and subcutaneous layers. The surrounding skin is prepped for surgery, covered by a clear adhesive surgical drape (incise drape), showing a slightly reflective surface. This visual illustrates a standard posterolateral thoracotomy or retroperitoneal approach, commonly utilized in thoracic or urological surgeries. The anatomical landmarks and orientation are critical for understanding surgical access to the thoracic cavity or kidney.
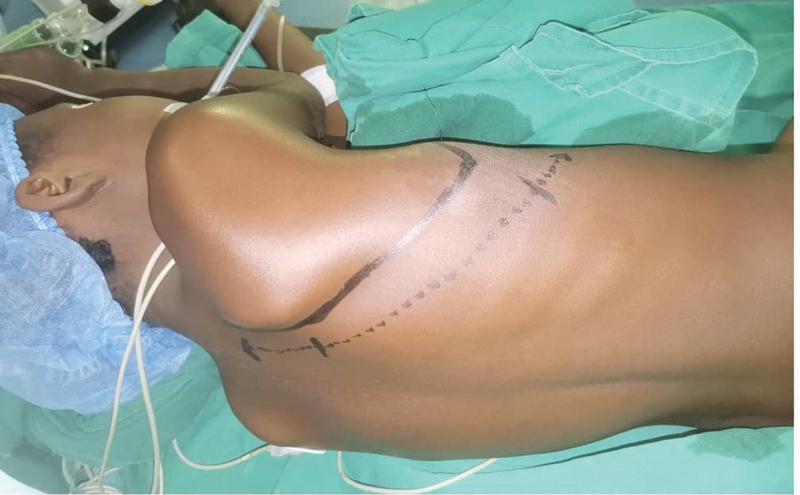
This clinical photograph demonstrates the preoperative surgical positioning and skin marking for a posterolateral thoracotomy in a patient with spontaneous pneumothorax. The patient is placed in the lateral decubitus position on an operating table, lying on their healthy side with the upper arm extended anteriorly toward the head to facilitate surgical access. A surgical marker has been used to delineate the incision site. The marking consists of a solid angled line, where one branch follows the line of the spinous processes and the other aligns with the spinal edge of the scapula. A dotted line bisects this angle, representing the planned cutaneous incision path. The positioning is designed to provide optimal exposure of the thoracic cavity while minimizing muscle sectioning, specifically targeting the planes between the latissimus dorsi, trapezius, serratus anterior, and rhomboid muscles. Visible equipment includes surgical drapes, a surgical cap, and anesthesia tubing.
THORACOTOMY
DEFINITION
INDICATIONS
- Lung cancer - lobectomy, pneumonectomy
- Esophageal resection (esophagectomy)
- Cardiac surgery - valve repair/replacement, CABG (when sternotomy is unsafe or re-do)
- Mediastinal tumors, thymectomy
- Thoracic aortic aneurysm / dissection
- Decortication of lung (chronic empyema / fibrothorax)
- Congenital lung anomalies (sequestration, CCAM)
- Tissue biopsy
- Massive haemothorax not controlled by chest drain
- Penetrating cardiac wounds / cardiac tamponade
- Traumatic aortic injury
- Resuscitative thoracotomy (agonal patient, penetrating thoracic trauma)
TYPES OF THORACOTOMY
1. Posterolateral Thoracotomy (MOST COMMON / GOLD STANDARD)
- Position: Lateral decubitus (affected side up)
- Incision: Passes 1-2 cm below the tip of the scapula, extending posteriorly and superiorly between the medial border of scapula and spine
- Gives access to: Lung and major bronchi, thoracic aorta, esophagus, posterior mediastinum, pleura
- Uses: Lobectomy, pneumonectomy, esophagectomy, aortic surgery
- Note: Best overall exposure of thoracic cavity
2. Anterolateral Thoracotomy
- Position: Supine or slightly tilted
- Incision: Over 4th/5th intercostal space from mid-axillary line curving parasternally, under the breast mound; pectoral muscles divided with diathermy
- Types:
- Supra-mammary - above the breast (superior access, cardiac surgery)
- Infra-mammary - below the breast (females, better cosmesis)
- Uses: Emergency cardiac surgery, left heart (mitral valve), left lung procedures, trauma
- Advantage: Patient remains supine - better cardiopulmonary stability
3. Median Sternotomy
- Position: Supine
- Incision: Vertical midline incision through sternum with a sternal saw
- Gives access to: Heart, ascending aorta, arch, both pleural cavities, anterior mediastinum, thymus
- Uses: Open heart surgery (CABG, valve surgery, cardiac transplant)
- Note: Technically this is a sternotomy, but often classified under thoracic incisions
4. Anterior Thoracotomy (Emergency / Left-sided)
- Position: Supine
- Incision: 4th or 5th interspace taken down with scalpel; pleura opened with scissors
- Uses: Resuscitative thoracotomy, cardiac tamponade, massive left haemothorax
- Advantage: No special positioning required - done rapidly at bedside or in ED
- Can be extended to clamshell thoracotomy if needed
5. Clamshell (Bilateral Transverse Thoracosternotomy) Thoracotomy
- Position: Supine
- Incision: Bilateral anterior thoracotomies connected by transverse sternotomy across 4th interspace - resembles an open clamshell
- Gives access to: Both pleural cavities + mediastinum simultaneously
- Uses: Double lung transplant, bilateral pulmonary metastasectomy, massive thoracic trauma, superior vena cava surgery
- Note: Maximum bilateral exposure but associated with significant morbidity
6. Axillary Thoracotomy
- Position: Lateral decubitus, arm elevated
- Incision: 4th interspace through axilla, between pectoralis major (anterior) and latissimus dorsi (posterior)
- Uses: Apical blebs (spontaneous pneumothorax), first rib resection (thoracic outlet syndrome), sympathectomy
- Advantage: Muscle-sparing, excellent cosmesis; long thoracic nerve must be protected
- Disadvantage: Limited exposure
7. Video-Assisted Thoracoscopic Surgery (VATS) - Minimally Invasive
- Multiple small port incisions (uniportal, two-port, or three-port)
- Avoids rib-spreading
- Reduced postoperative pain, shorter hospital stay
- Now the approach of choice for early-stage lung resections
- Limitations: Limited for complex surgery, steep learning curve
STEPS OF POSTEROLATERAL THORACOTOMY (STANDARD PROCEDURE)
Pre-operative Preparation
- Anaesthesia: General anaesthesia with double-lumen endotracheal tube (allows one-lung ventilation - collapse of operated lung, ventilate contralateral lung)
- Positioning: Lateral decubitus - affected side up, arm placed forward on support, axillary roll placed, table flexed to widen intercostal spaces
- Skin prep: Chin to toes with iodine/chlorhexidine solution
- Draping: Standard thoracic draping
Steps of Incision (Surgical Technique)
- Incision placed 1-2 cm below the tip of the scapula, curving posteriorly and superiorly between the medial border of the scapula and the spine
- Deepened through subcutaneous fat to the fascia overlying latissimus dorsi
- Divided in line with the skin incision using coagulating diathermy
- Careful haemostasis maintained
- A plane of dissection is developed manually, deep to scapula and serratus anterior
- Serratus anterior may be divided near its attachment to ribs 6, 7, 8 (if needed) - or mobilised along its inferior border (muscle-sparing)
- Ribs counted from highest palpable rib (usually 2nd)
- Approach usually through 5th or 6th intercostal space
- 6th rib periosteum scored with diathermy near its upper border (to avoid neurovascular bundle running in the subcostal groove of the rib above)
- Periosteal elevator lifts periosteum off the superior border of the rib
- Alternatively: intercostal muscle cut with diathermy just above the rib (just superior to upper border of lower rib)
- Pleura revealed and entered by blunt dissection
- Pleural cavity entered (lung collapses due to double-lumen tube)
- Finochietto rib retractor inserted between adjacent ribs
- Opened gently and progressively to prevent rib fracture
- Provides adequate exposure of thoracic contents
- Intended surgery performed (lobectomy, pneumonectomy, esophagectomy, etc.)
- Pericostal sutures placed around adjacent ribs to approximate them
- Serratus anterior and latissimus dorsi closed in layers
- Subcutaneous tissue and skin closed
- Intercostal drain(s) inserted through a separate stab incision - to drain blood/air and allow lung re-expansion
- Drain connected to an underwater seal drainage system
Post-operative Care
- Chest drain management and monitoring
- Analgesia - critical: epidural catheter (placed pre-op or intra-op), paravertebral block, or intercostal nerve blocks with long-acting local anaesthetic
- Chest physiotherapy and early ambulation
- Monitoring for complications
COMPLICATIONS
Immediate (Intraoperative)
- Haemorrhage (internal mammary artery, intercostal vessels, great vessels)
- Lung injury
- Injury to phrenic or vagus nerve
- Air embolism
Early (Post-operative)
- Bleeding / Haemothorax
- Pneumothorax / Air leak (persistent)
- Infection - wound infection, pneumonia, empyema
- Atelectasis and respiratory failure
- Pleural effusion
- Cardiac arrhythmias
- Bronchopleural fistula
Late
- Post-thoracotomy pain syndrome - pain along the incision persisting >2 months (intercostal neuralgia from costal neurovascular bundle injury)
- Shoulder dysfunction - from division of serratus anterior / damage to long thoracic nerve
- Chronic empyema
- Chest wall deformity
RESUSCITATIVE THORACOTOMY (EMERGENCY)
- Performed in agonal/peri-arrest patients with penetrating thoracic trauma
- Left anterior thoracotomy approach (4th/5th intercostal space)
- Goals:
- Release cardiac tamponade
- Control haemorrhage
- Open cardiac massage
- Cross-clamp descending aorta to restore coronary/cerebral perfusion
- No special positioning or equipment required
- Can be converted to clamshell if bilateral access needed
COMPARISON TABLE
| Feature | Posterolateral | Anterolateral | Clamshell | Axillary |
|---|---|---|---|---|
| Position | Lateral decubitus | Supine | Supine | Lateral |
| Exposure | Best unilateral | Moderate | Best bilateral | Limited |
| Emergency use | No | Yes | Yes (trauma) | No |
| Muscle divided | Latissimus dorsi | Pectoralis | Both sides | Minimal |
| Main use | Lung/esophageal surgery | Cardiac/emergency | Transplant/trauma | Bleb/sympathectomy |
KEY EXAM POINTS (MNEMONICS)
- Most common thoracotomy = Posterolateral
- Emergency thoracotomy = Left anterior (4th/5th ICS)
- Double lung transplant = Clamshell
- Cosmetically best = Axillary (muscle-sparing)
- Intercostal neurovascular bundle runs in subcostal groove - always enter just above the lower rib (superior border of lower rib)
- Double-lumen tube is mandatory for posterolateral thoracotomy (one-lung ventilation)
- Post-thoracotomy pain syndrome = pain >2 months along incision site
- VATS = now preferred for early-stage lung cancer over open thoracotomy
- Bailey and Love's Short Practice of Surgery 28th ed., Ch. 60 (pp. 1009-1010)
- Fischer's Mastery of Surgery 8th ed., Ch. 82
- StatPearls - Thoracotomy (NCBI)
- Patient positioning for posterolateral thoracotomy (lateral decubitus with arm forward)
- Skin incision line - 1-2 cm below scapula tip, curving posterosuperiorly
- Layers encountered: skin → subcutaneous → latissimus dorsi → serratus anterior → intercostal muscles → pleura
- Clamshell incision (bilateral transverse)
Show the images to draw
clamshell bilateral thoracotomy incision diagram
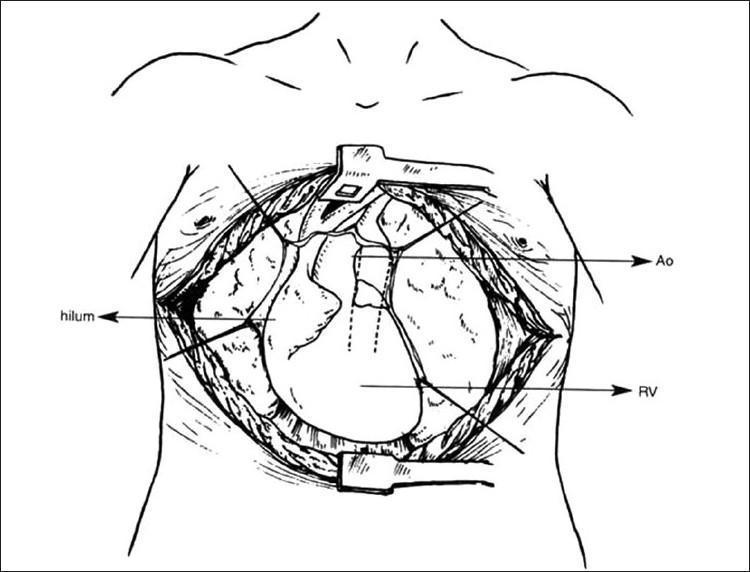
Anatomical diagram and surgical illustration of a 'clamshell' thoracotomy approach (bilateral anterolateral thoracotomy with transverse sternotomy). The diagram depicts a wide surgical field across the anterior chest wall, extending laterally toward the axillary lines. Key mediastinal and thoracic structures are exposed and labeled, including the heart centrally with the right ventricle (RV) prominently visible, and the ascending aorta (Ao) superior to it. The hilum is visible bilaterally, providing access to the pulmonary structures. The image demonstrates the extensive exposure of the anterior and posterior mediastinum provided by this incision, which is commonly utilized in complex cardiothoracic procedures, such as unifocalization of major aortopulmonary collateral arteries (MAPCAs) or lung transplantation, particularly in cases involving significant scarring from previous median sternotomies.
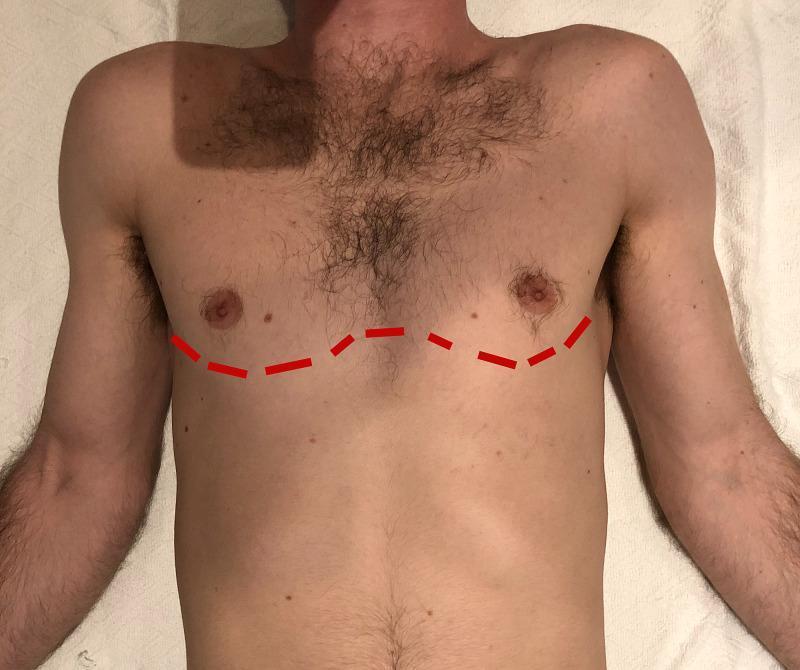
A clinical photograph of a male patient's torso in a supine position, serving as an anatomical diagram for surgical planning. A dashed red line is superimposed across the anterior chest to illustrate the approximate incision site for a bilateral clamshell thoracotomy. The line follows a transverse, slightly curved path through the fourth or fifth intercostal spaces, extending from the left anterior axillary line, passing inferior to the nipples/inframammary creases, and crossing the sternum to the right anterior axillary line. Anatomical landmarks visible include the pectoralis major muscles, sternum, and axillary regions. The image demonstrates the extensive surgical access required for emergency thoracic trauma management, such as hemorrhage control or cardiac procedures. The educational focus is on the surface anatomy and topographical mapping necessary for emergent surgical interventions in a trauma setting.
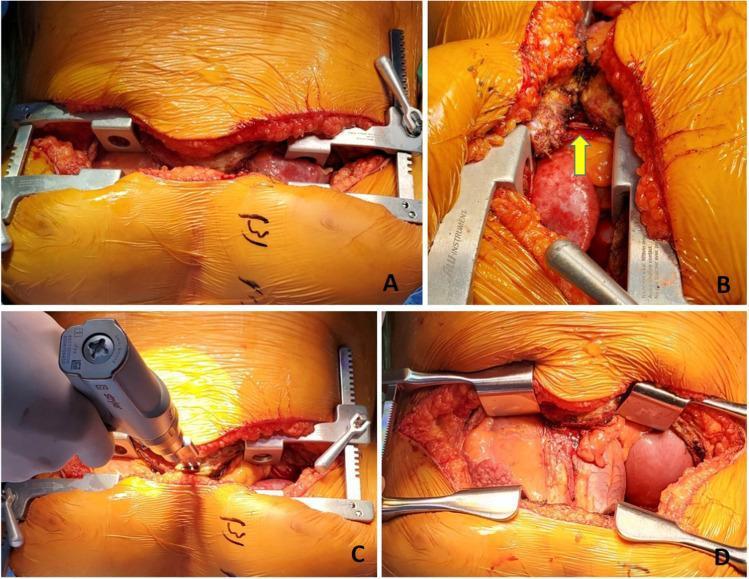
This composite of clinical photographs illustrates the surgical incision and exposure techniques for a clamshell incision (bilateral antero-lateral thoracotomy) during a lung transplant or major thoracic procedure. Panel A shows the initial bilateral thoracotomies with a Wilson rib retractor positioned to widen the intercostal spaces, viewed from the head end. Panel B provides a detailed view of the right internal mammary vessels, which have been ligated with surgical clips (indicated by a yellow arrow) to prevent hemorrhage. Panel C demonstrates the performance of a midline sternotomy using a surgical power drill to divide the sternum, connecting the bilateral thoracotomies. Panel D displays the final surgical exposure with Tuffier retractors in place, providing a wide field of view that reveals the underlying thoracic structures and an elevated right diaphragmatic dome. The sequence highlights the progression from intercostal dissection to full sternal division and wide retraction for optimal hilar access.
DIAGRAM 1 - Patient Positioning for Posterolateral Thoracotomy
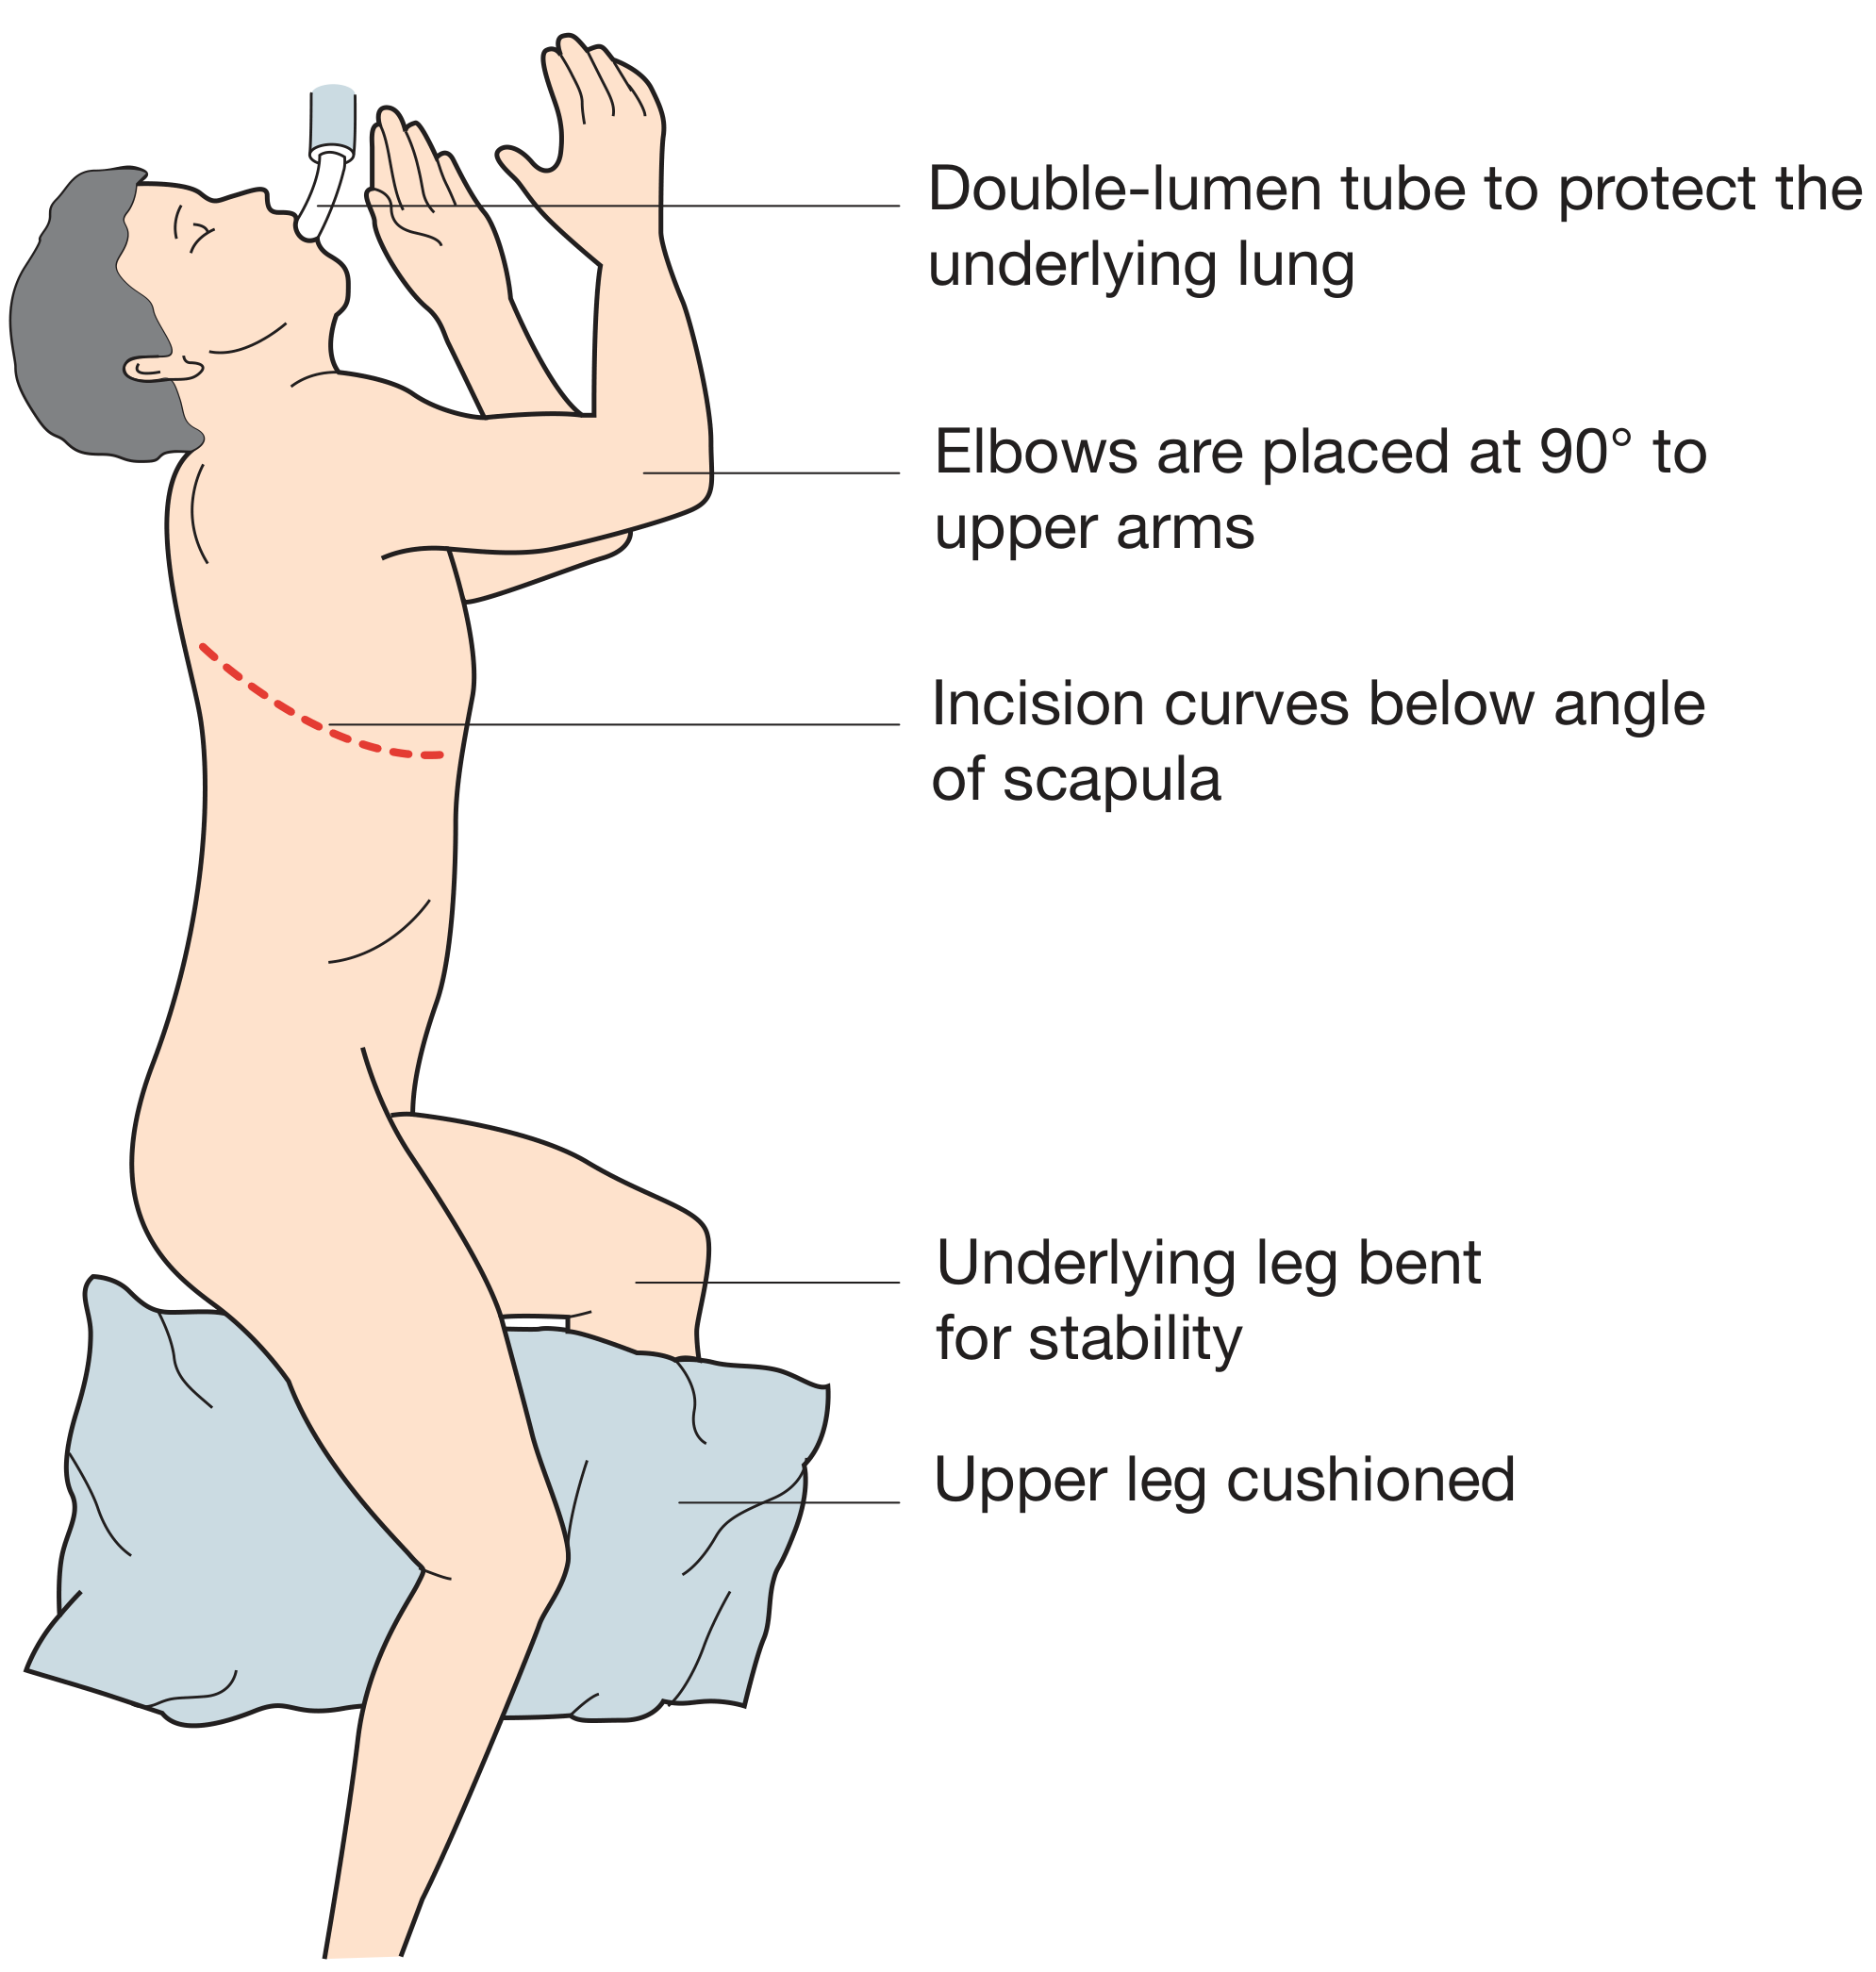
- Patient in lateral decubitus (affected side UP)
- Double-lumen tube to protect underlying lung
- Elbows at 90° to upper arms
- Incision curves below angle of scapula (red dashed line)
- Underlying leg bent for stability, upper leg cushioned
DIAGRAM 2 - Standard Incision Line for Posterolateral Thoracotomy
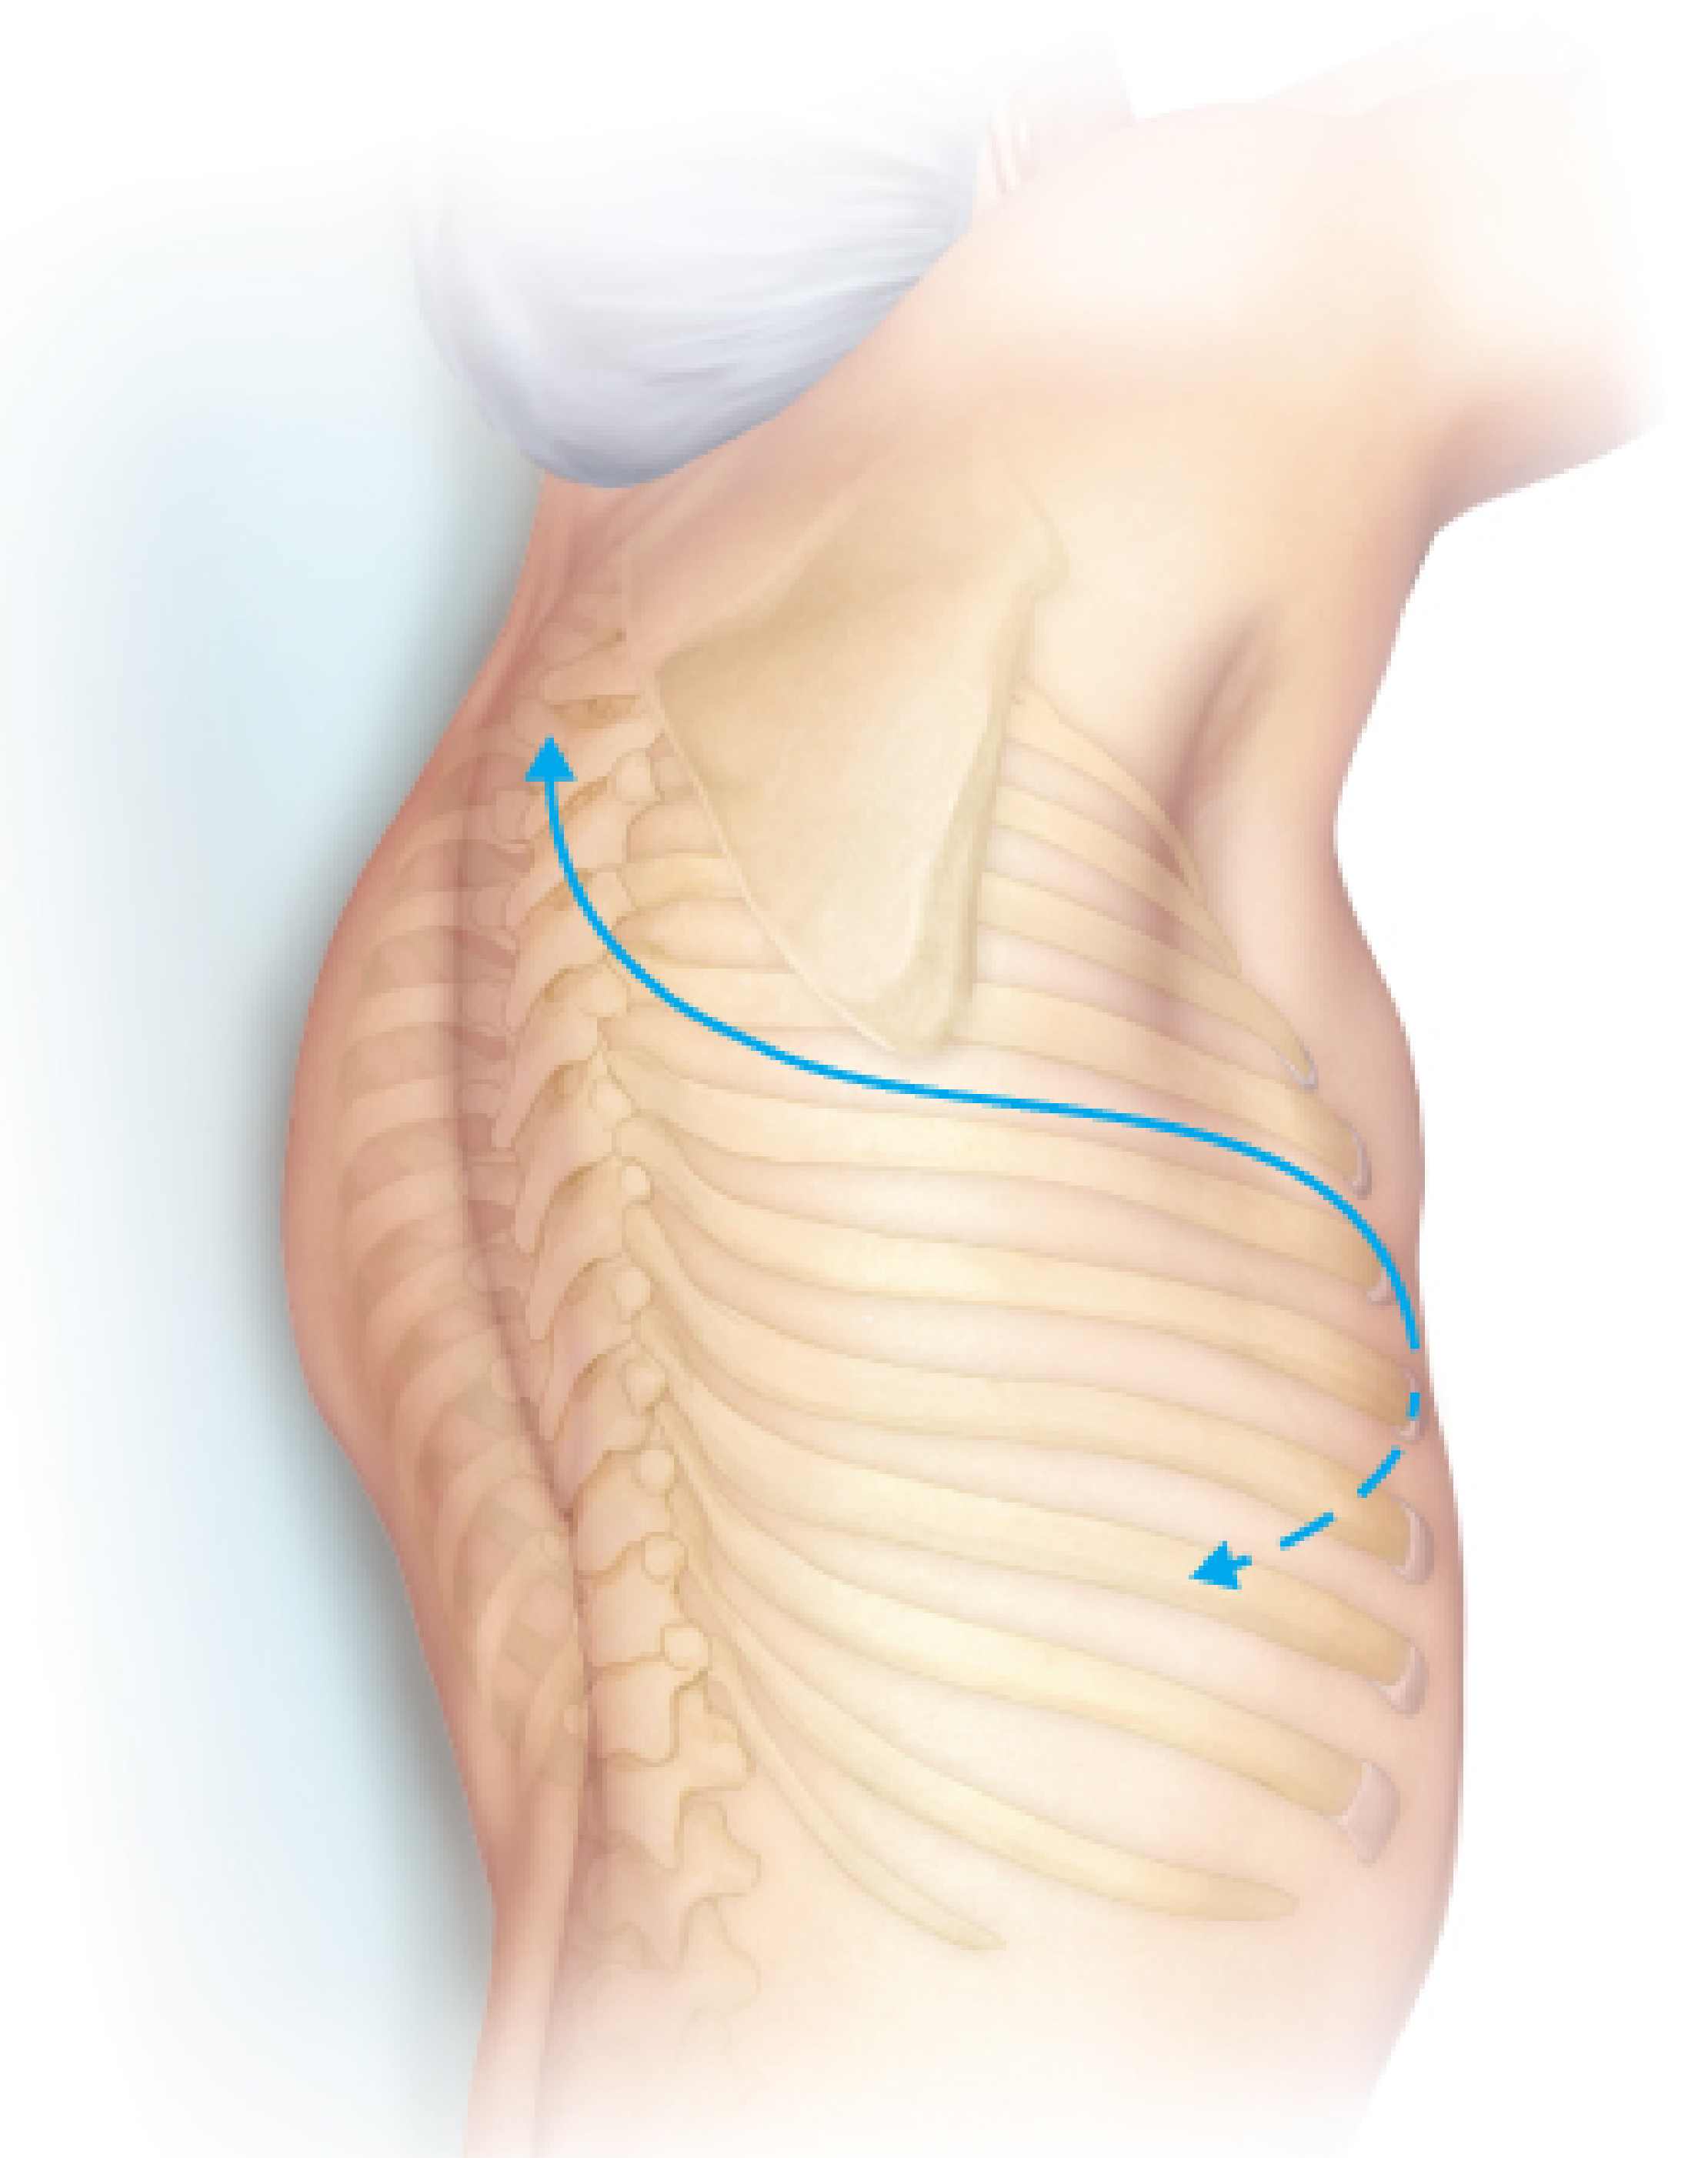
- Point 1: 4th/5th ICS along midclavicular line
- Point 2: One fingerbreadth BELOW tip of scapula
- Point 3: Midpoint between spine and scapula (at height of middle of scapula)
- The curve is smooth and connects all three points
DIAGRAM 3 - Muscle Layers Encountered During Posterolateral Thoracotomy
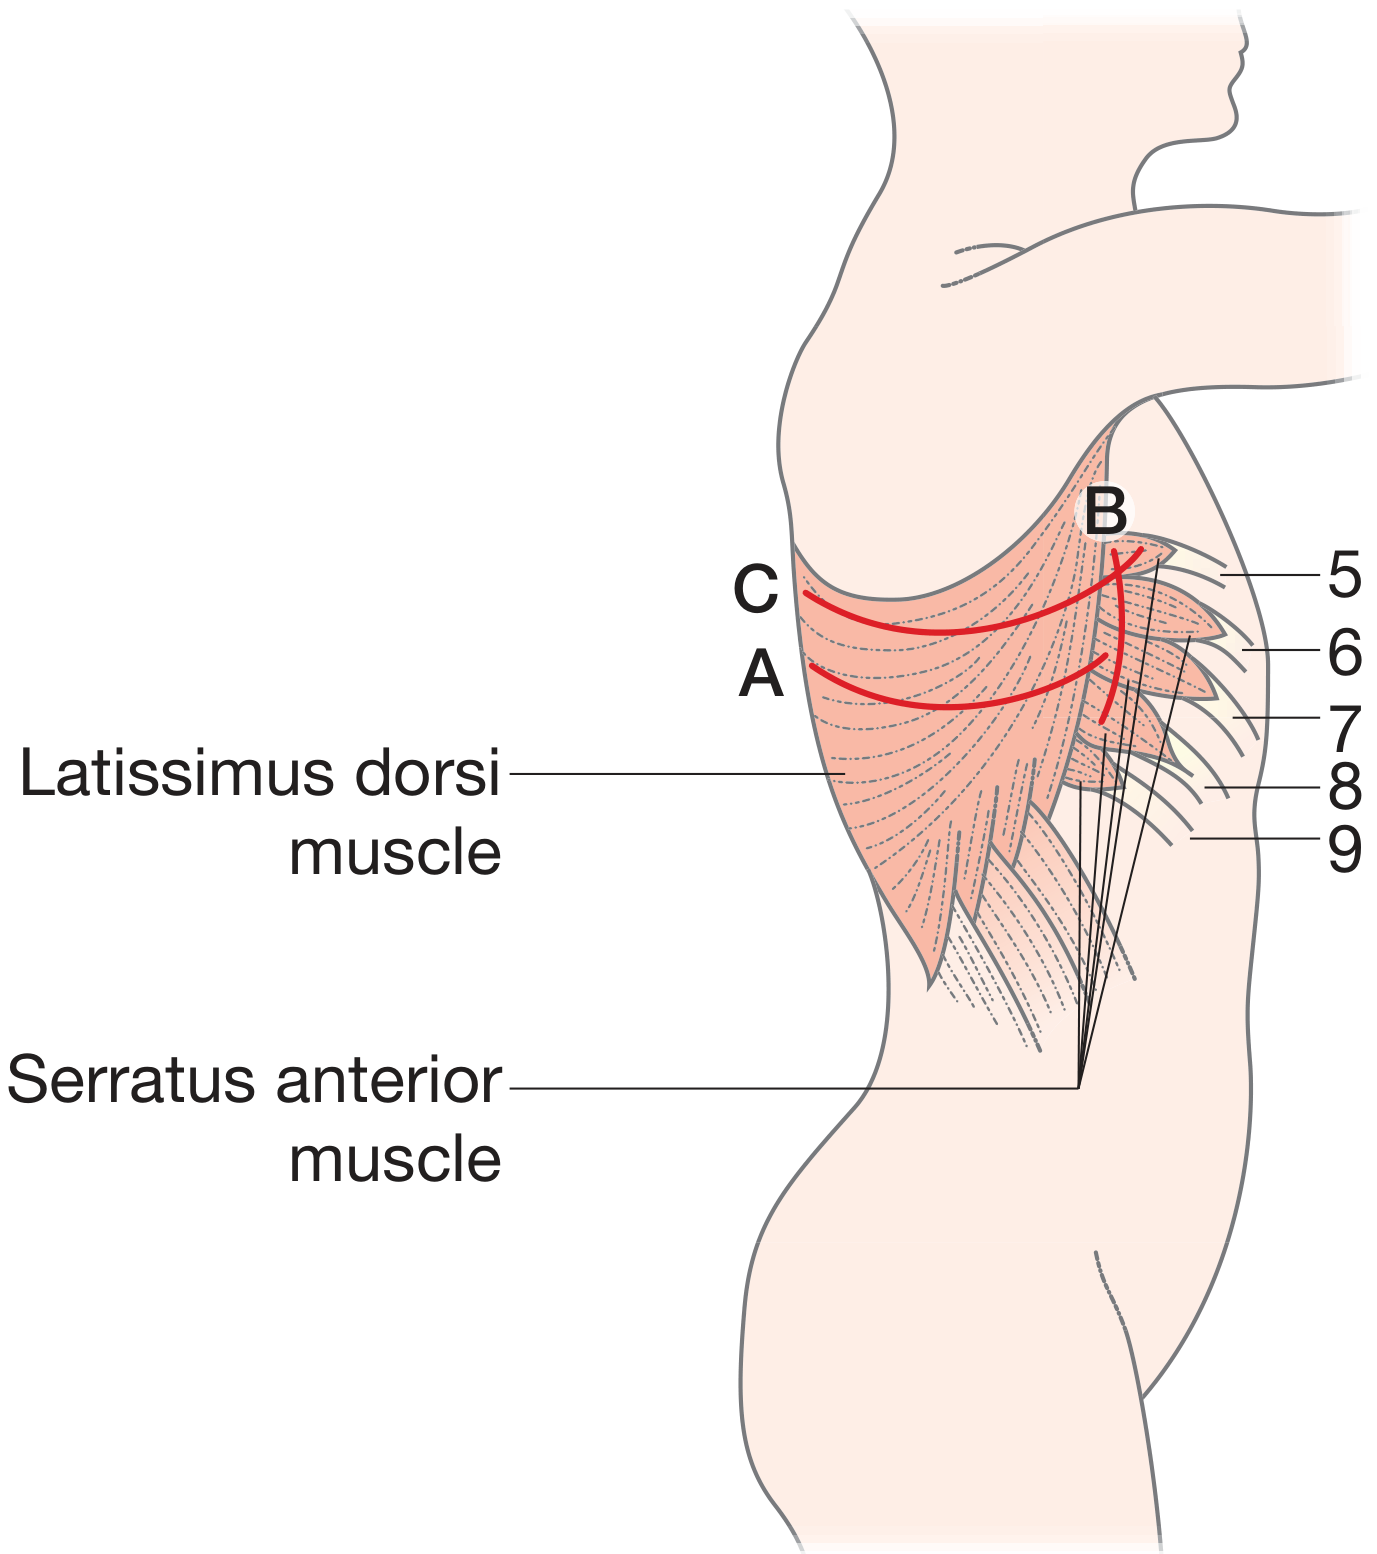
- A = Latissimus dorsi - divided in line with skin incision
- B = Serratus anterior - divided close to attachment at ribs 6, 7, 8 (or mobilised)
- C = Intercostal muscles - stripped off the UPPER border of the rib (to avoid neurovascular bundle in subcostal groove)
- Rib numbers 5, 6, 7, 8, 9 visible
DIAGRAM 4 - Double-Lumen Endotracheal Tube
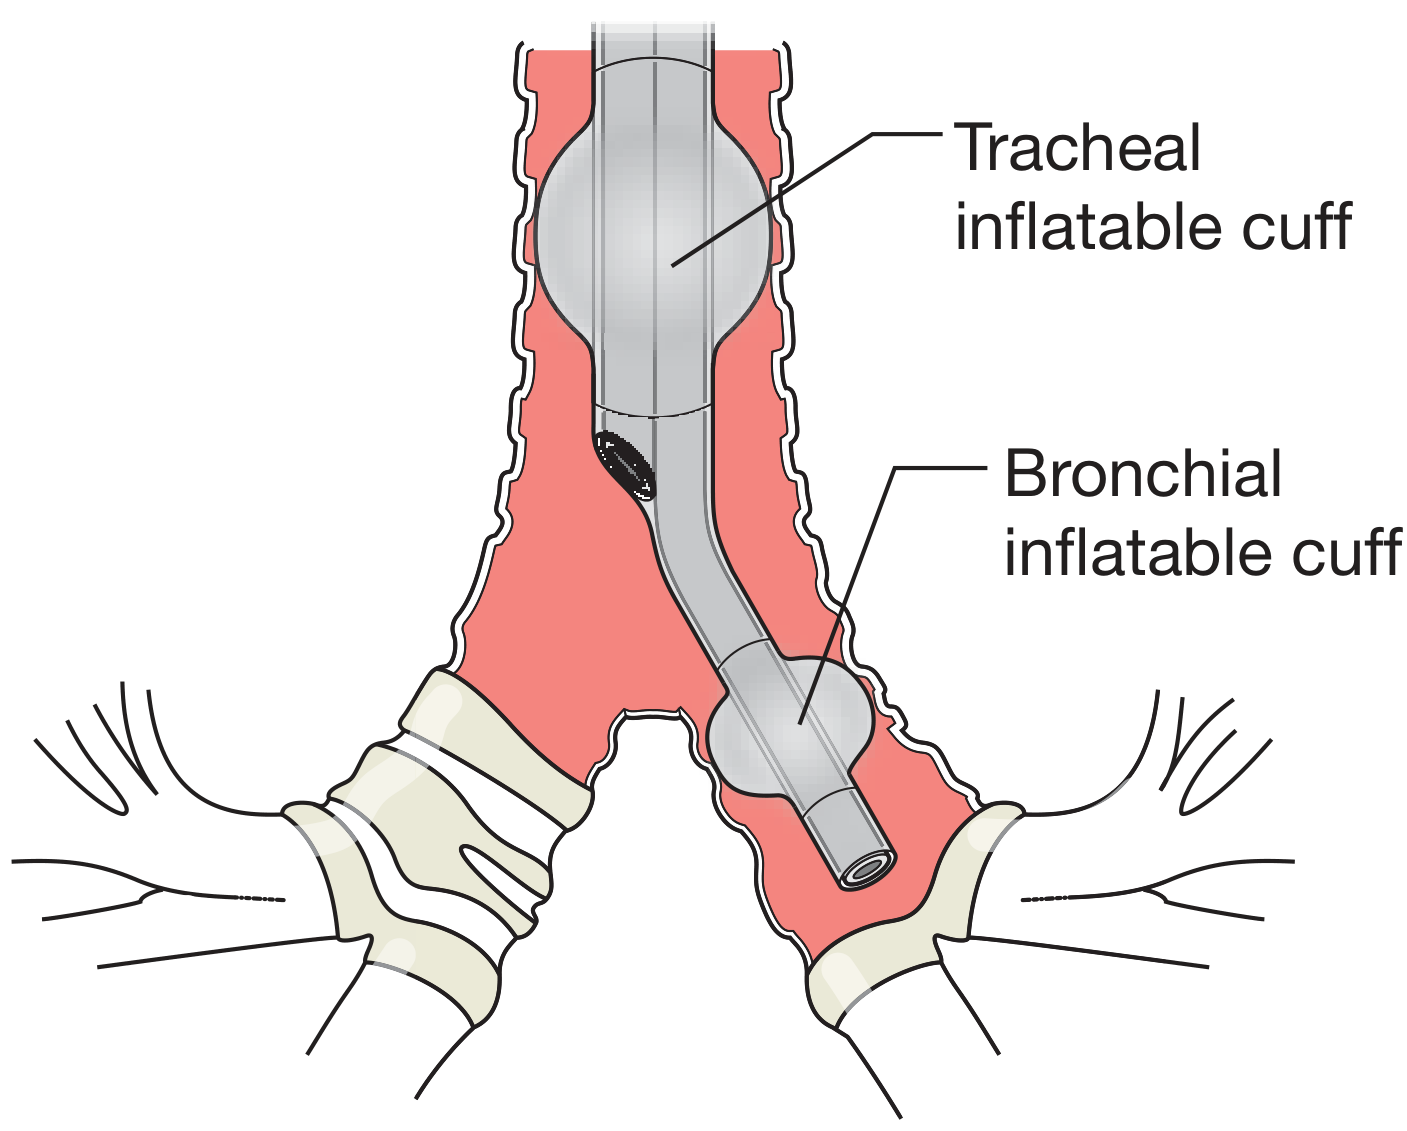
- Tracheal inflatable cuff (proximal)
- Bronchial inflatable cuff (distal - goes into one bronchus)
- Permits separate ventilation of right and left lungs
- Operated lung collapsed; contralateral lung ventilated
DIAGRAM 5 - Positioning for Anterolateral (Emergency) Thoracotomy
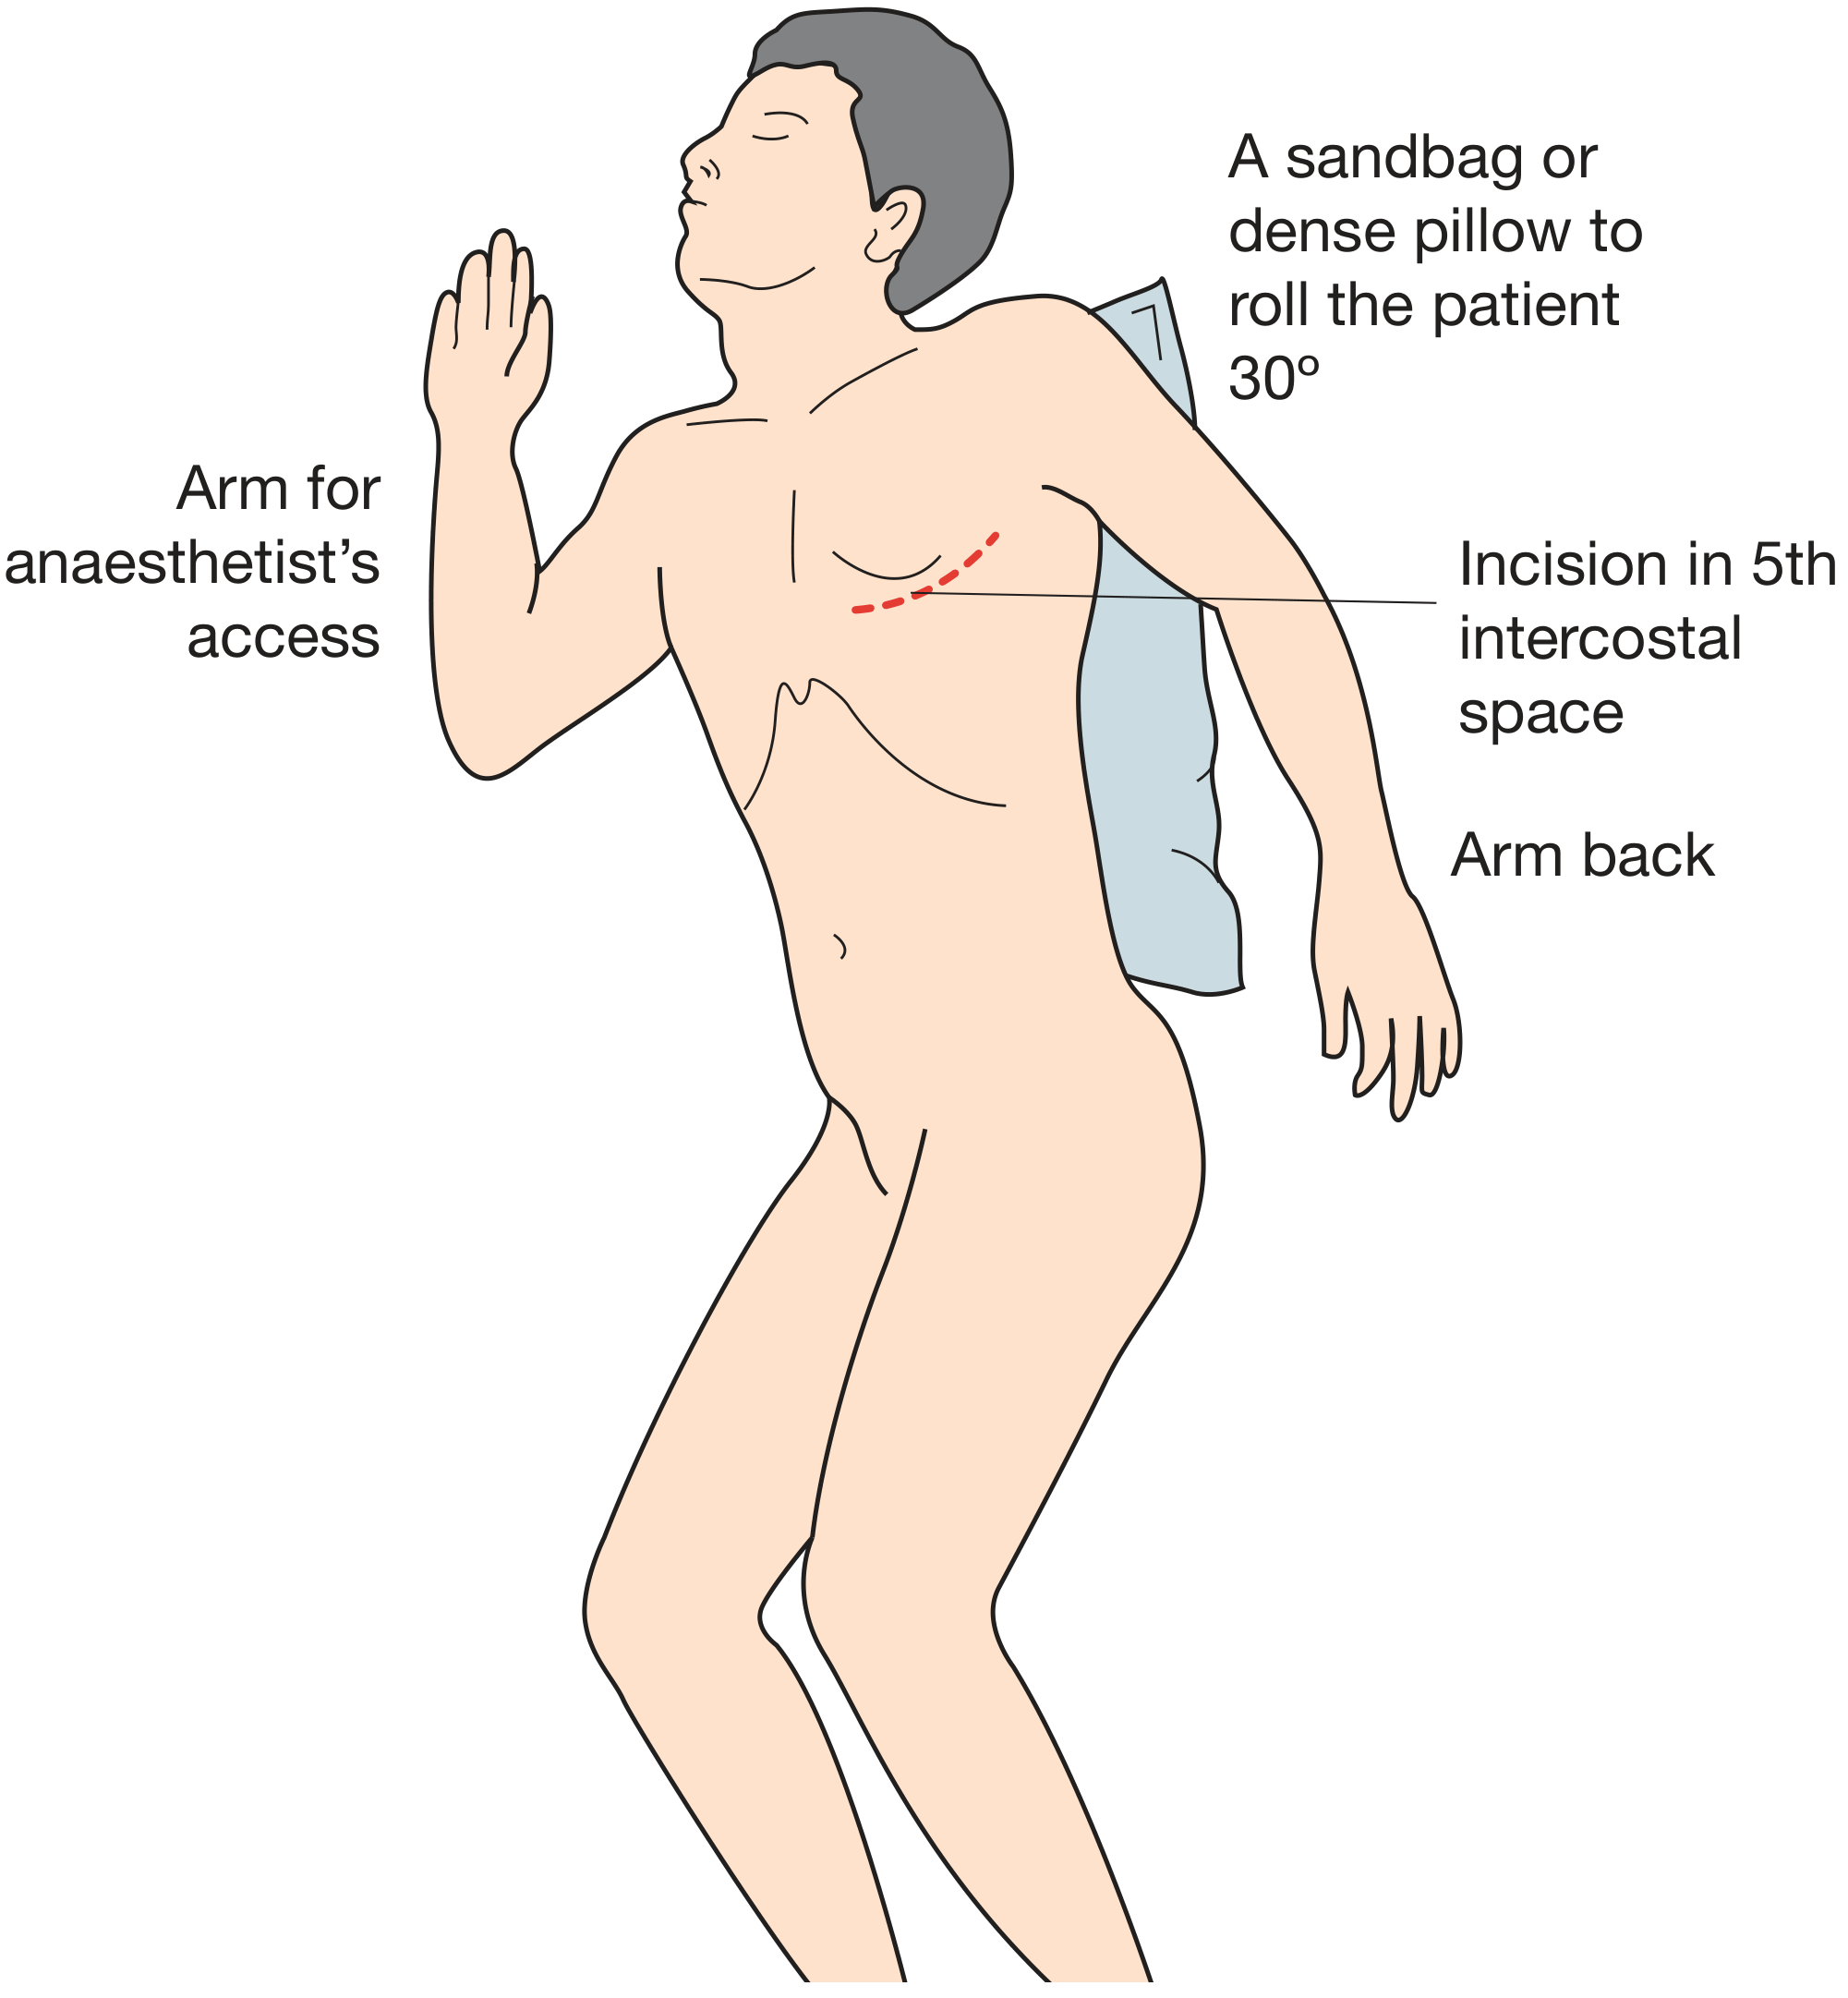
- Patient rolled 30° with sandbag/dense pillow behind
- Incision in 5th intercostal space (red dashed)
- One arm forward (anaesthetist access), one arm back
- No special equipment required - can be done in ED
DIAGRAM 6 - Clamshell (Bilateral Transverse) Thoracotomy
- Bilateral anterior thoracotomies in 4th/5th ICS
- Connected by transverse sternotomy across sternum
- Bilateral access to both pleural cavities + mediastinum
- RV (right ventricle) and Aorta exposed centrally
- Used for: double lung transplant, massive bilateral trauma
SUMMARY - WHAT TO DRAW IN EXAM
| Diagram | Title | Marks it fetches |
|---|---|---|
| 1 | Lateral decubitus positioning | Steps question |
| 2 | Incision line (3 points) | Types question |
| 3 | Muscle layers (A, B, C) | Steps question - MOST IMPORTANT |
| 4 | Double-lumen tube | Anaesthesia/steps |
| 5 | Anterolateral/emergency position | Emergency thoracotomy |
| 6 | Clamshell incision | Types question |
Exam tip: In a 20-mark answer, draw at least Diagrams 1, 3, and 4 - these are the three most commonly expected diagrams by examiners for a thoracotomy question.
Surgical anatomy of thoracoabdominal diaphragm and its surgical importance ..in 10 mark question..with diagrams
diaphragm surgical anatomy openings attachments diagram
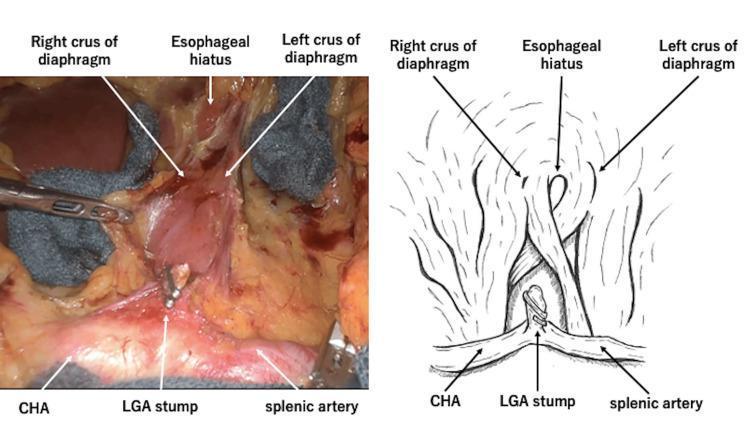
This composite educational graphic features a side-by-side presentation of an intraoperative photograph (left) and a corresponding anatomical line drawing (right) detailing the surgical dissection of the median arcuate ligament. The clinical photograph displays a high-magnification view of the upper abdominal surgical field. Key vascular structures are clearly labeled at the inferior margin, including the common hepatic artery (CHA) and splenic artery bifurcating from the celiac axis, and a ligated left gastric artery (LGA) stump. Superior to these vessels, the esophageal hiatus is shown, flanked by the right and left crus of the diaphragm. The diaphragm's muscular fibers are visible as they form the aortic and esophageal openings. The diagram replicates these relationships, emphasizing the spatial orientation of the celiac trunk branches relative to the diaphragmatic crura. This material is designed to demonstrate surgical anatomy during lymph node dissection and the release of median arcuate ligament syndrome (MALS), providing visual clarity on vascular and diaphragmatic landmarks essential for upper gastrointestinal surgery and esophageal cancer resection.
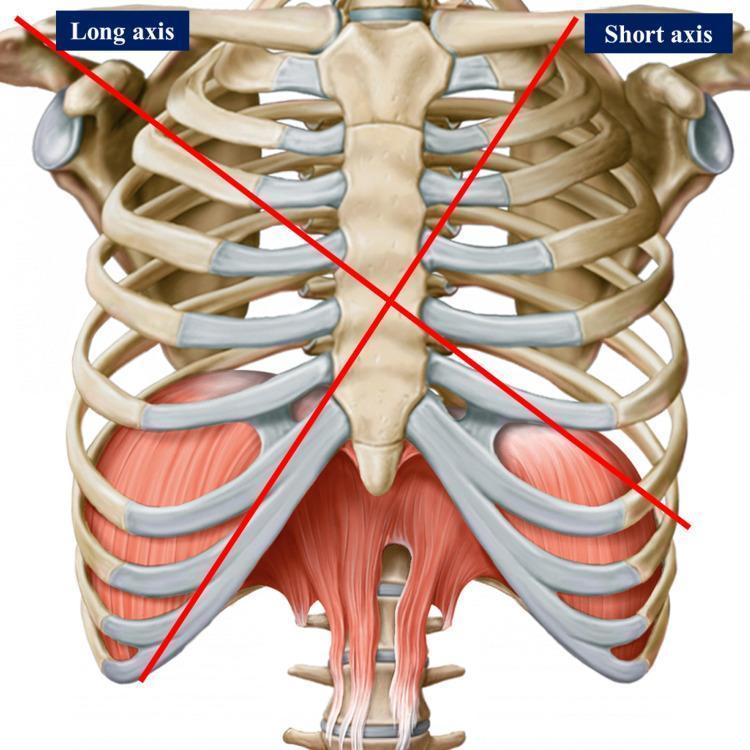
This anatomical diagram provides an anterior view of the human thoracic cage and upper abdominal musculature. The skeletal framework consists of the sternum (manubrium, body, and xiphoid process), articulating ribs with prominent costal cartilages, and components of the shoulder girdle, including the clavicles and glenoid cavities. Two intersecting red lines represent the long and short axes used for cardiac surface projection and surgical landmarks: the 'Long axis' extends from the right shoulder toward the left epigastrium, and the 'Short axis' extends from the left mid-clavicular region toward the right chondrocostal ramp. Inferiorly, the muscular diaphragm is depicted with its dome-like morphology and central tendon, alongside the superior attachments of the rectus abdominis muscle. The diagram serves as a clinical reference for surface anatomy, illustrating the spatial relationships between the thoracic wall and the underlying mediastinal structures, specifically for identifying cardiac chambers and valve locations in medical and osteopathic education.
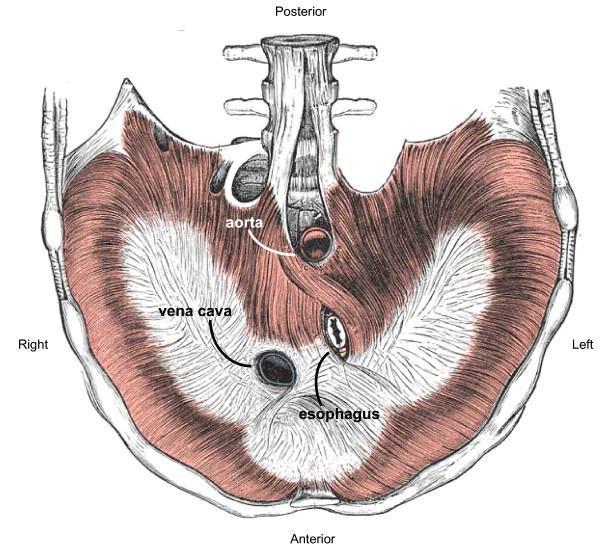
Anatomical diagram of the human diaphragm in a transverse section, viewed from below (inferior aspect from the abdominal cavity). The illustration demonstrates the dual composition of the diaphragm: a peripheral muscular region (appearing as a dark, striated band) and a central, trefoil-shaped non-muscular central tendon. Key hiatal structures are labeled to show their relative positions. The vena cava (caval opening) is located anteriorly and slightly to the right within the central tendon. The esophagus (esophageal hiatus) is situated posteriorly and to the left of the vena cava, surrounded by the muscular fibers of the right crus. The aorta (aortic hiatus) is positioned most posteriorly, passing behind the diaphragm adjacent to the vertebral column. Anatomical landmarks include the spinal column at the posterior margin and the ribs and costal margins laterally and anteriorly. This diagram illustrates the gross structural arrangement and spatial orientation of the major diaphragmatic apertures essential for understanding thoracoabdominal transit and surgical anatomy.
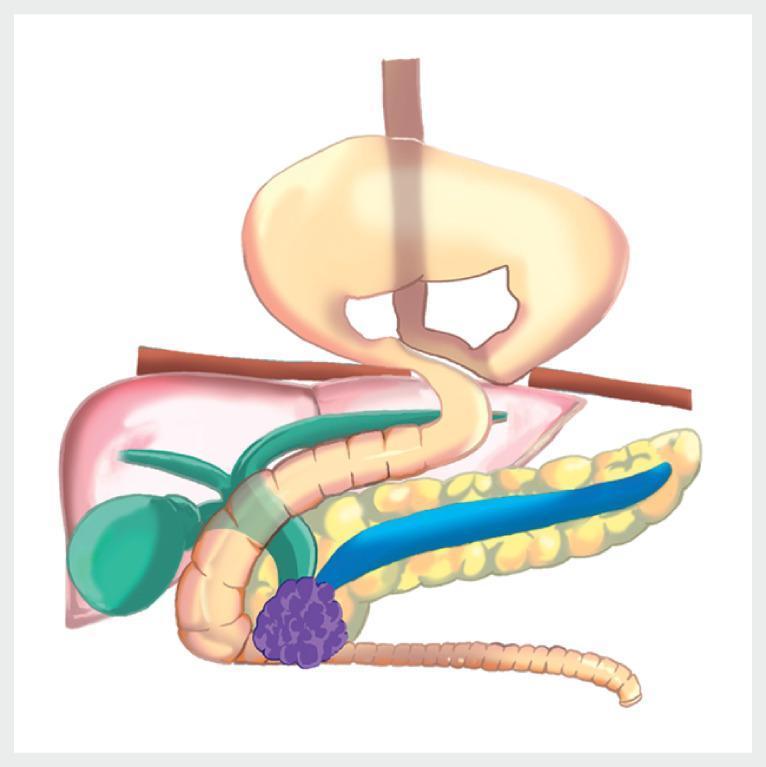
This medical anatomical diagram illustrates a complex surgical and pathological scenario involving the upper gastrointestinal and biliary systems. The image is divided by the diaphragm, showing a large hiatal hernia of the 'upside-down stomach' type, where the majority of the stomach has prolapsed into the thoracic cavity. Below the diaphragm, the abdominal anatomy includes the liver, gallbladder, and pancreas. A significant pathological finding is a purple, nodular mass located in the head of the pancreas, which is shown causing extrinsic compression of the distal common bile duct and the second portion of the duodenum. Additionally, the main pancreatic duct is depicted as dilated (highlighted in blue), indicating obstructive changes proximal to the tumor. The diagram provides clinical context for managing biliary and duodenal obstruction in the presence of severe anatomical distortion. This visual is suitable for gastroenterology and surgical oncology education, focusing on pancreatic malignancy and hiatal hernia complications.
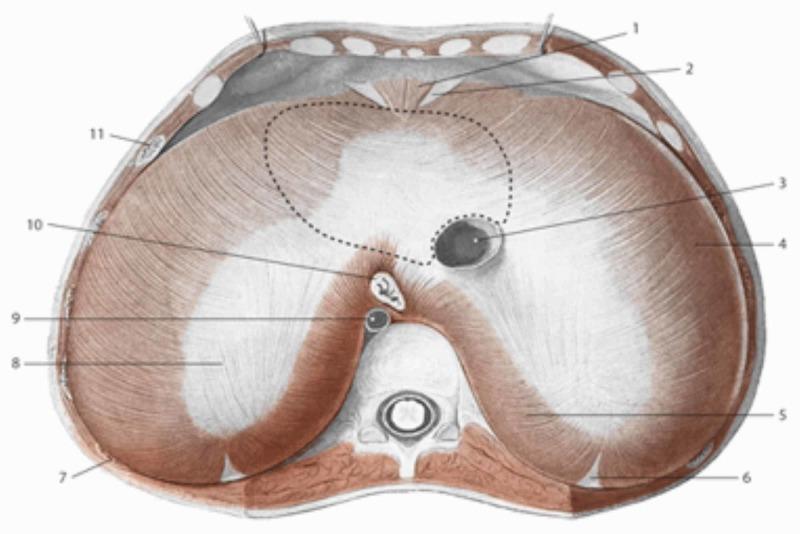
This anatomical diagram provides a superior view of the thoracic surface of the human diaphragm, illustrating its key structural components and apertures. The central area features the trefoil-shaped central tendon (8), a white aponeurotic region where muscular fibers insert. To the right of the midline within the central tendon is the caval opening (3 or 4 in metadata), which transmits the inferior vena cava. Posteriorly, the muscular part of the diaphragm forms the esophageal hiatus (10) for the passage of the esophagus and the aortic hiatus (9) for the descending aorta, the latter located between the crura in the lumbar area (5). A dotted line on the superior surface demarcates the area of contact and support for the heart. The diagram highlights the radiating muscular fibers (4) originating from the sternal (1), costal (7, 11), and lumbar (5) attachments. Surrounding structures include cross-sections of the ribs and the vertebral column, providing anatomical context for the diaphragm's position at the thoracoabdominal interface. This illustration is used for teaching respiratory anatomy and the spatial relationships of major retroperitoneal and thoracic structures.
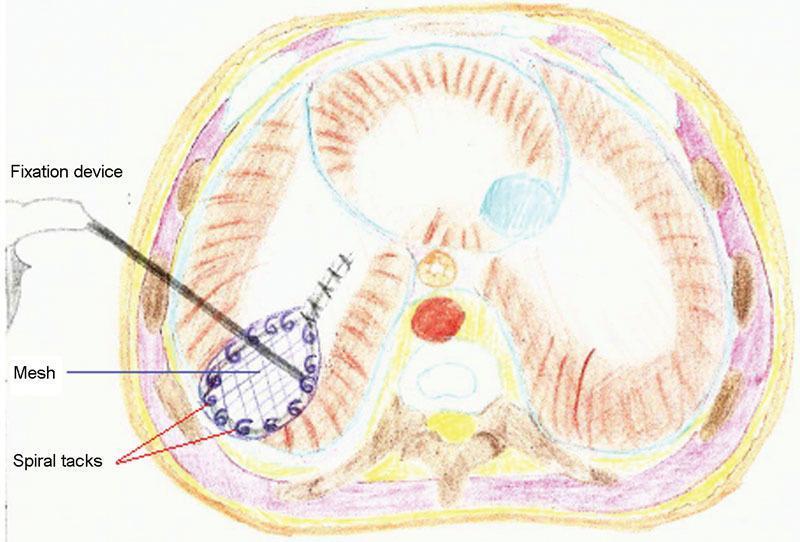
This medical illustration depicts a cross-sectional anatomical diagram of the trunk, specifically highlighting a surgical repair of a posterolateral diaphragmatic defect (likely a Bochdalek hernia). The central focus is on a prosthetic mesh patch, shown as a grid-like structure, positioned to close the opening in the diaphragm. The mesh is secured to the surrounding diaphragmatic tissue and adjacent thoracic wall structures using several non-absorbable spiral tacks, which are visible around the perimeter of the patch. A laparoscopic fixation device is illustrated in the act of applying or positioning the mesh. The surrounding anatomy includes the vertebral column, major vessels such as the aorta, and the musculature of the abdominal and thoracic walls. This educational diagram demonstrates the technique of tension-free prosthetic repair in cases where primary suture closure is insufficient, illustrating a common approach in pediatric or adult thoracic surgery.
diaphragm hiatus hernia surgical importance crura aortic esophageal
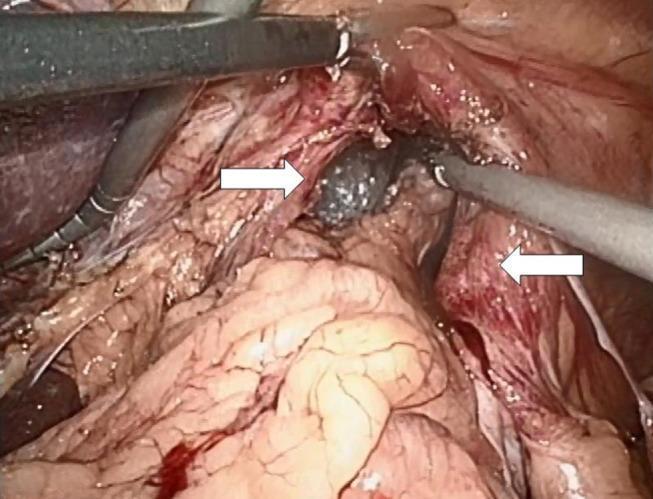
This endoscopic clinical photograph depicts an intraoperative view of a hiatal hernia repair procedure. The surgical field highlights the dissection and preparation of the esophageal hiatus. Two white arrows indicate the right and left crura of the diaphragm, which have been prepared in their ventral aspect, revealing the striated muscular texture of the diaphragmatic tissue. Centrally located between the crura is a dark, smooth-textured mass representing the hiatal sac being mobilized. Metallic laparoscopic surgical instruments are visible in the upper quadrants, manipulating the surrounding tissues. The surrounding anatomical structures show signs of active surgical dissection, including exposed tissue planes and minor localized hemorrhage. The view demonstrates the necessary anatomical exposure of the mediastinal opening required for reduction of hernia contents and subsequent hiatoplasty.
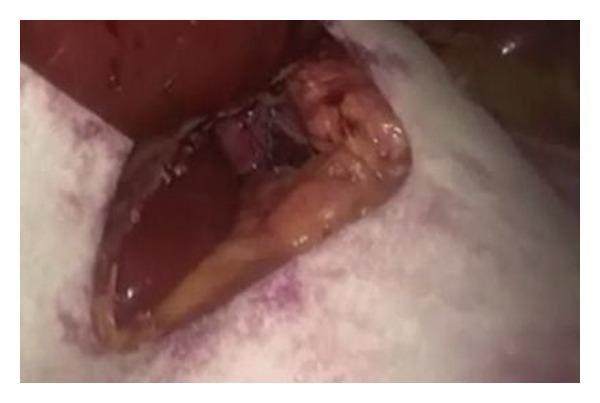
This clinical photograph captures an intraoperative view during a laparoscopic hiatal hernia repair (hiatoplasty). The image shows the application of Gore Bio-A Tissue Reinforcement, a synthetic absorbable mesh, over the diaphragmatic crura. The surgical field includes the exposed muscular pillars of the diaphragm, which have been primarily closed with sutures to reduce the esophageal hiatus. The white, translucent, 'U'-shaped mesh is seen positioned over the crura to provide structural reinforcement to the repair. The material is flexible, conforming to the anatomical contours of the retroesophageal space. Darker areas along the mesh edges indicate fixation points where absorbable sutures or tacks are used to secure the material to the underlying muscle, preventing migration. This procedure is performed to treat large hiatal hernias and gastroesophageal reflux disease (GERD) by strengthening the crural closure and reducing the risk of recurrence while avoiding the complications associated with non-absorbable permanent meshes.
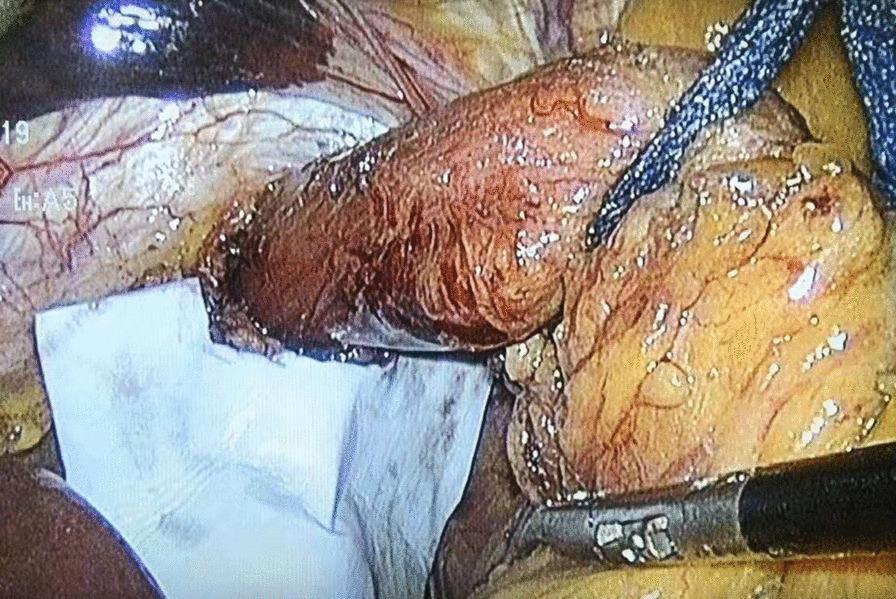
This clinical photograph captures a laparoscopic surgical field during a cruroplasty for hiatal hernia repair. The central focus is the intraoperative placement of a bioabsorbable surgical mesh (biological prosthesis) for reinforcement of the diaphragmatic crura. The mesh appears as a rectangular, opaque white, flexible sheet positioned at the base of the esophageal hiatus. A laparoscopic grasper with a silver metallic tip and black shaft is visible at the bottom right, used to manipulate the mesh and underlying tissue. Adjacent to the mesh is the reddish-brown muscular tissue of the diaphragm and the gastroesophageal junction. A blue braided suture is visible near the top right, and clear medical adhesive (cyanoacrylate) has been applied to fix the mesh in place. The image demonstrates the anatomical relationship between the prosthetic reinforcement and the esophageal hiatus, highlighting surgical techniques for strengthening hiatal closure in foregut surgery.
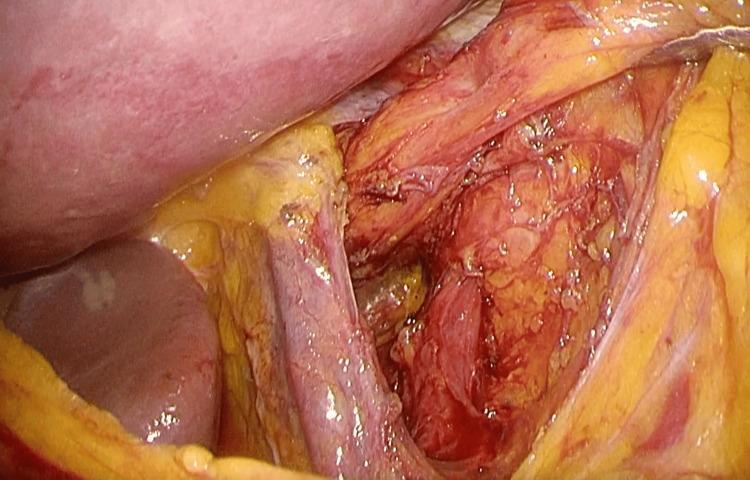
This intraoperative clinical photograph shows an open abdominal surgical field focused on the upper gastrointestinal region. The image demonstrates a pathologically enlarged esophageal hiatus, serving as a hernial orifice. Visible anatomical structures include the liver (smooth, reddish-brown organ on the left), the diaphragm, and the esophagus/stomach junction area. The operative field is characterized by moist, glistening visceral surfaces with exposed reddish muscular tissue and yellow adipose (fatty) tissue. The esophageal hiatus appears as a distinct, abnormally wide opening formed by the diaphragmatic crura. There is evidence of surgical dissection and manipulation of the surrounding tissues to expose the hiatal defect. This image illustrates a case of esophageal hiatal hernia where the orifice is sufficiently large to allow the herniation of abdominal viscera, such as the small intestine, into the thoracic cavity. The pathology is clinically relevant for understanding diaphragmatic hernia repair and the anatomical landmarks involved in cruroplasty.
SURGICAL ANATOMY OF THE THORACOABDOMINAL DIAPHRAGM AND ITS SURGICAL IMPORTANCE
INTRODUCTION
DIAGRAM 1 - Inferior View of Diaphragm (from below - Abdominal Surface)
DIAGRAM 2 - Posterior Attachments, Crura and Arcuate Ligaments
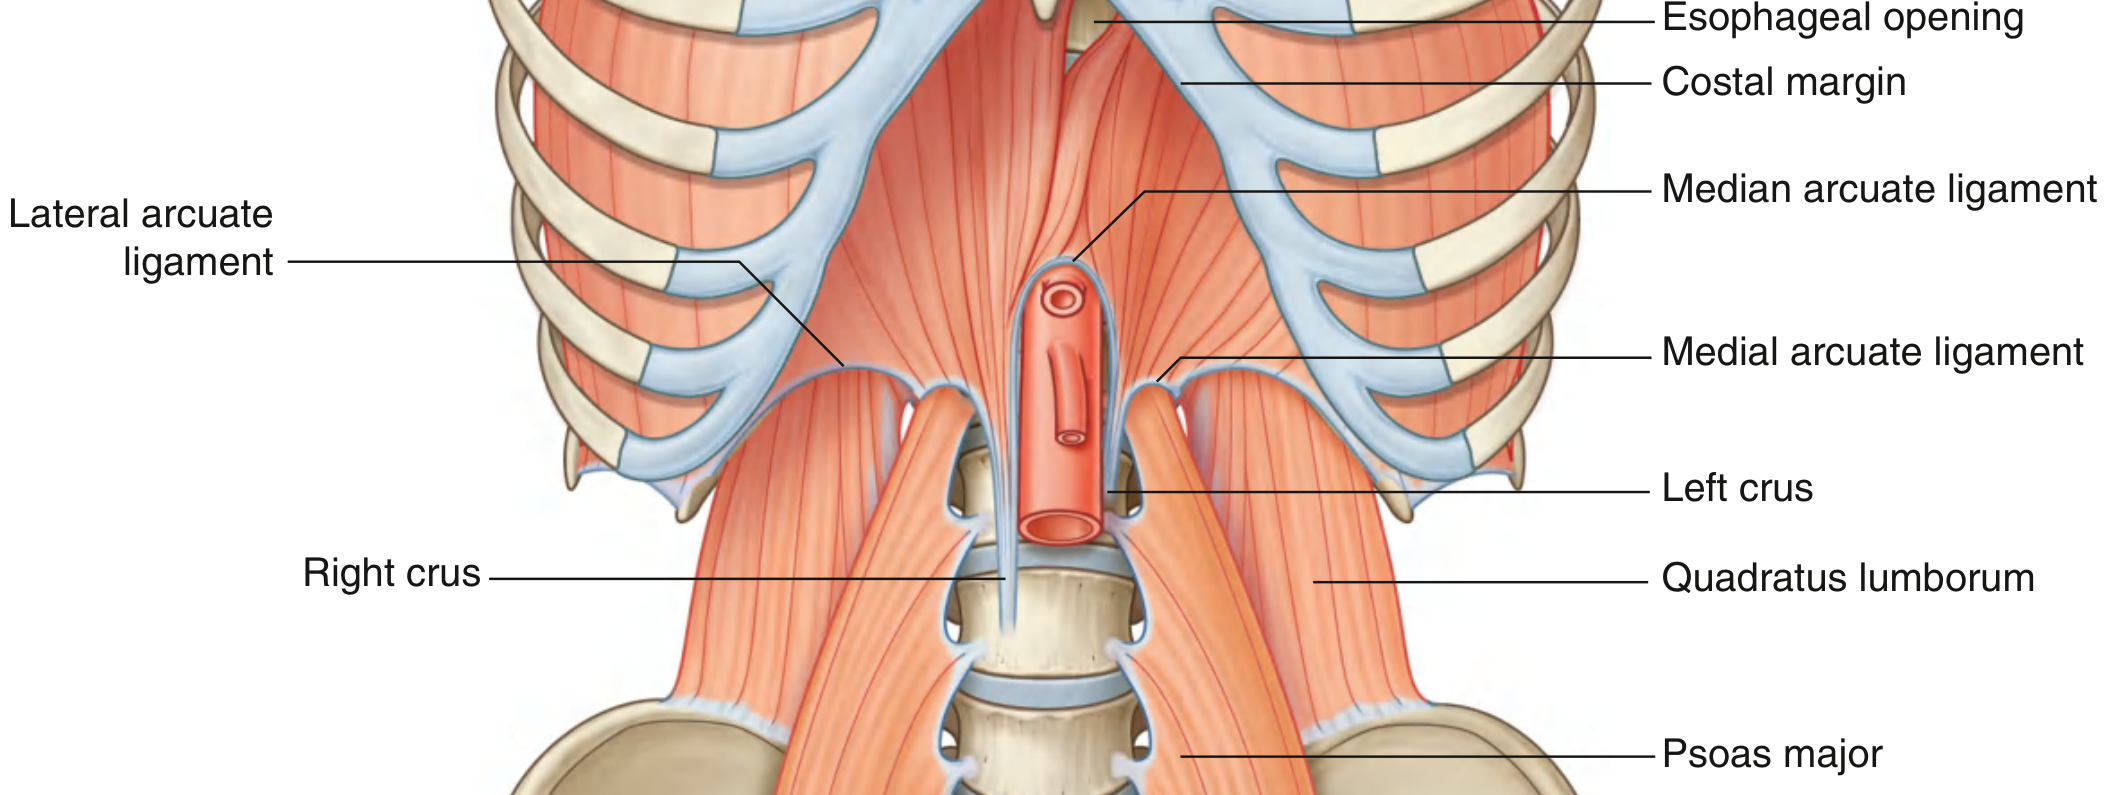
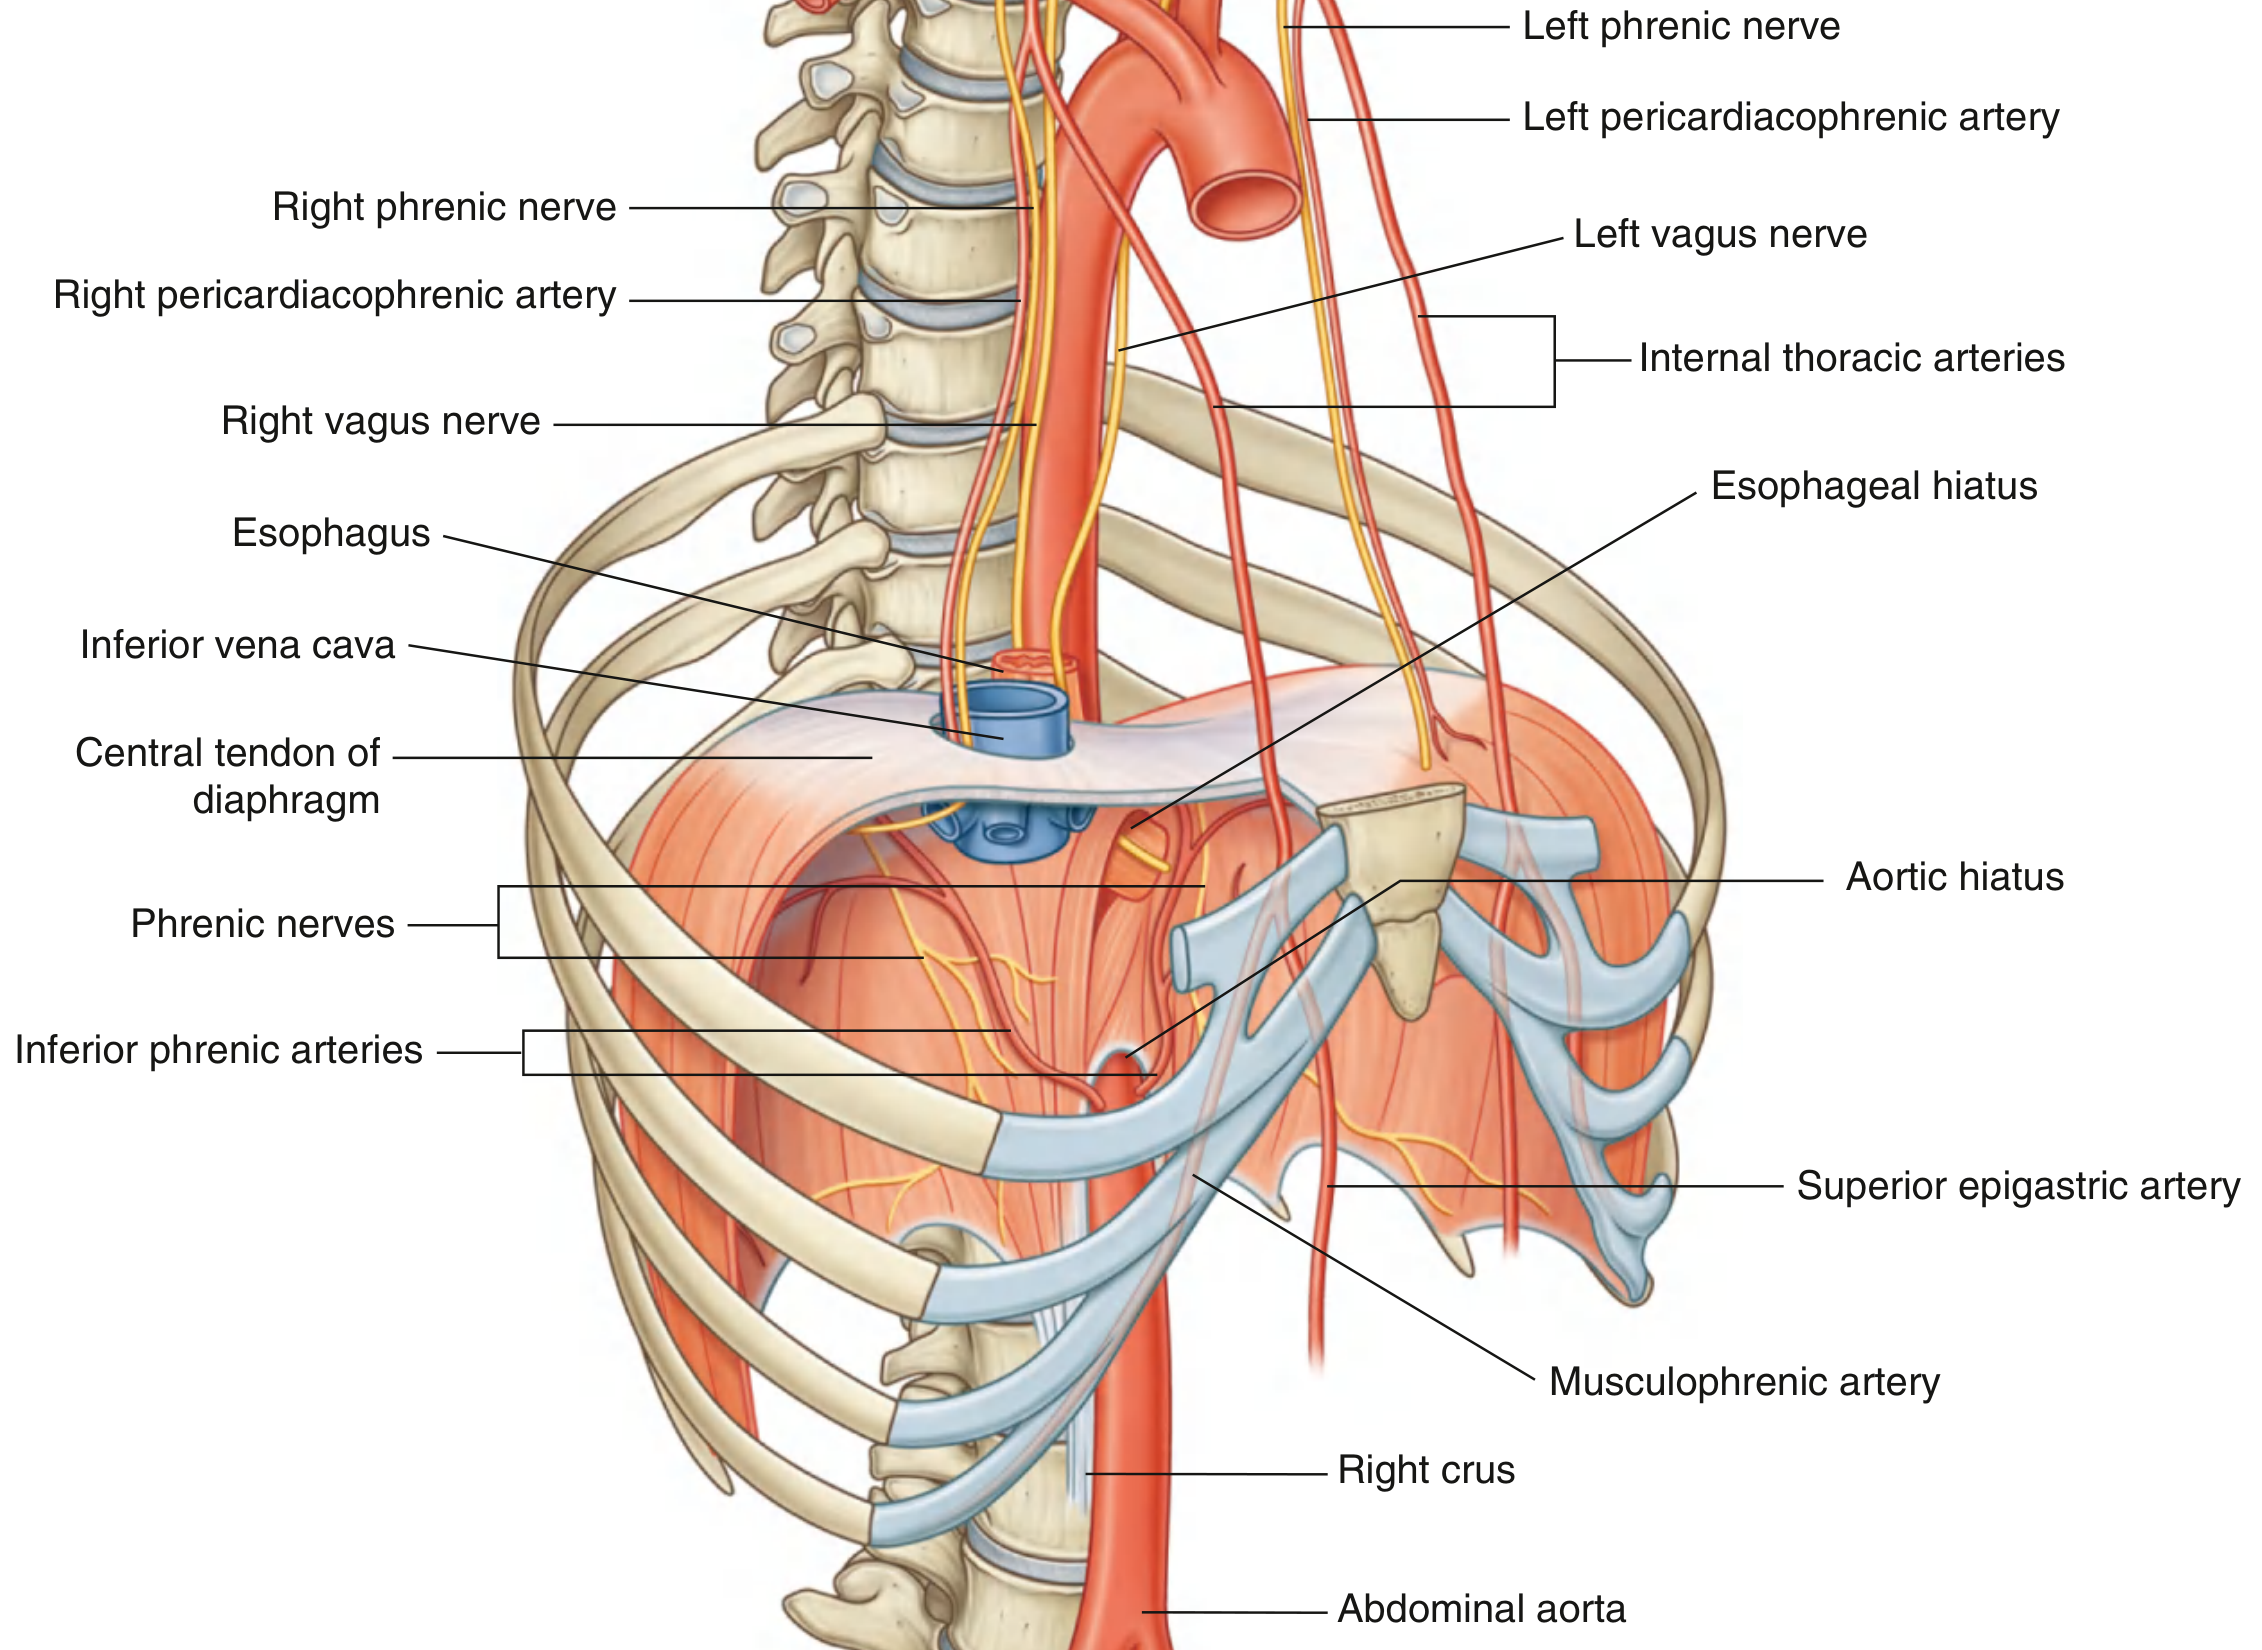
DIAGRAM 3 - Neurovascular Supply and Hiatuses (Full View)
SURGICAL ANATOMY
A. ATTACHMENTS
- Two slips from the posterior surface of the xiphoid process
- Inner surfaces of the lower 6 costal cartilages and their associated ribs (7th-12th ribs) by muscular slips interdigitating with transversus abdominis
- Right crus - arises from anterolateral surfaces of vertebral bodies L1, L2, L3 and intervening discs
- Left crus - arises from L1, L2 (and discs)
- Median arcuate ligament - fibrous arch connecting the two crura, crossing anterior to the aorta at T12
- Medial arcuate ligament - spans from vertebral body L1 to transverse process of L1, crossing over psoas major
- Lateral arcuate ligament - spans from transverse process L1 to rib 12, crossing over quadratus lumborum
B. THE THREE OPENINGS (HIATUSES) - Most Exam-Tested
| Hiatus | Level | Location | Structures passing through |
|---|---|---|---|
| Caval (Vena Caval) Opening | T8 | Central tendon, right of midline | IVC, right phrenic nerve |
| Esophageal Hiatus | T10 | Muscular part, left of midline, formed by right crus | Esophagus, vagus nerves (anterior + posterior), esophageal branches of left gastric artery/vein |
| Aortic Hiatus | T12 | Behind diaphragm (not through it), between crura, under median arcuate ligament | Aorta, thoracic duct, azygos vein |
- IVC = T8
- Esophagus = T10
- Aorta = T12
- Sympathetic trunks - lateral to aortic hiatus (behind medial arcuate ligament)
- Greater, lesser, and least splanchnic nerves - pierce the crura
- Left phrenic nerve - pierces the left dome of diaphragm separately
- Hemiazygos vein - may pass through left crus
C. NERVE SUPPLY
- Motor supply: Phrenic nerve (C3, C4, C5) - the ONLY motor supply
- "C3, 4, 5 keeps the diaphragm alive"
- Sensory supply:
- Central part (central tendon) - phrenic nerve (C3, C4, C5) → referred pain to shoulder tip
- Peripheral part - lower 6 intercostal nerves (T7-T12)
D. BLOOD SUPPLY
- Pericardiacophrenic arteries (branch of internal thoracic artery)
- Musculophrenic arteries (branch of internal thoracic artery)
- Superior phrenic arteries (from lower thoracic aorta)
- Inferior phrenic arteries - largest supply, arise directly from abdominal aorta just below the diaphragm
SURGICAL IMPORTANCE
1. Diaphragmatic Hernias
| Hernia | Site of defect | Type |
|---|---|---|
| Hiatus hernia (most common) | Esophageal hiatus - widening between crura | Sliding (95%) or Rolling/Para-oesophageal (5%) |
| Bochdalek hernia | Lumbocostal triangle (posterolateral - gap between costal and lumbar parts) | Usually left-sided; commonest congenital diaphragmatic hernia |
| Morgagni hernia | Sternocostal triangle (anterior - gap between sternal and costal parts) | Right-sided; rare; elective repair |
| Traumatic hernia | Anywhere from blunt/penetrating trauma | Left-sided more common |
- Between the lateral arcuate ligament (costal origin) and the lumbar part
- Most common site of congenital diaphragmatic hernia (CDH)
- 90% left-sided because the right side is protected by the liver
- Anterior gap between sternal and costal slips
- Transmits superior epigastric vessels
- Site of Morgagni hernia
2. Referred Pain to Shoulder
- Central diaphragm supplied by phrenic nerve (C3, C4, C5)
- Irritation (blood, pus, bile under diaphragm) → referred pain to shoulder tip
- Kehr's sign - left shoulder pain with splenic trauma/rupture (blood under left diaphragm)
- Important in diagnosing subphrenic abscess, ruptured spleen, perforated peptic ulcer
3. Subphrenic Abscess
- Pus collects in potential spaces under the diaphragm
- Right subphrenic space (most common) - between liver and right dome
- Left subphrenic space - between stomach/spleen and left dome
- Right subhepatic space (Morrison's pouch) - between liver and right kidney
- Clinically presents with referred shoulder pain, hiccough, elevated hemidiaphragm on X-ray
4. Access Route in Surgery
- The diaphragm must be divided/reflected to access the thoracoabdominal junction
- Thoracoabdominal incision - used for lower esophagus, gastric fundus, adrenal surgery, aorta
- The diaphragm is divided radially (peripherally) to avoid phrenic nerve injury
- In oesophagectomy - the esophageal hiatus is widened to deliver the stomach into the chest
5. Hiatus Hernia Surgery (Cruroplasty / Fundoplication)
- The esophageal hiatus is formed by fibers of the right crus encircling the esophagus
- Widening of hiatus + laxity of phrenoesophageal membrane → sliding hiatus hernia → GERD
- Surgical repair: Cruroplasty (posterior suturing of crura) + fundoplication (Nissen/Toupet)
- The right crus must be identified carefully as it forms the posterior border of the hiatus
6. The Median Arcuate Ligament
- Fibrous arch crossing anterior to the aorta at T12, connecting the two crura
- Median Arcuate Ligament Syndrome (MALS) - anomalously low median arcuate ligament compresses the coeliac trunk → chronic post-prandial pain, weight loss, bruit
- Treatment: Division of the median arcuate ligament (open or laparoscopic)
7. Phrenic Nerve Injury
- During mediastinal surgery, cardiac surgery, thoracotomy - the phrenic nerve runs close to the operative field
- Must be identified and preserved
- Injury → ipsilateral diaphragm paralysis → paradoxical movement → respiratory compromise
SUMMARY TABLE
| Feature | Detail |
|---|---|
| IVC hiatus level | T8 - central tendon, right side |
| Esophageal hiatus level | T10 - right crus, left of midline |
| Aortic hiatus level | T12 - behind diaphragm |
| Motor nerve | Phrenic (C3, C4, C5) |
| Largest artery | Inferior phrenic artery |
| Commonest CDH | Bochdalek (left posterolateral) |
| Commonest diaphragmatic hernia overall | Sliding hiatus hernia |
| Referred pain | Phrenic nerve → C3,4,5 → shoulder tip |
| Kehr's sign | Left shoulder pain in splenic rupture |
Surgical anatomy of thoracoabdominal diaphragm and its surgical importance ..in 10 mark question..with diagrams
WHAT WAS ALREADY PROVIDED (scroll up)
Answer Structure (10 marks)
- Introduction - definition and importance
- Attachments - sternal, costal, vertebral (crura + 3 arcuate ligaments)
- Three Openings - T8/T10/T12 with mnemonic "I Eat Apples at 8, 10, 12"
- Nerve supply - phrenic nerve C3,4,5 with clinical relevance
- Blood supply - phrenic arteries from above and below
- Surgical Importance (7 points):
- Diaphragmatic hernias (Bochdalek, Morgagni, Hiatus, Traumatic)
- Referred pain / Kehr's sign
- Subphrenic abscess
- Surgical access (thoracoabdominal incision)
- Hiatus hernia surgery (cruroplasty + fundoplication)
- Median arcuate ligament syndrome
- Phrenic nerve injury
3 Diagrams provided:
| # | Diagram | What to draw |
|---|---|---|
| 1 | Inferior view of diaphragm | 3 openings, central tendon, muscular part |
| 2 | Posterior attachments | Crura, 3 arcuate ligaments, psoas, quadratus lumborum |
| 3 | Neurovascular diagram | Phrenic nerves, phrenic arteries, hiatuses, vagus |
Make a presentation on diaphragmatic hernias for exam prep
diaphragmatic hernia types Bochdalek Morgagni hiatus hernia diagram classification
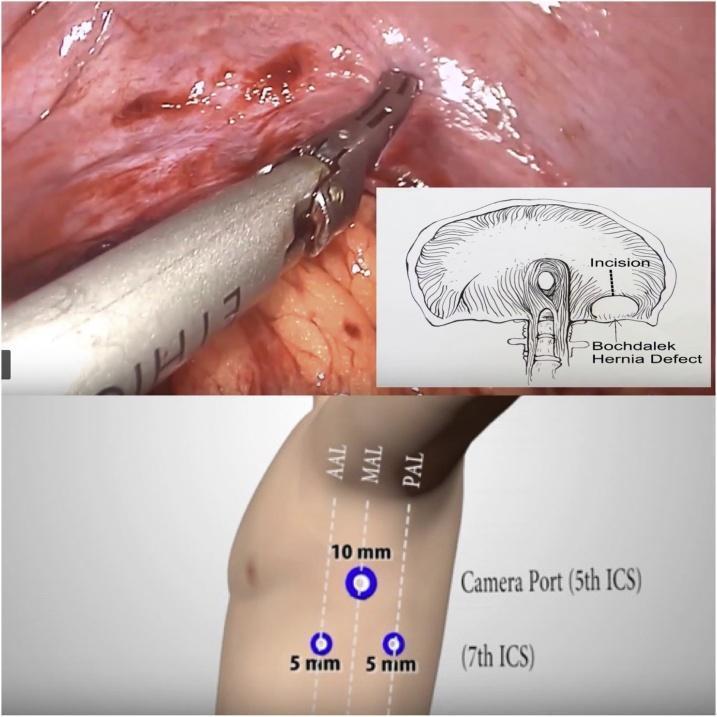
A composite medical illustration and intraoperative image detailing the surgical management of a Bochdalek hernia. The upper panel displays a laparoscopy frame showing the diaphragm with a 'pendulum-shaped incision' made to facilitate the reduction of herniated viscera. A surgical instrument is seen manipulating the vascularized, pink diaphragmatic tissue. An inset anatomical diagram clarifies the orientation, showing the relationship between the central tendon, the esophageal hiatus, the Bochdalek hernia defect, and the relief incision. The lower panel is a clinical diagram of thoracoscopic port placement on the left lateral chest wall. It illustrates the positioning of a 10 mm camera port at the 5th intercostal space (ICS) along the midaxillary line (MAL), flanked by two 5 mm working ports at the 7th ICS. Key anatomical landmarks are labeled, including the anterior axillary line (AAL), midaxillary line (MAL), and posterior axillary line (PAL), providing a guide for surgical access in thoracic surgery.
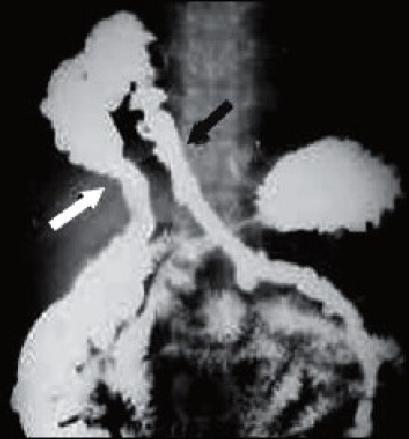
This diagnostic image is a contrast-enhanced fluoroscopic radiograph (barium study) of the upper abdomen and lower thorax, demonstrating a diaphragmatic hernia. The primary finding is the herniation of the transverse colon through a defect in the right dome of the diaphragm into the thoracic cavity. The contrast-filled colon shows a distinct superior deviation from the abdominal cavity. Specifically, the ascending limb of the herniated loop (marked by a white arrow) appears moderately dilated, while the descending portion of the loop passing through the diaphragmatic hiatus (marked by a black arrow) shows relative focal constriction, suggesting the site of the hernia neck. The image illustrates the radiological appearance of a Bochdalek or Morgagni hernia involving the large bowel. This clinical study is essential for visualizing gastrointestinal displacement and assessing the patency of herniated loops in patients presenting with atypical abdominal or respiratory symptoms.
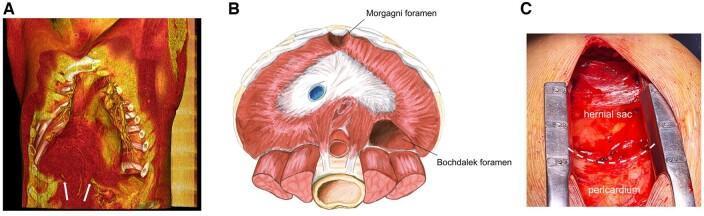
A multi-panel medical figure illustrating a Morgagni diaphragmatic hernia through diagnostic imaging, anatomical diagrams, and surgical photography. Panel A displays a 3D pre-operative angio-CT scan reconstruction, where a voluminous hernial sac containing omentum is color-coded red, positioned anterior to the yellow-coded pericardium. White markers indicate the diaphragmatic defect edges. Panel B is an anatomical illustration showing the superior view of the diaphragm, highlighting the anterior Morgagni foramen and the posterolateral Bochdalek foramen for comparative diagnosis. Panel C is an intraoperative photograph during a median sternotomy. Retractors expose the mediastinum, showing the physical relationship between the hernial sac and the pericardium, separated by a dashed white line indicating the boundary for dissection. This figure demonstrates the clinical presentation, anatomical basis, and surgical appearance of a rare adult Morgagni hernia causing significant cardiac compression.
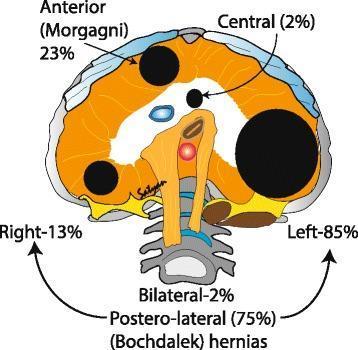
An anatomical diagram illustrating the classification and frequency of congenital diaphragmatic hernias (CDH) based on anatomical location. The illustration presents an axial view of the diaphragm, highlighting three primary defect sites: 1) Postero-lateral (Bochdalek) hernias, which are the most common at 75% of cases; 2) Anterior (Morgagni) hernias located retrosternally, accounting for 23%; and 3) Central hernias, representing 2%. The diagram further specifies the lateralization for Bochdalek hernias, indicating that 85% occur on the left side, 13% on the right side, and 2% are bilateral. Anatomical landmarks such as the vertebral column, esophagus, and major vessels are visible to provide orientation. This educational graphic is used to teach the epidemiology and spatial distribution of diaphragmatic defects in neonatology and pediatric surgery.
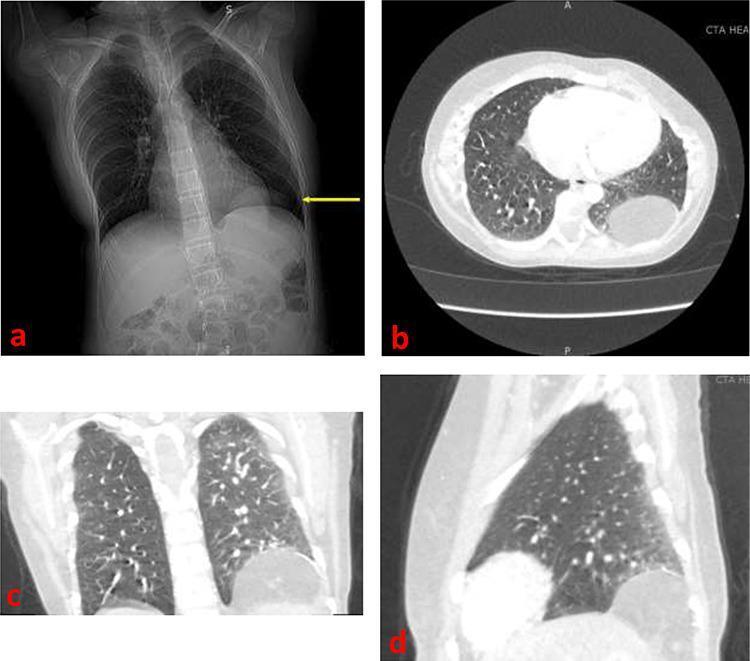
This composite of diagnostic images illustrates a Bochdalek diaphragmatic hernia in the left hemithorax through multiple modalities. (a) A frontal chest radiograph displays an obscure soft tissue opacity above the left hemidiaphragm (indicated by a yellow arrow), suggesting a protrusion into the thoracic cavity. (b, c, d) Contrast-enhanced Computed Tomography (CT) images in axial, coronal, and sagittal planes provide definitive characterization. The CT images reveal a well-defined, approximately 6 x 6 cm mass of retroperitoneal fat and omental tissue herniating through a defect in the posterolateral aspect of the left diaphragm. The axial view shows the rounded protrusion displacing lung parenchyma, while the coronal and sagittal reformats highlight the superior migration of abdominal contents through the diaphragmatic hiatus. Contrast enhancement aids in differentiating the low-density adipose tissue within the hernia from the surrounding pleura, chest wall, and vascular structures, demonstrating the clinical utility of cross-sectional imaging for surgical planning in diaphragmatic defects.
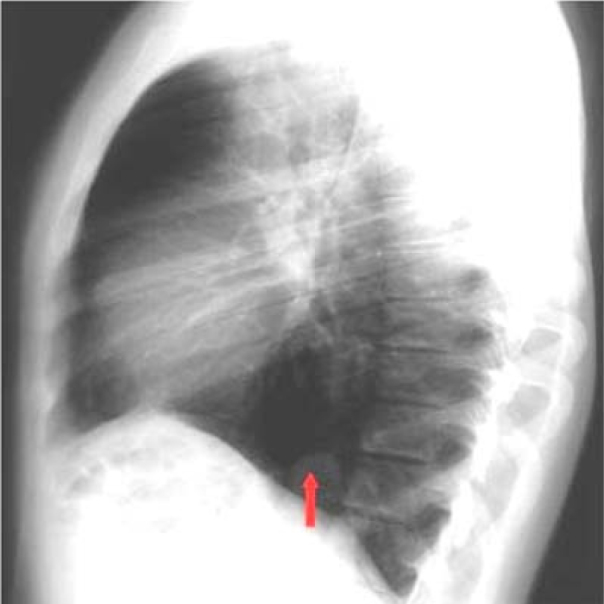
**Imaging Modality:** Lateral chest radiograph (X-ray). **Anatomical Region:** Thoracic cavity, specifically focusing on the posterior costophrenic angle and the right hemidiaphragm. **Observed Pathology:** Bochdalek hernia. **Characteristic Visual Features:** The image demonstrates a localized, well-circumscribed, small round soft-tissue opacity situated in the posterior aspect of the chest. The lesion is in direct contact with the posterior portion of the right hemidiaphragm, near the retrocardiac space and the vertebral column. A red arrow highlights the specific location of the protrusion. **Key Diagnostic Features:** The posterior location of the diaphragmatic defect is characteristic of a Bochdalek-type congenital diaphragmatic hernia. The lack of pulmonary parenchymal infiltration and the distinct margins of the opacity suggest a herniation of abdominal contents (typically omental fat or viscera) through a pleuroperitoneal hiatus. This presentation is a key differentiating feature from anterior Morgagni hernias or intrapulmonary nodules.
sliding hiatus hernia paraesophageal rolling hernia diagram types
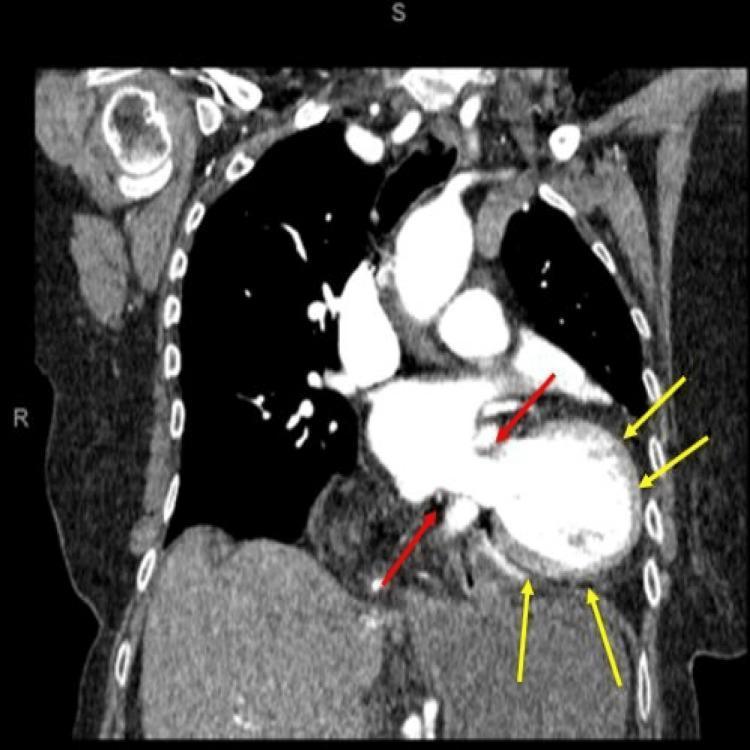
This diagnostic image is a coronal view of a Computed Tomography (CT) scan of the chest and upper abdomen, demonstrating a complex gastric volvulus associated with a large paraesophageal hiatus hernia. Red arrows indicate the rolling paraesophageal hiatus hernia, where a portion of the stomach has herniated through the esophageal hiatus into the thoracic cavity. The stomach exhibits significant distension and abnormal rotation (volvulus), leading to a distortion of normal gastrointestinal anatomy. Yellow arrows point to visible fluid accumulation (perigastric fluid) surrounding the gastric component within the intra-abdominal and lower thoracic space, which may suggest inflammation or venous congestion. The CT scan highlights the relationship between the anatomical displacement of the stomach and the potential for obstructive pathology. This material serves as a clinical reference for identifying surgical emergencies involving the upper gastrointestinal tract, specifically the coexistence of hiatal herniation and organoaxial or mesenteroaxial twisting of the stomach.
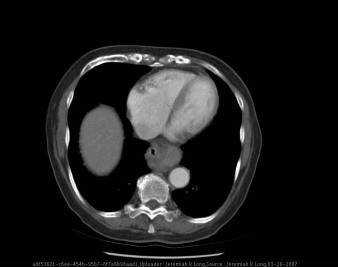
**Imaging Modality:** Axial computed tomography (CT) of the chest with intravenous and oral contrast. **Anatomical Region:** Lower thorax at the level of the retrocardiac space and esophageal hiatus. **Observed Pathology:** Sliding hiatal hernia (Type I). **Characteristic Visual Features:** The image demonstrates a soft tissue mass containing an internal air-fluid level located in the posterior mediastinum, situated directly behind the heart and anterior to the descending thoracic aorta. This represents the cranial displacement of the gastroesophageal junction and a portion of the proximal stomach through the esophageal hiatus into the thoracic cavity. The azygoesophageal recess is distorted by the herniated gastric contents. **Relevant Landmarks:** Key structures visualized include the cardiac silhouette (ventricles), the descending aorta, the vertebral body, and the liver dome (right). The oral contrast facilitates identification of the gastric lumen within the mediastinal herniation. **Differentiating Features:** The superior migration of the gastroesophageal junction above the diaphragmatic crus distinguishes this sliding hiatal hernia from a paraesophageal hernia, where the gastroesophageal junction typically remains in its normal anatomical position. No acute cardiopulmonary complications are visualized in this section.
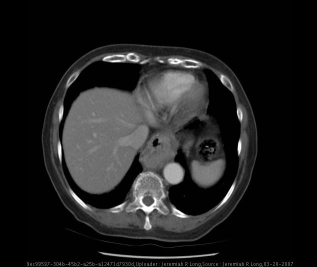
**Imaging Modality:** Axial computed tomography (CT) of the chest/upper abdomen with intravenous contrast. **Anatomical Region:** Lower mediastinum and diaphragmatic hiatus. **Observed Pathology:** Sliding hiatal hernia. The image demonstrates the superior migration of the gastroesophageal junction and a portion of the proximal stomach into the posterior mediastinum, located posterior to the heart and anterior to the descending aorta. **Characteristic Visual Features:** - A soft tissue mass containing an internal air-fluid level and heterogeneous contents (oral contrast and gas) is visible within the retrocardiac space. - The gastric herniation causes a focal widening of the diaphragmatic hiatus. - The descending thoracic aorta shows mild atherosclerotic calcification. - The liver, spleen, and visible portions of the lung parenchyma appear unremarkable at this level. **Differentiating Features:** The central location of the stomach within the hiatus, rather than adjacent to a normally positioned gastroesophageal junction, is characteristic of a sliding hiatal hernia (Type I) rather than a paraesophageal hernia. **Clinical Significance:** This finding is a common cause of retrocardiac masses on chest radiography and can correlate with symptoms of gastroesophageal reflux or mechanical compression.
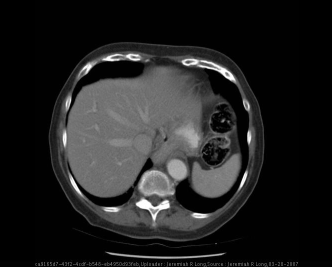
**Imaging Modality:** Contrast-enhanced Computed Tomography (CT), axial section. **Anatomical Region:** Lower thorax/upper abdomen at the level of the diaphragmatic hiatus. **Observed Pathology:** Sliding hiatal hernia. **Characteristic Visual Features:** The image demonstrates a portion of the stomach herniating superiorly through the esophageal hiatus into the posterior mediastinum. Key landmarks include the liver (right), spleen (left), and the descending aorta. Centrally, a retrocardiac soft tissue mass representing the displaced gastric cardia is visible adjacent to the esophagus. **Key Diagnostic Features:** - Widening of the diaphragmatic hiatus. - Intrathoracic displacement of the gastroesophageal junction. - Presence of a gas-filled or contrast-containing gastric pouch above the level of the diaphragm, posterior to the heart. - Absence of a distinct paraesophageal component, consistent with a Type I (sliding) hiatal hernia. **Clinical Context:** This finding is typically associated with gastroesophageal reflux disease (GERD) and is a common incidental finding on cross-sectional imaging of the chest and abdomen.
ls -la /tmp/workspace/ 2>/dev/null || echo "workspace empty or missing"
mkdir -p /tmp/workspace/diaphragmatic-hernia-ppt && python /tmp/skills/shared/scripts/fetch_images.py \ "https://cdn.orris.care/cdss_images/pmc_clinical_VQA_622033731d6070326ecbd0f92749ba4fbe6904cba4d16862549645f82a233284.jpg" \ "https://cdn.orris.care/cdss_images/pmc_clinical_VQA_acaebe8de7739161e48420770bf6aa8c88635dea40c460f7db0a8ea9ab27a8b7.jpg" \ "https://cdn.orris.care/cdss_images/pmc_clinical_VQA_dcd0a631662b48208a8101ecdf21d32a5fe2d35555ec0efbfd02794c1c36dba6.jpg" \ "https://cdn.orris.care/cdss_images/pmc_clinical_VQA_a3666f84b9d2a6ea50492a93b311f40c10e10141e10b41410e1041041041041041.jpg" \ "https://cdn.orris.care/cdss_images/roco_radiology_ROCO_02684_1766647479967.png" \ 2>/dev/null | python3 -c "import sys,json; d=json.load(sys.stdin); [print(i['url'], 'OK' if i['base64'] else 'FAIL') for i in d]"
python /tmp/skills/shared/scripts/fetch_images.py \ "https://cdn.orris.care/cdss_images/pmc_clinical_VQA_622033731d6070326ecbd0f92749ba4fbe6904cba4d16862549645f82a233284.jpg" \ "https://cdn.orris.care/cdss_images/pmc_clinical_VQA_acaebe8de7739161e48420770bf6aa8c88635dea40c460f7db0a8ea9ab27a8b7.jpg" \ "https://cdn.orris.care/cdss_images/pmc_clinical_VQA_dcd0a631662b48208a8101ecdf21d32a5fe2d35555ec0efbfd02794c1c36dba6.jpg" \ "https://cdn.orris.care/cdss_images/roco_radiology_ROCO_02684_1766647479967.png" \ "https://cdn.orris.care/cdss_images/dca7fa09f27f3536f7dc23c4278a4dc44254896e3d08924c3fc87762ea1ffb71.png" \ "https://cdn.orris.care/cdss_images/pmc_clinical_VQA_58314f26ecf199645d0ea65f4f6246a103f612a37d2052b2a11ff1d948417f3e.jpg" \ > /tmp/workspace/diaphragmatic-hernia-ppt/images.json && echo "Done"
~/diaphragmatic-hernia-ppt/build_ppt.py
import json, base64
from io import BytesIO
from pptx import Presentation
from pptx.util import Inches, Pt, Emu
from pptx.dml.color import RGBColor
from pptx.enum.text import PP_ALIGN, MSO_ANCHOR
# Load images
with open("/tmp/workspace/diaphragmatic-hernia-ppt/images.json") as f:
imgs = json.load(f)
def get_img(idx):
item = imgs[idx]
if item["base64"]:
raw = base64.b64decode(item["base64"].split(",", 1)[1])
return BytesIO(raw)
return None
# Image index map
IMG_CDH_CLASS = get_img(0) # CDH classification (Bochdalek 75%, Morgagni 23%, Central 2%)
IMG_DIAPHRAGM = get_img(1) # Inferior view diaphragm (3 openings)
IMG_MORGAGNI = get_img(2) # Morgagni hernia CT + anatomy + surgery
IMG_BOCHDALEK = get_img(3) # Bochdalek CXR lateral
IMG_CRURA = get_img(4) # Posterior diaphragm crura + arcuate ligaments
IMG_UPSIDE_STOM = get_img(5) # Hiatal hernia upside-down stomach
# ─── COLOR PALETTE ───────────────────────────────────────────────────
DARK_BLUE = RGBColor(0x1A, 0x37, 0x6C) # title bg
MED_BLUE = RGBColor(0x1F, 0x6F, 0xB8) # accent
TEAL = RGBColor(0x00, 0x8B, 0x8B) # section headers
WHITE = RGBColor(0xFF, 0xFF, 0xFF)
LIGHT_GRAY = RGBColor(0xF2, 0xF4, 0xF8)
ORANGE = RGBColor(0xE8, 0x5D, 0x04)
YELLOW_HL = RGBColor(0xFF, 0xD6, 0x00)
DARK_TEXT = RGBColor(0x1C, 0x1C, 0x2E)
RED_WARN = RGBColor(0xC0, 0x39, 0x2B)
GREEN = RGBColor(0x1E, 0x8A, 0x44)
# ─── PRESENTATION SETUP ──────────────────────────────────────────────
prs = Presentation()
prs.slide_width = Inches(13.333)
prs.slide_height = Inches(7.5)
blank = prs.slide_layouts[6]
# ─── HELPERS ─────────────────────────────────────────────────────────
def add_rect(slide, x, y, w, h, fill_color, alpha=None):
shape = slide.shapes.add_shape(1, Inches(x), Inches(y), Inches(w), Inches(h))
shape.line.fill.background()
shape.fill.solid()
shape.fill.fore_color.rgb = fill_color
return shape
def add_text(slide, text, x, y, w, h, size=18, bold=False, color=DARK_TEXT,
align=PP_ALIGN.LEFT, italic=False, wrap=True):
tb = slide.shapes.add_textbox(Inches(x), Inches(y), Inches(w), Inches(h))
tf = tb.text_frame
tf.word_wrap = wrap
tf.margin_left = Pt(0); tf.margin_right = Pt(0)
tf.margin_top = Pt(0); tf.margin_bottom = Pt(0)
p = tf.paragraphs[0]
p.alignment = align
run = p.add_run()
run.text = text
run.font.size = Pt(size)
run.font.bold = bold
run.font.italic = italic
run.font.color.rgb = color
run.font.name = "Calibri"
return tf
def add_multiline(slide, lines, x, y, w, h, size=16, bold=False, color=DARK_TEXT,
align=PP_ALIGN.LEFT, line_bold=None, spacing=1.0):
"""lines: list of str or (str, bold_override) tuples"""
from pptx.util import Pt as PT
from pptx.oxml.ns import qn
from lxml import etree
tb = slide.shapes.add_textbox(Inches(x), Inches(y), Inches(w), Inches(h))
tf = tb.text_frame
tf.word_wrap = True
tf.margin_left = Pt(2); tf.margin_right = Pt(2)
tf.margin_top = Pt(2); tf.margin_bottom = Pt(2)
for i, line in enumerate(lines):
if isinstance(line, tuple):
txt, lb = line
else:
txt, lb = line, bold
p = tf.paragraphs[0] if i == 0 else tf.add_paragraph()
p.alignment = align
run = p.add_run()
run.text = txt
run.font.size = PT(size)
run.font.bold = lb
run.font.color.rgb = color
run.font.name = "Calibri"
return tf
def add_img(slide, img_bytes, x, y, w, h=None):
if img_bytes is None:
return
img_bytes.seek(0)
if h:
slide.shapes.add_picture(img_bytes, Inches(x), Inches(y), Inches(w), Inches(h))
else:
slide.shapes.add_picture(img_bytes, Inches(x), Inches(y), Inches(w))
def slide_header(slide, title, subtitle=None):
"""Dark blue top bar with title"""
add_rect(slide, 0, 0, 13.333, 1.1, DARK_BLUE)
add_text(slide, title, 0.3, 0.1, 11.5, 0.75, size=32, bold=True, color=WHITE, align=PP_ALIGN.LEFT)
if subtitle:
add_text(slide, subtitle, 0.3, 0.78, 11.5, 0.35, size=16, bold=False, color=YELLOW_HL, align=PP_ALIGN.LEFT)
# Bottom accent stripe
add_rect(slide, 0, 1.1, 13.333, 0.06, MED_BLUE)
def section_badge(slide, text, x, y, w=3.5, h=0.38, bg=TEAL):
add_rect(slide, x, y, w, h, bg)
add_text(slide, text, x+0.08, y+0.04, w-0.1, h-0.05, size=14, bold=True, color=WHITE)
def bullet_box(slide, title, bullets, x, y, w, h, title_color=TEAL, bg=LIGHT_GRAY,
bullet_size=14, title_size=15):
add_rect(slide, x, y, w, h, bg)
# title bar inside
add_rect(slide, x, y, w, 0.4, title_color)
add_text(slide, title, x+0.1, y+0.05, w-0.2, 0.35, size=title_size, bold=True, color=WHITE)
# bullets
lines = []
for b in bullets:
lines.append(f" \u2022 {b}")
add_multiline(slide, lines, x+0.1, y+0.45, w-0.2, h-0.55, size=bullet_size, color=DARK_TEXT)
def key_fact_box(slide, label, value, x, y, w=2.5, h=0.9, label_bg=MED_BLUE, val_bg=WHITE):
add_rect(slide, x, y, w, 0.38, label_bg)
add_text(slide, label, x+0.08, y+0.06, w-0.15, 0.3, size=12, bold=True, color=WHITE, align=PP_ALIGN.CENTER)
add_rect(slide, x, y+0.38, w, h-0.38, val_bg)
add_text(slide, value, x+0.08, y+0.42, w-0.15, h-0.45, size=13, bold=False, color=DARK_TEXT, align=PP_ALIGN.CENTER)
# ══════════════════════════════════════════════════════════════════════
# SLIDE 1 – TITLE SLIDE
# ══════════════════════════════════════════════════════════════════════
sl = prs.slides.add_slide(blank)
add_rect(sl, 0, 0, 13.333, 7.5, DARK_BLUE)
add_rect(sl, 0, 5.8, 13.333, 1.7, MED_BLUE)
# Decorative diagonal stripe
add_rect(sl, 9.5, 0, 0.25, 7.5, TEAL)
add_rect(sl, 10.0, 0, 0.1, 7.5, ORANGE)
add_text(sl, "DIAPHRAGMATIC HERNIAS", 0.8, 1.2, 11, 1.4,
size=44, bold=True, color=WHITE, align=PP_ALIGN.LEFT)
add_text(sl, "Complete Exam Preparation Guide", 0.8, 2.7, 9, 0.6,
size=22, bold=False, color=YELLOW_HL, align=PP_ALIGN.LEFT)
# subtitle box
add_rect(sl, 0.8, 3.4, 8.5, 0.06, ORANGE)
add_text(sl, "Classification • Anatomy • Clinical Features • Diagnosis • Management", 0.8, 3.6, 10, 0.5,
size=17, bold=False, color=RGBColor(0xBB, 0xDE, 0xFF), align=PP_ALIGN.LEFT)
# Tags
for i, tag in enumerate(["Surgery", "NEET PG", "Anatomy", "Exam Prep"]):
add_rect(sl, 0.8 + i*2.1, 4.5, 1.9, 0.42, TEAL)
add_text(sl, tag, 0.85 + i*2.1, 4.56, 1.8, 0.3, size=14, bold=True, color=WHITE, align=PP_ALIGN.CENTER)
add_text(sl, "Sources: Bailey & Love • Sabiston • Gray's Anatomy • Murray & Nadel", 0.8, 6.2, 11, 0.4,
size=12, color=RGBColor(0xBB, 0xDE, 0xFF))
# ══════════════════════════════════════════════════════════════════════
# SLIDE 2 – OVERVIEW / CONTENTS
# ══════════════════════════════════════════════════════════════════════
sl = prs.slides.add_slide(blank)
add_rect(sl, 0, 0, 13.333, 7.5, LIGHT_GRAY)
slide_header(sl, "Overview", "What will be covered in this deck")
topics = [
("01", "Definition & Classification", "Types of diaphragmatic hernias"),
("02", "Anatomy of Diaphragm", "Weak areas & hiatuses"),
("03", "Hiatus Hernia (Types I–IV)", "Sliding, Rolling, Mixed, Complex"),
("04", "Bochdalek Hernia", "Congenital – posterolateral defect"),
("05", "Morgagni Hernia", "Congenital – anterior/retrosternal"),
("06", "Clinical Features & Diagnosis","Symptoms, radiology, endoscopy"),
("07", "Management", "Medical vs Surgical treatment"),
("08", "High-Yield Exam Points", "Mnemonics & quick-revision facts"),
]
cols = [(0.3, 1.3), (6.8, 1.3), (0.3, 2.8), (6.8, 2.8), (0.3, 4.3), (6.8, 4.3), (0.3, 5.8), (6.8, 5.8)]
for (num, title, sub), (cx, cy) in zip(topics, cols):
add_rect(sl, cx, cy, 6.2, 1.2, WHITE)
add_rect(sl, cx, cy, 0.7, 1.2, DARK_BLUE)
add_text(sl, num, cx+0.05, cy+0.28, 0.6, 0.6, size=22, bold=True, color=WHITE, align=PP_ALIGN.CENTER)
add_text(sl, title, cx+0.8, cy+0.08, 5.2, 0.45, size=16, bold=True, color=DARK_BLUE)
add_text(sl, sub, cx+0.8, cy+0.55, 5.2, 0.45, size=13, color=RGBColor(0x55, 0x55, 0x55))
# ══════════════════════════════════════════════════════════════════════
# SLIDE 3 – CLASSIFICATION
# ══════════════════════════════════════════════════════════════════════
sl = prs.slides.add_slide(blank)
add_rect(sl, 0, 0, 13.333, 7.5, LIGHT_GRAY)
slide_header(sl, "Classification of Diaphragmatic Hernias", "Based on anatomical location")
# Left: diagram image
if IMG_CDH_CLASS:
IMG_CDH_CLASS.seek(0)
add_img(sl, IMG_CDH_CLASS, 0.3, 1.3, 5.8, 5.8)
# Right: classification boxes
boxes = [
("TYPE I – CONGENITAL", MED_BLUE, "Hiatus Hernia\n(Present at birth - esophageal hiatus widening)"),
("TYPE II – BOCHDALEK", ORANGE, "Posterolateral lumbocostal triangle\n85% Left, 13% Right, 2% Bilateral\nMost common CDH (70-75%)"),
("TYPE III – MORGAGNI", TEAL, "Anterior / Retrosternal (sternocostal triangle)\n~23% of CDH cases\nUsually Right-sided"),
("TYPE IV – TRAUMATIC", RED_WARN, "Any location from blunt/penetrating trauma\nLeft side more common (liver protects right)"),
]
for i, (title, col, desc) in enumerate(boxes):
y = 1.3 + i * 1.52
add_rect(sl, 6.4, y, 6.7, 1.35, WHITE)
add_rect(sl, 6.4, y, 6.7, 0.4, col)
add_text(sl, title, 6.5, y+0.05, 6.5, 0.33, size=14, bold=True, color=WHITE)
add_text(sl, desc, 6.5, y+0.45, 6.5, 0.85, size=12, color=DARK_TEXT)
# ══════════════════════════════════════════════════════════════════════
# SLIDE 4 – ANATOMY (Diaphragm hiatuses)
# ══════════════════════════════════════════════════════════════════════
sl = prs.slides.add_slide(blank)
add_rect(sl, 0, 0, 13.333, 7.5, LIGHT_GRAY)
slide_header(sl, "Surgical Anatomy of the Diaphragm", "Openings, weak areas & crura")
# Diaphragm inferior view image
if IMG_DIAPHRAGM:
IMG_DIAPHRAGM.seek(0)
add_img(sl, IMG_DIAPHRAGM, 0.3, 1.3, 5.8, 4.0)
# Three hiatuses table
add_rect(sl, 6.4, 1.3, 6.6, 0.45, DARK_BLUE)
add_text(sl, "THREE OPENINGS OF THE DIAPHRAGM", 6.5, 1.33, 6.5, 0.38, size=15, bold=True, color=WHITE, align=PP_ALIGN.CENTER)
rows = [
("Caval Opening", "T8", "Central tendon, RIGHT", "IVC, Right phrenic nerve"),
("Esophageal Hiatus", "T10", "Right crus, LEFT of ML", "Esophagus, Vagus nerves (ant + post)"),
("Aortic Hiatus", "T12", "Behind diaphragm", "Aorta, Thoracic duct, Azygos vein"),
]
headers = ["Opening", "Level", "Location", "Structures"]
col_w = [1.8, 0.7, 1.9, 2.1]
col_x = [6.4, 8.2, 8.9, 10.8]
for ci, (hdr, cw, cx) in enumerate(zip(headers, col_w, col_x)):
add_rect(sl, cx, 1.75, cw, 0.4, MED_BLUE)
add_text(sl, hdr, cx+0.05, 1.78, cw-0.1, 0.33, size=12, bold=True, color=WHITE, align=PP_ALIGN.CENTER)
for ri, row in enumerate(rows):
bg = WHITE if ri % 2 == 0 else RGBColor(0xE8, 0xF0, 0xFE)
for ci, (val, cw, cx) in enumerate(zip(row, col_w, col_x)):
add_rect(sl, cx, 2.15 + ri*0.75, cw, 0.73, bg)
add_text(sl, val, cx+0.05, 2.18 + ri*0.75, cw-0.1, 0.65, size=11,
bold=(ci == 0), color=DARK_BLUE if ci == 0 else DARK_TEXT, align=PP_ALIGN.CENTER)
# Mnemonic box
add_rect(sl, 6.4, 4.5, 6.6, 0.9, RGBColor(0xFF, 0xF3, 0xCC))
add_rect(sl, 6.4, 4.5, 6.6, 0.32, ORANGE)
add_text(sl, "MNEMONIC", 6.5, 4.52, 6.4, 0.27, size=13, bold=True, color=WHITE)
add_text(sl, '"I Eat Apples at 8, 10, 12" → IVC(T8) | Esophagus(T10) | Aorta(T12)',
6.5, 4.85, 6.4, 0.5, size=13, bold=True, color=DARK_BLUE)
# Weak areas box
bullet_box(sl, "WEAK AREAS (Sites of Herniation)",
["Bochdalek (Lumbocostal) triangle – posterolateral",
"Morgagni (Sternocostal) triangle – anterior",
"Esophageal hiatus – widening of right crus",
"Central tendon – rare traumatic defect"],
6.4, 5.5, 6.6, 1.8, bg=WHITE)
# Crura image
if IMG_CRURA:
IMG_CRURA.seek(0)
add_img(sl, IMG_CRURA, 0.3, 5.35, 5.8, 1.9)
# ══════════════════════════════════════════════════════════════════════
# SLIDE 5 – HIATUS HERNIA
# ══════════════════════════════════════════════════════════════════════
sl = prs.slides.add_slide(blank)
add_rect(sl, 0, 0, 13.333, 7.5, LIGHT_GRAY)
slide_header(sl, "Hiatus Hernia", "Types I – IV • Most common diaphragmatic hernia")
# 4 type boxes at top
type_data = [
("TYPE I\nSLIDING", "85–95%", MED_BLUE,
"OGJ slides above diaphragm\nNo true peritoneal sac\nPredisposes to GORD\nMost common"),
("TYPE II\nROLLING", "5%", ORANGE,
"Gastric fundus herniates\nalongside esophagus\nOGJ remains below diaphragm\nTrue peritoneal sac"),
("TYPE III\nMIXED", "Common", TEAL,
"Both OGJ + fundus herniate\nMore common than pure type II\nHigher risk of complications"),
("TYPE IV\nCOMPLEX", "Rare", RED_WARN,
"Other viscera herniate:\nColon, small bowel, spleen\nGiant hernia (>50% of stomach)\nHighest risk"),
]
for i, (title, pct, col, desc) in enumerate(type_data):
x = 0.2 + i * 3.3
add_rect(sl, x, 1.3, 3.1, 4.5, WHITE)
add_rect(sl, x, 1.3, 3.1, 0.75, col)
add_text(sl, title, x+0.1, 1.32, 2.4, 0.68, size=14, bold=True, color=WHITE)
add_rect(sl, x+2.3, 1.32, 0.75, 0.45, WHITE)
add_text(sl, pct, x+2.32, 1.35, 0.7, 0.38, size=12, bold=True, color=col, align=PP_ALIGN.CENTER)
add_text(sl, desc, x+0.15, 2.1, 2.85, 3.5, size=12.5, color=DARK_TEXT)
# Bottom info strip
add_rect(sl, 0, 5.9, 13.333, 1.5, WHITE)
add_rect(sl, 0, 5.9, 13.333, 0.08, MED_BLUE)
facts = [
("Risk Factors", "Obesity, Advanced age\nPregnancy, Chronic cough"),
("Key Symptom", "Heartburn / GORD\nDysphagia (type II/III/IV)"),
("Emergency", "Gastric volvulus\nOrganoaxial or mesenteroaxial"),
("Investigation", "Barium swallow (gold std)\nEndoscopy, CT scan"),
("Surgery", "Laparoscopic Nissen / Toupet\nfundoplication + cruroplasty"),
]
for i, (lbl, val) in enumerate(facts):
x = 0.3 + i*2.6
add_rect(sl, x, 6.0, 2.45, 0.38, DARK_BLUE)
add_text(sl, lbl, x+0.05, 6.03, 2.3, 0.3, size=12, bold=True, color=WHITE, align=PP_ALIGN.CENTER)
add_text(sl, val, x+0.05, 6.42, 2.3, 0.9, size=11, color=DARK_TEXT, align=PP_ALIGN.CENTER)
# ══════════════════════════════════════════════════════════════════════
# SLIDE 6 – BOCHDALEK HERNIA
# ══════════════════════════════════════════════════════════════════════
sl = prs.slides.add_slide(blank)
add_rect(sl, 0, 0, 13.333, 7.5, LIGHT_GRAY)
slide_header(sl, "Bochdalek Hernia", "Congenital Diaphragmatic Hernia (CDH) – Posterolateral defect")
# Image left
if IMG_BOCHDALEK:
IMG_BOCHDALEK.seek(0)
add_img(sl, IMG_BOCHDALEK, 0.3, 1.3, 5.5, 5.8)
# Right side - info boxes
bullet_box(sl, "ANATOMY OF DEFECT",
["Lumbocostal (Bochdalek) triangle",
"Gap between costal & lumbar parts",
"70–75% of all CDH cases",
"LEFT-sided 85% | RIGHT 13% | Bilateral 2%",
"Right side protected by liver"],
6.1, 1.3, 7.0, 2.3)
bullet_box(sl, "CLINICAL FEATURES",
["Presents in NEONATES with respiratory distress",
"Scaphoid (boat-shaped) abdomen",
"Absent breath sounds on affected side",
"Mediastinal shift to opposite side",
"Bowel sounds in chest",
"Pulmonary hypoplasia + hypertension"],
6.1, 3.75, 7.0, 2.5)
add_rect(sl, 6.1, 6.4, 7.0, 0.9, RGBColor(0xFF, 0xEB, 0xEB))
add_rect(sl, 6.1, 6.4, 7.0, 0.32, RED_WARN)
add_text(sl, "SURGERY", 6.2, 6.42, 6.8, 0.27, size=13, bold=True, color=WHITE)
add_text(sl, "Primary repair via laparotomy/thoracotomy. Prosthetic mesh if large defect. Survival 65–90%",
6.2, 6.75, 6.8, 0.5, size=12, color=DARK_TEXT)
# ══════════════════════════════════════════════════════════════════════
# SLIDE 7 – MORGAGNI HERNIA
# ══════════════════════════════════════════════════════════════════════
sl = prs.slides.add_slide(blank)
add_rect(sl, 0, 0, 13.333, 7.5, LIGHT_GRAY)
slide_header(sl, "Morgagni Hernia", "Anterior retrosternal diaphragmatic hernia")
# Image left (Morgagni CT + anatomy + surgery)
if IMG_MORGAGNI:
IMG_MORGAGNI.seek(0)
add_img(sl, IMG_MORGAGNI, 0.3, 1.3, 6.3, 5.8)
bullet_box(sl, "ANATOMY OF DEFECT",
["Sternocostal (Morgagni / Larrey) triangle",
"Anterior gap between sternal & costal parts",
"~23% of all CDH",
"Usually RIGHT-sided (liver on right protects left side occasionally)",
"Has a TRUE peritoneal sac (unlike Bochdalek)"],
6.8, 1.3, 6.3, 2.3)
bullet_box(sl, "CLINICAL FEATURES",
["Usually presents in ADULTS (often incidental)",
"Chest pain, dyspnoea, GI symptoms",
"Recurrent respiratory infections",
"Often contains: omentum, transverse colon",
"Rarely: small bowel, stomach",
"Retrosternal opacity on CXR"],
6.8, 3.75, 6.3, 2.3)
bullet_box(sl, "SURGERY",
["Elective repair even if asymptomatic (risk of strangulation)",
"Laparoscopic approach (preferred)",
"Reduction of contents + excision of sac",
"Primary suture or mesh repair"],
6.8, 6.15, 6.3, 1.2, title_color=GREEN)
# ══════════════════════════════════════════════════════════════════════
# SLIDE 8 – CLINICAL FEATURES & DIAGNOSIS
# ══════════════════════════════════════════════════════════════════════
sl = prs.slides.add_slide(blank)
add_rect(sl, 0, 0, 13.333, 7.5, LIGHT_GRAY)
slide_header(sl, "Clinical Features & Diagnosis", "Presenting symptoms and investigations")
# Hiatus hernia image
if IMG_UPSIDE_STOM:
IMG_UPSIDE_STOM.seek(0)
add_img(sl, IMG_UPSIDE_STOM, 0.3, 1.3, 5.3, 3.0)
bullet_box(sl, "SYMPTOMS – HIATUS HERNIA (Type I)",
["Heartburn (pyrosis) – worst after meals",
"Regurgitation of acid",
"Dysphagia (particularly with solid food)",
"Chest pain mimicking angina",
"Nocturnal cough, hoarseness (laryngeal irritation)",
"Anaemia (from chronic bleeding)"],
5.8, 1.3, 7.3, 2.7)
bullet_box(sl, "SYMPTOMS – PARAESOPHAGEAL / CDH",
["Dysphagia, early satiety",
"Epigastric / chest pain post-prandially",
"Respiratory distress in neonates (CDH)",
"Gastric volvulus: sudden severe epigastric pain,\n dysphagia, retching without vomiting (Borchardt's triad)"],
5.8, 4.1, 7.3, 2.15)
# Investigations column
bullet_box(sl, "INVESTIGATIONS",
["CXR: retrocardiac gas shadow, mediastinal shift",
"Barium swallow: gold standard for hiatus hernia",
"OGD / Endoscopy: mucosal assessment, GORD",
"CT scan: best for CDH, paraesophageal hernias",
"pH monitoring: quantify acid reflux",
"Manometry: esophageal motility"],
0.3, 4.4, 5.3, 2.9)
# Borchardt's triad box
add_rect(sl, 0.3, 1.3, 5.3, 1.0, RGBColor(0xFF, 0xF3, 0xCC))
add_rect(sl, 0.3, 1.3, 5.3, 0.35, ORANGE)
add_text(sl, "BORCHARDT'S TRIAD (Gastric Volvulus)", 0.4, 1.33, 5.1, 0.28, size=12, bold=True, color=WHITE)
add_multiline(sl, ["1. Severe epigastric pain & distension",
"2. Unproductive retching (dry vomiting)",
"3. Inability to pass nasogastric tube"],
0.4, 1.7, 5.1, 0.7, size=12, color=DARK_TEXT)
# ══════════════════════════════════════════════════════════════════════
# SLIDE 9 – MANAGEMENT
# ══════════════════════════════════════════════════════════════════════
sl = prs.slides.add_slide(blank)
add_rect(sl, 0, 0, 13.333, 7.5, LIGHT_GRAY)
slide_header(sl, "Management", "Medical & Surgical Treatment")
# Medical management
bullet_box(sl, "MEDICAL (Hiatus Hernia Type I)",
["Lifestyle: weight loss, small meals, avoid recumbency",
"Elevate head of bed 15–20 cm",
"Avoid coffee, alcohol, NSAIDs, smoking",
"Antacids / Alginate preparations",
"PPI (Proton pump inhibitor) – first-line",
"H2 blockers if PPI not tolerated"],
0.3, 1.3, 6.1, 3.2, title_color=GREEN)
# Surgical
bullet_box(sl, "SURGICAL INDICATIONS",
["Failed medical therapy",
"All paraesophageal hernias (type II/III/IV)",
"Complications: bleeding, stricture, Barrett's",
"Giant hiatus hernia",
"Gastric volvulus (emergency)"],
6.6, 1.3, 6.5, 2.2, title_color=ORANGE)
bullet_box(sl, "SURGICAL PROCEDURES",
["Laparoscopic Nissen fundoplication (360°) – most common",
"Toupet fundoplication (270°) – if dysmotility",
"Dor fundoplication (anterior 180°)",
"Cruroplasty: posterior suture of crura",
"Mesh reinforcement for large hiatus",
"CDH: reduction + primary repair / mesh patch"],
6.6, 3.65, 6.5, 3.0, title_color=MED_BLUE)
# Emergency box
add_rect(sl, 0.3, 4.6, 6.1, 2.7, RGBColor(0xFF, 0xEB, 0xEB))
add_rect(sl, 0.3, 4.6, 6.1, 0.38, RED_WARN)
add_text(sl, "EMERGENCY MANAGEMENT (Gastric Volvulus)", 0.4, 4.63, 5.9, 0.3, size=13, bold=True, color=WHITE)
add_multiline(sl, [
" • Immediate NGT decompression (if possible)",
" • IV fluid resuscitation",
" • Emergency laparotomy / laparoscopy",
" • Reduction of volvulus + gastropexy",
" • Repair of hernia defect",
" • High morbidity – early diagnosis critical"
], 0.4, 5.05, 5.9, 2.15, size=12, color=DARK_TEXT)
# ══════════════════════════════════════════════════════════════════════
# SLIDE 10 – HIGH-YIELD EXAM FACTS
# ══════════════════════════════════════════════════════════════════════
sl = prs.slides.add_slide(blank)
add_rect(sl, 0, 0, 13.333, 7.5, DARK_BLUE)
add_rect(sl, 0, 0, 13.333, 1.1, RGBColor(0x0D, 0x1E, 0x45))
add_text(sl, "HIGH-YIELD EXAM FACTS", 0.4, 0.1, 12, 0.75, size=34, bold=True, color=WHITE)
add_rect(sl, 0, 1.1, 13.333, 0.06, YELLOW_HL)
facts_hy = [
("Most common diaphragmatic hernia overall", "Sliding hiatus hernia (Type I) → 85–95%"),
("Most common CONGENITAL diaphragmatic hernia", "Bochdalek hernia → posterolateral, left-sided 85%"),
("Mnemonic for hiatuses", "I Eat Apples at 8, 10, 12 → IVC T8, Esophagus T10, Aorta T12"),
("IVC hiatus location", "Central tendon, RIGHT of midline, T8"),
("Esophageal hiatus formed by", "Right crus (mainly) – surrounds esophagus"),
("Borchardt's triad", "Severe pain + Unproductive retching + Cannot pass NGT → Gastric volvulus"),
("Neonatal CDH – presentation", "Respiratory distress + Scaphoid abdomen + Mediastinal shift"),
("Morgagni hernia has / Bochdalek has", "TRUE sac / No sac (usually)"),
("Hiatus hernia treatment 1st line", "PPI therapy + lifestyle modification"),
("Operation of choice for GORD + hiatus", "Laparoscopic Nissen fundoplication + cruroplasty"),
("Diaphragm motor nerve", "Phrenic nerve C3, C4, C5 – 'C3,4,5 keeps diaphragm alive'"),
("Kehr's sign", "Left shoulder tip pain from blood/irritation under left diaphragm (splenic rupture)"),
]
cols2 = 2
rows_per_col = (len(facts_hy) + 1) // 2
for i, (q, a) in enumerate(facts_hy):
col = i // rows_per_col
row = i % rows_per_col
x = 0.3 + col * 6.6
y = 1.25 + row * 1.0
bg = RGBColor(0x1F, 0x3A, 0x6E) if i % 2 == 0 else RGBColor(0x16, 0x2D, 0x5E)
add_rect(sl, x, y, 6.4, 0.88, bg)
add_rect(sl, x, y, 0.05, 0.88, YELLOW_HL)
add_text(sl, q, x+0.15, y+0.04, 6.15, 0.35, size=12, bold=True, color=YELLOW_HL)
add_text(sl, a, x+0.15, y+0.42, 6.15, 0.42, size=12, color=WHITE)
# ══════════════════════════════════════════════════════════════════════
# SLIDE 11 – COMPARISON TABLE
# ══════════════════════════════════════════════════════════════════════
sl = prs.slides.add_slide(blank)
add_rect(sl, 0, 0, 13.333, 7.5, LIGHT_GRAY)
slide_header(sl, "Quick Comparison Table", "Bochdalek vs Morgagni vs Hiatus Hernia")
headers2 = ["Feature", "Hiatus Hernia", "Bochdalek Hernia", "Morgagni Hernia"]
col_widths = [2.5, 3.2, 3.5, 3.5]
col_starts = [0.2, 2.7, 5.9, 9.4]
header_colors = [DARK_BLUE, MED_BLUE, ORANGE, TEAL]
for hdr, cw, cx, hc in zip(headers2, col_widths, col_starts, header_colors):
add_rect(sl, cx, 1.3, cw-0.05, 0.5, hc)
add_text(sl, hdr, cx+0.08, 1.33, cw-0.2, 0.42, size=14, bold=True, color=WHITE, align=PP_ALIGN.CENTER)
rows2 = [
("Location", "Esophageal hiatus", "Posterolateral (lumbocostal)", "Anterior (sternocostal)"),
("Laterality", "Central", "Left 85%, Right 13%", "Right-sided (usually)"),
("Frequency", "Most common overall", "75% of CDH", "23% of CDH"),
("Age", "Adults (middle-aged+)", "Neonates", "Adults (often incidental)"),
("Sac present", "No (Type I) / Yes (II)", "Usually NO sac", "YES – peritoneal sac"),
("Contents", "Stomach (OGJ/fundus)", "Bowel, stomach, spleen", "Omentum, transverse colon"),
("Key symptom", "GORD, heartburn", "Neonatal respiratory distress", "Often asymptomatic/chest pain"),
("Management", "PPI → Laparoscopic fundo","Primary repair / mesh", "Elective laparoscopic repair"),
]
for ri, row in enumerate(rows2):
bg = WHITE if ri % 2 == 0 else RGBColor(0xE8, 0xF2, 0xFF)
for val, cw, cx in zip(row, col_widths, col_starts):
add_rect(sl, cx, 1.82 + ri*0.68, cw-0.05, 0.66, bg)
add_text(sl, val, cx+0.08, 1.85 + ri*0.68, cw-0.18, 0.6, size=12,
bold=(col_starts.index(cx) == 0), color=DARK_BLUE if col_starts.index(cx) == 0 else DARK_TEXT,
align=PP_ALIGN.CENTER)
# ══════════════════════════════════════════════════════════════════════
# SAVE
# ══════════════════════════════════════════════════════════════════════
out = "/tmp/workspace/diaphragmatic-hernia-ppt/Diaphragmatic_Hernias_Exam_Prep.pptx"
buf = BytesIO()
prs.save(buf)
with open(out, "wb") as f:
f.write(buf.getvalue())
print(f"Saved: {out}")
cd /tmp/workspace/diaphragmatic-hernia-ppt && python build_ppt.py 2>&1
python3 -c " from pptx import Presentation prs = Presentation('/tmp/workspace/diaphragmatic-hernia-ppt/Diaphragmatic_Hernias_Exam_Prep.pptx') print(f'Slides: {len(prs.slides)}') for i, slide in enumerate(prs.slides, 1): texts = [s.text_frame.text.strip() for s in slide.shapes if s.has_text_frame and s.text_frame.text.strip()] print(f' Slide {i}: {texts[0] if texts else \"(no text)\"}') import os size = os.path.getsize('/tmp/workspace/diaphragmatic-hernia-ppt/Diaphragmatic_Hernias_Exam_Prep.pptx') print(f'File size: {size/1024:.1f} KB') "
Diaphragmatic Hernias Exam Prep
Presentation · PPTX
What's Inside (11 Slides)
| Slide | Content |
|---|---|
| 1 | Title slide - professional dark blue theme |
| 2 | Overview / Table of contents (all 8 topics at a glance) |
| 3 | Classification - Types I–IV with CDH frequency diagram (Bochdalek 75%, Morgagni 23%) |
| 4 | Surgical Anatomy - 3 hiatuses table (T8/T10/T12), weak areas, mnemonic "I Eat Apples at 8,10,12" + textbook diagrams |
| 5 | Hiatus Hernia - All 4 types (Sliding/Rolling/Mixed/Complex) with risk factors, investigations |
| 6 | Bochdalek Hernia - Anatomy, clinical features (scaphoid abdomen, respiratory distress), surgery |
| 7 | Morgagni Hernia - Anatomy, adult presentation, elective laparoscopic repair |
| 8 | Clinical Features & Diagnosis - Borchardt's Triad box, investigations, radiology |
| 9 | Management - Medical (PPI + lifestyle), Surgical (Nissen fundoplication), Emergency (volvulus) |
| 10 | High-Yield Exam Facts - 12 key facts in dark theme, perfect for last-minute revision |
| 11 | Comparison Table - Hiatus vs Bochdalek vs Morgagni side-by-side |