
Stoppas approach
Reading File
The Stoppa approach is a surgical technique used for pelvic and acetabular fracture fixation, providing access to the inner pelvis through a low midline or Pfannenstiel incision.
Searching sources...
Finding Sources
Finding Sources
Reading File
Reading File
Finding Sources
Reading File
Reading File
Reading File
Reading File
Loading Image
Reading File
Here is a comprehensive overview of the Stoppa Approach (Anterior Intrapelvic / Modified Stoppa Approach) for acetabular and pelvic fracture surgery, drawn from Campbell's Operative Orthopaedics 15th Ed 2026 and Rockwood & Green's Fractures in Adults 10th Ed 2025.
Stoppa Approach (Anterior Intrapelvic / Modified Stoppa Approach)
Also called the Anterior Intrapelvic (AIP) approach, this is a preperitoneal approach to the inner pelvis, most widely used for acetabular fracture fixation. It replaces the medial window of the traditional ilioinguinal approach with a less morbid dissection plane.
Indications
- Anterior wall and anterior column acetabular fractures
- Quadrilateral surface fractures - especially comminuted ones requiring direct buttress plating; this is the primary indication over the ilioinguinal approach
- Anterior column-posterior hemitransverse fractures
- Both-column fractures (anterior approach component)
- T-shaped fractures with anterior displacement
- Transverse fractures combined with pubic symphysis disruption
- Can be combined with the lateral (first) window of the ilioinguinal approach to avoid dissecting the middle window (femoral neurovascular bundle)
Incision
Two options:
- Pfannenstiel incision (preferred) - transverse, approximately 2 cm above the pubic symphysis (shown in the diagram below)
- Vertical midline incision - starting 1 cm inferior to the symphysis, ending 2-3 cm below the umbilicus; used when a prior laparotomy incision exists
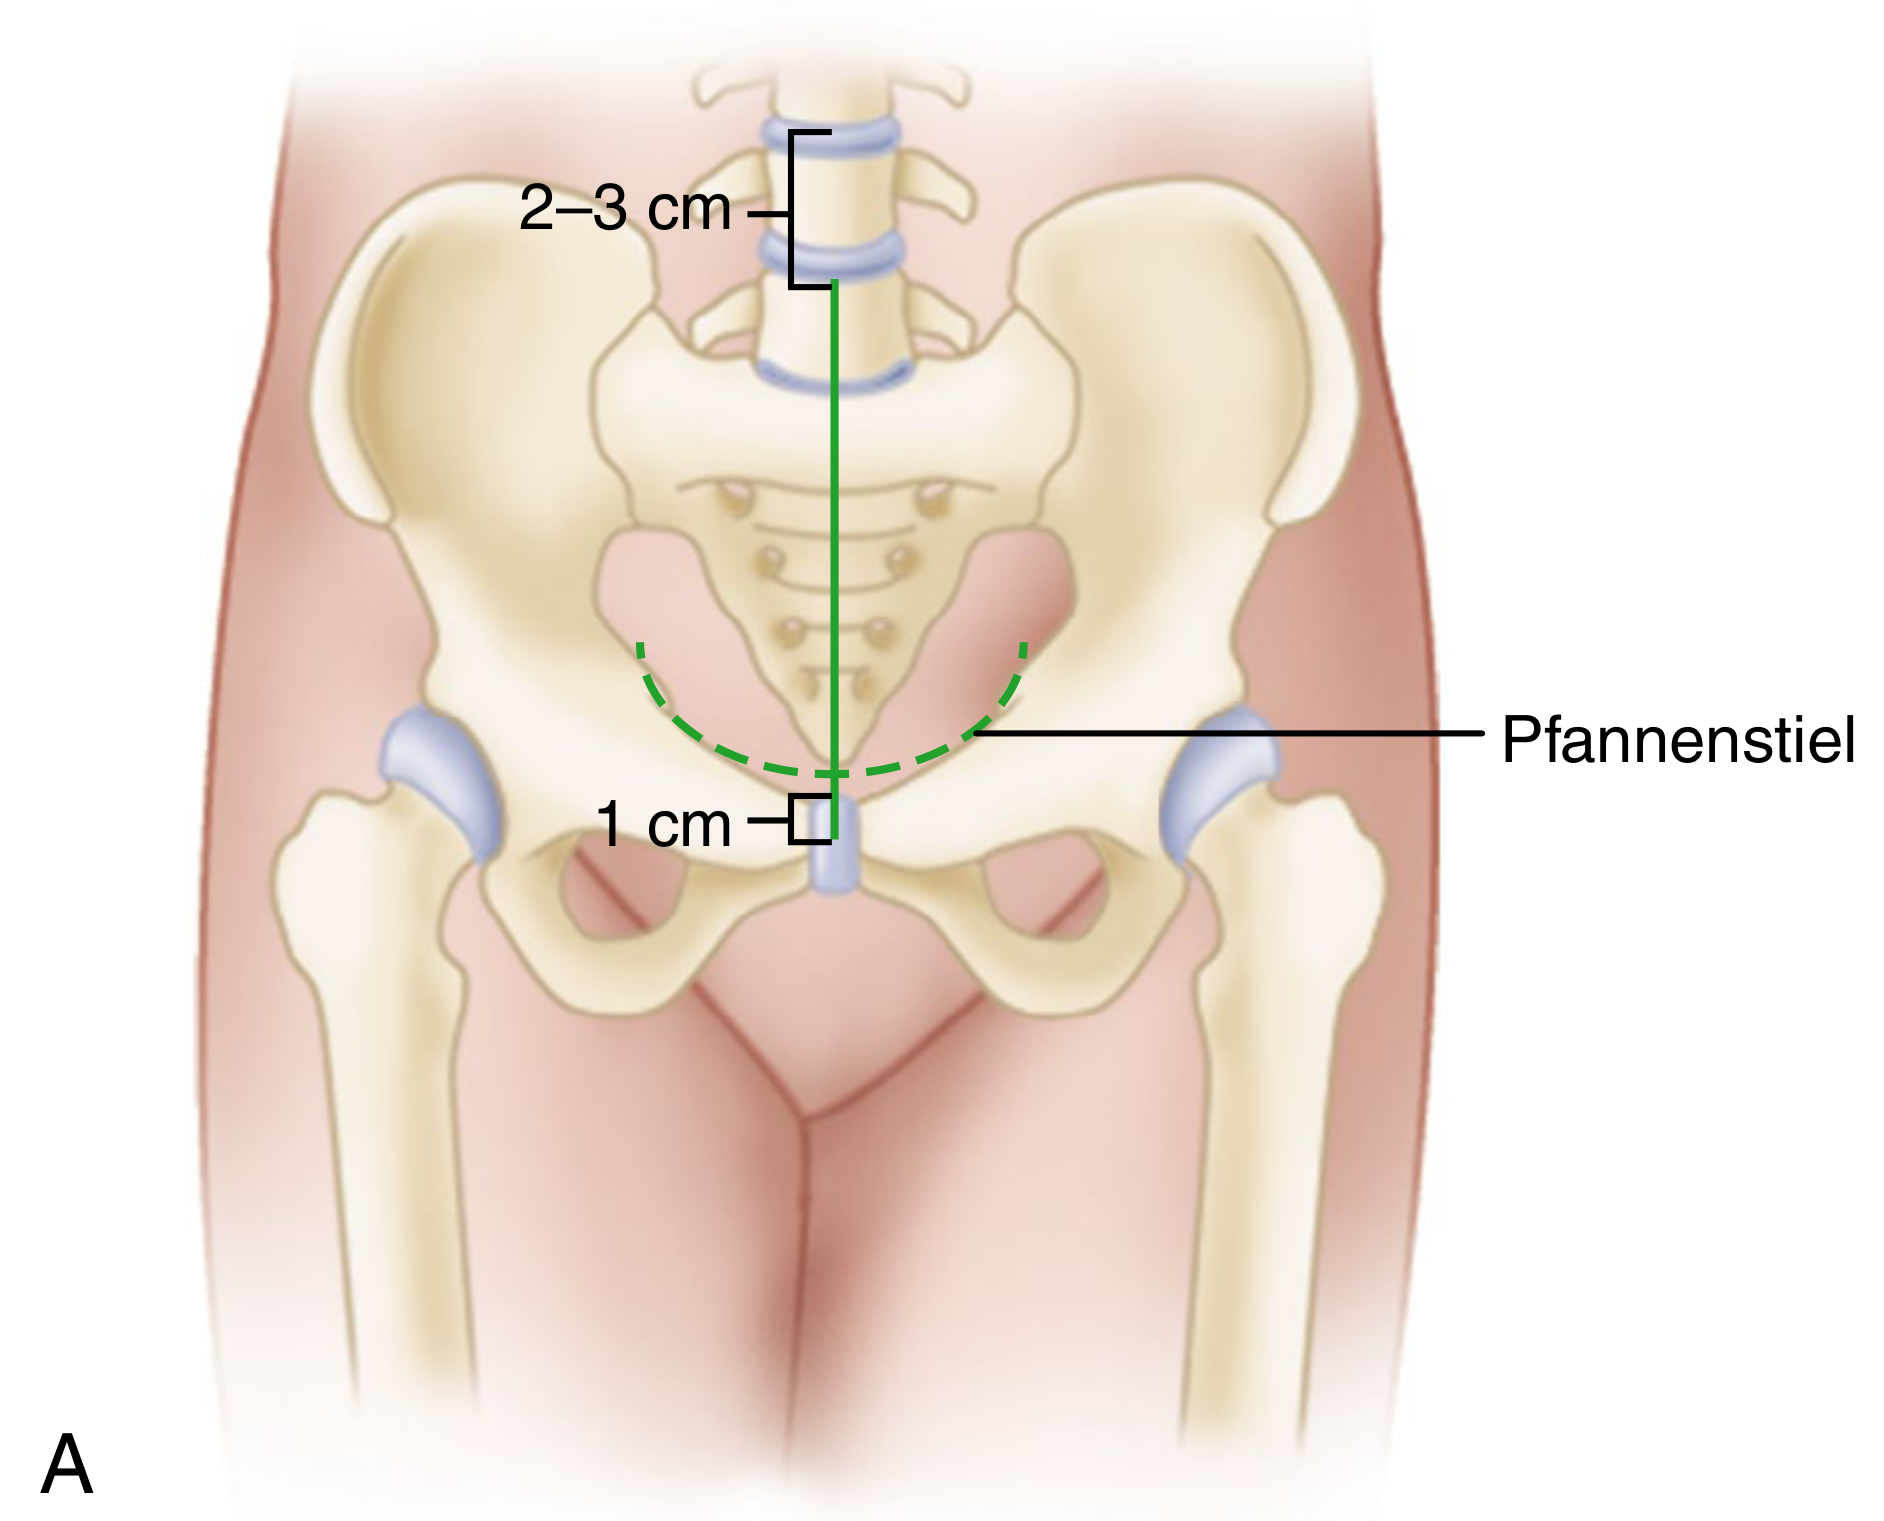
Step-by-Step Technique
- Make Pfannenstiel or midline skin incision and divide subcutaneous tissue down to the rectus fascia.
- Identify the linea alba (decussation of fascial fibers); incise the rectus fascia longitudinally along the linea alba.
- Gently retract both rectus abdominis bellies laterally.
- Stay in the preperitoneal (retropubic) space - do NOT open the peritoneum.
- Pack a damp laparotomy sponge in the retropubic space and place a malleable retractor to protect the bladder.
- Release the rectus muscle off the anterior surface of the pubic tubercle.
- Sharply dissect periosteum from the superior pubic bone; carry blunt dissection deeper.
- Identify the superior pubic ramus (pectin pubis) and carry dissection laterally along the pelvic brim.
- Place a sharp Hohmann retractor over the ramus lateral to the tubercle; use a Deaver retractor laterally to protect iliac vessels.
- Identify and ligate the corona mortis vessels (anastomoses between the obturator vessels and the external iliac or inferior epigastric vessels) - a critical safety step.
- Continue subperiosteal dissection along the pelvic brim to the iliopectineal eminence.
- Dissect the iliopectineal arch from the bone to allow elevation of the femoral vessels and nerve.
- Continue over the anterior acetabular wall; place Hohmann/custom retractors near the iliopubic eminence.
- Continue lateral dissection along the pelvic brim to the entire internal surface of the superior pubic ramus.
- At the quadrilateral surface: identify the obturator neurovascular bundle, protect it, and place a custom pelvic floor retractor into the lesser sciatic notch.
- Elevate the periosteum and obturator internus with a Cobb elevator to expose the quadrilateral surface.
- After full pelvic brim exposure, a sharp Hohmann retractor can be impacted at the posterior top of the acetabulum into the ilium just lateral to the sacroiliac joint.
Key Anatomy and Hazards
| Structure | Risk |
|---|---|
| Corona mortis | Must be ligated - vascular anastomosis between obturator and external iliac/inferior epigastric vessels |
| Bladder | Retracted medially with malleable retractor; protected with wet sponge in retropubic space |
| Obturator neurovascular bundle | At risk during quadrilateral surface dissection; requires direct identification |
| External iliac vessels | Protected by Deaver retractor; avoid excessive stretch |
| Peritoneum | Must not be opened; entire approach stays in the preperitoneal space |
| Lateral femoral cutaneous nerve | At risk if the lateral window of the ilioinguinal approach is added |
Advantages over the Ilioinguinal Approach
- Avoids the middle window of the ilioinguinal approach, thus no dissection around the femoral vein, artery, nerve, and lymphatics
- Excellent direct access to the quadrilateral surface for buttress plating
- Better access for cleaning the anterior column fracture line
- Can be combined with the lateral (first) ilioinguinal window - the "AIP + lateral window" combination is increasingly favored over the full ilioinguinal approach
- Adding an ASIS osteotomy can further improve access to the anterior wall and psoas gutter (the territory of the middle ilioinguinal window)
Limitations
- Does not provide direct hip joint access (articular surface not directly visualized; reduction is inferred from extra-articular fracture lines and fluoroscopy)
- Fractures with significant posterior displacement may require an additional posterior Kocher-Langenbeck approach
- Limited access to posterior column fractures unless combined
Position and Setup
- Patient supine on a radiolucent flat-top table
- Affected limb prepped into the field (allows intraoperative manipulation)
- Some surgeons use a pelvic reconstruction table
- Skeletal traction aids visualization, especially through the lateral window
- A triangle under the hip relaxes the iliopsoas
Sources:
- Campbell's Operative Orthopaedics 15th Ed 2026, pp. 90 & 3507-3510
- Rockwood and Green's Fractures in Adults 10th Ed 2025, pp. 2525-2530
This is a shared conversation. Sign in to Orris to start your own chat.