
If un treated trigger can heal it self and pulling the skin on trigger area' what happens
trigger finger untreated natural history self healing spontaneous resolution
Trigger Finger (Stenosing Tenosynovitis) - What Happens Without Treatment & With Skin Pulling
What Is Trigger Finger?
Can It Heal on Its Own Without Treatment?
- A 2018 study (PMID: 29619360) followed patients referred to a hand surgery office with untreated trigger finger. About 52% resolved spontaneously within an average of 8 months with no treatment at all.
- Trigger thumb had the highest spontaneous resolution rate (~72%).
- However, 6% had already fully resolved even before seeing the specialist (within the 6-8 week referral wait).
- If the finger starts locking regularly (gets stuck in flexion), spontaneous healing becomes unlikely.
- In severe cases, the finger can become permanently fixed in a bent (flexed) position - this is a serious complication of leaving it untreated too long.
- Diabetes, rheumatoid arthritis, and repetitive gripping occupations make spontaneous healing less likely.
- Early - mild aching and stiffness, especially in the morning. Often resolves with rest.
- Moderate - painful catching/snapping when moving the finger.
- Severe - finger locks in flexion; you need the other hand to force it straight.
- End-stage - finger becomes permanently fixed in a flexed (bent) position and cannot be extended.
What Happens When You Pull the Skin Over the Trigger Area?
- Temporary mechanical relief - stretching the skin and underlying tissue may momentarily reduce pressure on the inflamed pulley and tendon, giving brief relief from tightness.
- No structural change - the skin pull does not reduce the inflammation, break up the nodule on the tendon, or widen the narrowed pulley. The pathology remains.
- Risk of aggravation - forceful manipulation around an inflamed tendon can worsen local irritation.
- Possible minor benefit as massage - gentle soft tissue mobilization around the A1 pulley has some supportive role alongside formal treatment (like splinting), but it is not a standalone cure.
What Actually Works?
- Rest and activity modification - reducing repetitive gripping (first-line for mild cases)
- Finger splinting - holding the finger straight, especially at night
- Corticosteroid injection into the tendon sheath - most effective conservative treatment
- Surgery (A1 pulley release) - used when injections fail or the finger is locked; the pulley is cut to free the tendon
- Roberts and Hedges' Clinical Procedures in Emergency Medicine, Trigger Finger section
- Sabiston Textbook of Surgery, Trigger Thumb and Fingers section
If un treated trigger point on scapular region can heal it self and pulling the skin on trigger area' what happens
myofascial trigger point scapular region untreated natural history skin pulling technique effect
myofascial trigger points scapular region referred pain diagram
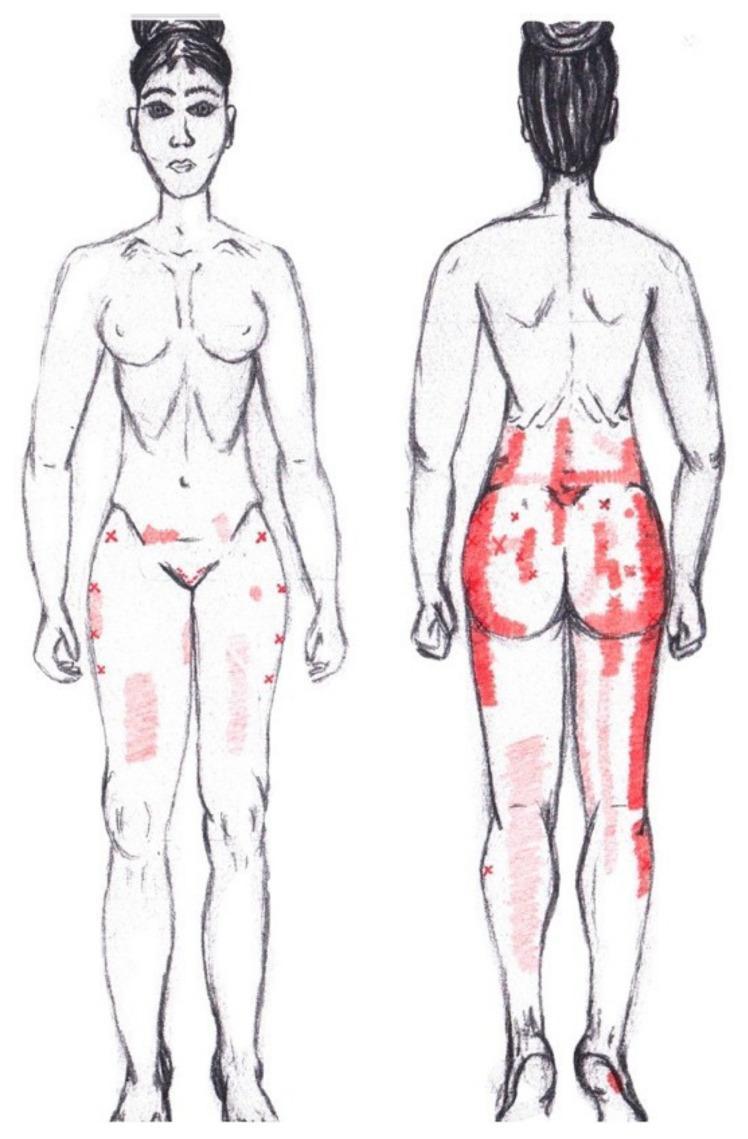
This medical illustration is a graphical simulation depicting the referred pain pattern associated with myofascial trigger points in the gluteus minimus muscle. The diagram includes anterior and posterior views of a female figure with red-shaded regions indicating pain distribution. On the posterior view, the pain is most concentrated in the gluteal region, particularly over the buttock, and radiates superiorly into the lumbar region and inferiorly along the posterior aspect of the thigh and calf. The right side shows more extensive distal radiation down to the ankle compared to the left. On the anterior view, referred pain is illustrated in the lower abdominal/inguinal region, the lateral hip (greater trochanter area), and extending down the anterior and lateral aspects of the thigh towards the knee. Small 'x' marks within the shaded areas signify the location of active trigger points. This diagram serves as an educational tool for identifying referred pain pathways in musculoskeletal medicine and physical therapy, specifically for differentiating gluteus minimus involvement from other lumbosacral or hip pathologies.
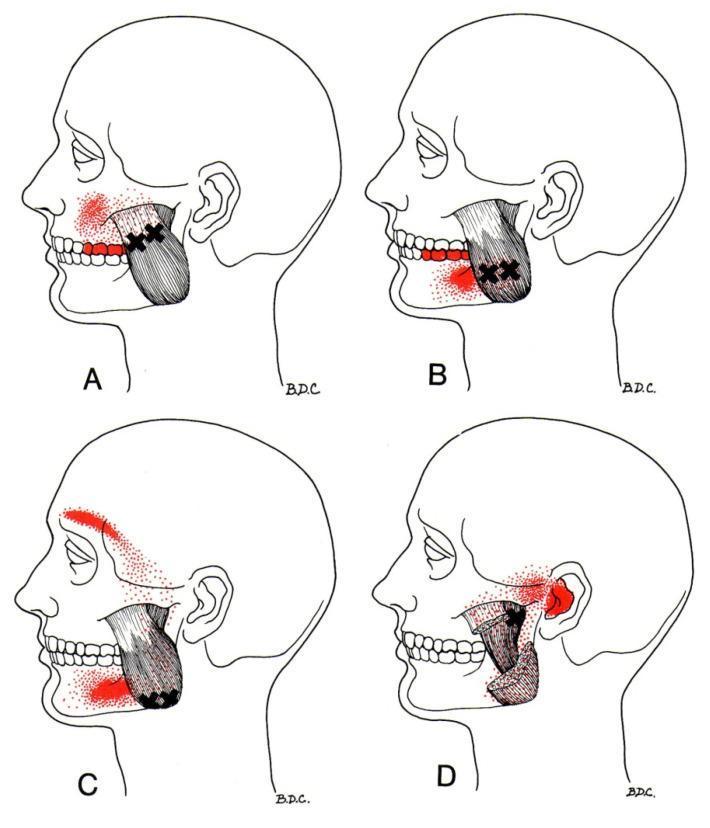
A series of four anatomical diagrams (A-D) illustrating myofascial trigger points in the masseter muscle and their associated referred pain patterns in the human head and neck. Each lateral-view diagram shows the masseter muscle connecting the zygomatic arch to the mandible. Black crosses (X) indicate the primary trigger point locations, while red stippled areas denote the distribution of referred pain. Diagram A shows trigger points in the upper muscle belly referring pain to the maxilla and upper teeth. Diagram B displays trigger points in the lower muscle fibers referring pain to the mandible and lower teeth. Diagram C illustrates trigger points at the inferior mandibular attachment referring pain to the eyebrow, temple, and lower jaw. Diagram D depicts trigger points in the deep layer of the masseter referring pain to the ear and temporomandibular joint (TMJ) region. This educational visual is used to demonstrate the diagnostic clinical findings for temporomandibular disorders (TMD) and craniofacial pain syndromes.
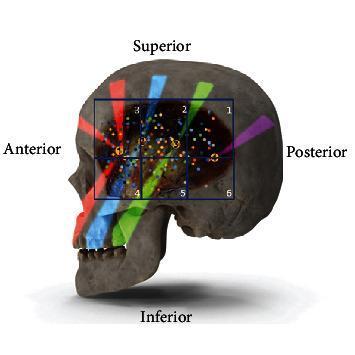
This anatomical diagram illustrates the innervation and myofascial trigger points of the human temporalis muscle overlaid on a lateral view of a skull. The temporal fossa is divided into six anatomical sextants (labeled 1-6) using a blue grid for topographical classification. Scattered colored dots represent the entry points of the deep temporal nerve branches into the muscle belly, with the highest density observed in sextant 2. Four specific myofascial trigger points (1-4) are identified within the muscle, each associated with distinct colored bands (red, blue, green, and purple) that radiate toward the teeth, orbit, and temporal region to represent referred pain patterns according to Travell and Simons. The diagram is oriented with Superior, Inferior, Anterior, and Posterior labels. This visual serves as a clinical guide for understanding the correlation between neuromuscular anatomy and pain management in the craniofacial region, specifically for diagnostic and therapeutic interventions like trigger point injections or nerve blocks.
If un treated trigger point on scapular region can heal it self and pulling the skin on trigger area' what happens