What are the most recent techniques for hernia repair and tell me its it's procedure step by step and also include images wherever possible
Reading File
Finding Sources
Searching the Web
latest techniques hernia repair 2024 2025 laparoscopic robotic TAPP TEP eTEP
Searching PubMed
hernia repair technique laparoscopic robotic
Reading File
Reading File
Reading File
Loading Image
Loading Image
Reading File
Reading File
Loading Image
Loading Image
Loading Image
Reading File
Finding Sources
I now have comprehensive data from multiple authoritative sources. Let me compile the full detailed answer.
Modern Hernia Repair: Techniques, Procedures & Current Evidence
Hernia repair is one of the most commonly performed surgical procedures worldwide, with over 20 million repairs done annually. The field has evolved dramatically from purely tissue-based repairs to tension-free mesh repairs, and now to fully minimally invasive and robotic platforms. Below is a complete guide covering every major technique with step-by-step procedures.
Overview of Techniques
| Category | Technique | Approach |
|---|---|---|
| Open tissue repair | Shouldice, Desarda, Bassini | Open |
| Open mesh repair | Lichtenstein, Plug & Patch | Open |
| Laparoscopic | TEP, TAPP | Minimally invasive |
| Extended laparoscopic | eTEP | Minimally invasive |
| Robotic | r-TAPP, r-TEP, r-eTEP, RVHR | Robotic-assisted MIS |
1. Mesh Technology - The Foundation of Modern Repair
Before understanding the operations, it's important to know the implants used.
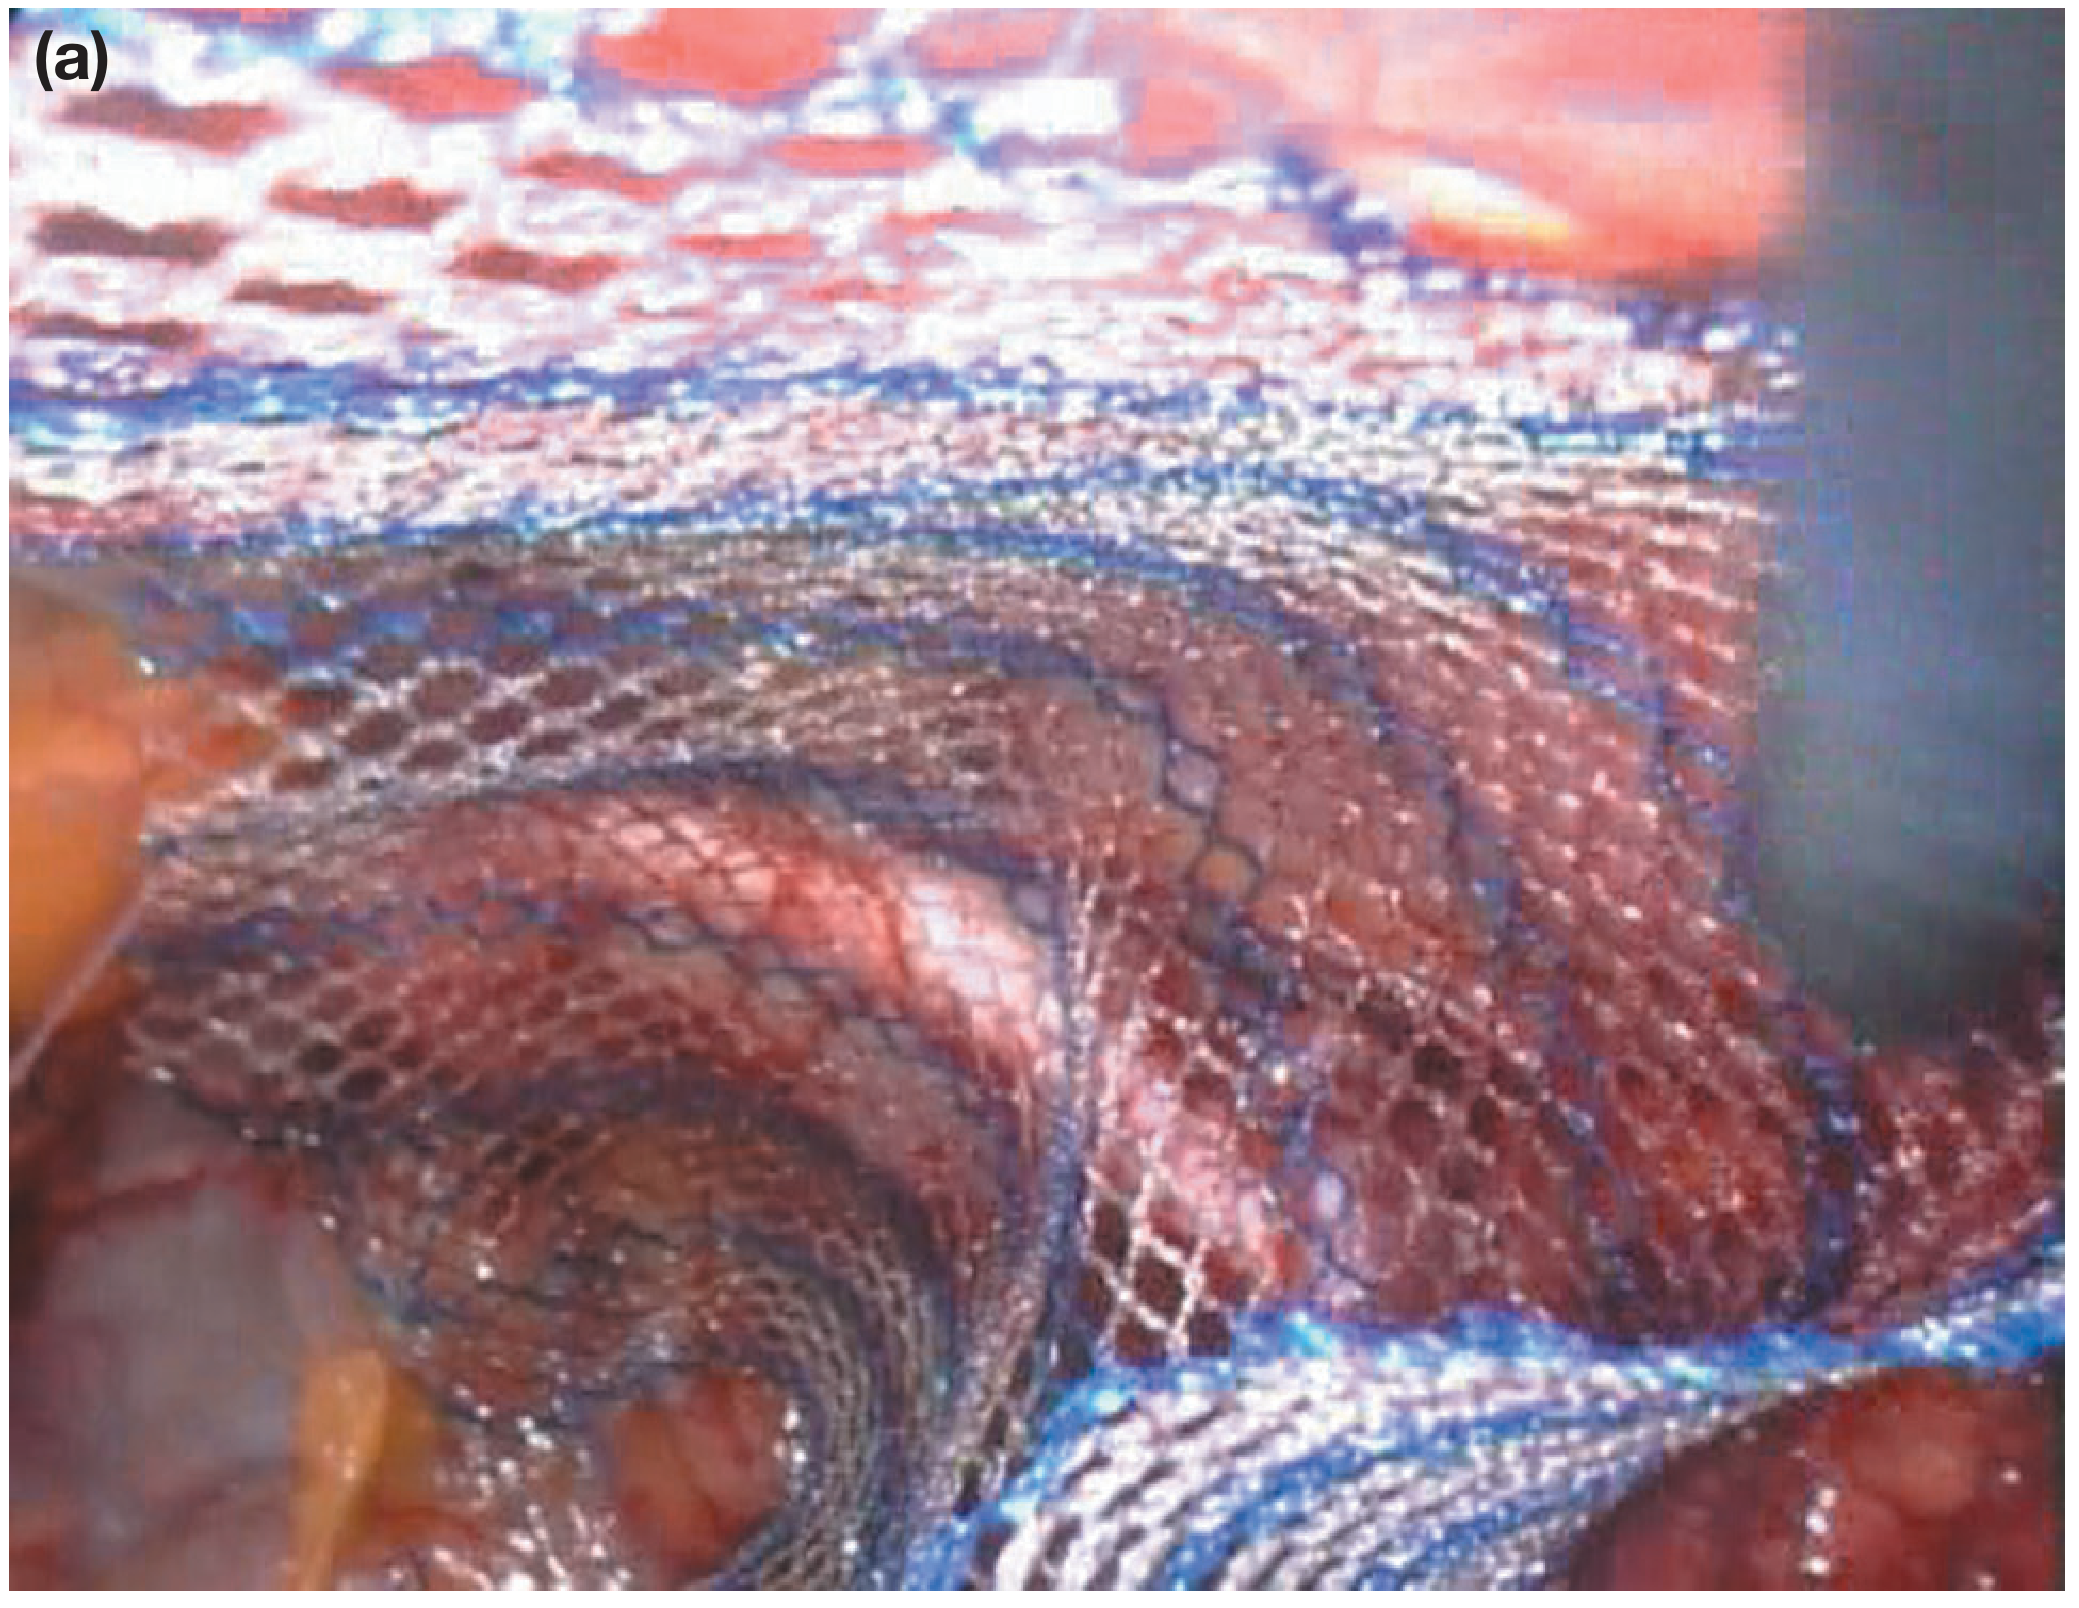
Polypropylene mesh integrated into host tissue - the blue weave of the mesh can be seen incorporating into the surrounding tissue (Bailey & Love's Surgery, 28th Ed.)
Mesh can be used in three configurations (Bailey & Love's Short Practice of Surgery, 28th Ed., p. 1084):
- Bridge repair: mesh is fixed over the defect as a tension-free patch
- Plug repair: a plug of mesh is pushed into the defect (largely abandoned due to "meshoma" formation causing chronic pain and risk of erosion into adjacent organs)
- Augmented repair: defect closed with sutures + mesh added for reinforcement - currently the standard
Mesh materials:
- Polypropylene - inert, hydrophobic, monofilament; resists bacterial ingrowth; most widely used
- Polyester - hydrophilic; encourages microvascular ingrowth
- PTFE (polytetrafluoroethylene) - inert flat sheets; anti-adhesive; useful for intraperitoneal placement
2. Open Tissue Repair (No Mesh)
Still relevant for contaminated fields, strangulated bowel, and mesh-free patient preference.
Shouldice Repair
The best non-mesh option, supported by Level 1A evidence.
Step-by-step:
- Inguinal incision, 6-8 cm, parallel to inguinal ligament
- Divide Scarpa's fascia; open external oblique aponeurosis through external ring
- Identify and preserve ilioinguinal and iliohypogastric nerves
- Isolate spermatic cord with Penrose drain; divide cremaster muscle longitudinally
- Identify and dissect hernia sac; ligate or reduce indirect sac at internal ring
- Open transversalis fascia from internal ring to pubic tubercle (the key step - this is unique to Shouldice)
- Four-layer continuous suture repair of the posterior inguinal wall using the divided edges of transversalis fascia
- Close external oblique aponeurosis over the cord
- Skin closure
Outcomes: Still has a higher recurrence rate than Lichtenstein mesh repair, with approximately threefold increased risk per systematic review (Current Surgical Therapy 14e).
Desarda Repair (Newer Tissue Technique)
A tension-free option using an autogenous patch of external oblique aponeurosis rather than mesh.
- A strip of external oblique aponeurosis is mobilized and used to reinforce the inguinal floor
- Early data show ~40% higher recurrence vs. Lichtenstein but no foreign body material
3. Open Mesh Repair: Lichtenstein "Tension-Free" Repair
The most common open hernia repair globally; the current gold standard for open inguinal hernia repair. Originally described in 1989.
Step-by-step (Current Surgical Therapy 14e):
Step 1 - Incision:
Make a 6-8 cm oblique incision inferior and medial to the anterior superior iliac spine (ASIS), extending medially just lateral to the symphysis pubis.
Step 2 - Expose the canal:
- Divide Scarpa's fascia
- Identify and ligate/cauterize superficial epigastric veins
- Incise the external oblique aponeurosis in line with its fibers, extending through the external inguinal ring medially
- Identify and preserve the ilioinguinal nerve (runs along the inguinal canal)
- Elevate external oblique flap to locate the iliohypogastric nerve superiorly
Step 3 - Spermatic cord isolation:
- Encircle the spermatic cord with a Penrose drain
- Separate the indirect hernia sac (found on the anterolateral cord surface) from the cord using blunt dissection
- Identify and preserve the genital branch of the genitofemoral nerve within the cord
Step 4 - Hernia sac management:
- Indirect sac: Dissect to the level of the internal ring; for small sacs, invert or ligate; for large/scrotal sacs, divide the sac mid-canal to avoid scrotal dissection
- Direct sac (Hesselbach's triangle): Imbricate (invert) the sac using absorbable suture - do not necessarily excise
Step 5 - Mesh placement:
- Cut a 7×15 cm polypropylene mesh to shape with a keyhole slit at the lateral end for the spermatic cord
- Fix the medial end of the mesh to the anterior surface of the pubic tubercle (1-2 cm overlap medially)
- Sew the inferior edge of the mesh to the shelving edge of the inguinal ligament with a running suture to just beyond the internal ring
- Fix the superior edge to the internal oblique aponeurosis with interrupted sutures
- Create the keyhole: the two tails wrap around the cord at the internal ring and are sutured together, reconstructing the ring snugly
Step 6 - Closure:
- Close external oblique aponeurosis over the cord
- Approximate Scarpa's fascia with absorbable sutures
- Skin closure
4. Laparoscopic Repair: TEP and TAPP
Both approaches place a large mesh (10×15 cm or larger) in the preperitoneal plane, covering Hesselbach's triangle, the deep inguinal ring, and the femoral canal. Laparoscopic repair offers reduced pain (both immediately and up to 5 years post-op), faster return to activity, and fewer wound complications vs. open. It is especially advantageous for bilateral hernias and recurrence after open surgery (Bailey & Love's, p. 1091).
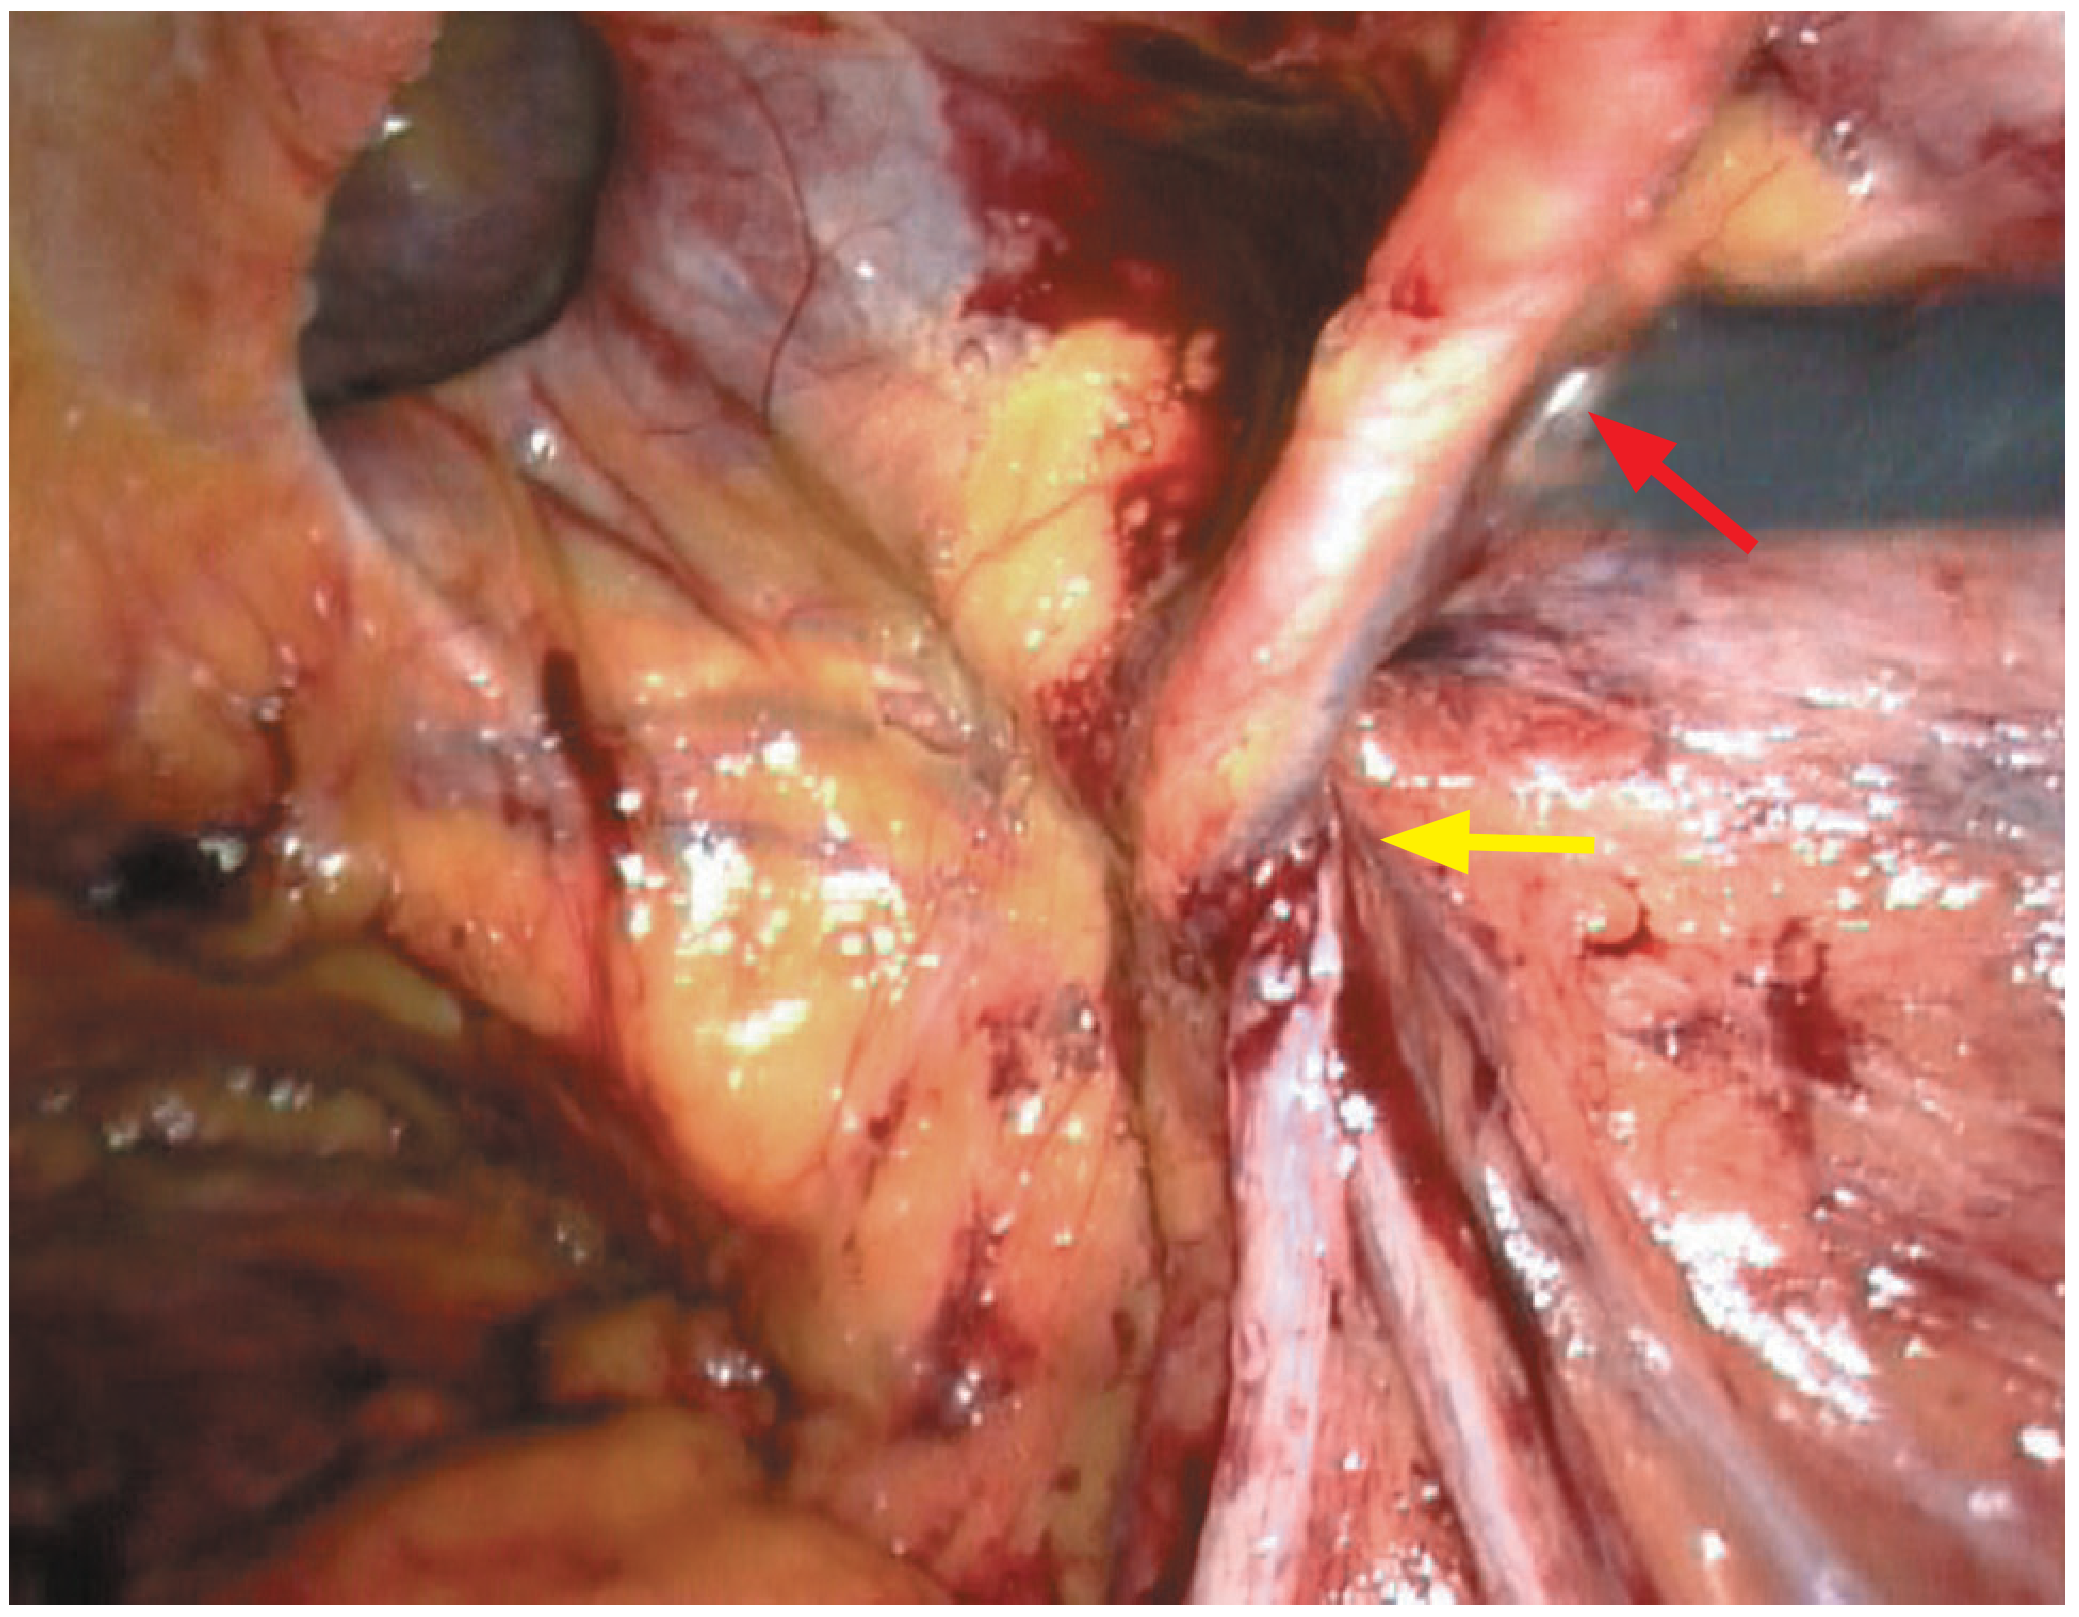
Laparoscopic view of right direct inguinal hernia. Red arrow = inferior epigastric vessels; Yellow arrow = contents of spermatic cord through deep ring. (Bailey & Love's Surgery, 28th Ed.)
4A. TEP - Totally Extraperitoneal Repair
The peritoneal cavity is never entered. Work occurs entirely in the preperitoneal space.
Step-by-step:
Step 1 - Access:
- Infraumbilical incision; enter preperitoneal space (just deep to anterior rectus sheath, in front of posterior sheath)
- Insert a balloon dissector trocar and inflate under direct vision to develop the preperitoneal space (Retzius space)
- Place a 10-12 mm camera port here; insert two additional 5 mm working ports in the midline below the umbilicus
Step 2 - Space development:
- Insufflate with CO₂ to 10-12 mmHg to maintain the preperitoneal space
- Sweep peritoneum posteriorly using blunt dissection
- Identify the pubic symphysis, Cooper's ligament, and the inferior epigastric vessels as anatomical landmarks
Step 3 - Hernia reduction:
- Identify the hernia defect (direct = medial to inferior epigastric vessels; indirect = lateral)
- Reduce the hernia sac back into the preperitoneal space
- For indirect sacs: dissect from cord structures (parietalization); large sacs may be divided
Step 4 - Mesh placement:
- Roll a 10×15 cm mesh and introduce through the 10 mm port; unroll and flatten over the defect
- Position to cover the entire myopectineal orifice: medially past midline, laterally beyond the deep ring, inferiorly over Cooper's ligament
- No fixation is typically required in TEP (the preperitoneal pressure holds the mesh)
Step 5 - Closure:
- Desufflate CO₂ slowly while watching the mesh to ensure it stays flat
- Fascial closure at 10 mm port site; skin closure
4B. TAPP - Transabdominal Preperitoneal Repair
The peritoneal cavity is entered first, then the preperitoneal space is developed through a peritoneal incision.
Step-by-step:
Step 1 - Access:
- Enter the peritoneal cavity via Hasson technique or Veress needle at umbilicus
- Establish pneumoperitoneum; three-trocar technique (10 mm umbilical camera + two 5 mm lateral working ports)
Step 2 - Peritoneal incision:
- View the inguinal region from inside; identify the medial umbilical ligament, inferior epigastric vessels, and hernia defect
- Make a curved peritoneal incision about 2 cm above the hernia defect, from the medial umbilical ligament to the anterior superior iliac spine
- Develop the preperitoneal flap inferiorly, exposing Cooper's ligament, the vas deferens, and gonadal vessels (the "triangle of doom" and "triangle of pain" must be avoided laterally)
Step 3 - Hernia sac reduction:
- Reduce any direct or indirect hernia contents
- Parietalize the cord structures (separate peritoneum from vas and vessels) to allow flat mesh placement
Step 4 - Mesh placement:
- Insert and position a 10×15 cm mesh to cover the entire myopectineal orifice
- Optionally fix with tacks to Cooper's ligament medially (lateral fixation near the triangle of pain is avoided to prevent nerve injury)
Step 5 - Peritoneal closure:
- Close the peritoneal flap over the mesh with a running suture or tacker to prevent bowel contact with the mesh
- Desufflate and close port sites
5. eTEP - Extended Totally Extraperitoneal (The Newest Standard)
First described by Igor Belyansky in 2017, eTEP dramatically expands the working space compared to conventional TEP by accessing a larger preperitoneal plane. It is becoming widely regarded as the gold standard for minimally invasive hernia repair and was the most discussed technique at WALS 2025.
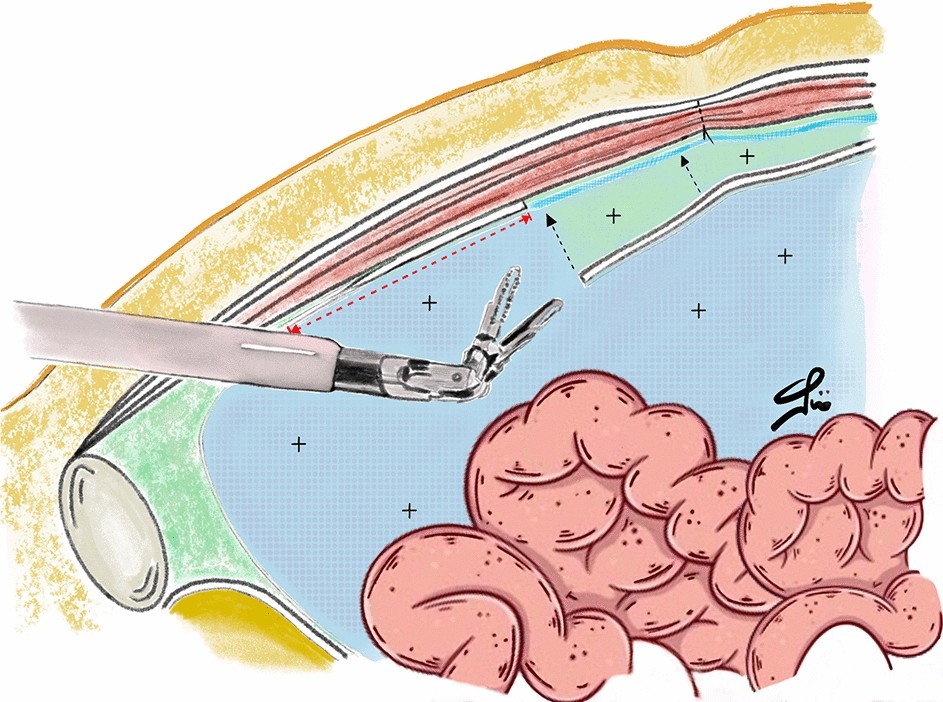
eTEP approach: The articulating instrument accesses the extended extraperitoneal space, with peritoneum (blue, labeled "+") separating the working space from the bowel.
Key advantage over TEP: The initial entry is made contralateral to the hernia (e.g., left-sided access for right-sided hernia), crossing the midline to develop a much larger extraperitoneal workspace - enabling treatment of bilateral hernias without repositioning.
Step-by-step:
Step 1 - Contralateral entry:
- Small infraumbilical incision on the side opposite the hernia
- Enter the retrorectus (Retzius) space behind the rectus muscle but in front of the posterior rectus sheath
- Place a 12 mm camera port
Step 2 - Space development across midline:
- CO₂ insufflation; develop the space working medially, then cross the midline
- Dissect into the Retzius space on the side of the hernia - this creates the "extended" space much larger than standard TEP
Step 3 - Additional ports:
- Two 5 mm working ports placed on the ipsilateral side, typically in the mid-abdomen and iliac fossa
Step 4 - Hernia anatomy and reduction:
- Identify Cooper's ligament, inferior epigastric vessels, vas deferens, and gonadal vessels
- Reduce hernia sac; parietalize the cord structures
- For bilateral hernias: work can proceed to the contralateral side in the same large space
Step 5 - Large mesh placement:
- A larger mesh (12×17 cm or greater) is placed, covering the entire myopectineal orifice bilaterally if needed
- Mesh fixation generally not required; lies flat under preperitoneal pressure
Step 6 - Closure:
- Release CO₂; confirm mesh position
- Port site fascial closure; skin closure
Advantages: Larger workspace, better ergonomics, handles bilateral and complex hernias, lower conversion rates, reduced chronic pain rates compared to TEP and TAPP.
6. Robotic Hernia Repair
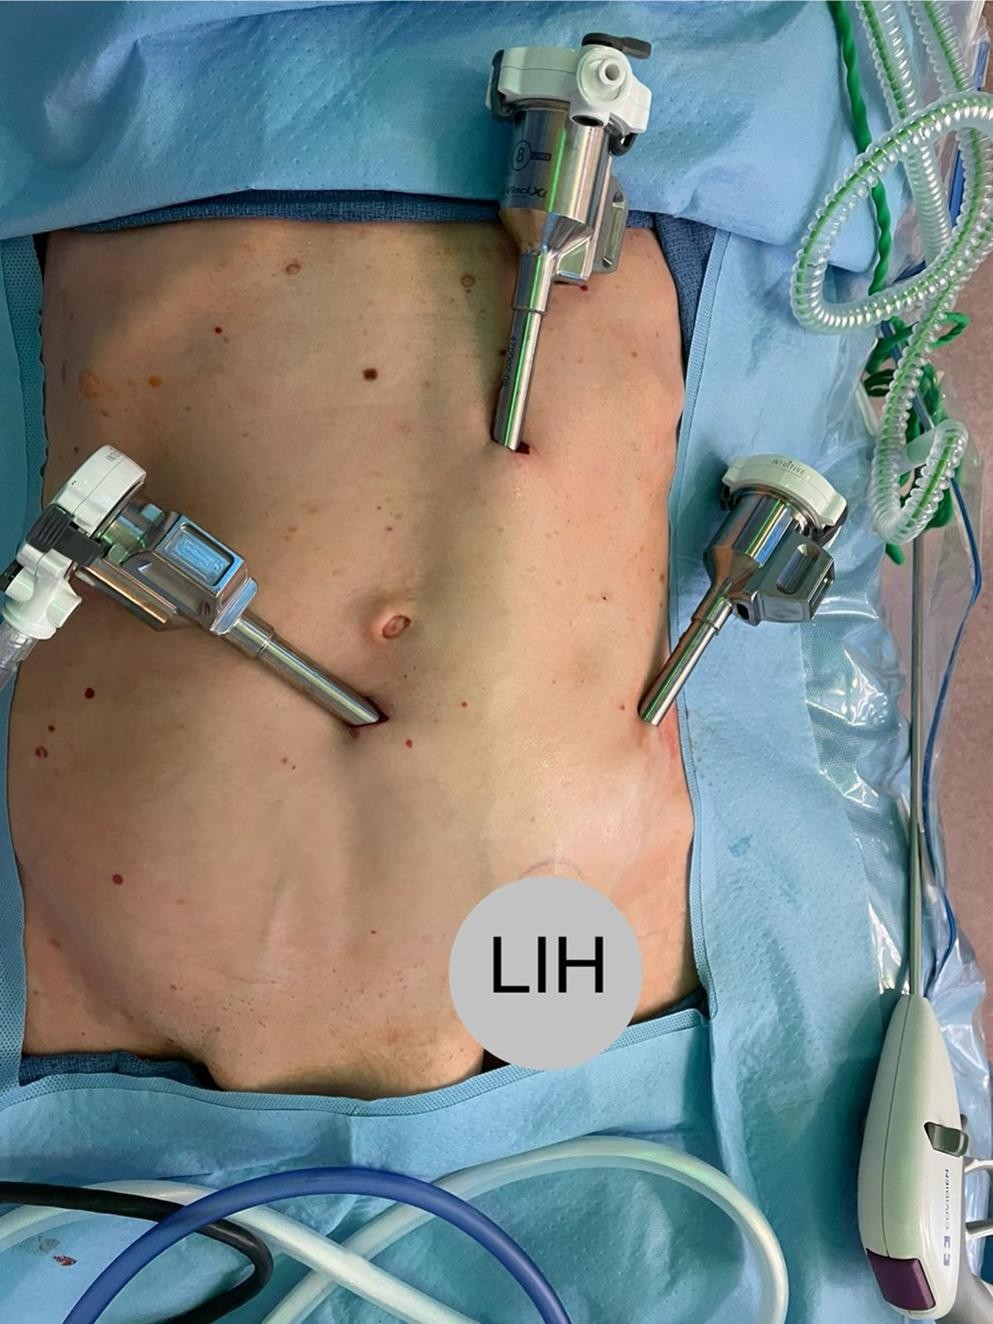
Port placement for robotic eTEP inguinal hernia repair (r-eTEP) with the patient positioned for left inguinal hernia (LIH). (Published 2025, Hernia journal)
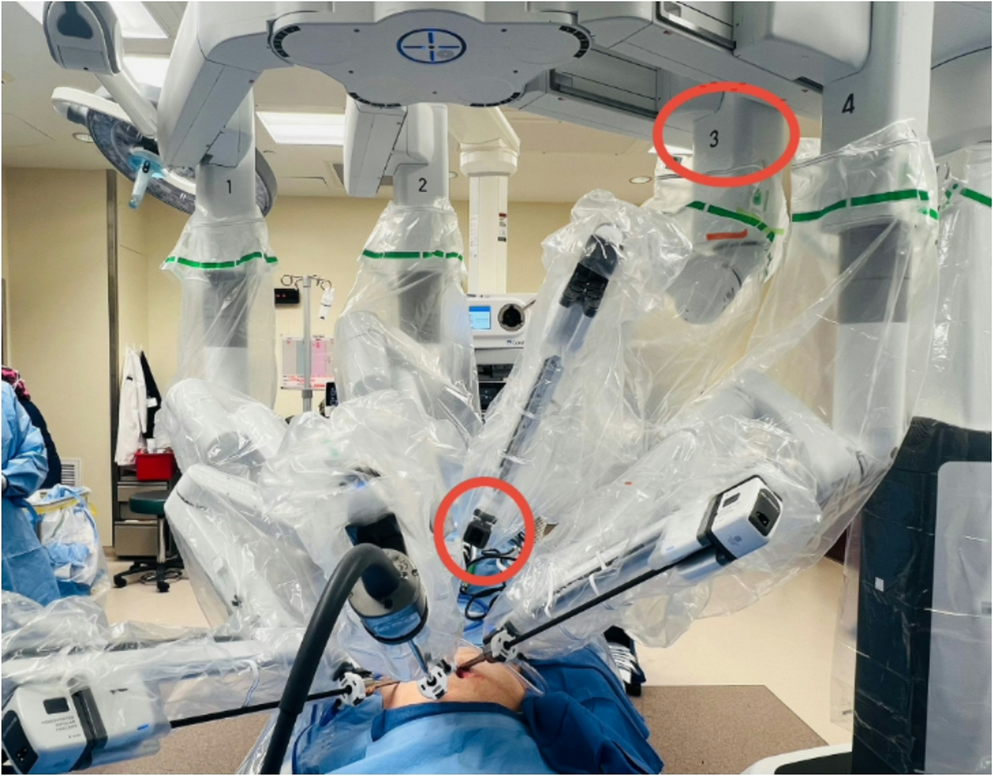
Da Vinci Xi robotic system docked for r-eTEP inguinal hernia repair. Arms 1, 2, and 4 are shown engaged; arm 3 (circled) is folded away. (2025)
Robotic inguinal hernia repair usage grew from 0.7% to 28.8% in Michigan from 2012 to 2018 (Sabiston Textbook of Surgery). The robotic platform capitalizes on articulating instruments, 3D magnification, and tremor filtration.
Robotic TAPP (r-TAPP)
The most commonly performed robotic inguinal hernia approach. The steps mirror laparoscopic TAPP but with the surgeon at the robotic console using wristed instruments:
- Robotic trocar placement: 8 mm camera at umbilicus + two 8 mm arm ports laterally
- Enter peritoneum; identify hernia anatomy
- Peritoneal flap raised; hernia reduced; cord structures parietalized
- Mesh inserted, positioned, and sutured in place (robotic instruments make suturing far easier than laparoscopic)
- Peritoneal closure with running barbed suture (major advantage of robotic - this step is far more reliable)
Robotic eTEP (r-eTEP) - Latest Technique
Combines the large extraperitoneal workspace of eTEP with robotic precision. Published series from 2025 show favorable perioperative outcomes and represent the newest evolution.
Steps are equivalent to laparoscopic eTEP but with robotic arm placement:
- Contralateral infraumbilical 8 mm camera port
- Two ipsilateral 8 mm robotic working ports
- Retrorectus space development, midline crossing, full space creation
- Robot docked; hernia reduction, cord parietalization
- Large mesh deployed and smoothed using robotic arms
- Optional peritoneal closure possible with robotic suturing
Robotic Ventral Hernia Repair (RVHR)
For umbilical, incisional, and ventral hernias. From the PROVE-IT RCT (Sabiston, p. 1360):
- Robotic approach has longer operative time vs. laparoscopic (146 vs. 94 min)
- No difference in 90-day outcomes or pain
- At 2 years: lower recurrence rate with robotic approach (P=0.019)
- Defect closure is much easier robotically due to articulating instruments - the key advantage
7. Comparison Summary
| Feature | Open (Lichtenstein) | Lap TEP | Lap TAPP | eTEP | Robotic |
|---|---|---|---|---|---|
| Anesthesia | Local/regional/GA | GA | GA | GA | GA |
| Incision | 6-8 cm | 3 small ports | 3 small ports | 3 small ports | 3 small ports |
| Bilateral hernias | Two incisions needed | Possible | Possible | Single field | Single field |
| Recurrence risk | Low (mesh) | Low | Low | Very low | Very low |
| Chronic pain | Moderate | Lower | Lower | Lowest | Very low |
| Learning curve | Moderate | Steep | Moderate | Moderate | Moderate |
| Cost | Lowest | Moderate | Moderate | Moderate | Highest |
| Fascial closure | Easy | Difficult | Easier | Easier | Easiest |
8. Current Evidence (2025)
Recent meta-analyses confirm (PMID: 41452528, 2025 - Systematic Review/Meta-Analysis):
- Robotic TAPP vs. laparoscopic TEP: comparable clinical outcomes; robotic approach associated with longer operative time but trending toward lower recurrence
- Single-port vs. multi-port laparoscopic/robotic repair (PMID: 39419843): no significant difference in major outcomes; single-port offers cosmetic advantage
- For ventral hernias (PMID: 39966282 - ROVER review, 2025): robotic-assisted ventral hernia repair shows reduced surgical site occurrences and recurrence compared to laparoscopic IPOM
Important clinical note: The choice of technique depends on surgeon training/expertise, patient anatomy, hernia type/size, bilaterality, prior repairs, and institutional resources. No single technique suits all hernias. - Bailey & Love's Surgery, 28th Ed., p. 1091
Sources: Bailey & Love's Short Practice of Surgery 28th Ed.; Sabiston Textbook of Surgery (Current Ed.); Current Surgical Therapy 14e; PMID 41452528; PMID 39966282; PMID 39419843; Hernia journal 2025 (r-eTEP case series).
This is a shared conversation. Sign in to Orris to start your own chat.